How to Create WooCommerce Products with Gravity Forms
Easily create new WooCommerce Products with Gravity Forms entries so users can submit new products on the front end.
Editor’s note: This article is about creating WooCommerce products using the Advanced Post Creation Add-on. If you’re looking for a native Gravity Forms & WooCommerce integration, check out Gravity Shop Product Configurator, which lets you embed Gravity Forms inside WooCommerce products.
Did you know that the Gravity Forms Advanced Post Creation Add-On can create WooCommerce Products? It opens up a whole world of possibilities where users can create products completely on the front end.
For example, you can create your own marketplace specific to vendors in your niche, like a focused version of Etsy. Those vendors can add new products using your form.
In this tutorial, our niche is stickers, and the form we’re going to build lets users add their own stickers for sale on our site, but we’ve seen this on sites that sell music, art prints, stock photos, and more.
Getting Started
In this tutorial, we’re going to do a deep dive on building a form that will create a WooCommerce Product on submission.
WooCommerce Products
WooCommerce stores a lot of data for each product, and before we can build a form that will create them, we need to first get an understanding of what kind of values we must pass to create a product and how those values are stored in the WordPress database.
Required Fields
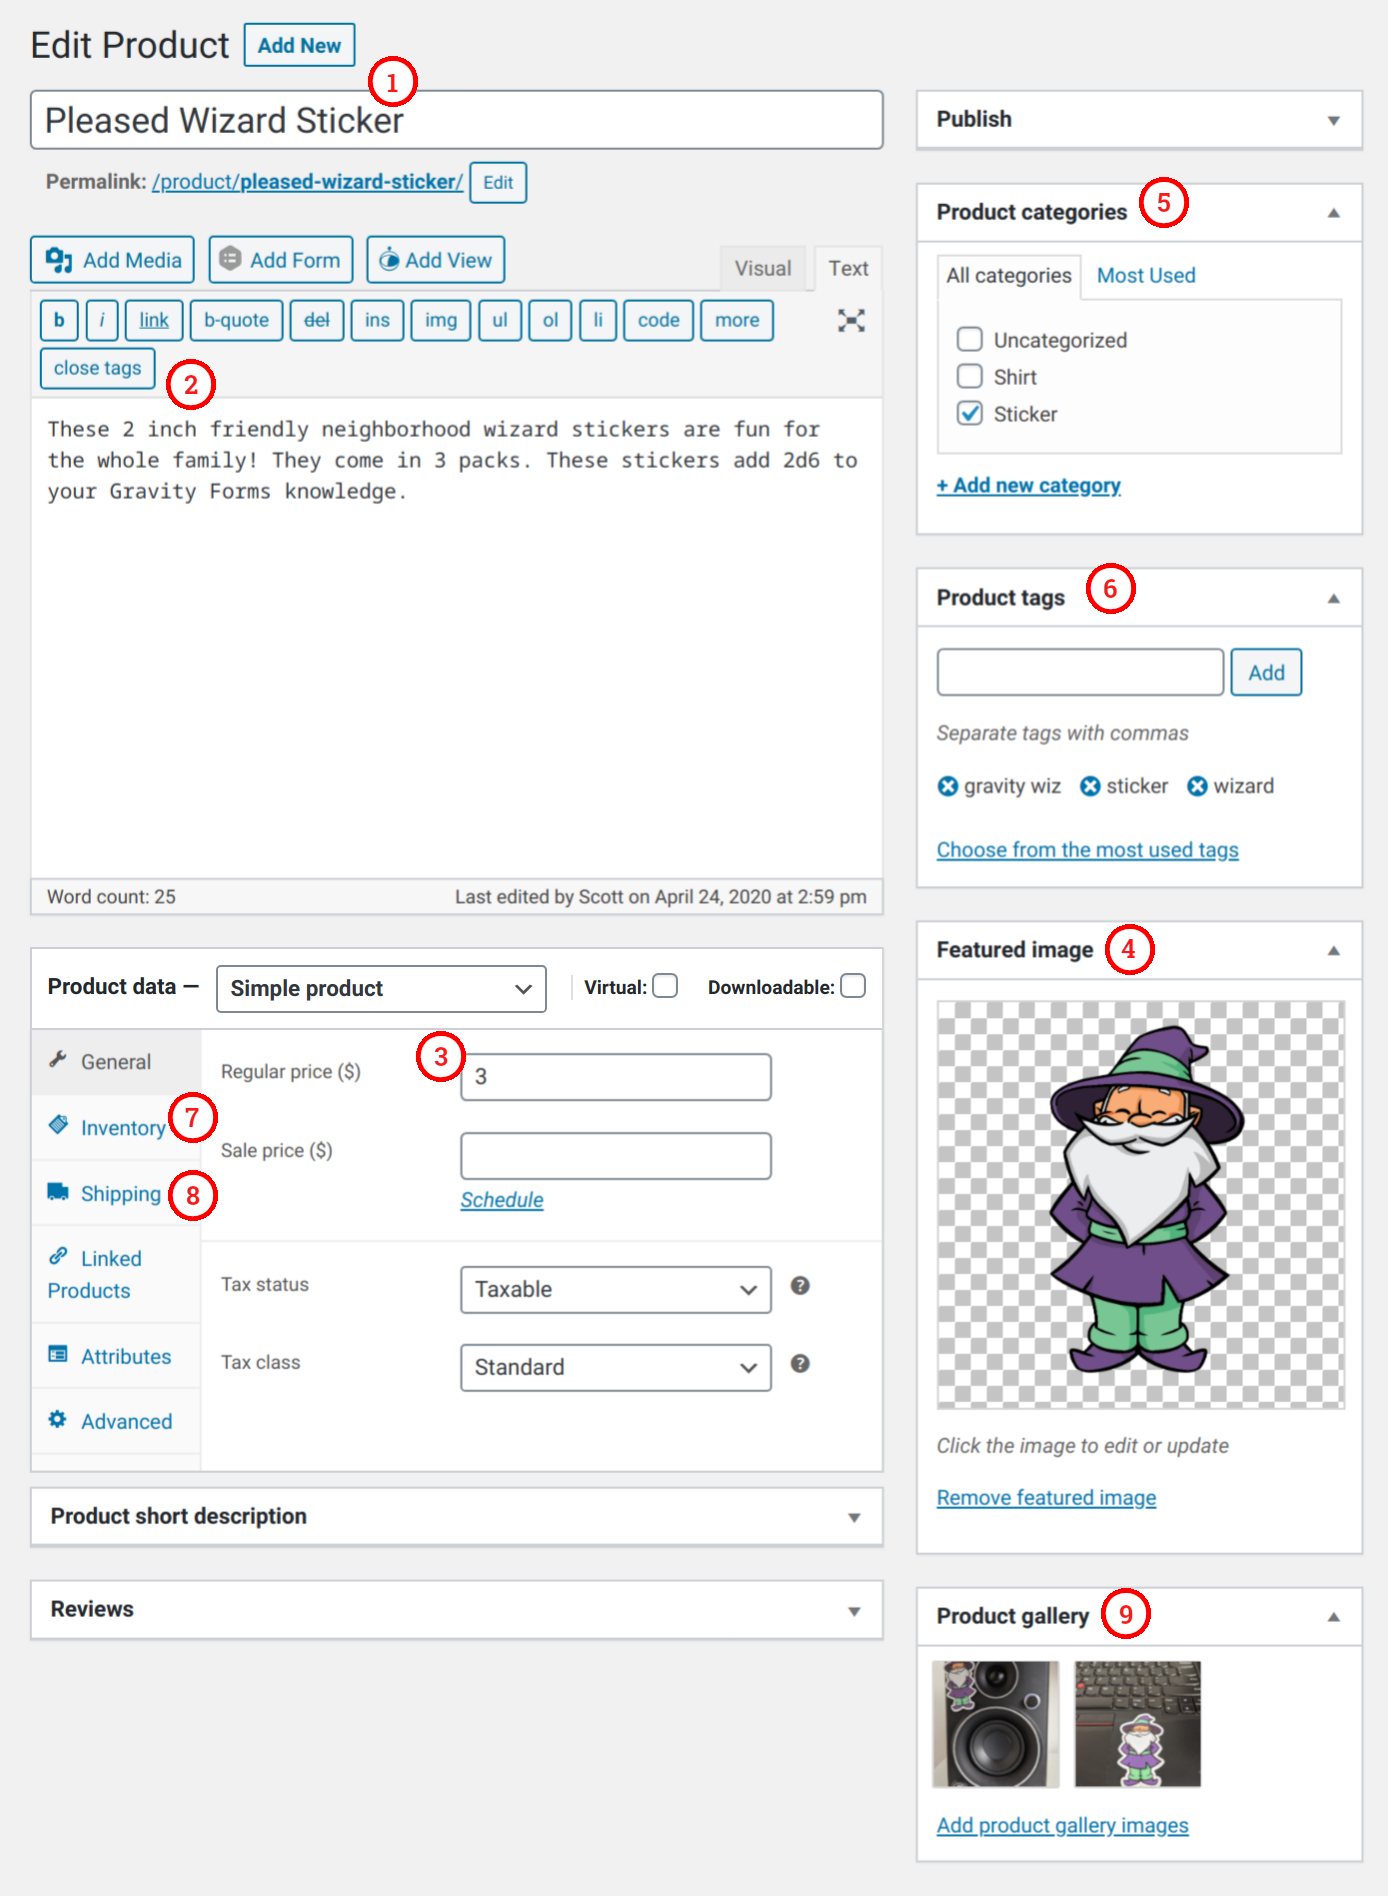
The following fields are what I would consider the minimum to create a WooCommerce Product that can be sold in your store. Technically they aren’t all required, but from my experience excluding any of them will exclude sales.
- Name – The name of your Product, which also used for the Product slug.
- Description – The description displays on the Product page.
- Price – WooCommerce allows for two prices: regular price and sale price.
- Featured Image – The featured image is used extensively in a WooCommerce store. All products should have one.
Optional Fields
These next fields are optional, but are commonly used with WC Products.
- Category – Similar to WordPress Post categories, this is the taxonomy for the Product.
- Tags – SEO tags to increase Product visibility in searches.
- SKU – If you track inventory, unique Stock Keeping Units are attached to all Products. It’s located under the Inventory tab.
- Weight – Product weight is used to determine shipping costs. Find it in the Shipping tab.
- Product Gallery – On top of the Featured Image, Products can contain galleries that are displayed on the Product page.
Creating Products with Gravity Forms
With a solid understanding of WooCommerce Products, we’re ready to build a form that will create new Products. Let’s get started.
Step 1 – Add Your Fields
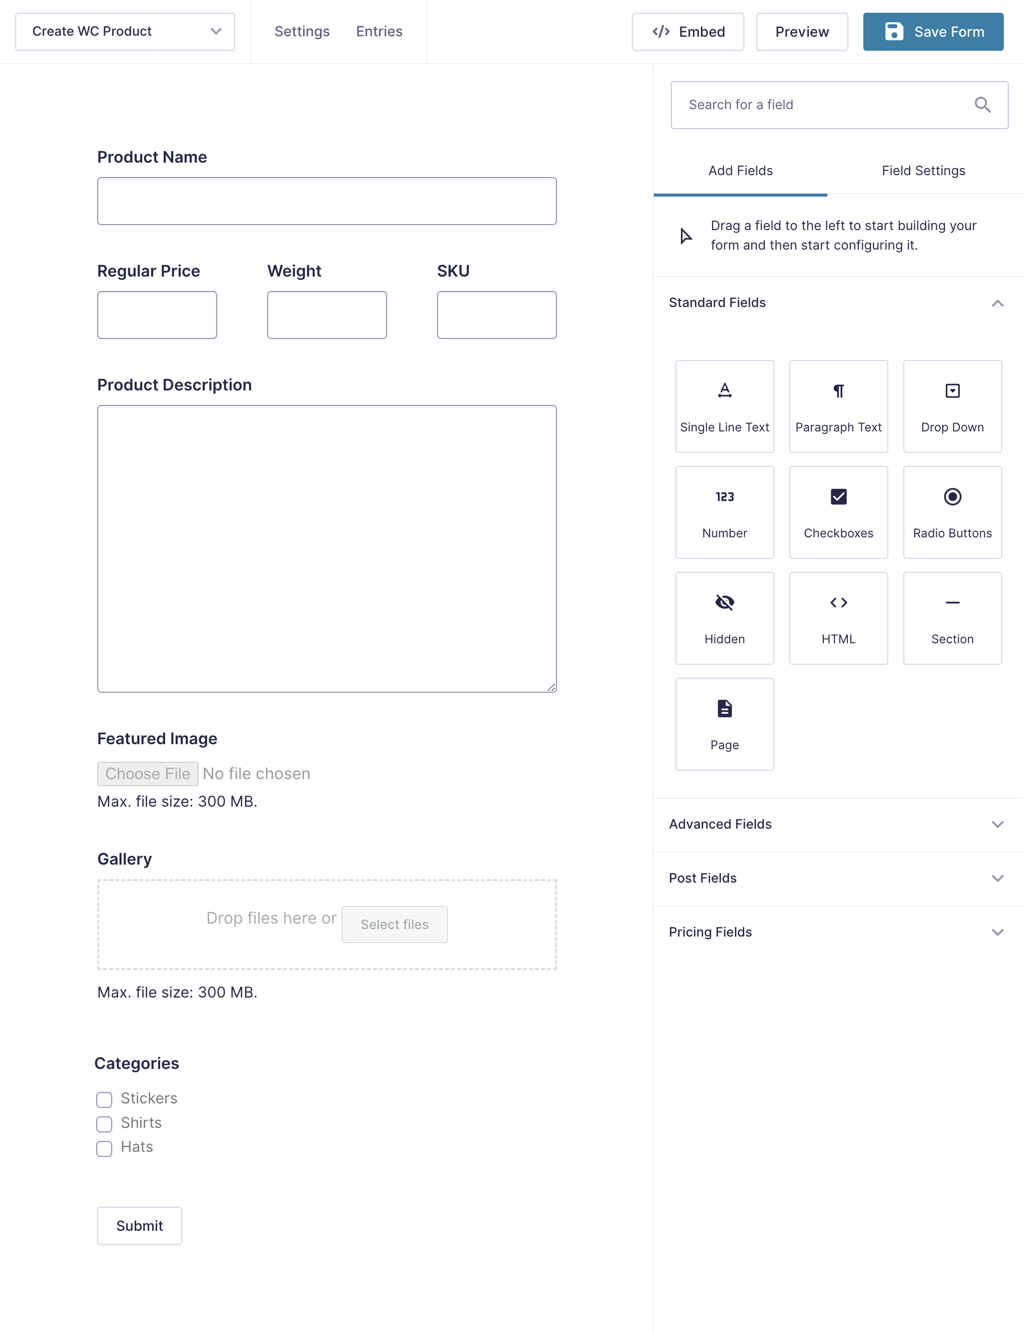
We’re going to add all of the fields from above to our form because I like building ambitious forms. Here’s a breakdown of how I have set up my form:
- For Product Name, Regular Price, Weight, and SKU we’ll add a Single Line Text field.
- Add a Paragraph field for the Product Description so the user has a little more room.
- Featured Image and Gallery require File Upload fields.
- Just like other WordPress Posts, WooCommerce Products support multiple categories, so I recommend a Checkbox field for adding categories to your Product.
Below is the entire form with all the fields added.
Uploading galleries requires GF Media Library. See Uploading to the WooCommerce Product Gallery below.
GF File Upload Pro
Step 2 – Create APC Feed
With the fields in place, it’s time to create an Advanced Post Creation feed and map the fields to the WooCommerce fields.
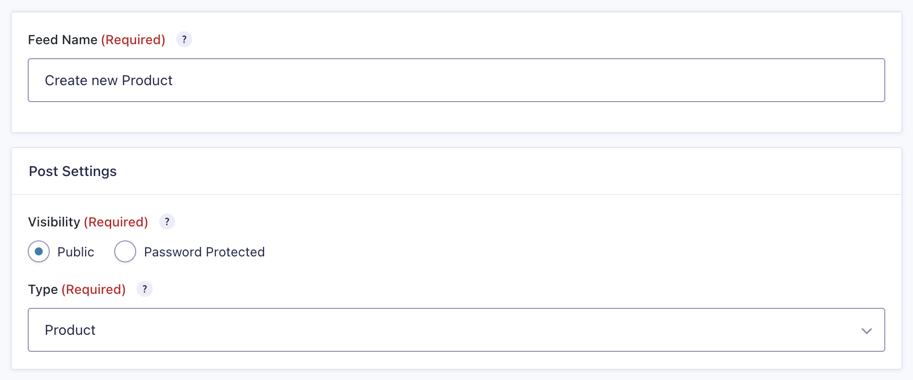
Give your Feed a Name and set the Post Type to Product.
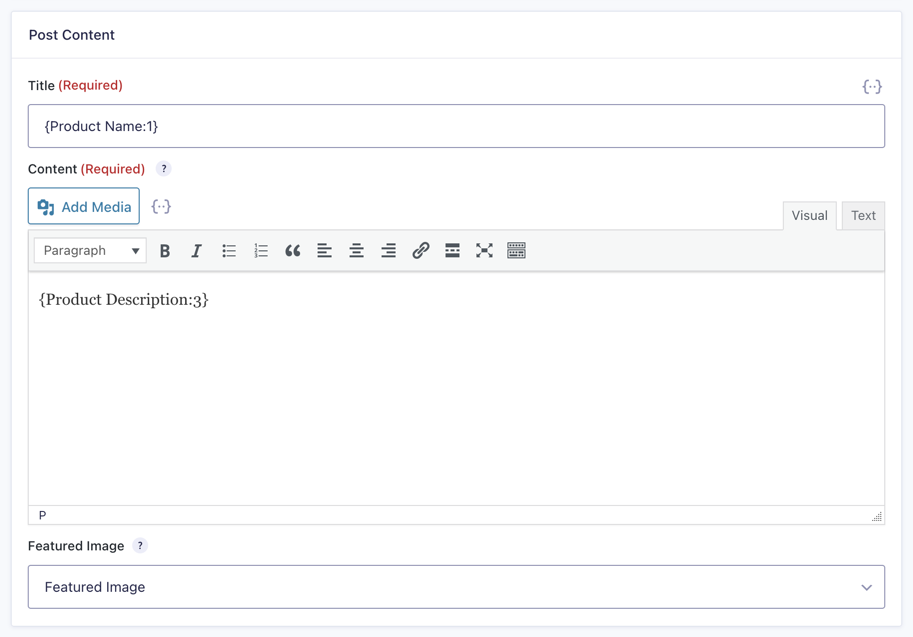
Under Post Content, we’ll map most of our fields. The APC Add-On automatically supports standard Post fields, but WooCommerce has some custom fields that need to be mapped manually. We’ll start with the supported fields.
Title, Content, and Featured Image are simple to map. Simply select the merge tag for Title and Content that matches your Name and Product Description fields. For Featured Image, select your appropriately named File Upload field.
To map a field to the Product Short Description, add this snippet to your theme’s functions.php file.
For Gallery, Price, Weight, and SKU, we’ll need to manually map the fields. To do this, select Add New Custom Field Name at the bottom of the Select Custom Field Name Drop Down. Then, type in each of the appropriate field types. Note the leading underscore; this is required.

WooCommerce requires both _regular_price and _price to have a value. If you omit either one, the price won’t appear on the Product page.
Here’s a reference for easy copy/pasting of the field names:
_product_image_gallery
_regular_price
_price
_weight
_sku
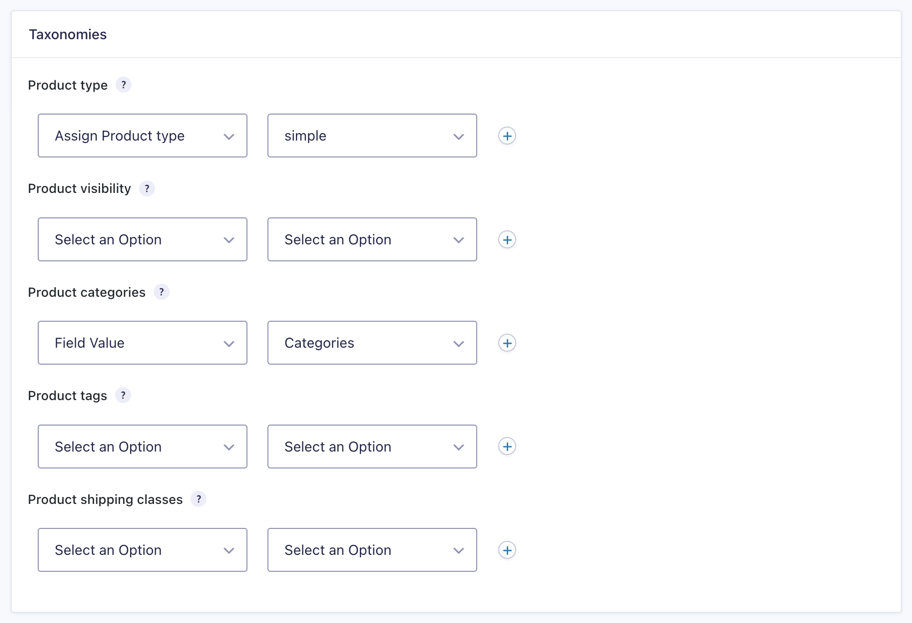
Under Taxonomies you can map the Categories field. You can also map to any additional taxonomies, such as Tags or custom WC Taxonomies.
That’s It!
With those two steps completed, you’re all set to create WooCommerce Products with your form. Give it a spin and you’ll be generating Products in no time.
Taking it Further
Automatically Populate Categories and Tags
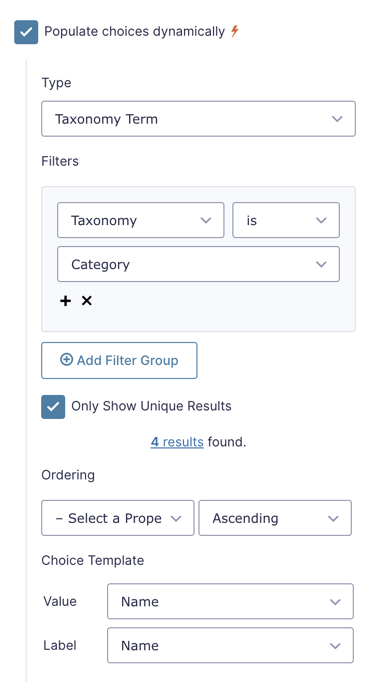
Use GF Populate Anything to automatically populate Categories and Tags into Checkbox fields. Populate Taxonomy Term and set the Filter and Choice Template according to this screenshot.
Uploading to the WooCommerce Product Gallery
Use GF Media Library to upload images to the WooCommerce Image Gallery. Simply check the Upload to Media Library option and map the field as shown in Step 2.

Enhance File Upload Fields
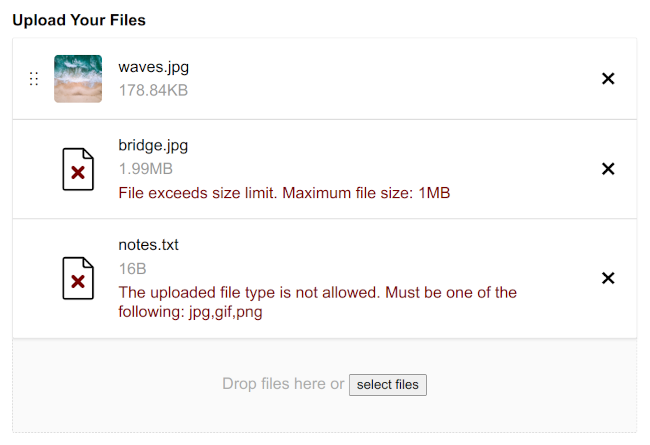
Use GF File Upload Pro to add image previews, cropping, maximum file size limits, real-time upload validation, and more to Multi-File Upload fields.
 Managing physical products? Check out GP QR code.
Gravity Forms QR Code can help you bridge the physical and digital world. Generate QR codes from Gravity Forms field values, or scan QR codes to insert values into Gravity Forms fields. Learn more about Gravity Forms QR Code.


Thank you for this tutorial.
Is it possible to create an form submission action that after the product is created it redirect the user to the new product, or possibly another page?
Hi James,
You can set up a redirect that uses the
{post_id}merge tag to do this.I am also curious how I find the other post content, or custom field names/values?
For example, if I want to set products to Virtual or Downloadable, how would I find those types of things?
Thank you, James
Thanks for the reply to my first question Scott. Going to test it out now.
WooCommerce stores those attributes in the
postmetadatabase table. For example, the Downloadable attribute is stored with the_downloadablemeta key. It accepts the meta values ofnoandyes. Virtual uses a similar key_virtualand accepts the same meta values.Thank you Scott.
So you are referencing the tables in the database to get the id/name and then you are also using that to get the value? If so, I can see what you see.
Oddly, when I created a product and assigned it as a Virtual Product it worked perfectly, until I edited the product from the backend, then I noticed the Virtual Option was no longer selected.
Either way this is awesome and I really do appreciate the tutorial.
Scott, are you able to update other Database Table data? For example, I want to also add the Short Description which is in the “posts” database table and would be the post_excerpt data.
I tried to do it, but it didn’t carry over.
James
Hi James,
You can use this filter hook to make the Post excerpt field available in the Post Creation feed.
Best,
Thank you Samuel, that worked perfectly.
Hi James,
You’re welcome. Glad it worked for you.
Best,
Good morning !
I wanted to ask, is it possible to add with this plugin WooCommerce product attributes ? Because I do not see this option. I can add taxonomies like: categories and tags, but I can’t find the way to add woocommerce product attributes.
Is there a way to add these attributes ?
I am waiting for the answer.
Hi Nahuel,
Setting the Product Attributes doesn’t appear possible with the Post Creation Addon. You can contact Gravity Forms Support to see if they have a way to get this done.
Best,
This works like a charm when making a woo product. However, when I print the array of meta saved by this process (I know this is more to do with GF’s APC addon), there are only a handful there.
If I then load the WP admin page for this new product and simply hit Update without changing anything, loads more are added.
How can I add in an action to do that update post action after the GF/GWiz form is processed?
Cheers.
Hi Austen,
Just as you mentioned, this has more to do with how the GF APC addon creates the Woo Product. It may be possible with custom snippets, but we don’t have a solution. You can hire a developer to assist you with this. Here’s a list of Recommended Developers.
Best,
Hi
I realize this is an old thread but would appreciate some help.
I’ve followed the instructions in order to map an external link but it doesn’t seem to work. In your reply above you refer to this field as “product type” but then say to map the “product tags” field. Should this not be the “product type” field? The only other thing I can see being the issue is perhaps I have the field values wrong in my form. Could you confirm the correct values (e.g is it “External/Affiliate product” or just “external”).
Thanks
Hi Scot,
From what I understand, Scott’s reply here should do the trick: https://gravitywiz.com/how-to-create-woocommerce-products-with-gravity-forms/comment-page-1/#comment-628311. If you need further support and if you have an active Gravity Perks Advanced or Pro license, you can contact us via our support form.
Best,
Is it possible to use custom checkout links instead of having users use the normal woocommerce add to cart process for checking out?… I’m looking at something to allow vendors create products through the forms but redirect users to their Facebook or WhatsApp to complete an order
Hello Benky, You would be able to accomplish this when the user completes the entry within the confirmation page. What you could do is setup conditional logic on the checkout page that would dictate which confirmation page to take the user to depending on the selection on the form. 😃
Ray nuevanente muchas gracias, lo que no puedo poner las categorias cuando creo un producto es decir categorizar el producto de woocommerce no al crear un post, nuevamente muchas gracias
Mil gracias por responder tan rapido pero no tengo muchos conocimientos, podrias darme unos pasos a seguir o si hay algun video tutorial te lo agradeceria mucho. Mil gracias Ryan
Hello Xavi, Check out Gravity Forms official documentation on this here and let us know if that helps at all. 😀
Hola, muy interesante todo y util, una pregunta como hago para poder incluir las categorias cuando sube el producto y los atributos. Muchas gracias
Hello, you will be adding these under Taxonomies. You can map the Categories field as well as any additional taxonomies, such as Tags or custom WC Taxonomies. 😀
I have questions similar to those posed by others…..
Woocommerce has product data options of “Simple,” “Grouped,” “External / Affiliate,” and “Variable.” For “External,” one can also specify an external URL. (https://woocommerce.com/videos/woocommerce-external-affiliate-product-overview/)
Is there a way to specify these values via Gravity Forms?
Is there a way to also pass in a second description so that both a long and short description is passed?
Yep! You’ll need to add 2 new fields to the form:
wp_term_taxonomytable.Then, in the APC feed, map the
_product_urlCustom Field to your Single Line Text field and map the the Tags Field Value to your Drop Down like this.Hello!
Is there a way to add a External/Affiliate and the URL to the product?
Hello Fernando, I am not sure I follow. Could you please let us know a little more about your use case for this one? Thanks!
WIll this work for product variations as well?
Variations and Attributes are not currently supported in the APC Add-On. You can map them under taxonomies, but it’s half-baked. The attribute gets added to the the
wp_term_relationshipstable, but it doesn’t add the_product_attributesmeta key inwp_post_meta.This is compounded by the fact that this isn’t a simple key; it’s stored in JSON similar to
wp_attachment_metadata. Support needs to be added in the GF APC Add-On itself.Very interesting and helpful, thank you! I just wonder about how to add a field for “Product data” in order to let the submitter chose between “Simple Product”, “Download Product” or even other? I’d like to use the free “WP Crowdfunding” plugin in conjunction with WooCommerce, which creates a new campaign as a new product. WP-Crowdfunding also creates a new “Product data” type named “Crowdfunding”, which is important for displaying the campaign-related data such as “funding goal” or other typically Crowdfunding-related information. So how can I use this GF-Addon for creating a new campaign of a product-data-type “Crowdfunding”?
I have same issue
I don’t know enough about how WP Crowdfunding stores its data to give a definitive answer, but most likely you just need to target the correct meta keys from
wp_post_metato classify the product as crowdfunding. I recommend reaching out to the developers of that plugin to find out how that data is structured.