How to Automate Seasonal Hotel Rates with Gravity Forms Bookings
Build a hotel booking system using GP Bookings and set your seasonal rates once so they recur automatically forever.
- Step 1: Add New Service (Hotel Booking)
- Step 2: Add Resources (Rooms)
- Step 3: Set Pricing Rules
- Step 4: Set Availability Windows
- Step 5: Build Booking Form
- Test Booking!
Instead of babysitting your calendar, GP Bookings turns Gravity Forms into a booking system that runs itself—tracking room inventory, syncing calendars, handling pricing rules, and more.
Today, we’ll focus on setting seasonal pricing once so it automatically applies every year going forward.
Let’s set it up! 🪄
For a higher-level look at why GP Bookings is ideal for your site, check out our breakdown on how it solves common hotel booking challenges.
This article requires the Gravity Forms Bookings perk.
Buy Gravity Perks to get this perk plus 48 other premium Gravity Forms plugins!
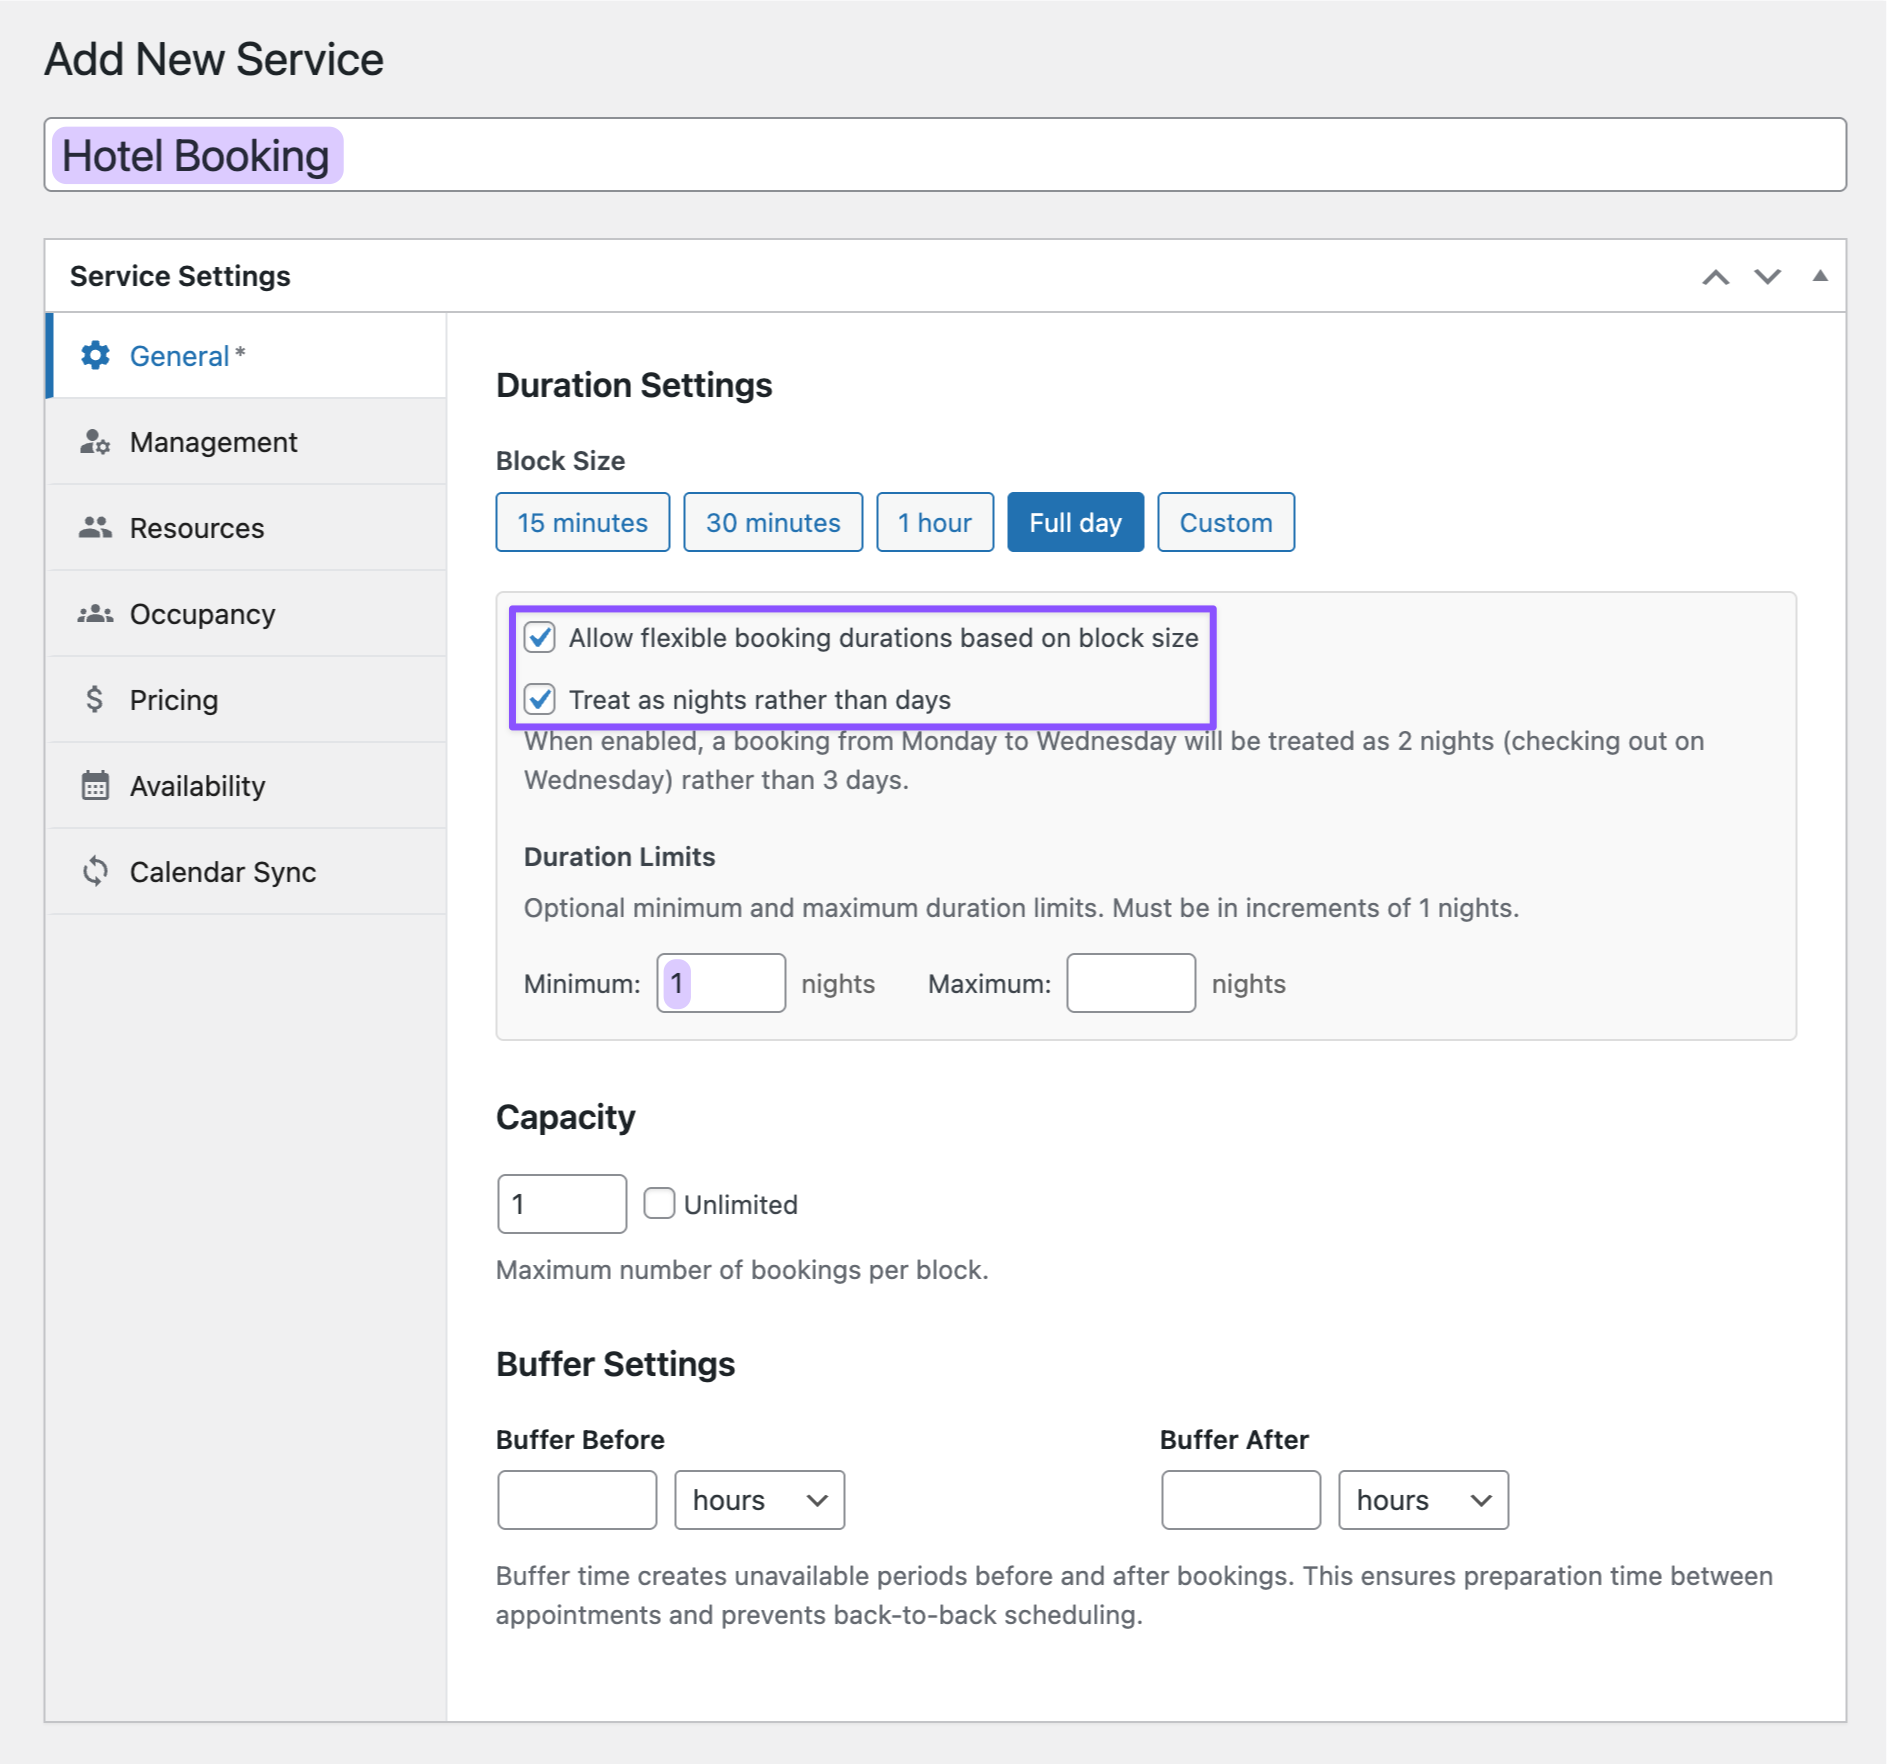
Step 1: Add New Service (Hotel Booking)
The first step is to add a new “Service” in GP Bookings. A Service acts as your rulebook. It defines what you’re offering and how guests can book it (by the hour, by the day, or by the night).
Since we’re setting up a hotel booking, we’ll make it work for overnight stays.
- Open your Spellbook › activate GP Bookings.
- In your WordPress dashboard, navigate to GP Bookings › Services › click Add New Service.
- Name it Hotel Booking › set Block Size to Full Day.
- Enable both: Allow flexible booking durations and Treat as nights rather than days.
- Set Minimum stay to 1 night.
- Click Publish to save.
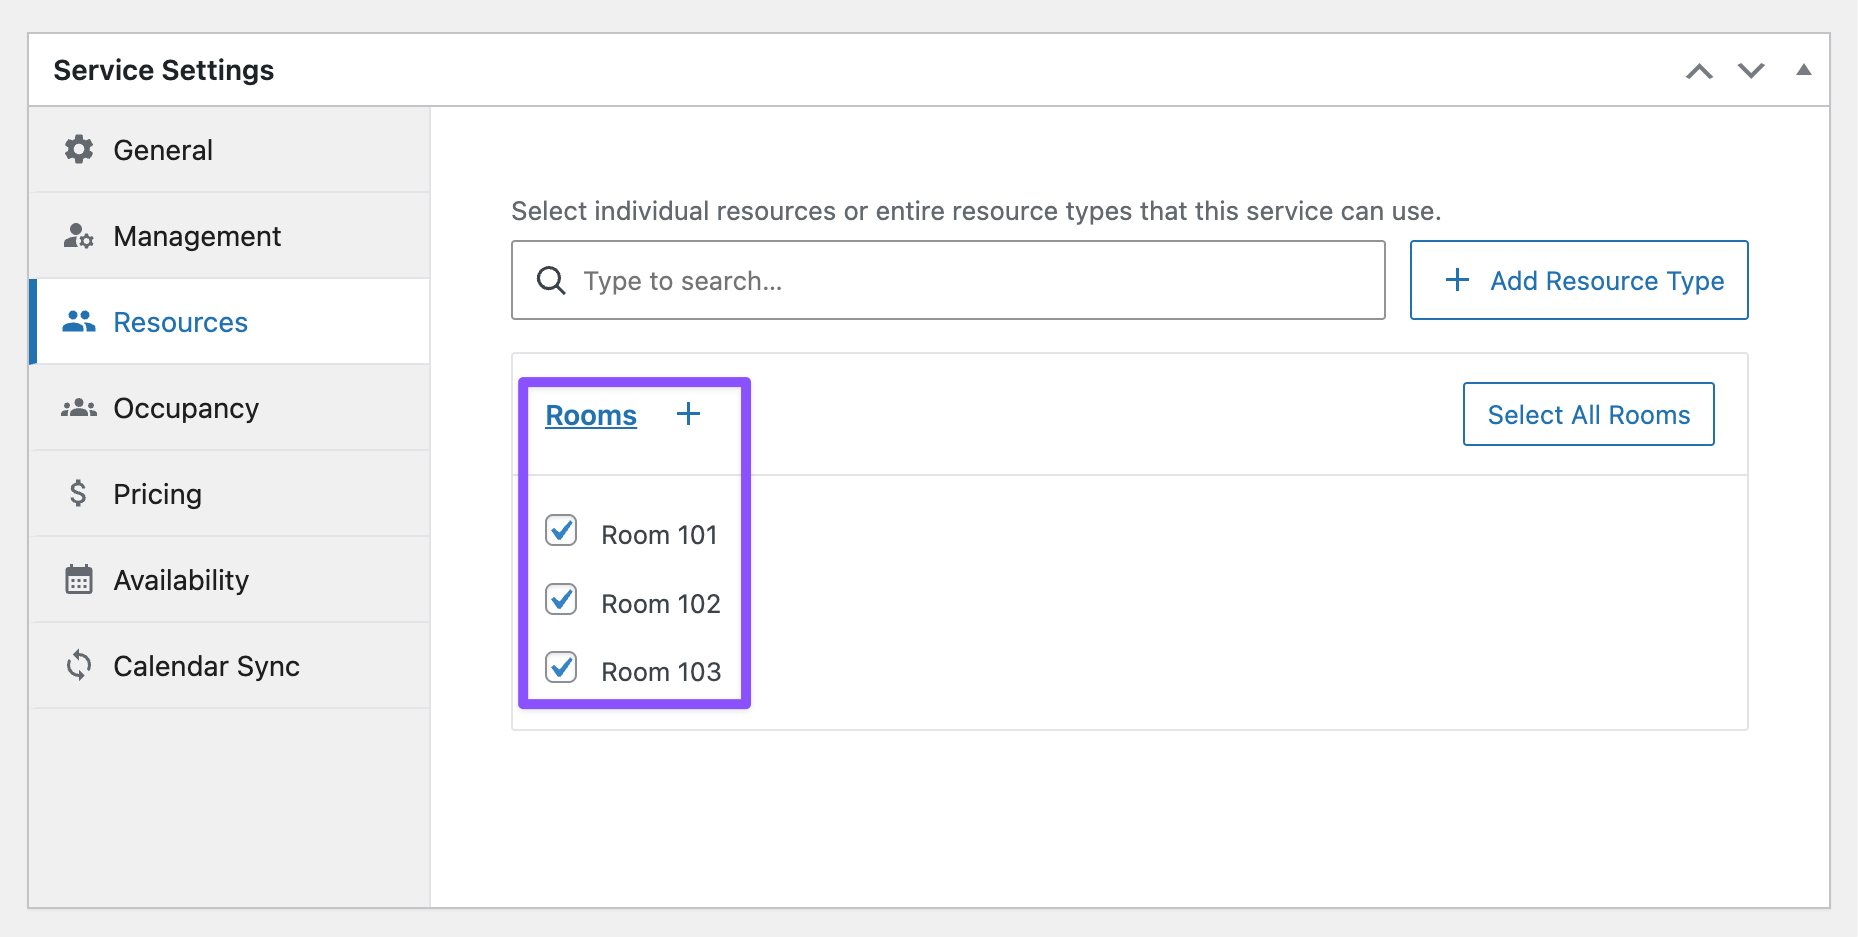
Step 2: Add Resources (Rooms)
Next, let’s add your rooms. In GP Bookings, each room is a “Resource”—the actual unit being booked (check out our docs to learn more about Resources).
To keep things organized, we’ll group them into a Resource Type called “Rooms,” then add the individual room numbers.
- Still in the Service Settings › go to Resources tab.
- Click Create Resource Type › name it Rooms › click Add.
- Click the + symbol to add individual rooms — Room 101, Room 102, and more.
- Check the boxes for all rooms you want bookable.
- Click Update to save.
Pro-Tip
Offering different room types like Standard vs. Deluxe? Create separate Resource Types for each, then set different base rates for each type in your Pricing Rules.
Step 3: Set Pricing Rules
Let’s set booking rates that adjust themselves based on dates.
We’ll set up a “Base Rate” for regular nights and a “Holiday Surcharge” that kicks in automatically during peak season.
- Still in the Service Settings › go to the Pricing tab.
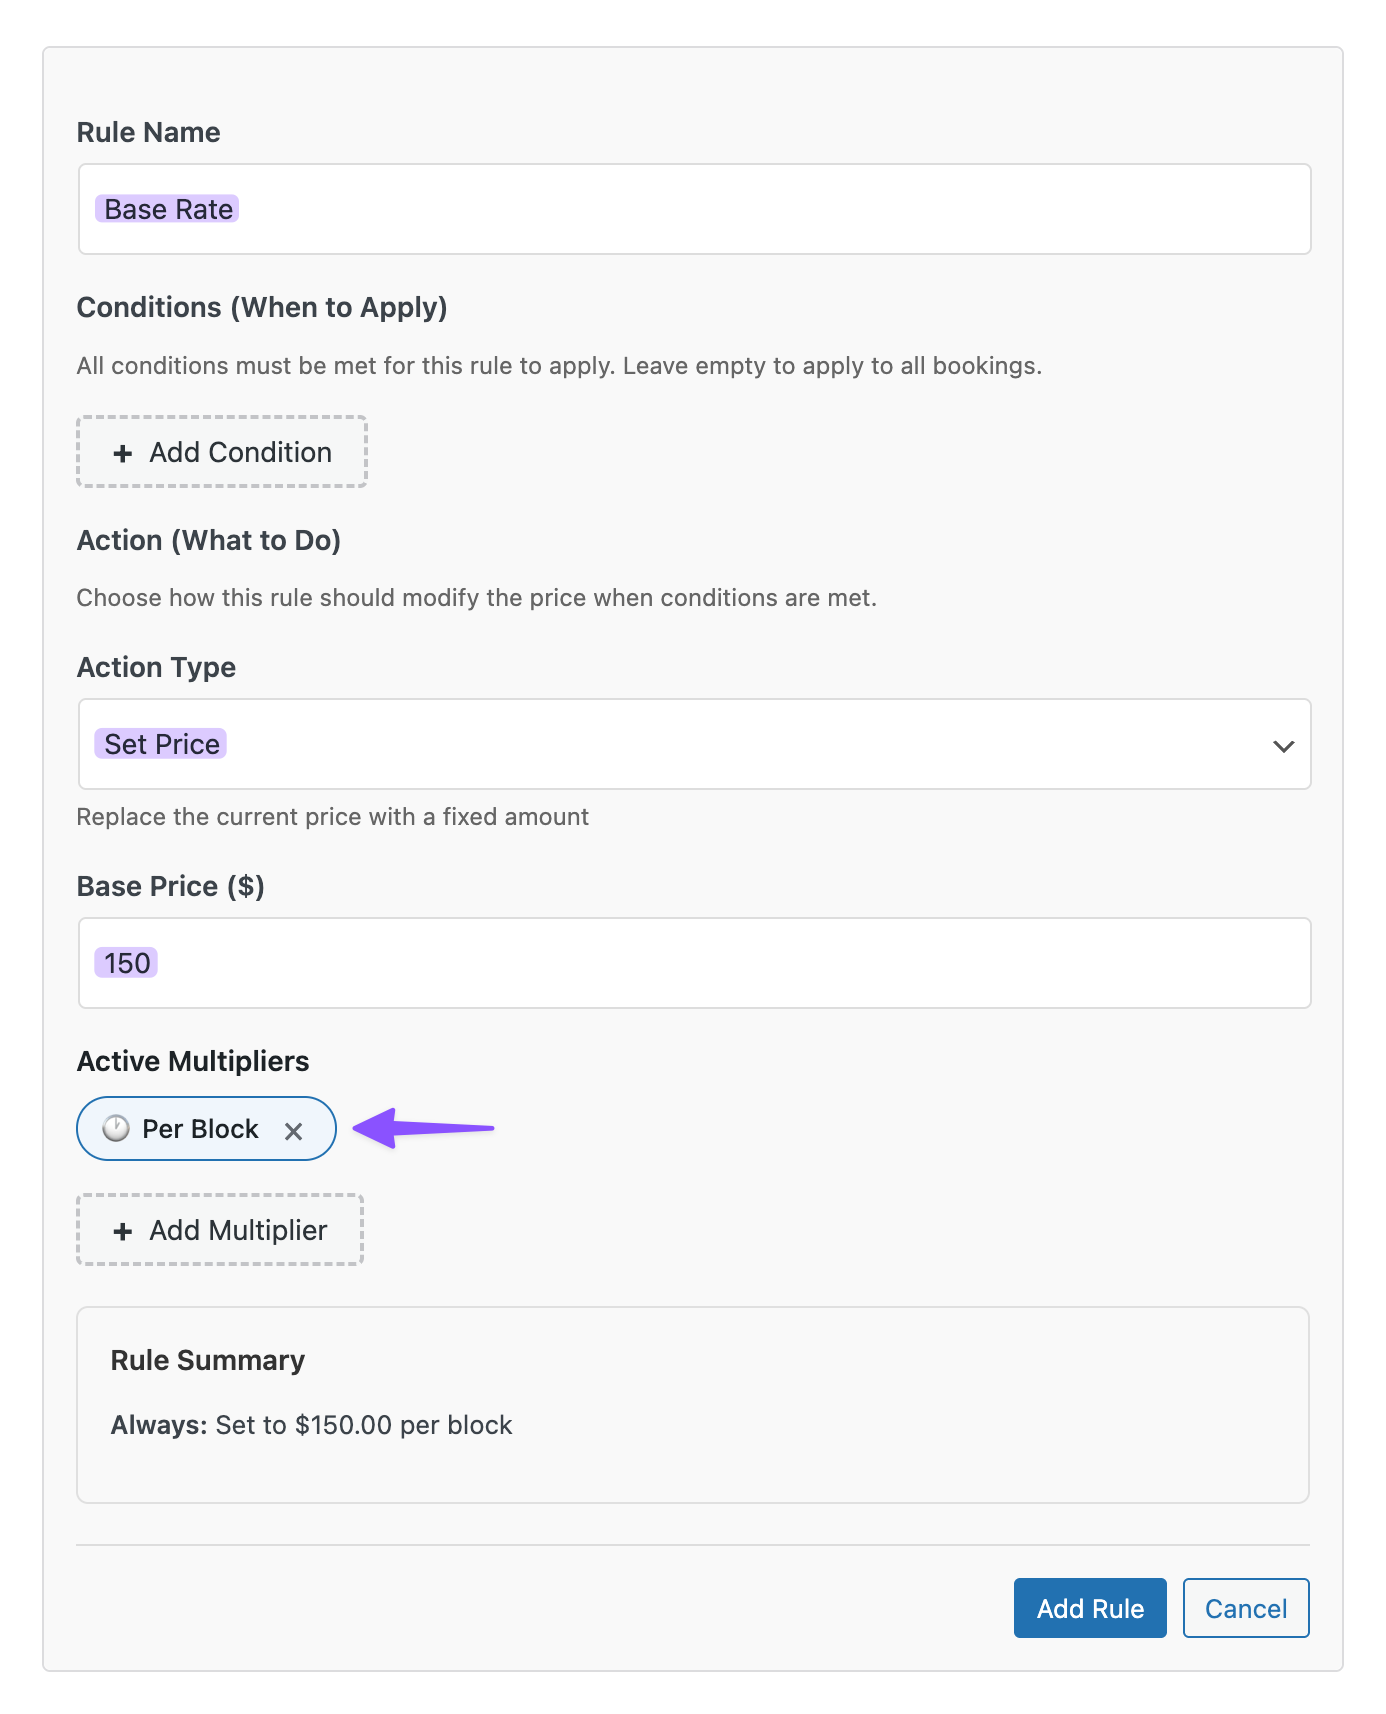
Base Rate
- Click Add Rule › name it Base Rate.
- Action Type: Set Price.
- Amount: $150.
- Multiplier: Per Block (per night).
- Click Add Rule to save.
Holiday Surcharge
- Click Add Rule › name it Holiday Surcharge.
- Click + Add Condition › choose Date Range.
- Start Date: 12/20/2026.
- End Date: 12/31/2026.
- Check Recurring Yearly (set it once, works forever).
- Set Action Type to Add/Subtract.
- Amount: $50.
- Multiplier: Per Block (per night).
- Click Add Rule to save.
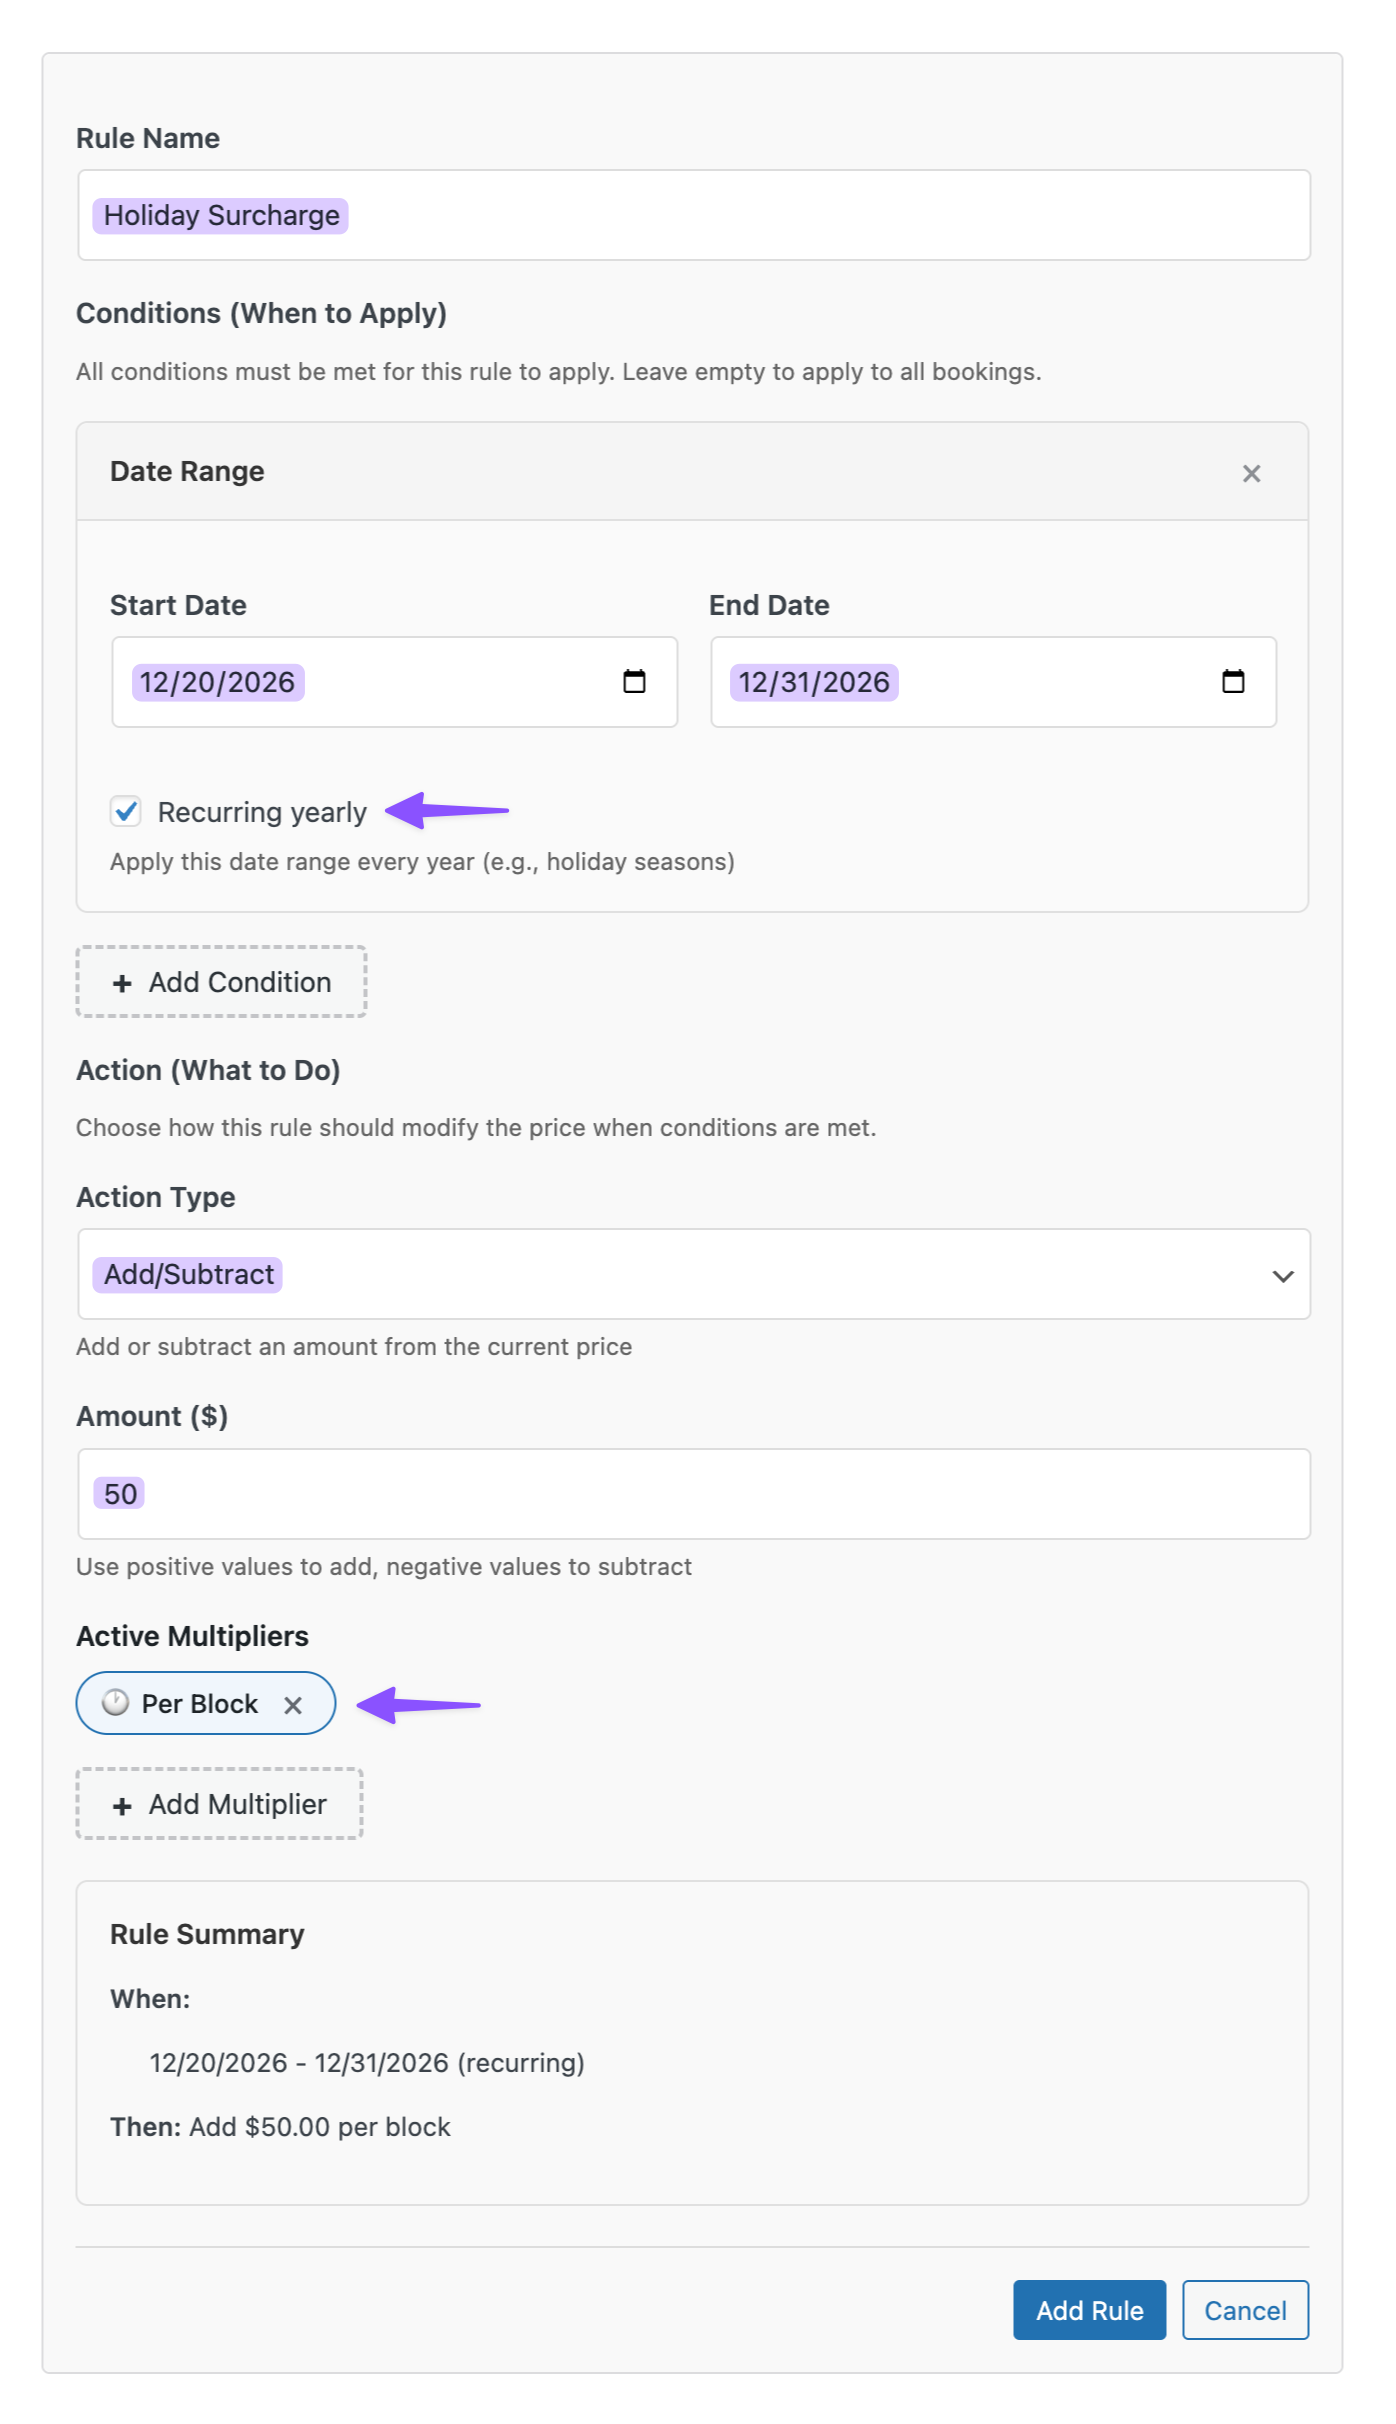
Done! Your rooms now cost $150/night year-round, then automatically jump to $200/night every December 20–31.
Wizard’s Note
You can also use GP Conditional Logic Dates for seasonal pricing, which can work for simpler needs. However, it would also mean creating separate product fields for each price and swapping between them based on the selected date. Contrast this with GP Bookings: centralized pricing rules in the backend and the ability to stack multiple rules (like a holiday fee on top of a weekend rate) without adding extra fields to your form.
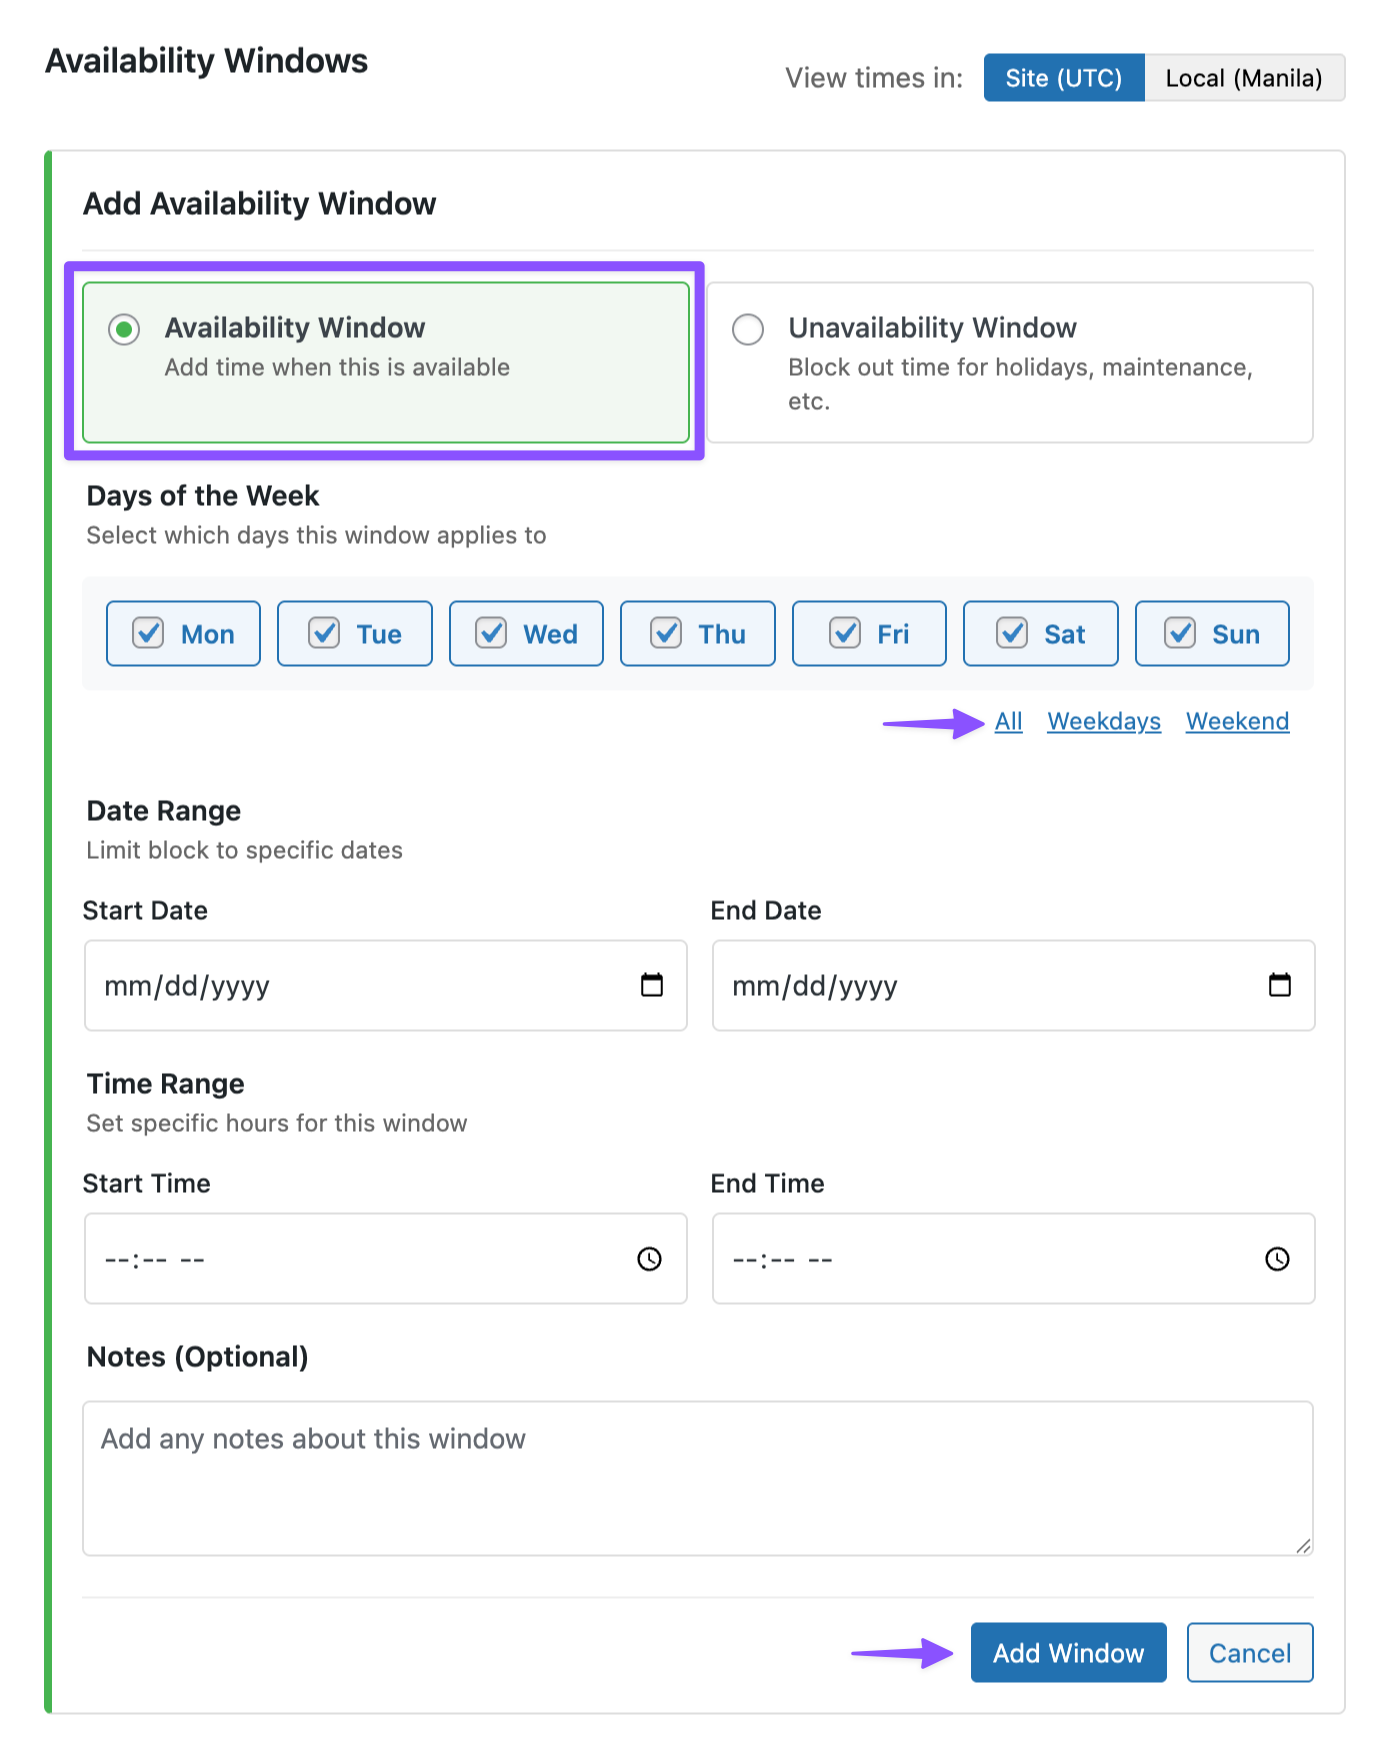
Step 4: Set Availability Windows
Time to open your calendar for bookings. We’ll add “Availability Windows”—these turn grayed-out dates into clickable, bookable slots.
- Still in the Service Settings › go to the Availability tab.
- Click Add Window › select Availability Window.
- Set your operating schedule:
- Days of Week: All (available every day).
- Click Add Window.
- Click Update to save.
Pro-Tip
Want to block off holidays or set specific hours (like check-in from 3-6 PM)? Use Unavailability Windows to mark when rooms can’t be booked. Learn how in the GP Bookings docs!
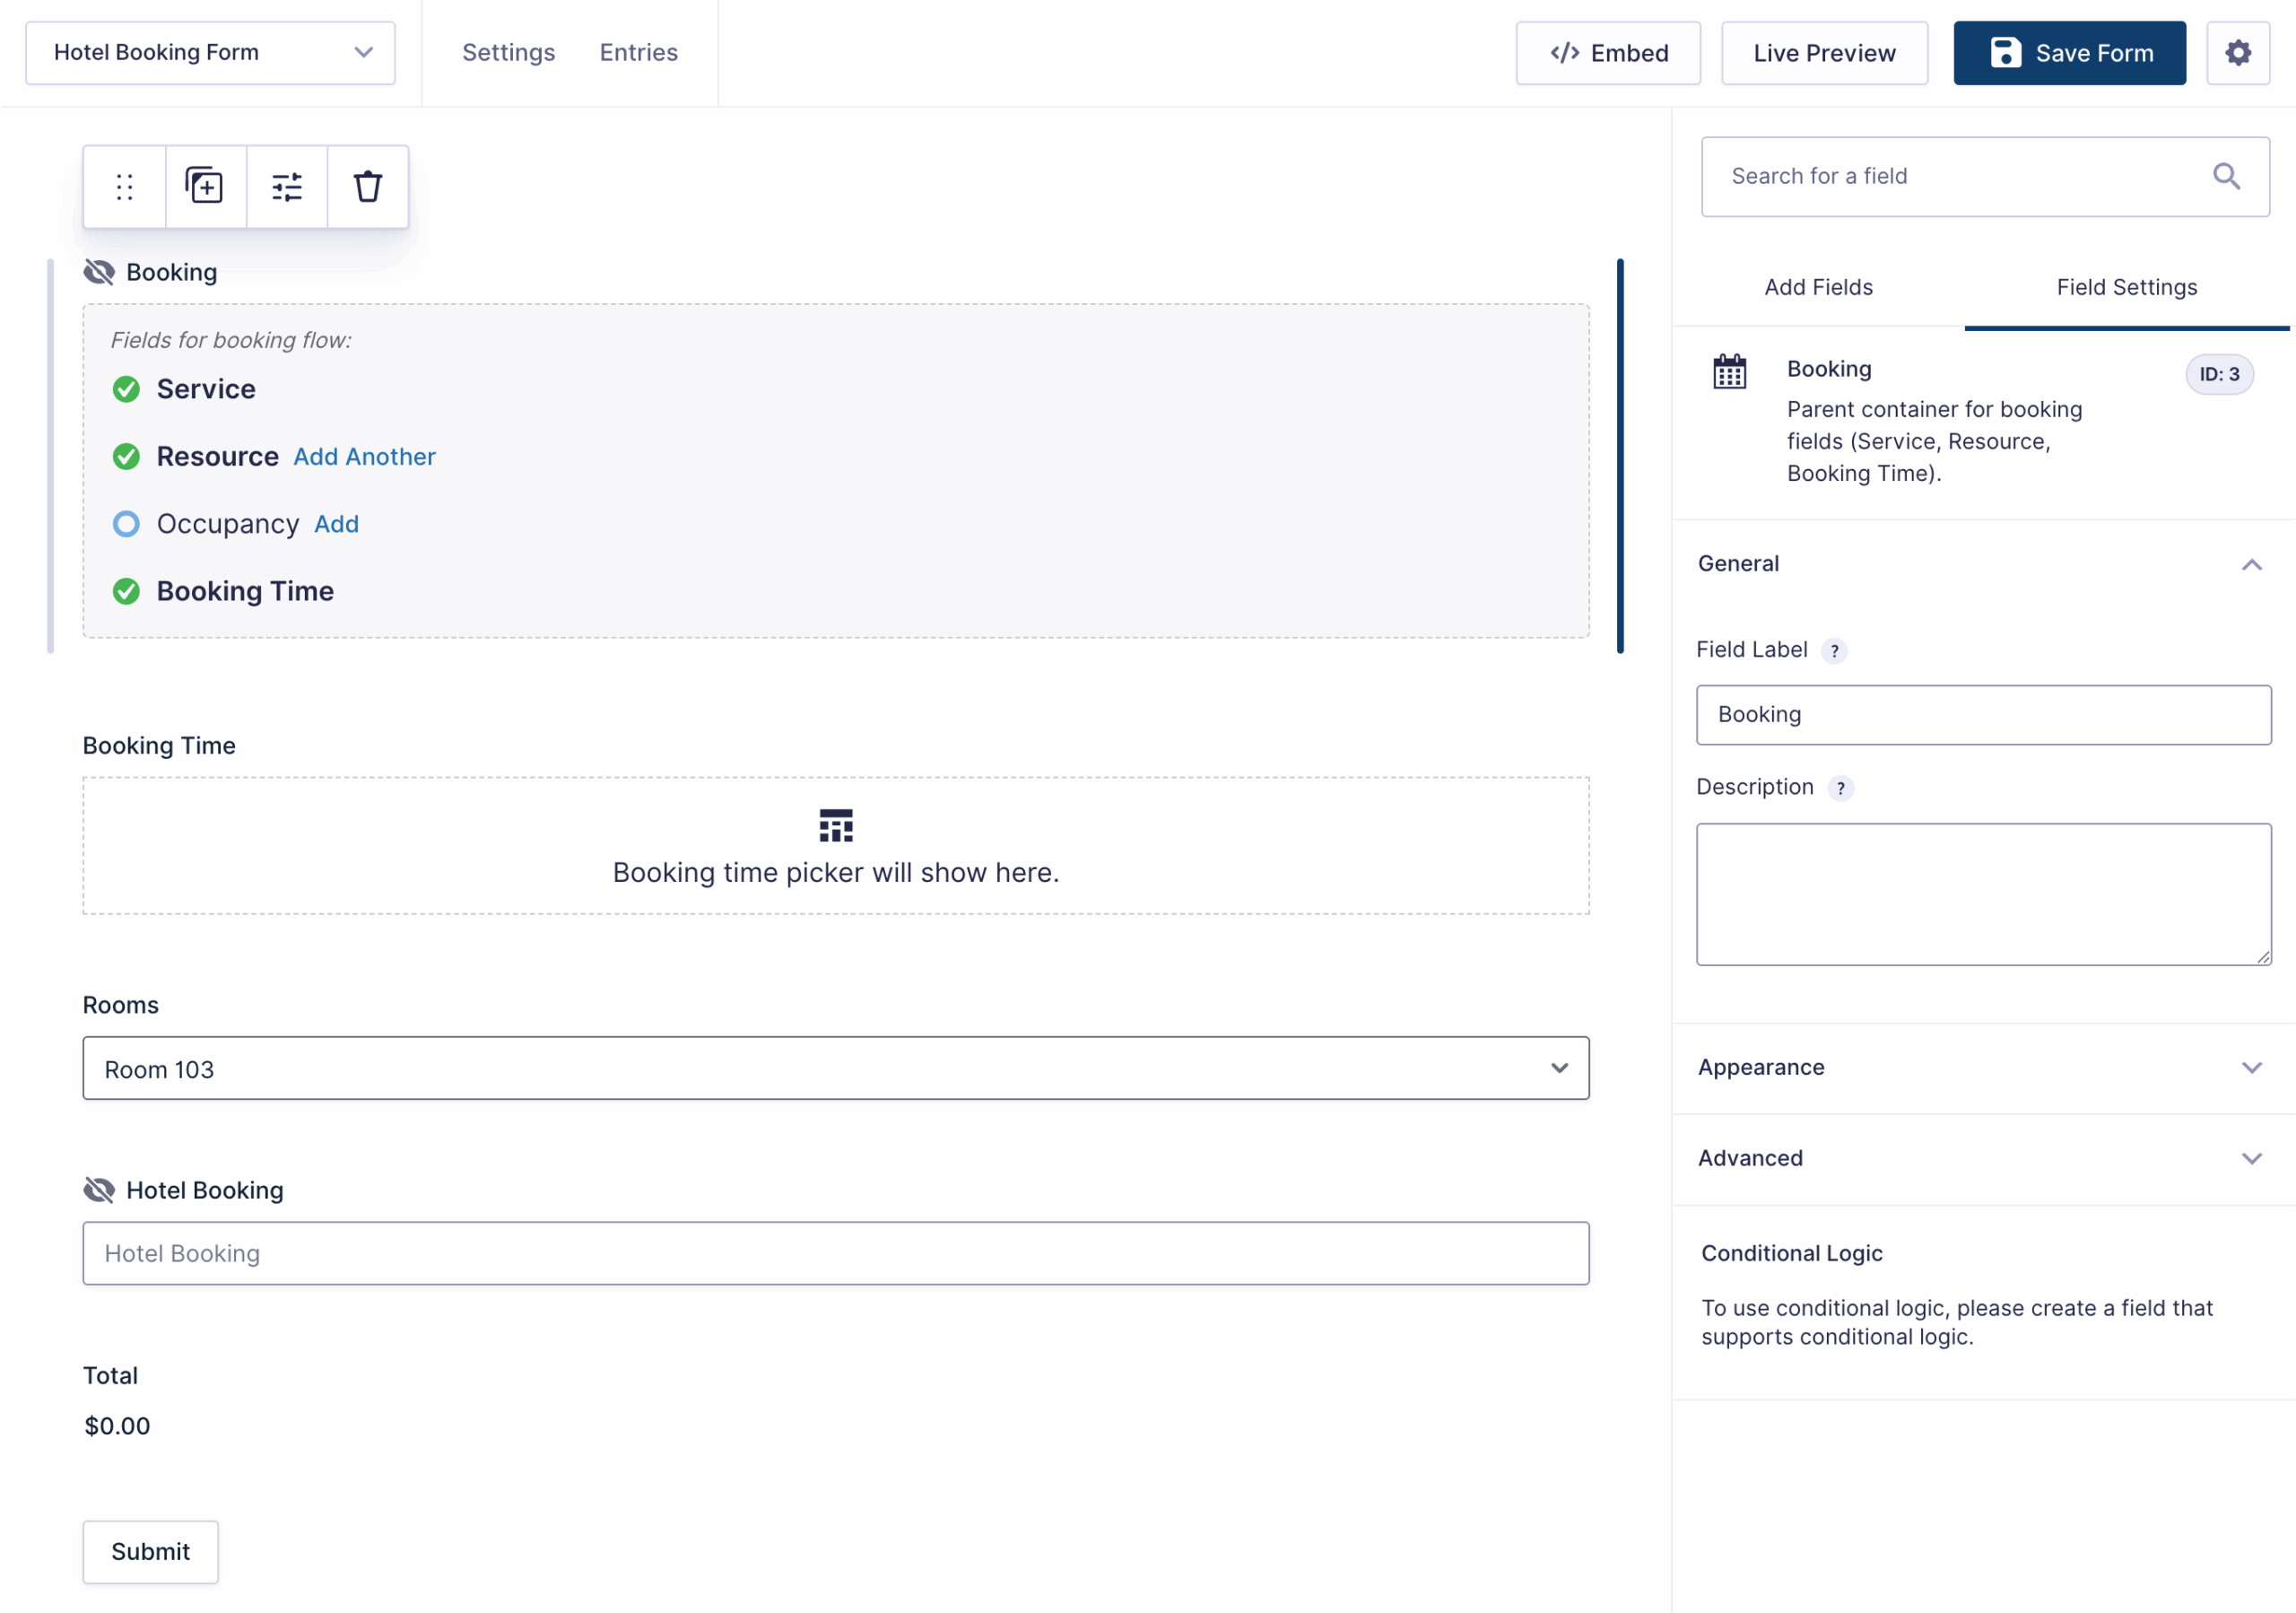
Step 5: Build Booking Form
Finally, let’s build the form your guests will use to book rooms.
We’ll add a “Booking” field that connects your service setup, room inventory, and pricing into one complete form.
- Create a new form or use this ready-made form (right-click and save).
- Under Advanced Fields › add a Booking field.
- Inside it, add three sub-fields: Service, Resources, and Booking Time.
- Click the Service field.
- Rename it to Hotel Booking.
- Set Selection Mode to Preselected Service.
- Set Service to Hotel Booking.
- Click the Resources field.
- Rename it to Rooms.
- Set Allocation Mode to Manual Selection (this lets guests pick their room).
- Click the Booking Time field.
- Rename it to Booking Time.
- Go to Pricing Fields › add a Total field.
- Click Save Form.
Pro-Tip
If you have multiple identical rooms (like three “Standard King” rooms), use Automatic Assignment with Capacity Spread to distribute bookings evenly across rooms.
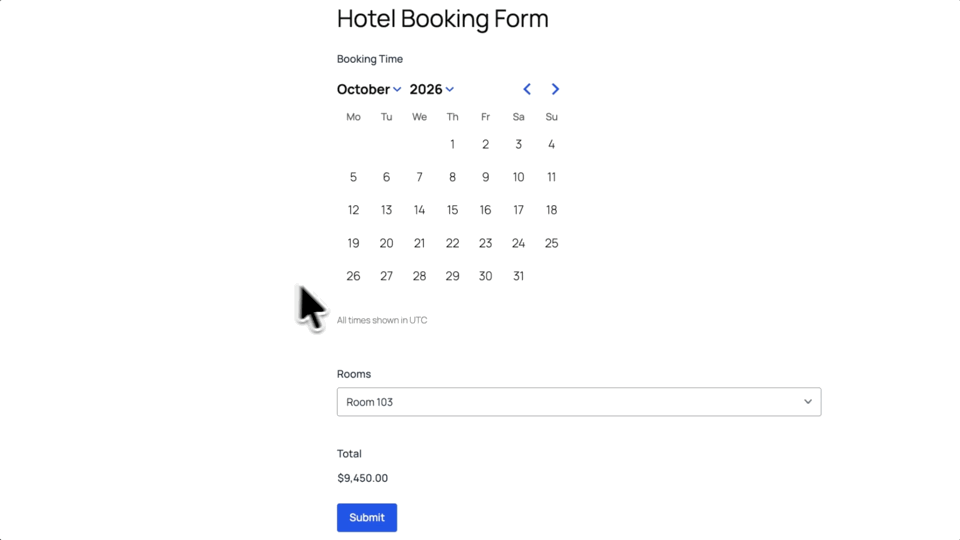
Test Booking!
Preview your form and try these two booking dates:
- October 26–29 (3 nights): Should total $450.
- December 26–29 (3 nights): With your holiday surcharge, this should total $600.
Wizard’s Note
You can layer Pricing Rules conditions to automatically adjust pricing based on different factors — like time of day, day of week, or even guest count.
If you want to see what that looks like in action, check out our guides on time-of-day pricing and pricing that changes based on guest count.
Ready to head into peak season? 🗓️✨