How to Capture a Phone Number’s Type, Location, Carrier and More in Gravity Forms
Create smarter notifications and personalized follow-ups by using rich, actionable data stored in phone number entries.

What if your Gravity Forms phone fields could do more than just collect numbers? Like tell you if someone’s on mobile or landline, what carrier they’re using, or if they’re halfway around the globe.
It can with GP Advanced Phone Field! Cracking open every phone number like a data piñata, revealing sweet insights about who your customers really are and how to reach them best.
But first…
This article requires the Gravity Forms Advanced Phone Field perk.
Buy Gravity Perks to get this perk plus 48 other premium Gravity Forms plugins!
What Exactly is Phone Meta?
Every time someone submits their phone number, you’re not just collecting digits. Behind the scenes, you’re also capturing usable info called “Phone Meta.”
Think of if as a beefed up caller ID:
- Number Type: Mobile or landline?
- Carrier: Who’s providing the service?
- Geolocation: Where the area code’s hometown is.
Don’t worry, this isn’t spying! It’s real, public info that just gives you more details on the numbers you collect.
Want the full dossier? Check out our docs for the full list of capturable phone meta.
Where Can I Find This Phone Meta?
First things first: You’ll need the Advanced Phone Field enabled. If this is your first time, you can learn from our quick setup guide, and come back here when you’re ready.
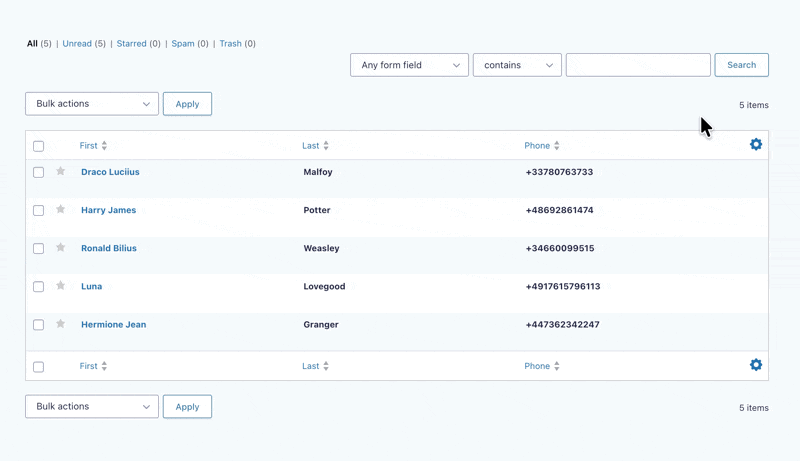
So — when someone submits their number, where does all this juicy data go? It’s automatically saved with each entry, just not visible right away. If you want to see this data, you can add it to your entries page.
Here’s how:
- Navigate to your form’s Entry List page.
- Click the gear icon (⚙️) at the top right corner.
- Drag and drop the meta info (carrier, type, etc.) from Inactive to Active Columns.
- Save settings.
Tip
Learn how to add a country code drop down to make your phone field friendlier for users around the globe. 🌎
What Can You Do with Phone Meta?
Here are two ways you can put all this juicy data to work:
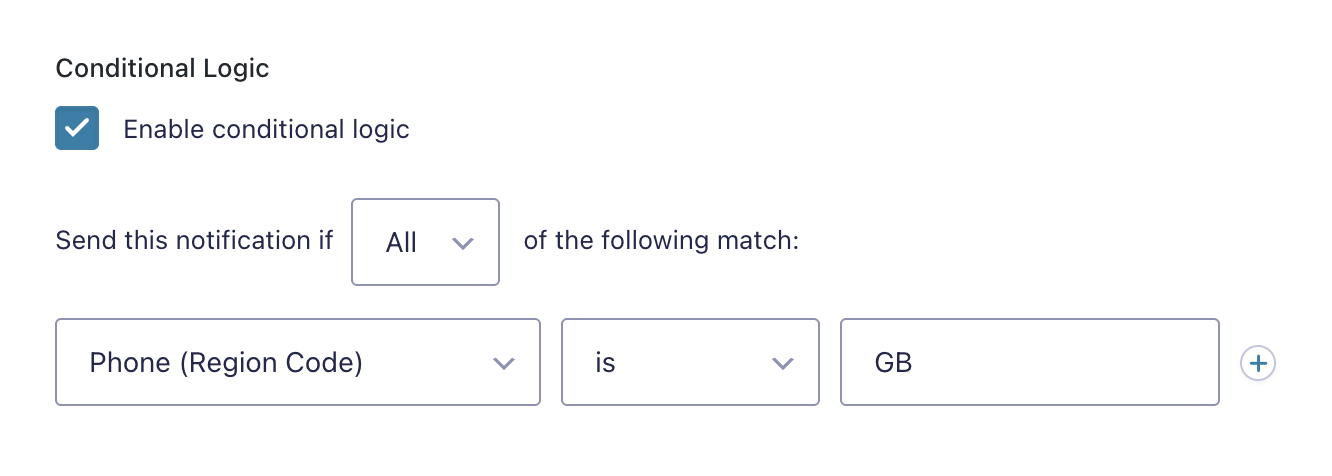
1. Create Smarter Notifications with Conditional Logic
Why send the same email to everyone? Use conditions to send personalized messages. For example, to target a special offer to UK users, set a condition so the notification sends only when a phone number’s Region Code is GB.
Here’s how to set it up:
- Edit your form’s notifications settings.
- Enable Conditional Logic.
- Select your phone field property from the dropdown (type, carrier, region code, etc.).
- Set your condition/s.
And here are some sample rules you could create:
- Type is
MOBILE - Description is
Los Angeles, CA - Carrier contains
Verizon
Go wild!
2. Display Phone Data with Merge Tags
Merge tags are your backstage pass to using phone meta anywhere they’re supported. Need to display the carrier on a confirmation page or use the region code in an email? Just add a simple modifier to your phone field’s merge tag.
For example, to get the carrier, we use:
{Phone:1:phone[carrier]}Let’s break this down:
Phone is the field label, 1 is the field ID, and phone[carrier] is the modifier.
Want other properties? Just swap the modifier:
- Number Type:
{Phone:1:phone[type]} - Country Code:
{Phone:1:phone[regionCode]}
Check out our docs for the full list of available phone meta modifiers.
![A confirmation message showing the modified phone number merge tag: {Phone:3:phone[nationalNumber]}](https://gravitywiz.com/app/uploads/2025/10/gpapf-confirmation-message.png)
Dial Into the Magic
Ready to turn your basic phone fields into meta wizards? 🧙🏼