Beginner’s Guide to Sending Data Between Gravity Forms and n8n Using API Alchemist
Learn the basics of sending API data between Gravity Forms and n8n with a simple use case where we extract the contents of an attached PDF. No coding magic required.

- Build overview
- Step 1 — Add trigger node to n8n
- Step 2 — Connect the n8n webhook to Gravity Forms
- Step 3 — Configure Gravity Forms’ request
- Step 4 — Preparing callback URL
- Step 5 — Send test data to n8n
- Step 6 — GET the PDF
- Step 7 — Extract PDF text
- Step 8 — Send PDF text back to Gravity Forms
- n-6-7-8-n ⛓️
API Alchemist is our very own Gravity Forms API hub. You can push, pull, and even populate data to and from Gravity Forms using most REST APIs on the web. This allows you to integrate Gravity Forms with the tools you already use and magically expand automation capabilities.
Speaking of automation, the API we’re focusing on today is n8n, an AI automation platform where you can create workflows with multiple steps, including receiving data from an API request, using tools like AI bots and file extractors, and sending it over to other services like Slack.
Let’s explore this connection by creating a simple PDF text extraction workflow. Unfortunately, PDFs are still used everywhere. Attaching them to a submission is one thing, but wouldn’t it be great if your forms could extract the information within them?
Well, with API Alchemist + n8n, they can. 😉
This article requires the Gravity Connect API Alchemist plugin.
Buy Gravity Connect to get this plus other premium Gravity Forms plugins!
Build overview
We’ll connect Gravity Forms and n8n using API Alchemist to:
- Send an uploaded PDF from the form to n8n.
- Use n8n’s tools to extract text from the PDF.
- Send the extracted text back from n8n to the form.
Both API Alchemist and n8n offer drag-n-drop interfaces for you to perform complex tasks without writing any code. They also make the code you need to interact with manageable even if you don’t have a background in development.
We recommend following this tutorial in test mode. You can even use my test form for simplicity.
Quick word on JSON
Since we’ll be dealing with API requests, there is a little bit of JSON in this tutorial. I’ll be guiding you every step of the way, and if you have any questions, leave them in the comments below.
If you want to get more familiar with JSON and API requests in general, check out our Wizard’s Pocket Guide to APIs.
Step 1 — Add trigger node to n8n
Here’s what our full workflow will look like:
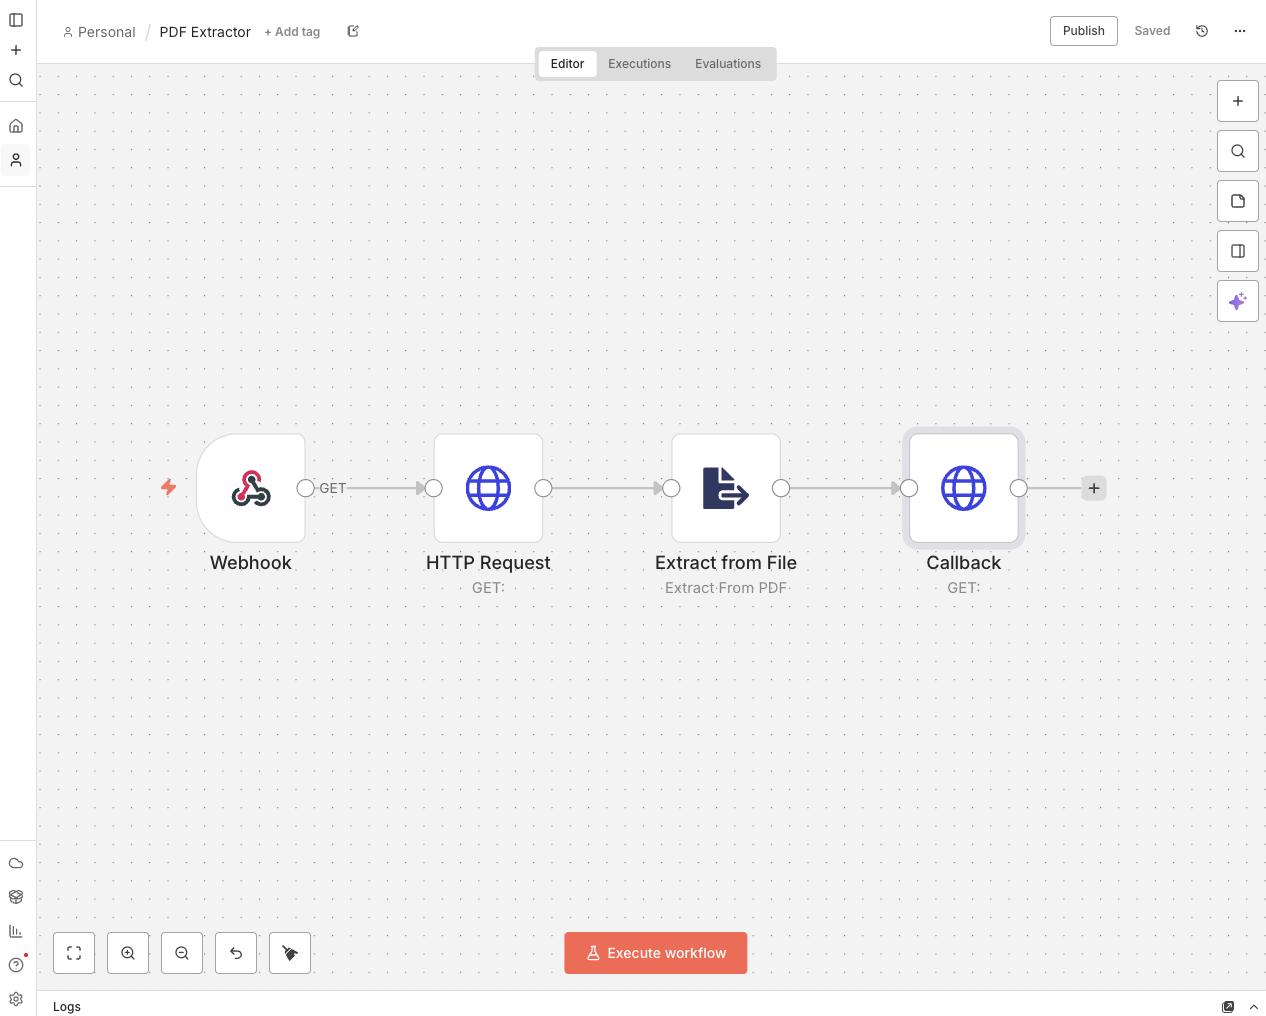
Each step you see there is called a node, and we’ll add them one at a time. For starters, add your first node: Webhook (“On webhook call”). We’ll need it to set up API Alchemist.
Step 2 — Connect the n8n webhook to Gravity Forms
Rapid-fire:
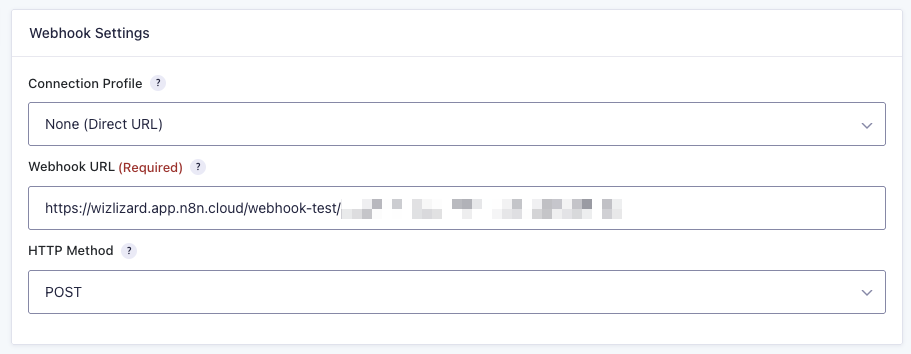
- Open the Webhook node.
- Set its HTTP Method to POST.
- Copy the URL right above by clicking on it.
- Head over to your form.
- Go to Form Settings › API Alchemist.
- Add a new feed by clicking on Add New.
Under the Webhook Settings, paste the URL from the Webhook node into Webhook URL and set the HTTP Method to POST. This is telling the API Alchemist feed to send POST requests to that URL.
Step 3 — Configure Gravity Forms’ request
Going down to Request Configuration, choose Customize request body so we can control the JSON response that will be sent over to n8n. Let’s name its key “pdf” under the Field Name and set the Value to the File Upload field merge tag.
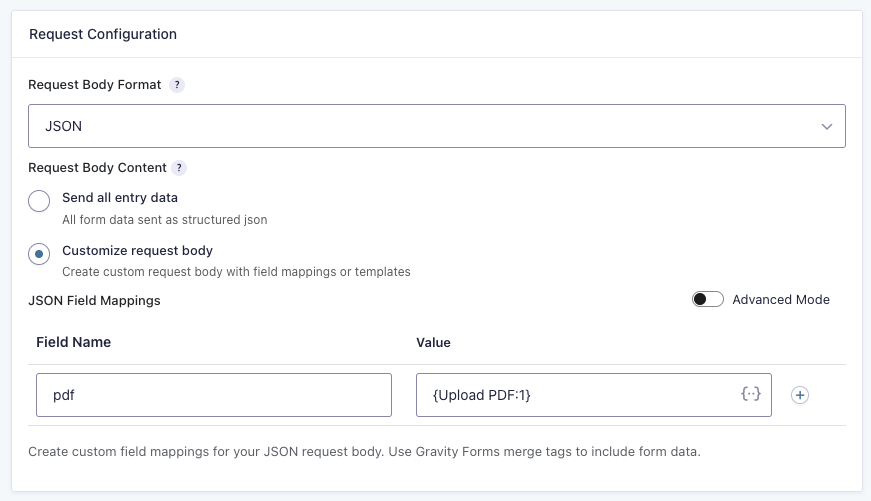
If you want to see what this looks like in JSON, just toggle Advanced Mode.
Step 4 — Preparing callback URL
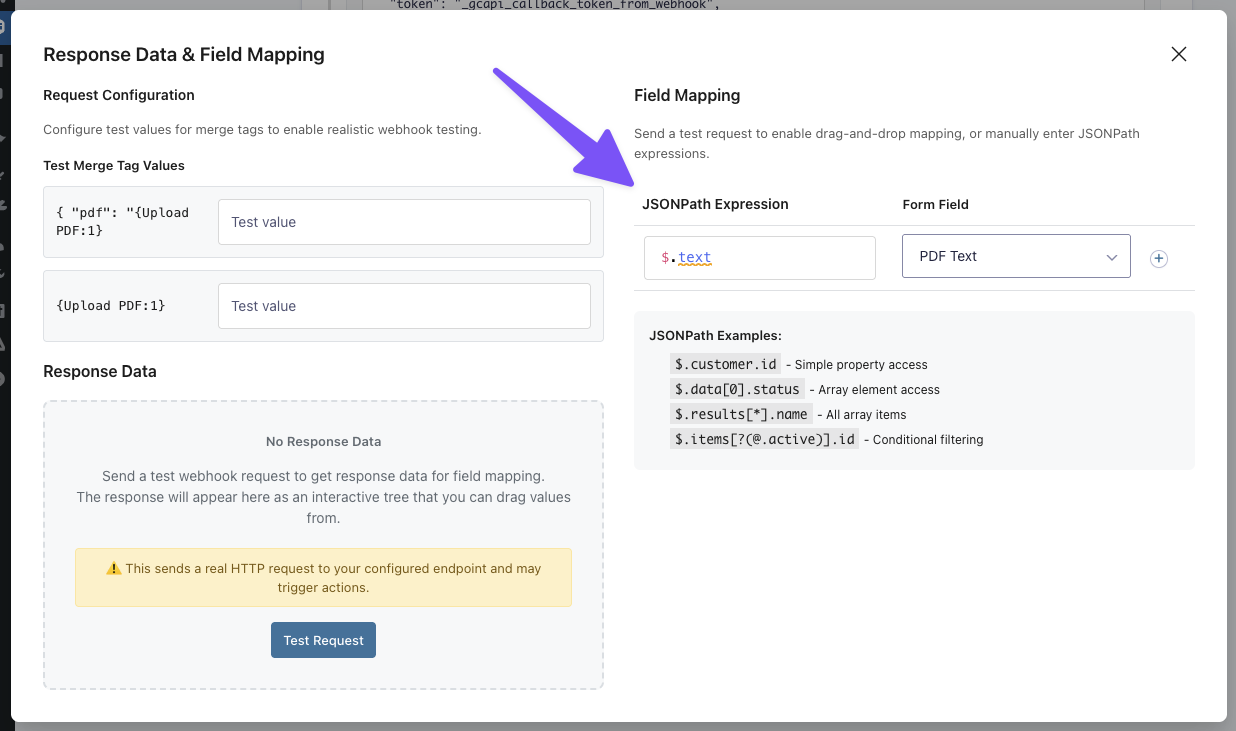
Next, let’s prepare the feed to also receive the extracted PDF text back from n8n. Go to Response Handling, click on Enable Response Handling and select Advanced.
The difference between Simple and Advanced here is that your server won’t wait on a response from n8n — it will give it a callback URL instead, so that n8n can let your server know when it’s finished doing its thing.
A bit down below, click on Open Response Mapping Editor. Set the JSONPath Expression to $.text and choose the form field you want the text to be output to.
Close the modal and save the feed. Time to finish our n8n setup.
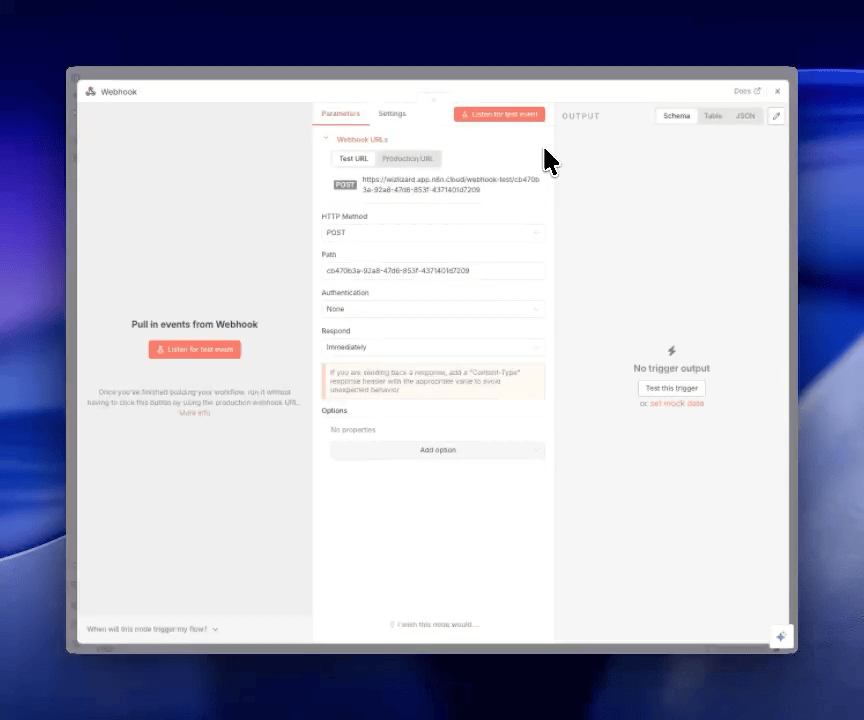
Step 5 — Send test data to n8n
Open the Webhook node and click on Listen for test event. Go back to your form and submit a PDF. This will give n8n all the information we need to build our workflow, which appears on the Output (right) side.
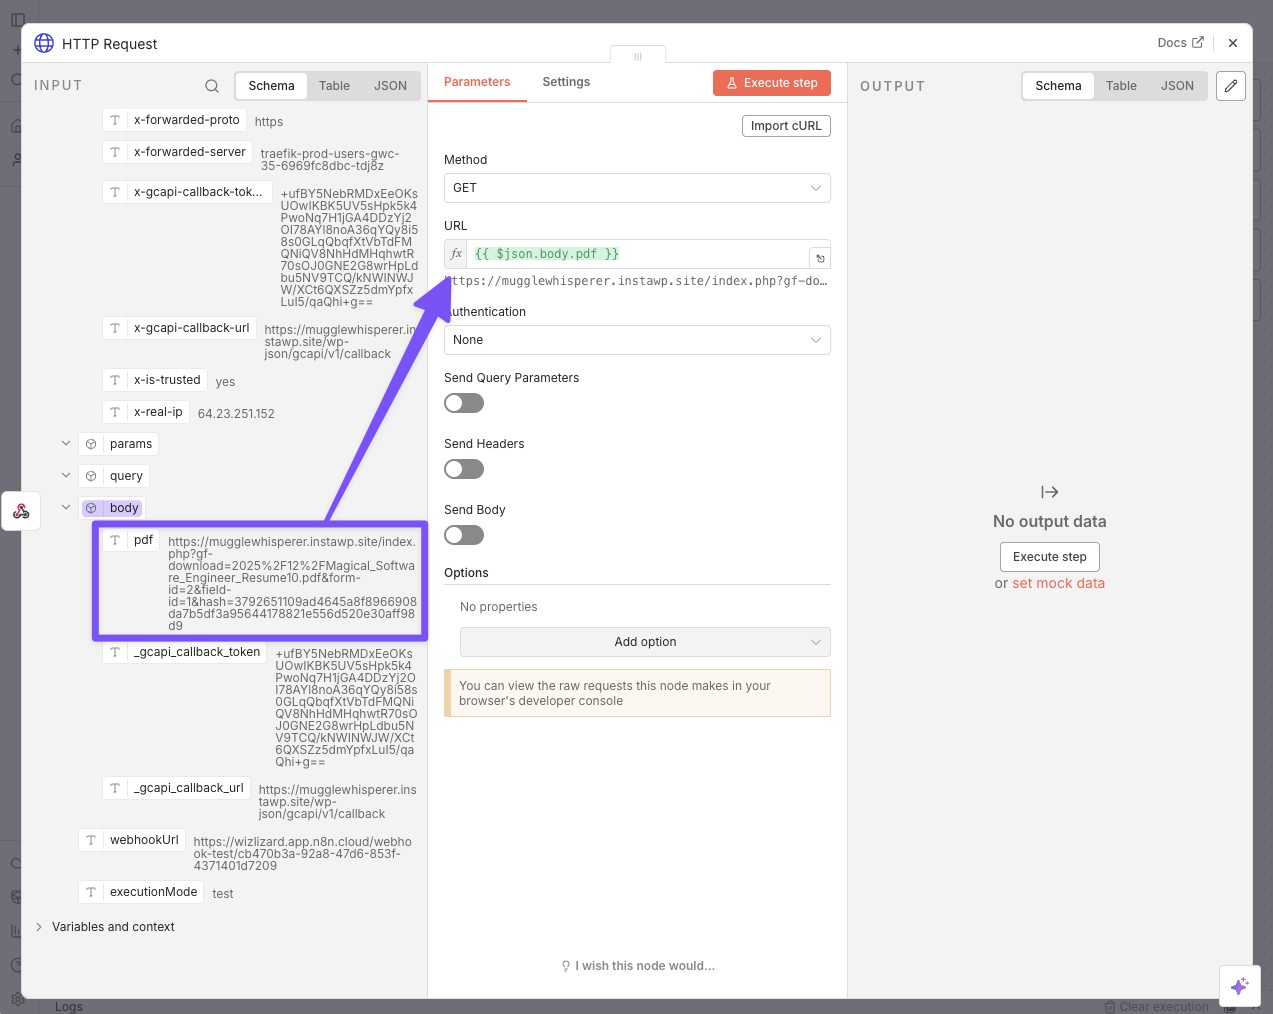
Step 6 — GET the PDF
n8n has received the PDF from Gravity Forms via POST, but to prepare for the text extraction step, it needs to perform a GET request to make the PDF accessible to its other tools.
Add an HTTP Request node and a modal will appear. On the Input side, scroll all the way down to find the request’s body. From there, drag and drop the pdf key (this one) into the URL field.
Step 7 — Extract PDF text
Add an Extract from File node and choose Extract from PDF. Click on Execute Previous Nodes on the Input side and you’ll see the output appear on the Output side.

Step 8 — Send PDF text back to Gravity Forms
With our PDF text ready in our robotic hands, it’s time to add another HTTP Request node.
- Set its HTTP Method to POST.
- In the Input side, navigate to the Webhook step and scroll down to the original request body.
- Drag and drop the
_gcapi_callback_urlto the URL setting.
Next, enable Send body and change Specify Body to Using JSON. Then, use this template:
{
  "token": "{{ $('Webhook').item.json.body._gcapi_callback_token }}",
  "data": {
    "text": {{ JSON.stringify($json.text) }}
  }
}
How I got here
- I manually wrote all of the JSON keys.
- Dragged and dropped the
_gcapi_callback_tokenfrom the Webhook step and thetextfrom the Extract from File step. Both are available in the Input side. - Added the
JSON.stringifyfunction to the text value to convert it from JavaScript to JSON.
Time to execute the last step!

n-6-7-8-n ⛓️
That’s it! Now you can click on Execute workflow, upload a PDF again, and see n8n doing the magic by itself.
Have any questions? Drop them down below.
If you want to make the output more readable, you can add an AI step in n8n with your model of choice (e.g. OpenAI) and format the text before sending it back to Gravity Forms.
PS—I was not expecting this to have exactly eight steps. Magic works in wonderful ways. 🧙♂️