How to Validate VAT Numbers in Real Time in Gravity Forms
Connect Gravity Forms to a VAT validation API to check numbers instantly as users type and catch invalid entries before submission.

- What You’ll Need
- 1 — Create a Connection Profile
- 2 — Build VAT Validation Form
- 3 — Prevent Tampering
- 4 — Test Drive
- Wrapping Up
VAT Numbers keep you compliant and your invoices accurate. But let’s be real, manually validating them is tedious. One invalid VAT number can mean compliance issues and extra admin work you don’t need.
But, what if you could validate VAT numbers instantly, catching errors before they happen?
Today, we’re going to brew a solution using GC API Alchemist, which bridges Gravity Forms with any API—including VAT validation services. We’ll pair it with GP Populate Anything which handles the real-time validation. It sends the VAT number to the API, gets the result, and updates the form instantly.
Together? They create a vigilant VAT validator. 🦸
This article requires the Gravity Connect API Alchemist plugin.
Buy Gravity Connect to get this plus other premium Gravity Forms plugins!
What You’ll Need
- GC API Alchemist: connects the form to a VAT validation API.
- GP Populate Anything: pings the API after the users type and stores the result.
- Conditional Logic: shows/hides the submit button based on validity.
- A magical snippet: prevents tampering with the validation result.
- A free account at EU VAT API.
But wait, what’s an API (Application Programming Interface)? Think of them as messengers that let two apps talk to each other. In our case, it’s how Gravity Forms talks to a VAT validation service.
You can learn more by checking out our beginner-friendly guide that breaks down APIs in plain English.
1 — Create a Connection Profile
First, we’ll connect GC API Alchemist to the VAT validation API. We’re using the EU VAT API for this guide.
- Open your Spellbook › activate GC API Alchemist.
- Navigate to Forms › API Connections.
- Click Add New API Connection to create the profile.
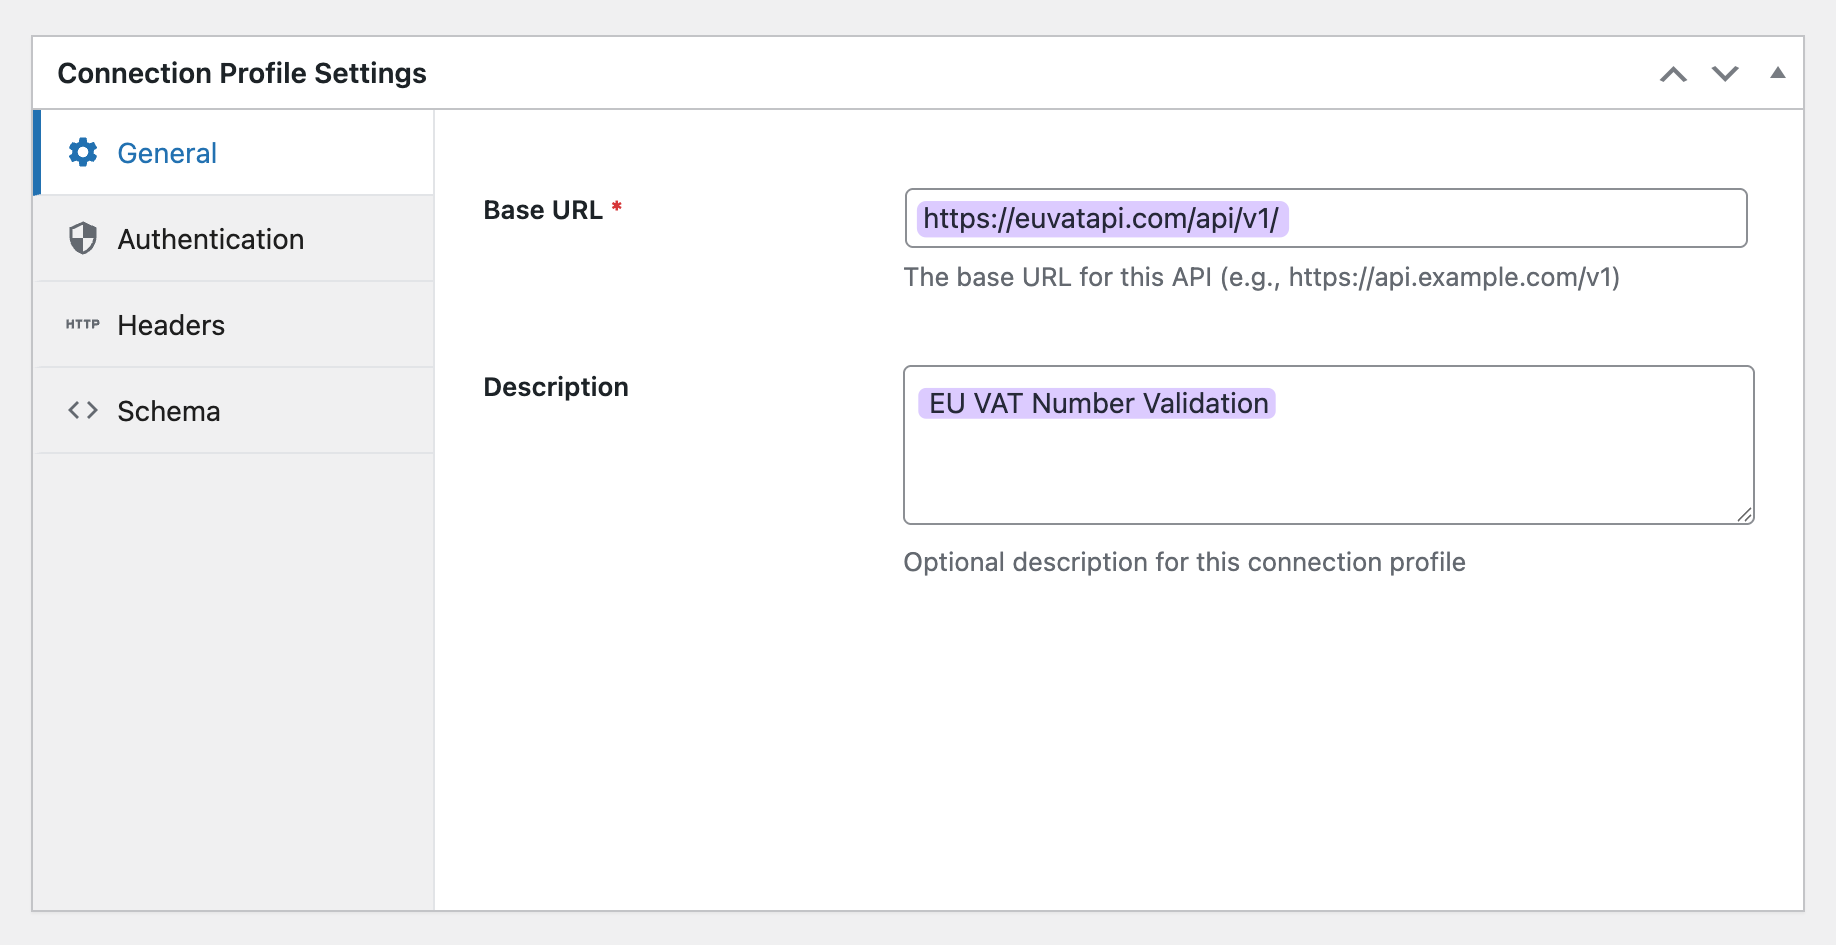
- In General:
- Base URL:
https://euvatapi.com/api/v1/ - Description:
EU VAT Number Validation
- Base URL:
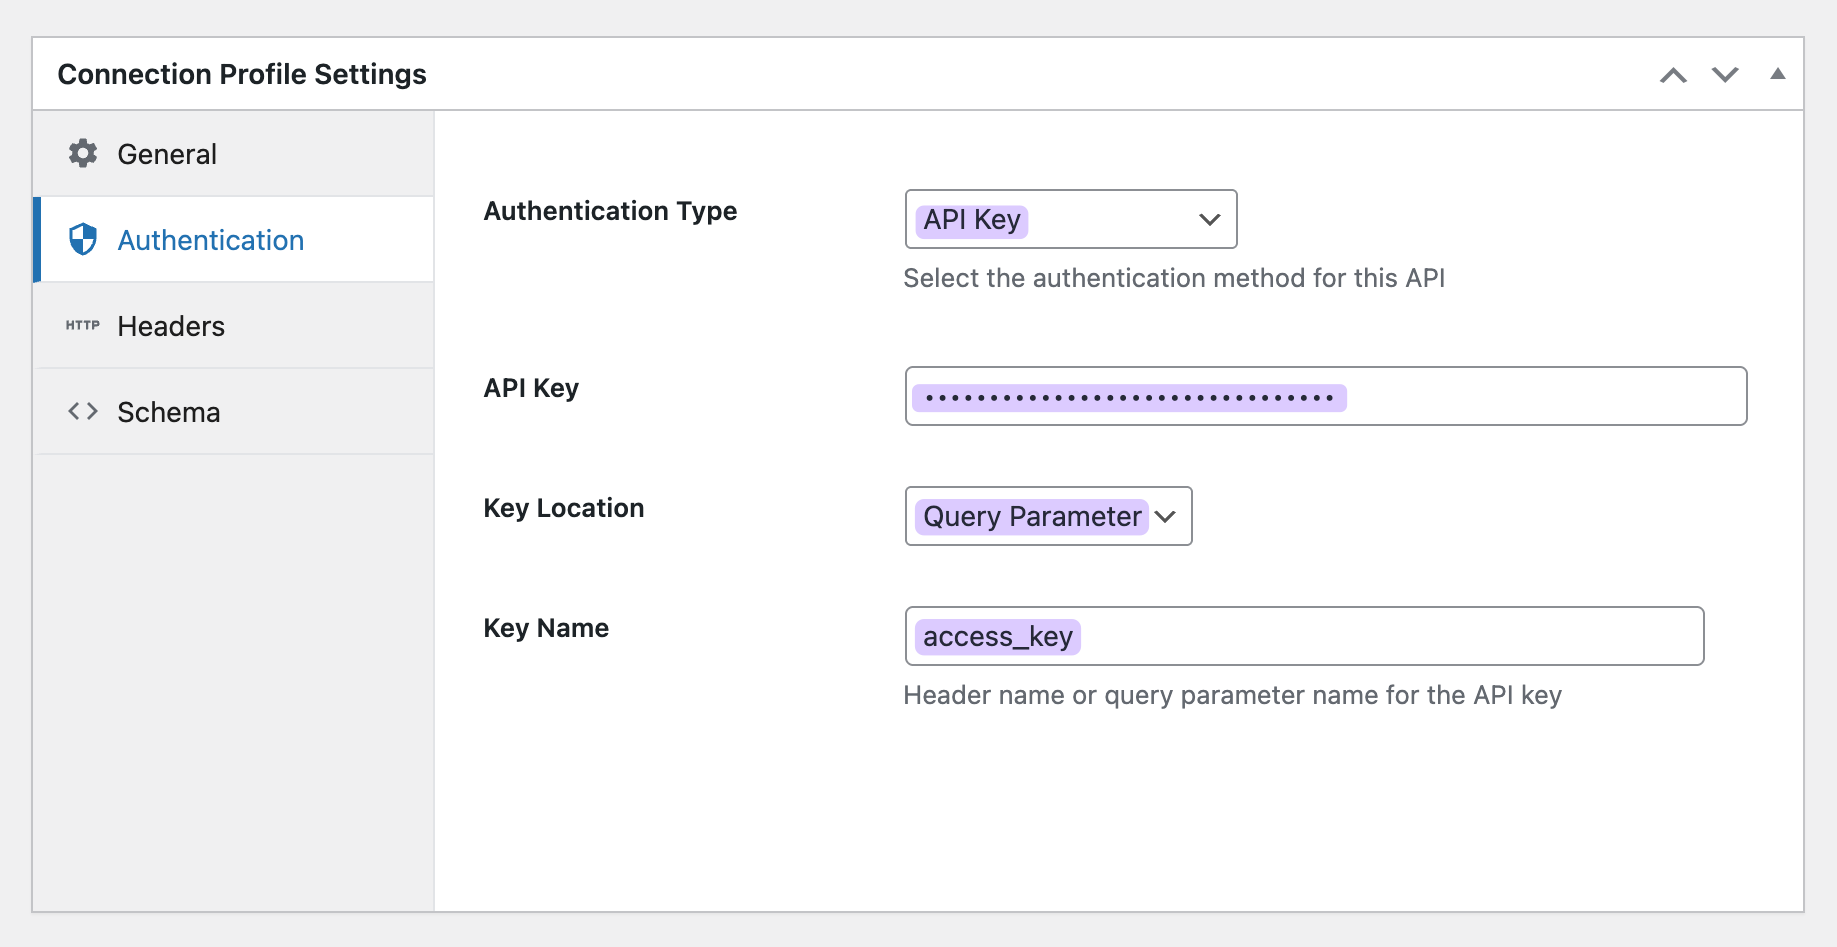
- In Authentication:
- Type:
API Key - Head to https://euvatapi.com/ › copy your API key › paste.
- Key Location:
Query Parameter - Key Name:
access_key
- Type:
- Click Publish.
Create the Endpoint
But what is an endpoint? Think of it as a specific question you’re asking the API. You send info (VAT number) and specify what answer you want back (whether it’s valid).
- In the new connection profile › click Create Endpoint.
- In Configuration:
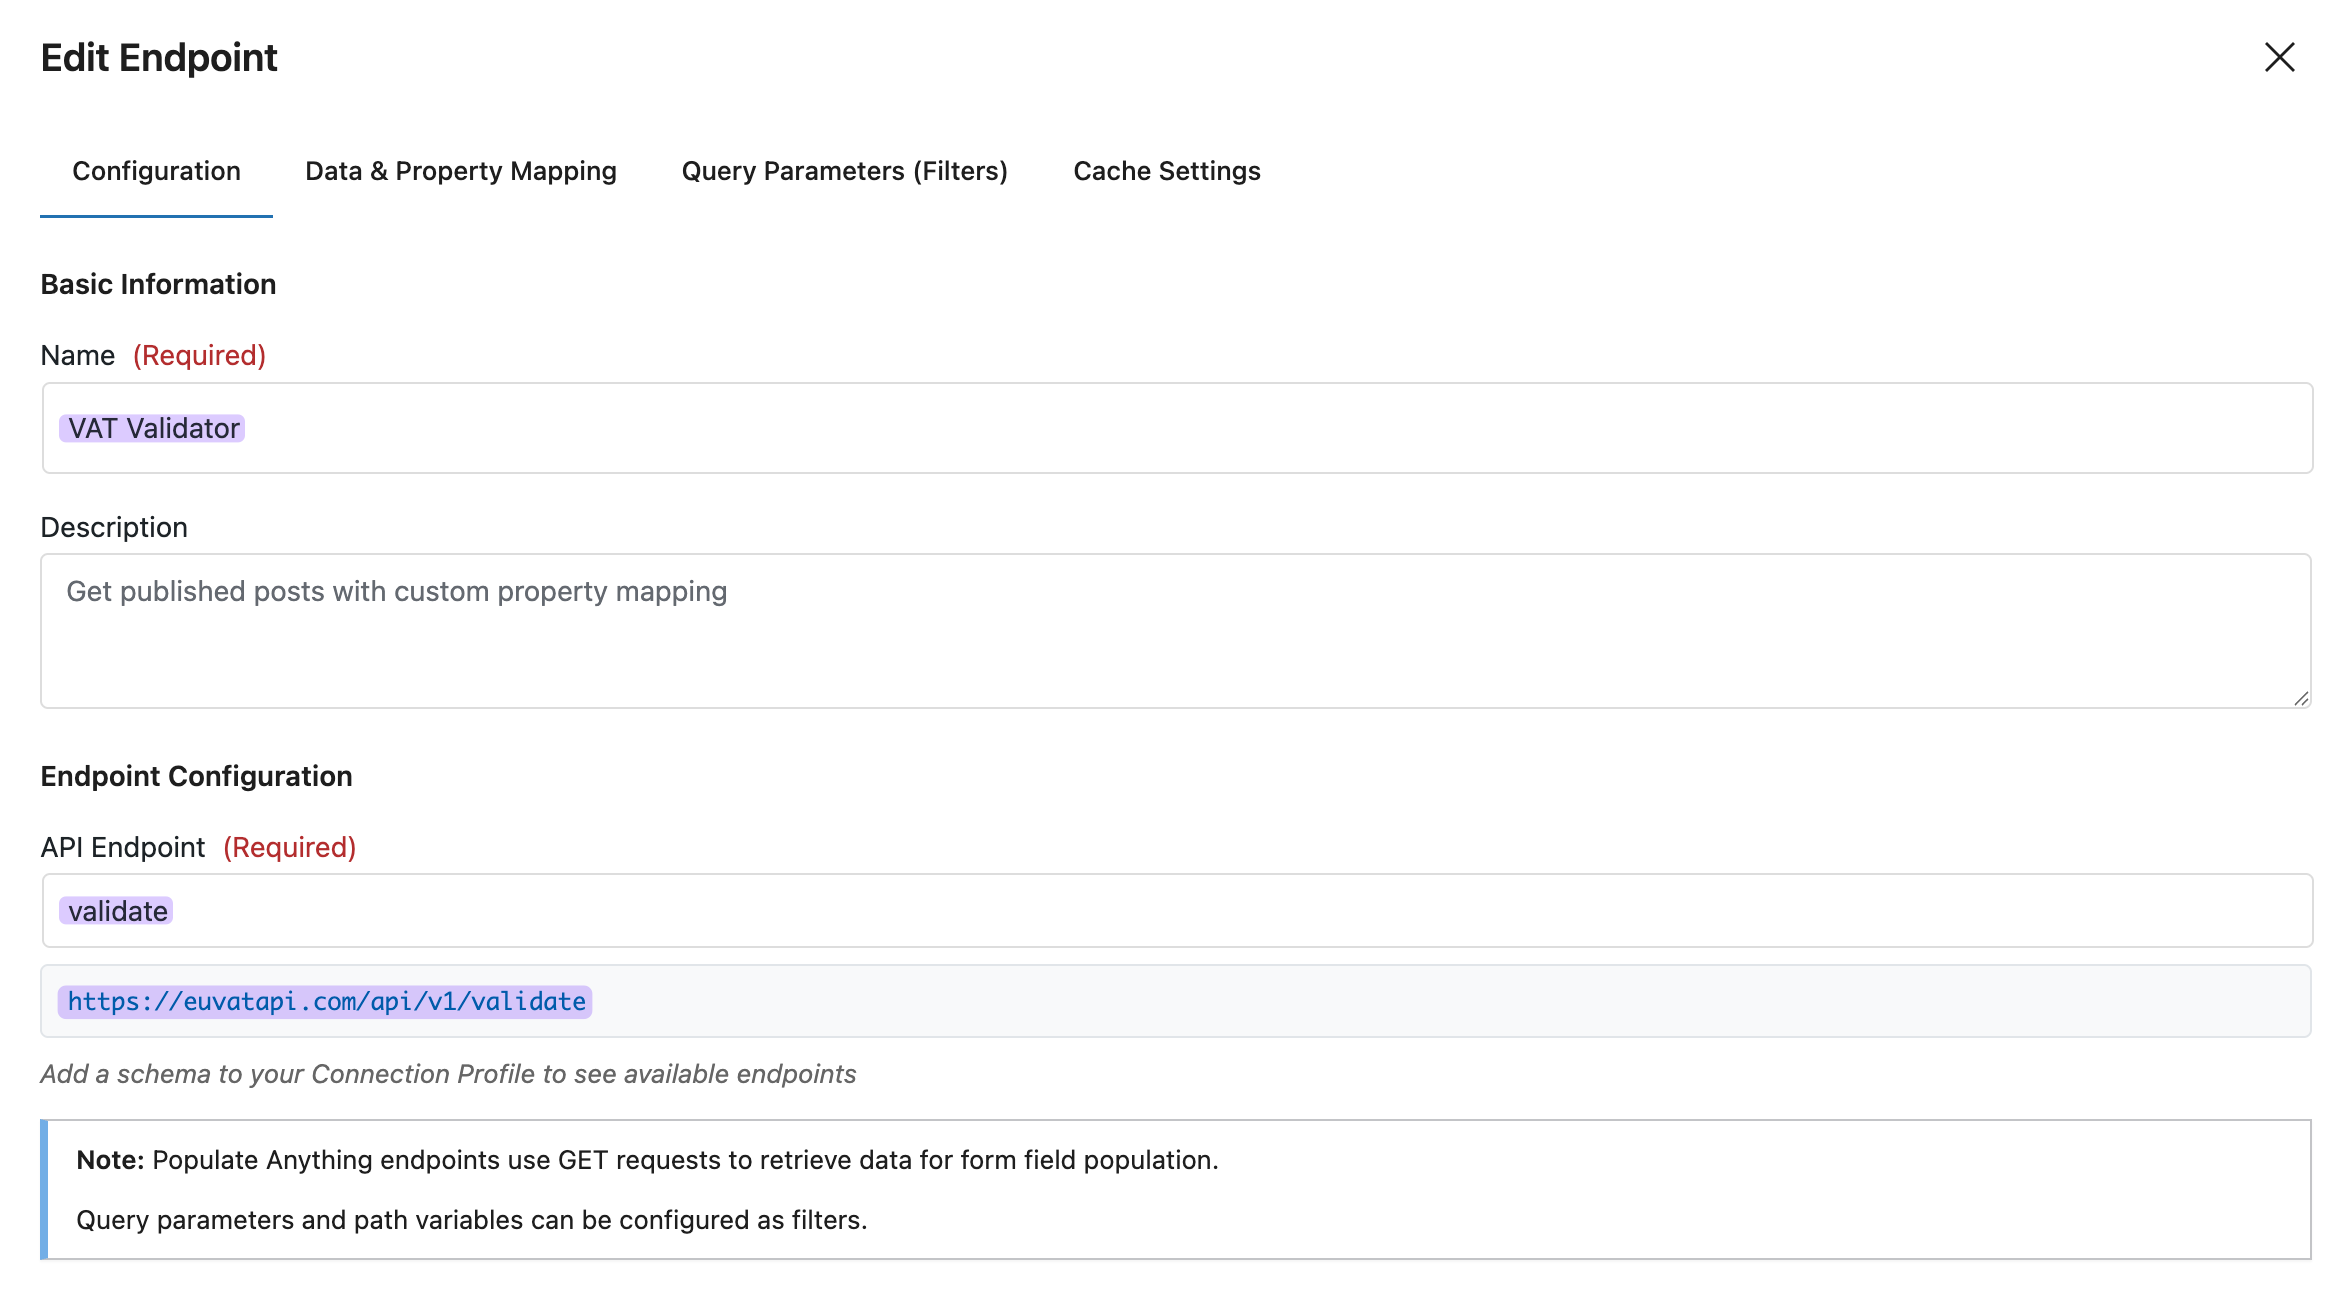
- Name:
VAT Validator - API Endpoint:
validate— this createshttps://euvatapi.com/api/v1/validate - Click Next.
- Name:
- In Data & Property Mapping › skip for now › click Next.
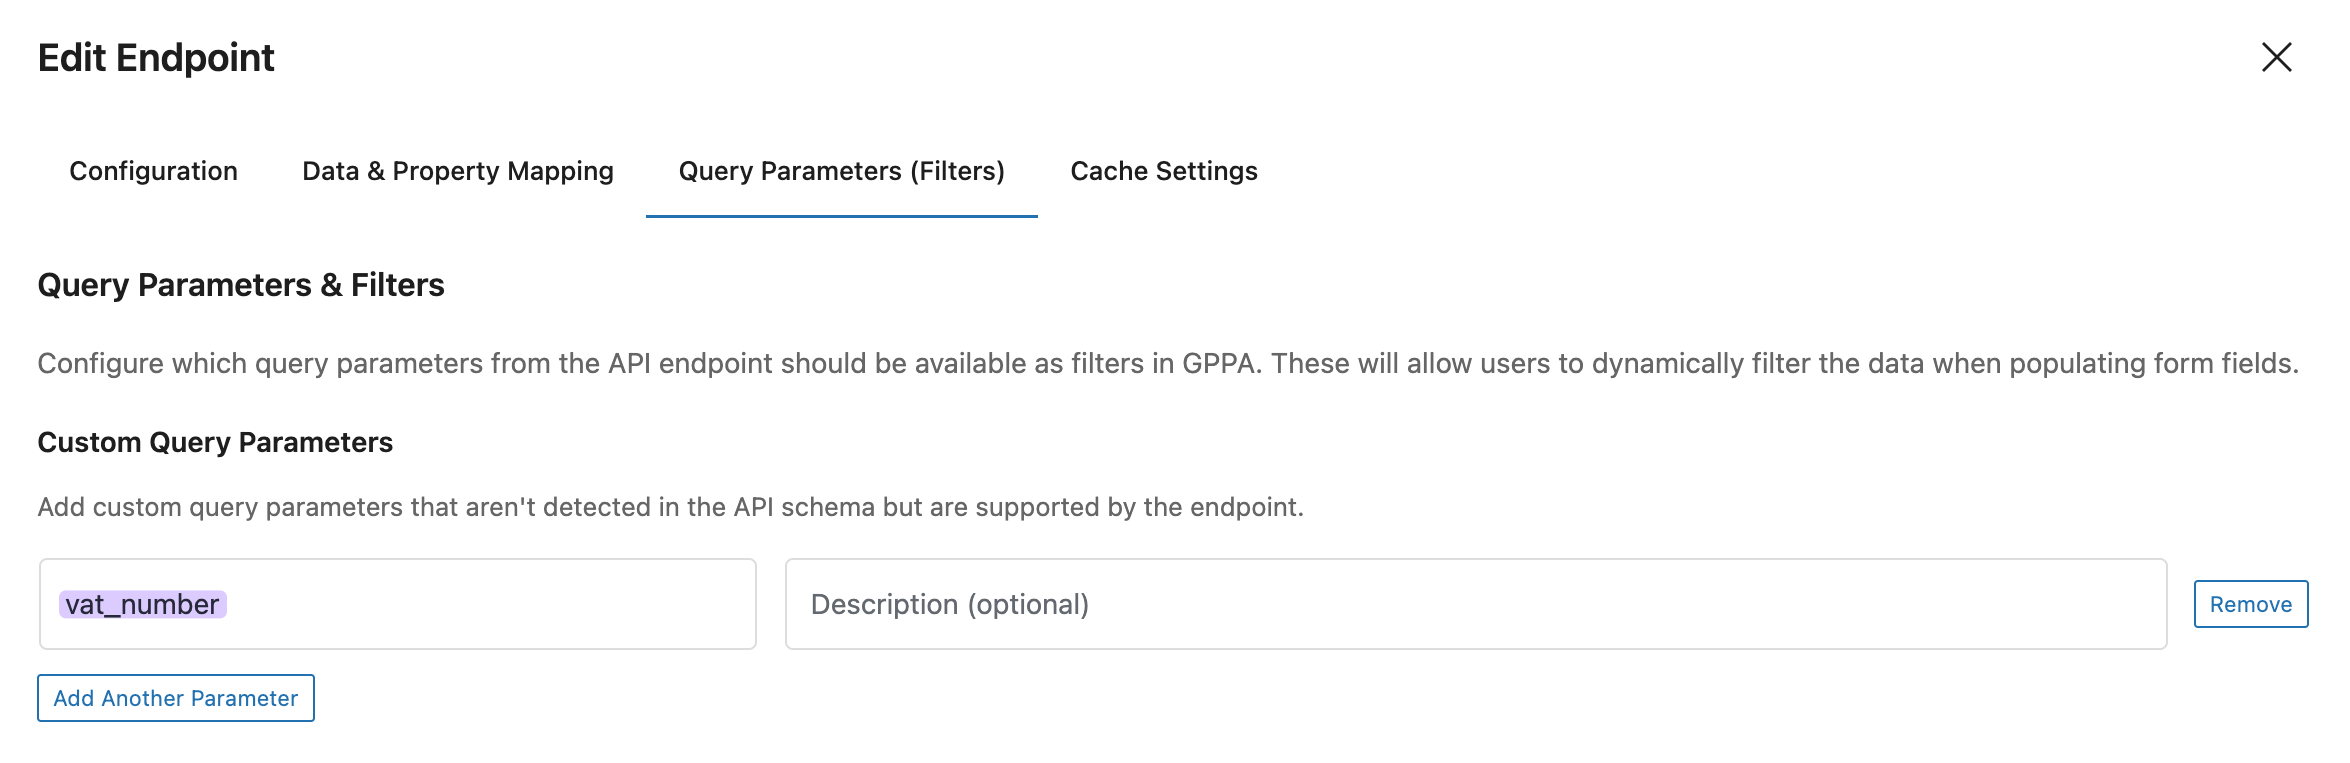
- In Query Parameters & Filters:
- Click Add Parameter.
- Parameter Name:
vat_number— this is data the API will use to validate against. - Click Next.
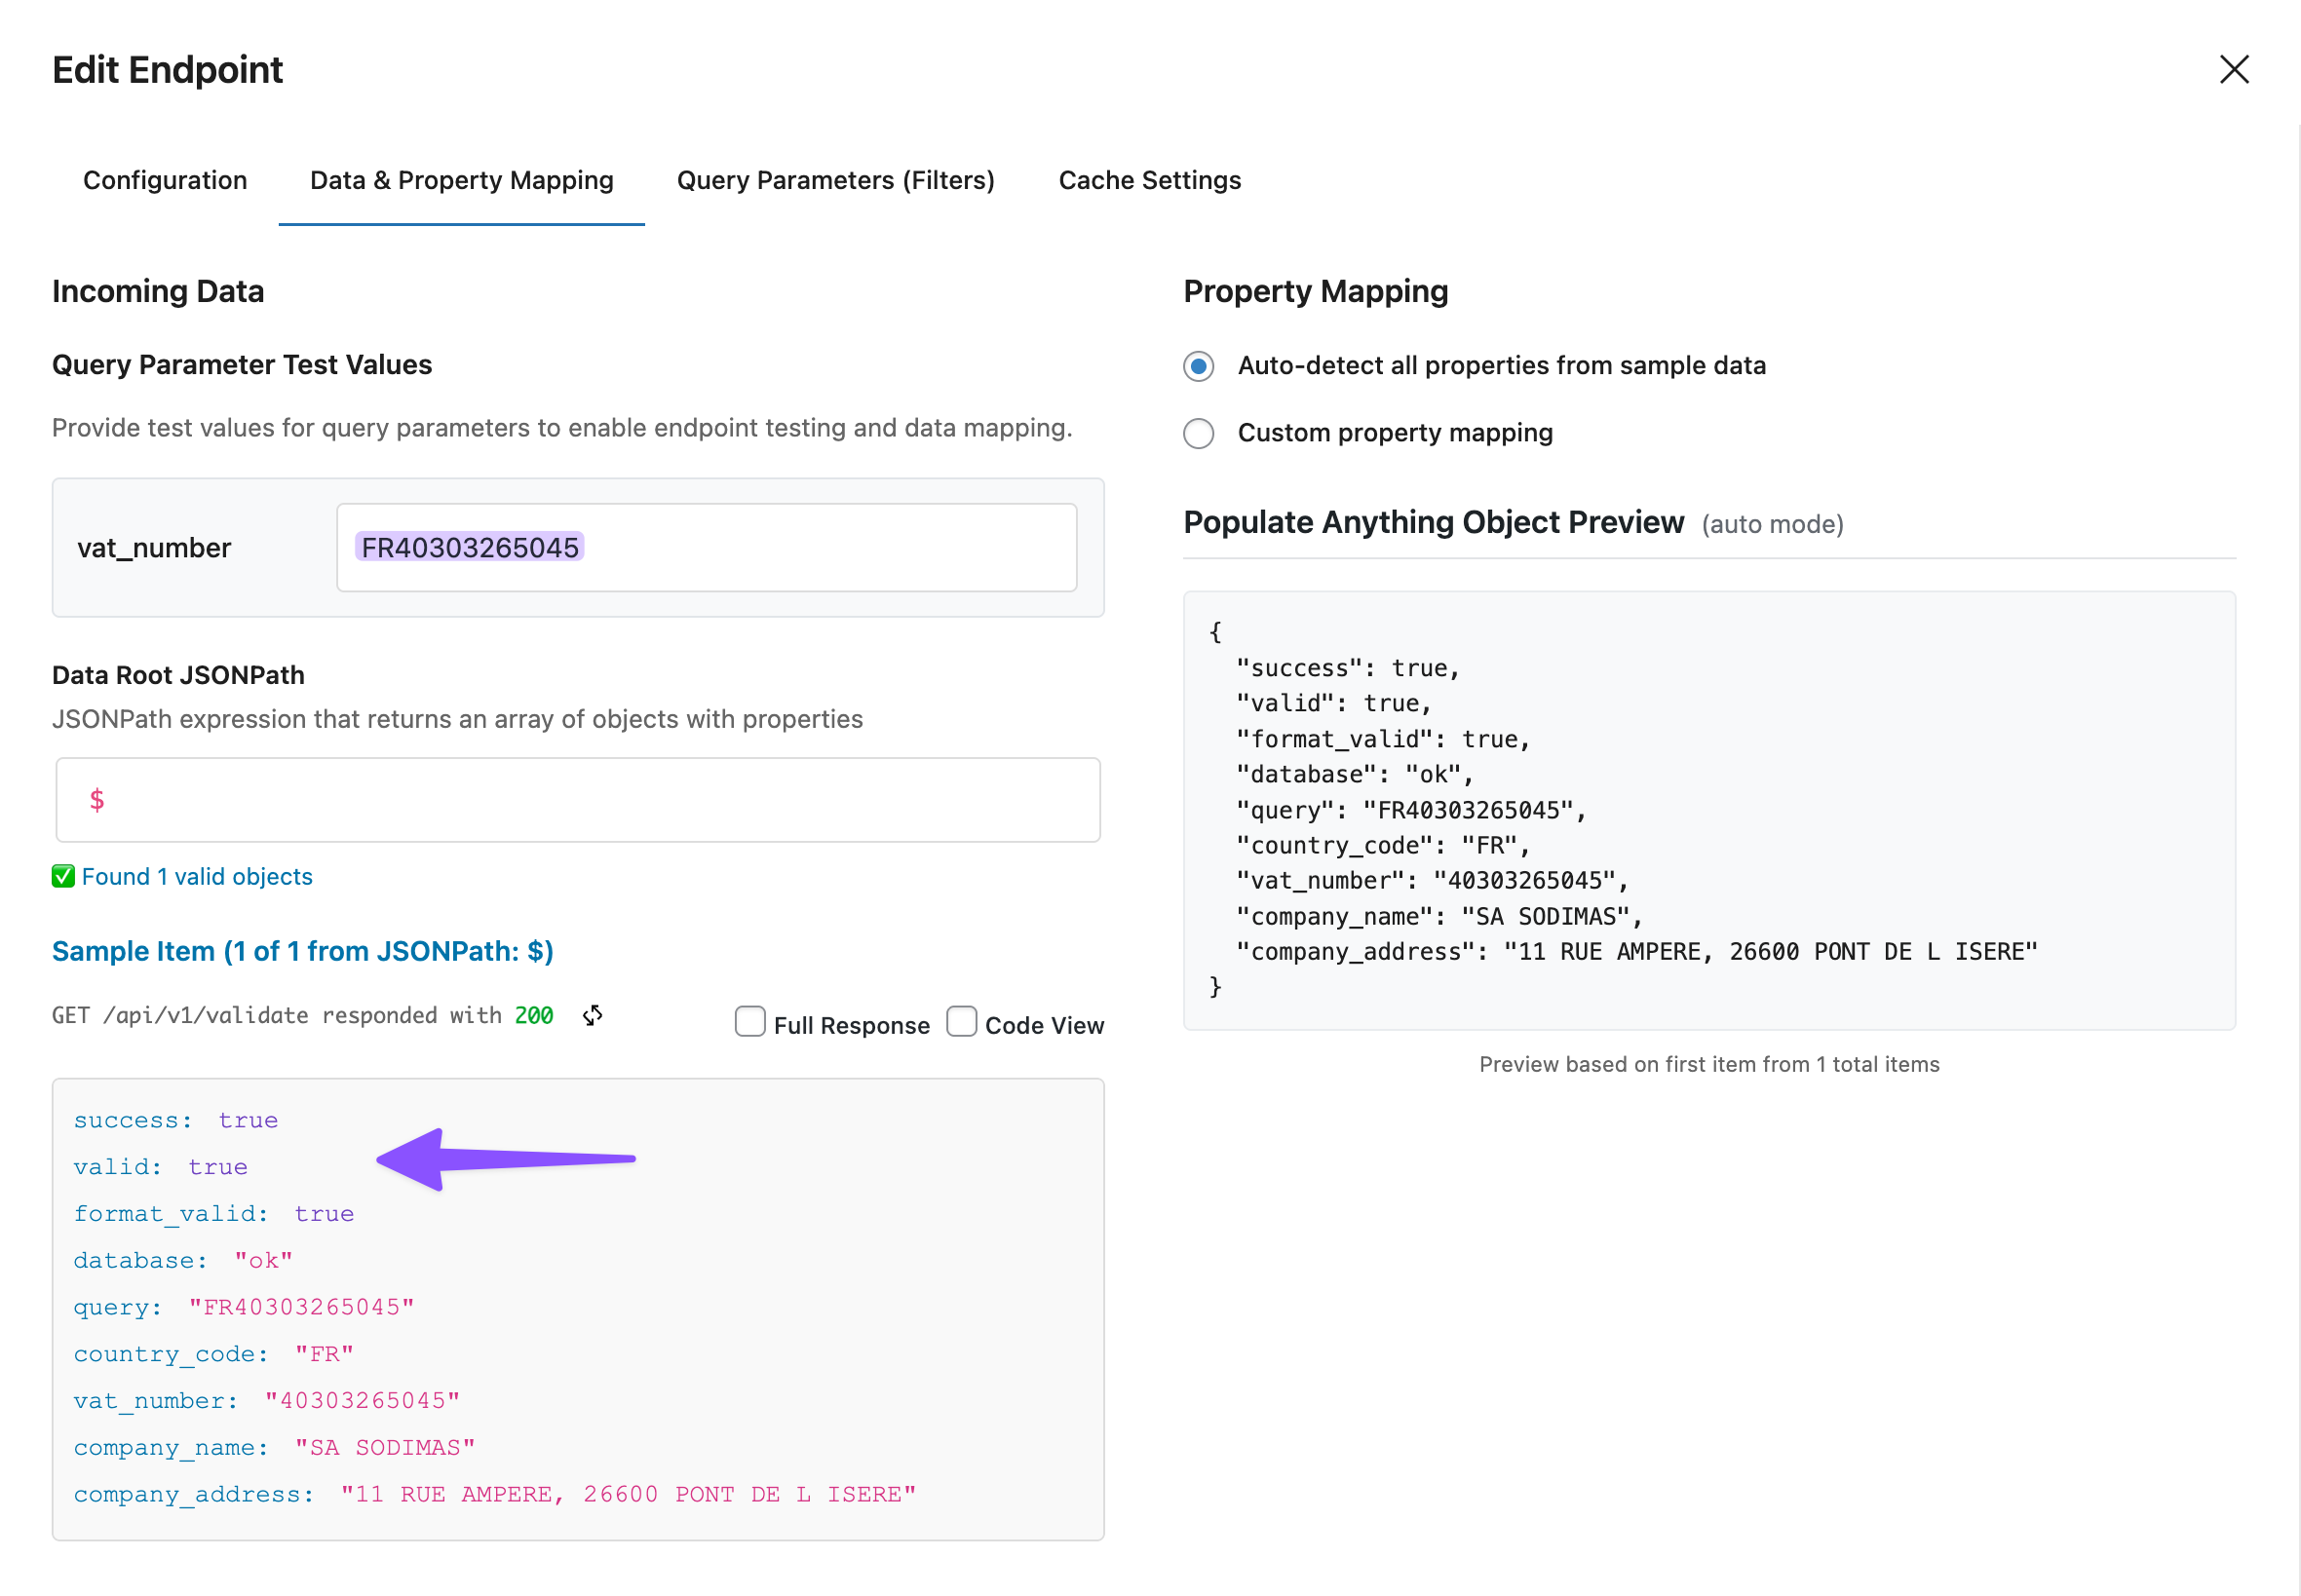
- Data & Property Mapping (Round 2):
- You’ll see the new
vat_numberparameter. - Enter a test number:
FR40303265045 - The API auto-tests and shows the full response data.
- Leave property mapping as-is › click Next.
- You’ll see the new
- Query Parameters & Filters (Round 2) › click Next.
- In Cache Settings: Leave caching enabled — saves API calls and tokens.
- Click Create Endpoint.
Alright! You’ve now taught GC API Alchemist the language it needs to speak with the VAT API.
2 — Build VAT Validation Form
Let’s create the form where users enter the VAT numbers and where GP Populate Anything validates them in real-time.
Add Form Fields
- Open your Spellbook › activate GP Populate Anything.
- Create a new form (or edit an existing one).
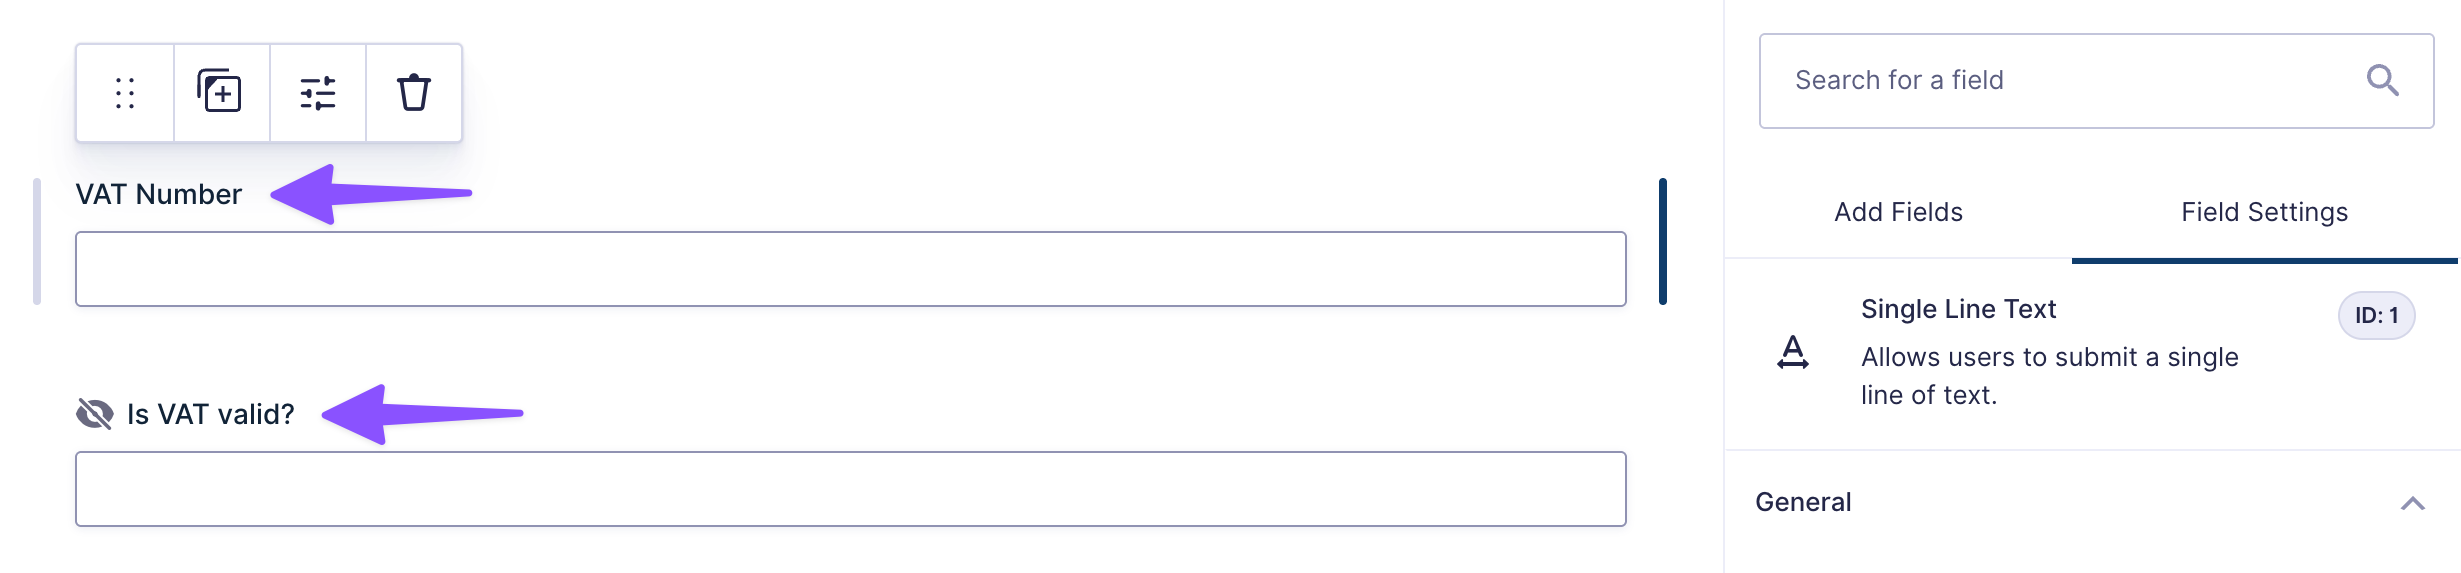
- Add a Single Line Text field:
- Label:
VAT Number
- Label:
- Add another Single Line Text field (this will store the result):
- Label:
Is VAT Valid? - Go to Advanced › Visibility › set to hidden.
- Check Allow field to be populated dynamically.
- Label:
Connect GP Populate Anything to GC API Alchemist
- Still in the
Is VAT Valid?field › enable Populate value dynamically. - Configure Population:
- Type:
API Alchemist - Connection Profile:
EU VAT API - Endpoint:
VAT Validator - Add Filter Group › set to
vat_numberisVAT Numberfield. - Value Templates: Set to
valid(this pulls the validation result from the API)
- Type:
Add Feedback Messages
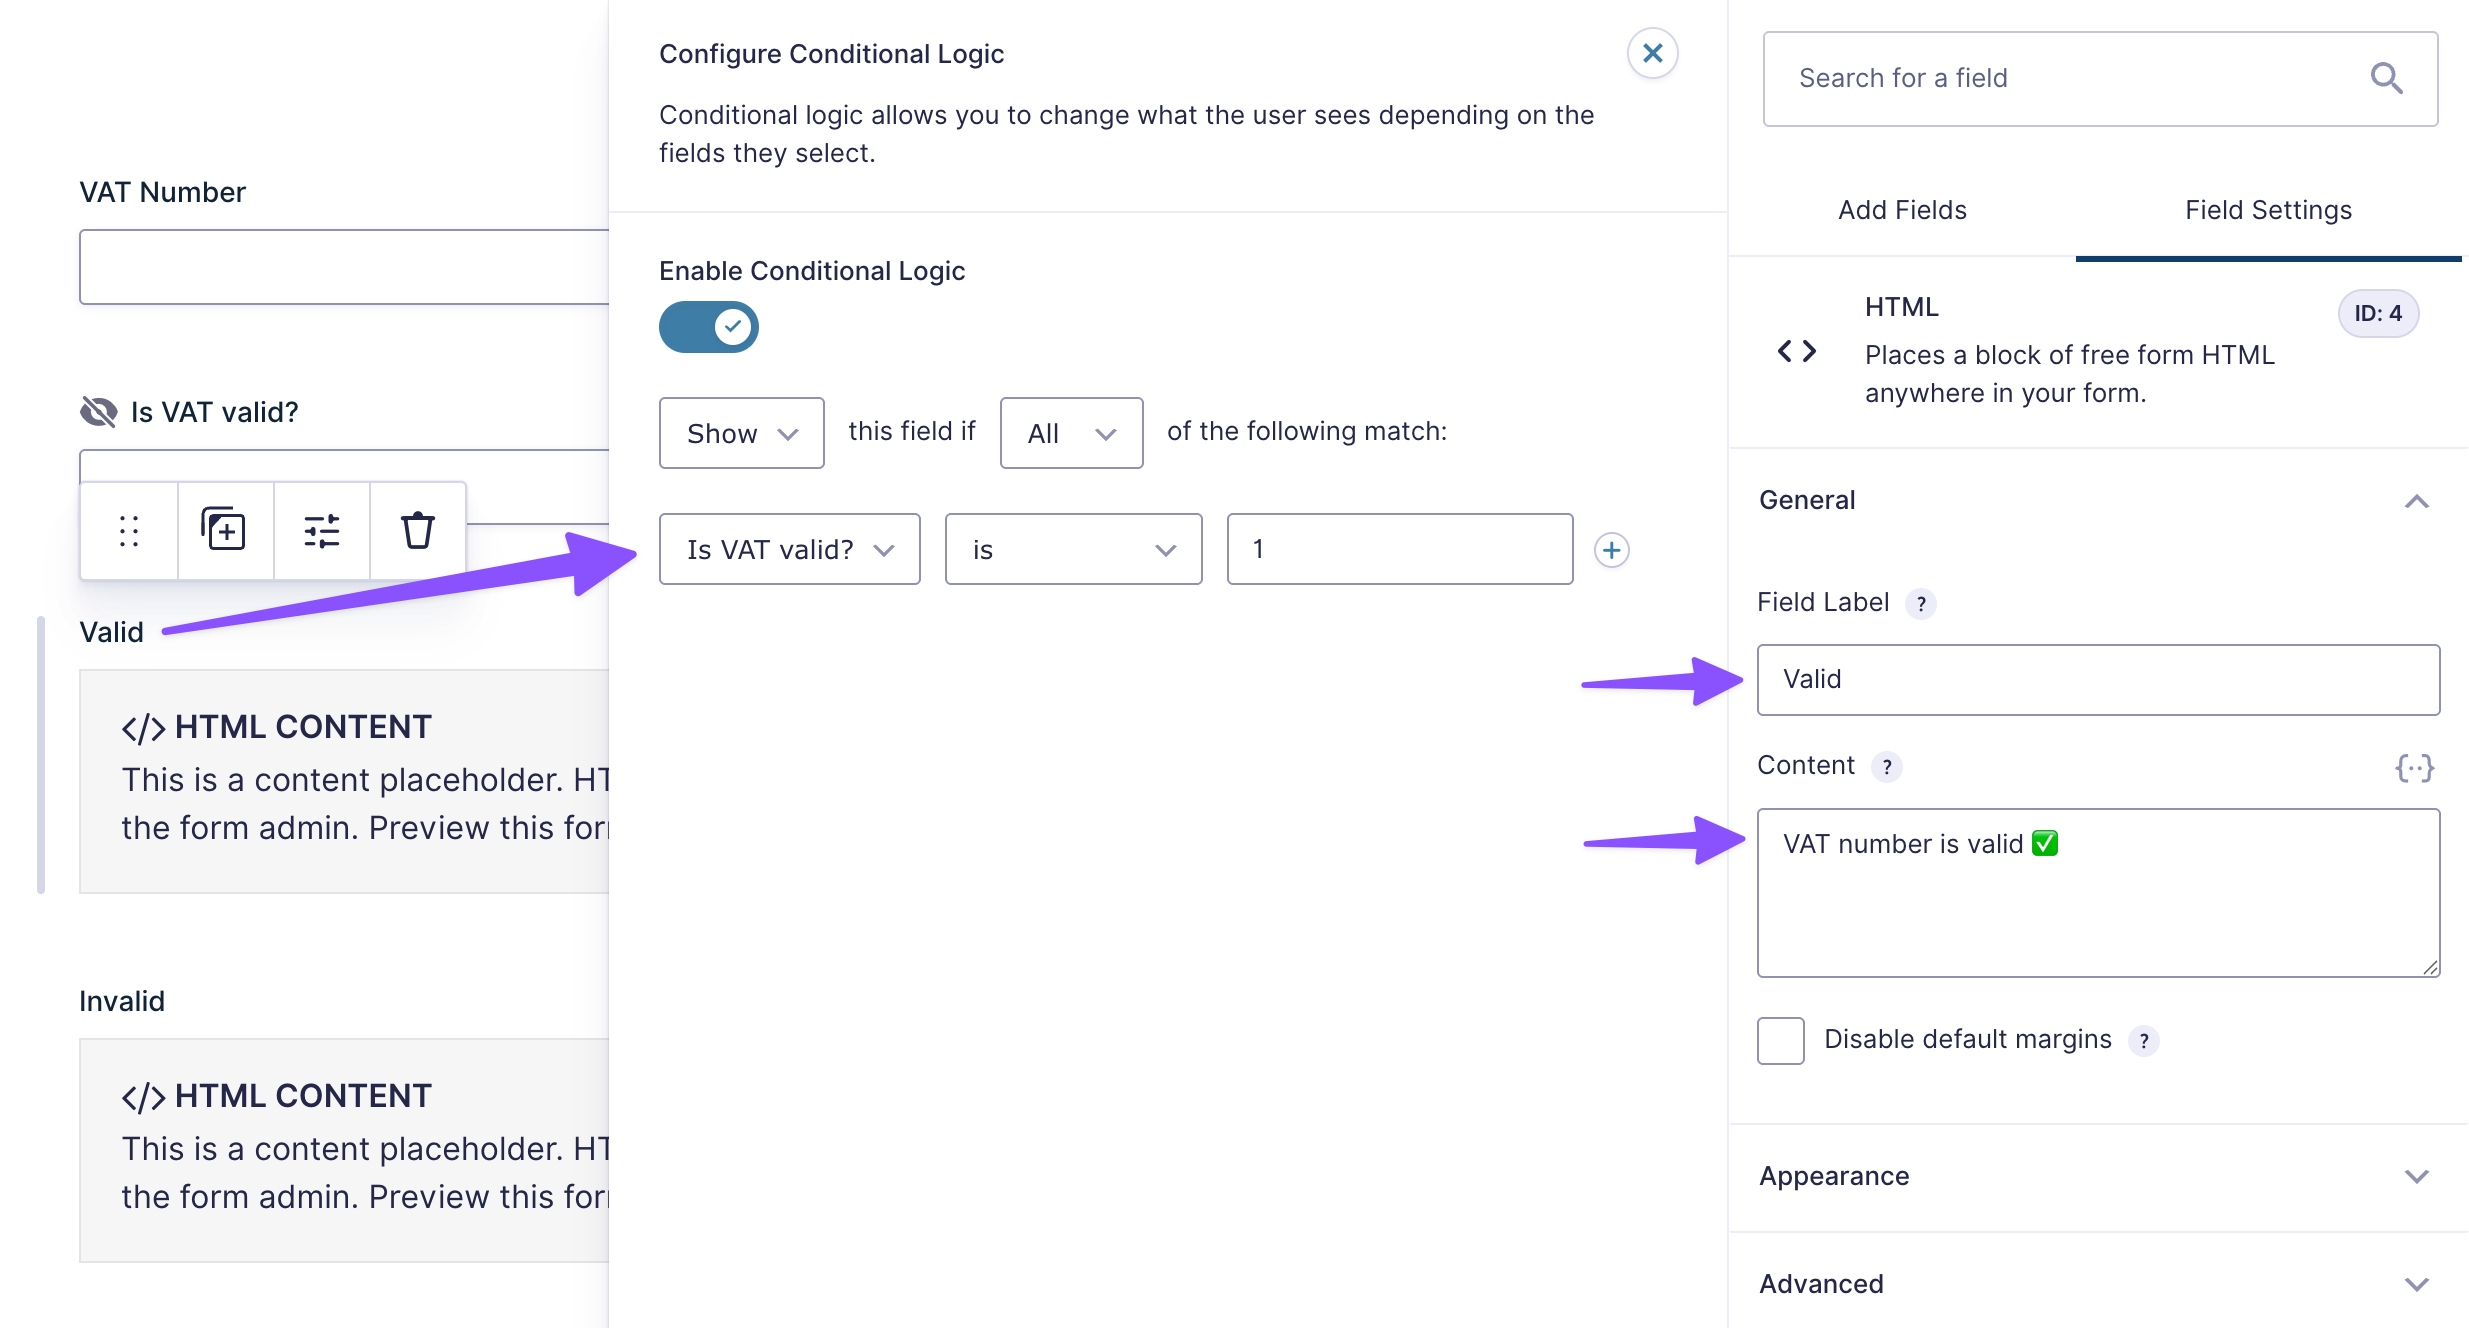
We can control the feedback messages using conditional logic.
- Add an HTML field:
- Content:
VAT number is valid ✅ - Enable Conditional Logic:
ShowifAllmatch:Is VAT valid?is1(1 means true)
- Content:
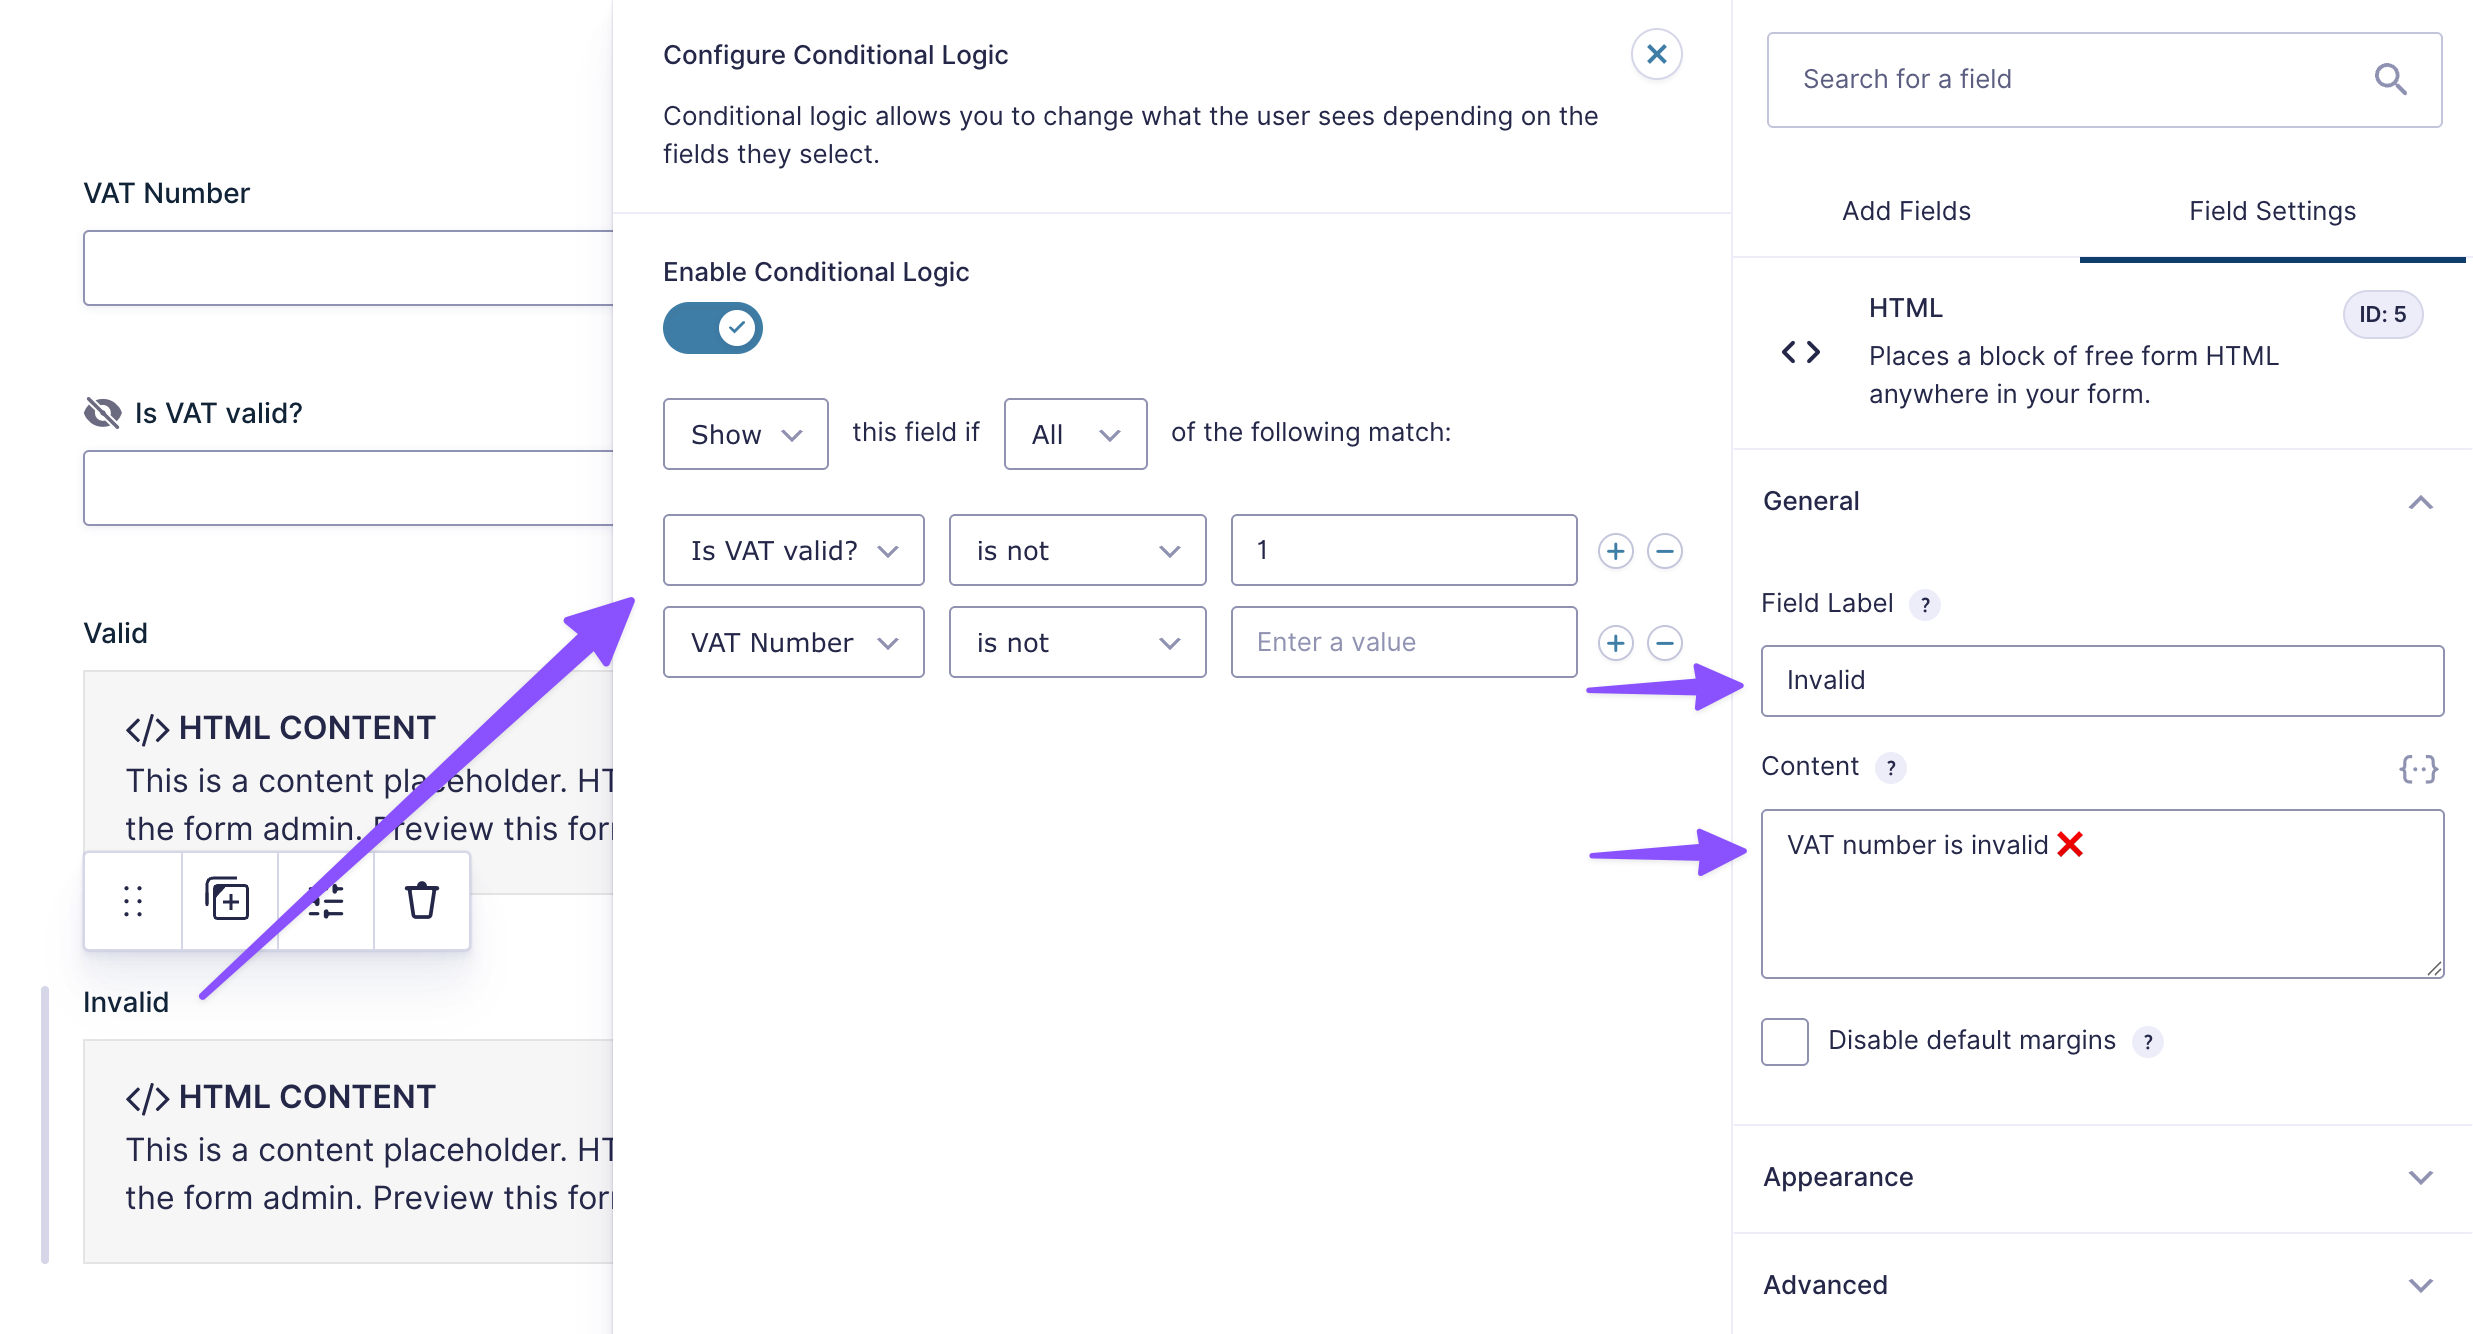
- Add another HTML field:
- Content:
VAT number is invalid ❌ - Enable Conditional Logic:
ShowifAllmatch:Is VAT validis not1 - Add another condition:
VAT Numberis not[leave empty]— this prevents showing the error when field is blank.
- Content:
Liked these feedback messages?
This is one of the many ways of doing live custom validation in Gravity Forms. Check out four other ways you can put it to work.
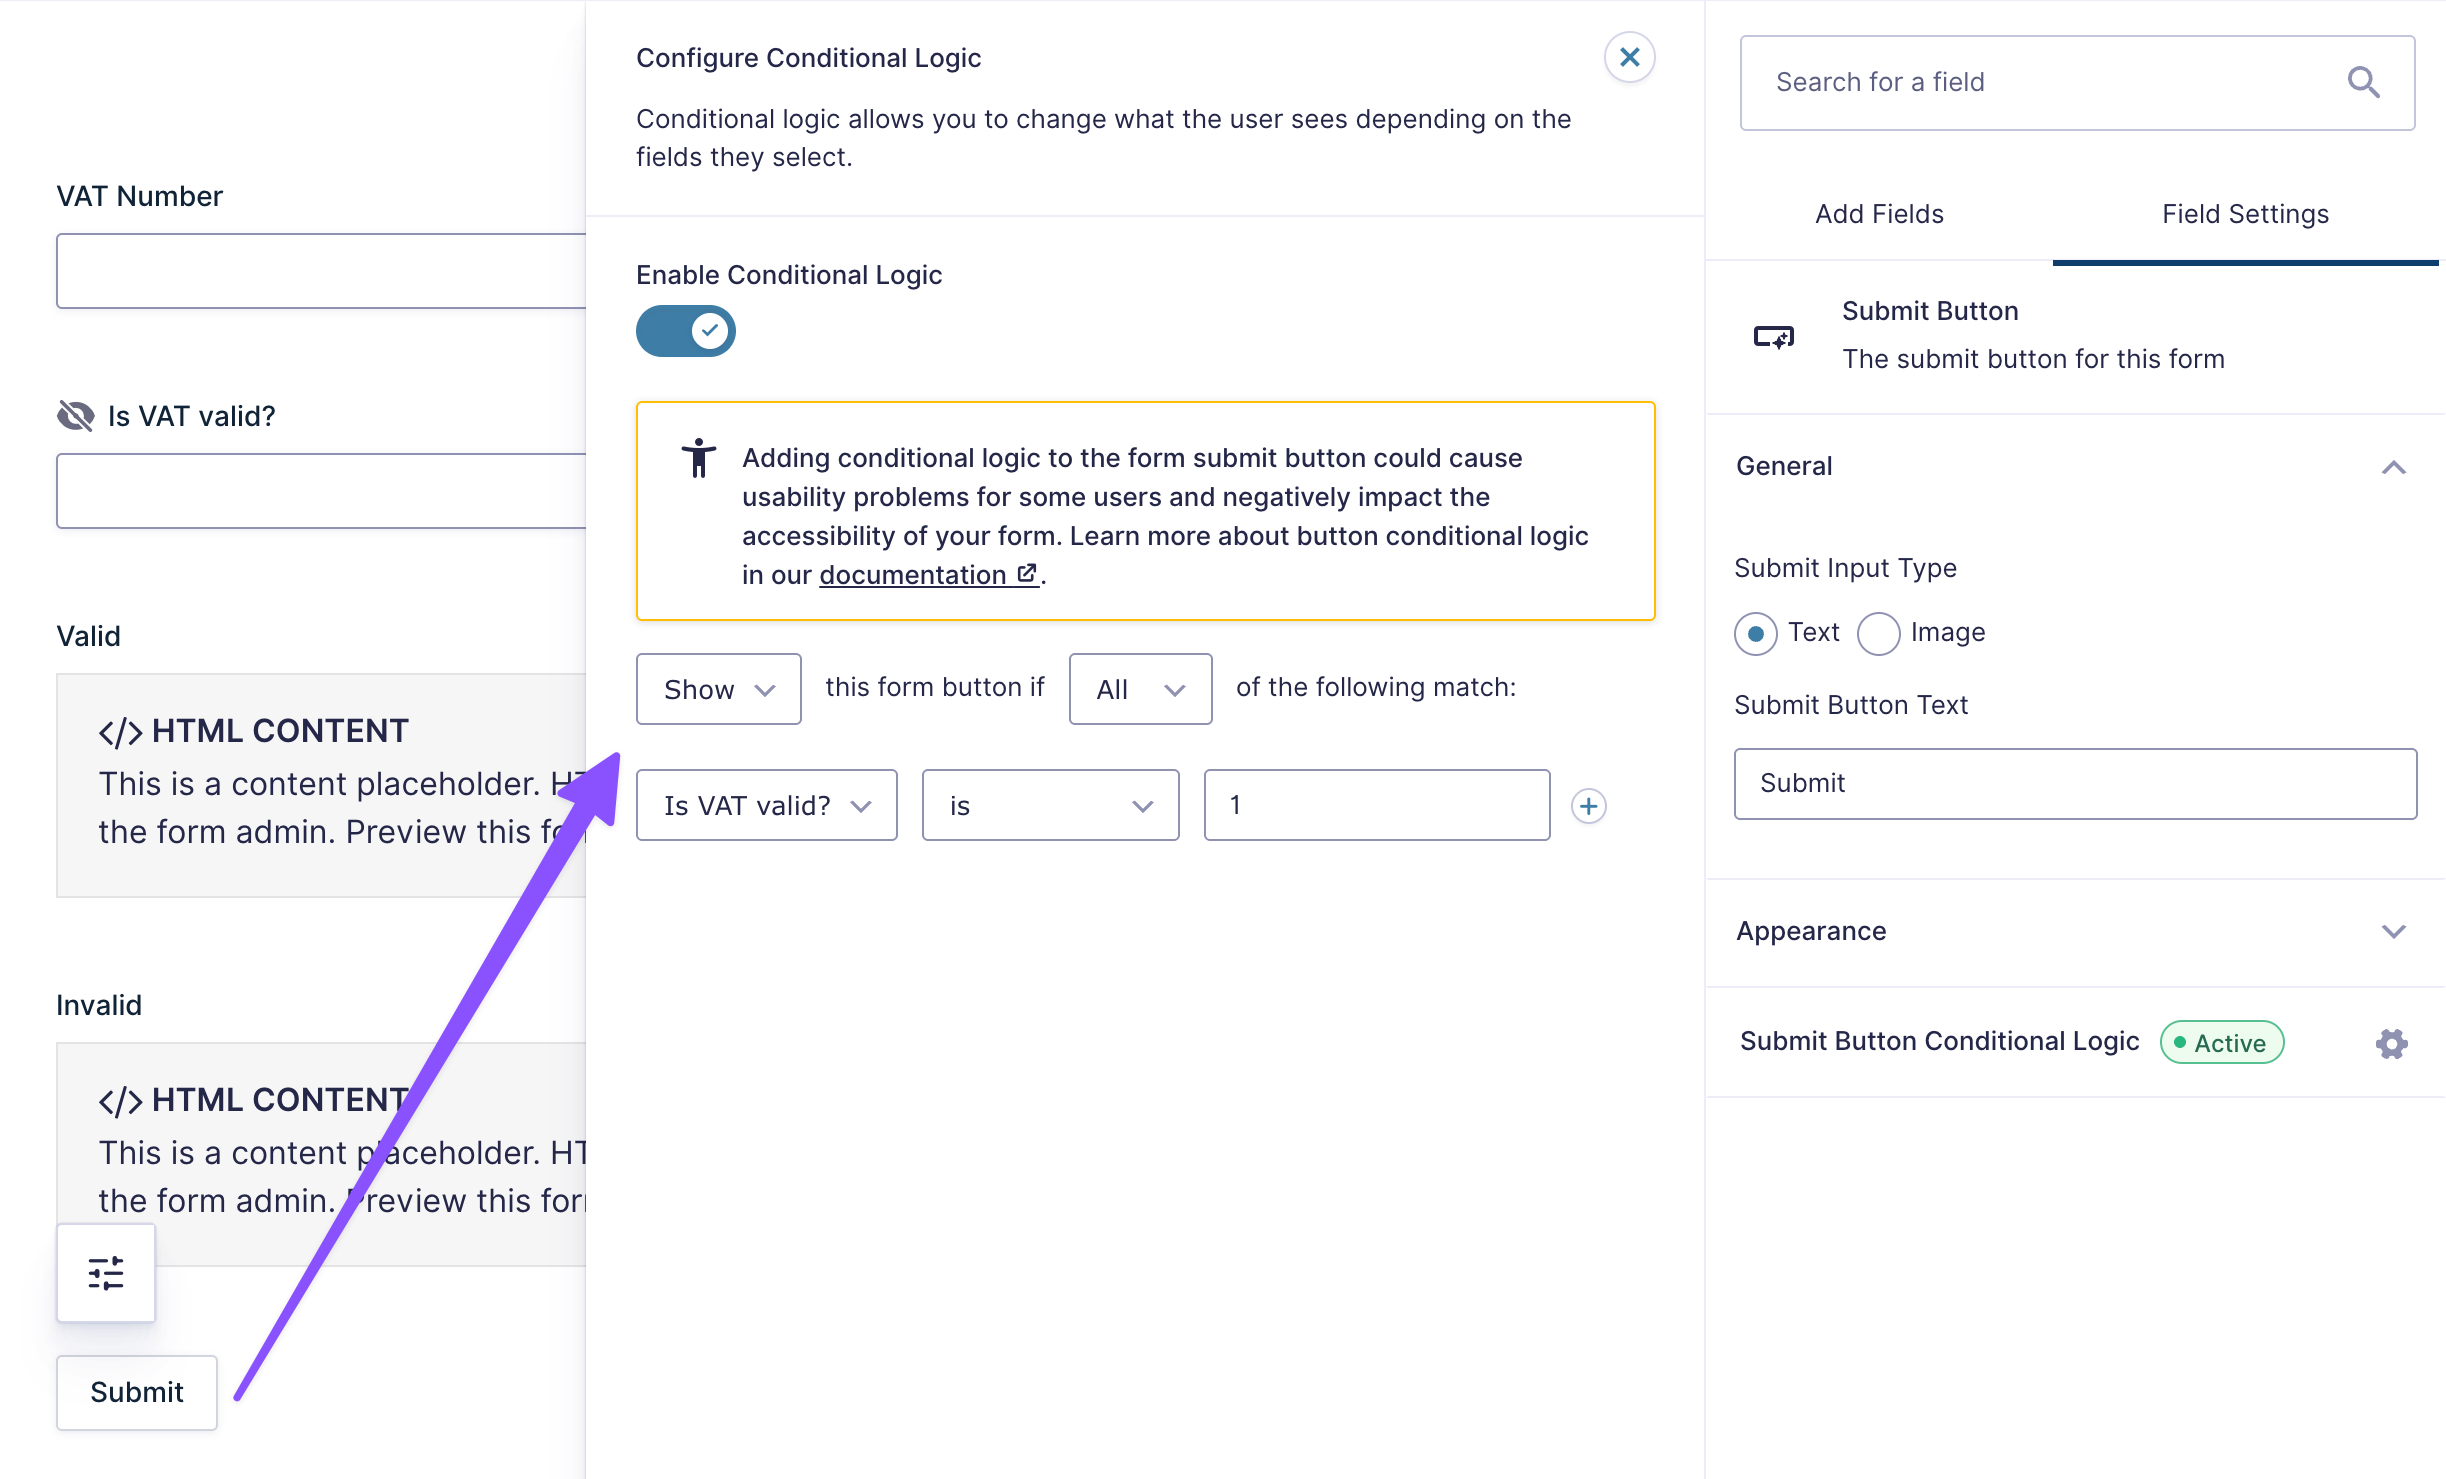
Show/Hide Submit Button
Let’s hide that submit button until the VAT number checks out.
- Click the Submit button to edit.
- Enable Conditional Logic
ShowifAllmatch:Is VAT valid?is1
Looking to connect your forms to other external databases—like government APIs? Check out our full guide on connecting Gravity Forms to Any API for Live Data Lookup.
3 — Prevent Tampering
A tech-savvy user could open the browser’s tools and manually change the value in the hidden field. To prevent this, we’ll use the force repopulation snippet that’ll force the form to double-check with the API one last time right before the form is submitted.
- Go to Plugins › Add New › search for Code Snippets › install and activate.
- Navigate to Snippets › Add New.
- Copy the force repopulation snippet code.
- Paste the code into the new snippet.
- Add a title ›
Force Repopulation - Save and Activate.
Now, when someone submits the form, the VAT number will be checked one more time on the server. If someone tries to cheat by changing the hidden field, the system will catch it and check again. 👮
4 — Test Drive
Let’s make sure everything works.
- Preview the form.
- Enter an invalid VAT number — try
GB999999999- Invalid message appears
- Submit button stays hidden
- Enter a valid VAT number — try
FR40303265045- Valid message appears
- Submit button shows up
If all works as expected, you’re done!
Pro Tip
Now that you’ve validated the VAT number, you might want to take it a step further and automatically calculate those VAT/tax amounts right in your form. Check out how you can calculate tax and VAT in Gravity Forms to round out your invoicing setup.
Wrapping Up
Let’s do a quick recap of what we just built.
- Connected Gravity Forms to a live VAT validation API.
- Validated user input VAT numbers in real-time thanks to GP Populate Anything.
- Secured the form against invalid submissions.
And VAT’s a wrap! Give yourself a pat on the back. 🙌