How to Create a Newsletter Signup Popup in Gravity Forms
Turn any Gravity Forms newsletter signup into a no-code popup triggered by scroll depth, exit intent, and more using GP Popups.
- What You’ll Build
- What You’ll Need
- Edge Cases & Limitations
- Variations / Taking It Further
- Key Takeaways
Gravity Forms makes it easy to build a newsletter signup form, but displaying it as a popup isn’t something it supports natively.
For a while, here at Gravity Wiz, we worked around this using other plugins. Then we built Gravity Forms Popups (aka GP Popups) and decided it was time to migrate all our popup forms to it, starting with our newsletter signup.
This guide walks you through how to create a newsletter signup popup in Gravity Forms, using our own as the example. Let me show you how we did it. 🪄
This article requires the Gravity Forms Popups perk.
Buy Gravity Perks to get this perk plus 48 other premium Gravity Forms plugins!
How do you create a newsletter signup popup in Gravity Forms?
You create one using GP Popups, a perk in the Gravity Perks suite. You start with an existing form, create a popup feed, and GP Popups takes care of how and when it appears. It supports five trigger types: a click, a time delay, scroll depth, exit intent, and hash values.
What You’ll Build
By the end of this guide, you’ll be able to:
- Display a Gravity Forms newsletter signup as a popup on any page of your site
- Control when and how the popup appears based on how your visitors interact with your page
- Test and verify your popup is working before going live
What You’ll Need
- Gravity Forms (any license)
- Gravity Perks (via Spellbook)
- Includes: Gravity Perks Popups (AKA GP Popups)
- An email marketing integration (e.g., Mailchimp Add-On, GC Drip, or similar)
How to Set Up Your Newsletter Popup
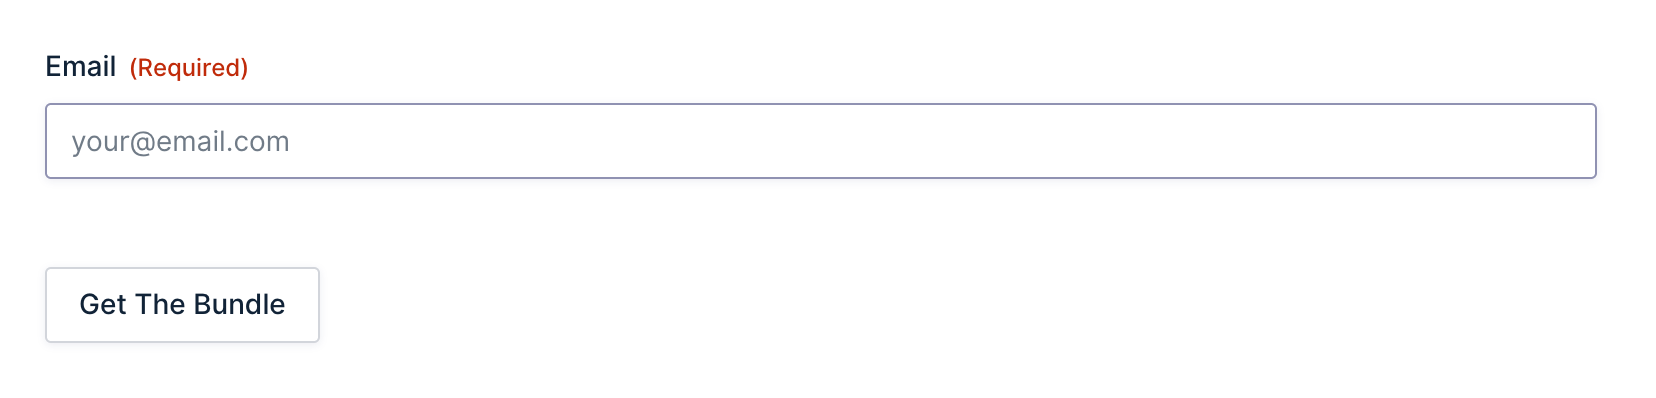
Step 1 — Build the Newsletter Signup Form
Start by creating the form you want to show inside the popup.
- In your WordPress admin, go to Forms and click Add New.
- Add at least an Email field.
- Connect your email marketing integration on the form.
- Set the confirmation message people will see after submitting.
- Save the form.
Step 2 — Create a New Popup Feed
A popup feed is how GP Popups connects your form to a popup. It’s where you’ll control how the popup looks, when it fires, and who sees it.
- Open your Spellbook › install and activate GP Popups.
- In your WordPress admin, go to Forms › Popups.
- Click Add New.
- Select the form you just created from the dropdown.

Step 3 — Set Your Trigger and Display Mode
This step controls how and when the popup fires and what it looks like on screen.
- In the popup feed, click the Trigger Settings tab.
- Choose your trigger. For newsletter capture, two options are worth starting with:
- Scroll Depth triggers once someone has scrolled to a specific point on the page.
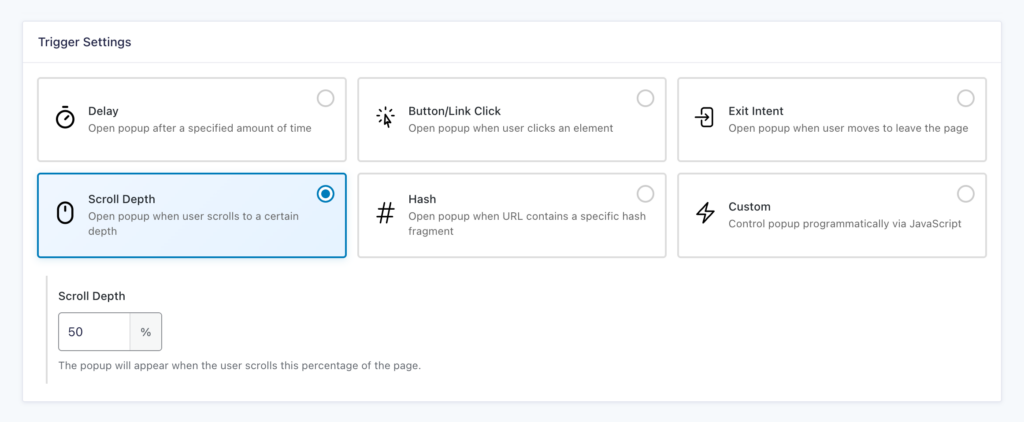
- Exit Intent fires when the user’s cursor moves toward the top of the browser window, toward the tabs or address bar.
- Scroll Depth triggers once someone has scrolled to a specific point on the page.
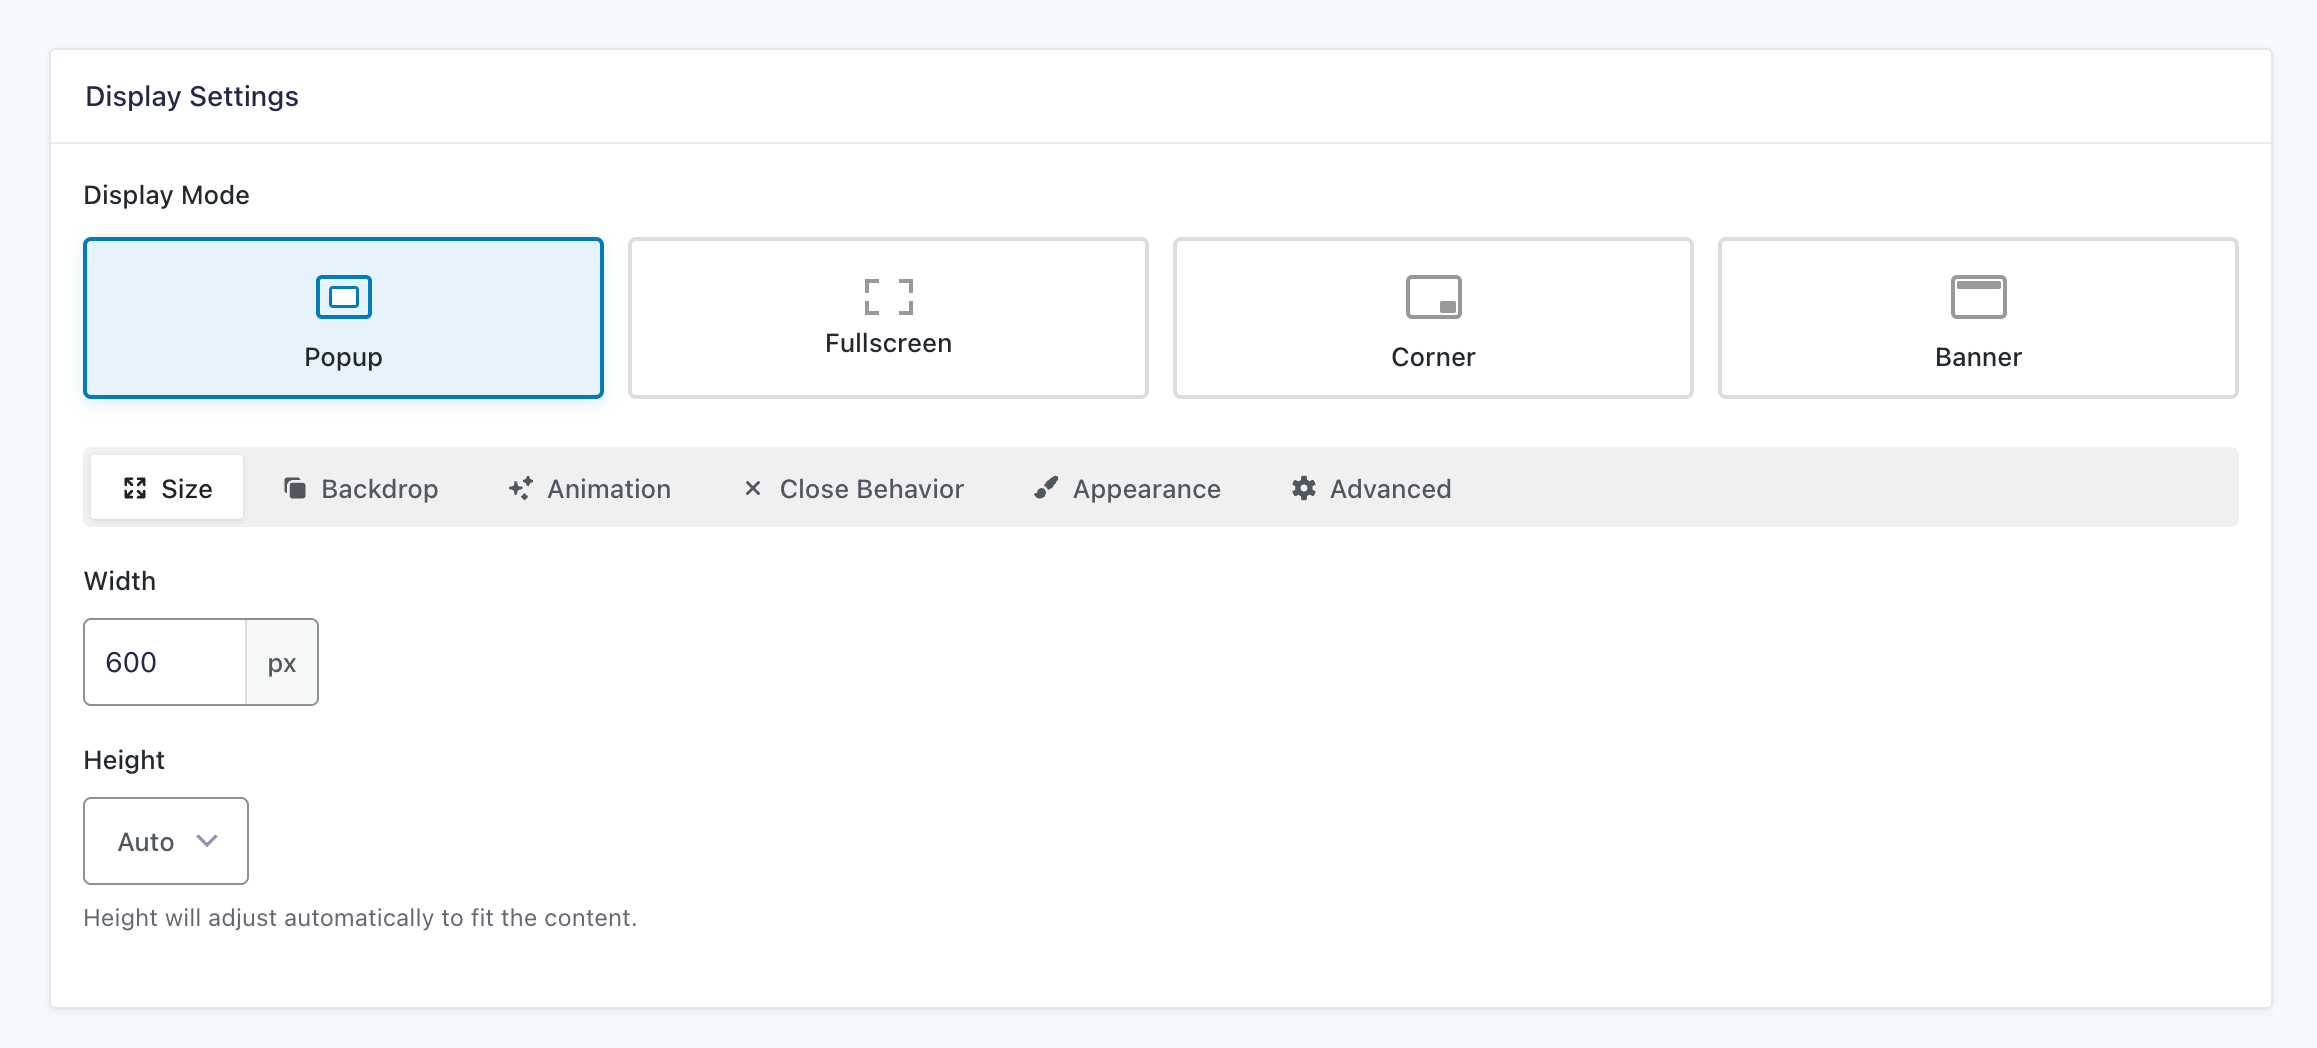
- Click the Display Settings tab.
- Choose a Display Mode:
- Set your preferred size, animation, and close behavior. (Pretty straightforward to configure and adjust anytime).
- Save settings.
Want more control over who sees your popup and when?
You can add targeting rules in the Targeting tab to show the popup only on specific pages or to specific visitors.
Step 4 — Test the Setup
Before going live, run through a quick test to confirm everything is working as expected.
- Open a fresh incognito window.
- Visit the page where the popup is configured to fire and confirm it appears as expected.
- Submit a test entry and confirm your email marketing integration receives the submission.
- While logged in as admin, open the GP Popups Debugger from the WordPress admin bar to inspect targeting rule states in real time.
Edge Cases & Limitations
- Exit Intent on mobile/touchscreen devices. Exit Intent isn’t reliable on mobile/touchscreen devices since there’s no cursor movement to detect. For mobile visitors, Scroll Depth or Delay are better options.
- Email service connection. GP Popups handles the display, but the subscription depends on your email integration being set up correctly on the form. If signups aren’t coming through, check the form’s email feed settings, not the popup.
- Popup fires on every visit. This usually means Remember Dismissal isn’t configured, or the cookie isn’t saving correctly. Try opening a fresh incognito window to rule out a stale cookie.
Variations / Taking It Further
- Corner popup variation: Not a fan of center modals? Try Corner display mode with a Delay trigger for a signup prompt that stays out of the way without disappearing.
- Blog-specific targeting. Limit the popup to blog posts or post category URLs so it only shows up for readers who are already spending time with your content.
- Connecting to GC Drip. If you use Drip, you can set up GC Drip as a feed on the same form. It’s actually how we handle newsletter signups here at Gravity Wiz.
- Swap forms without reconfiguring. GP Popups lets you swap the form inside an existing popup feed without touching your trigger or display settings. Handy if you want to test different form designs without starting from scratch.
Key Takeaways
- Gravity Forms doesn’t natively include popups. GP Popups adds that ability without custom code.
- GP Popups handles the display. Your email marketing integration handles the subscription. Make sure both are set up correctly before going live.
- GP Popups supports five trigger types. A click, a time delay, scroll depth, exit intent, and hash values. For newsletter signups, Scroll Depth and Exit Intent are good starting points.
- Targeting rules control who sees the popup and when. Use them to focus the popup on the right pages and the right visitors.
Related Use Cases
- Checkout popup. The same GP Popups setup works just as well for checkout forms. Check out our guide on how to connect it to a button click and open a payment form in a popup.
- Event registration popup. Keep the same popup feed and swap the form to capture event registrations without rebuilding your trigger or display settings.
- Lead capture and content upgrades. Pair GP Popups with a download or resource form, then use the Corner or Banner display mode for a less intrusive lead magnet.