How to Gate Any Content in Elementor Using Gravity Forms
Gate any content built in Elementor using GP Submit to Access, including texts, posts, pages, templates, and more.

- Why Use the Shortcode Method?
- Understanding the [gpsa] Shortcode
- Two Ways to Gate Elementor Content
- Wand a Better Way? 🪄
GP Submit to Access makes it easy to gate content in the native WordPress block editor, whether it’s a specific block or the whole page.
But what if you want to gate content built in Elementor? Say you want to hide a video, ebook, or a simple download button?
With the shortcode method, you absolutely can. 🔐
Why Use the Shortcode Method?
While full-page redirects work great for beefy forms, shortcodes offer the flexibility to…
- Gate content in tricky spots like sidebars, footers, or directly inside your favorite page builder like Elementor.
- Wrap your content with shortcodes, so you can keep designing in Elementor without interruptions.
- Gate entire pages, posts, or specific sections like a video, ebook, or download button.
- Instantly reveal content after submitting the form—no redirects, no reloads.
Understanding the [gpsa] Shortcode
Before we jump in, let’s first get familiar with how to build the GP Submit to Access shortcode aka [gpsa] shortcode.
Here’s its most basic form:
[gpsa required_form_ids="1"] Put content here. [/gpsa]Let’s break this down:
- The
[gpsa]…[/gpsa]tags create the gate. Any content between them stays gated. required_form_ids=”1”tells the gate which form unlocks it. Change1to your form’s actual ID.
It’s also possible to tweak how the gate behaves using a few handy parameters we can add inside the shortcode. For example:
requires_access_messagelets you show a message before someone fills out the form. Want to put your form right in the middle of the message? Just drop the{form}merge tag wherever you’d like it to appear.fallback_behaviordecides what happens if someone hasn’t filled out the form yet. Useshow_messageto show your message, orhideto hide everything until they submit.
Example:
[gpsa required_form_ids="1" requires_access_message="Fill out form to unlock! {form}" fallback_behavior="show_message"] Put content here. [/gpsa]In this example, visitors see the message with the form embedded right where the {form} is placed. The fallback_behavior=”show_message” makes sure the message shows up first.
![The Elementor editor showing the '[gpsa]' shortcode inserted in a shortcode block.](https://gravitywiz.com/app/uploads/2025/12/gpsa-shortcode-with-parameters.png)
These are just two of the many shortcode parameters you can use. Check out the full list of GP Submit to Access shortcode parameters for more options.
Two Ways to Gate Elementor Content
- Method 1 is for simple texts, links, or HTML you can drop right into a shortcode widget.
- Method 2 is for gating entire posts, pages, or saved templates built in Elementor.
Method 1 — Gating Text and HTML
This method is great for gating messages, text announcements, download links, coupon codes, or any HTML content in Elementor.
Here’s how:
- Open your Spellbook › activate GP Submit to Access.
- Edit post or page with Elementor › drag a Shortcode widget into the layout.
- Paste the
[gpsa]shortcode › replace1with the form ID. - Add the text or HTML content between the
[gpsa]tags. - Save the page.
Now the content stays hidden until visitors submit the form.
![User adds a shortcode block in Elementor , pastes '[gpsa]' shortcode with HTML content, and publishes. On the front end, the user submits form and HTML content unlocks.](https://gravitywiz.com/app/uploads/2025/12/gpsa-gate-text-or-html-in-elementor.gif)
Method 2 — Gating Elementor Posts, Pages, and Templates
While method 1 works perfectly for simple texts and HTML, what if you want to gate an entire post, page, or template built in Elementor?
Say, a styled container with a video player, or even a full page template.
Since we can’t wrap this type of content directly in Elementor, we instead use a “nesting” trick: grab the content’s ID, turn it into a shortcode, and nest it inside the [gpsa] tags.
Wizard’s Note
This method gets the job done, but we’ll be the first to admit it feels a bit like a patchwork spell. It requires a third-party plugin and some manual copy-pasting that we know isn’t ideal.
So if you’re thinking, “There has to be a better way,” there absolutely could be—we just need you to say the word! 🧙♂️
Get Elementor Content ID
Since Elementor doesn’t have a built-in way to grab IDs, we’ll need to grab them manually.
For Posts or Pages:
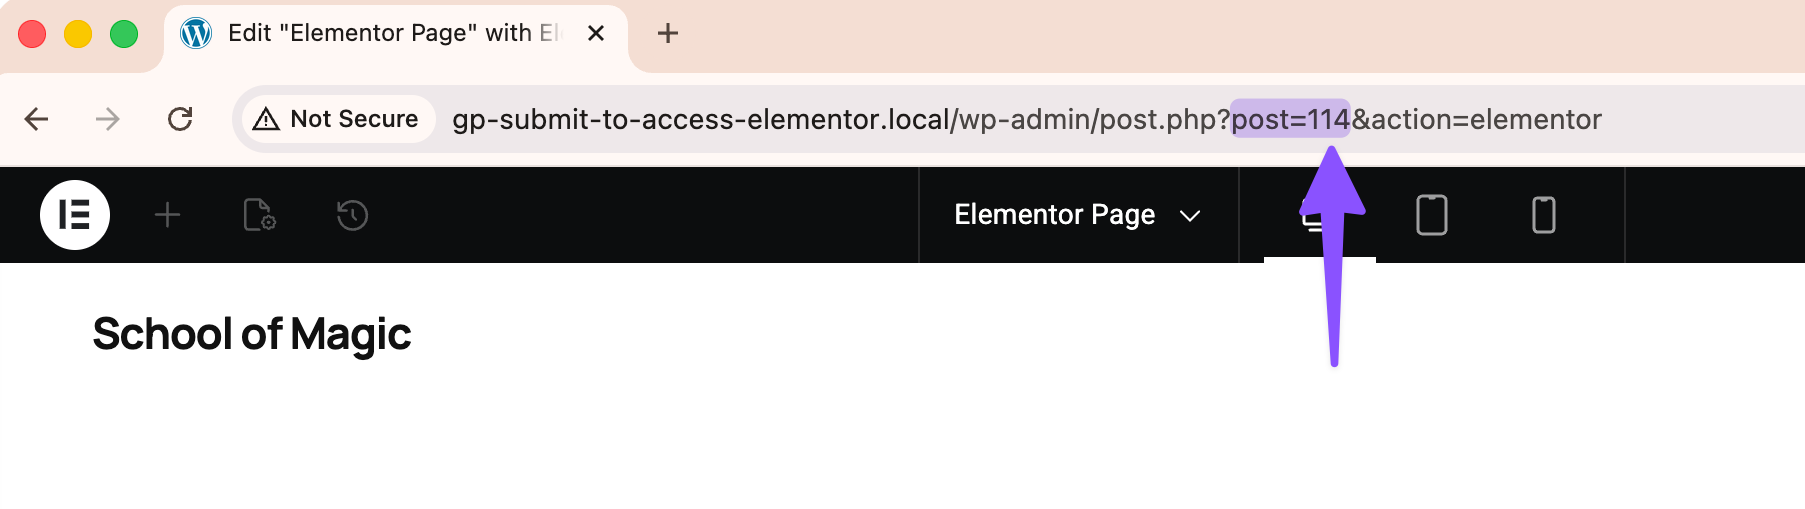
- Edit the post or page with Elementor.
- Look at the browser’s URL bar and find the ID number after
post=. Example:post=123means the ID is123.
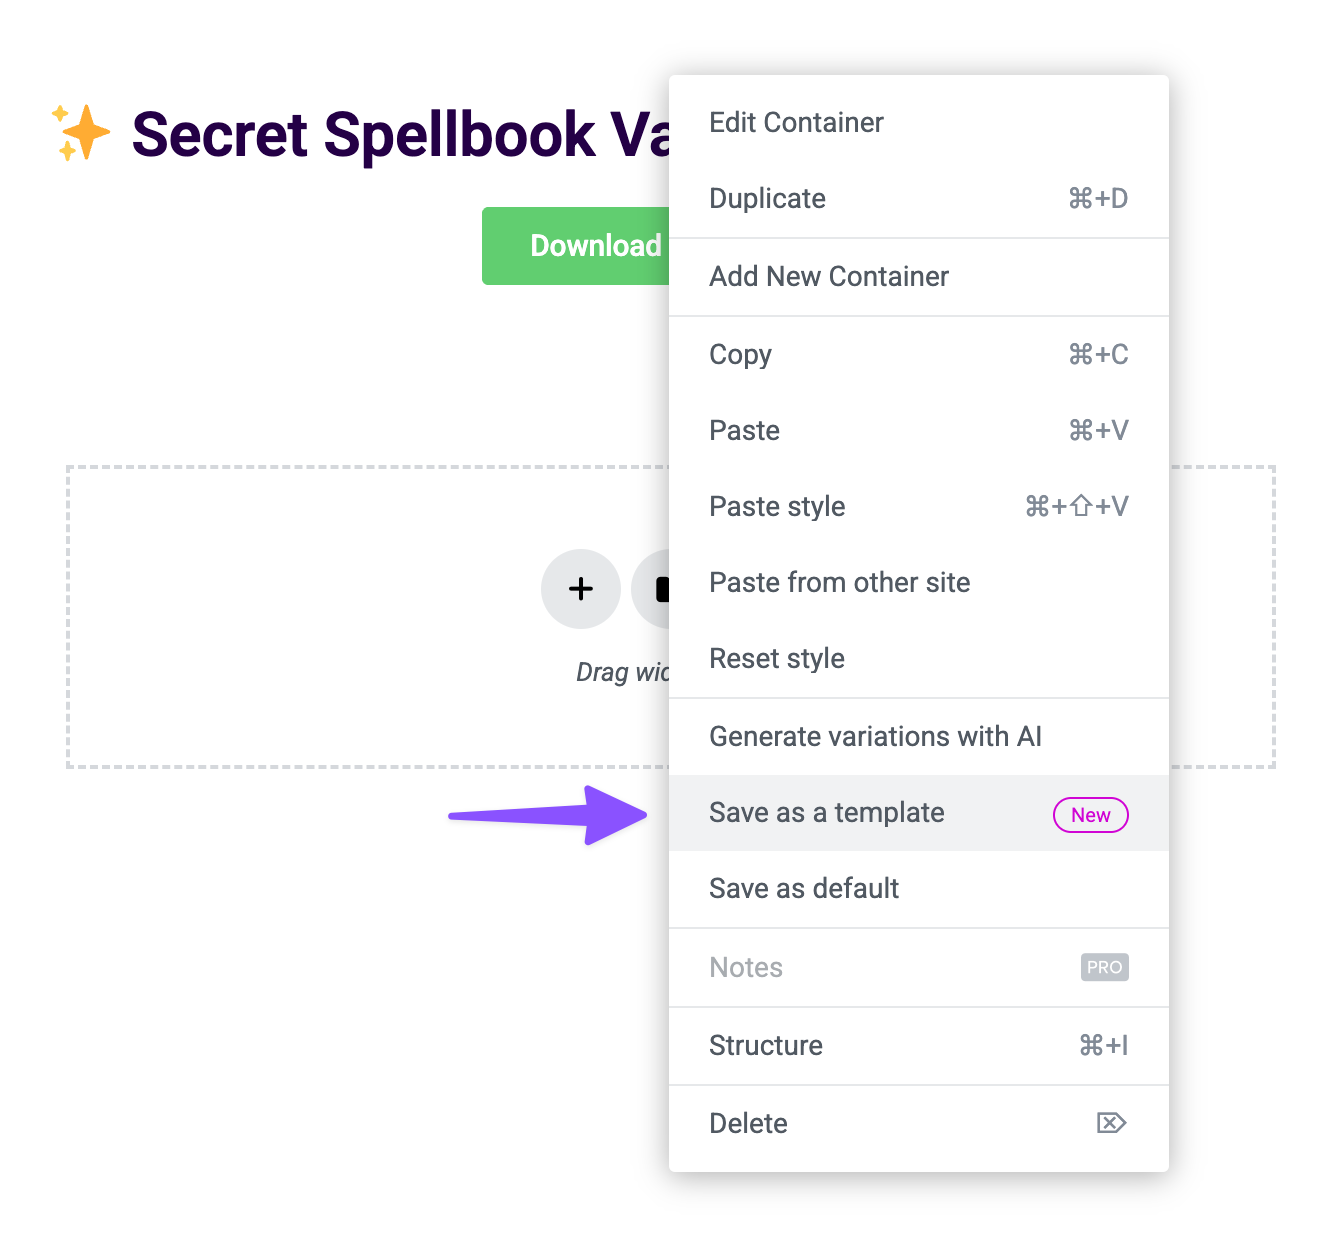
For Widgets or Sections:
We’ll need to turn widgets or entire sections into a template first, then grab its ID.
- In the post or page you’re editing, right-click the container where the widget or section is › select Save as a Template.
- In the WordPress dashboard, just below Elementor › click Templates › Saved Templates.
- Edit the template with Elementor.
- Look at the browser’s URL bar and find the ID number after
post=. Example:post=149means the template’s ID is149.
Build the Elementor Shortcode
Wizard’s Note
Elementor doesn’t natively support shortcodes for its content, so we’ll need a third-party plugin to build them.
For this guide, we’ll be using the free Dynific Addons for Elementor, but feel free to use whatever plugin works for you.
- In the WordPress dashboard, navigate to Plugins › Add New.
- Search for Dynific Addons for Elementor › Install and Activate.
- Build the shortcode using Dynific’s shortcode
[INSERT_ELEMENTOR]plus the ID you grabbed from the URL:[INSERT_ELEMENTOR id=”149”]— replace149with the content ID.[INSERT_ELEMENTOR]simply displays the Elementor content you want to gate.
- Copy shortcode to your clipboard.
Add Elementor Shortcode inside the [gpsa] Shortcode
- Edit post or page with Elementor › drag a Shortcode widget into the layout.
- Paste the
[gpsa]shortcode (replace1with your form ID), - Paste the Elementor shortcode inside the
[gpsa]shortcode, like this:
[gpsa required_form_ids="1"] [INSERT_ELEMENTOR id="149"] [/gpsa]![User adds a shortcode block in Elementor, pastes the [INSERT_ELEMENTOR] shortcode wrapped in the '[gpsa]' shortcode, and publishes.](https://gravitywiz.com/app/uploads/2025/12/gpsa-elementor-shortcode-in-gpsa-shortcode.gif)
- Save Page.
And that’s it! When visitors see your form, they fill it out, submit, and the Elementor content unlocks instantly.
![User adds a shortcode block in Elementor, pastes the [INSERT_ELEMENTOR] shortcode wrapped in the '[gpsa]' shortcode, and publishes.A user submits a form on the frontend, and the gated content unlocks.](https://gravitywiz.com/app/uploads/2025/12/gpsa-unlock-elementor-content.gif)
Wand a Better Way? 🪄
If you think it’d be awesome to have this built directly into GP Submit to Access, drop a comment below. If enough wizards ask for it, we might just brew it up! 🧙


I would love to see additional Elementor support – maybe a full-fledged Elementor widget that allows styling for a form, with the option to hide a page or Elementor Template behind a gate. (On some sites, I install Essential Add-ons for Elementor for the sole purpose of Gravity Forms styling, so it would be nice to avoid that!)
Hey Travis, great suggestion! That’s definitely an interesting idea. We’ll reach out via support to learn a bit more about your setup and how you’re using Elementor with Gravity Forms.