How to Embed Images in Gravity Forms Notifications
Embed images to emails sent with Gravity Forms instead of linking them, ensuring branding, formatting, and visual information appears properly.

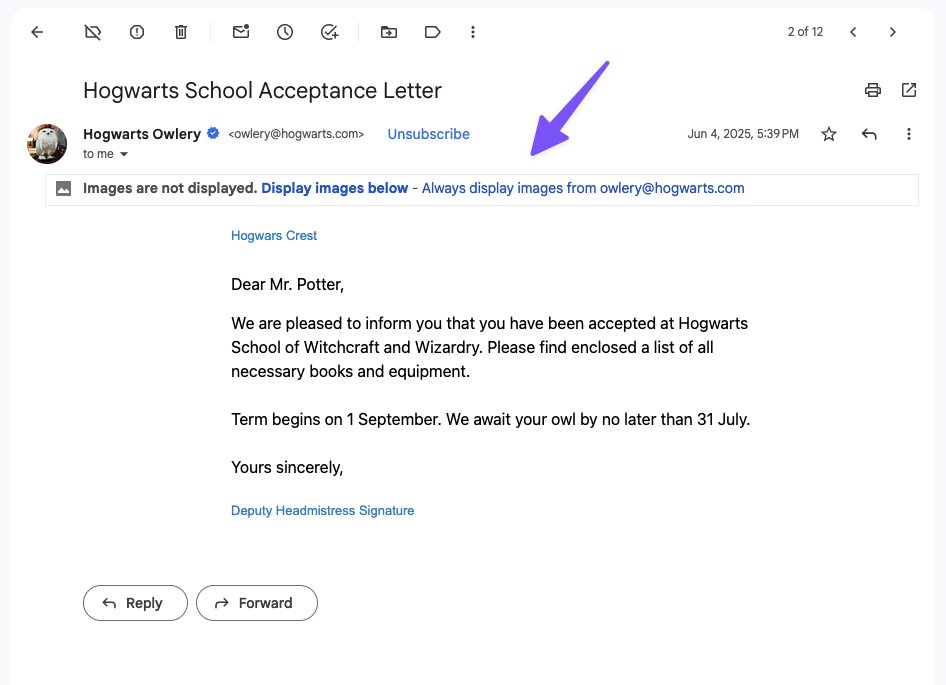
In notifications, <img> tags add static images by linking to the original source rather than directly embedding and attaching them to the email. In other words, the image referenced in the email is still remotely hosted, not physically attached.
The issue here is that, if a user has remote content loading disabled on their email client, remote images won’t show. Branding, profile pictures, or product / inspection images go *puff*, gone. Best case scenario? Users will have to manually load images.
We wrote a snippet that lets you actually attach and embed images to your emails with a CID handler, bringing your images back in all their glory.
What is a CID?
CID (Content-ID) is an email MIME mechanism to embed images inside an email rather than linking to external URLs.
When it makes sense to embed
CID handlers are great for:
- Brand logos, small header images, profile pictures.
- Images that must display even when external images are blocked.
- Lightweight visual assets.
But, they are embedding images directly on emails, making them larger in size.
Meanwhile, remotely hosted images:
- Keep emails smaller.
- Improve load times with external caching or on-demand loading.
- If there’s a good amount of images, it makes emails less likely to be marked as spam.
CID images are a great fallback mechanism for critical visuals, not necessarily a replacement for remotely hosted images. Depending on your use case, a combination of embedded and remotely hosted images is key for a balanced email diet.
Step 1 — Install the snippet
Install CID Image Handler to your website.
Not familiar with PHP snippet installation? We have a great tutorial just for you.
Step 2 — Add CID to images
Once the CID handler is installed, you can use it directly in your notification.
- Switch your Message editor to Code.
- If you need to add an image, click on Add Media right above the Message field.
- Go to the
srcattribute of your<img>tags. - Add
cid:right before the image URL.
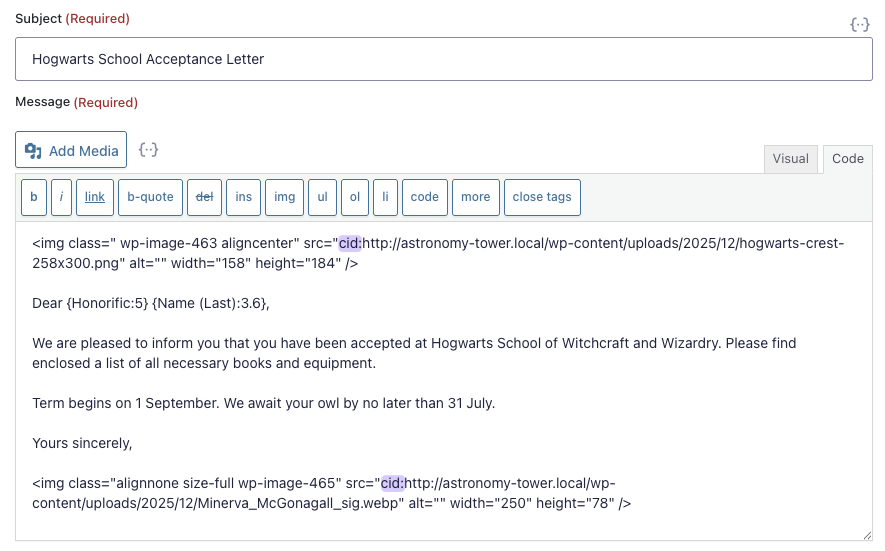
The snippet also supports simple CID identifiers. In the case of our example above, src="cid:2025/12/hogwarts-crest.png" would also work.
Keep in mind
If you have any formating you’d like to do to the image using the Visual editor, do so before adding the CIDs to the source URL. CIDs are email-specific, so the image will appear broken in the editor due to its source URL being modified.
When the email is prepared for sending, the snippet will detect these CID references and embed the images directly.

Picture this
Now that your images are embedded to your emails, here are a few other things you can do with our notification spells:
- Schedule follow-ups (or fun birthday messages) with GP Notification Scheduler.
- Manually send follow-ups to all users who filled out a form with GP Email Users.
- Ensure emails you collect are real with GP Email Validator.
Got any questions? Let us know in the comments down below.