Adding Workflows to Forms with Gravity Flow
tl;dr – Automated form-based workflows make business processes more efficient and more transparent. Gravity Flow brings this powerful dimension to Gravity Forms.
Regular Gravity Wiz readers already know the power and flexibility of Gravity Forms. It can be used to build any type of form, it’s easy to customize, it integrates with just about everything, and it has a great ecosystem of third-party add-ons. You can even use it to build a simple membership site.
But what if your account registration form needs approval from a couple of administrators before the user account or site is created? What if your client’s job application form needs to be sent back to the applicant for additional information and then on to a manager for approval? What if an order form needs approval if it’s over a certain amount before collecting payment from the customer? These are all real-world challenges that have been solved with Gravity Flow.
The Value of a Workflow
Whenever you implement a workflow, no matter how humble you think it is, you should always try to keep in mind the business objectives. This is especially important if you’re working on a workflow for a client because the value of the workflow to the client will have an effect how much you get paid.
The business objective might be, for example:
Save time or money
Reduce turnaround times
Monitor and improve performance or response times
Gain a clearer vision of what’s happening at each step in the process
Businesses processes can nearly always be improved. Remember that automated workflows will often replace chaotic ad hoc systems based on email or spreadsheets. Sometimes they’ll replace an inefficient system implemented in a proprietary software package that’s too expensive to maintain. Either way, the value generated by a well-designed and well-implemented workflow can be relatively enormous and the users are generally extremely grateful and relieved to receive the improvement.
The following examples should give you an idea of the kinds of processes that can be automated, how their workflows might be configured in Gravity Flow and their business objectives.
Example 1: Membership Site Creation and Follow Up Process
Here’s an example of a simple process for a membership site. As you can see, the process ‘flows’ from top to bottom and takes about one week to complete. It involves a step expiration (auto-approve), plus step scheduling for the follow-up emails.
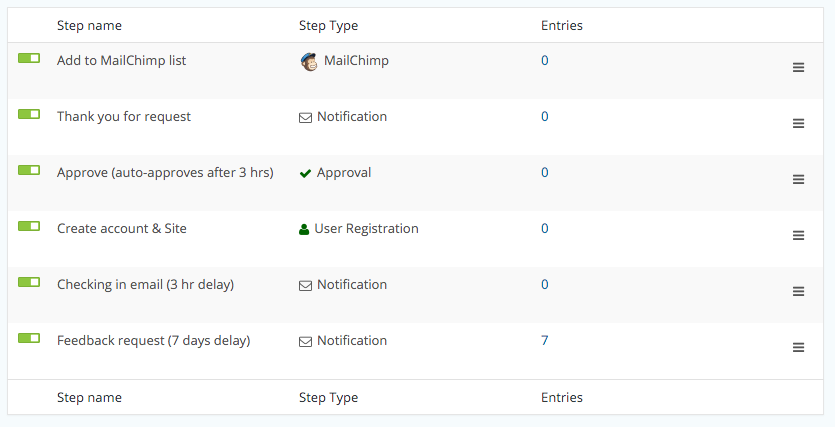
With the exception of the one approval step, which we’ll look at below, all the the steps simply trigger a Gravity Forms add-on feed or notification in the right order and at the right time.
You can see how this process could easily be extended to include a complete onboarding process for new users by dripping more content over a longer period of time.
Adding an API-based step to your workflow expands your automation capabilities to outside of your website. The best part? It doesn’t need to be complicated nor involve code. Learn more about using APIs in Gravity Forms.
Business Objectives
Save administrative time by automating emails and account creation.
Reduce turnaround time for new accounts.
Example 2: A Job Application Process
If there’s one thing I’ve learned over the years about business processes it’s that no two processes are ever exactly the same. And if there’s another thing I’ve learned, it’s that it’s really difficult to communicate or discuss even the simplest of processes without a without some kind of visual representation. A swimlane diagram really helps to clarify who needs to do what and when so you can identify each of the steps that are needed. You can do this on the back of an envelope or there are lots of diagramming tools that can help you. A swimlane diagram for a job application might look something like this.
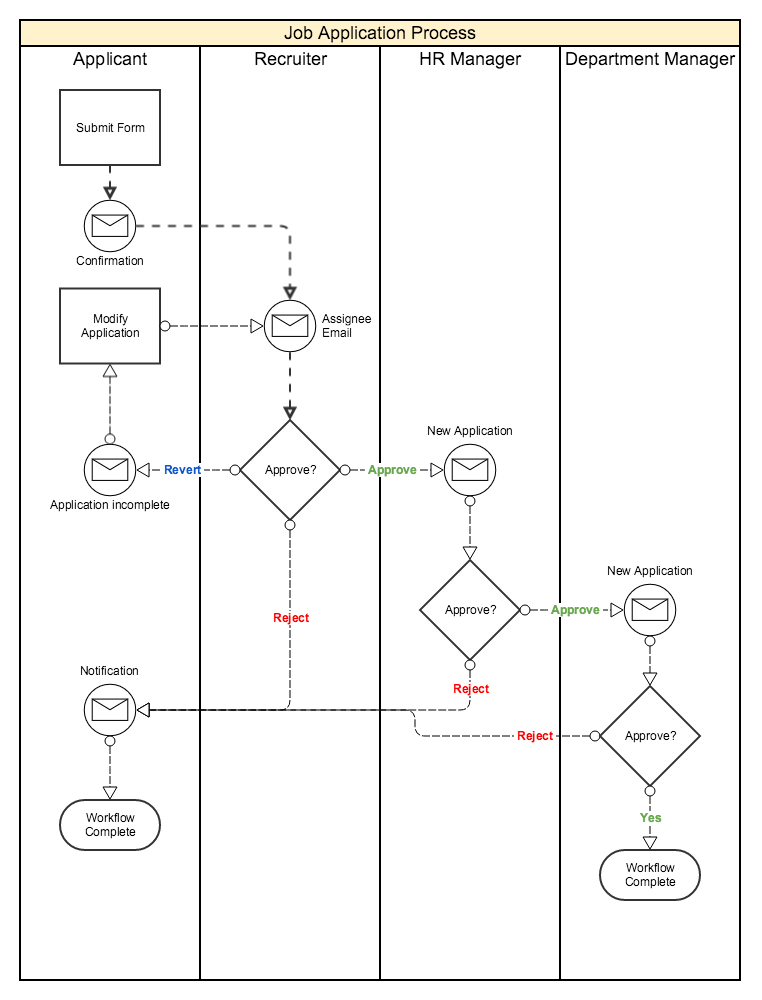
In this workflow only the Recruiter, the HR Manager and the Department Managers have WordPress accounts. Even though the applicants do not have an account they are still able to participate in the workflow on the front-end using a special security token in the entry link.
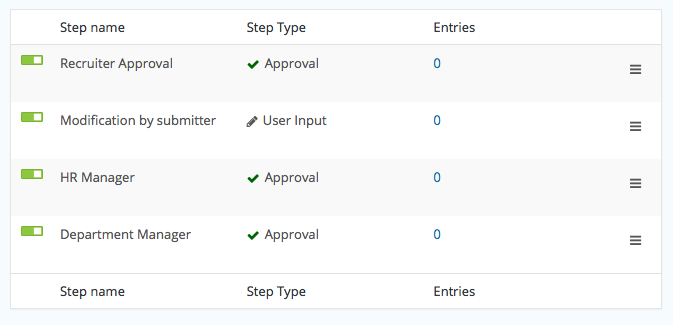
Workflow Steps
Once you have the process clear and agreed with your stakeholders you can start adding workflow steps to the form. This is what the above process looks like in Gravity Flow.
Approval Steps
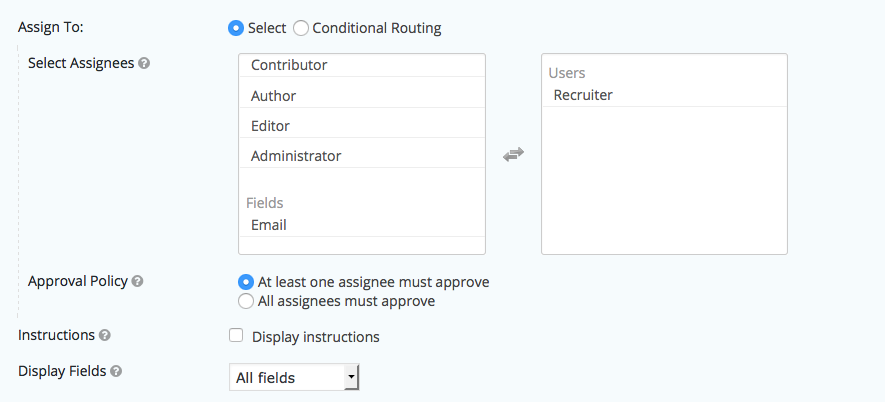
In this process, there’s a loop between the first and second steps until the recruiter either rejects or approves the request. Here’s the first part of the configuration of the Recruiter Approval step. You can see the Recruiter user account is assigned to the approval step.
Next we define the email that should be sent out to the assignee (in this case the recruiter).
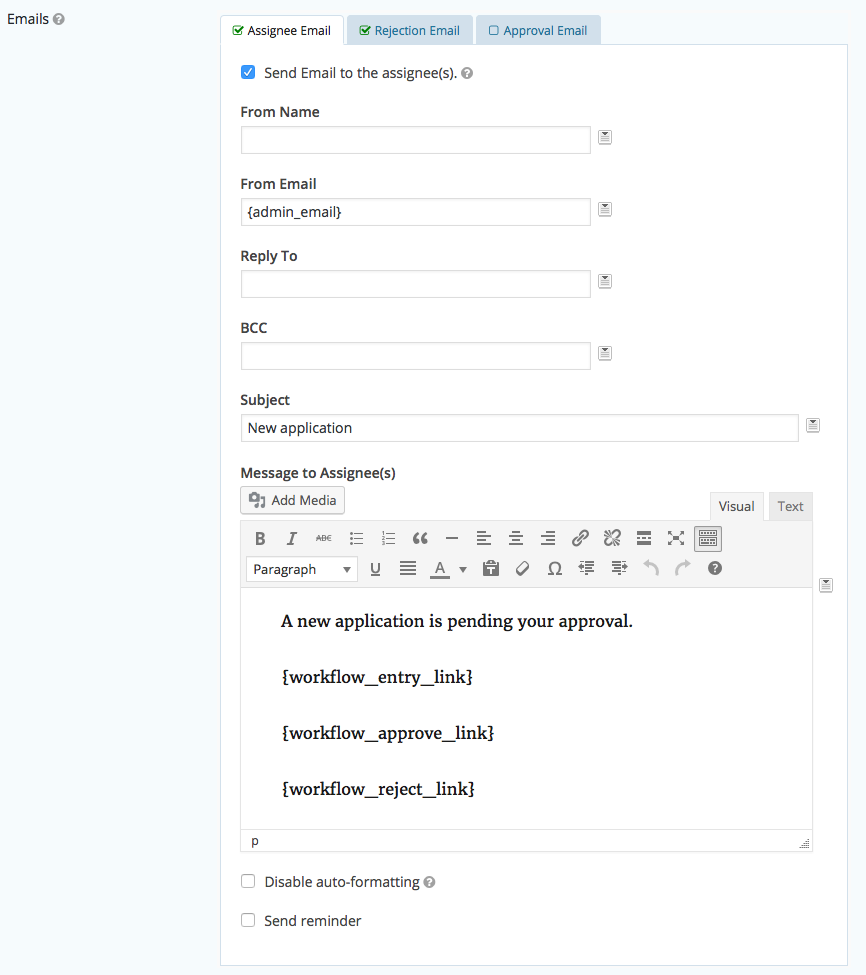
As you can see, if you’re familiar with Gravity Forms you’ll feel right at home with Gravity Flow. Notice the merge tags for the entry link, and the one-click approve/reject links.
In addition to the recruiter’s email, the applicant also will receive an email if the application is rejected. The configuration of the rejection email is very similar to the assignee email except it’s is assigned to the email field because the applicant does not have a user account.
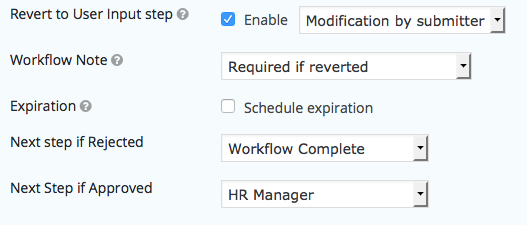
Finally we need to configure the step routing – what happens when the approval step is rejected, approved, or reverted (sent to a user input step). If the recruiter sends the application back to the applicant the email will need to add a note explaining what further information is required so we’ll make the workflow note required if reverted.
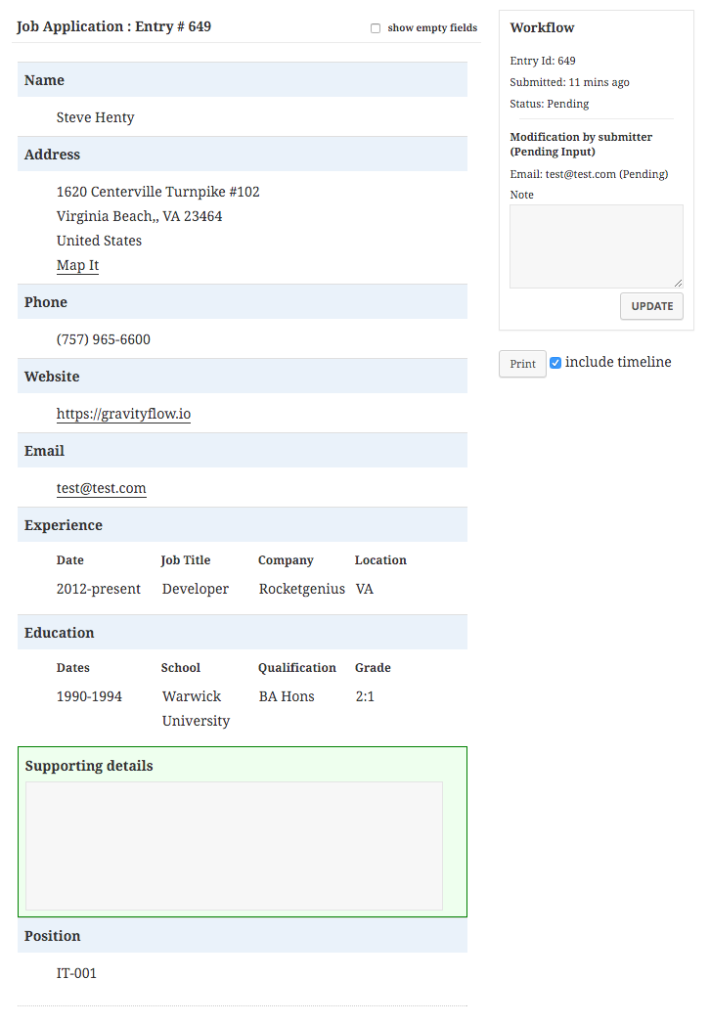
When an applicant submits an application form the recruiter will receive an email but it will also appear in his or her inbox. The inbox is a standard feature of Gravity Flow and it can be access either in the WordPress admin UI or on the front-end using the shortcode. By default the inbox looks like this but of course the columns can be adjusted.

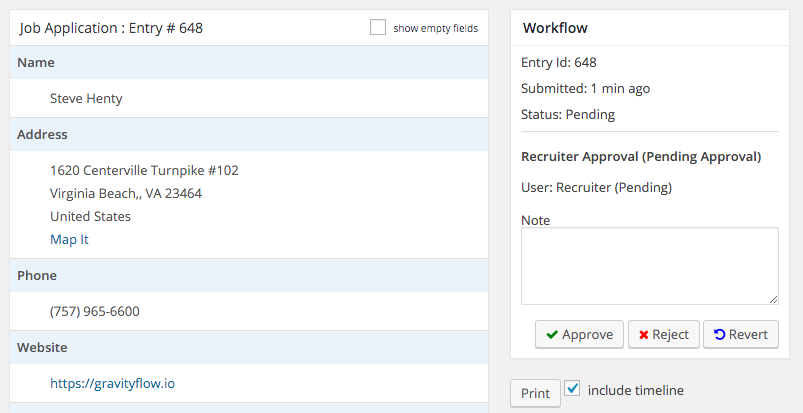
When the recruiter clicks on the entry the workflow detail page is displayed along with the field value and the workflow box with the approval buttons.
The User Input Step
When the recruiter clicks the revert button the entry is sent to the ‘Modification by submitter’ step. This User Input step is assigned to the email field.

When this step is triggered the applicant will receive an email with a link to the entry detail page on the front-end. As they don’t have a WordPress account the link will contain a special security token which allows them to access only their own entry.
The User Input step looks like this to the applicant on the front-end (depending on the theme):
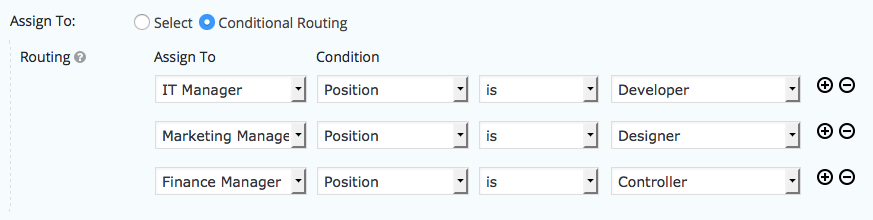
Conditional Assignee Routing
The final approval step needs to be assigned to the department manager. Usually there will be more than one department manager, so how do we configure that in the step assignee settings so we don’t have to configure multiple steps? There are a number of ways this could be done, but in this case the users are assigned depending on the value submitted in the Position/Vacancy field:
Business Objectives
Increased efficiency by replacing an email-based system.
Improved transparency. Information is accessible centrally in the workflow timeline and no longer locked inside email accounts.
Conclusion
Forms built with Gravity Forms can do so much more than collect and display entries. They can reduce turnaround times, increase transparency and improve communication inside teams and with customers. If you’d like to find out more, head over to gravityflow.io.