How to Populate Database Data into Gravity Forms
Learn how to populate database data anywhere in Gravity Forms directly from the WordPress database — and by extension, custom databases, ACF Repeater Fields, WooCommerce, and more.
By default, GP Populate Anything allows you to easily populate data from common objects like Posts, Users and Form Entries. However, what might not be so obvious is that Populate Anything can also populate data directly from the WordPress database. The entire WordPress database is accessible, which includes the tables that other object types may not provide access to. This opens up a whole new realm of possibilities!
In this article, we’ll explore how you can use Populate Anything with a number of different scenarios. We’ll start with the example of a travel agency that’s populating a list of airports as our basic use case, and then do a deeper dive into some more advanced use cases.
Table of Contents
The Basics
Let’s first take a look at how we can populate choices and values from the database.
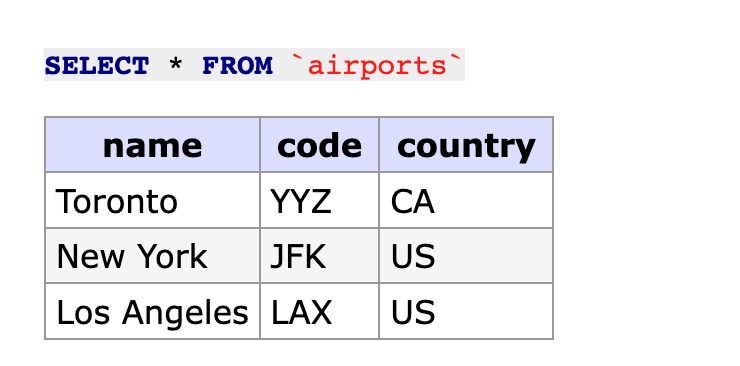
This examples uses a custom table in the database called airports. Each airport has a unique city name, airport code, and country code. Here’s a sample of what the data looks like:
Populating Gravity Forms Choices from a Database
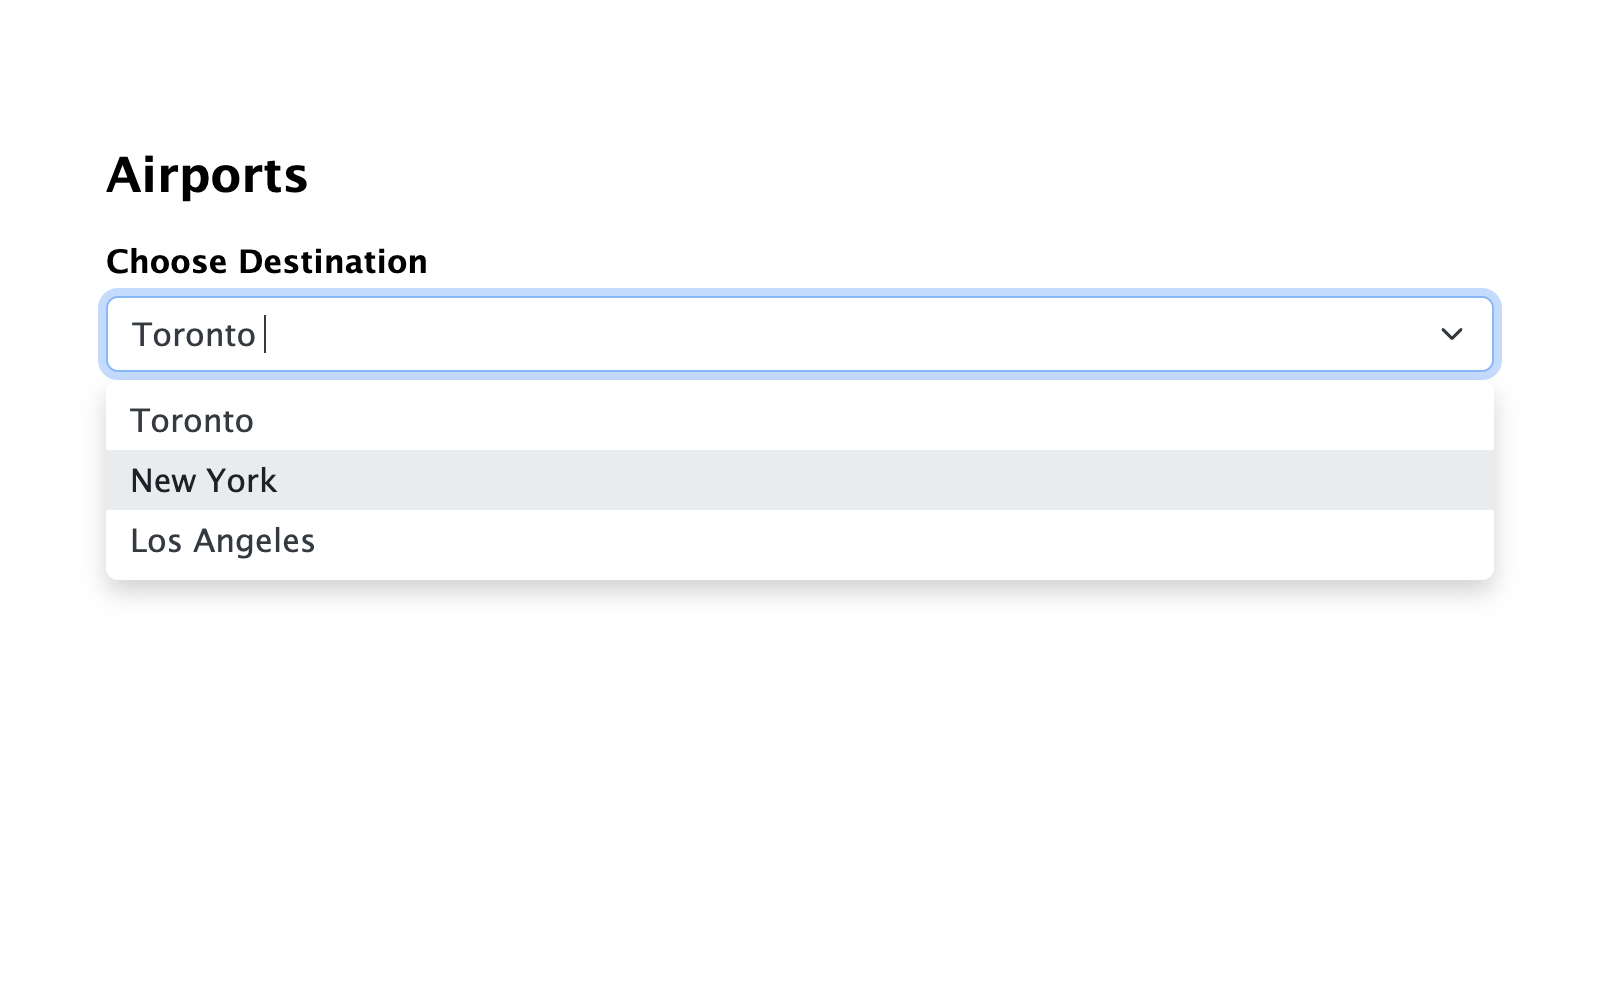
We’ll start by populating a list of airports for users to select from a dropdown list. Follow these steps:
- Open your form and add a new Drop Down field called “Choose Destination”.
- Make sure Populate choices dynamically is checked.
- Choose Database as the Type.
- Choose airports as the Table.
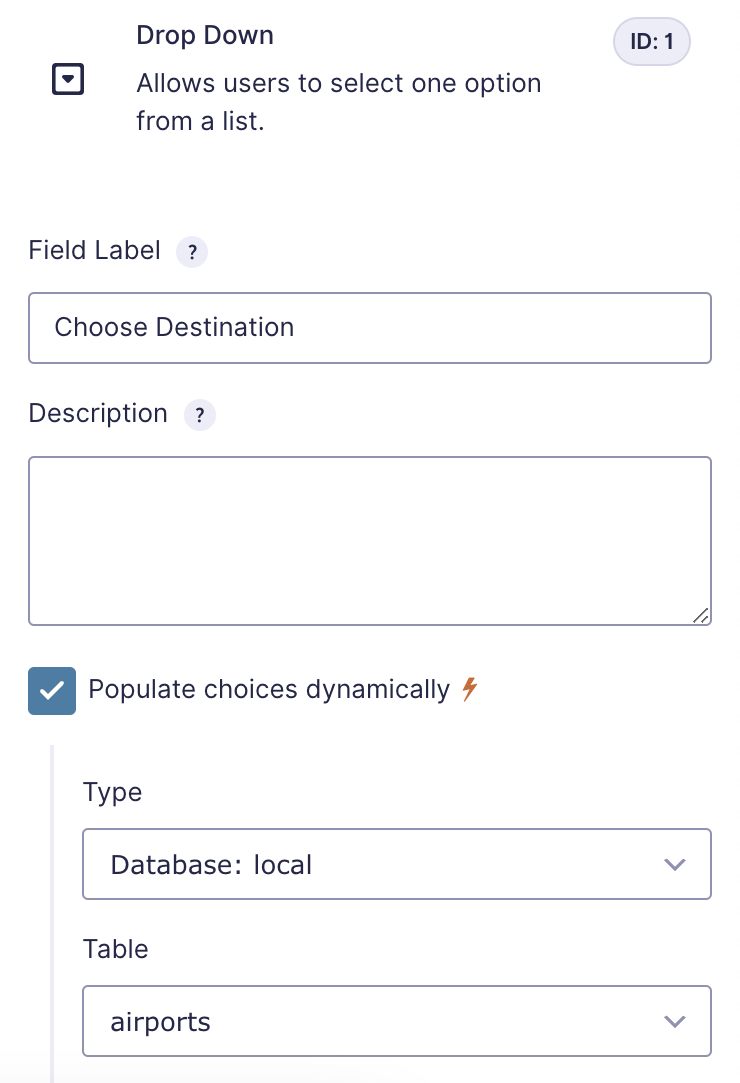
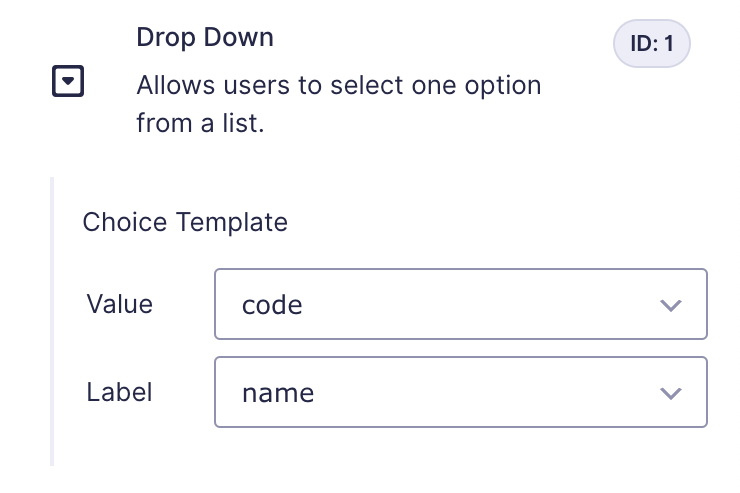
- Under the Choice Template section, set the Value to code and the Label to name.
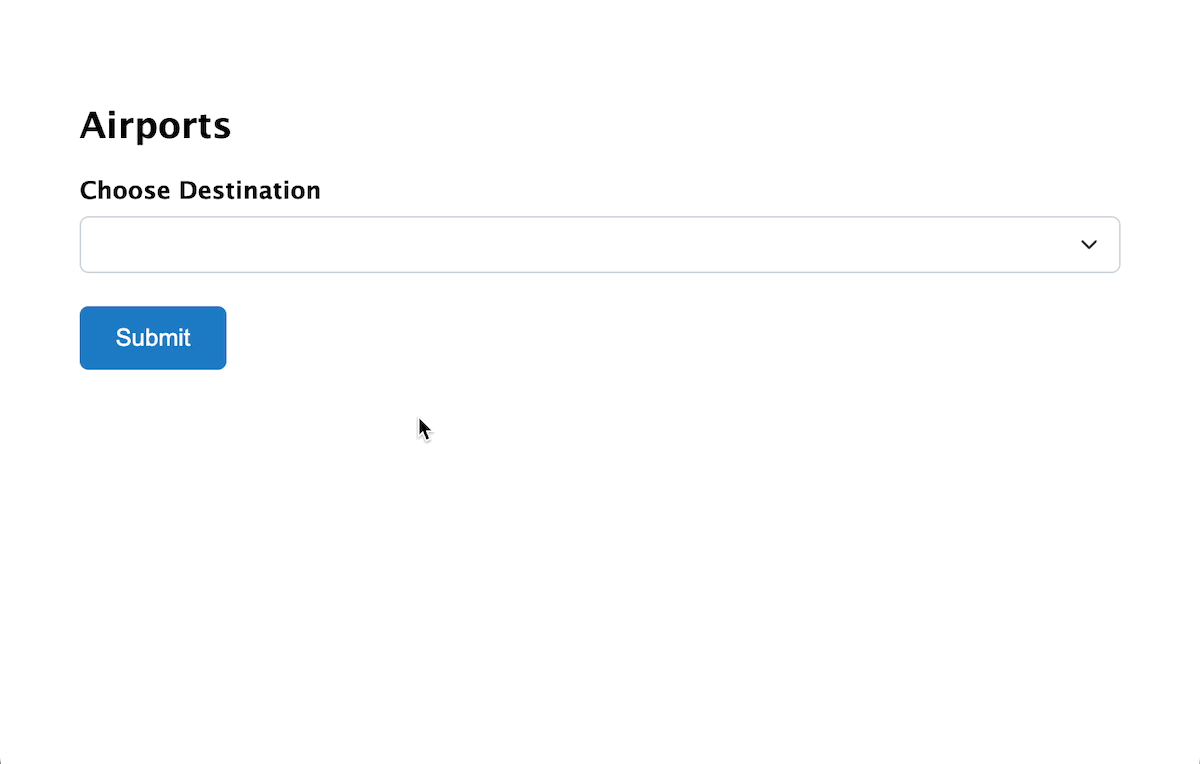
Here’s how the results look on the frontend:
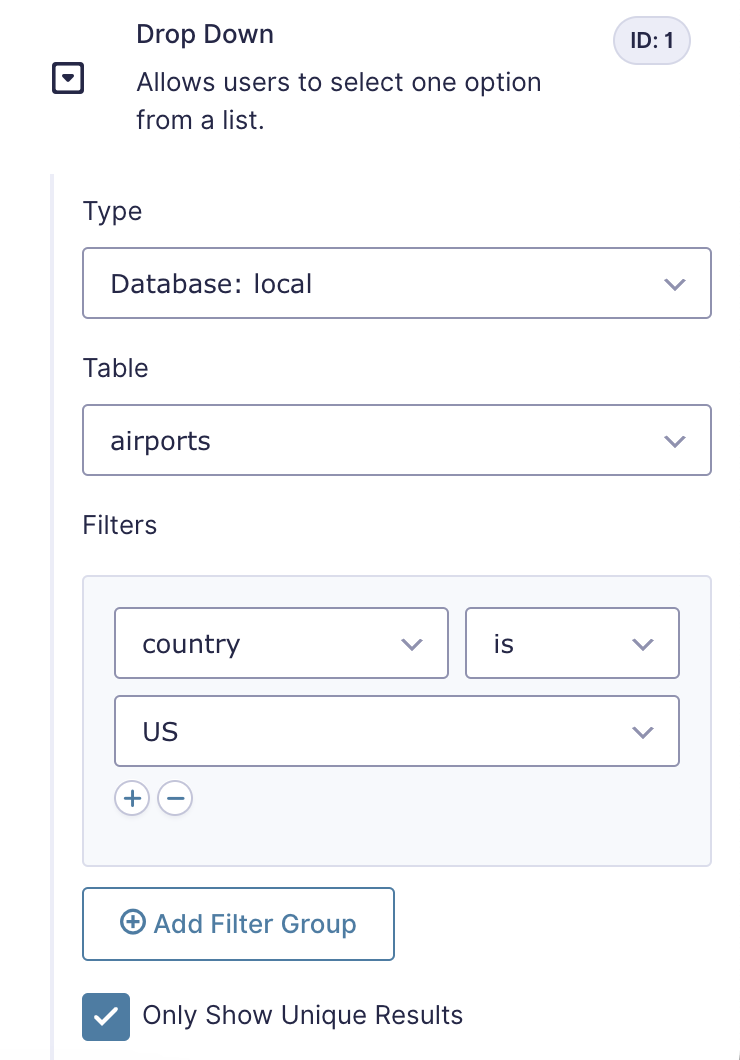
Add a filter
Let’s adjust the form to have a filter included. We’ll only show airports if the country code is US.
In the form settings, click Add Filter Group under the Filters header. We’ll set the filter to country is US.
If you’re displaying a large number of items, consider using GP Advanced Select so users can easily search and filter the choices.
Populate a Gravity Forms Field Value from a Database
Building on the previous example, we can also populate values from the selected name in the airports table. For example, let’s say that we want to flag international airports. Let’s populate the country to a hidden field for admin usage.
- Add a new hidden field to the form.
- Make sure Populate value dynamically is checked.
- Choose Database as the Type.
- Choose airports as the Table.
- Set country as the Value.

Digging Deeper
Let’s take a deeper dive into some more advanced scenarios that showcase Populate Anything’s full potential.
Populate from CSV, XML, and JSON files into Gravity Forms
CSV files are commonly used to store and organize large datasets. Plugins such as wpDataTables allow you to import CSV data into the WordPress database. Once the CSV data is in the database, we can populate this data into Gravity Forms via Populate Anything. This approach also supports XML and JSON formats, which offer a ton of versatility.
Let’s say that we didn’t already have an airports table in our database, and instead we had a CSV file. Here’s how we can populate them:
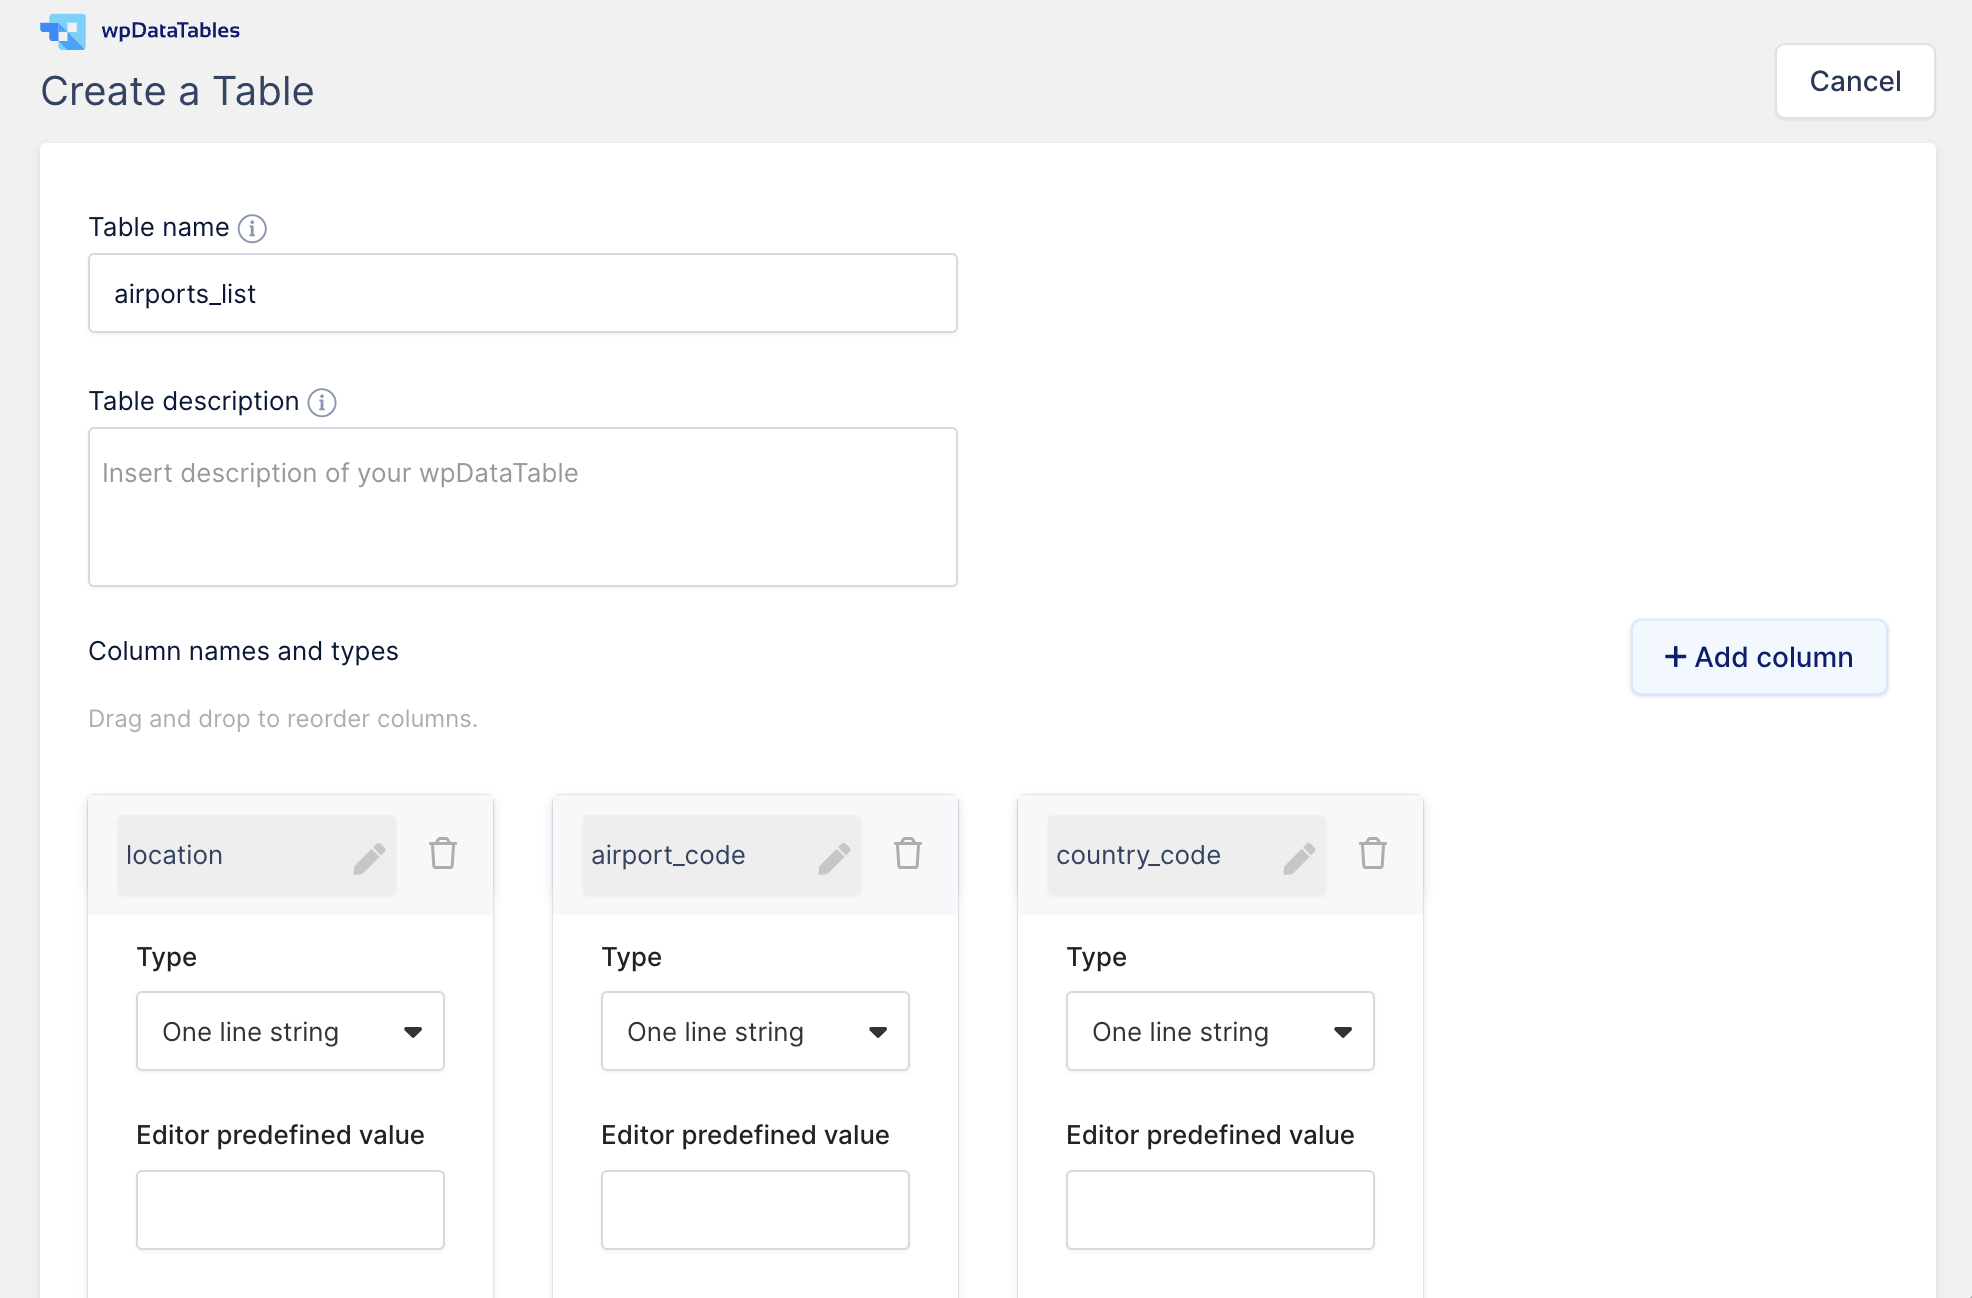
- Install and activate the wpDataTables plugin.
- In the Dashboard, select wpDataTables › Create a Table › Create a data table by importing data from a data source.
- Click Browse and choose your CSV file.
- Give your table a name and leave the default settings selected for each column. Click Create the table to finish the process:
Once the table is created, we’ll use Populate Anything to populate the data into our form.
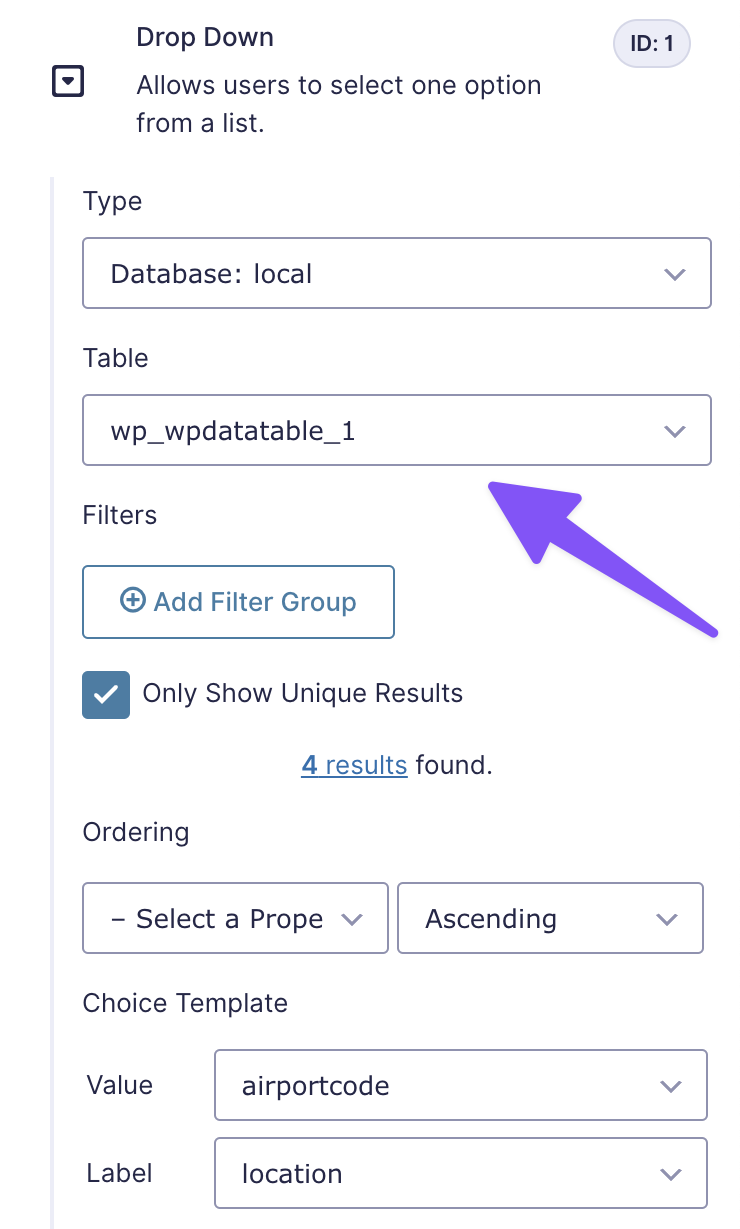
Follow the same steps as described above with the “Choose Destination” field by creating a new Drop Down field and populating the choices dynamically with Database set as the Type.
For the Table selection, look for a table called wp_datatable_1. This table should be the new table that was created from importing the CSV file. If you already have multiple wp data tables, there may be a different number at the end of the table name.
Under the Choice Template section, set the Value to be the airport code, and the Label to be the location name. Your final configuration should look something like this:
Populate Gravity Forms from a Custom Database
Out of the box, Populate Anything supports connecting to the default WordPress database where your site is hosted, along with all of the tables inside that database.
What happens if your data exists in a separate database instead of the default WordPress database? You can use this snippet to register additional database connections. Once your custom database is registered, it will appear in the database drop down selection menu when choosing your Database.
Populate Data from Multiple Forms
By default, the Entry object type in Populate Anything is restricted to a single form. However, there may be scenarios where you want to populate a field with data from multiple other fields across different forms.
For example, let’s say you have two separate intake forms, each with its own email field. You can use the database gf_entry_meta table to access entry data from both forms, and populate a third form with a full list of all emails from both fields.
To set this up, take note of both the form IDs and field IDs on that form. Let’s assume that:
- The first form ID is 187 and the email address field ID on this form is 1
- The second form ID is 188 and the email address field ID on this form is 2
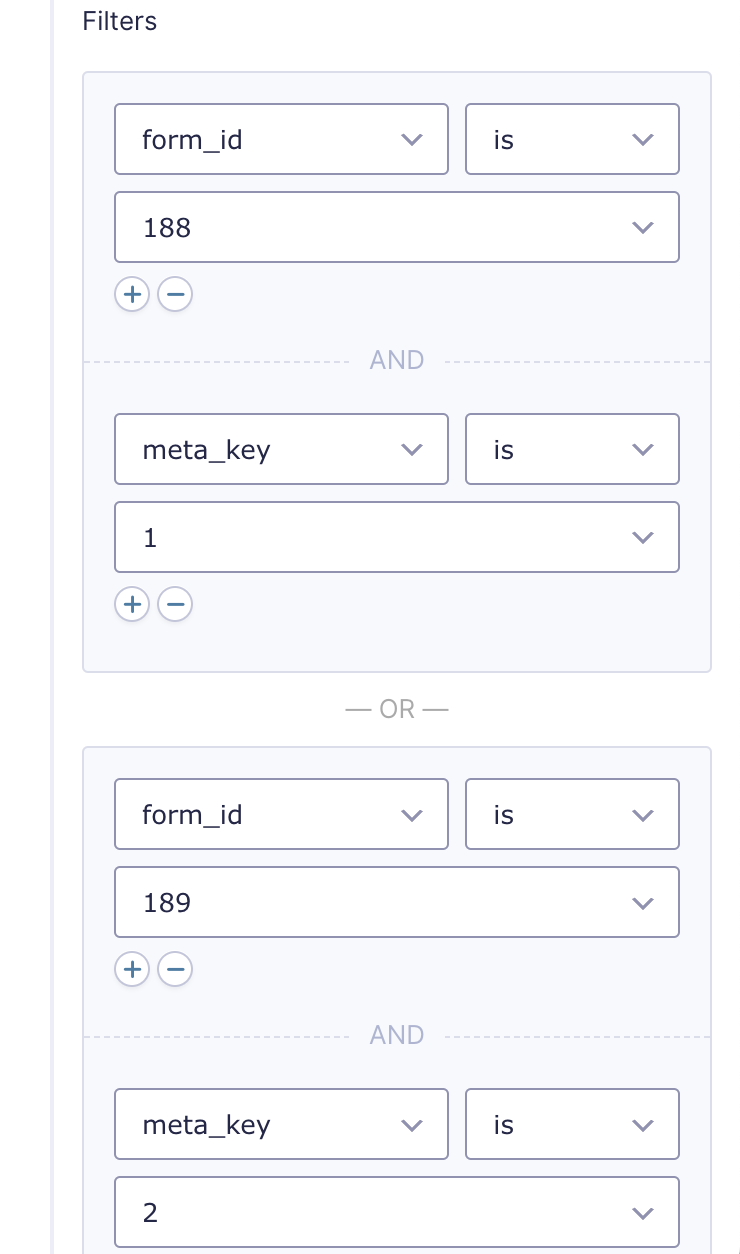
On the third form, create a Drop Down field and populate the choices dynamically from the gf_entry_meta table.
To only show the data from the two email fields we want and exclude the other form fields, we can filter on the form_id and meta_key fields.
Here’s what the configuration above looks like when used with a filter:
Note: One limitation with this approach is that populating multiple inputs per choice is currently not supported.
Want to take this idea even further? This handy snippet allows you to use the UI to determine which entries should be populated.
Populate from ACF Repeater Fields into Gravity Forms
Advanced Custom Fields (ACF) is a popular plugin for adding custom fields to WordPress. With Populate Anything, you can populate ACF repeater data into choice-based fields. For instance, if you have a record store that uses the ACF repeater structure for its inventory, you can populate all records into a dropdown field.
ACF stores its data in the wp_postmeta table of the database. Each meta_key field starts with the repeater field name, and ends with the sub-field’s name. We can use this naming pattern to filter specific sub-fields.
For example, let’s say we have a “records” repeater field, and the following sub-fields:
- Title
- Artist
- Release Year
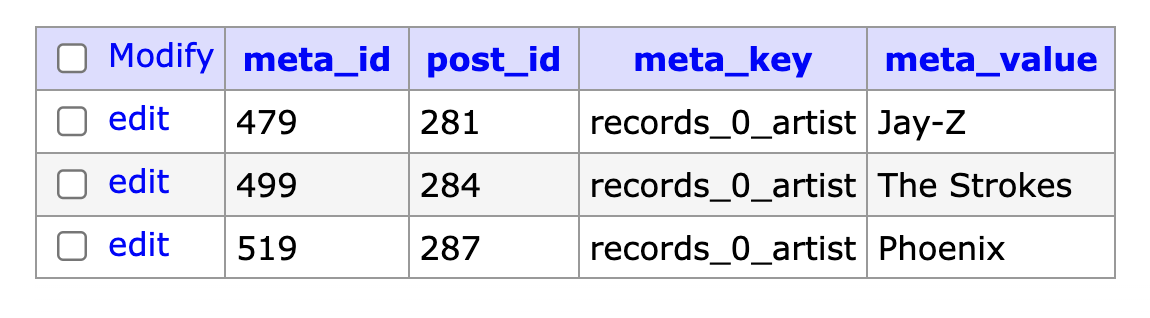
We can configure Populate Anything’s filtering options like this to display a list of all artist names from all records:
- Type: Database
- Table: wp_postmeta
- Filters:
- meta_key starts with “records”
- meta_key ends with “artist”

Alternatively, this snippet allows you to populate ACF repeater data by configuring the Posts type instead of the Database.
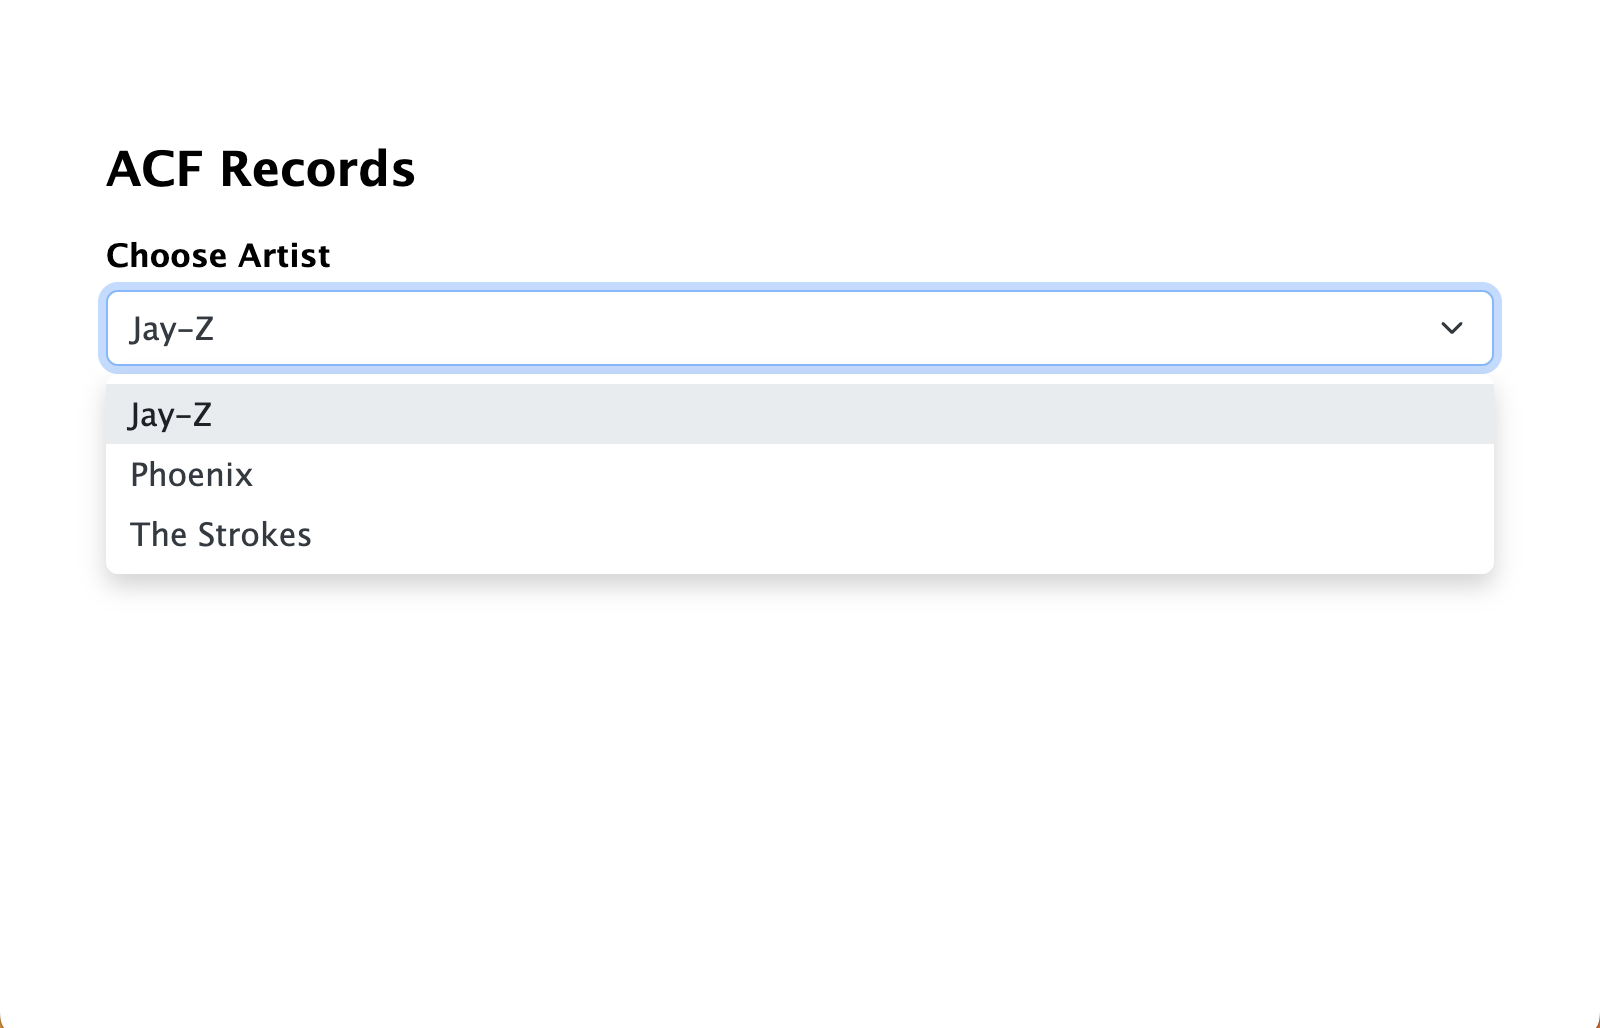
Here’s what the data looks like on the frontend:
Populate WooCommerce Order Data into Gravity Forms
If you are using WooCommerce for your online business, you can populate your customers’ order data with Populate Anything in several different ways. WooCommerce stores orders as Custom Posts, and products in the woocommerce_order_items database table. You can use Populate Anything’s versatile filtering options to automatically populate a user’s order and product information into a form.
For more information and some example of how to populate WooCommerce data, check out our in-depth guide here.
How’d We Do?
There are a plethora of different ways to populate database data in Gravity Forms. We’d love to hear how you are using them. Let us know in the comments below.


Is there a way to populate data into a drop down/radio/checkbox if certain fields in the DB are value1,value2,value3?
Hi John,
We have a snippet that you can use with Populate Anything to populate comma separated values into the choices of a field:
https://gravitywiz.com/snippet-library/gppa-explode-commas-as-choices/
This will work when populating from the database.
Best,
Oh wow, thank you. This is great.
You’re welcome, John, happy to help! 🙂