How to Populate WooCommerce Order Data into Gravity Forms
Build a form for your customers to easily contact you regarding products they have ordered.
This article requires the GP Populate Anything perk.
Buy Gravity Perks to get this perk plus 48 other premium Gravity Forms plugins!
If you sell products with WooCommerce and use Gravity Forms, then you most likely have a need to populate order data into a form. Not only does order data offer valuable insights into your customers’ buying habits, it’s often utilized in customer-facing forms to ease their effort in filling out the form.
A common use case for this is ‘report an issue’ forms. It’s important to make it easy for your customers to contact you, especially if the reason they’re reaching out is to report an issue.
In this tutorial, we’re going to walk through how to save your customers time and energy by building a form to report an issue that uses Populate Anything to automatically look up previous orders for the current user. Since WooCommerce requires users to create an account before placing an order, our form is going to automatically look up their previous orders and let them pick the product they’re reporting the issue on. Let’s get started!
Looking for a stronger Gravity Forms & WooCommerce integration? Check out Gravity Shop Product Configurator, which puts the control and customization of Gravity Forms inside WooCommerce products.
Getting Started
This article assumes you have a fully set up WooCommerce store with some completed orders. Once you have GF Populate Anything installed, follow the steps below to build the form.
Steps
Step 1 – Orders Field Population and Filters
Start by adding a Drop Down field and populating it with completed WooCommerce orders for the currently-logged-in user. Exactly how to do this will depend on whether you are using WooCommerce’s new High-Performance Order Storage (HPOS), or whether your orders are stored as Custom Posts.
Method 1 – Custom Post Order Storage
Until recently, WooCommerce stored orders as Custom Posts. If you have an older store, this is probably the case on your site. Populating from Custom Posts is easy, and Populate Anything’s filters give you granular control over what type of posts to populate.

Note the Post Status filter. WooCommerce uses custom post statuses to indicate what state the order is in. A WooCommerce post status is required in order to get any results. Completed orders are given the status wc-completed. This status isn’t recognized by Populate Anything, so you’ll need to manually enter it using the Custom Value option in the filter drop down.
The WooCommerce Status options are:
wc-processing: Payment has been received and the order is awaiting fulfillment.wc-on-hold: Waiting to confirm payment.wc-cancelled: The order is cancelled by the customer or an administrator.wc-completed: The order is fulfilled and complete.
Method 2 – High-Performance Order Storage (HPOS)
WooCommerce recently introduced their High-Performance Order Storage (HPOS), where orders are stored in a custom database table, completely removed from Custom Posts. If you have HPOS enabled on your store, you’ll need to populate orders directly from the prefix_wc_orders table in the database.
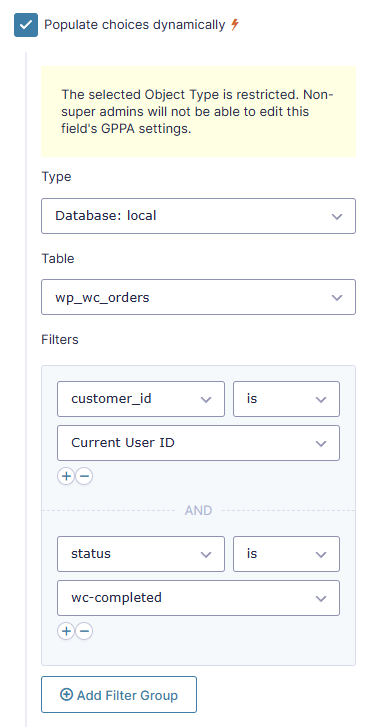
This time, the order statuses will be recognized by Populate Anything, providing you have an order in the database with that status. If not, you can manually enter it using the Custom Value option in the filter drop down, as explained in the Custom Post Order Storage instructions above.
Step 2 – Choice Template for Orders Field
With the filters set up, the next step is to choose the Choice Template. Again, how to do this will depend on whether you’re using Custom Posts order storage or HPOS.
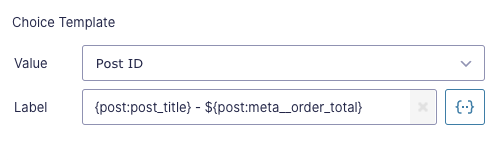
Method 1 – Custom Post Order Storage
Populate Anything defaults populate the Post ID as the value, which is perfect. For the label, I like to add the order total to remind customers exactly which order they’re selecting. This is a nice touch for customers that order from you often. You can populate multiple values into the label by selecting Custom Value from the drop down.
Here’s what it looks like on the front end:

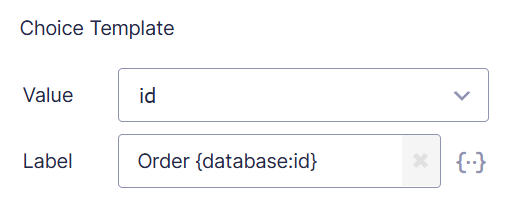
Method 2 – High-Performance Order Storage (HPOS)
With HPOS, you’ll need to select id as the value. You can then populate the label with multiple values by selecting Custom Value as described above.
Step 3 – Populate Products
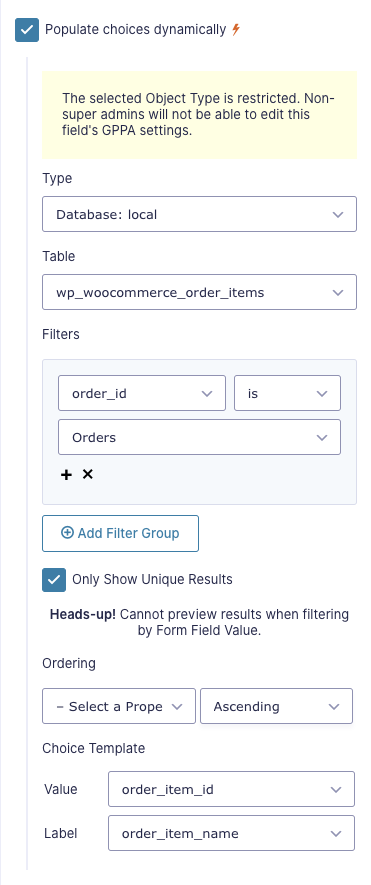
With the Orders Drop Down finished, it’s time to populate the Products Drop Down. This time it doesn’t matter if you are using HPOS or Custom Post order storage. The population will be directly from the WordPress database in both cases. WooCommerce stores the items from an individual order in the prefix_woocommerce_order_items database table.
That’s It!
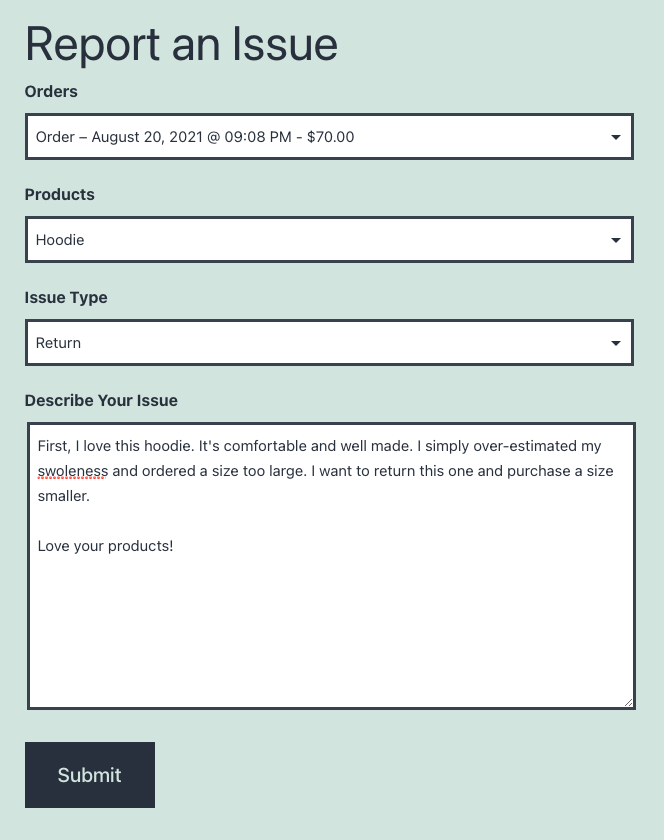
With those two fields in place, you add any other fields you want to include in your Report an Issue form. Here’s an example for how this form could look on the front end.
Taking It Further
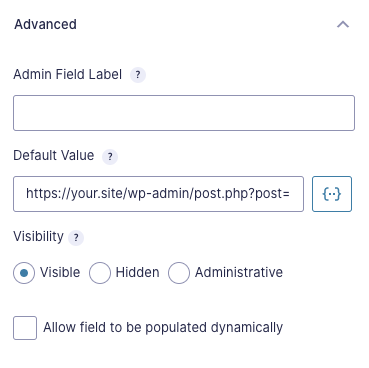
Save yourself time finding the order by including a hidden field that populates with a link to the selected order. To do this, add a hidden Website field to the form, and set its Default Value to the WP Admin link for editing posts. The format for that link is the following:
https://your.site/wp-admin/post.php?post=123&action=edit
Then, insert the Live Merge Tag for the Orders Drop Down above as the Post ID.
https://your.site/wp-admin/post.php?post=@{:3:value}&action=edit
Here’s what that looks like in the field settings:
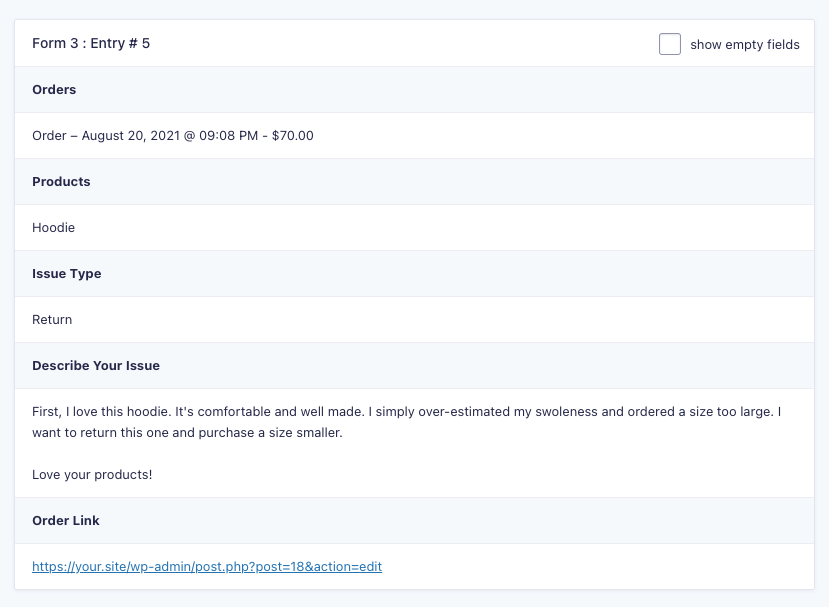
The URL will then show up in your entries on the back end.
To remove hidden fields from Confirmations and Notifications, use our All Fields Template and the :nohidden merge tag modifier.


hello,
i cant seem to be able to load the products from the Step 3 – Populate Products – is the Filters > Order_id > Orders (this just seems to be text) correct?
Hi Alex,
The filter in Step 3 is “order_id – is – Orders”, where “Orders” is referring to the Dropdown field in Step 1.
I’ve also followed up by email so we can get eyes on your form to help further.
Best,
Thank you for this helpful tutorial! I managed to populate a checkbox list of all ordered items of a specific order. However I’m struggling to add the Quantity of each product to the label (as this is another table in the database it seems) as well as to filter the list for specific product categories. E.g. I want to filter an order for all products of the category “fruits” and list them by name and quantity ordered in the form. Is there any workaround for this? Thanks a lot!
Hi Peter,
You can populate the quantity from the
woocommerce_order_itemmetatable. Here’s a screenshot with an example setup:For the categories, WooCommerce doesn’t store that with the order. Drop us a line in support and we can look into what it would take to add support for this.
greetings beside the populated products, how can I populate the quantity of each product? regards
Hi Revo,
To get the quantity of the selected product, add a single line text field and set it up to populate data from the wp_woocommerce_order_itemmeta table. You’ll then add a filter to check if the order_item_id is equal to the value of the selected Product field. Add another filter to check if meta_key is equal to _qty to get the quantity. Set the value template property to the meta_value. This should get you the quantity of the selected product in the order.
I hope this helps.
Best,
Hey,
Thanks for your article !
I’m using {post:post_date} to get WooCommerce order date, do you know how to remove timestamp from date format ? I tried to use date(‘Y-m-d’, strtotime({post:post_date})) inside Choice Template label but do not work.
Best Regards.
We don’t have a ready solution for this one but, if you’re a Pro customer, it seems like something we could cover as a minor customization. Drop us a line via support!
With regards, how can I create an unbreakable space in Popular Aniting to leave the first option of the drop-down field empty, please guide me clearly. Thanks
Hi,
You can use the placeholder setting of the field to add an empty text at the top of the populated choices.
Best,
Important Tips: WooCommerce 3.5 began storing the customer ID associated with an order in the post_author field of the wp_posts table. Previously, this information was stored in post meta as _customer_user, and will continue to be stored there as well for backwards compatibility.
Thanks for sharing this tip.
Best,
Guys, finding orders this way doesn’t work at all! This is no longer a post type. That’s the only one reason I chose your GP. Please help us, we need it asap. Here is our website https://association.confidencesdabeilles.fr/
thanks for letting me know it dont work i was just about to pay for it :(
Hi Shawn,
We’re replying to Gaetan via email, to see how best we can assist with his use case. You can also get in touch via our pre-sales contact form with details about your use case. With that, we’ll be able to determine if what you want to achieve is possible or not.
Best,
To be accurate Shawn and for the others. We’re using Woocommerce subscriptions and this is precisely that plugin which causes some issues. We, and thanks to the very helpful Samuel, were able to identify it. I’m sure it works as a charm for the normal wordpress ecommerce! Give it a try, it’s the only way to know ;).