How to Enrich Gravity Forms Entries with CRM Data
Capture only a customer’s email and use GC API Alchemist to pull the rest of their details from a CRM and save them straight to the entry.
- What You’ll Need
- 1 — Connect Gravity Forms to a CRM
- 2 — Build the Form
- 3 — Configure the API Feed
- Bonus: Data Enrichment in Action
- Go Forth and Enrich!
Connecting Gravity Forms to a CRM is a great way to automate busywork, like syncing contacts and handling follow ups. But while standard integrations focus on pushing data to your CRM, the real magic happens when you flip the script and pull data back.
Let’s say a returning lead fills out a support form. Instead of making them retype their details, you ask for just an email. Your form then quietly looks them up in your CRM, pulls their name, phone, and job title, and saves it all to the entry.
This is called data enrichment and GC API Alchemist makes it possible in Gravity Forms by fetching the data and saving it directly to the entry. Let’s see how it works. 🔎
This article requires the Gravity Connect API Alchemist plugin.
Buy Gravity Connect to get this plus other premium Gravity Forms plugins!
What You’ll Need
- GC API Alchemist: lets Gravity Forms push and pull data from any API-supported platform.
- To install, open your Spellbook › click Connect › install and activate GC API Alchemist.
- A Customer Relationship Management (CRM): where your contacts are stored and organized.
- We’re using HubSpot for this tutorial, but feel free to use any CRM where your contacts are stored.
Wizard’s Note
If you’re using a different CRM, no worries! The steps are pretty much the same. Just make sure to check your CRM’s API documentation and swap in the correct endpoints.
1 — Connect Gravity Forms to a CRM
First, we need to build a secure bridge between Gravity Forms and your CRM.
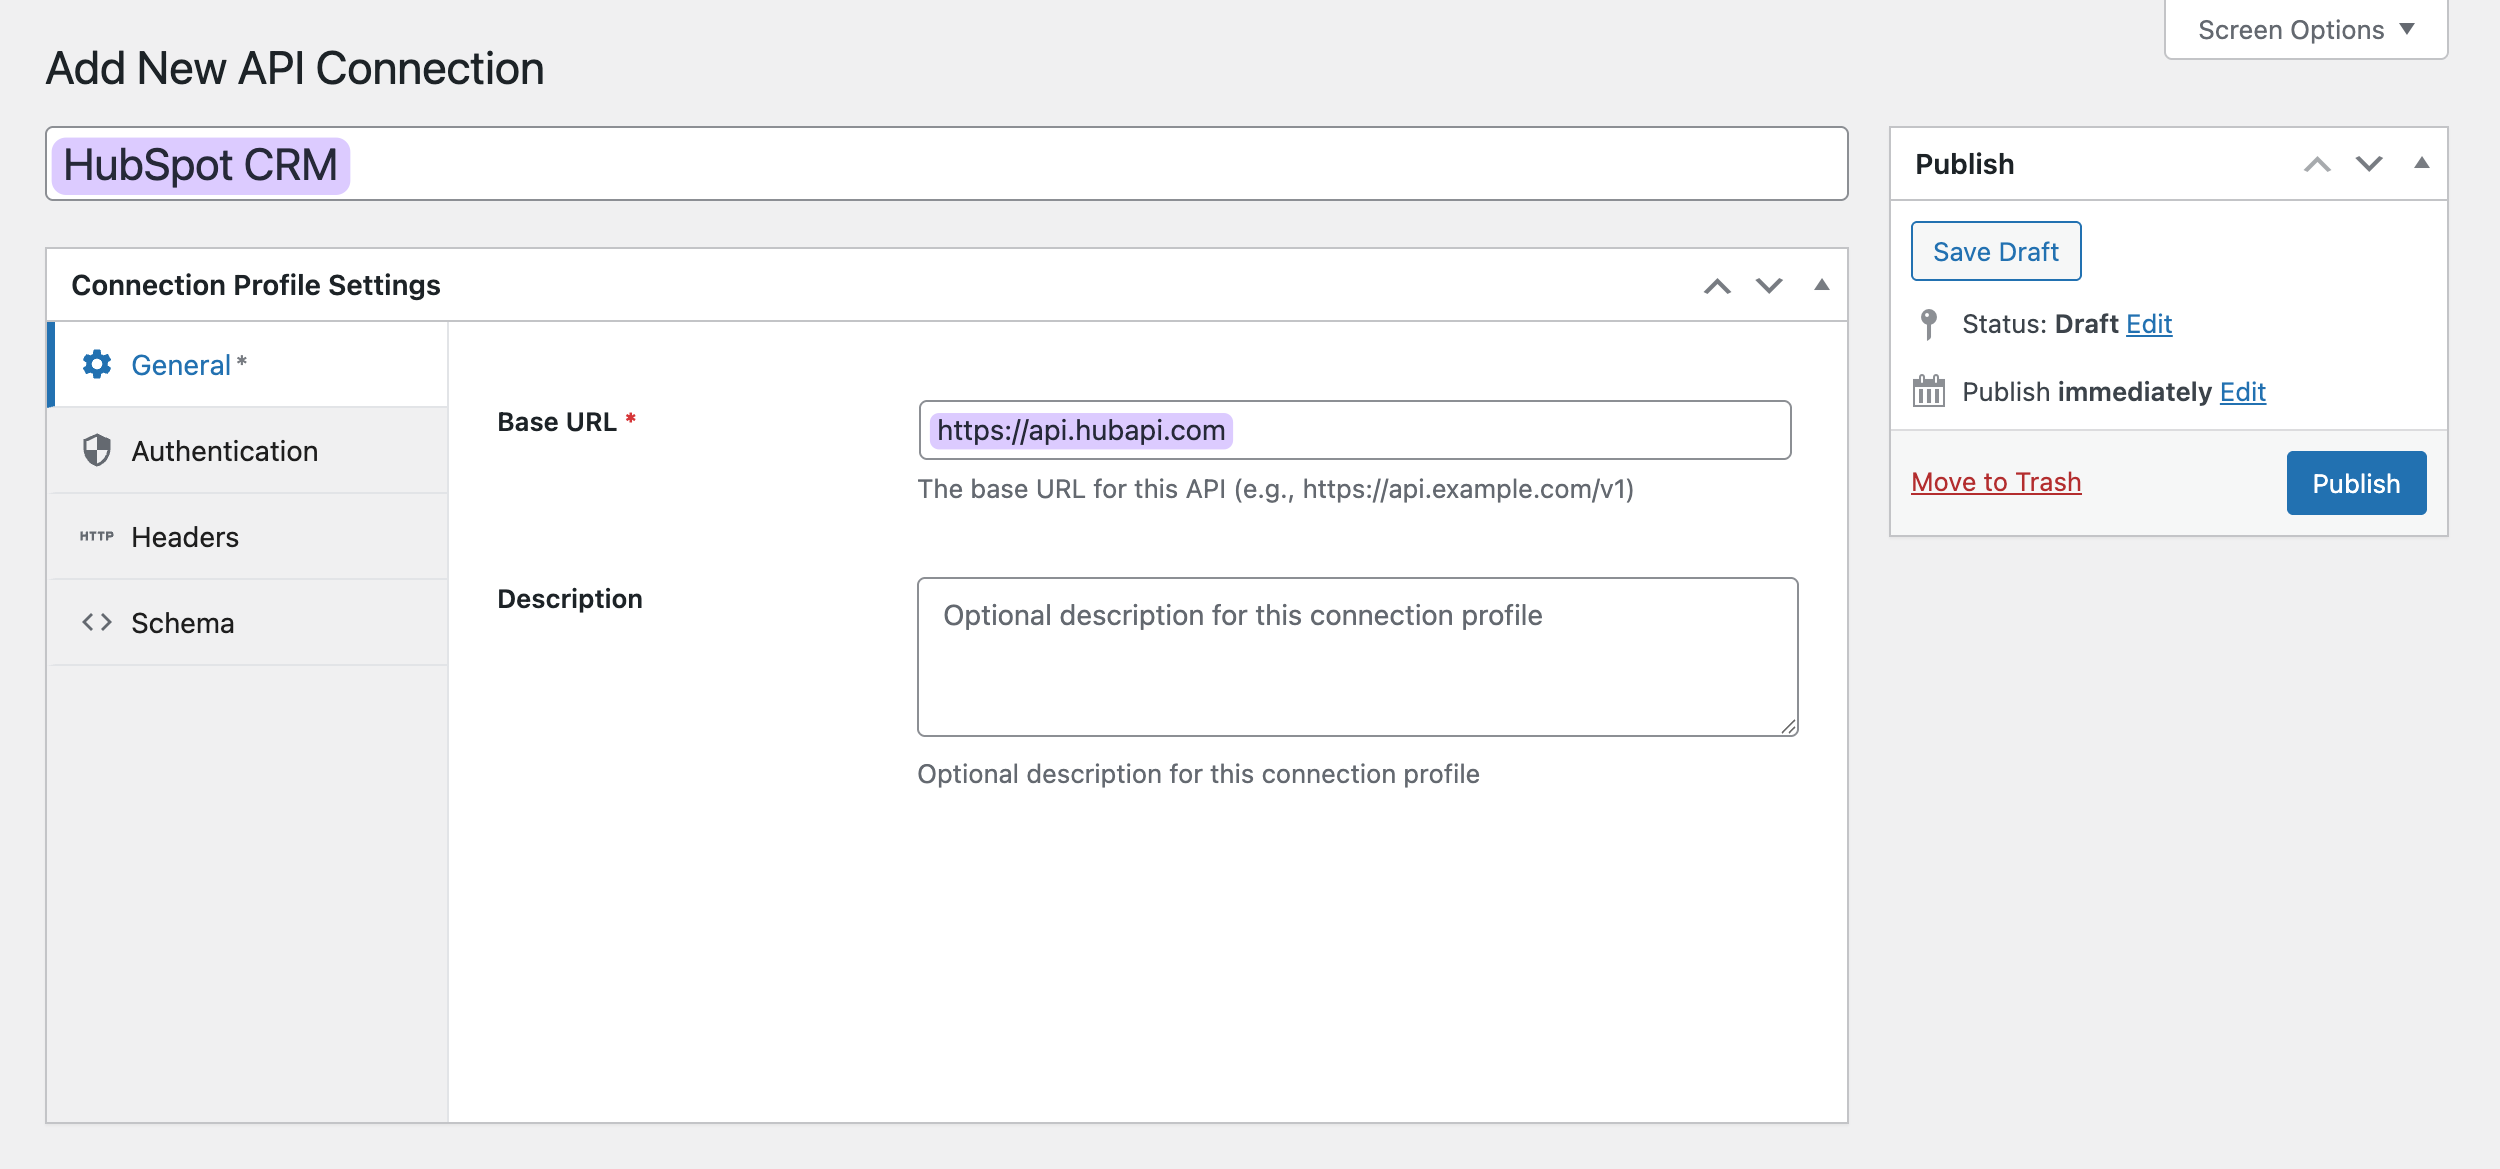
- In your dashboard › navigate to Forms › click API Connections.
- Click Add New Connection.
- Give it a name:
HubSpot CRM - Base URL:
https://api.hubspot.com - In the Authentication tab › select Bearer Token.
Let’s pause here and grab your access token from HubSpot. Keep this tab open—we’ll come back to it later.
- Open a new browser tab › log into your HubSpot account.
- Go to Settings › Integrations › Legacy Apps.
- Click Create legacy app › Private › give it a name—e.g.
GC API Alchemist. - Under Scopes › click + Add new scope › search for
crm. Objects.contacts.read. - Click Create app › go to Auth › and copy the access token.
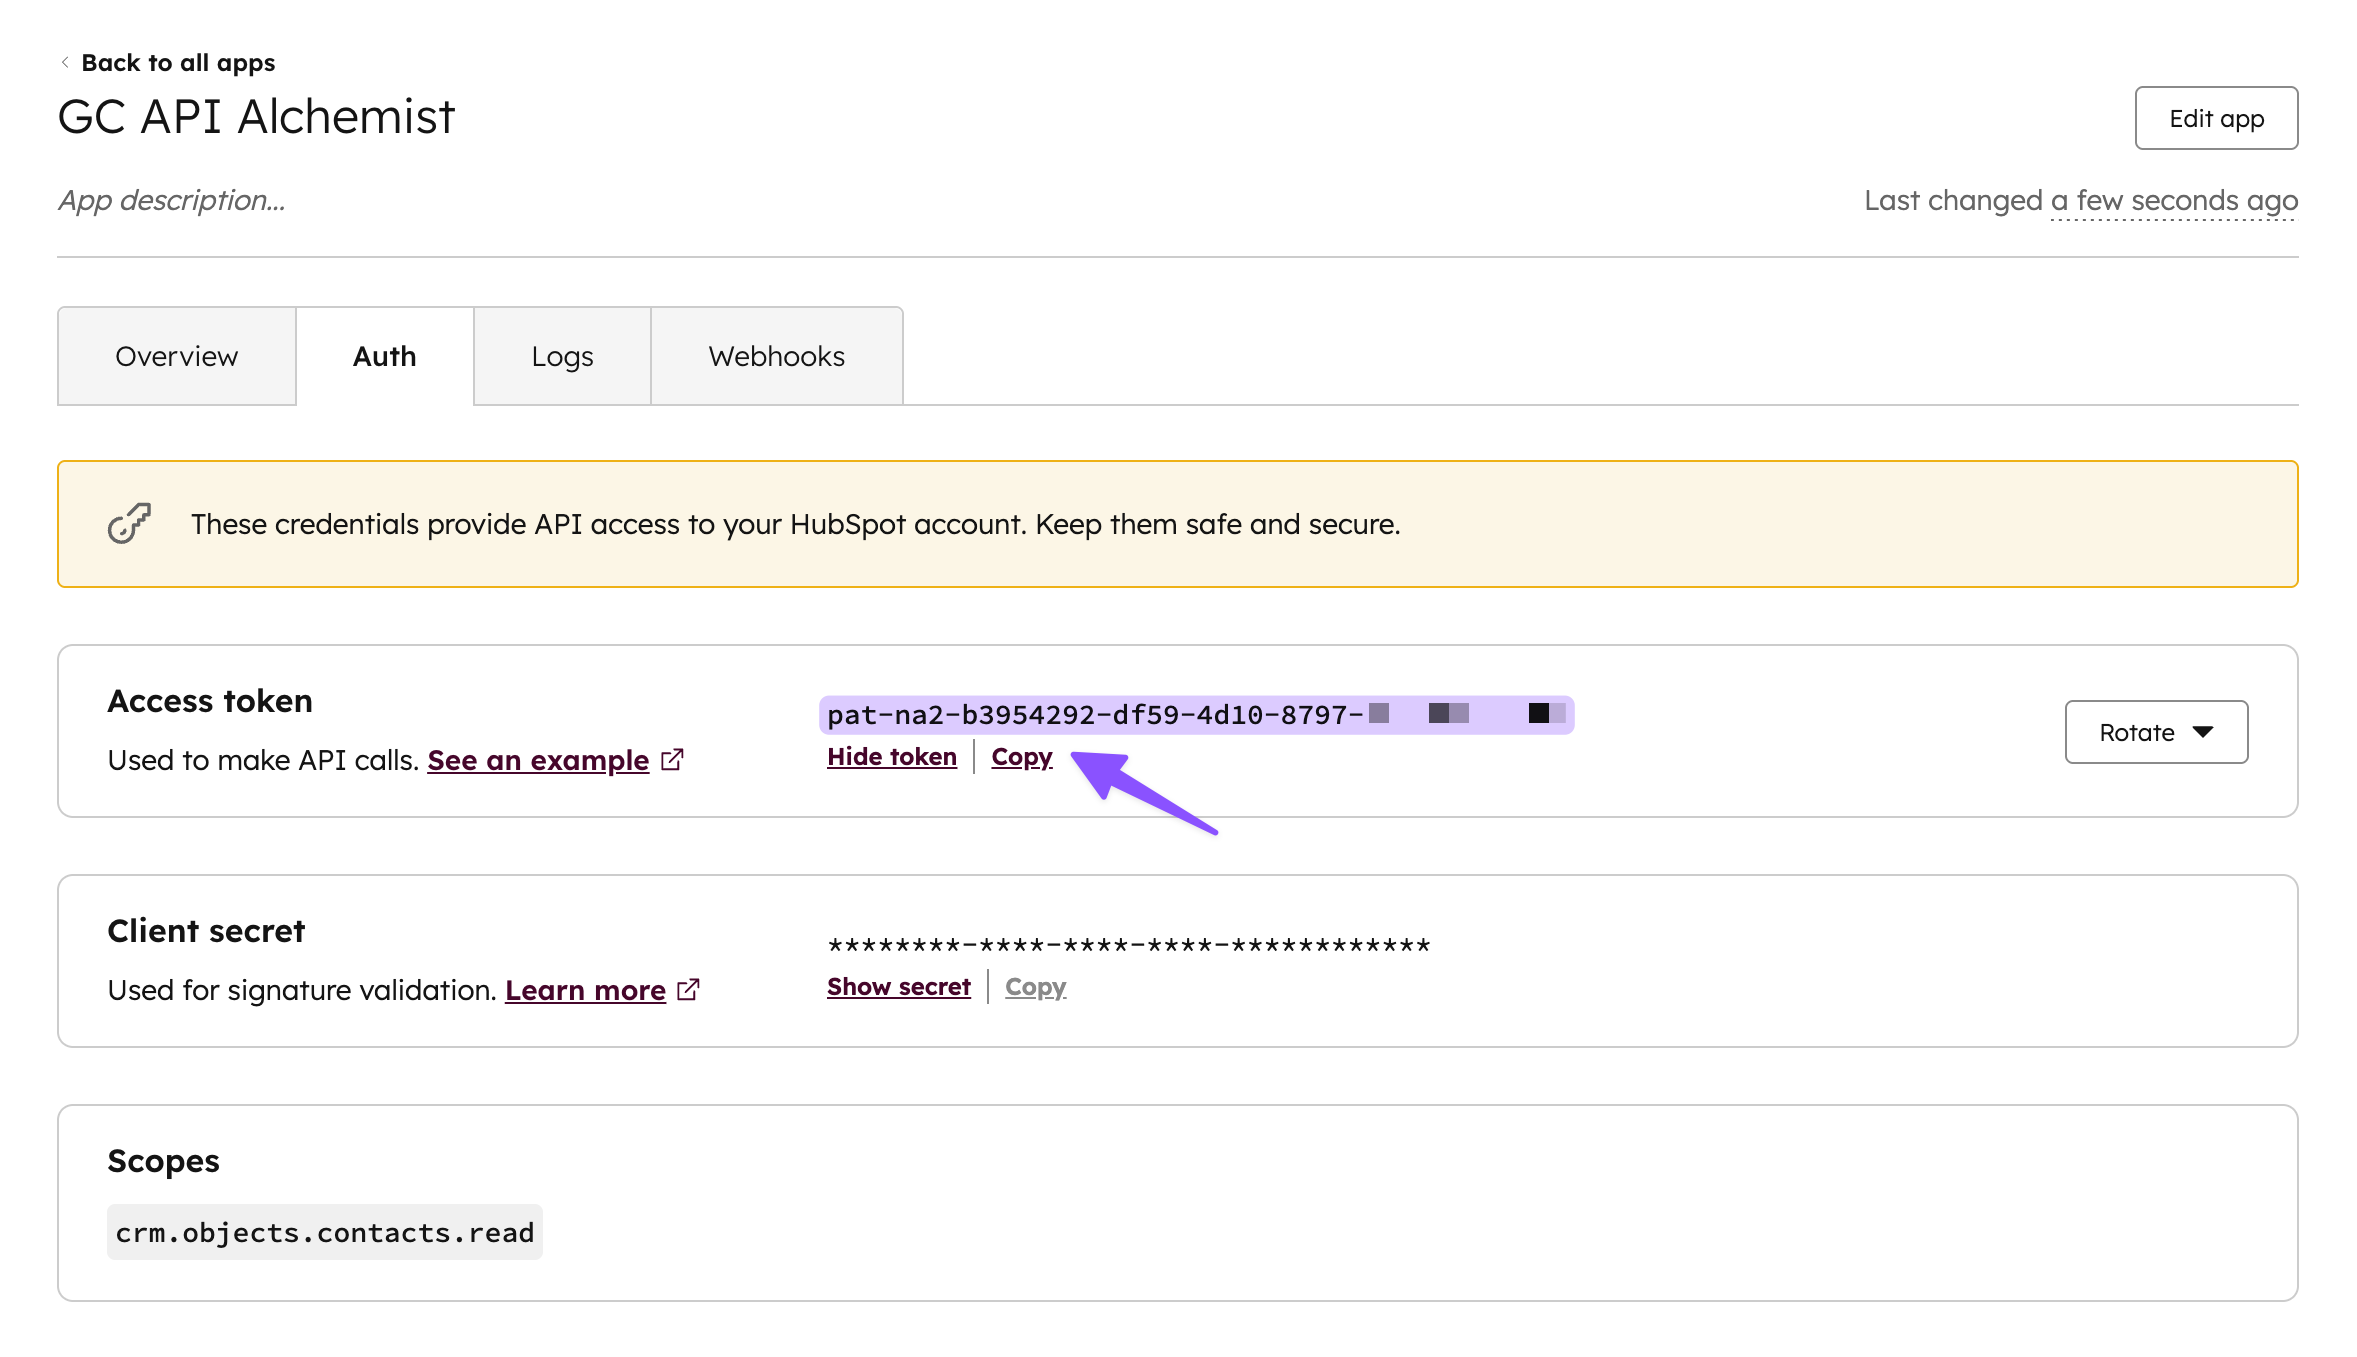
- Back in the Authentication tab, paste the token into the Bearer Token field › click Publish.

Voila! Your bridge is built. Gravity Forms is now ready to push and pull data from HubSpot. ✨
2 — Build the Form
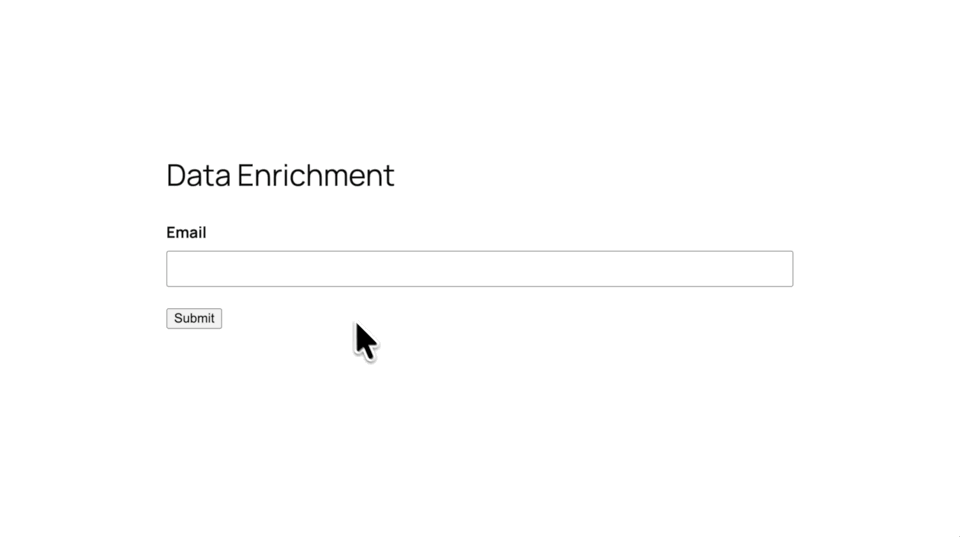
Let’s create the form that’ll collect the email and store the enriched entry.
The trick here is to use hidden fields. We want to capture data like job title and phone number for our internal records only.
- Create a new form (or edit an existing one).
- Add an Email field.
- Add a Single Line Text field for every piece of data you want to fetch:
- First Name
- Last Name
- Phone Number
- Job Title
- Lifecycle Stage
- Lead Status
- For each of these fields › go to Field Settings › Appearance › set Visibility to Hidden.

Hiding these fields shortens the form. The user might think, “Oh, it’s just an email field,” but behind the scenes are containers to catch a wealth of data.
3 — Configure the API Feed
Now we’re going to set up the API feed to send the email to HubSpot, retrieve the contact’s profile, and save all the data we need directly to the entry.
- Go to your form’s Settings › click API Alchemist.
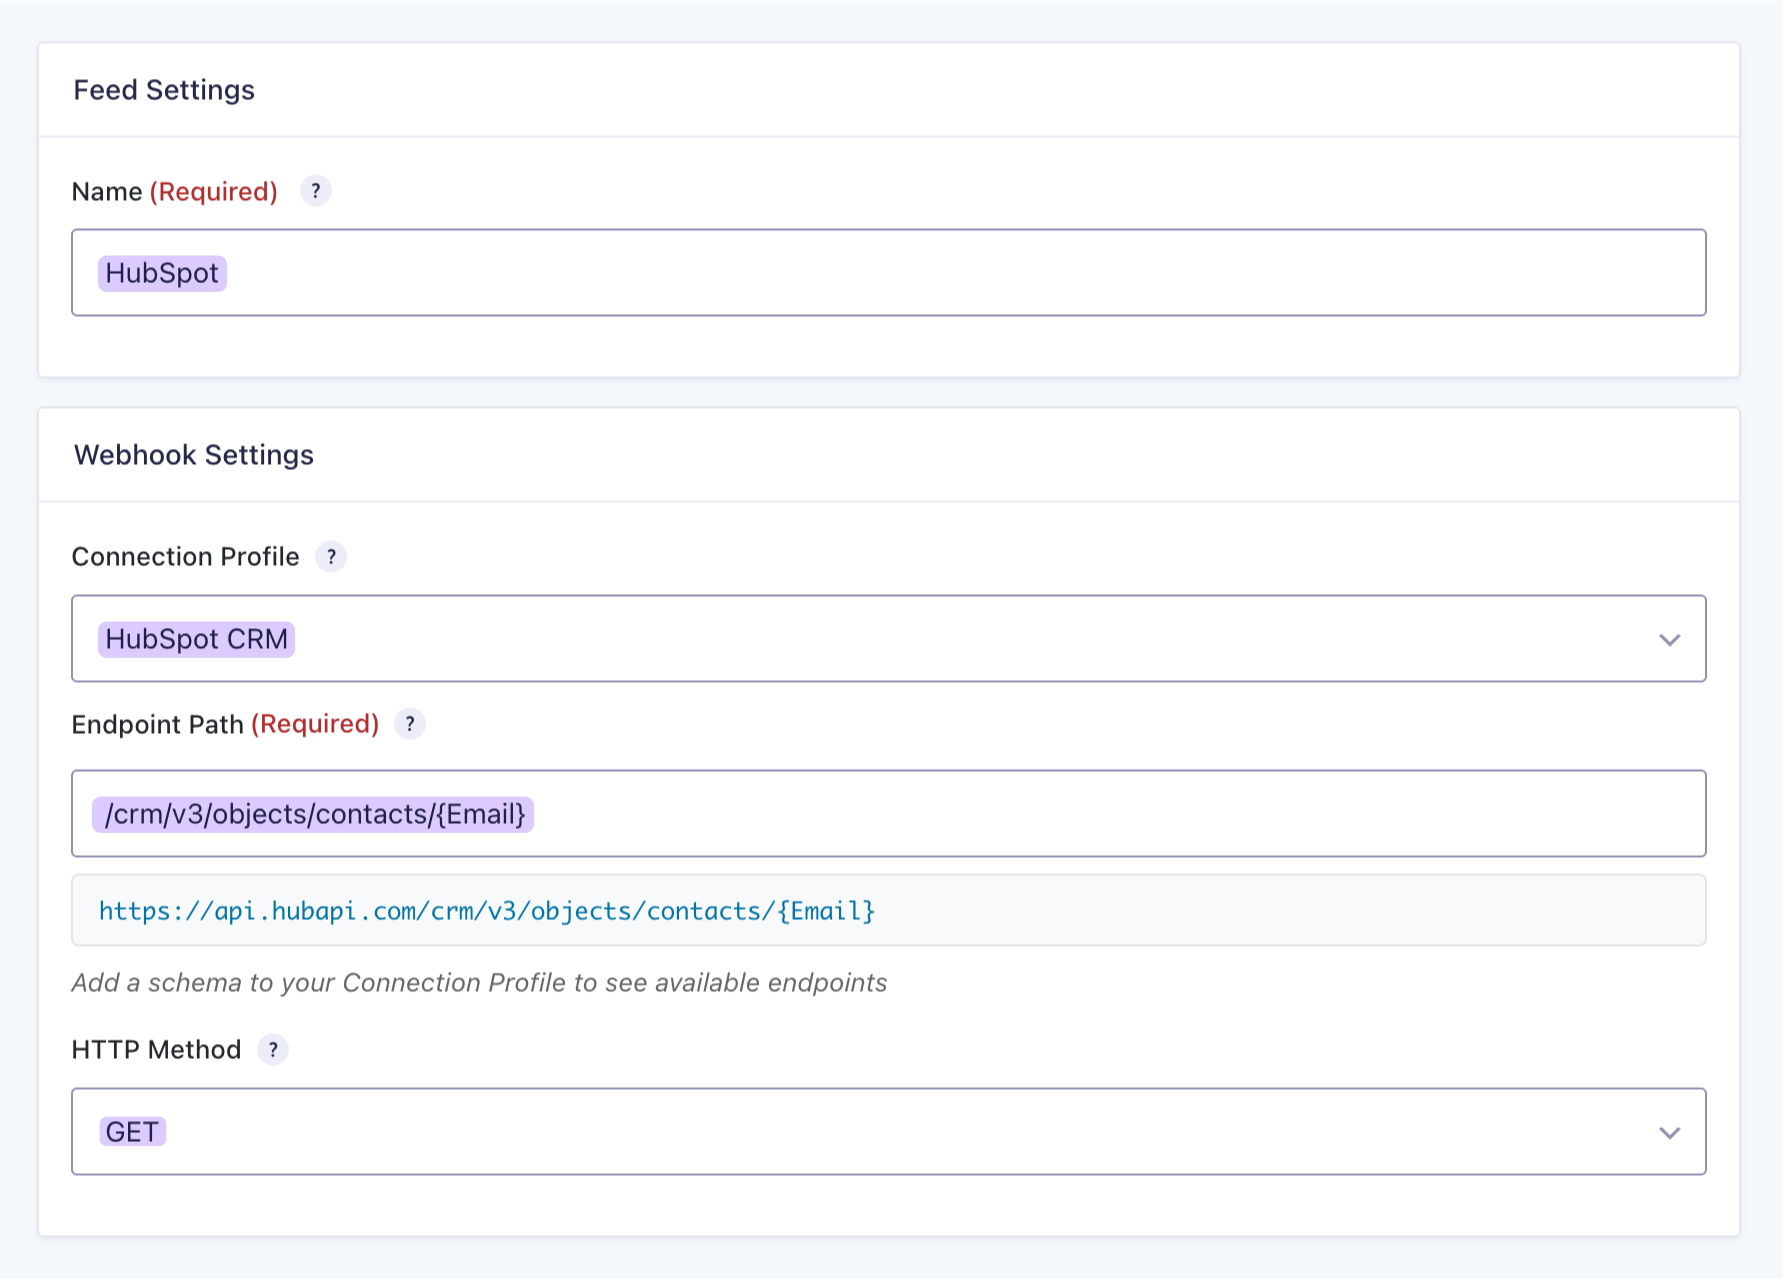
- Click Add New › name the feed—e.g.
HubSpot
Webhook Settings
- Select the connection profile ›
HubSpot CRM. - For Endpoint Path:
/crm/v3/objects/contacts/{Email}- This tells the API: “Look for the contact that matches this email.”
- HTTP Method:
GET
Note
Using a different CRM? Make sure to check its API docs to get the right endpoint. As an example, here’s HubSpots guide on retrieving a contact.
Request Configuration
Let’s fine-tune our request so HubSpot understands exactly what we’re asking for.
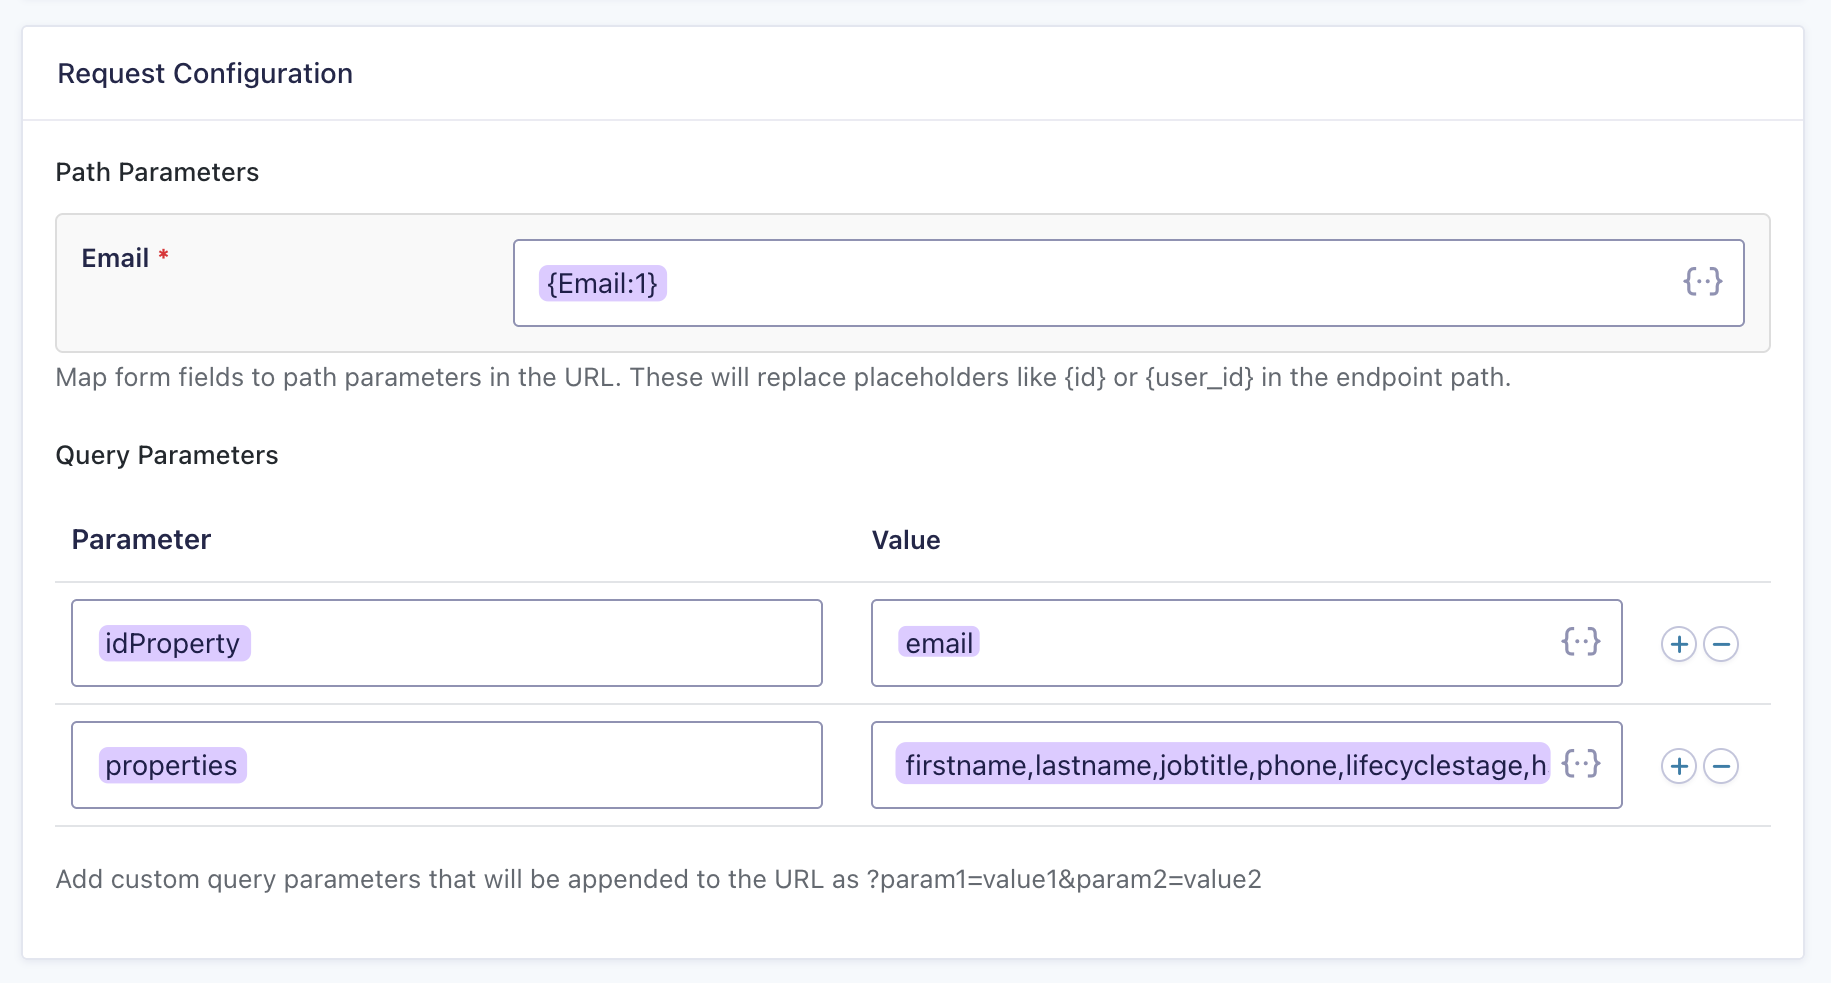
- Path Parameters: Click the merge tag icon › select your form’s
{Email:1}field. This tells HubSpot to use the submitted email to match records. - Under Query Parameters › add two new rows with these values:
| Parameter | Value |
|---|---|
idProperty | email |
properties | firstname,lastname,phone,jobtitle,lifecyclestage,hs_lead_status |
What’s happening here?
idProperty: By default, HubSpot looks for contacts by their number ID (likecontact 001). This parameter just tells it: “We’re using an email instead.”properties: tells HubSpot specifically which contact data to get.
Note
Not sure what the exact property name is in the CRM you’re using? Check your CRM’s API docs, just like HubSpot’s documentation on properties.
Response Handling
- Enable Response Handling › select Simple.
- Enable Require response to complete submission.
Why enable this?
Gravity Forms might save the entry before the API has fetched the data. To prevent this, we’ll ask the form to wait a few more milliseconds until the data arrives.
Response Field Mapping
This is where we tell Gravity Forms what to do with the data that comes back.
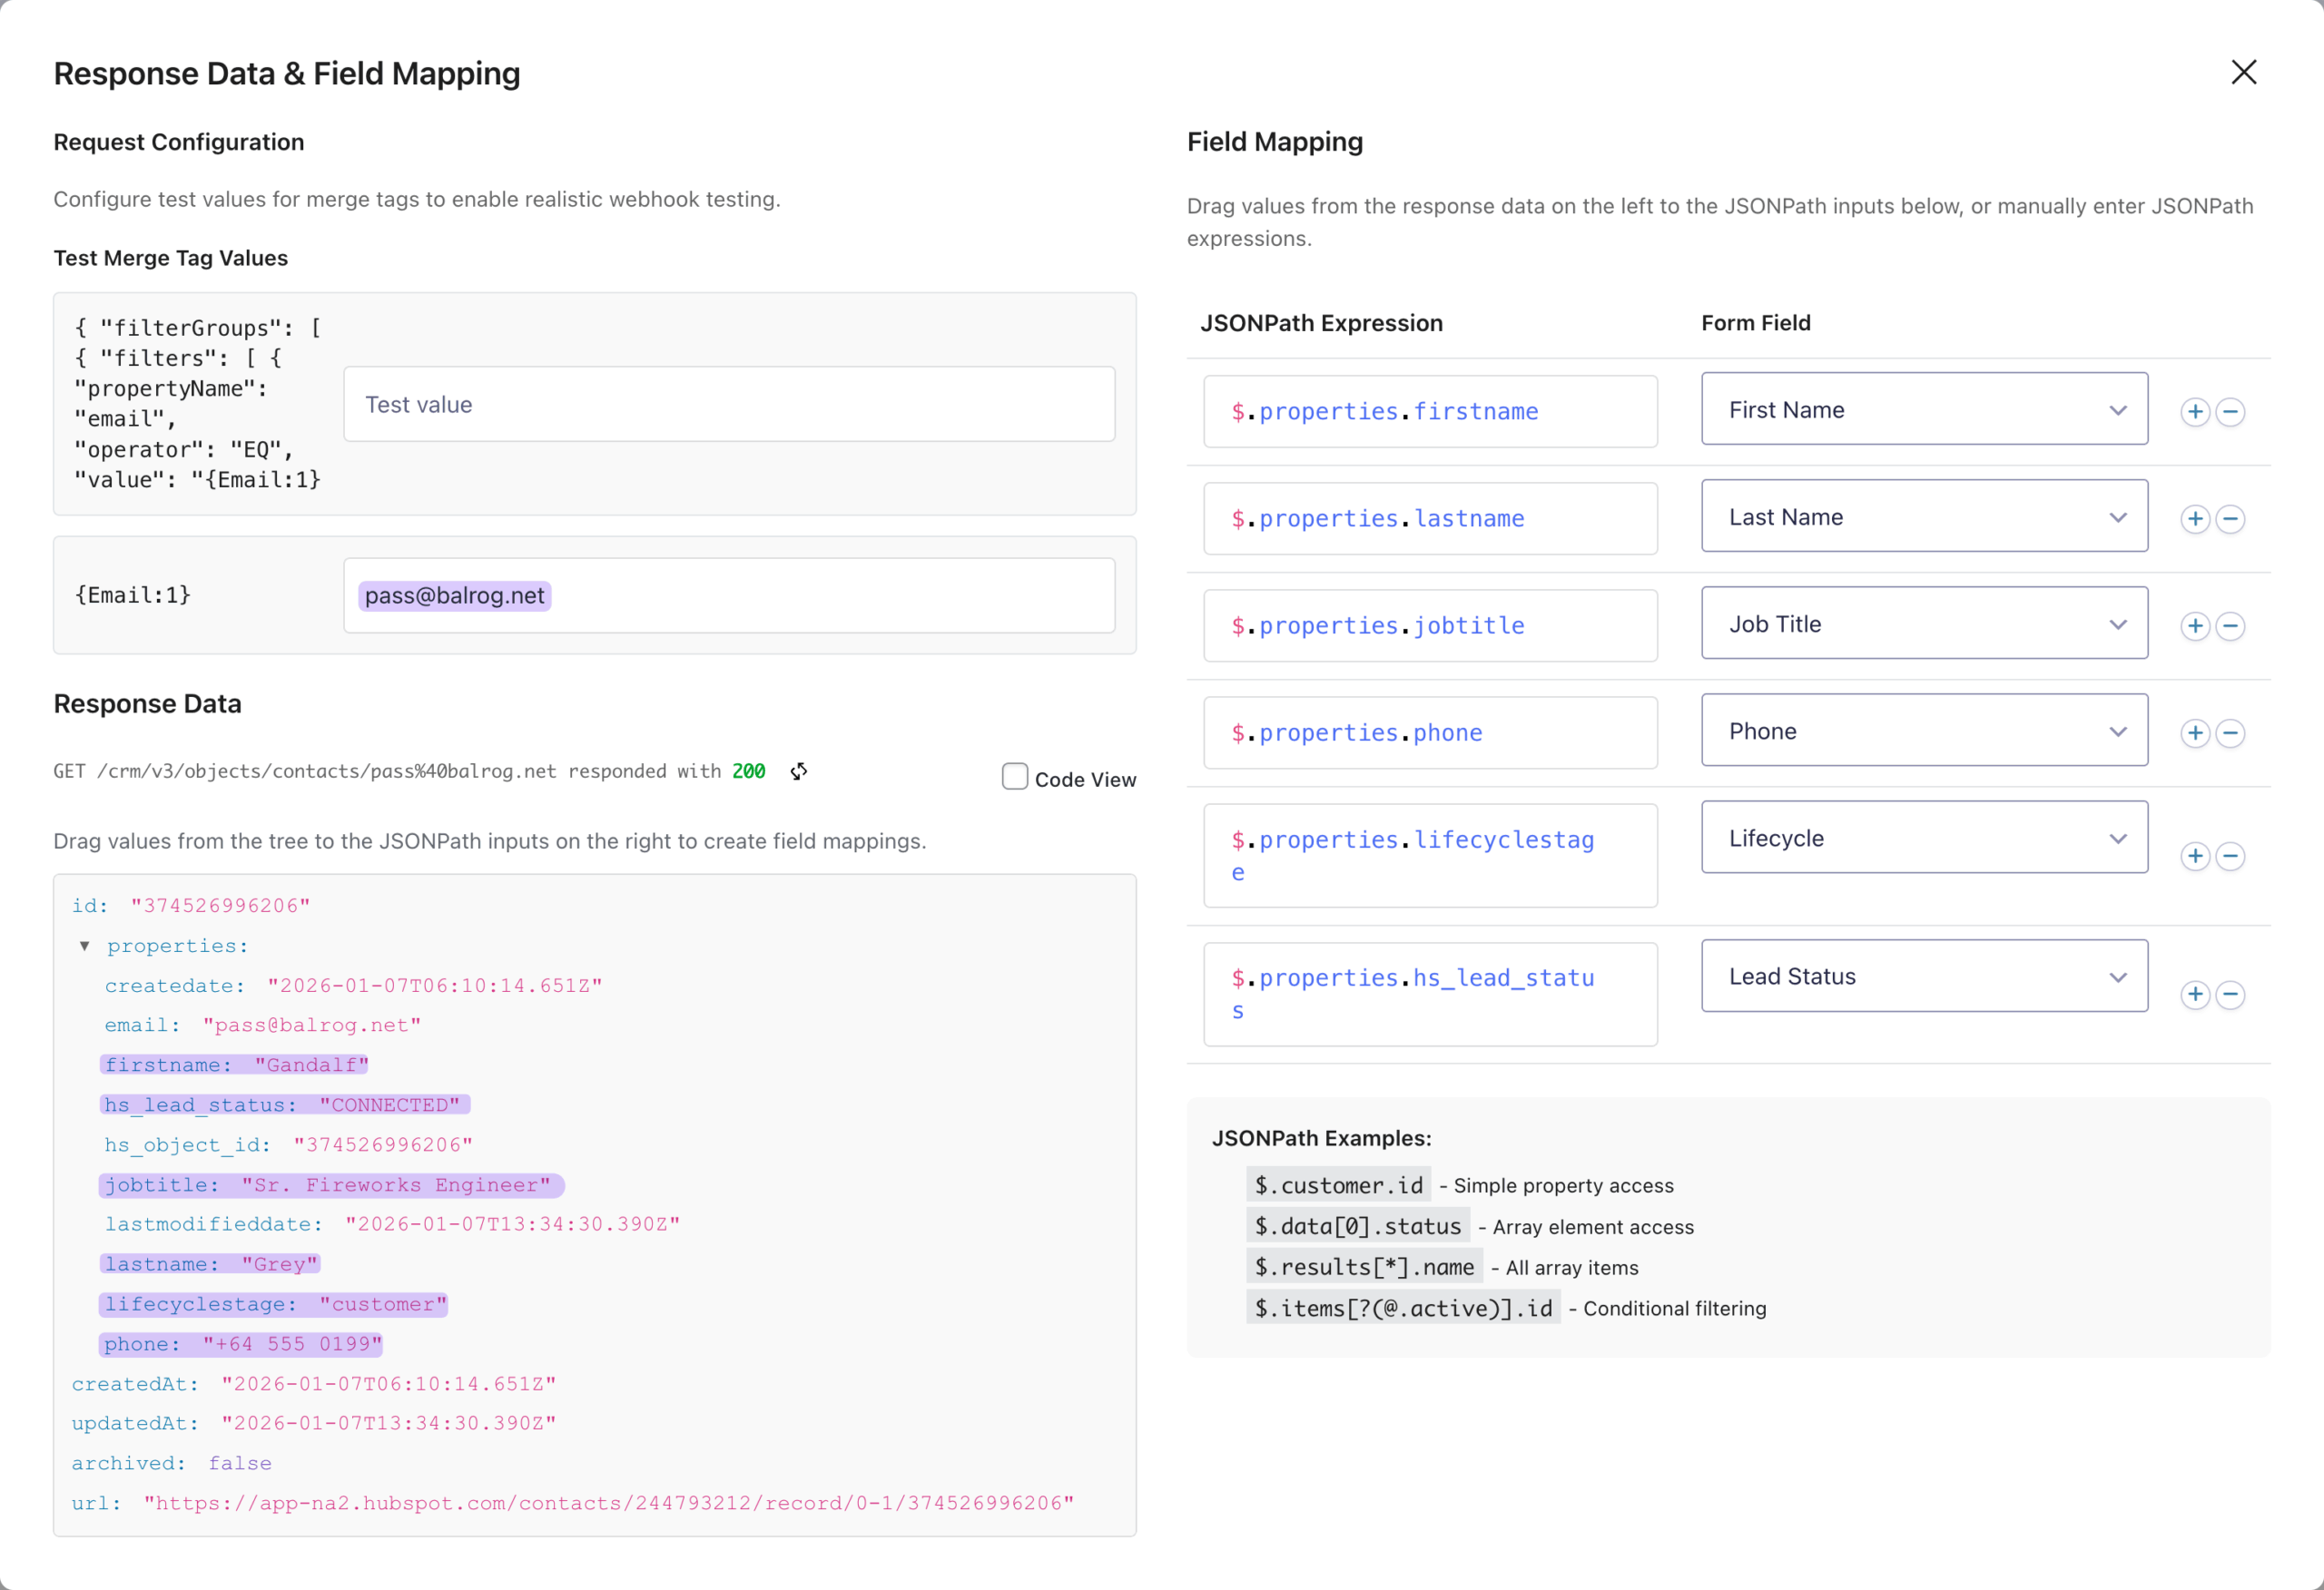
- Still in the feed settings › click Open Response Mapping Editor.
- In the
{Email:1} field: temporarily add a test email (use one that’s already in your CRM!) › click Test Request. - You’ll see the response data displayed as an interactive tree.
Clickpropertiesto expand it and see all the contact data we requested in the form of values called JSONPaths Expressions.
Drag each JSONPath Expression from the tree to its designated column on the right, then map it to the corresponding form field using the dropdown selector.- First Name:
$.properties.firstname - Last Name:
$.properties.lastname - Job Title:
$.properties.jobtitle - Phone:
$.properties.phone - Lifecycle Status:
$.properties.lifecyclestage - Lead Status:
$.properties.hs_lead_status
- First Name:
- Close the window › click Save Settings.
Preview your form, enter an email, and submit.
Check the entry and you’ll see all those hidden fields magically populated with the contact data we’ve requested. ✨
Bonus: Data Enrichment in Action
Here are a few more ways Gravity Forms can benefit from data enrichment:
- B2B Lead Gen: Marketing wants short forms. Sales wants context. To solve this, capture just an email, but pull in job title, company size, and the works, so sales knows who they’re talking to.
- Support Routing: If someone’s tagged as “Enterprise” in your CRM, use that data to send their ticket straight to your top-tier support team.
- Event Registration: Returning attendees shouldn’t have to fill out the same form twice! One email, and you’re done.
Go Forth and Enrich!
One more thing: if you wanna take this even further, you can pair this with GP Populate Anything and show the enriched data live on the form as users type. We’ve got a full guide on connecting Gravity Forms to any API—worth a look if you’re curious!
Got other API workflows in mind? Drop us a line below and we might cover it next. 😉