Complete Guide to Gravity Forms Conditional Logic
You’ll become a Gravity Forms conditional logic wizard with this complete guide, including advanced conditional logic, pricing, registration, and more.
Creating one static form to handle every single use and edge case is hard. Gravity Forms conditional logic fixes that, letting you adapt your forms based on user input or conditions.
Basically, conditional logic lets you do “stuff” differently based on how someone fills out a form or other information, like the time of day or day of the week.
With that power in hand, you can unlock all sorts of advanced use cases for your WordPress forms.
Once you master conditional logic, you’ll be able to simplify and optimize your workflows, create more personalized forms, better handle payments, and just generally get more from Gravity Forms.
In this post, we’re going to help you become a Gravity Forms conditional logic wizard. We’ll start with a general introduction to conditional logic in Gravity Forms.
Then, we’ll explore a ton of real-world use cases for conditional logic in Gravity Forms, like early-bird pricing for payment forms, role-based user registration, and lots more.
You'll need our suite of plugins to use this article. Buy Gravity Perks today to get conditional logic wizardry with all 33 of our galactic Gravity Forms plugins!
How Conditional Logic Helps You Build Better WordPress Forms
Conditional logic helps you create more powerful, personalized forms without needing to create separate forms for every edge case. This helps you…
- Eliminate extraneous fields – automatically hide fields that don’t apply to the person filling out the form.
- Personalize your forms – display fields that are personalized to each user.
- Create better notification workflows – route your notifications more intelligently by sending different notifications based on how someone filled out a form or the time/date.
- Create better web workflows – process submissions differently based on their content or time of day. For example, giving certain users a higher user role via your custom user registration form.
- Set up smarter pricing – create smarter pricing for payment forms, like different prices based on a person’s age or when they’re submitting the form.
How to Use the Core Gravity Forms Conditional Logic
Below, you’ll learn how to use conditional logic rules for three areas in Gravity Forms:
- Fields
- Notifications
- Feeds
All these features are available in the core Gravity Forms plugin.
How to Use Gravity Forms Conditional Logic for Form Fields
When most people think of Gravity Forms conditional logic, they’re probably picturing using conditional logic to show or hide fields based on how a person filled out previous fields.
For example, if you have a checkbox where users can subscribe to your email list, you could display additional conditional fields for people to indicate their interests but only after they first agree to receive your email list.
To add field conditional logic to a form field:
- Click on a field to display its settings.
- Go to the Conditional Logic tab.
- Flip the switch to Enable Conditional Logic.
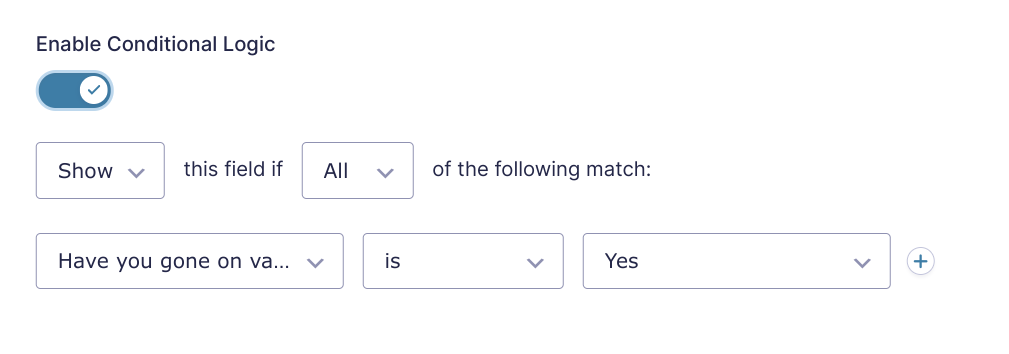
After flipping the switch, you’ll see new options where you can show or hide the field based on the value in a previous field. You can also click the + icon to add multiple conditions and select whether all of the conditions must be met or just some:
How to Use Gravity Forms Conditional Logic for Notifications
Gravity Forms conditional logic isn’t limited to just showing or hiding fields, you can also use it to power your backend notifications.
For example, you can send notification emails to different addresses and/or include different content in the body of the email based on how someone filled out a form.
To set up conditional logic for Gravity Forms notifications, go to Settings → Notifications while in the form editor. Then, create a new notification or edit an existing one.
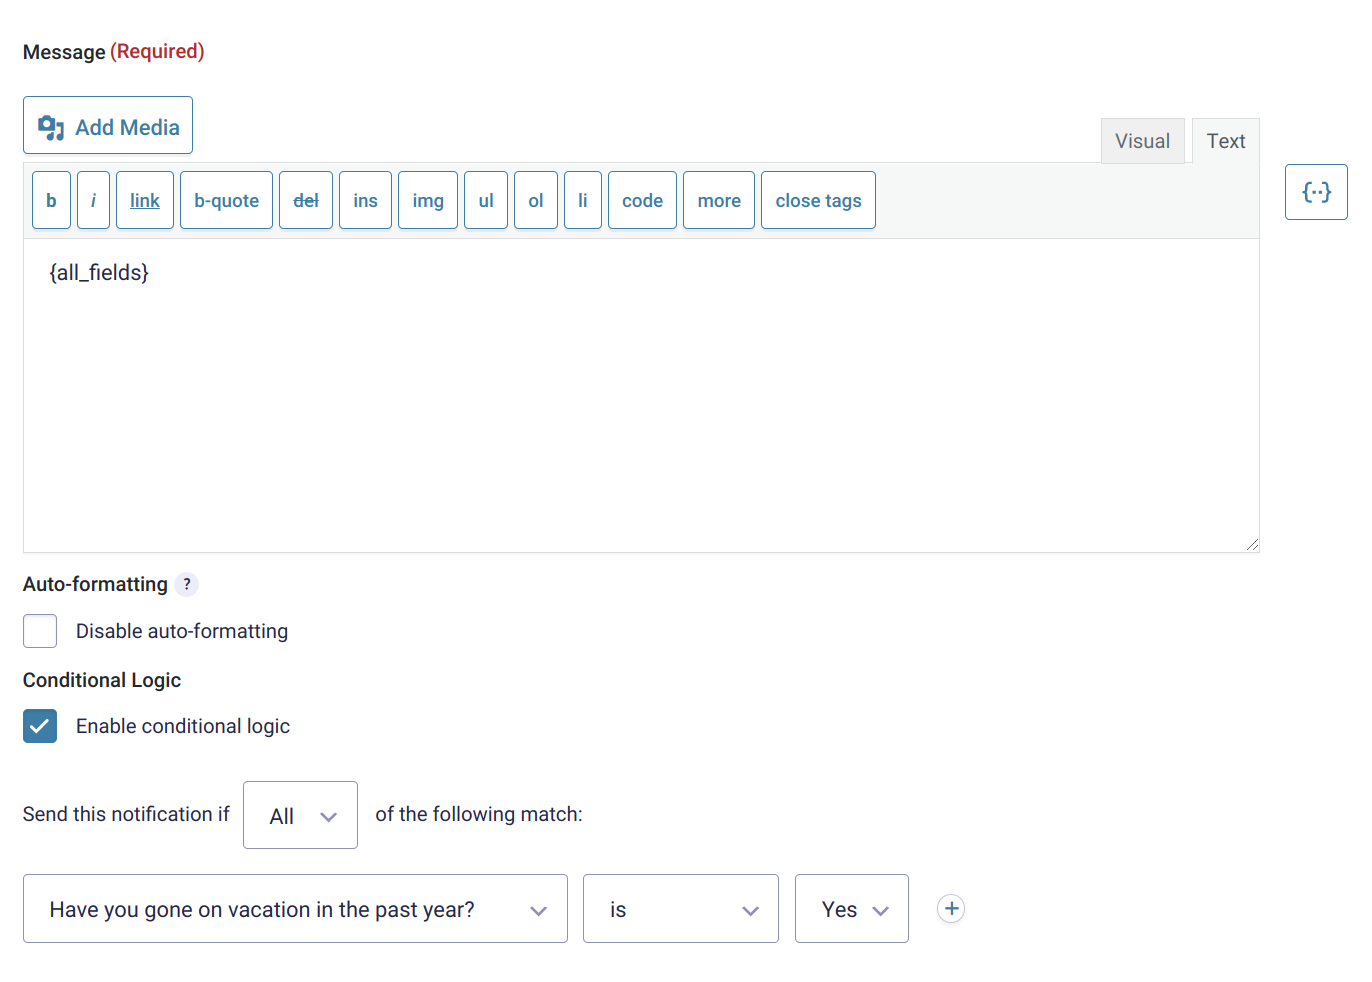
At the bottom of the notification interface, you’ll see a Conditional Logic checkbox. When checked, you’ll see new options to only send this notification if it matches some or all fields:
How to Use Gravity Forms Conditional Logic for Feeds
Finally, you can also use Gravity Forms conditional logic to handle your feeds.
If you’re not familiar with this term, a “feed” is essentially a notification that sends information to an external service.
In this case, external means anything outside Gravity Forms. For example, a feed could be sending…
- User information to WordPress for account registration.
- Emails and other data to your email marketing service or CRM.
- A support request to your ticketing service, like Help Scout.
- A file to your storage service, like Dropbox.
Feeds are a big part of what makes Gravity Forms so flexible, and being able to conditionally handle those feeds opens up a whole new world of flexibility for your forms.
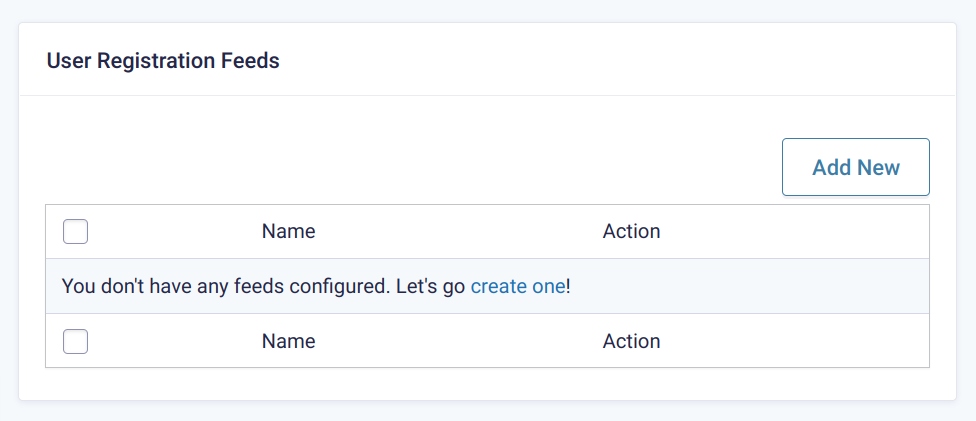
To create feeds for your form, you’ll need to be using a Gravity Forms add-on that supports feeds. For example, the Gravity Forms User Registration add-on:
Once you create a feed, you can scroll to the bottom of its settings to enable conditional logic for that feed:
Gravity Forms Conditional Logic Not Working?
If you followed the steps above but conditional logic is not working, a common culprit is your site’s JavaScript. Specifically, jQuery. You can learn more about the issue in this help article.
Typically the issue is multiple copies of jQuery are loaded on your site. The support article for “gravity forms conditional logic not working” on GravityForms.com linked above is seven years old, so this is a longstanding WordPress issue.
How to Extend Gravity Forms Conditional Logic With Gravity Perks
While the native Gravity Forms conditional logic is already flexible, you can take conditional logic even further with the conditional logic extensions in Gravity Perks’ collection of 50 Gravity Forms add-ons:
- Conditional Pricing – add conditional prices to your Gravity Forms Product fields.
- Conditional Logic Dates – conditionally show/hide fields based on the date, day of the week, time of day, etc.
- Populate Anything – conditionally load data using filtering based on the choices a user has made.
How to Create Conditional Pricing in Gravity Forms
If you’re using Gravity Forms to process payments, the GP Conditional Pricing perk lets you create flexible pricing levels for your Product fields without needing to create twenty different Product fields for every situation.
To use it, open a form where you’ve included at least one Product field. Then, go to Settings → Conditional Pricing and…
- Choose the Product field to which you want to add conditional pricing to from the drop-down.
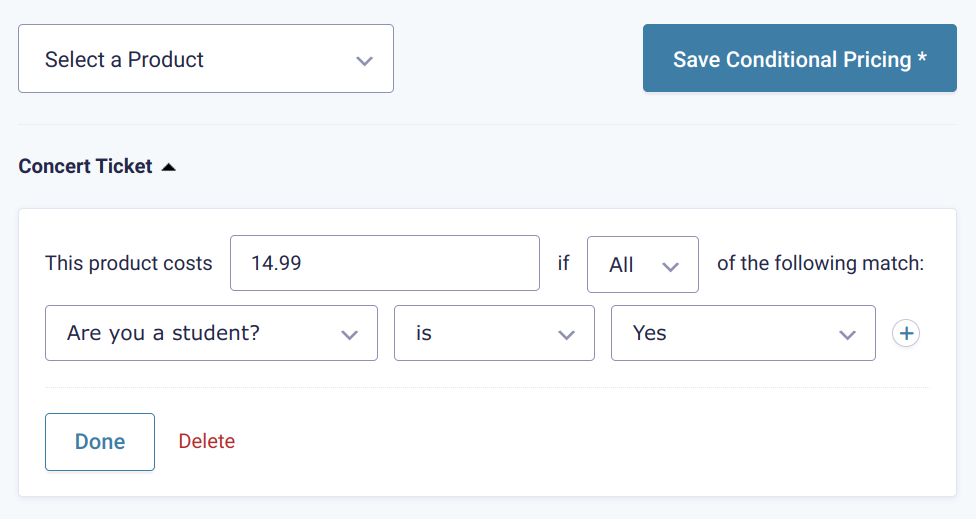
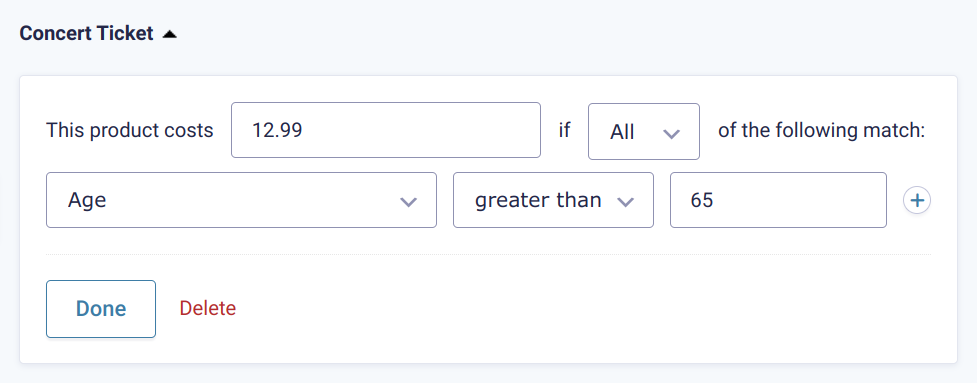
- Enter different prices depending on how a person has filled out the form using conditional logic.
For this example, the product is a concert ticket and we’re using conditional logic to show a different price depending on whether or not the purchaser has an active student ID. The ticket costs $14.99 if they say “Yes” and $19.99 otherwise.
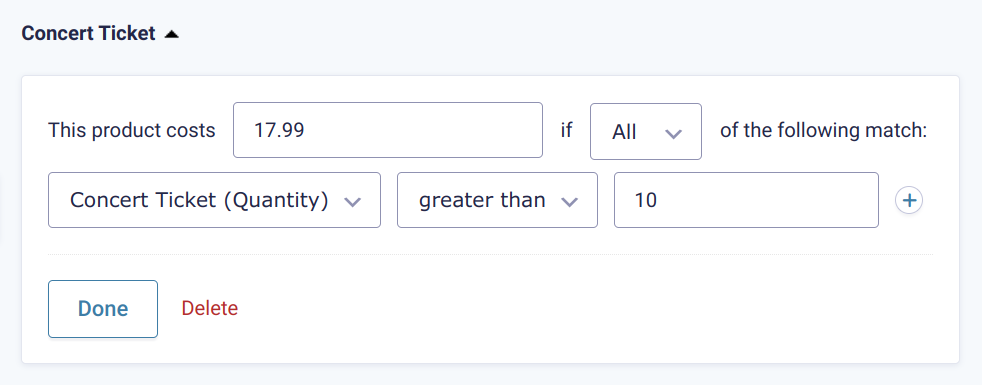
You can also create conditional pricing rules based on quantity. For example, if a person purchases more than ten tickets, you could offer a lower price per ticket:
How to Use Conditional Logic Based on Date or Time of Day in Gravity Forms
With the GP Conditional Logic Dates perk, you can show or hide fields based on dates or the time of day, including the…
- Date that a user selected in a date picker field
- Day of the week
- Day that the form was submitted
- Time of day
To use conditional logic dates, enable the regular Gravity Forms conditional logic for a form field.
You’ll now get two new options for date-based conditional logic:
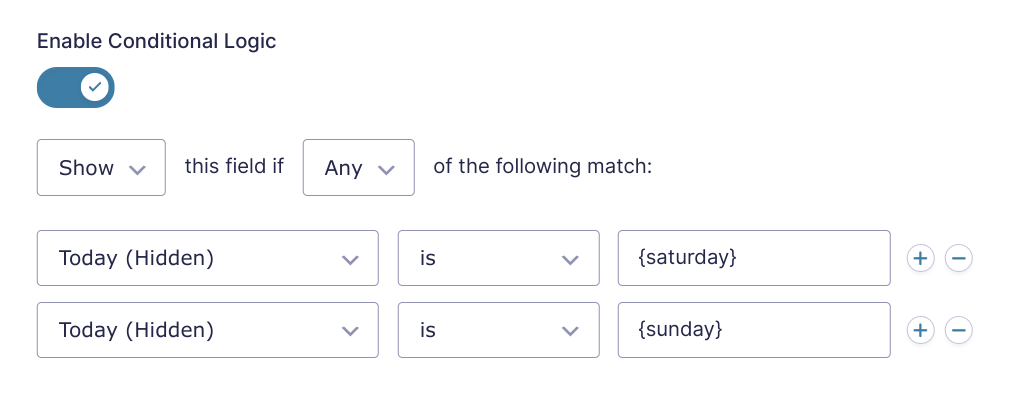
- Any date picker field – you can choose a specific day or use merge tags. For example, {saturday} or {today:+2 weeks}.
- The current time of day – e.g. before 12:30 pm
For example, if you want to only show a field on the weekend, you could add {saturday} and {sunday}:
You also don’t need to make the date picker field visible on the front-end to use dates in your forms. If you just want to use date-based conditional logic without making anything visible, you can:
- Add a Date field.
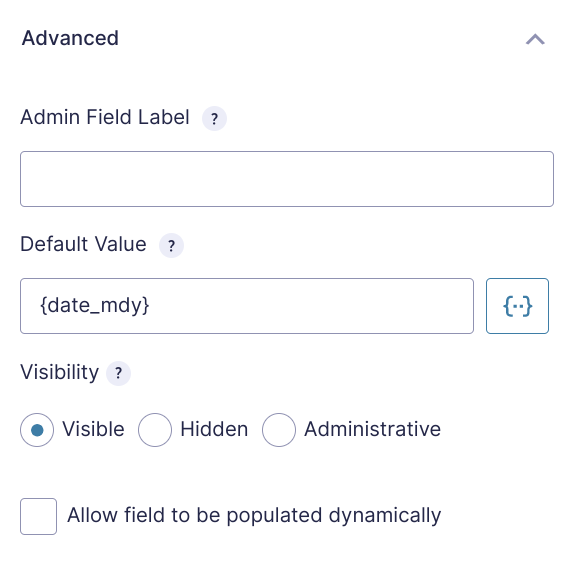
- Set the Default Value in the Advanced tab equal to {date_mdy} to populate it with the current date.
- Apply the gf_invisible CSS class to the field to hide it from end users.
You can also use time and date-based conditional logic for form notifications or feeds.
For example, if you have a form to process customer support requests, you could conditionally send notifications to different support teams based on the date or time of day. For example, divert form notifications to…
- Your weekend support team on the weekends.
- Your after-hours support team after 5 pm.
- Etc.
How to Conditionally Populate Forms With Data in Gravity Forms
Another way to create conditional logic in your forms is to display different data based on the choices a user has made.
For example, you could populate a drop-down list with different options based on the response to a previous form field.
A real-life use case of this would be:
- An Author drop-down field.
- When a user selects an author from the drop-down, the next drop-down field automatically populates its choices with the books from that specific author.
To set this up, you can use the GF Populate Anything perk. This perk lets you populate field choices and values with data from anywhere on your site, including…
- Posts
- Users
- Taxonomies
- Terms
- Gravity Forms entries
- Databases
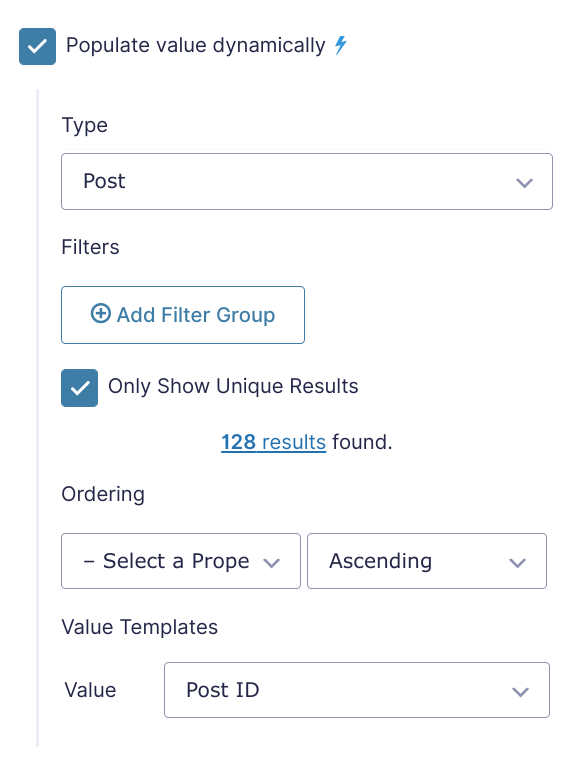
Once you activate the perk, you can start dynamically populating fields by following these steps:
- Add a form field that supports choices. Examples are drop-downs, radio buttons, checkboxes, text-based fields.
- Check the box to Populate value dynamically.
- Choose your input Type. For example, you could populate it with posts, taxonomies, other Gravity Forms entries, etc.
- Add filters to display specific objects (Optional).
- Use the Value Templates to choose what information to display for those objects.
You can learn more about using the GP Populate Anything perk in this detailed tutorial.
Utilize conditional logic with OpenAI. Gravity Forms OpenAI is a free plugin that lets you communicate with models like GPT3.5 from within your forms. Use optional conditional logic and PHP filtering, as well as fine-tuned models, to deliver customized content for your users.
Eight Real-Life Use Cases for Gravity Forms Conditional Logic
With a feature as flexible as Gravity Forms conditional logic, it can sometimes be difficult to envision how you can actually apply this feature to real-life use cases.
To help, let’s finish things out with a look at eight real use cases and how you can set them up with Gravity Forms conditional logic and/or some of the Gravity Perks extensions.
1. Apply Age-Based Pricing
If you’re selling products with Gravity Forms, you can use the GP Date Time Calculator and GP Conditional Pricing perks to automatically display age-based pricing based on a user’s date of birth.
For example, you can automatically apply senior or student discounts based on each form submitter’s age.
First, add a Date picker field and name it Date of Birth. This lets a person choose their date of birth.
Then, create a Number field and…
- Select Enable Calculation
- Enter {Date of Birth:1:age} in the formula to automatically calculate a person’s age based on their date of birth.
Finally, create a Product field for the item you want to sell. Then…
- Go to Settings → Conditional Pricing.
- Select your product from the drop-down.
- Create your conditional price rules based on the Age field.
2. Offer Early-Bird Pricing Discounts or Rush Pricing Surcharges
Early-bird pricing is a common strategy for live events, like conferences and concerts. Essentially, if people purchase before a certain date, they’ll pay less. Or, you could also apply these same principles in reverse to create higher rush pricing if people wait too long to purchase.
To set up date-based pricing in either direction, you can use the GP Conditional Logic Dates and GP Conditional Pricing perks.
First, you need to create a hidden date field that contains the current date. As you saw earlier, here’s how to set this up:
- Create a regular Date field.
- Go to the Advanced tab and set its Default Value equal to {date_mdy}.
- Apply the gf_invisible CSS class to hide the field from end users.
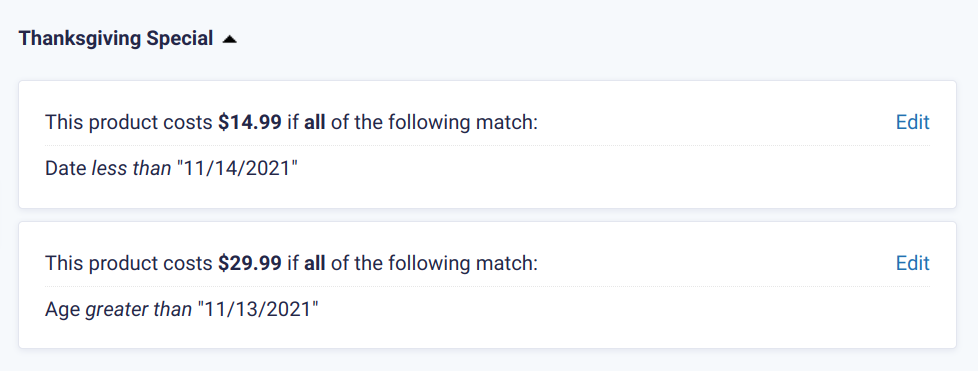
Then, create your Product field and set the base price for the item. After that, go to Settings → Conditional Pricing. There, you can create your pricing rules based on the date and/or time that a person makes their purchase:
3. Offer Conditional Discounts
Beyond early-bird pricing, you can also offer other conditional discounts like discounts for…
- Purchasing multiple years/months upfront.
- Choosing a specific product.
- Being a registered member.
To set up all kinds of discounts, you can use the GF eCommerce Fields perk.
It lets you add a new Discount field to offer a flat-rate or percentage discount.
Once you have your Discount field, you can then apply any of the conditional logic principles you learned about above.
For example, you could use date-based conditional logic to offer specific discounts for people who book during the week versus on the weekend.
Again, to add this type of date-based conditional logic, you can use the GP Conditional Logic Dates perk and then target specific days using merge tags, like:
- {saturday}
- {sunday}
4. Create Checkbox Products
With its native Product field, Gravity Forms doesn’t let you create checkbox products.
By using conditional logic, though, you can add a list of products where people can check as many products as they want. Gravity Forms will then accurately calculate the order total based on the choices a person made.
To create checkbox products in Gravity Forms, you can:
- Add a regular Checkbox field that lists each product choice.
- Create a single Product field for each item in the checkbox.
- Hide the Product fields from end users using CSS.
- Use conditional logic to only “show” a Product field when a user checks the corresponding box.
5. Assign Different User Roles During User Registration
Because Gravity Forms lets you use conditional logic in your form’s feeds, you can process user registrations differently based on a user’s input in the form.
For example, you can assign one user role to users who register with an email from your business’ domain while assigning a lower user role to people who register with third-party email addresses.
To set this up, you’ll need to:
- Create a user registration form using the Gravity Forms User Registration add-on.
- Create a user registration feed that assigns the relevant user role.
- Use the Registration Condition feature to apply conditional logic. In this case, you’ll only register the user if their email address contains “@yourdomain.com”.
- Create additional user registration feeds to handle third-party domain names and assign the relevant user roles.
You can extend this functionality further with the GP Auto Login perk, which lets you automatically log in users after they submit the form.
6. Display Different Confirmation Messages
You already learned how to send different notifications using conditional logic. But with the Gravity Forms conditional shortcode, you can also use conditional logic in the form confirmations that appear immediately after a user submits a form.
The basic shortcode snippet is as follows:
                    [gravityforms action="conditional" merge_tag="" condition="" value=""]</pre>
<pre>Content you would like to conditionally display.</pre>
<pre>[/gravityforms]
You can use any field in your form as the logic and customize the message by editing the text.
With the GP Preview Submission perk, you can also include conditional logic in HTML fields using this shortcode.
There is a world of shortcode possibilities beyond the conditional shortcode. Check out our comprehensive guide on Gravity Forms Shortcodes to learn more about the essential types of shortcodes — and how to get started with displaying and customizing each.
7. Change a Feed’s Submit Button, e.g. Dedicated “Pay Via Stripe” Button
For some forms, you might want to use a different “Submit” button based on a user’s choices.
For example, if you’re using the Gravity Forms Stripe Add-On plugin, you could change the button to “Pay via Stripe” if people select Stripe as a payment method so that they know they’re going to be redirected to Stripe’s website.
To change the Gravity Forms submit button based on the feed, you can use this free plugin.
If you’re using multiple feeds, you can then use conditional logic to use a different feed based on a user’s choices (and thus change the submit button based on a user’s choices).
8. Show/Hide Fields Based on Whether a User is Logged In
If you allow registration on your site, it can be helpful to show or hide fields based on whether or not a user is logged in.
For example, you could combine this with the GF eCommerce Fields perk from above to offer special discounts to logged-in users.
To use a user’s logged-in status as a conditional logic value, you can create a hidden field to store the user’s login status. To populate it, set the Default Value equal to the {user:user_login} merge tag.
From there, you’ll be able to use that hidden field in your conditional logic rules. For example, showing/hiding the Discount field based on the field containing the user’s login status.
Get Started With Gravity Forms Conditional Logic Today
Mastering conditional logic in Gravity Forms helps you create better, more personalized forms and also improve your backend workflows when it comes to notifications and data processing.
By itself, Gravity Forms already lets you make powerful conditional choices.
Then, Gravity Perks extends that core functionality with new options to:
- Create conditional prices, including conditional discounts.
- Use dates, days of the week, and times as conditional logic rules for fields, notifications, and feeds.
- Populate data in a form based on users’ choices.
To get access to those new features, purchase Gravity Perks today.
You can buy a single add-on or get access to all of Gravity Perks’ 50 add-ons for one low price.





If only Gravity forms had a:
SHOW this field if ANY 2 (or any 3 etc) of below are selected. (Does one of your perks have it?)
I need it for a form that let’s people know if they have enough ID to untertake a course.
Cheers
Hi Peter,
We do not have a solution to setup an advanced conditional logic. You may want to check out this other plugin to see if it helps.
Best,
Usually I don’t learn post on blogs, however I wish to say that this write-up very forced me to take a look at and do so! Your writing style has been surprised me. Thank you, quite great article.
Thank you. Glad you liked it.
Great plugin, but things get extremely painful because onte thing is missing: nested AND and OR conditions! Please do it.
Hi Agnes,
Conditional Logic is a core feature of Gravity Forms, so I’ll suggest you get in touch with the Gravity Forms Support to add your feature request.
Best,
The problem with Gravity Forms Conditional Logic is that it is very basic. You only can select All or Any and often it is not enough as you need both. This actually surprised me.
Hi Janis,
You may want to get in touch with Gravity Forms and add this to their Roadmap. https://www.gravityforms.com/gravity-forms-roadmap/
Best,
Hi. Great article thank you. The power and depth of GF Conditional Logic is one of the most underrated features of GF. It solves so many problems website owners face especially when using GF as a marketing tool. Cheers Shane
Thanks Shane! We are glad the article is helpful.
Hello! I am looking for a way to compare the value of a formula in the next field. Example: 1st field: X=AB+CD 2nd field: if(x>1; 23; x>2; 111; x>3; 87342; x>4; 0) How does it work? Thx, Uli
Hi Uli,
This looks like a question that will require some digging.
If you have an active Gravity Perks License, can you please get in touch with us via our support form with your account email address so we can assist you further.
Best,
I hope this is the right place to ask. I’ve created a quiz. Not using the Quiz Add-on. I’m using radio buttons with 3 choices with values. I have around 20 fields or questions. I wish to include on the results some feedback to the user based on the choices he/she made. Th quiz is not a right or wrong quiz. It is medical quiz. I have the GP Post Content Merge Tags and it is really useful but not for this purpose..
I thank you for your help
Hi Fernando,
You may want to check out this tutorial documentation on how to use Advanced Conditional Shortcode, to display different messages/feedback on the confirmation page based on the user selections. If this doesn’t work for you and you have an active Gravity Perks License, you can open a ticket with us via our support form, with your account email so we can assist you further.
Best,
“advanced conditoinal logic”
What is conditoinal logic? ;-)
Hi Peter,
Conditional logic allows you to build interactive forms that let you collect the data you need without straining the user experience. You may want to check out Gravity Form’s documentation on Conditional Logic for more information.
Best,
Excuse me, the form will merge to generate an independent ID field value based on the user input fields. I want to judge whether the ID has been submitted before submitting it. What can I do?
This sounds like a good fit for our Require an Existing Value for Submission snippet.
Nice write up.
Using the GF Unique ID, I’d like to ask if it is possible to apply conditions based on the last digit of the unique ID of a form submission. This is different from using the “If… exists” logic as the interest here is on the last digit (or even last two digits) and not all the numbers.
The idea is to see if form submissions (tasks) can be assigned to team members in a somewhat orderly and equal manner.
For example: Upon submission of form, Notifications for form entries with Unique ID’s ending in: 001, 121,541, 341, … should be sent to “Admin 1”; 012, 002, 022, 172,… should be sent to “Admin 2”; 003, 013, 023, 453, … should be sent to “Admin 3”; Etc.
Is there a way to achieve this?
Hello! We may be able to come up with a solution for this one. Do you have a Gravity Perks License? If you do, go ahead and reach out to our support channel here.
Hello, Is there a way to apply conditional logic via a hook in PHP? For instance, if someone enters an email from a certain domain @client2.com Then show a HTML message, or show/hide a second field. I’ve scrolled through snippets and found nothing so far. Thank you, R
Yes there is. Are you sure its PHP you are after?
Within the Conditional Logic of the field/HTML message, you can show/hide the field if the value of another field “contains” a string, such as “@client2.com”. It checks for the string as soon as the user focuses out of the field. That’s within Gravity Forms itself.
If you’re looking for a PHP hook to show/hide the field/HTML message on the render of the page (not as the user types it, with data that is already available either by URL param or other means), then I’d suggest doing it like this with Gravity Forms hooks already available:
http://snippi.com/s/2cdr9ae
(I did not test the syntax/validity of the snippet, just wrote quickly)
Hi Rb,
I agree with Kaden, you can achieve what you want to do with the contains operator of conditional logic, which is also available within HTML fields. Please check it out.
Thanks, Kaden.😀
Best,
Thank you guys! I have a list of items in a separate database, and I want to be able to check various forms & notifications against that list, and so rather than manually changing field conditions in 3 places, I wanted to automate that. Appreciate your code help! R
Hello RB, THis could be accomplished by using the gform_pre_render hook. That way you can apply a conditional that would need to be met so that the notification would fire off correctly. You can find an example here on how to configure a conditional.
Per your most recent comment, you could generate the conditionals dynamically on the gform_pre_render hook too. Append new conditionals to a $field Object within the $form Object. For example, on the $field Object on the conditionalLogic key:
[conditionalLogic] => Array ( [actionType] => ‘show’ [logicType] => ‘all’ [rules] => Array ( [0] => Array ( [fieldId] => 123 // ‘contains’ [value] => ‘@client2.com’ ) ) )
Add as many rules as you’d like there.
Hello Kaden, This is a great write up and thank you for sharing your knowledge!
Is there a way to conditionally require a field? Like if I check one box, can I then change another field to required (instead of optional).
I’m a client of yours and I’m not sure if perks has this available.
Hello Gabe, Is this what you are looking for? Let us know if you have any other questions.
Thanks! You rock dude. That’s exactly what I needed and my google fu skills were failing me :)
Hi Chris,
You will be needing only the GP Limit Submission Perk from Start, so a Basic License should be okay for you.
Best,
Looking for some pre-sales help/advice. Re conditional logic and the limit entries perk.
I can’t work out from the tutorials, but can I use conditional logic+limit entries to limit submissions based on a field value on a per page basis?
So I’d have a hidden field ‘Entries’ , which auto populates on the form using the custom field value… {custom_field:entries_available} . Can I then set a rule to only allow that number of entries on that post id/url?
So the conditional logic would be if {custom_field:entries_available} is 25 on post_id 234 can the form prevent entries once 25 has been reached on post_id 234, but then continue to allow entries on other post_id’s ?
Is this possible? Or do I need to set up a new limit-entries feed per post_id/url and have the entry limit number added directly to that feed, rather than referenced in a field value?
Ideally I would want to simply create posts with entry limits as custom field values and publish them, with each post preventing form entries when their {custom_field:entries_available} has been reached. This would obviously be much easier than creating a new ‘limit-entries’ feed for each post, if it was possible!
Hope this makes sense
Sorry if this is the wrong place to ask, I cannot see another way to find out.
Thanks
Hi Chris,
You could get the Post ID via the query parameter, populate a field with it, and then use that field in the conditional logic. But this may involve setting up multiple conditional logic for every post or page the form will be on. You could also use our Limit Submission Perk to easily set up different submissions limit on a form per Page. All you have to do is to create different feeds and set up the rules for the form on the various different pages it will be embedded on. You can read more about how to set up a limit based on the Embed Url
That being said, if you have a Gravity Perks license, you could also send us a message via the support form so we can assist you further.
Thanks!
Thanks Samuel, So yes I I expected a new feed would be required for every page/post the form is live on would be the only way to set different limits on a per page/post basis. Thanks for confirming. I will be purchasing, my only issue now is to decide how many of your perks I need from the start and which package to go for! Thanks!
This article could be improved by also explaining all the ways the Conditional Shortcode could be used, such as within the notification emails or confirmations.
https://docs.gravityforms.com/conditional-shortcode/
Hello, thank you so much for the feedback. We are actually going through an update of all our articles to not only be updated with recent changes, but also include many more examples on how to use each perk. We look forward to releasing these as soon as we can get them out. 😃