Complete Guide to Gravity Forms reCAPTCHA and Gravity Forms Spam
Everything you need to know about spam prevention using Gravity Forms, including how to use reCAPTCHA and other tools.

reCAPTCHA is a free Google service that helps you protect your website from spam. You can add it to your website or forms (for example by using Gravity Forms reCAPTCHA) to block automated software like bots while making it easy for users to access your website.
reCAPTCHA v2 and reCAPTCHA v3 are both good anti-spam solutions for most WordPress users even though it has a few limitations. That said, there aren’t many solutions out there that are better than reCAPTCHA.
With this in mind, in this article, we’ll show you how you can add reCAPTCHA to your Gravity Forms. We’ll also explain how you can supplement it and enhance the user experience your Gravity Forms reCAPTCHA delivers using Gravity Perks.
- Gravity Forms Spam Prevention Techniques
- How to Add reCAPTCHA to Gravity Forms
- Other Ways to Beef Up Gravity Forms Spam Protection
- Supercharge Gravity Forms reCAPTCHA
Gravity Forms Spam Prevention Techniques
Gravity Forms packs built-in anti-spam options including reCAPTCHA and spam honeypot protection. Here are some of the different ways you can prevent spam entries:
- CAPTCHA and reCAPTCHA. CAPTCHA and reCAPTCHA are both great solutions for preventing spam entries in Gravity Forms. The benefit of using this spam prevention technique is that these fields are available as Advanced Fields in the Gravity Forms form editor out of the box. reCAPTCHA works in the background to identify if the user behaves like a human or a bot. This prompts privacy concerns from some.
- Double opt-in. An easy way to prevent spam entries in your email list is by setting up double opt-in. This means that users have to click on a confirmation link sent to their inbox to join. We recommend the Double Opt In for Gravity Forms add-on for implementing it on your website.
- Honeypot field. Honeypot fields are hidden fields that only bots can detect. So, if a submission comes through that has the honeypot field filled, you’ll know that it came from a bot. The main downside of this is that the user might have autofill features enabled that automatically populate the form field. However, you can use this in combination with other spam prevention techniques. You can activate a honeypot field with Gravity Forms on the Form Settings page.
- Test question. You can set up a simple test question by adding conditional logic to your form’s Submit button. If the user answers correctly, the Submit button automatically becomes active. You can easily combine the test question technique with other spam prevention techniques.
- Limit submissions. You can prevent repeat spam submissions by limiting the number of times users can submit your form. This spam prevention technique is super easy to set up and can be combined with honeypot fields.
- Blocklists. Setting up a blocklist of words, IPs, or email addresses is an effective way to prevent spam entries. This works great with the honeypot field spam prevention technique.
- Delete entries. Delete unwanted entries as soon as they’re submitted. Use this in tandem with the blocklists technique and conditional logic to determine which entries to delete and which ones to keep.
Speaking of spam. Have you tried ChatGPT? We provide a free plugin that integrates Gravity Forms directly with OpenAI. You can use it to check a submission for spam, check plagiarism, summarize key takeaways, validate information, or anything else.
How to Add reCAPTCHA to Gravity Forms
Setting up Gravity Forms reCAPTCHA v2 in WordPress is incredibly easy and you don’t have to use a separate plugin.
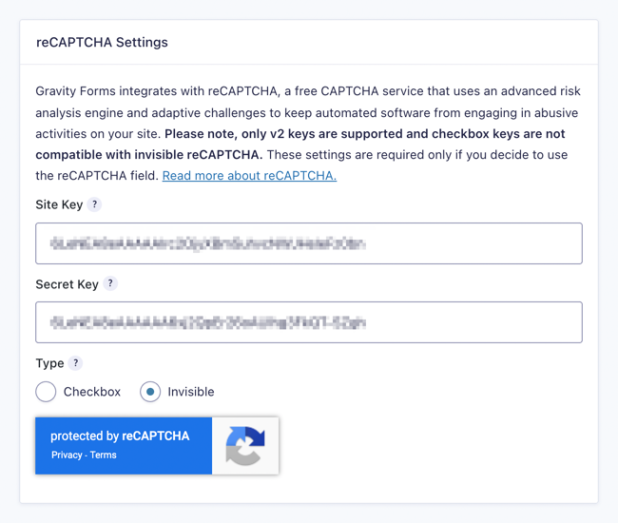
If you haven’t done so already, you’ll first need to sign up for a free reCAPTCHA API account. Once that’s done, head over to the Gravity Forms settings page by navigating to Forms > Settings from the WordPress admin panel.
Enter the reCAPTCHA Site Key and Secret Key under the reCAPTCHA Settings option. You can also select which type of reCAPTCHA to add to your WordPress forms – Checkbox or Invisible. Click the Save Settings button to proceed.
Now, you can add Gravity Forms reCAPTCHA to any form (whether it’s a registration form or a contact form) using the form builder.
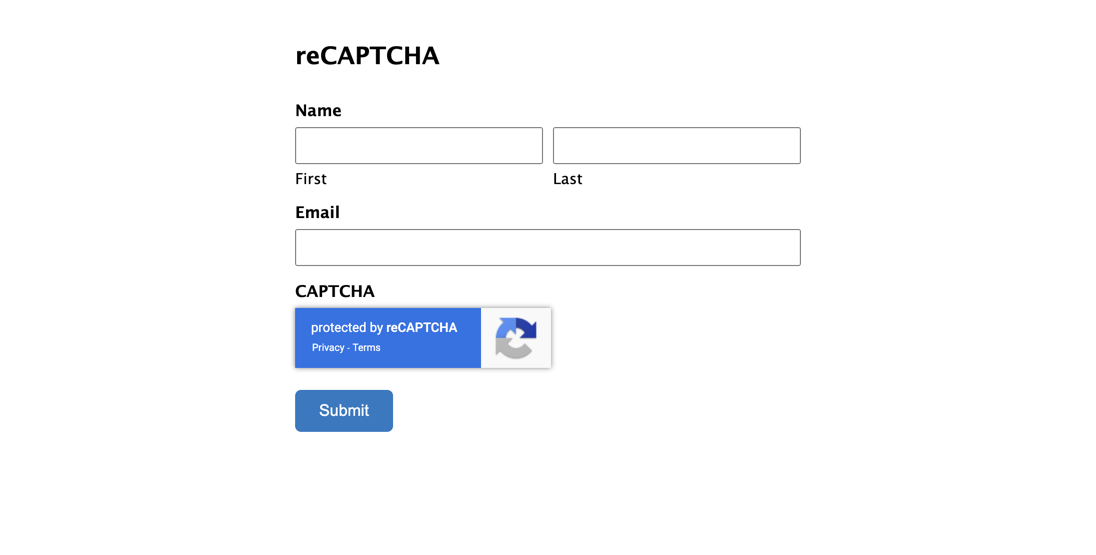
To add the reCAPTCHA field, simply drag and drop the CAPTCHA form field (under Advanced Fields) to your form. Click the Update button to continue.
Other Ways to Beef Up Gravity Forms Spam Protection
If you’re concerned about user privacy or simply don’t want to (or can’t) use a Google service on your website then you can protect Gravity Forms against spam in other ways.
The easiest way to supercharge your Gravity Forms spam protection is by using Gravity Perks and its add-ons. Here are some perks to help you get started with a step in the right direction:
Limit Online Form Submissions
Using GF Limit Submissions, you can effectively prevent repeat spam entries and hacking attempts from spambots on your WordPress website by limiting online form submissions.
GF Limit Submissions
The perk offers tons of options in filtering and limiting entries for your Gravity Forms forms. For example, you can set it up to limit entries by IP address, type of entry, user, role, URL, field value, and much more.
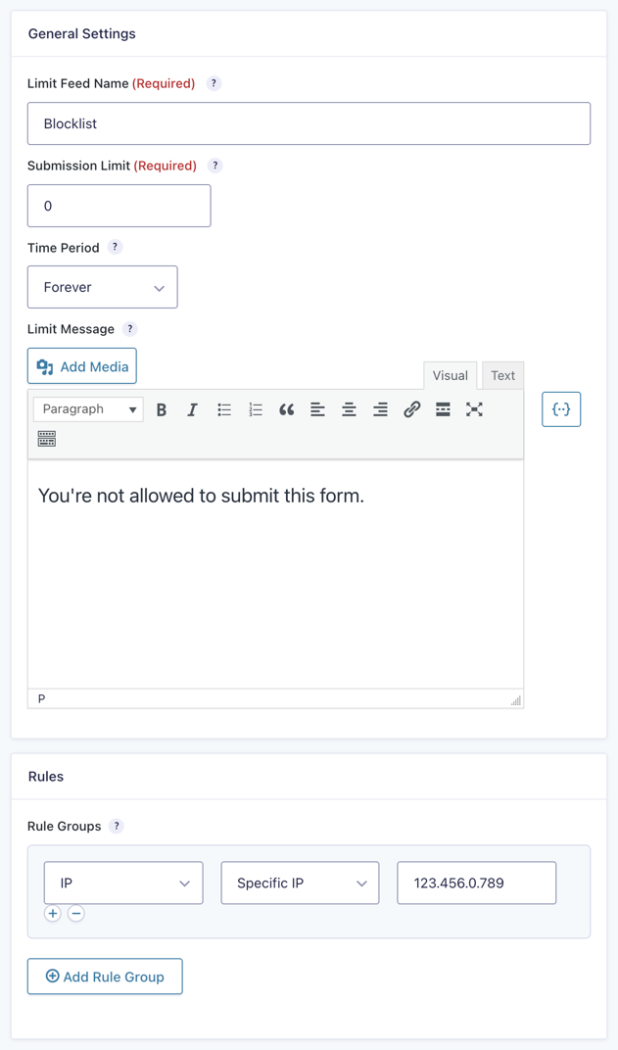
You can use this perk in tandem with the Gravity Forms reCAPTCHA solution to better manage user submissions. Once you have the perk installed and activated, go to the form you’d like to limit entries on. Head over to the form settings by navigating to Settings > Limit Submissions, click the Add New button, and fill out the General Settings.
For example, if you wanted to prevent submissions from a specific IP address, you’d configure the limit feed settings as follows:

Click the Update button to continue. This way, users with the specified IP address won’t be able to submit the form. You can set up as many rule groups as you’d like using GF Limit Submissions.
Set Up a Blocklist to Prevent Spam Submissions
GF Blocklist lets you specify a list of blocklist words, IPs, or specific email addresses in order to prevent unwanted submissions through Gravity Forms.
GF Blocklist
You can use the gpb_enable_honeypot hook to silently reject the submission while making it appear as if the submission was successful. This discourages spammers from attempting to find loopholes in your blocklist to exploit.
This option can be configured for a single field, multiple fields, or for all fields in a Gravity Forms form.
The enable the blocklist on a single field, simply navigate to a form field’s Perks settings and tick the checkbox next to the Validate against WordPress “Comment Blocklist” option.
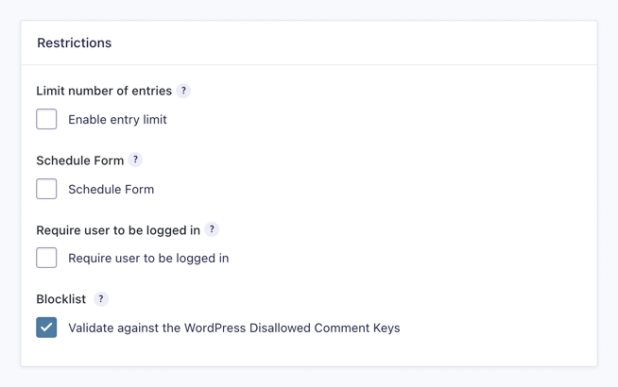
To enable the blocklist for the entire form, head over to Restrictions from the form’s settings area and tick the checkbox next to the Validate against the WordPress Disallowed Comment Keys option.

To kick it up a notch, here’s a complete WordPress comment blocklist from GitHub that you can combine with the GF Blocklist perk to get the simplest spam-killer ever!
Automatically Delete Gravity Forms Entries Upon Submission
An effective approach to keeping information safe is to not retain data and attachments collected from forms on your server.
GF Disable Entry Creation
Using the GF Disable Entry Creation perk, you can automatically delete a Gravity Forms entry after the form is submitted. The perk also deletes any associated files that are attached to the submission.
Once you have the perk installed and activated on your website, you can disable entry creation by going to the form’s settings and ticking the checkbox next to the Entry creation option.
Supercharge Gravity Forms reCAPTCHA
Adding Gravity Forms reCAPTCHA to your forms is a simple and effective way to prevent spam submissions in WordPress. You can choose between two different types of Gravity Forms reCAPTCHA – checkbox and invisible reCAPTCHA.
And, whenever you’re ready to take things to the next level, you can use Gravity Perks alongside Gravity Forms reCAPTCHA to beef up your spam protection and better protect your data. We recommend using the GF Limit Submissions, GF Blocklist, and GF Disable Entry Creation perks as add-ons.
So, how will you protect your WordPress site against Gravity Forms plugin spam submissions? Share your thoughts in the comments section below.


Hi, I am using gravity forms with recaptcha. But when a china client opens up the form, the recaptcha doesn’t work because google limitations in that country. However, there is a global version of the recaptcha, but i can’t find anywhere in gravity forms setup to configure this (contact 7 has settings for this).
Here is googles suggestion to change this, but I’m running WP and Divi and not sure where to change.
https://developers.google.com/recaptcha/docs/faq#can-i-use-recaptcha-globally
Any advice is appreciated.
Sam
Hi,
Unfortunately, I am unfamiliar with where to make the change in the ReCaptcha settings. I suggest you contact Gravity Forms support for this. They are in a better position to assist you since this is one of their add-ons.
Best,
Hi guys. So funny you just updated this article this week. We recently created an alternative to Google’s captcha that is community run. It’s called GravityCaptcha. It works by accessing our hundreds of questions we’ve created on a secure database. The questions and answers are encrypted. If the user enters the wrong answer, it doesn’t submit. If they answer the right one, it does. If one of the questions becomes compromised, the site admin can mark the entry as a spam entry and we blacklist the question/answer from our database after a second spam report by another user.
It’s free in the repository! – https://wordpress.org/plugins/better-captcha-gravity-forms/