How To Create And Display User Submitted Posts With Gravity Forms (And Gravity Wiz)
Gravity Forms is one of the most popular WordPress forms plugins out there that offer a great deal of flexibility in terms of functionality and usability. For instance, you can use it to display user-submitted posts on your site’s front-end.

With Gravity Forms, you can:
- Enable your site’s users to upload information (such as posts) to your site and submit it to you.
- Automatically save user-submitted data as a WordPress post or custom post.
- List the Gravity Forms entries in a table layout on your site’s front-end.
In this post, we’ll take you step-by-step through a quick tutorial on how you can create and list user-submitted posts on your WordPress site’s front-end using Gravity Forms.
Let’s get started!
Why you might want to display user-submitted posts on the front-end?
Many online business owners need a way to let users submit information – such as blog posts, reviews, recipes, or job listings – and display it on the front-end. For example, if they’re looking to create a:
- Member directory. If you use a WordPress member directory plugin to list members, students, or staff in a table layout, you may also want people to be able to submit their registration information and upload their profile directly to your site. Instead of installing a dedicated membership plugin, you can use the simple and easy-to-use Gravity Forms plugin to handle member registrations and profile uploading.
- Document library. Many websites use a WordPress document library plugin that allows users to search for and download document files. If you want to allow users to upload their own documents to your site, Gravity Forms will let you do just that!
- Job board. Gravity Forms can help businesses simplify accepting job board listings via its optimized submission form. Hiring managers can list their job description using the form. The user-submitted information is then accepted and automatically displayed in a searchable, sortable job board with filter options.
Now that you know what the Gravity Forms plugin is and what it can do for you, let’s take a look at how you can use it to create and display user-submitted posts on your WordPress site.
How to create and display user-submitted posts on your website
Here, you’ll learn how to add the following features to your WordPress site:
- Collect user submitted posts using Gravity Forms
- Store posts as WordPress posts
- Display user-submitted posts in a table layout on your site’s front-end
Step #1: Collect user submitted posts using Gravity Forms
To get started, you’ll need to install the Gravity Forms WordPress plugin to your website and create a form that enables your site’s visitors to enter and submit their information. Users will also be able to upload files, member profiles, documents, upcoming events, and just about anything else.
Start by purchasing the Gravity Forms plugin and install it to your WordPress site by going to Plugins -> Add New. Once that’s done, go to Forms -> Add New from the WordPress admin panel to create a form. Give your form a title and fill in all the required fields. Since we want to enable visitors to upload images and documents through Gravity Forms, we need to add the File Upload field type to the form. If users are likely to submit several images, you can add multiple file upload fields.
Use File Upload Pro to add image previews, cropping, and more to Multi-File Upload fields.
In addition to this, you can also add additional form fields for Google reCaptcha, maths challenge questions, checkboxes, or image uploads. The goal is to collect everything you need to publish the post on your site’s front-end. So, for example, you might need to create a separate field in the post submission form for screenshots or use the rich text editor to allow users to copy and paste their submission instead of attaching a file.
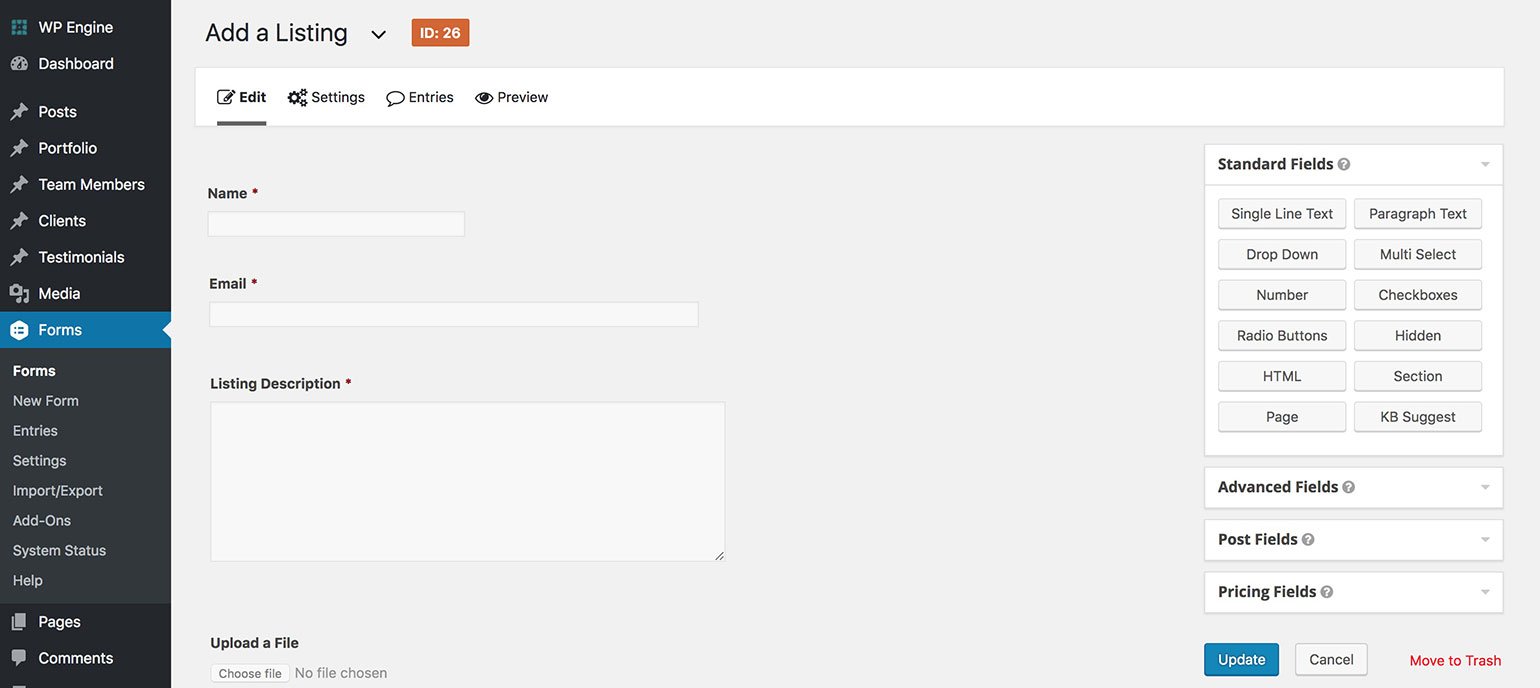
Click the Update button to save changes to your form. Next, create a new page by heading over to Pages -> Add New and click the Add Form button. (You can also add the form to your site’s homepage.) Select the form you just created and add it to the page.
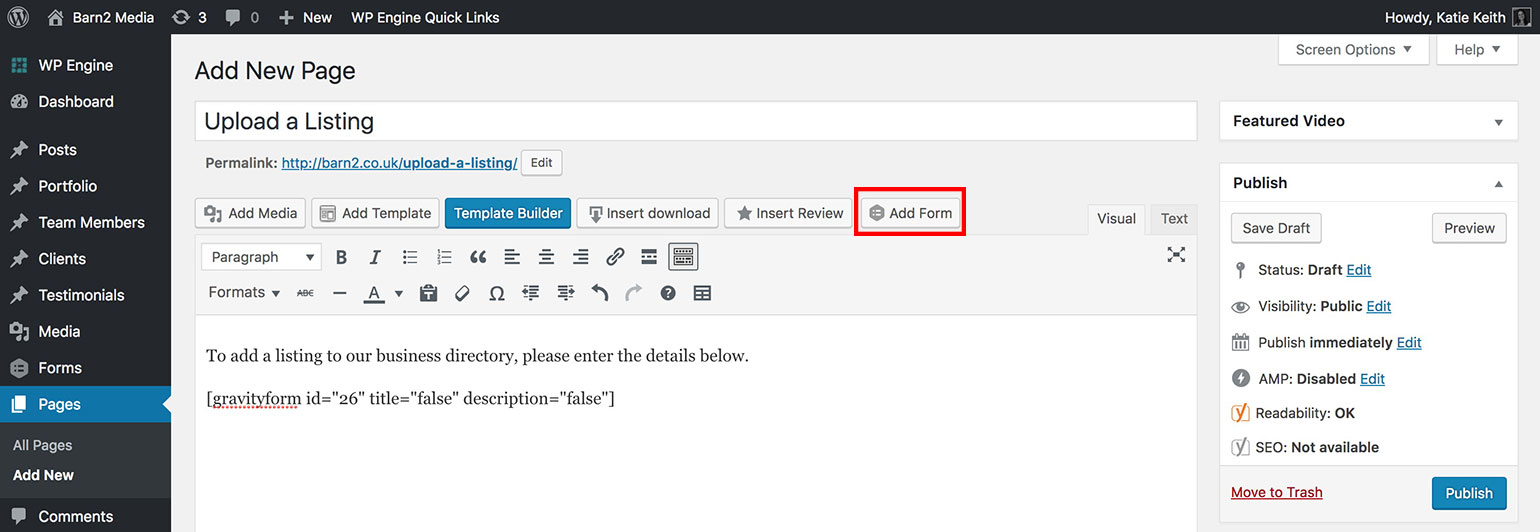
Click the Publish button to proceed.
Preview your form on your site’s front-end. It should look something like this:

You can also go into the plugin settings to set a custom success message.
Step #2: Store posts as WordPress posts
Now that you know how to create a form using Gravity Forms for collecting information from visitors, let’s take a look at what else you can do with it.
The way your submission form is set up right now, you’ll receive the user-submitted information via email which will also be stored in the WordPress database. However, this might not be the best option for people who want to automatically post user-submitted content on the front-end.
Next, we’ll take a look at how you can automatically create WordPress posts or custom posts out of the user-submitted content. This way, you won’t have to manually upload the information to your site to display it on the front-end.
This is great for anyone who’s looking for an easy way to let visitors submit guest posts. It gives admins the option to set post categories or custom fields before publishing.
How to save user-submitted data as a WordPress Post using Gravity Forms
Gravity Wiz has an in-depth tutorial on how to save Gravity Forms submissions as posts. It involves using Gravity Forms’ Post Fields options to create a form that automatically generates a post in WordPress when the form is submitted.
So, whenever a user fills out the form, Gravity forms will check to see if any post fields exist on the form. If they do, it’ll use that information to create a new post. For example, if you were creating a job board, you could set:
- Post title to the job’s title.
- Post content to the job description.
- Featured image to the hiring company’s logo.
In addition to this, you’ll also be able to set the default post status i.e. draft, pending review, or published. This is useful in case you want to manually moderate entries instead of having to publish immediately.
Step #3: Display user submitted posts in a table layout on the front-end
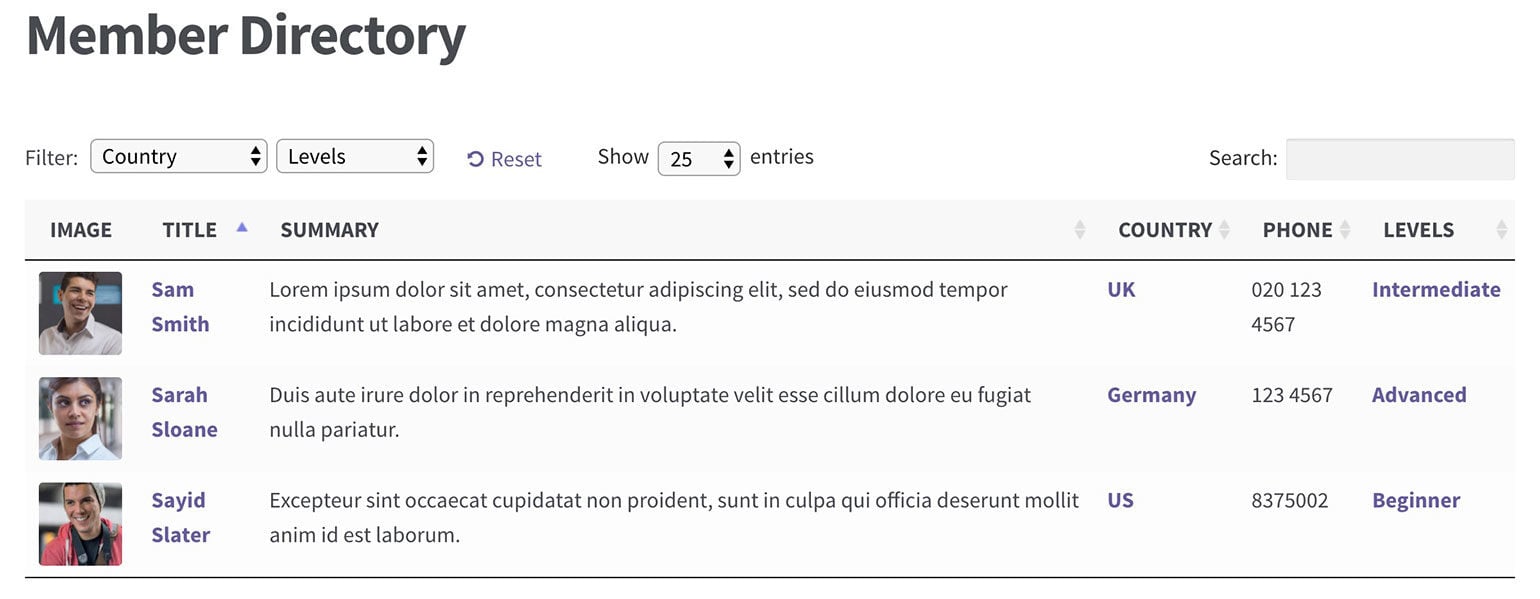
Now that you know how to collect user-submitted information and save it as a WordPress post, you can use the Posts Table Pro plugin to display these posts on your WordPress website’s front-end.
Posts Table Pro is a WP plugin that enables you to list posts (and other post types) on your site’s front-end in a searchable, sortable, and filterable table layout.
It’s an ideal tool for anyone who’s looking to display user-submitted data on their site’s front-end as each entry is assigned a separate row in the table. Your site’s users will be able to use the search box to quickly find specific entries, use the filter tool to refine lists, and sort by column.
How to list user-submitted information in WordPress
- Get the Posts Table Pro plugin and install it to your WordPress site.
- Copy and paste the license key from the confirmation email to the license key field by heading over to Settings -> Posts Table Pro.
- The settings page is where you can configure how your table appears and behaves on the front-end. We recommend you take a minute to figure out your preferences and configure the plugin’s settings accordingly. For example, you can set image size, which columns to display, filter options, and much more.
- Create a new page to list the user submitted information from Gravity Forms.
- Click the Insert Posts Table icon in the toolbar. You’ll notice that the shortcode [no_shortcodes][posts_table][/no_shortcodes] will automatically be added to the text editor.
Finally, preview the page on your site’s front-end. You should be able to see all of your user submitted posts listed in a neat and organized table layout on the front-end.
When handling longer submissions, it helps to ensure progress is never lost. Gravity Forms Advanced Save and Continue automatically saves and reloads form progress, allows you to manage multiple drafts, and works whether logged in or as a website visitor.
Conclusion
Instead of having users submit posts through your contact form, consider creating a dedicated post submission form for your website. Gravity Forms offers several useful features for businesses to accept user submissions and automatically create WordPress posts out of them. Once that’s done, they’ll be able to display the user submissions in a searchable, sortable, and filterable table layout on their WordPress website.
We explained how this is possible with Gravity Forms and Posts Table Pro. Hopefully, you’re in a good position now to take the next steps.
What sort of user-generated content are you looking to display on your WordPress site’s front-end? We’re happy to help so let us know by commenting below!


I’m working on a project, And i’ll love to know if gravity form has any perks to help with this feature.
We have a magazine blog, we want users to be able to submit post from the frontend, however we want this to be available to registered users only.
We have seen documentations showing that we can use advanced post to submit posts through the forms.
Here is what we want.
Hi Sammy,
Based on your requeriments. You should be able to:
Best,
This is awesome, thanks! How would it be possible for a user to then delete posts after a job is filled – but only the posts they have added themselves?
Hi Loren,
You could probably change the post status to Draft instead of deleting it. If you have a Gravity Perks license, you can get in touch with us via our support form so we can assist you further.
Best,