Complete Guide to Gravity Forms Salesforce Integration
Find out how to set up a Gravity Forms Salesforce integration in WordPress using Zapier in a few simple steps, plus exclusive Gravity Wiz benefits.
- Why You Might Want a Gravity Forms Salesforce Integration
- How to Integrate Gravity Forms With Salesforce
- How to Send Forms to Salesforce as Custom Objects
- Set Up Your Gravity Forms Salesforce Integration Today

As an online business owner, there are plenty of ways that you can benefit from Gravity Forms Salesforce integration. For starters, you can use it to automatically send form entries directly into Salesforce to sync contact data. This gives you the ability to automate sales activity in Salesforce.
Automating these processes can benefit your business in many ways. For example:
- Better lead management
- Quicker lead updates
- Improved navigational experience for users
- Easier file requests from users
- Workflow optimization
However, to successfully implement Gravity Forms Salesforce integration, you’ll need to use a third-party app, like Zapier or Automate.io.
In this complete guide, we’ll explain how you can easily set up Gravity Forms Salesforce integration using Zapier.
Why You Might Want a Gravity Forms Salesforce Integration
Before we jump into the tutorial, let’s quickly take a look at the benefits of bringing a Gravity Forms Salesforce CRM integration to your WordPress business site. The powerful functionality of Gravity Forms plus Gravity Perks allows you to supercharge your lead generation far and above simply gathering contact data.
Better Manage Your Leads
Connecting your forms plugin to your Salesforce account lets you easily sync contacts between your WordPress site and customer relationship management tool. For example, whenever you get a new Gravity Forms submission, you can automatically move contact data and create leads immediately in Salesforce.
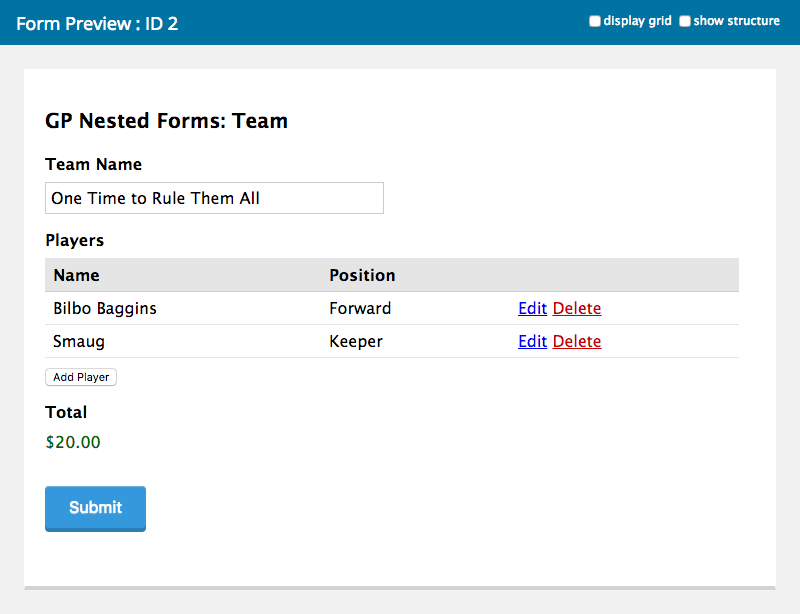
To take things further, GF Nested Forms (part of Gravity Perks) supports Zapier feeds on child forms. You can use this to import each child entry into Salesforce as an independent lead. This is particularly useful if you’re registering a team and would like to be able to manage each member on that team individually in Salesforce.
Update Leads Quickly
There are tons of situations where you might need visitors to submit complex forms. However, long forms can be a daunting prospect, and you might want to capture a visitor’s data in your CRM as soon as possible before asking them to fill out a more complicated form.
Gravity Forms Easy Passthrough is the easiest way to transfer data between forms with ease. Perfect for anyone working with multiple forms!
GF Easy Passthrough allows you to generate a lead from a simple form and then pass that information through automatically to a more complex form. This saves the user time and ensures that the same lead is updated in Salesforce when the first form is submitted, allowing them to work on the longer form when it’s more convenient for them to do so.
Improve the Navigational Experience
Similarly, if your business requires visitors to fill out those large, complex forms, then you should look for ways to improve the navigational experience. This is a simple way to make the form-filling experience less overwhelming for users.
GF Multi-Page Navigation dramatically improves the navigational experience on multi-page forms. This can help you increase conversions and generate more leads that you can sync to your Salesforce CRM.
Request Files Without Hassle
It’s pretty standard for businesses to ask for an RFP or some other type of PDF through their sales forms. Our perk File Upload Pro makes collecting files from leads more professional. In addition, it’s designed to give better feedback to the user than the standard Gravity Forms file upload field, enhancing your File Upload fields with image previews, modern icons for non-image file types, and support for zooming and cropping.
Optimize Workflows
On the management side of things, there’s always room for automating workflows with Gravity Forms. For example, you can set up conditional logic for prices, dates, or populating form field choices and values.
We have tons of Gravity Perks that help you add conditional logic to your forms, making it easier to optimize your workflows and transfer data into your Salesforce CRM.
Gravity Forms Conditional Pricing is unconditionally the best solution for providing dynamic, interactive pricing for your future customers.
Check out our Complete Guide to Gravity Forms Conditional Logic for more information on how to use Gravity Forms Salesforce add-ons.
How to Integrate Gravity Forms With Salesforce
Here, we’ll show you how to integrate Gravity Forms with Salesforce using Zapier. We’ll explain how you can do this with zaps, which is much easier than Salesforce’s web-to-lead feature.
For this tutorial, we’ll assume you already have a Salesforce and Zapier account set up, have Gravity Forms installed, and have a lead form (or contact form) on your site that you’d like to transfer data from.
Let’s say you want to set up a simple member registration form on your website. Once the user enters their name and email address and selects a subscription plan, they’re redirected to a more complex form that asks for additional details.
The easy way to set this up is by using GF Easy Passthrough.
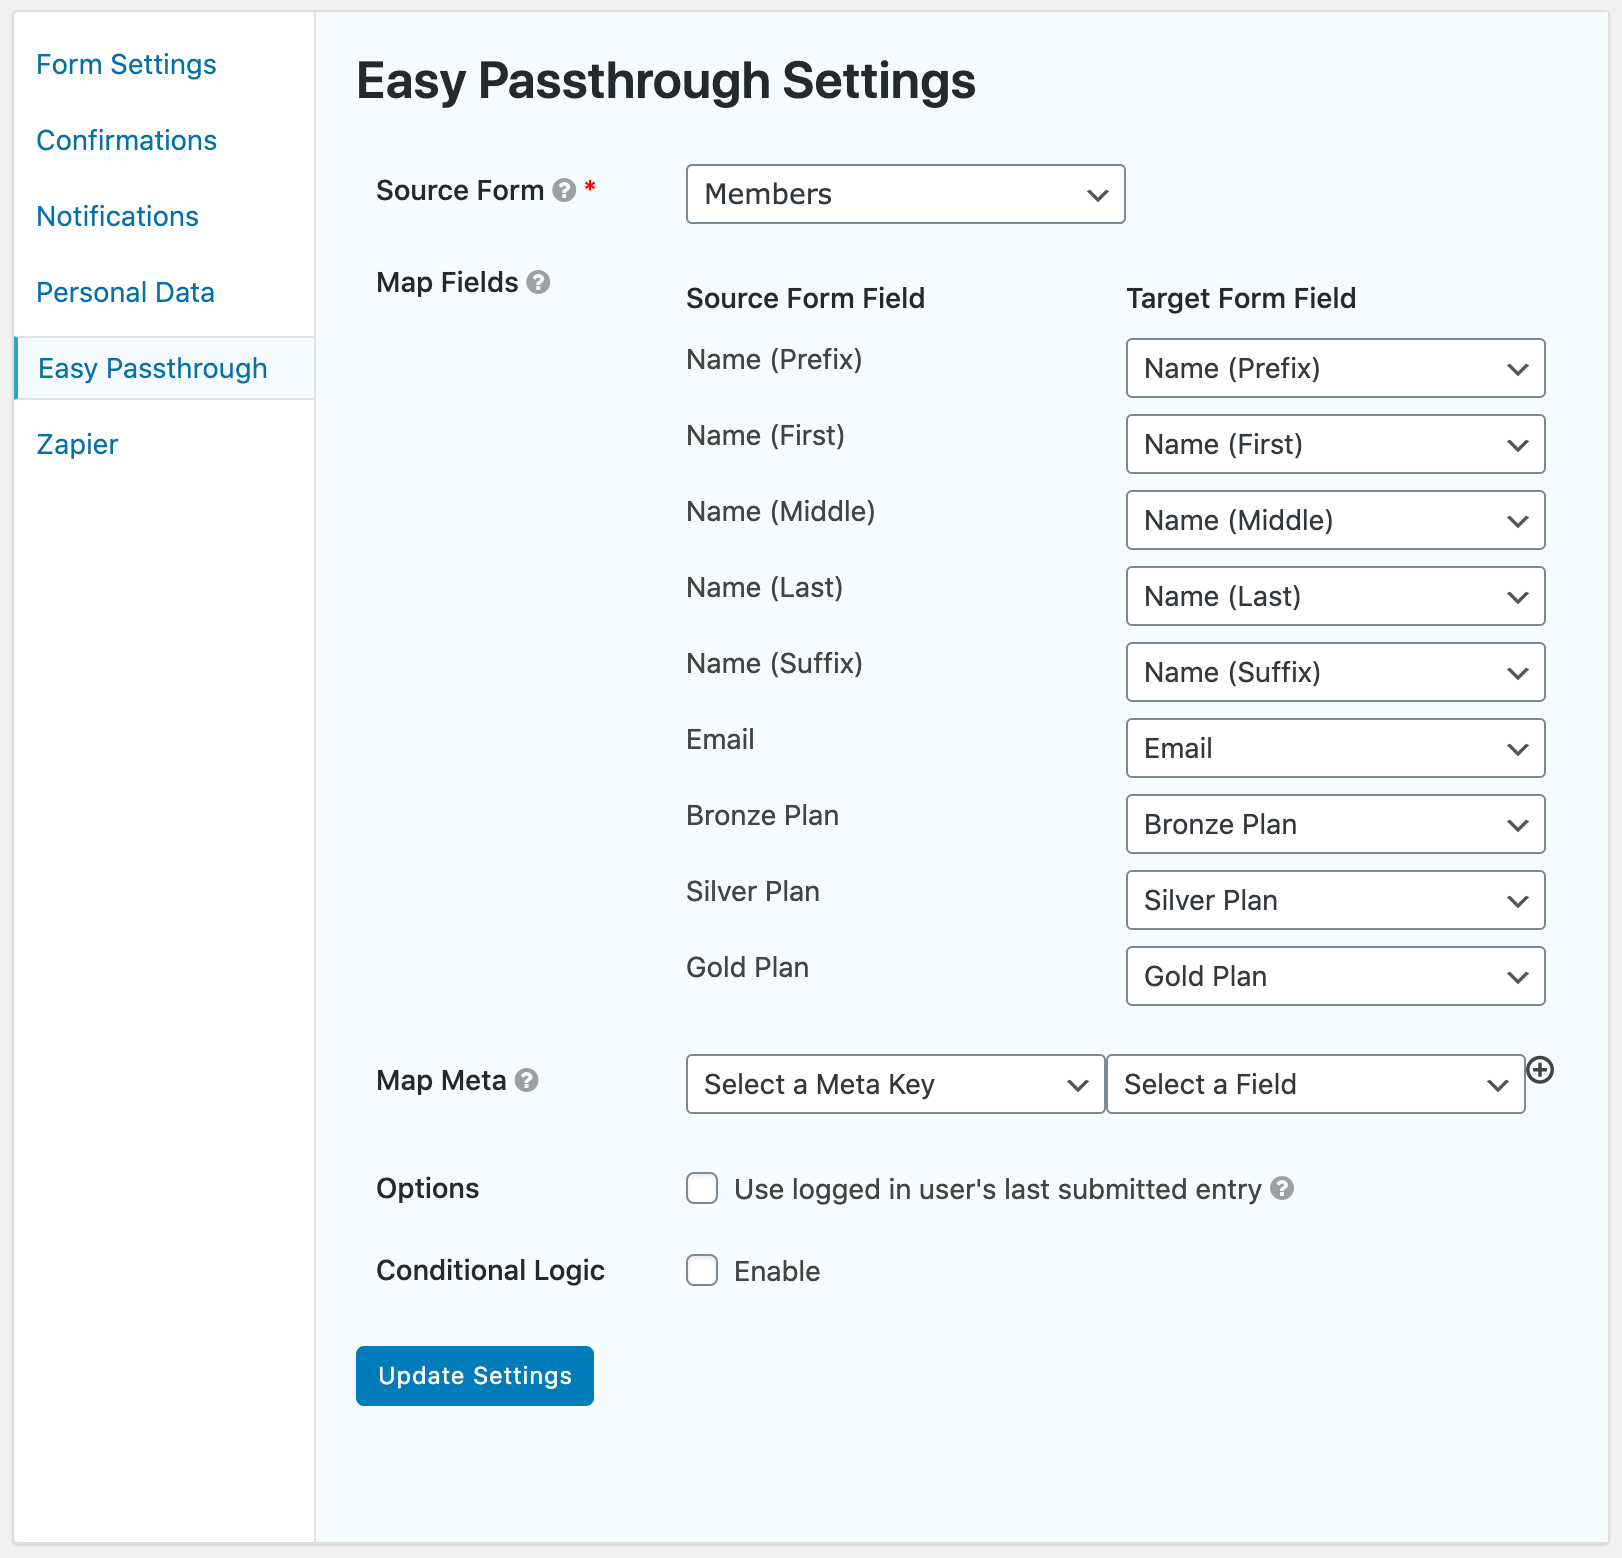
Start by creating both forms in Gravity Forms. Then go to Settings › Easy Passthrough from the complex form and map fields from your source form. Once you have the Gravity Forms Salesforce integration set up, you can automatically add new leads to Salesforce.
Whenever a user submits the source form, they’ll automatically be added to Salesforce as a new lead. This way, even if they don’t fill out the complex form, you’ll still have their name, email address, and selected subscription plan added to your CRM.
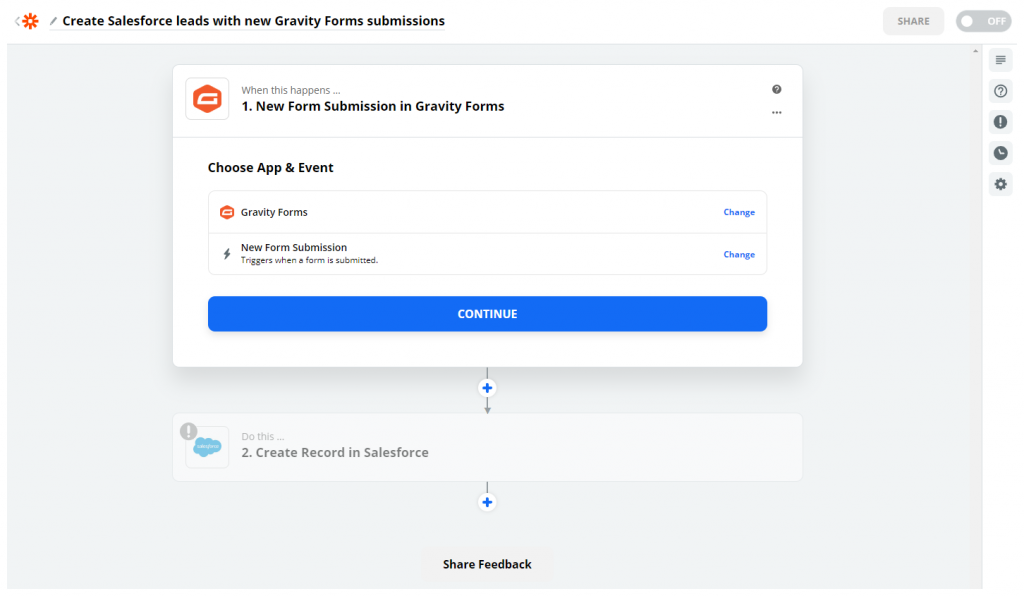
Next, we’ll explain how you can use Zapier to connect Gravity Forms to Salesforce. From your Zapier account, search for Gravity Forms Salesforce zaps.

Click the Try It button next to the Create Salesforce leads with new Gravity Forms submissions zap.
Click the Continue button, and you’ll see a Zapier webhook.
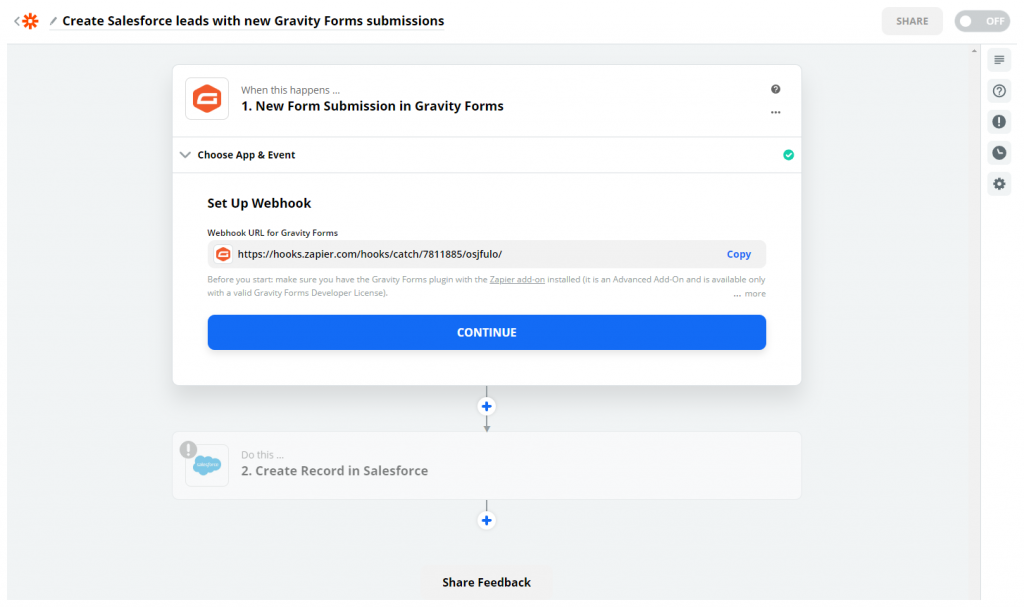
Copy the webhook to your clipboard. Go to the Gravity Forms form you want to automate and navigate to Settings > Zapier. Click the Add New button and paste the webhook.
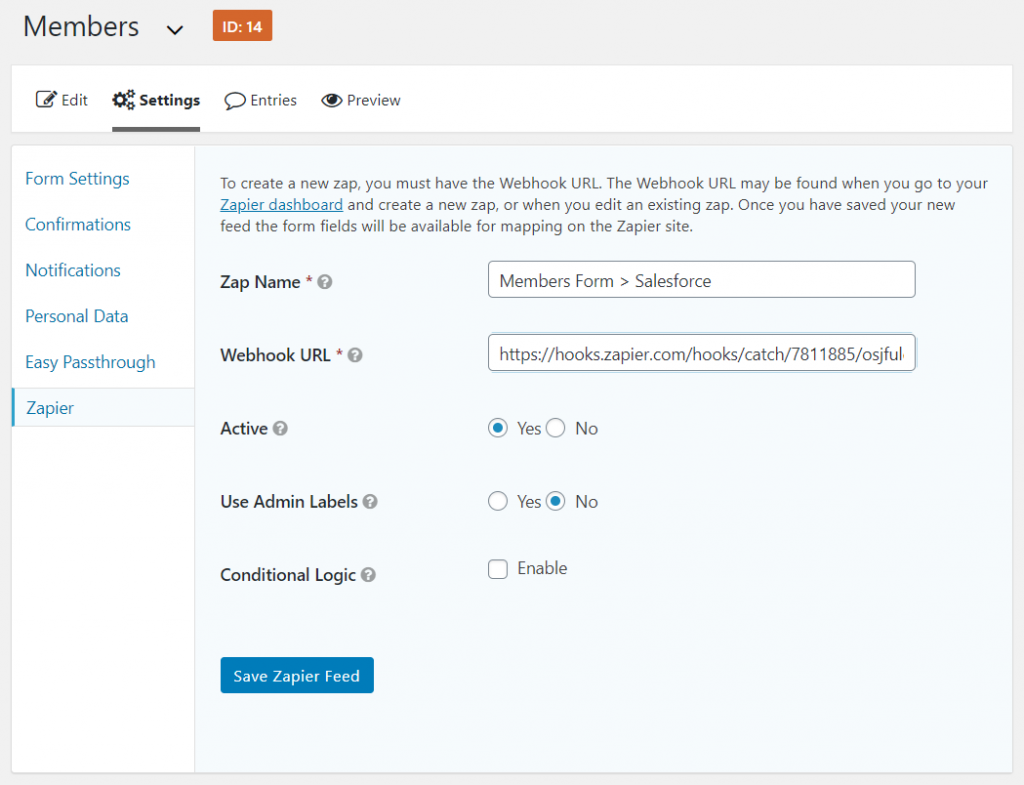
Click the Save Zapier Feed button.
Next, go back to Zapier and click Continue to continue setting up the automation. Zapier will prompt you to test the trigger.
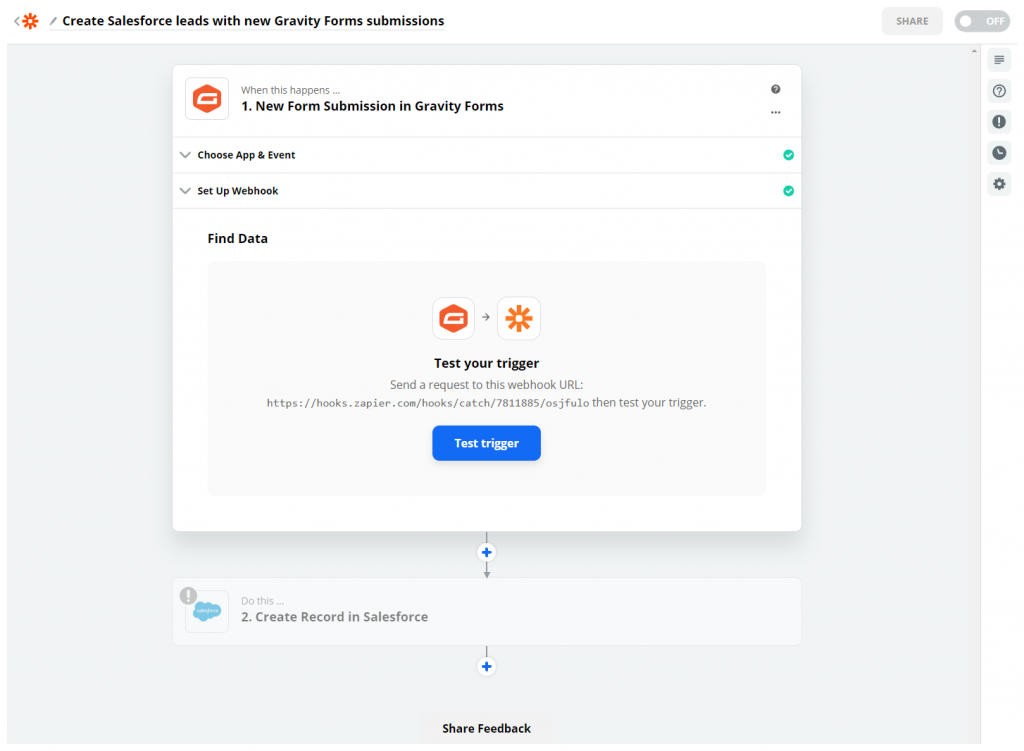
Once that’s done, you can continue setting up the Salesforce API step of your automation.
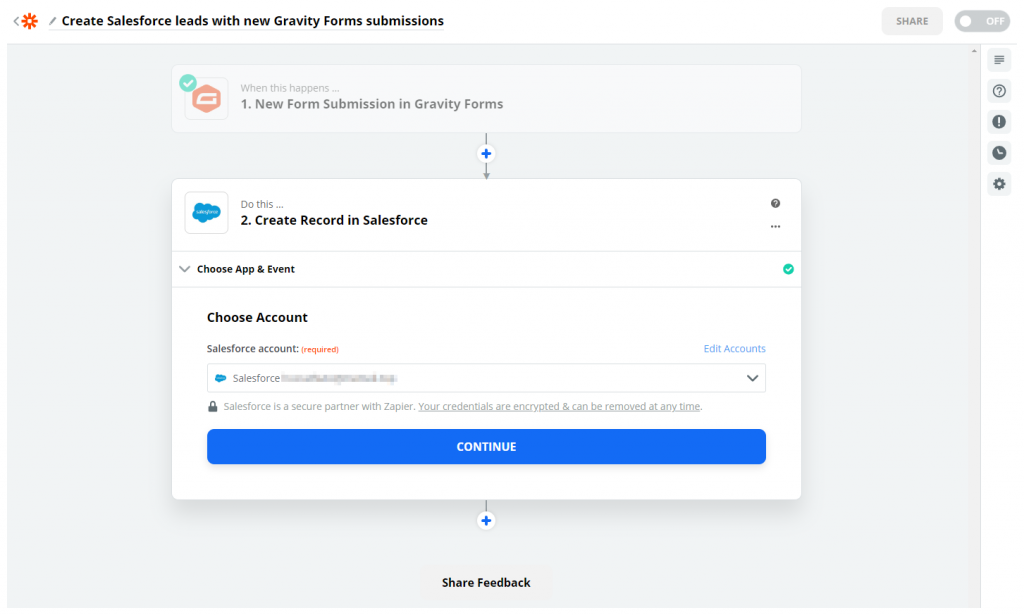
You’ll see all of the fields you’ve defined in your Salesforce CRM. Using Zapier, you can map these Salesforce fields to the information you collect from Gravity Forms.
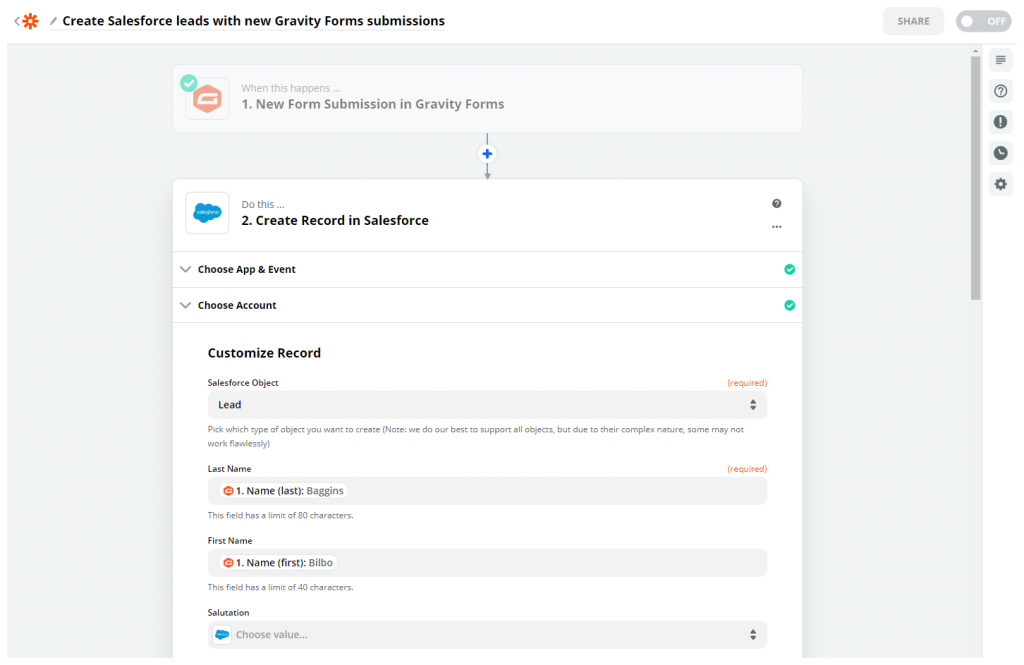
Click Continue when you’re done field mapping. Now, all of the new form submissions you get through this Gravity Form will be added as leads to Salesforce.
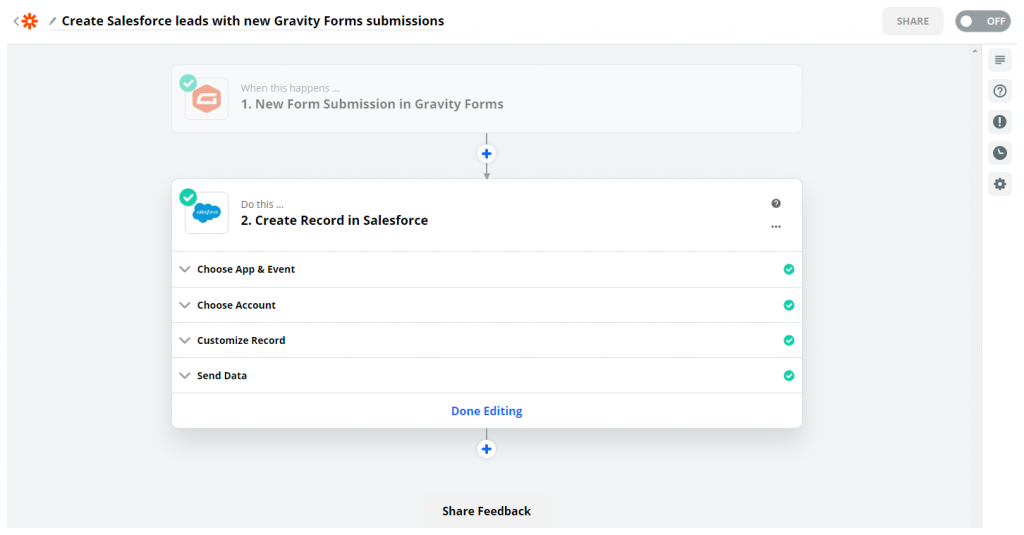
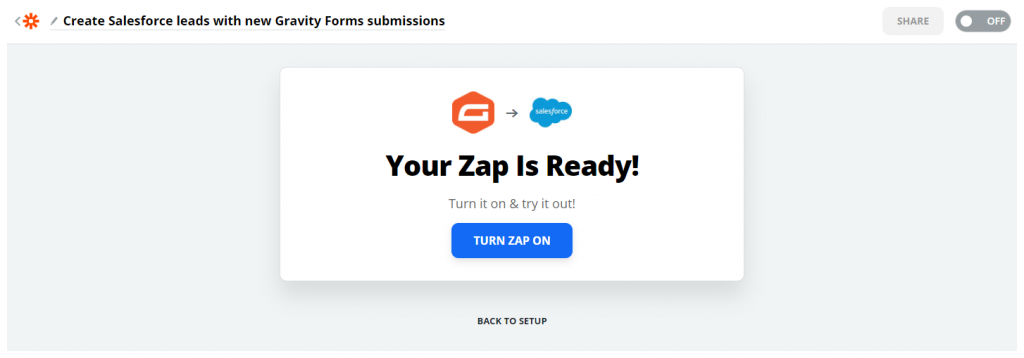
You can test out the zap to make sure everything is working and click Done Editing to proceed. If everything looks good, click the Turn Zap On button.
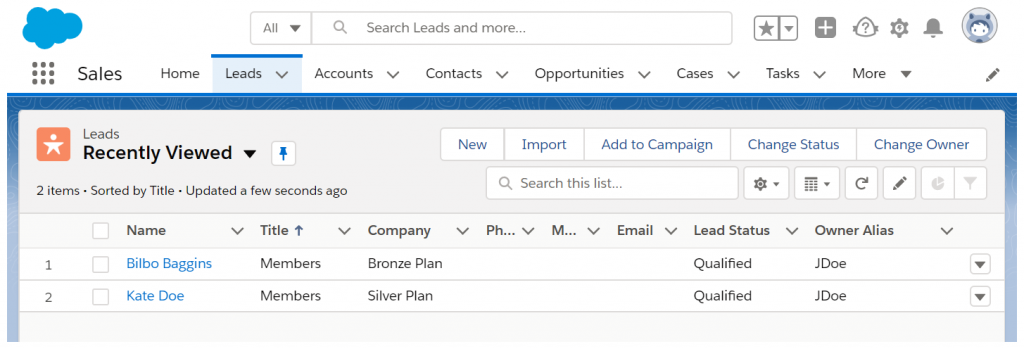
Now, whenever a user submits the form on your website, their data will automatically be transferred to Salesforce. The leads will look something like this screenshot in the CRM:
How to Send Forms to Salesforce as Custom Objects
With this Gravity Forms Salesforce integration, you can also send forms as custom Salesforce objects. This is useful for businesses that need to track different kinds of data beyond contacts, accounts, and leads.
For example, if you’re an event management company, you might want to collect information about various event venues in your area that can be booked for events. As the Salesforce administrator, you could create a custom object called Event Venues and add custom fields like venue location, capacity, AV capabilities, and booking rates to it.
Using Zapier, you can use the Add new Gravity Forms entries as custom objects in Salesforce zap to automate it. The rest of the steps are the same as described in the tutorial above.
Prefer managing form data in Google Sheets? Gravity Forms to Google Sheets automatically sends and syncs Gravity Forms data securely with Google Sheets, providing you (and your data) access to collaboration, reporting, and other integrations (Data Studio, BigQuery).
Set Up Your Gravity Forms Salesforce Integration Today
A Gravity Forms Salesforce integration allows business owners to manage their leads and contacts better. Through automation, you can save up valuable time while providing your employees with the detail they need to make more sales!
Using Zapier, you can create a new zap to transfer data from your Gravity Forms form to Salesforce automatically. This is much easier than using the Salesforce web-to-lead feature. And, once you’re done setting up the automation, you can enhance your Gravity Forms using Gravity Perks’ suite of add-ons to deliver a better user experience.
Which Gravity Forms Salesforce add-on will you use to enhance your forms? Let us know in the comments section below!

If you don’t want to deal with Zapier as a middleman or a monthly subscription, here’s a plugin for gravity forms to salesforce setups that’s a direct api connection: https://pluginbrewery.com/wordpress-plugins/gravity-forms-salesforce-integration/
Hey Evan, thanks for sharing this!
Great plugin on the CodeCanyon. Gravity Forms – Salesforce CRM Integration: https://codecanyon.net/item/gravity-forms-salesforce-crm-integration/20174431