Embedding Gravity Forms in WordPress: Shortcodes & More
Learn how to quickly and easily embed Gravity Forms into your website in five different ways, including using a shortcode, the Gravity Forms block, and more.

Whether you’re creating a simple contact form or a complex order form with payment integrations, Gravity Forms offers an intuitive, drag-and-drop interface that makes the process easy and efficient. Plus, with its wide range of add-ons and integrations, the possibilities are near endless.
In this article, we’ll be focusing on one aspect of Gravity Forms that’s particularly important for anyone looking to add forms to their website: embedding.
We’ll explore five different methods for embedding Gravity Forms into your WordPress site, from adding a form to a page or post to incorporating it into your sidebar or theme template.
Our goal is to help you get a better understanding of how to get the most out of this powerful form builder plugin and how to make sure your forms are seamlessly integrated into your site.
So let’s get started!
How to Create a Form with Gravity Forms
You can embed a form in many different ways into your website. There’s a default “Embed” button, you can add a Gutenberg block, use a shortcode, and more.
Before you can embed the form, however, you’ll need to create one using Gravity Forms. Let’s first take a look at how that’s done.
If you’re already familiar with the plugin, you can skip ahead to the next section.
Creating a form in Gravity Forms is a simple and intuitive process, thanks to its drag-and-drop interface and pre-made templates.
Here’s a step-by-step walkthrough for creating a basic form using Gravity Forms.
- Install and activate the Gravity Forms plugin.
- From your WordPress dashboard, navigate to ‘Forms’ and click ‘New Form’.
- You can choose to start with a blank form or select from any of the pre-made form templates that Gravity Forms offers. This is a great option if you want to create a form quickly or don’t have much experience with form building.
- Give your form a name that accurately reflects the purpose of the form. This name will be visible in the WordPress dashboard and should be descriptive enough to help you identify the form easily.
- Use the drag-and-drop editor to add any form fields you require. Gravity Forms offers a wide range of fields, from basic text and number inputs to more complex options like file uploads and conditional logic. Simply drag the field type you need from the sidebar onto the form canvas, and then configure it as needed using the settings panel.
- When you’re finished adding fields and configuring your form, click “Update” to save it.
See the process for yourself in this short video on creating a new form with Gravity Forms.
To get started even faster, you can make use of a template or saved file as a basis for your form. Simply select the template or file you want to use when creating a new form, and Gravity Forms will pre-fill the form with the appropriate fields and settings. This is a great way to save time and ensure that your forms are consistent and well-designed.
With your form created, you’re ready to move on to the next step, i.e., embedding it into your website. Let’s see the various ways in which you can do so!
How to Embed a Gravity Form Into Your Site
Once you’ve created a form, the next step is to embed it into your website. We’ll be discussing five methods in detail, to help you understand the various ways in which you can embed your form.
Method 1: Using the Gravity Forms Embed Form Button
Using the “Embed Form” button is a quick and easy way to embed a form into your WordPress site using Gravity Forms. It gives you control over the placement of the form on the page and allows you to customize its appearance and behavior.
Here is an overview of the process of embedding a form using this method,
- Go to the form you want to embed in the Gravity Forms Form Editor.
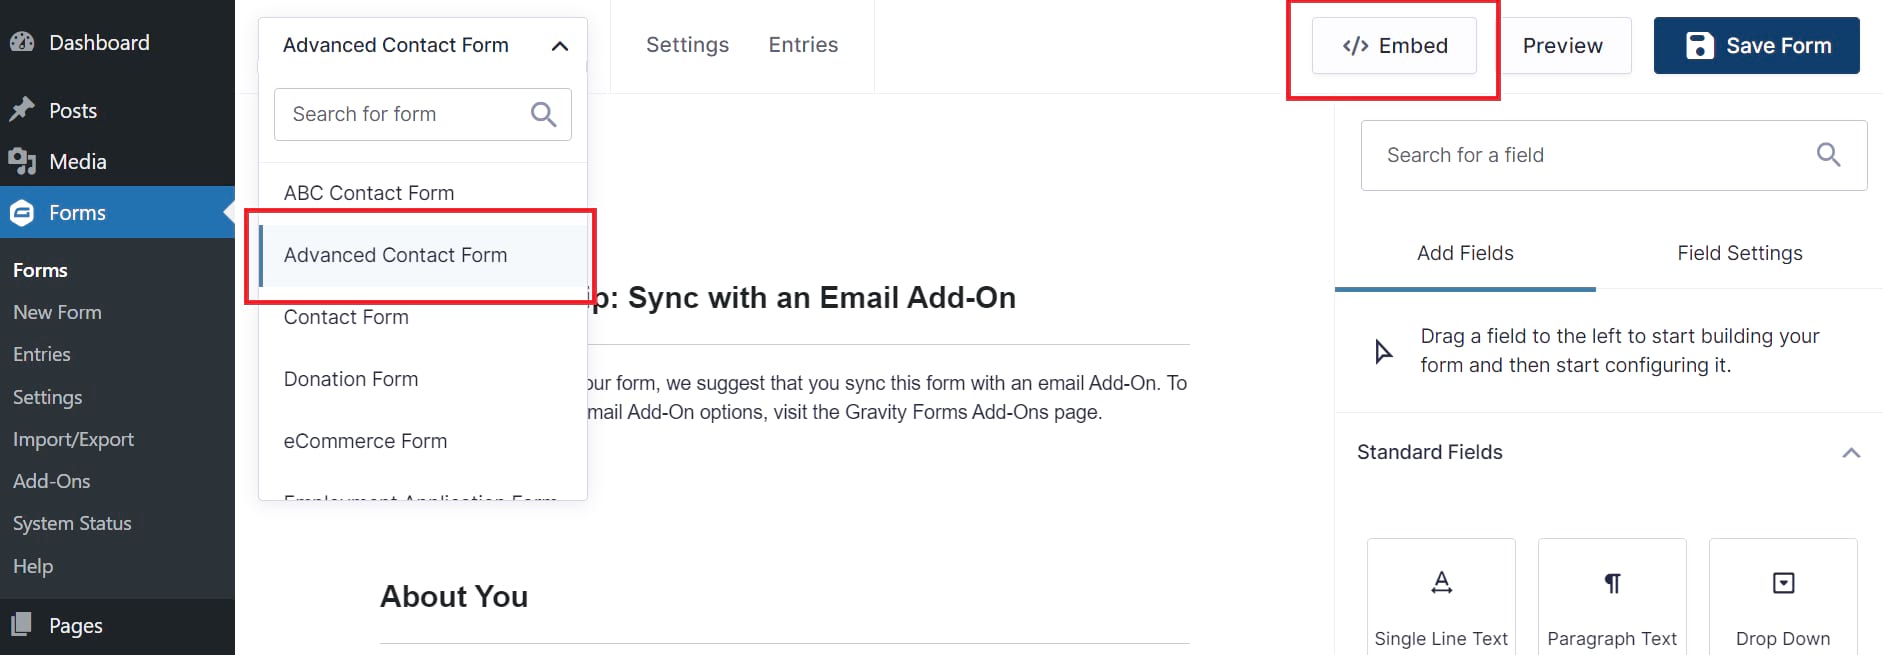
- Find the “Embed” button on the right-hand side of the screen.
- Click this button to open the Embed Form flyout
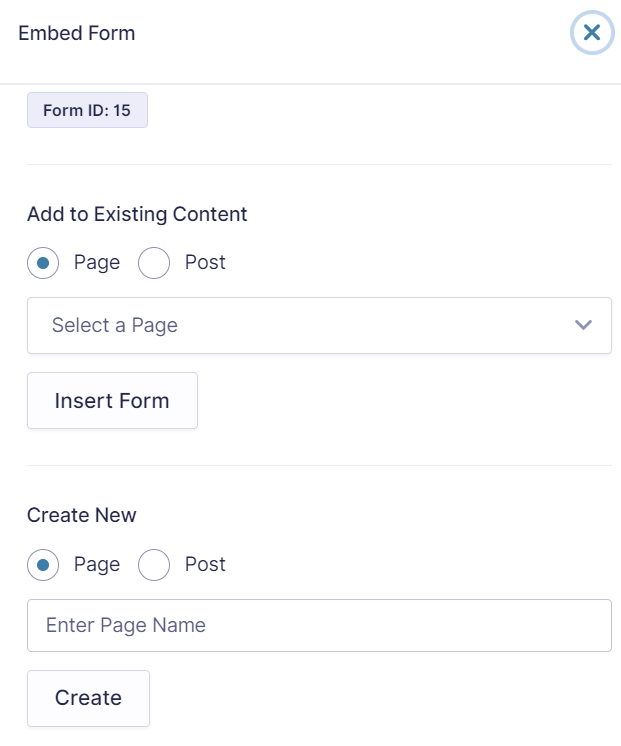
- In the “Embed Form” flyout, you’ll see a few options. You can choose a page or post to embed your form into, create a new page or post to add the form to, or copy the form’s shortcode.
- If you choose to copy the shortcode, you’ll be able to manually add it to any page or post where you want to display the form.
- If you choose to embed the form into an existing page or post, a new Gravity Forms block will be added to the page or post.
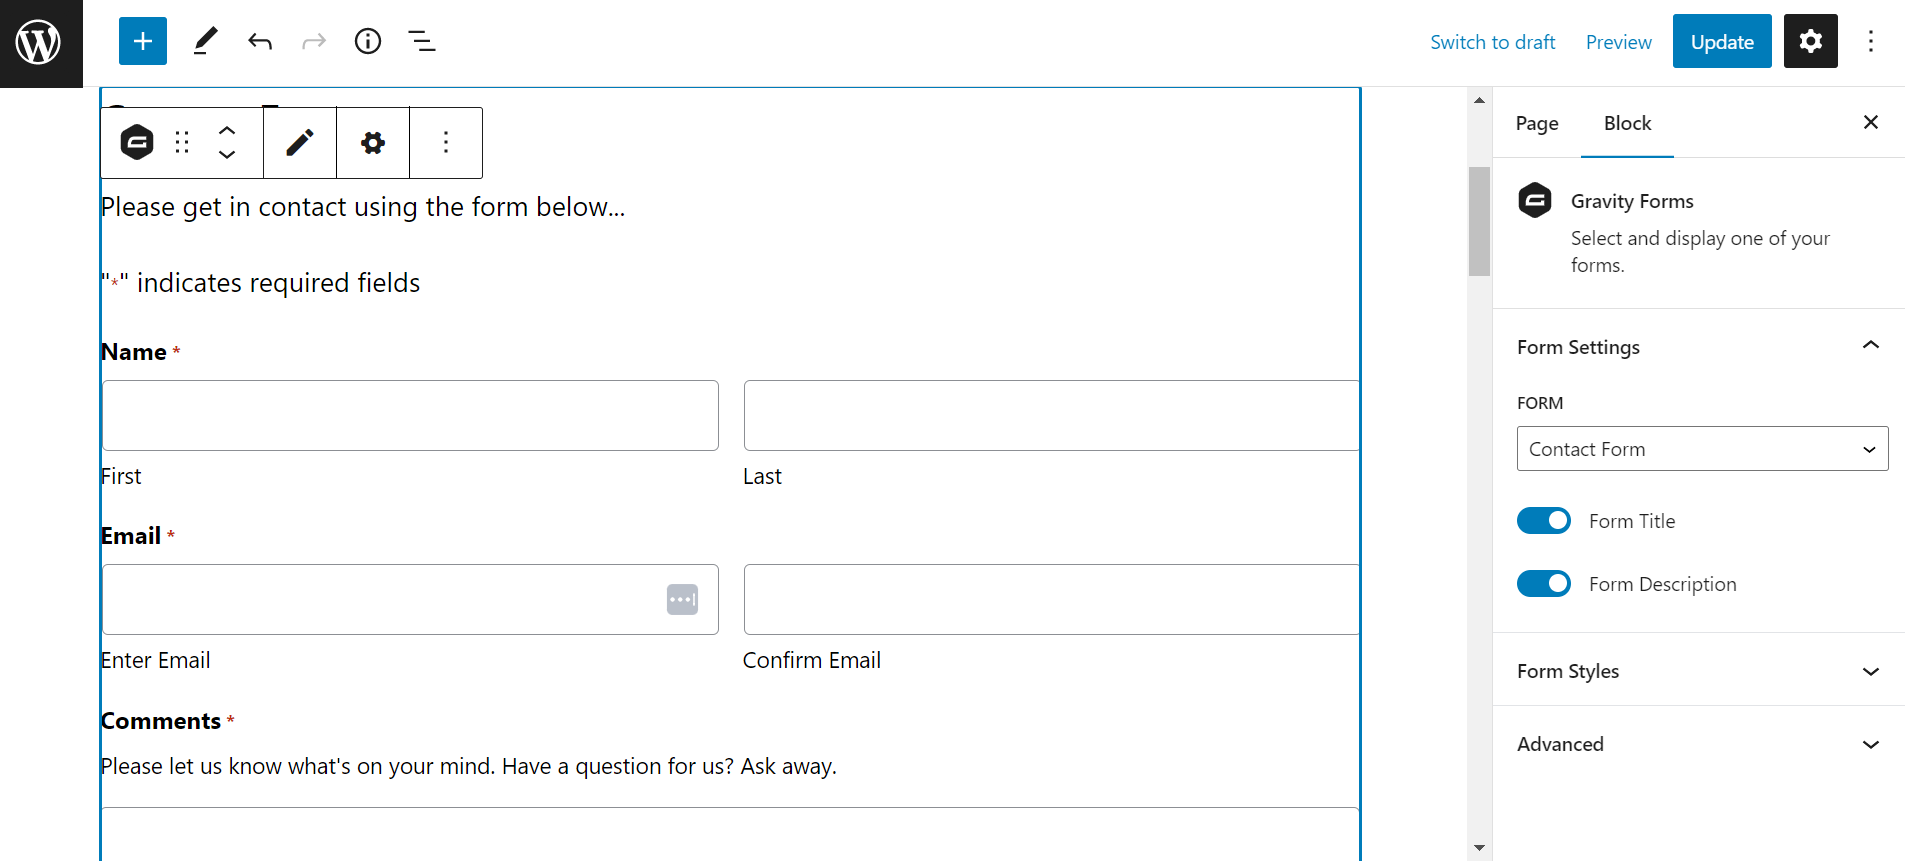
- Select the form you want to embed from the dropdown menu on the block.
- Once you’ve selected your form, you can move it around the page to position it exactly where you want it.
- In the block settings, you can also modify various options for your form. You can toggle the visibility of the form title and description, choose whether to use AJAX for the form, and select whether to show the entire form or just a marker for the form in the editor.
This last option can be especially helpful if you’re working with a large form and only want to display a small section of it in the editor.
Method 2: Using the Gravity Forms Block in the Gutenberg Editor
The second method for embedding Gravity Forms into your WordPress site is to use the Gravity Forms block in the Gutenberg editor.
The process is very similar to the previous method, with the only difference being that you add the block directly from the Gutenberg editor when editing a specific page or post.
To begin,
- Open the page or post in the Gutenberg editor where you want to embed your form.
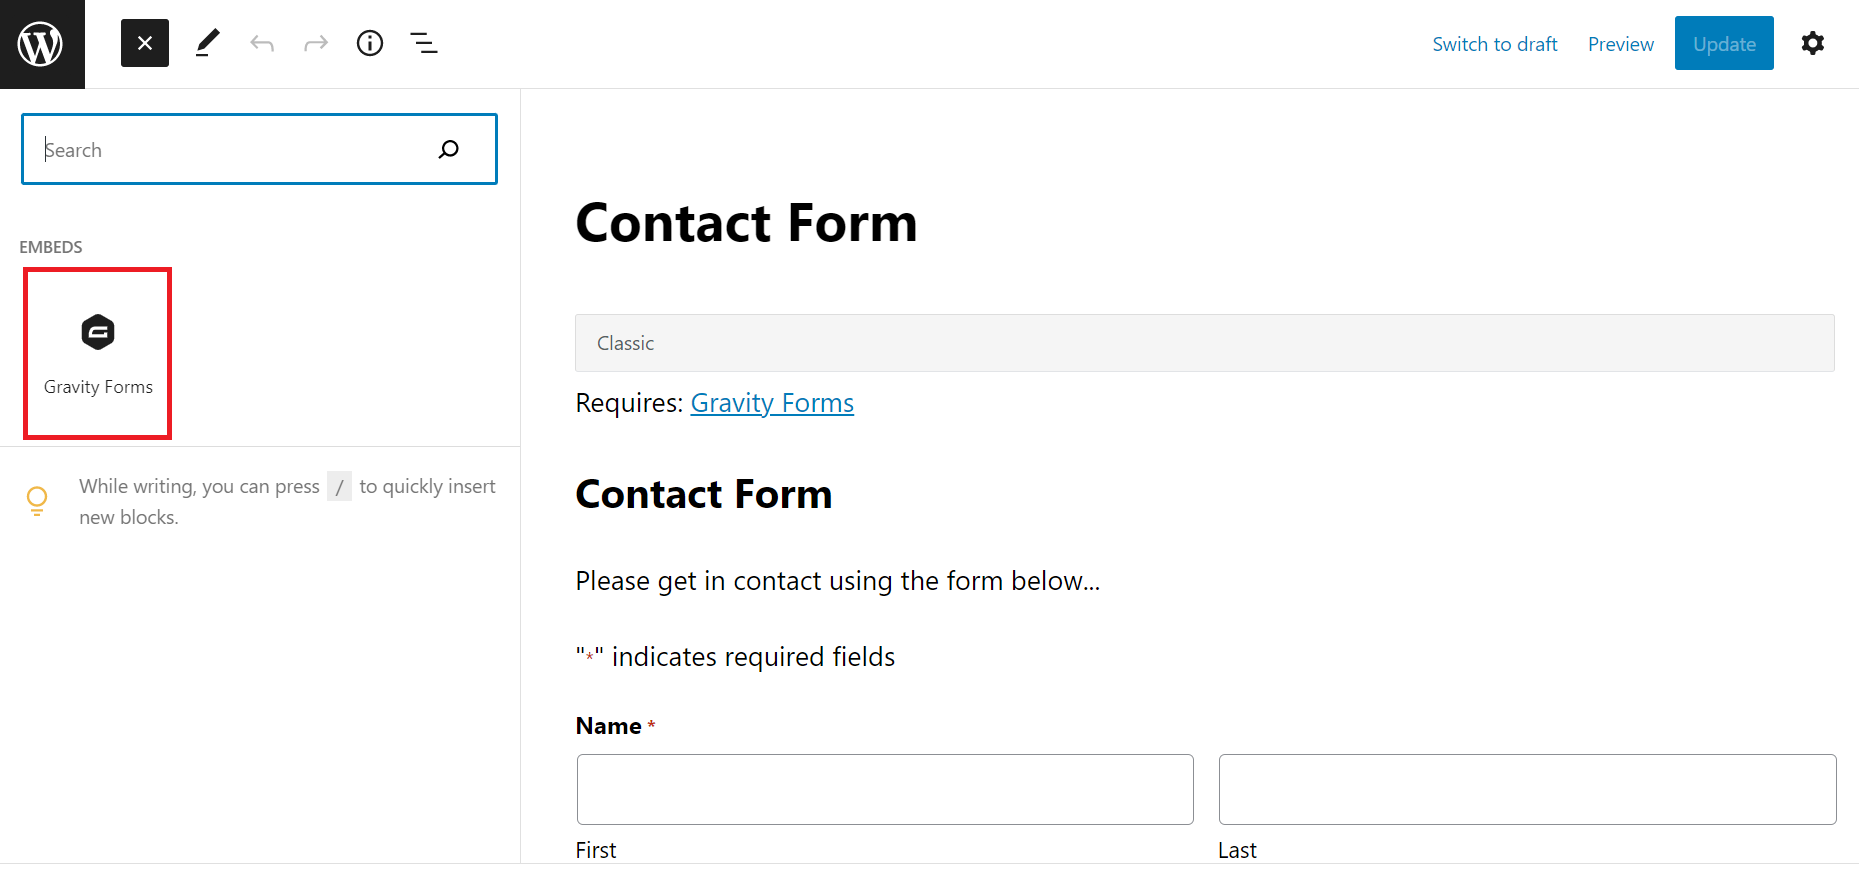
- Click the ‘+’ icon to add a new block to your page or post.
- Search for ‘Gravity Forms’ and select it.
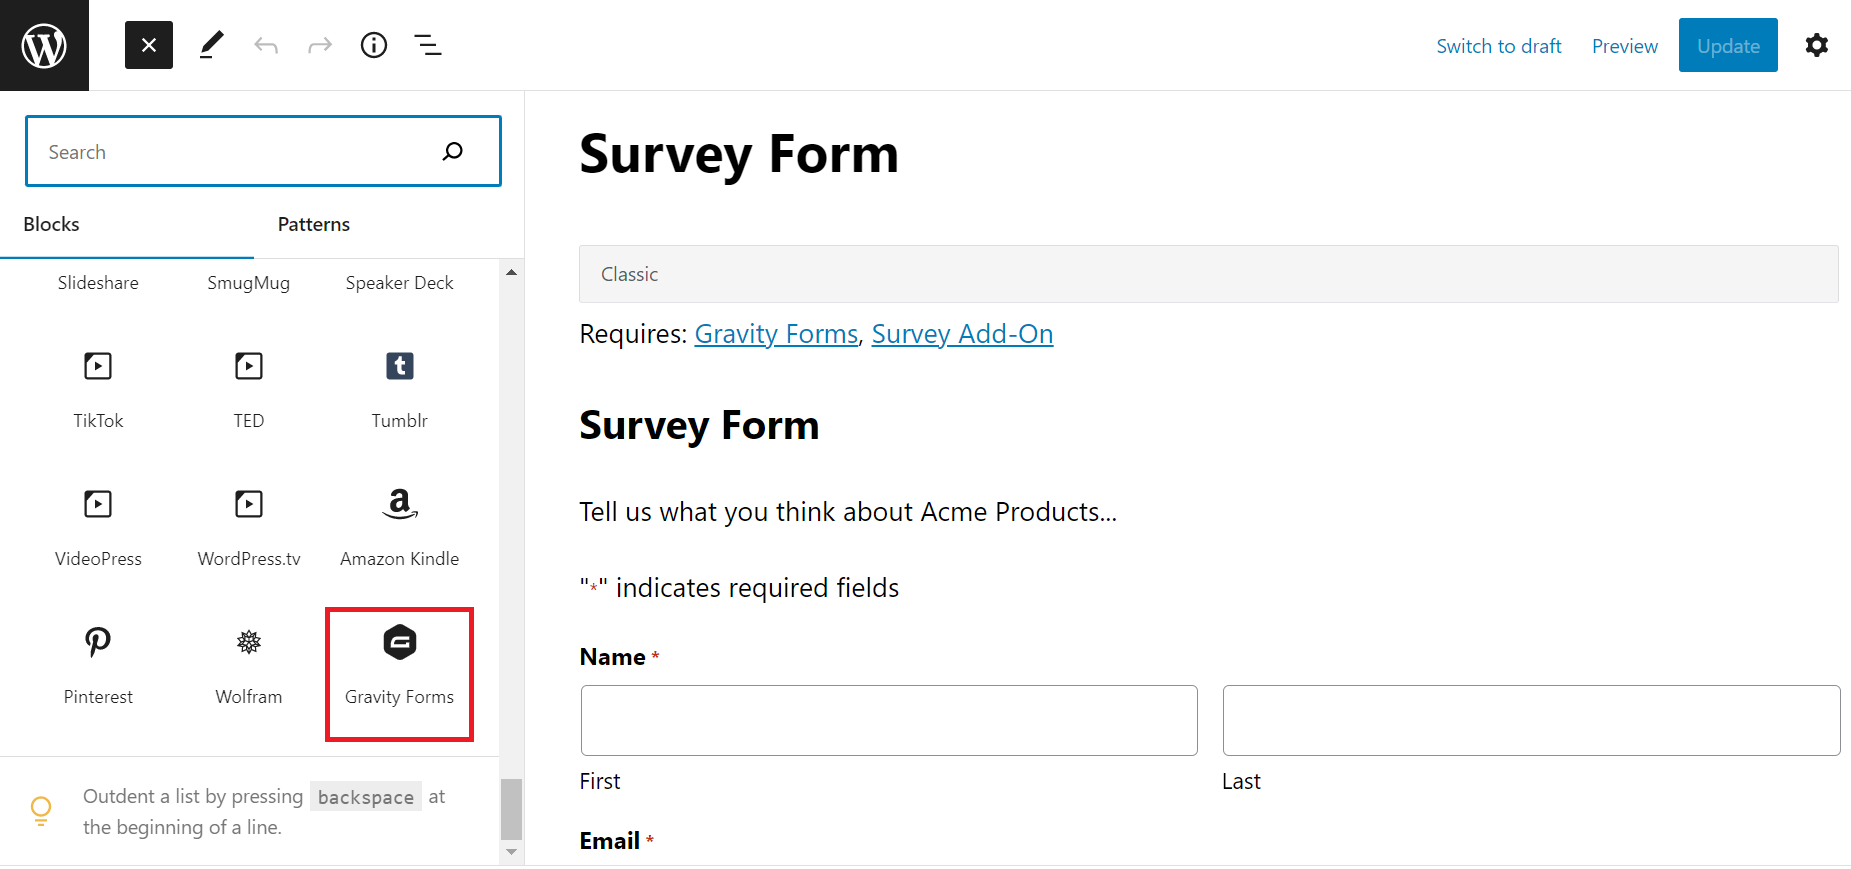
- Once you’ve added the Gravity Forms block, you’ll see a dropdown menu where you can select the form you want to embed.
- You can use the block settings on the right-hand side of the editor to customize the form’s appearance and behavior. This includes toggling the visibility of the form title and description, turning AJAX on or off, and choosing whether to show the whole form within the editor block or just a marker for it.
- Just like with the Embed button, you can move the form block to exactly where you want it and modify the block settings for the form.
Using the Gravity Forms block in the Gutenberg editor can make embedding forms even more seamless, especially for those who are more comfortable using the Gutenberg editor for their page or post content.
Method 3: Using a Shortcode
The third method to embed a Gravity Form in your WordPress site, i.e., by using a shortcode, is one of the most straightforward and flexible ways to add a form to your site.
There are two ways to generate a shortcode:
- Using the Embed button or
- Creating it manually
To generate a shortcode using the Embed button,
- Navigate to the Form Editor of the form you want to embed.
- Click on the Embed button.
- Click the Copy Shortcode button to copy the shortcode to your clipboard.
- This shortcode can be pasted into any post, page, or widget on your site.
Here’s a short walkthrough of this process:
To create a shortcode manually,
- You’ll need the ID of the form you want to embed.
- The ID can be found on the Forms page of your WordPress admin area.
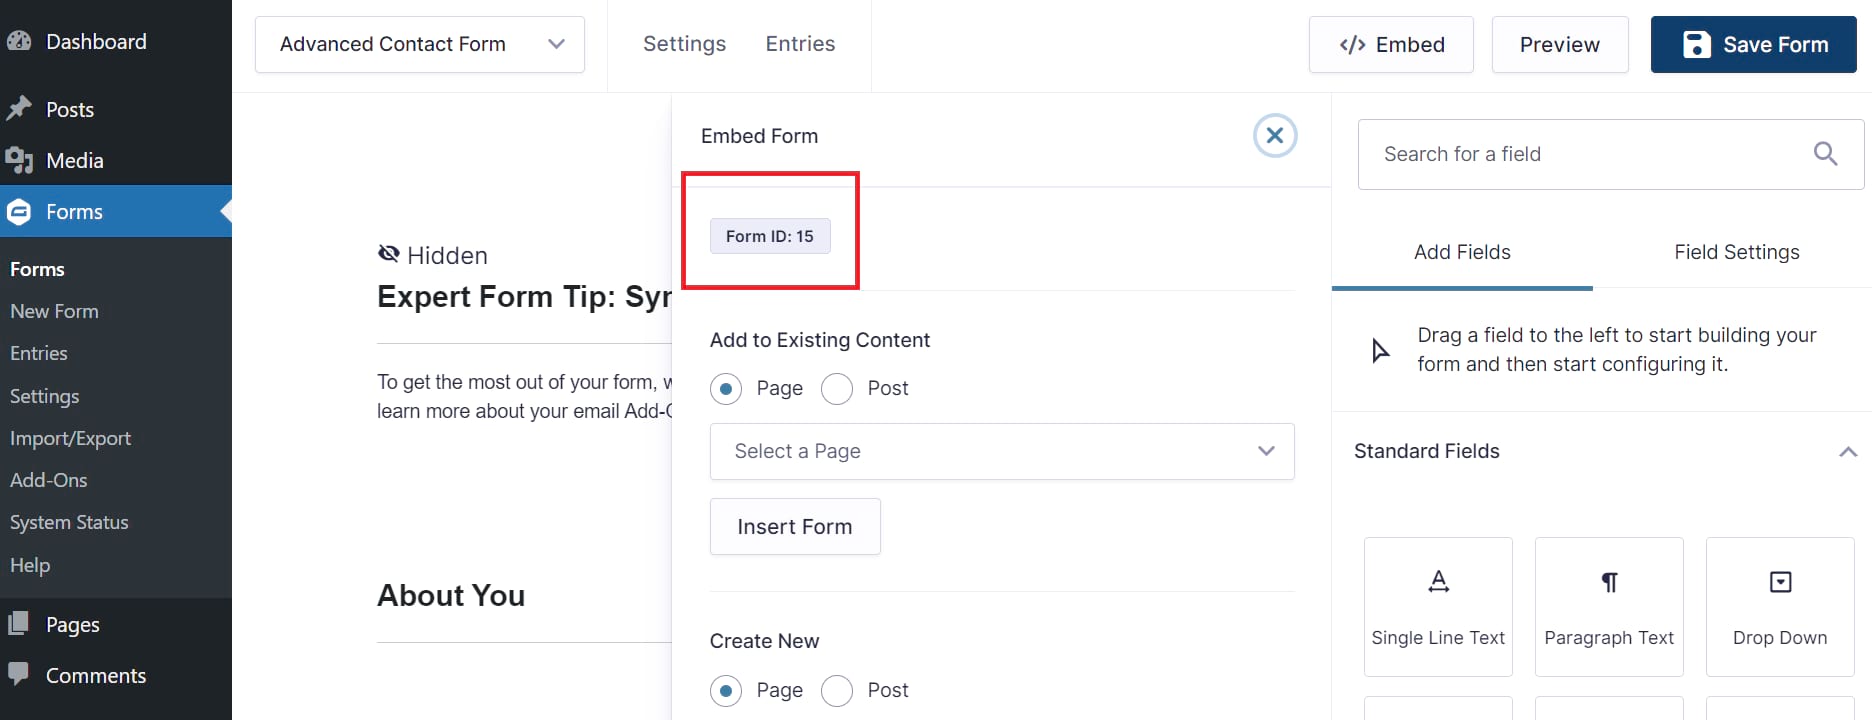
- Once you have the ID, create a shortcode following the pattern:
[gravityform id="form id" title="true/false" description="true/false" ajax="true/false"]- Replace “form ID” with the specific ID of the form you want to embed and choose either true or false for each of the other variables. These variables determine whether or not to display the form title or description and whether or not to use AJAX when submitting the form.
- For example, to embed the form with the ID “5” with no title or description, but using AJAX, you would use the following shortcode:
[gravityform id="5" title="false" description="false" ajax="true"]- Once you have your shortcode, navigate to the page or post where you want to add the form and add a new block. Once the block selector appears, choose “Shortcode” and paste the shortcode you generated earlier into the block.
This shortcode will work not only in the post and page editors but also in the widgets area of your site, making it a highly versatile method for embedding forms wherever you require on your site.
Gravity Forms shortcodes aren’t limited to simply displaying your forms – there is a wide array of powerful functionality that you can unlock using shortcodes. Learn more how to use shortcodes effectively in this dedicated guide.
Method 4: Using the WordPress Classic Editor
The Classic Editor is the pre-Gutenberg WordPress editor that many users still prefer. If you are using this editor, it’s still possible to embed Gravity Forms onto your page or post using the Add Form button.
Here’s how:
- Open the Classic Editor for the page or post where you want to embed your form.
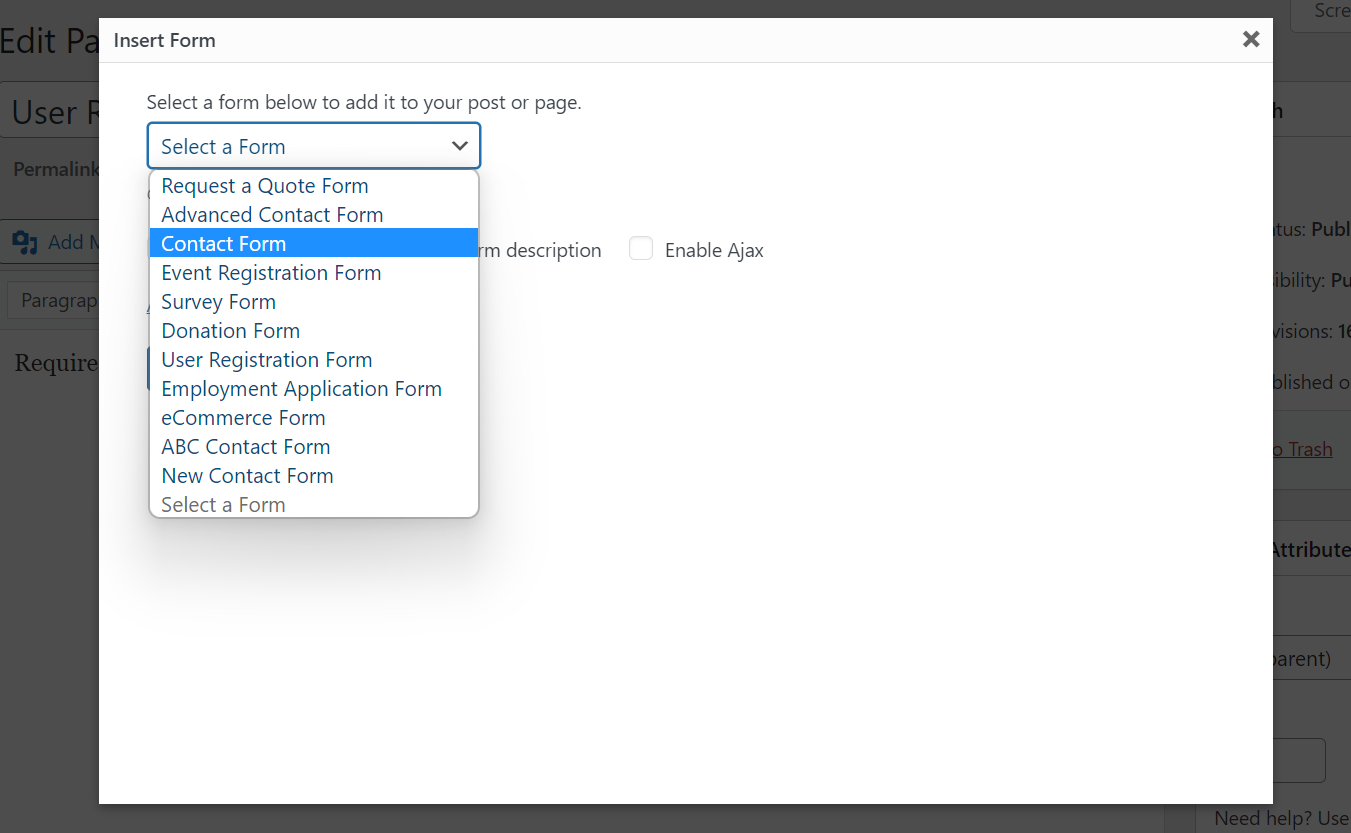
- Look for the Add Form button in the Upload/Insert toolbar, and click on it. This will bring up a separate window for Insert Form.

- From here, select the form you want to add from the dropdown menu.
- Additionally, you can specify some form options from this window, such as whether you want to display the form title or description.
- Once you have selected the options you want, click the Insert Form button. This will automatically insert the Gravity Forms shortcode into the body of the page or post content you are editing.
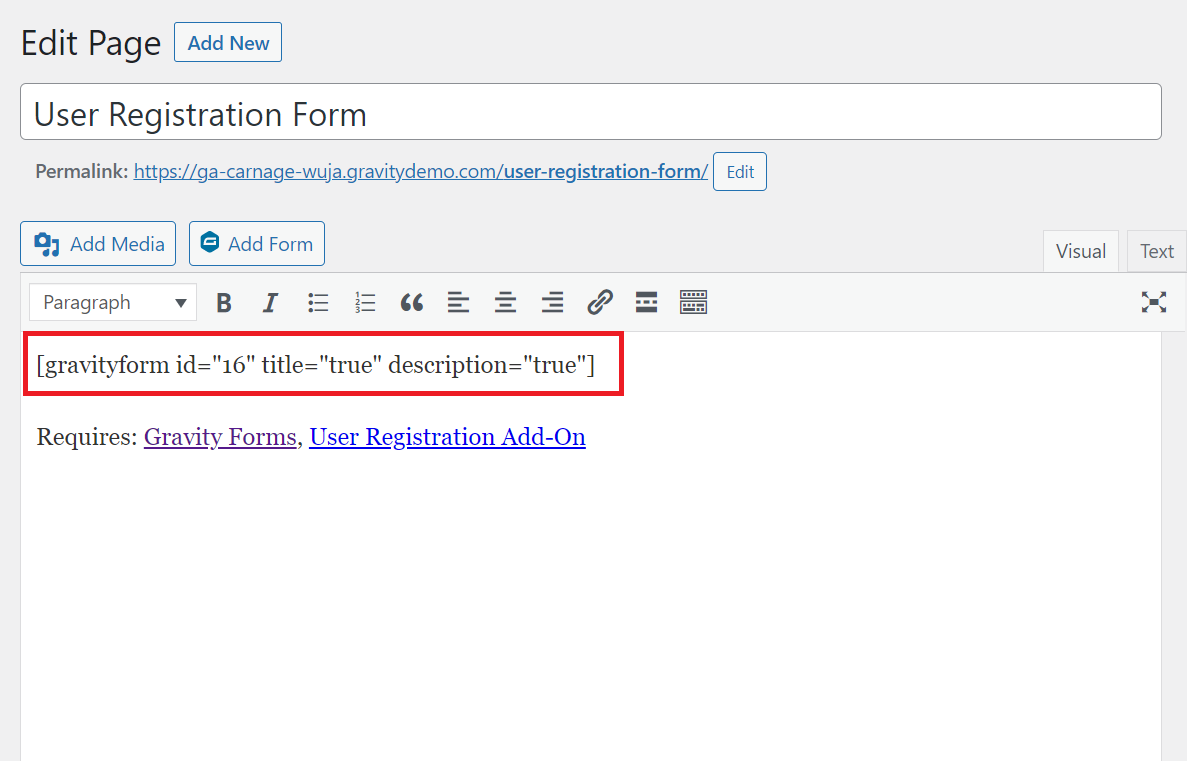
It’s worth noting that you can also simply paste the shortcodes generated in methods 1 or 3 into the Classic Editor to achieve the same result. This is a simple, straightforward way to embed forms onto your website for those who prefer the Classic Editor over the Gutenberg editor.
Just a note, if you’re using the Classic Editor plugin with a Gutenberg-based WordPress install, you’ll still be able to use the Add Form button to embed your form in the Classic Editor. This means that you don’t have to completely switch to the Gutenberg editor if you don’t want to.
Method 5: Using Alternative Page Builders
If you’re using a page builder like Elementor, there are two alternative methods for embedding Gravity Forms into your site.
The first method is to use the dedicated Form widget included with Gravity Forms. To use this method,
- Search for “Form” in the Elements area,
- Drag and drop this into your page or post.
- Select your chosen form from the dropdown list.

As with other methods, you can configure whether to display the form title and description.
This method is quick and easy, and it provides the added benefit of letting you add a form to your page or post without having to switch between your page builder and the WordPress editor.
The second method for Elementor is to use third-party Gravity Forms widgets, such as those available through the free PowerPack Lite for Elementor or Essential Addons for Elementor plugins.
With these plugins,
- You can add a dedicated Gravity Forms widget to Elementor, in the same way as the Form widget described above.
- You also get some options to style your form directly from the page builder. For example, you can adjust the form field display, typography, color, and form labels.
Similar methods are available with other page builders. For example, you can access an almost identical third-party Gravity Forms module for Divi by installing a free plugin. This module allows you to add Gravity Forms to your Divi pages and adjust the form style and appearance to match your site design.
Bonus Method: Embedding a Form Using Hooks
For advanced users, it’s possible to embed a Gravity Form into a WordPress site using theme files or hooks. This method is more complex than the previous ones and requires some knowledge of PHP and WordPress development.
To embed your form, you can use the Gravity Forms function, gravity_form(), which allows you to embed a form into your site by calling the function in your theme files or a plugin. The function takes a variety of parameters, including the form ID, settings, and field values.
To customize how your Gravity Form is displayed, you can use the gform_pre_render filter to modify the form’s HTML output before it’s displayed on the page, or the gform_field_content filter to customize the content of individual form fields.
Note that this method is only recommended for advanced users who have experience with PHP and WordPress development. If you’re not comfortable with HTML customization, it’s best to use one of the simpler methods described earlier in this guide.
For more information on embedding forms using hooks, check out the dedicated guide by Gravity Forms, which provides detailed instructions and examples for this method.
Embed and Enhance Your WordPress Forms
Think of embedding a form into your website as putting the final piece into a puzzle, completing the picture and making it whole. With Gravity Forms, you can now easily connect with your customers, get valuable feedback, and streamline your communication process, ultimately resulting in a better user experience.
Now that you’ve learned how to embed Gravity Forms, it’s time to take your form-building to the next level. With a range of extensions available through Gravity Perks, you can add advanced features to your forms, automate tasks, and improve your site’s functionality.
So go ahead, experiment with the different methods we’ve discussed, and explore the possibilities of Gravity Forms. You’ll be surprised at what you can achieve!