Gravity Forms Data Export: A Step-by-Step Guide
Learn how to export Gravity Forms data in this step-by-step guide. Explore the benefits of exporting form data and how to get more out of your data export.

- Why Export Data From Gravity Forms?
- How to Export Data from Gravity Forms – A Step-by-Step Guide
- Get the Most Out of Your Data Export
- Export Gravity Forms Data With Ease
Gravity Forms is an incredibly versatile and popular tool for collecting data from your website users. However, when it comes to harnessing the power of that data, you need to be able to export it in a format that can be easily analyzed and dissected in other platforms.
To help you do this, Gravity Forms has a simple and easy-to-use data export feature that lets you export your data in a variety of formats.
In this step-by-step guide, we’ll walk you through the process of exporting your data from Gravity Forms, covering the different export options as well as the advantages and limitations of each.
Let’s dive in! But first, here are some reasons why you should export data from your website forms.
Why Export Data From Gravity Forms?
Gravity Forms gives you the opportunity to analyze, process, and make the most of the information you collect from your website users. Here’s how.
Ability to Track User Behaviour Patterns
Analyzing your form data can help you track patterns, trends, and insights to power your business decisions and help you improve your products or services.
For example, if you collect customer feedback through Gravity Forms, exporting the data will enable you to identify common pain points or issues from customers, giving you an opportunity to address these areas and improve your customer satisfaction levels.
Easier Data Sharing in Various Formats for Collaborative Analysis
Exporting form data from Gravity Forms is important for accessibility and ease of analysis. Once exported, data can be imported into other systems, such as MS Excel or Google Sheets, where it can be easily manipulated, analyzed, and shared.
By exporting your form data to MS Excel, for example, you can create graphs, charts, and pivot tables, making it easier to identify trends and insights.
In addition, exporting your form data to a collaborative tool like Google Sheets allows you to securely share the data with team members or stakeholders, facilitating easier collaboration and decision-making.
Smooth Transition in Case of Data Migration
Exporting your form data can ease the transition process if you need to migrate your website to a new hosting platform. By exporting the data beforehand, you can back it up and ensure that you do not lose any important information during the migration process. This means you can quickly re-import the data to your new hosting platform and continue with your analysis without any interruptions.
Now that we have established why it is important to export form data, let’s take a look at how to export Gravity Forms data.
How to Export Data from Gravity Forms – A Step-by-Step Guide
Exporting data from Gravity Forms is a straightforward process that can be completed in just a few steps. Here is a detailed, step-by-step tutorial to walk you through the process.
Note that you’ll need an active copy of Gravity Forms in order to follow this tutorial.
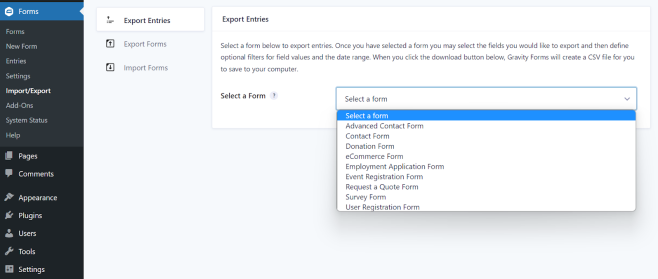
Step 1 – From your WordPress dashboard admin area, navigate to ‘Forms’ > ‘Import/Export’ to access the form export page.

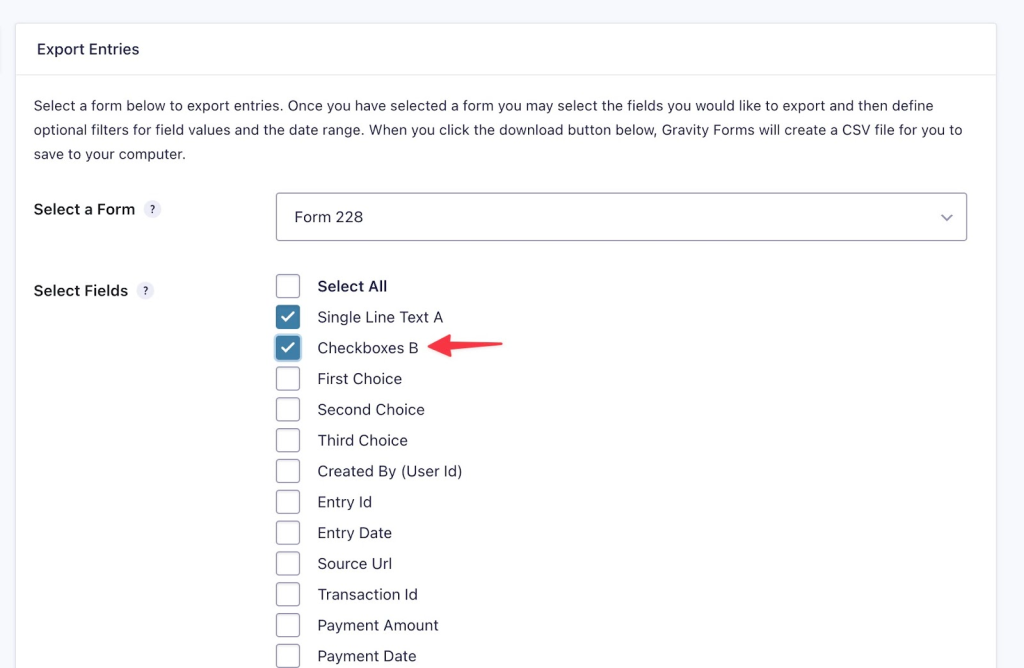
Step 2 – From the ‘Export Entries’ tab, select the form that you want to export Gravity Forms entries for from the dropdown menu.
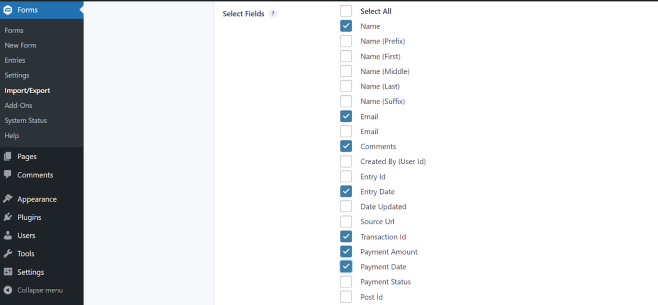
Step 3 – Once the form is selected, you’ll be able to choose which Gravity Forms entries you want to export. Select the checkboxes next to each form field you want to export.
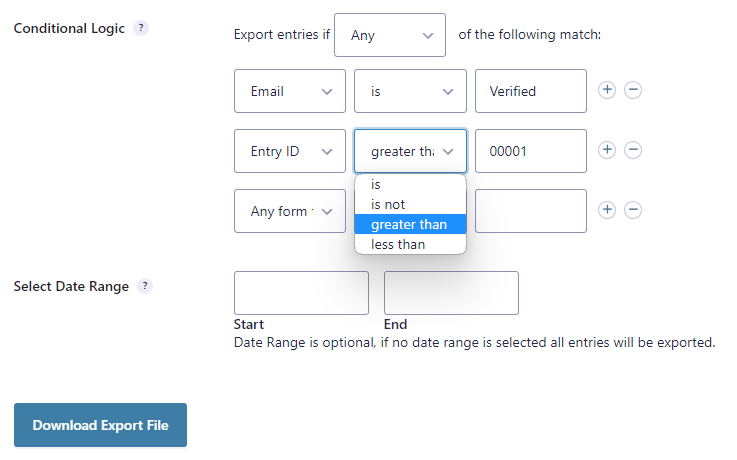
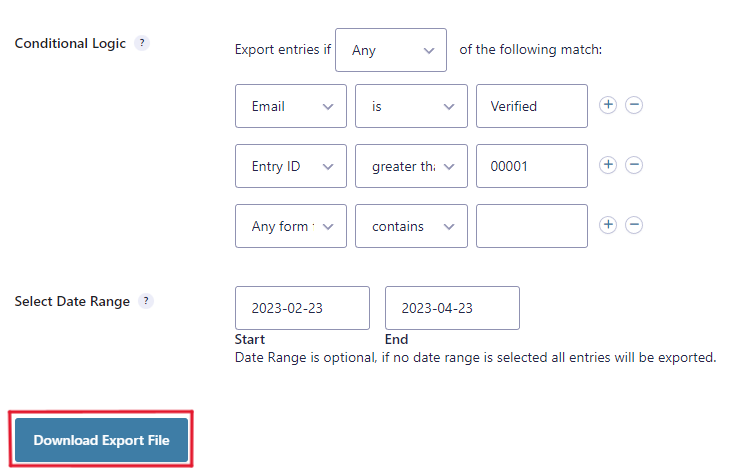
You can also apply conditional logic to your data export – this enables you to export only fields containing specific information.
To do this, click on the “Advanced Options” link and select “Enable conditional logic”. This will display additional options that allow you to specify the conditions that must be met for a field to be included in the export.
You can also apply a date range for the field submissions to be exported. This is useful if you only want to export entries within a specific time frame. To do this, simply enter the desired date range in the “Date Range” section. If this is left blank, all entries will be exported.
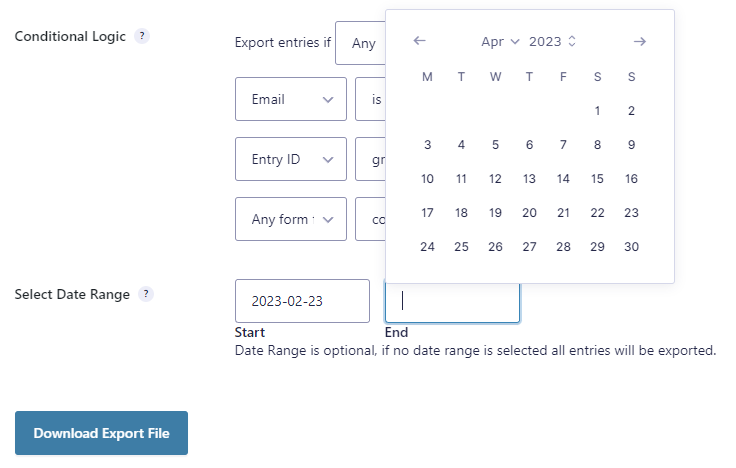
Step 4 – Click ‘Download Export File’ to download your form data as a .csv file. Once this is exported, you can then easily import the comma-separated values in your .csv file into your preferred platform for analysis, for example, Excel or Google Sheets. Note that you cannot export form data directly as an .xlsx file. You’ll need to download the .csv file first and then convert it to .xlsx.
Here’s a short video to walk you through the entire process.
And that’s it! You have now successfully exported your form data from Gravity Forms. By following these steps, you can easily export your form data and start analyzing it in your preferred platform.
Want to save time and send your Gravity Forms data directly to Google sheets? We’ve got a direct solution for you below!
Get the Most Out of Your Data Export
Gravity Forms has a powerful, in-built data export functionality that empowers users to process and analyze data on other platforms. Having said that, there are ways to boost this native functionality with simple, easy-to-use plugins, which can help you export child entries from nested forms, get multiple fields in a single column, or even set up data synchronization with Google Sheets.
Here’s how you can do that!
Export Multi-input Fields in a Single Column
If analyzing complicated Excel file sheets is not your cup of tea, you can use this code snippet from Gravity Wiz to export multi-input fields, like the checkbox field, name field, multi-select field, and others, into a single column. This presents your data in a more user-friendly format and makes it much easier to read and analyze.
Export Child Entries from Nested Forms
The Gravity Forms Nested Forms plugin from Gravity Wiz allows you to include nested form data in your data export and export child entries along with their associated parent entry.
By exporting child entries, you can process feeds for each child entry individually, which means you can track individual signups, registrations, or even new rows in your Google Sheet. This allows you to target child entries specifically in your post-export filtering, analysis, and reporting, while preserving full context with access to their associated parent entry data.
For instance, let’s say you have a parent entry that represents a customer and several child entries representing their orders. By exporting child entries separately, you can easily analyze the orders by customer, product, or date, without having to sift through irrelevant data.
Exporting child entries can also help you maintain data integrity. Keeping the child entries attached to their parent entries but on their own row, makes it easier to track changes, identify errors, and avoid duplication.
Set Up Automatic Data Synchronization with Google Sheets
If you’re using Google Sheets as your preferred platform for collecting form data for analysis, the Gravity Forms Google Sheets plugin can streamline this process.
The plugin has an integrated automatic data synchronization feature, which means that every time you get a new form submission entry, this is added to the relevant Google Sheet without any input required.
This both saves you the time of having to manually export new entries at regular intervals and ensures that your sheets are always kept up to date with your latest Gravity Forms data.
If you’re looking for a simple way to send existing Gravity Forms entries to Google Sheets, or to another feed-based integration, Gravity Forms Feed Forge is a free plugin that allows you to process feeds for existing entries (though, this connection is one-way).
Automate Exporting and Deletion with Entry Automation
Entry Automation by CosmicGiant makes it possible to automate common Gravity Forms tasks like data exporting and entry deletion. Entry Automation supports exporting via Excel, CSV, JSON, or PDF, as well as auto-exporting to specific providers like Dropbox, Google Drive, and FTP. You’ll find features for granular control over how exported data is processed and managed — with flexible automation scheduling, easy sorting, entry targeting, and field-by-field exporting control.
Share Gravity Forms Data easily with GravityExport
GravityKit provides a plugin for exporting Gravity Forms data to Excel, CSV, or PDF using a secure, shareable download link. To simplify exported data analysis, GravityExport also provides tools for splitting fields with multiple values (like Checkboxes) into different rows, and options for configuring multiple exports per form — each with different filters, fields, and unique shareable URLs. You can also automatically send reports to Dropbox or FTP.
Export Gravity Forms Data With Ease
Exporting form submission data from Gravity Forms is an essential process for analyzing and making informed decisions based on the information collected through your forms. With just a few simple steps, you can easily export your form data in CSV format and import it into your preferred analysis tool.
However, if you’re looking to get the most out of your form data management, Gravity Wiz offers a range of no-code plugins that can enhance the default functionality of Gravity Forms. From exporting child entries to syncing your data with Google Sheets, these plugins offer powerful and time-saving solutions that can level up your form data management game.
The possibilities for form data analysis and management are endless with Gravity Forms and its add-ons. This is of particular significance in an increasingly code-free environment, where even non-developers are keen to use and customize their WordPress websites.
So don’t hesitate to explore the full range of options and make the most of your data, without getting involved with code. With Gravity Forms and Gravity Wiz, the sky’s the limit!


