How To Customize the Gravity Forms Layout in WordPress

Gravity Forms helps you create all kinds of helpful forms for your WordPress site. But if you want to get the most from those forms, it’s important to optimize the Gravity Forms layout.
Optimizing the layout of your forms makes them more user-friendly and lets you control exactly how you display information on your forms.
There are three main ways to customize the Gravity Forms layout:
- Built-in options for basic layout choices.
- CSS styling (Gravity Forms includes a number of built-in CSS classes).
- Using other Gravity Forms Plugins for even more flexibility.
In this tutorial, you’ll learn how to use all three methods to customize the layout of your forms.
We’ll start by discussing the basic built-in options and Gravity Forms layout CSS. Then, we’ll take you through how to use Gravity Perks and some of its 48 add-ons to optimize your layouts further and add new features to your forms.
Why It’s Important to Customize the Layout of Your Forms
Form layout and form looks have a large effect on form usability and conversion rates.
For example, data from a Google eye-tracking study suggests that even small changes like using a left-aligned top label or well-deployed dropdowns can lead to faster form completion times and an easier experience for visitors as they navigate input fields (as measured by fewer eye movements).
Basically, this isn’t something you should ignore, and with the Gravity Forms layout options that we’ll show you in this post, you’ll have the ability to create a form layout that’s optimized for your visitors.
How to Use Basic Gravity Forms Layout Options
The Gravity Forms WordPress plugin includes some basic layout options in the form builder interface.
First, the obvious one is the drag-and-drop interface itself – you can use drag-and-drop to arrange the order of all fields in relation to one another. You can also use drag-and-drop to arrange the fields into columns.

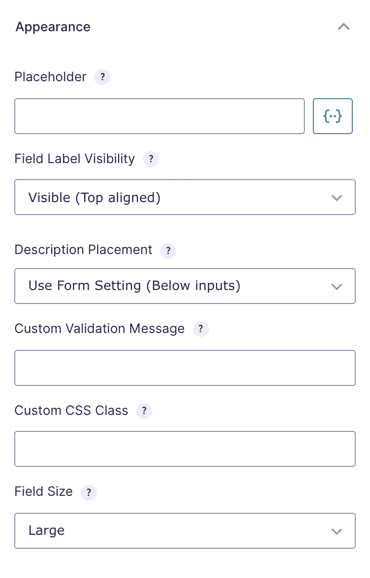
If you edit a field, you’ll also get some more layout options in the Appearance tab. For example, you can change the location of a field’s description or hide its label and/or sub-label:
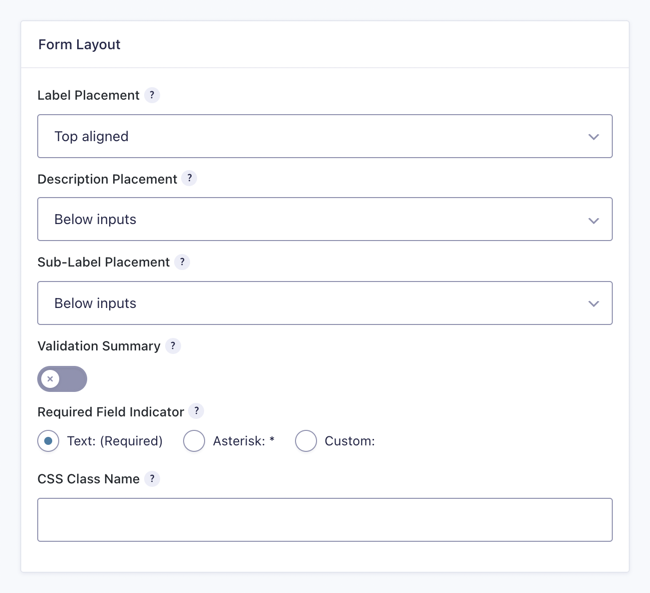
If you go into the Form Settings, you’ll also get additional options for label and description placement in the Form Layout section:
There are also some fields that can help you control the layout of your forms. For example, you can use the section break and page break fields to divide your form into different sections or create multi-page forms.
How to Use CSS Layouts for Gravity Forms
If you want to go beyond the basic built-in layout options, Gravity Forms comes with its own built-in CSS classes that you can use, called “Ready Classes”.
You can use “Ready” classes to:
- Change the layout of list fields. For example, dividing a list of checkboxes / radio buttons / selectors into multiple columns.
- Use a horizontal form layout where the submit button is beside form fields. Best for short forms.
View a full list of Gravity Forms Ready Classes – this page also includes visual examples.
CSS Ready Classes for column layout are deprecated in Gravity Forms 2.5. Instead, use the drag-and-drop editor to arrange your fields into columns.
To add a Ready Class to one of your form fields, you can use the Custom CSS Class setting in the Appearance tab of a field’s settings:

You can add multiple Ready Classes to a field, or mix-and-match a Ready Class with your own custom CSS that you’ve added to your site’s stylesheet. To do this, just add a space between each CSS class name in the Custom CSS Class setting.
Let’s look at some specific examples…
How to Create a Horizontal Gravity Forms Layout
With Ready Classes, you can build horizontal form layouts like below:
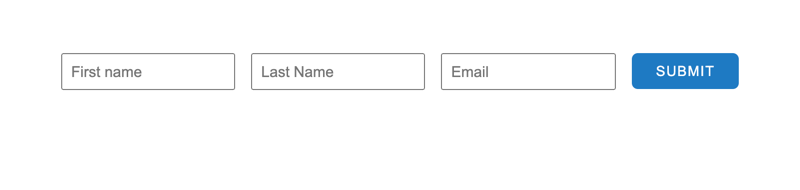
To achieve this layout:
- Add
gf_simple_horizontalto the CSS Class Name in the Form Layout section in Form Settings. - Align your fields horizontally using the drag-and-drop editor.
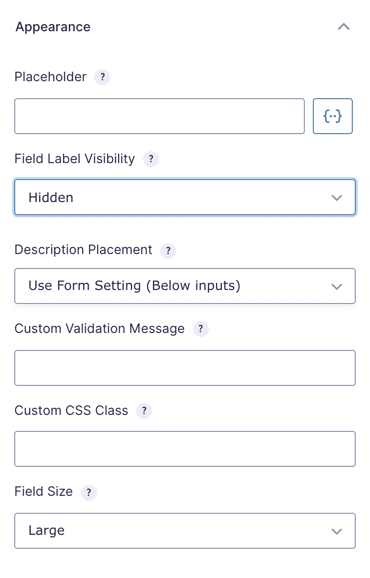
If you’re using this layout, you might also want to hide Gravity Forms field labels when using placeholders. You can do this using the Field Label Visibility setting in each field’s Appearance tab:
Other Gravity Forms CSS Tweaks
Three other layout tweaks you can make with CSS are:
- Numbering rows in a Gravity Forms list field
- Hiding the Gravity Forms Ajax spinner
- Transforming the contents of an HTML field into a banner message
Note that you can also use CSS to customize your forms’ background color (based on its form wrapper), form header, spacing, and so on.
Display and customize your forms on the front end using shortcodes
Ever used shortcodes before? These little one-liners of code allow you to easily display how your forms appear on the front end of your site. You can use shortcodes to embed forms, display user information, show progress meters, run split tests, display forms conditionally, and plenty more. Learn more about Gravity Forms shortcodes from our comprehensive guide.
How to Further Customize Your Layouts With Gravity Perks
To further customize your Gravity Forms layout, you can use Gravity Perks. Gravity Perks is a collection of 48 different add-ons for Gravity Forms that can help you enhance your forms in a ton of different ways.
One of those ways? New layout options!
For example, with the GF Nested Forms add-on, you can “nest” forms inside one another for custom layouts, including a nice Gravity Forms table layout.
This not only lets you create custom form layouts, but it also helps you add new functionality to your forms. You can create one parent form and then use a child form to collect additional entries and attach them to the parent form.
The child form entries will then display in a Gravity Forms table layout inside the parent form.
For example, if you create a team registration form for a local sports league, you could create:
- A parent form for people to add the details about their team as a whole.
- A repeatable child form inside that parent form where people can add details about each individual team member.
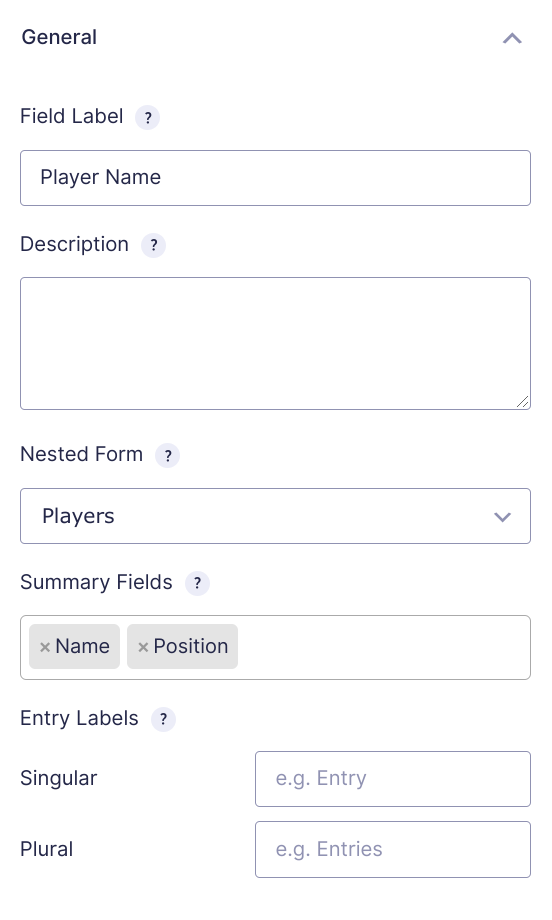
You’ll start by creating the child form. Then, you can “nest” that form inside the Gravity Forms layout of the parent form using the Nested Form field. By default, it will use a Gravity Forms table layout and you can choose which summary fields to include:
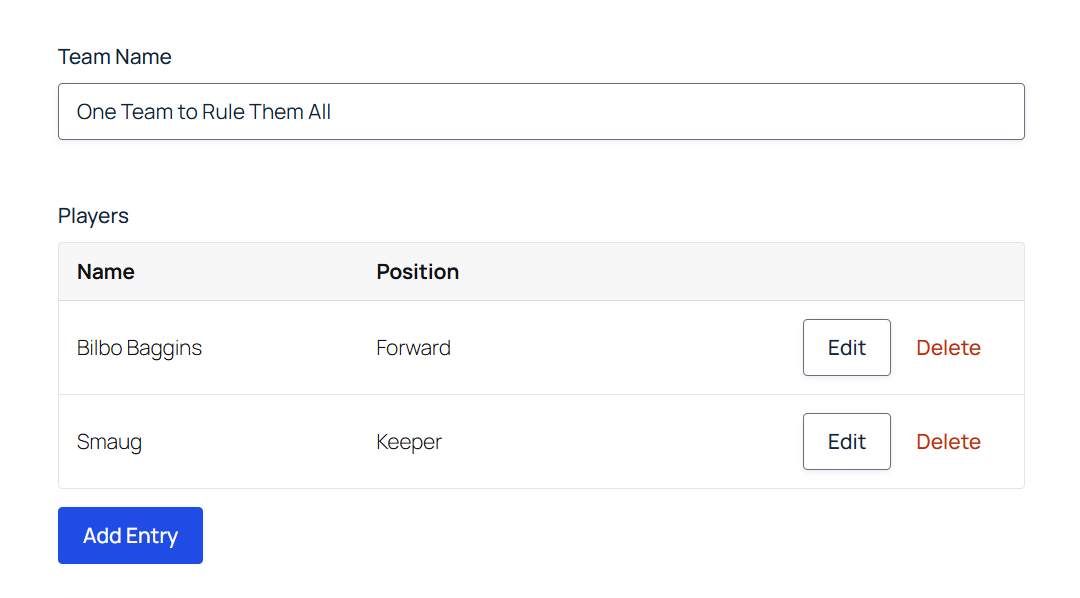
Here’s an example of what that might look like on the front-end – you can see how the plugin uses a Gravity Forms table layout for the repeatable child form:
You also have full control over the template of the nested child form. There are four available templates which you can customize by following these steps:
- nested-entries.php – renders child entries in the Nested Form field. This is what defines the Gravity Forms table layout.
- nested-entries-detail.php – renders child entries on the back-end in the entry detail page.
- nested-entries-simple-list.php – renders a single value from each child entry when using merge tags.
- nested-entry.php – renders a single child entry when using merge tags.
Conclusion
Optimizing your form’s layout is important for usability and user experience.
Gravity Forms includes basic layout options in the form builder. Then, you can use Ready Classes to further customize your Gravity Forms layout.
If you want to take things further, you can use Gravity Perks and the GF Nested Forms add-on to create a Gravity Forms table layout where a child form is nested “inside” a parent form.
To get started, purchase Gravity Perks today.


Is there a way to CSS in gravity forms whereas there are 2 columns but one field is larger than the other (so basically a 2/3 to 1/3, 2 columns)? I tried giving the 2/3 field a larger field size but it still split right in half :/. Any help is appreciated :)
Hi Zack,
You may create your own classes in your Website CSS and assign the class name in the respective fields. You can use the CSS below as a starting point to achieve what you want.
.gf_one_third{
    width: 33.3%!important;
    display: inline-block;
        vertical-align: top;
        float: none;
}
.gf_two_third{ width: 66.6%!important; display: inline-block; vertical-align: top; float: none; }I also found this plugin online, that appears to do something similar. You can check it out.
Best,
Samuel Bassah, thank you so much for the code you included in your reply. It saved me and I was able to use it. Just wanted to say thank you!! 🙏
A suggestion: Before Submission, we can preview a form using {all_fields} merge tag. However when previewing a form (or when the form is sent via a email notification) containing a nested field, the nested field entries by default appear one below the other in a LIST format instead of a TABLE format. If the Nested form field entries in the preview instead by default appeared in a table format it would be in a more appropriate and very neat reader friendly way of viewing the contents. In other words – If a List field is used in a form – and if you see the preview (or the notification email in which it is sent), the preview of the list field is a very neat table with one row each for every submitted entry of a list field which makes it very easy for the user to read and make sense of the data. However if a nested field is used instead of a list field – the preview (or the notification email) the entries do not appear as table rows for each entry but instead appear as a vertical list blocks of all the submitted entries.
If there is a way to change the default view of the nested form field entries in the preview submission (Or notification) to the table format – it would be great if a small article is written on it on your site please
Thanks for the great work you guys are doing with gravity forms! Cheers
Hello Arvind, this is an excellent question. You can actually control the output of the nested form fields by using the nested forms templating system to make the list view or detailed view, then using the {all_fields} or nested fields merge tag to display it. If you want more control over the all fields merge tag or you wish to only display a single field at a time, you can customize this via the All Fields Template plugin.😃
Thanks for your reply . In addition to your reply I also found the following resource elsewhere on your website which had in a way already provided this functionality. I will try implementing. Thanks for all the resources. In case anyone else needs this too I am posting the github link of the snippet created by David:
https://gist.github.com/spivurno/3a3b92bf32824a414c87c23bbf5ca335