How to Supercharge Your Real Estate Business using Gravity Forms
Learn how to build a mortgage calculator, schedule showings, and create a home appraisal form using Gravity Forms and Gravity Perks.
As a realtor, you know the importance of having a strong brand. You are your brand, and this includes your online presence. Let’s look at how you can use Gravity Perks to optimize your online efforts and take your real estate website to the next level.
Not into real estate? Don’t worry — the bulk of these concepts can be applied to other business processes and serve as useful know-how regardless of your industry. 💯
In this article, we’ll cover how you can create:
- A mortgage calculator with Gravity Forms Advanced Calculations.
- A showing scheduler with Gravity Forms Inventory and Gravity Forms Notification Scheduler.
- A home appraisal form with Gravity Forms Page Transitions and Gravity Forms Save and Continue.
Table of Contents
- Create a Gravity Forms Mortgage Calculator
- Create a Client Showing Scheduler
- Create a Home Appraisal Form
- Taking it Further
Create a Gravity Forms Mortgage Calculator
Let’s start by building a mortgage calculator for your clients. With this form, we can calculate an estimated monthly payment based on the inputs they provide.
This article requires the GP Advanced Calculations perk.
Buy Gravity Perks to get this perk plus 48 other premium Gravity Forms plugins!
Build the Form
Create a new form and add the following number fields:
- Home Price.
- Down Payment.
- Interest Rate.
- Amortization Period.
- Maintenance Fees.
- Property Taxes.
- Total Monthly Payment.
Set Up the Total Monthly Payment Calculation
Now that the fields are created, it’s time to set up the monthly payment calculation. We’ll use the following standard formula:
M = P [ i(1 + i)^n ] / [ (1 + i)^n – 1].Here’s what each variable means:
- M = Total monthly payment (this is what we’re going to calculate).
- P = The total amount of your loan (home price – down payment).
- I = Interest rate (interest rate / 12 months / 100).
- N = The total number of months to pay off the mortgage (Amortization period in years * 12 months).
On your form setup, select Total Monthly Payment and click Enable Calculation under Field Settings. In the Formula box, add the calculation described above. You’ll want to use merge tags to make sure the field values are being calculated:

Pro-tip: If you want to include variable values in your calculation, you can use conditional statements tied to another field. Learn more on how to set up dynamic pricing in Gravity Forms.
Since this is a long formula, it may be easier to download the example and import it to your site.
Your finished form should look like this:
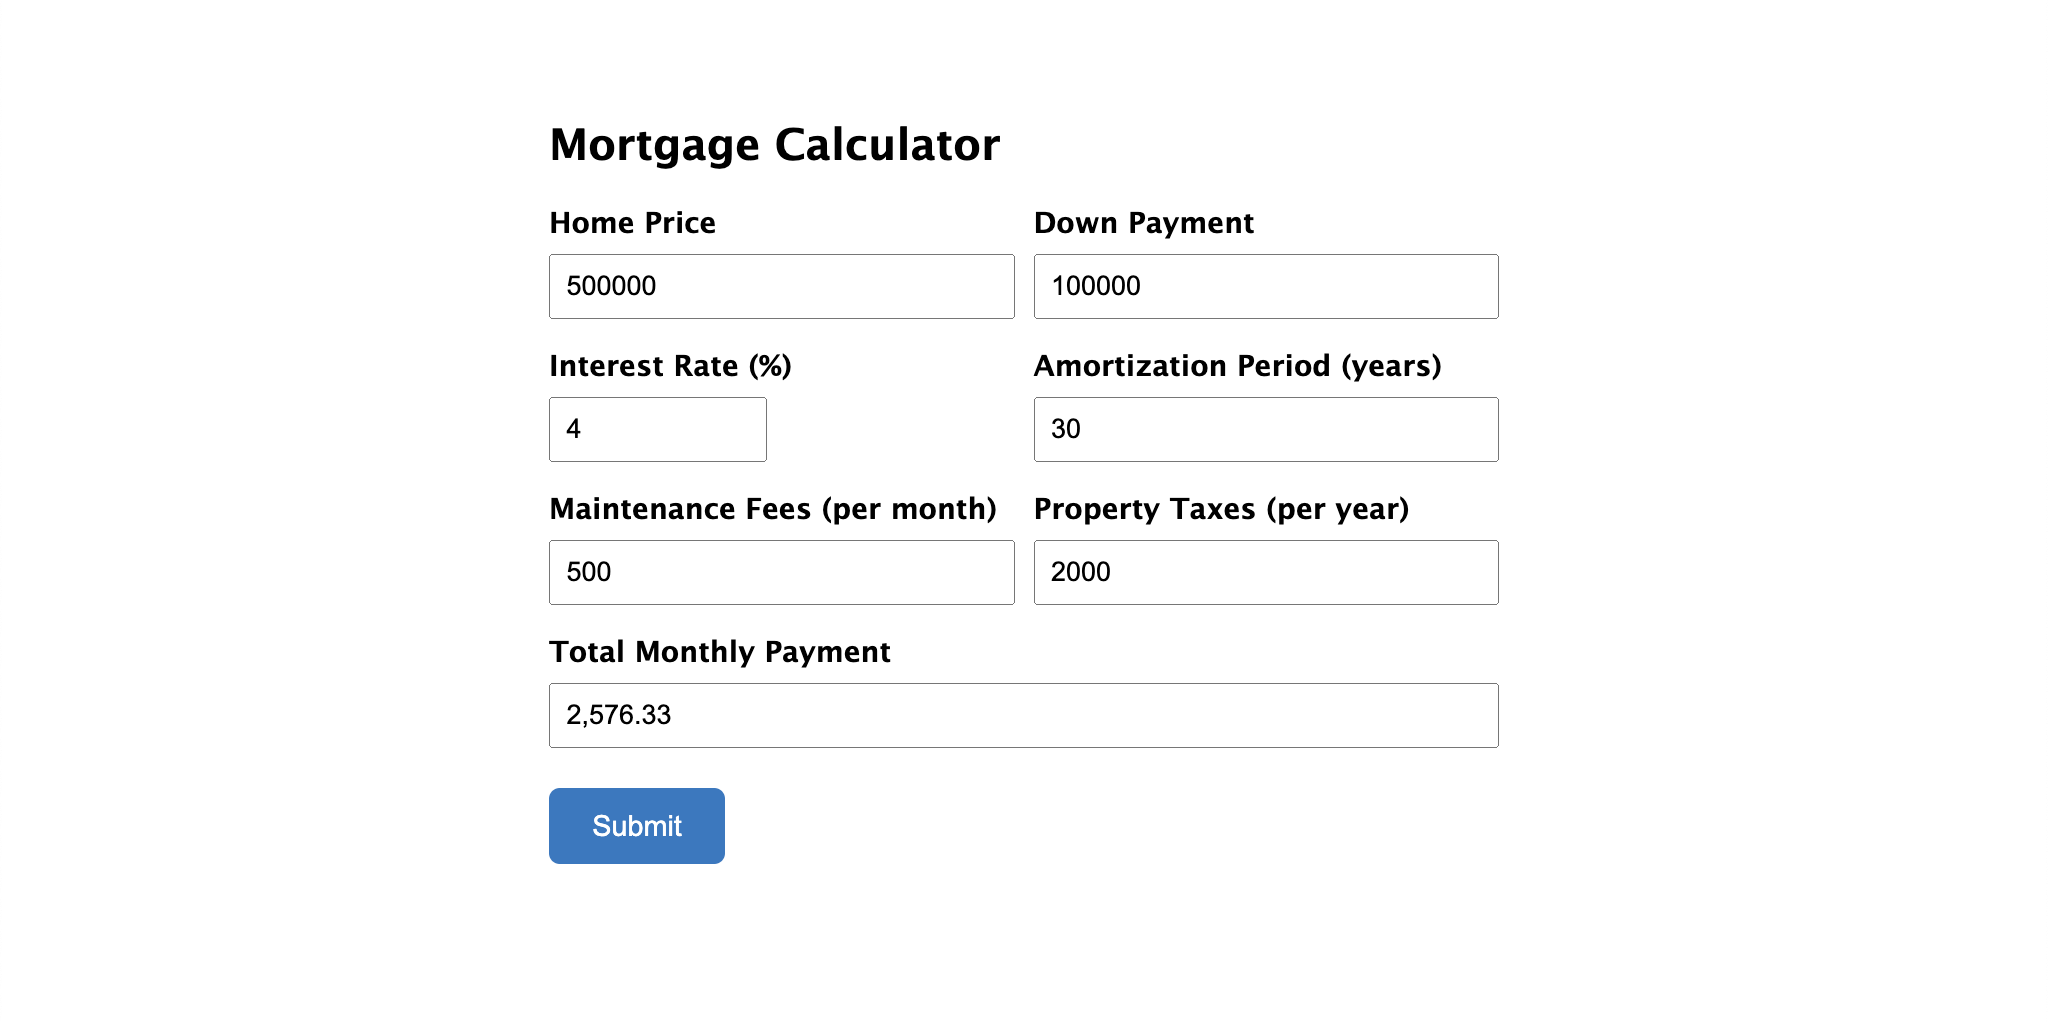
Your clients now have a handy tool to calculate their payments!
Download the finished form here and import it to your site to get started right away.
Create a Client Showing Scheduler
Once your clients use the mortgage calculator to see what they can afford, they may want to schedule a showing for properties they’re interested in. Let’s build a scheduling form to make it easy for clients to book a time that’s convenient for them and works with your schedule at the same time.
We’ll also set up a scheduled notification to automatically remind clients of their showing on the day of the appointment.
This article requires GP Inventory, GP Limit Dates, and GP Notification Scheduler.
Buy Gravity Perks today and get 48+ premium Gravity Forms plugins, including these perks!
Build the Form
Let’s start by creating a new form called Showing Scheduler. Add the following fields to your form:
- Name.
- Email.
- Showing Date.
- Showing Time.
- This will be a Drop Down field. Add each time slot you want to make available to buyers as a choice in the dropdown.

Set Up the Schedule
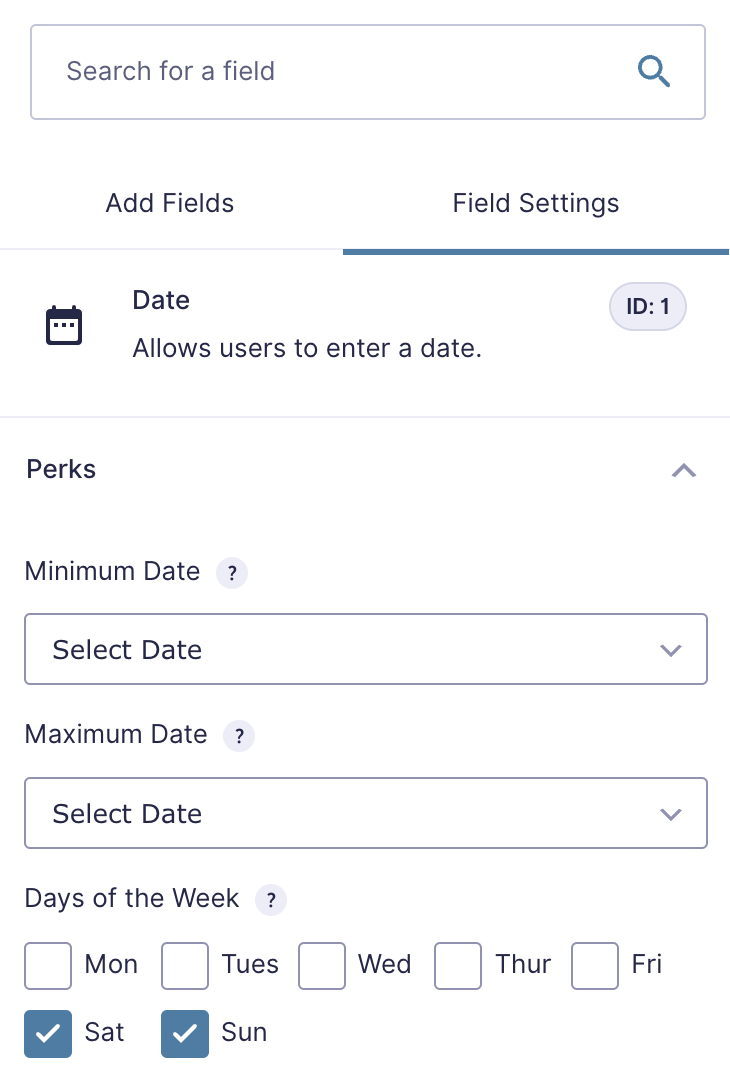
Let’s say that you only want to offer showings on weekends from 1-2 pm and from 4-5 pm. We’ll use a combination of Gravity Forms Limit Dates and Gravity Forms Inventory to restrict the available dates and times that buyers can select.
To restrict buyers to only book on weekends, click on Select Showing Date and navigate to Perks › Days of the Week. Make sure only Saturday and Sunday are selected:
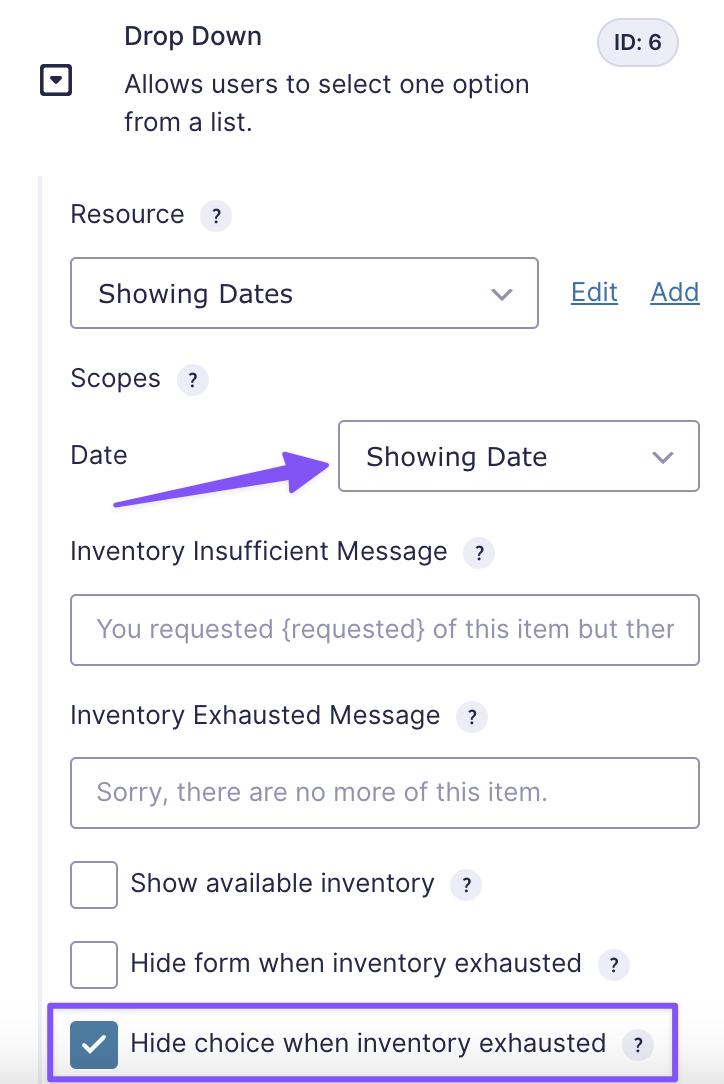
To restrict the available times to only be available once per each weekend day, click on Showing Time, navigate to Perks › Inventory Type, and choose Advanced.
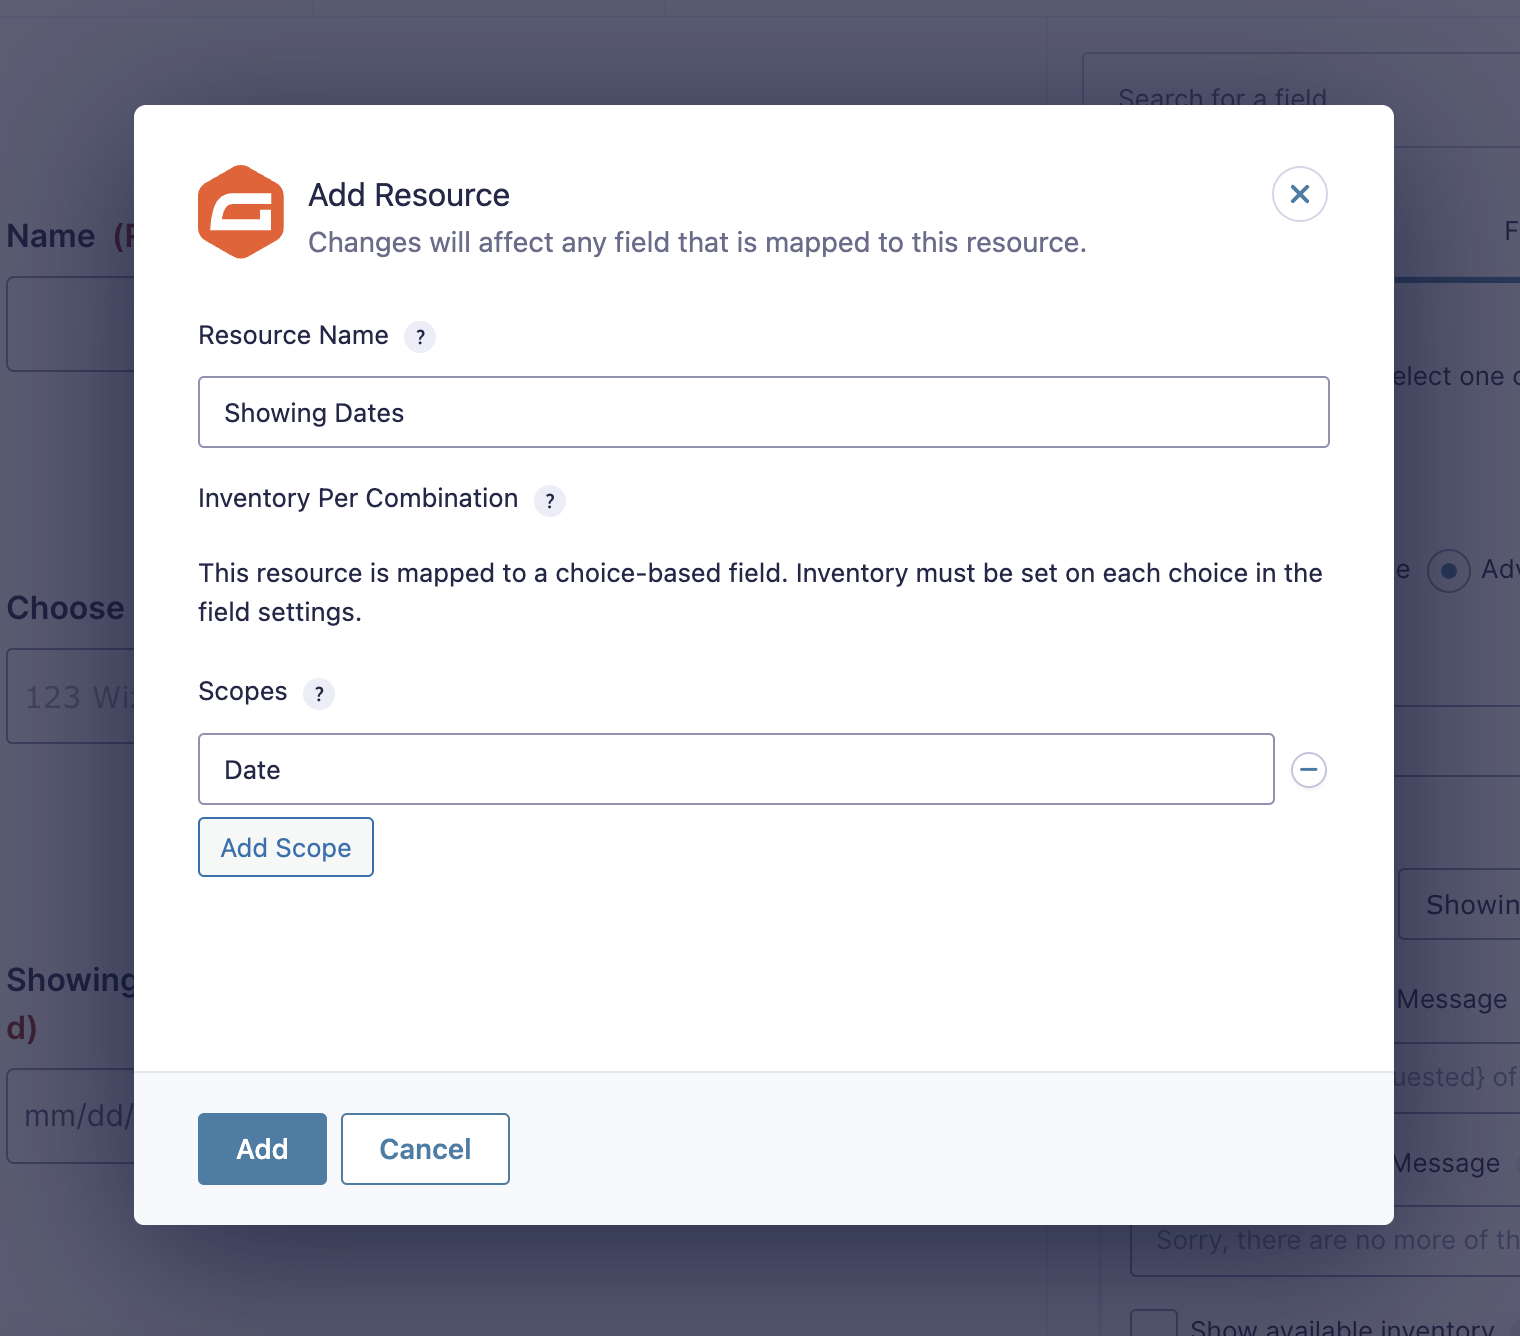
Beside the Resource dropdown, click Add. We’ll name the resource Showing Dates. Under the Scopes header, click Add Scope and type in “Date”.
Click the blue Add button at the bottom of the modal to save the resource.
You should now see a Date dropdown under Inventory › Scopes. Click on the dropdown, and choose Select Showing Dates.
To hide a timeslot once it’s been booked, check Hide choice when inventory exhausted.
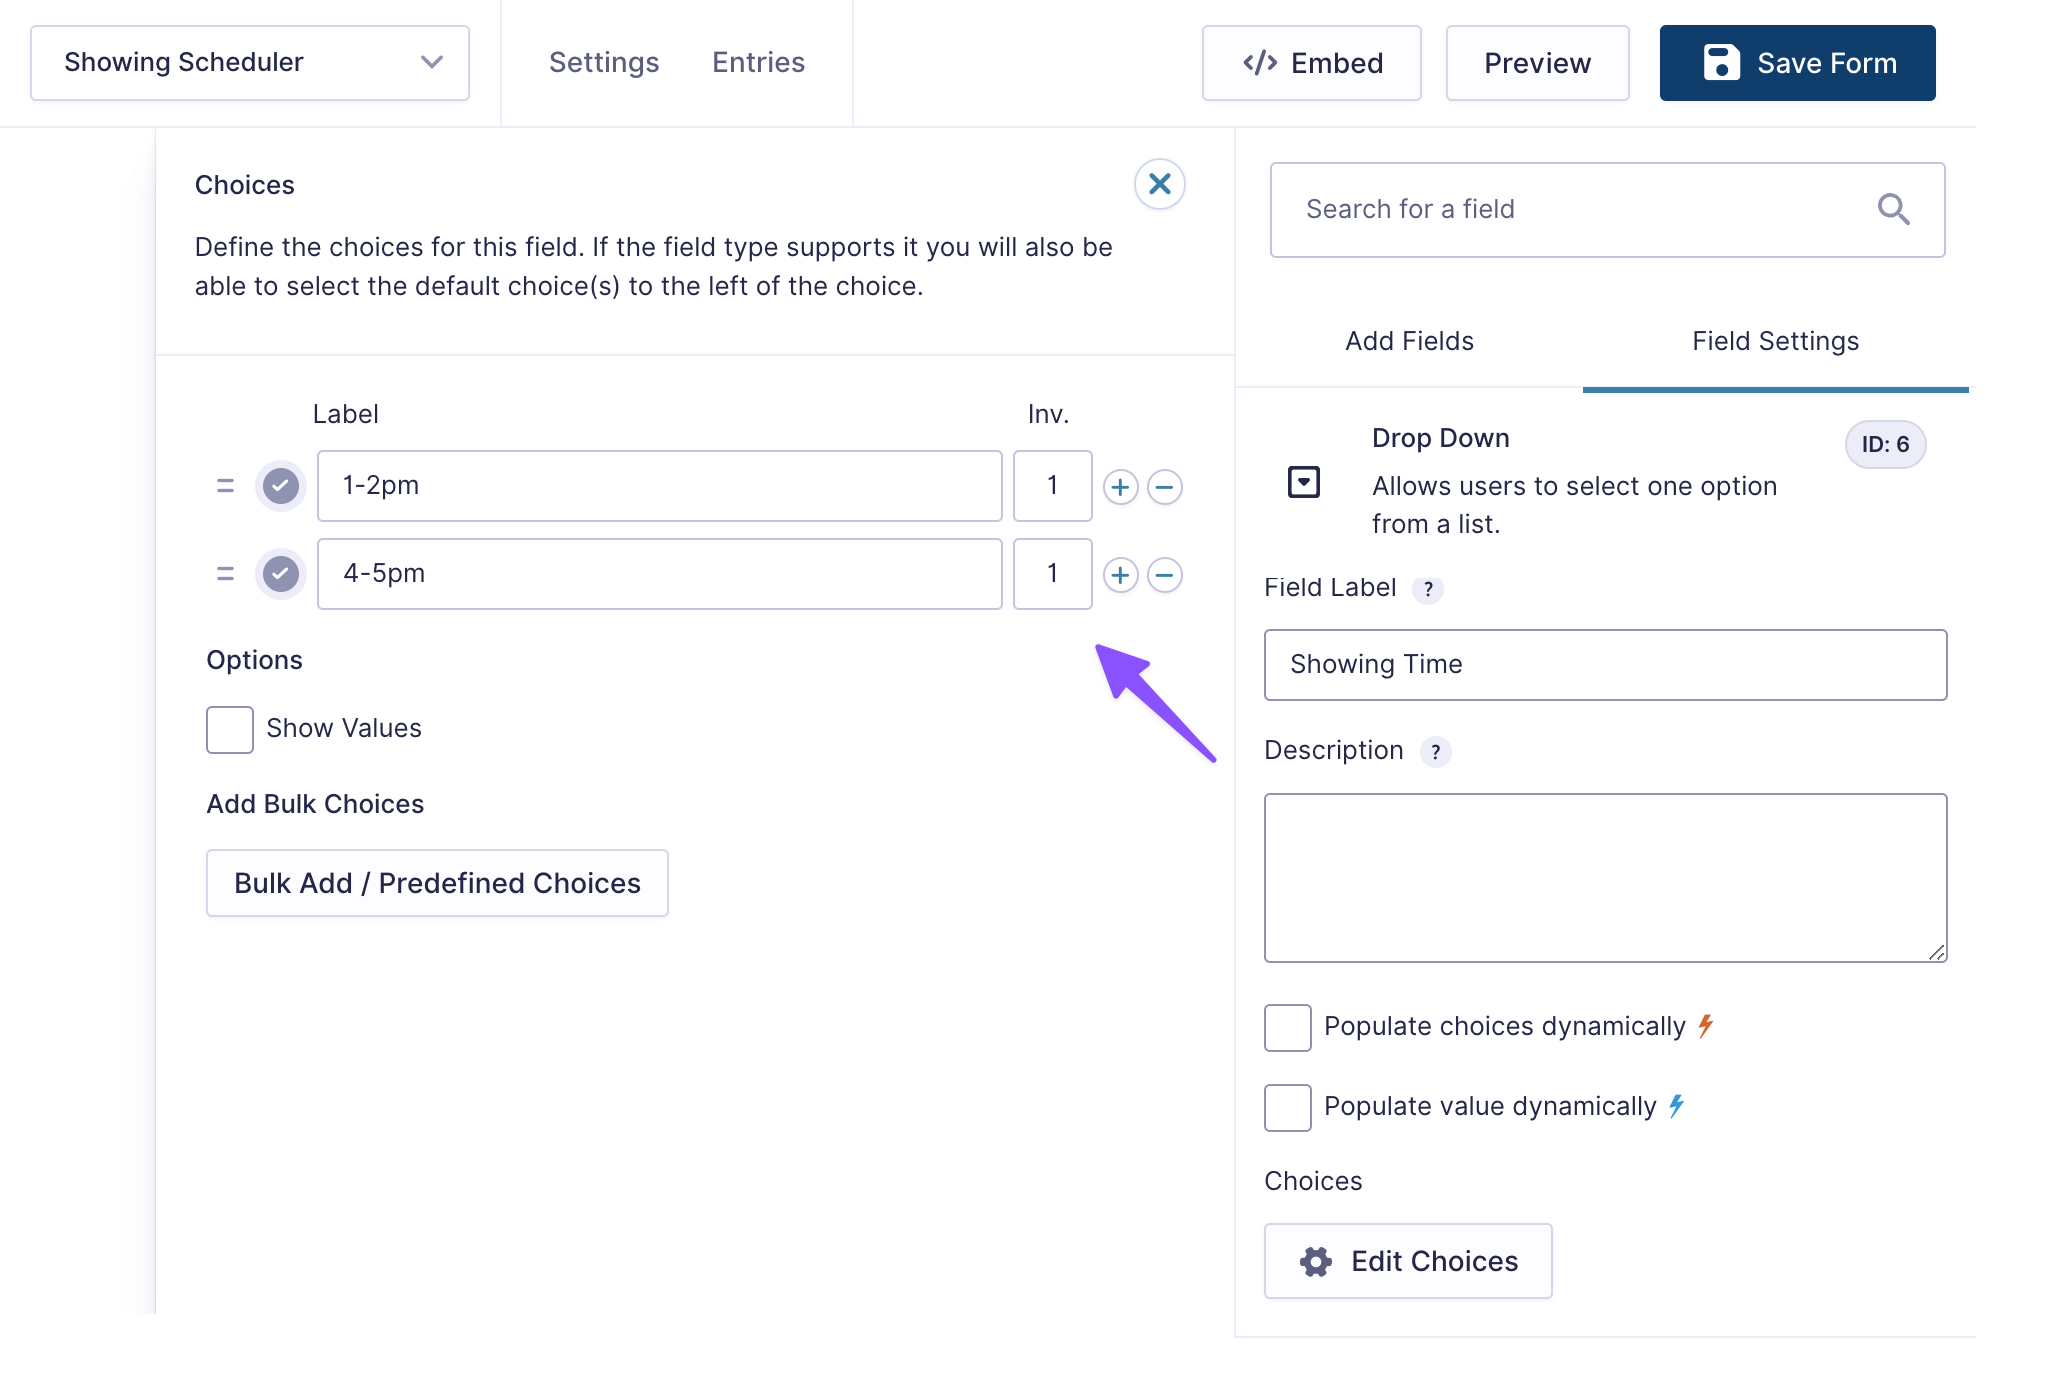
Finally, we’ll make sure to only allow one booking per time slot. Navigate to General › Edit Choices. You should see a new column called Inv. beside each choice. Set each Inv. to 1 and save.
Set Up the Notifications
After a client books a showing, wouldn’t it be great if you could send a reminder to them on the day of their appointment? With Gravity Forms Notification Scheduler, you can!
Open the Showing Scheduler form and navigate to Settings › Notifications. Click Add New in the top right corner, and fill out the following fields:
- Name: “Showing Scheduler”.
- Send To: Select a Field
- Send To Field: Choose the Email field from the dropdown.
- From Name: Enter your name here.
- From Email: Leave the default text in place.
- Subject: “Reminder for your upcoming showing”.
- Message: Your custom message here. You can include merge tags to personalize the message based on what the user filled out when they submitted the form.
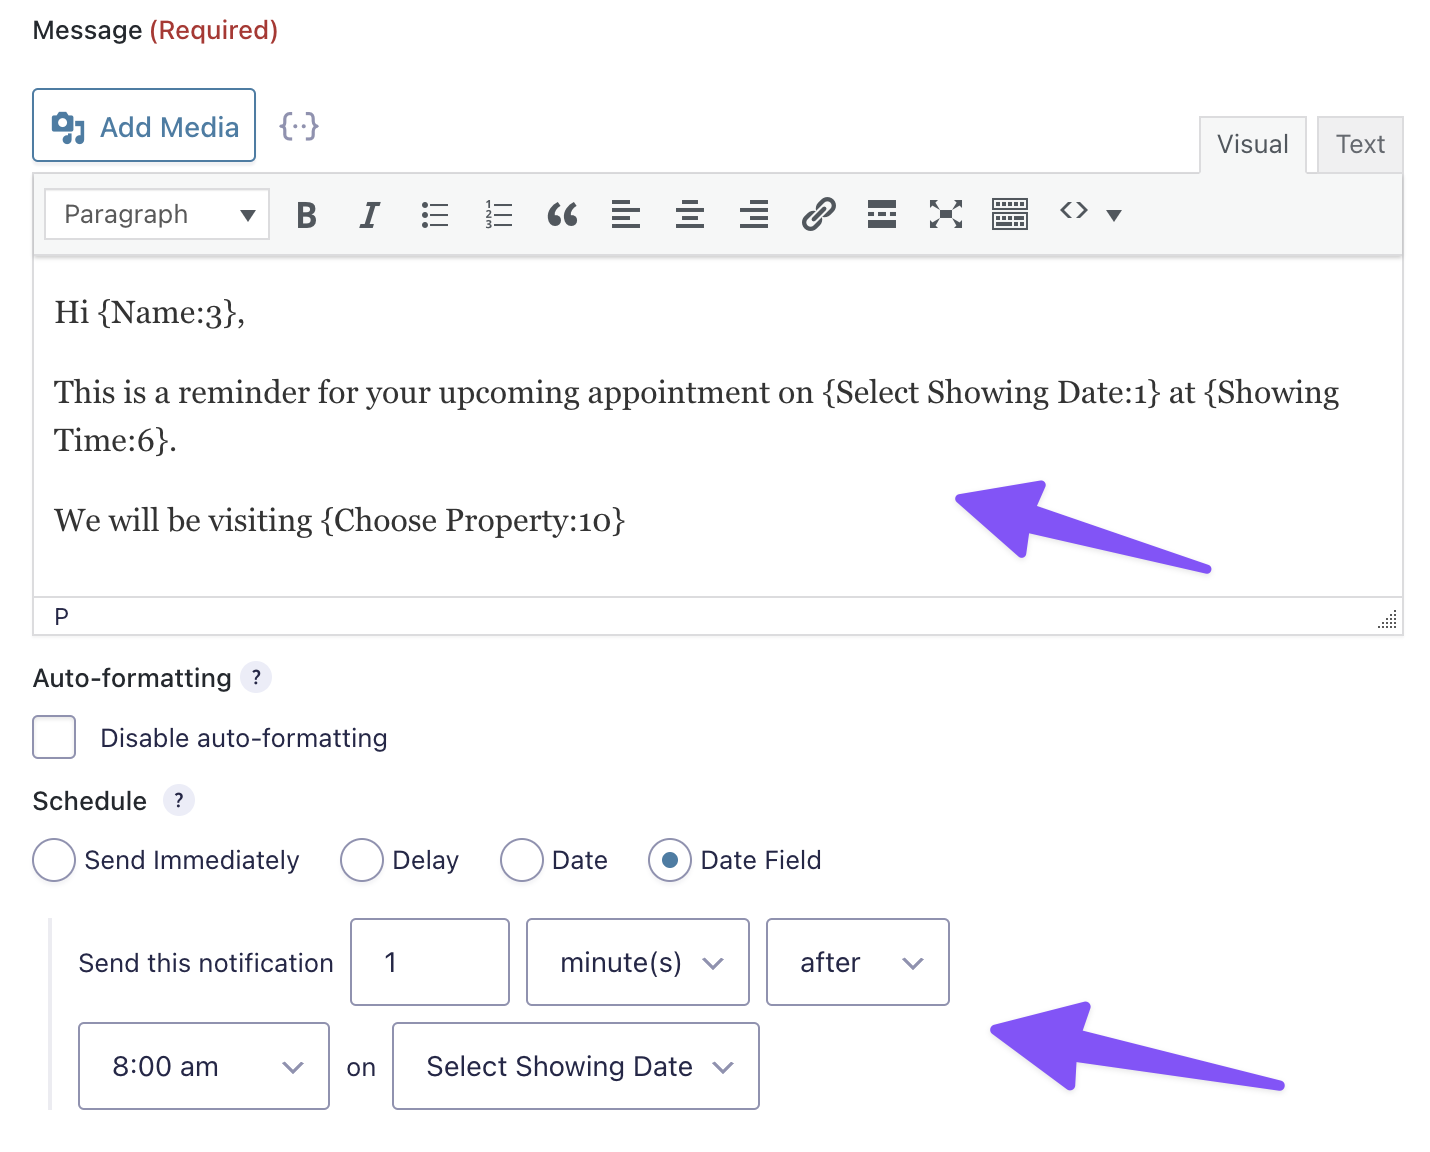
Once the notification fields are configured, the final step is to enable the schedule. Under Schedule, choose Date Field and set a time to send the notification. On the last dropdown towards the far right, choose Showing Date.
Here’s an example that will send the notification at 8:01am on the day of the showing:
Download the finished form here and import it to your site to get started right away.
Create a Home Appraisal Form
On the hunt for new clients? A home appraisal form is a great marketing tool you can offer to prospective clients. What better way to entice sellers than to give them a preview of what their home could be worth?
Typically, these types of forms are long, have multiple pages, and can be very tedious to fill out. Thankfully, Gravity Perks can make this experience a lot smoother for users. GP Page Transitions transforms the user experience with submission-less, automatic page transitions that are easy on the eye. GP Advanced Save & Continue lets users fill out a partial form entry at one time, and easily come back at a later time and return exactly where they left off.
Build the Form
Start by creating a new form like normal, with all of the pages and fields you want to include. In this example, we’ll add fields and page breaks in this order:
- Name
- Address
- Page Break
- # Square Feet
- # Bedrooms
- # Bathrooms
- Is a garage included?
- Page Break
- Ideal Sale Timeline
- Other Notes
Enable Page Transitions
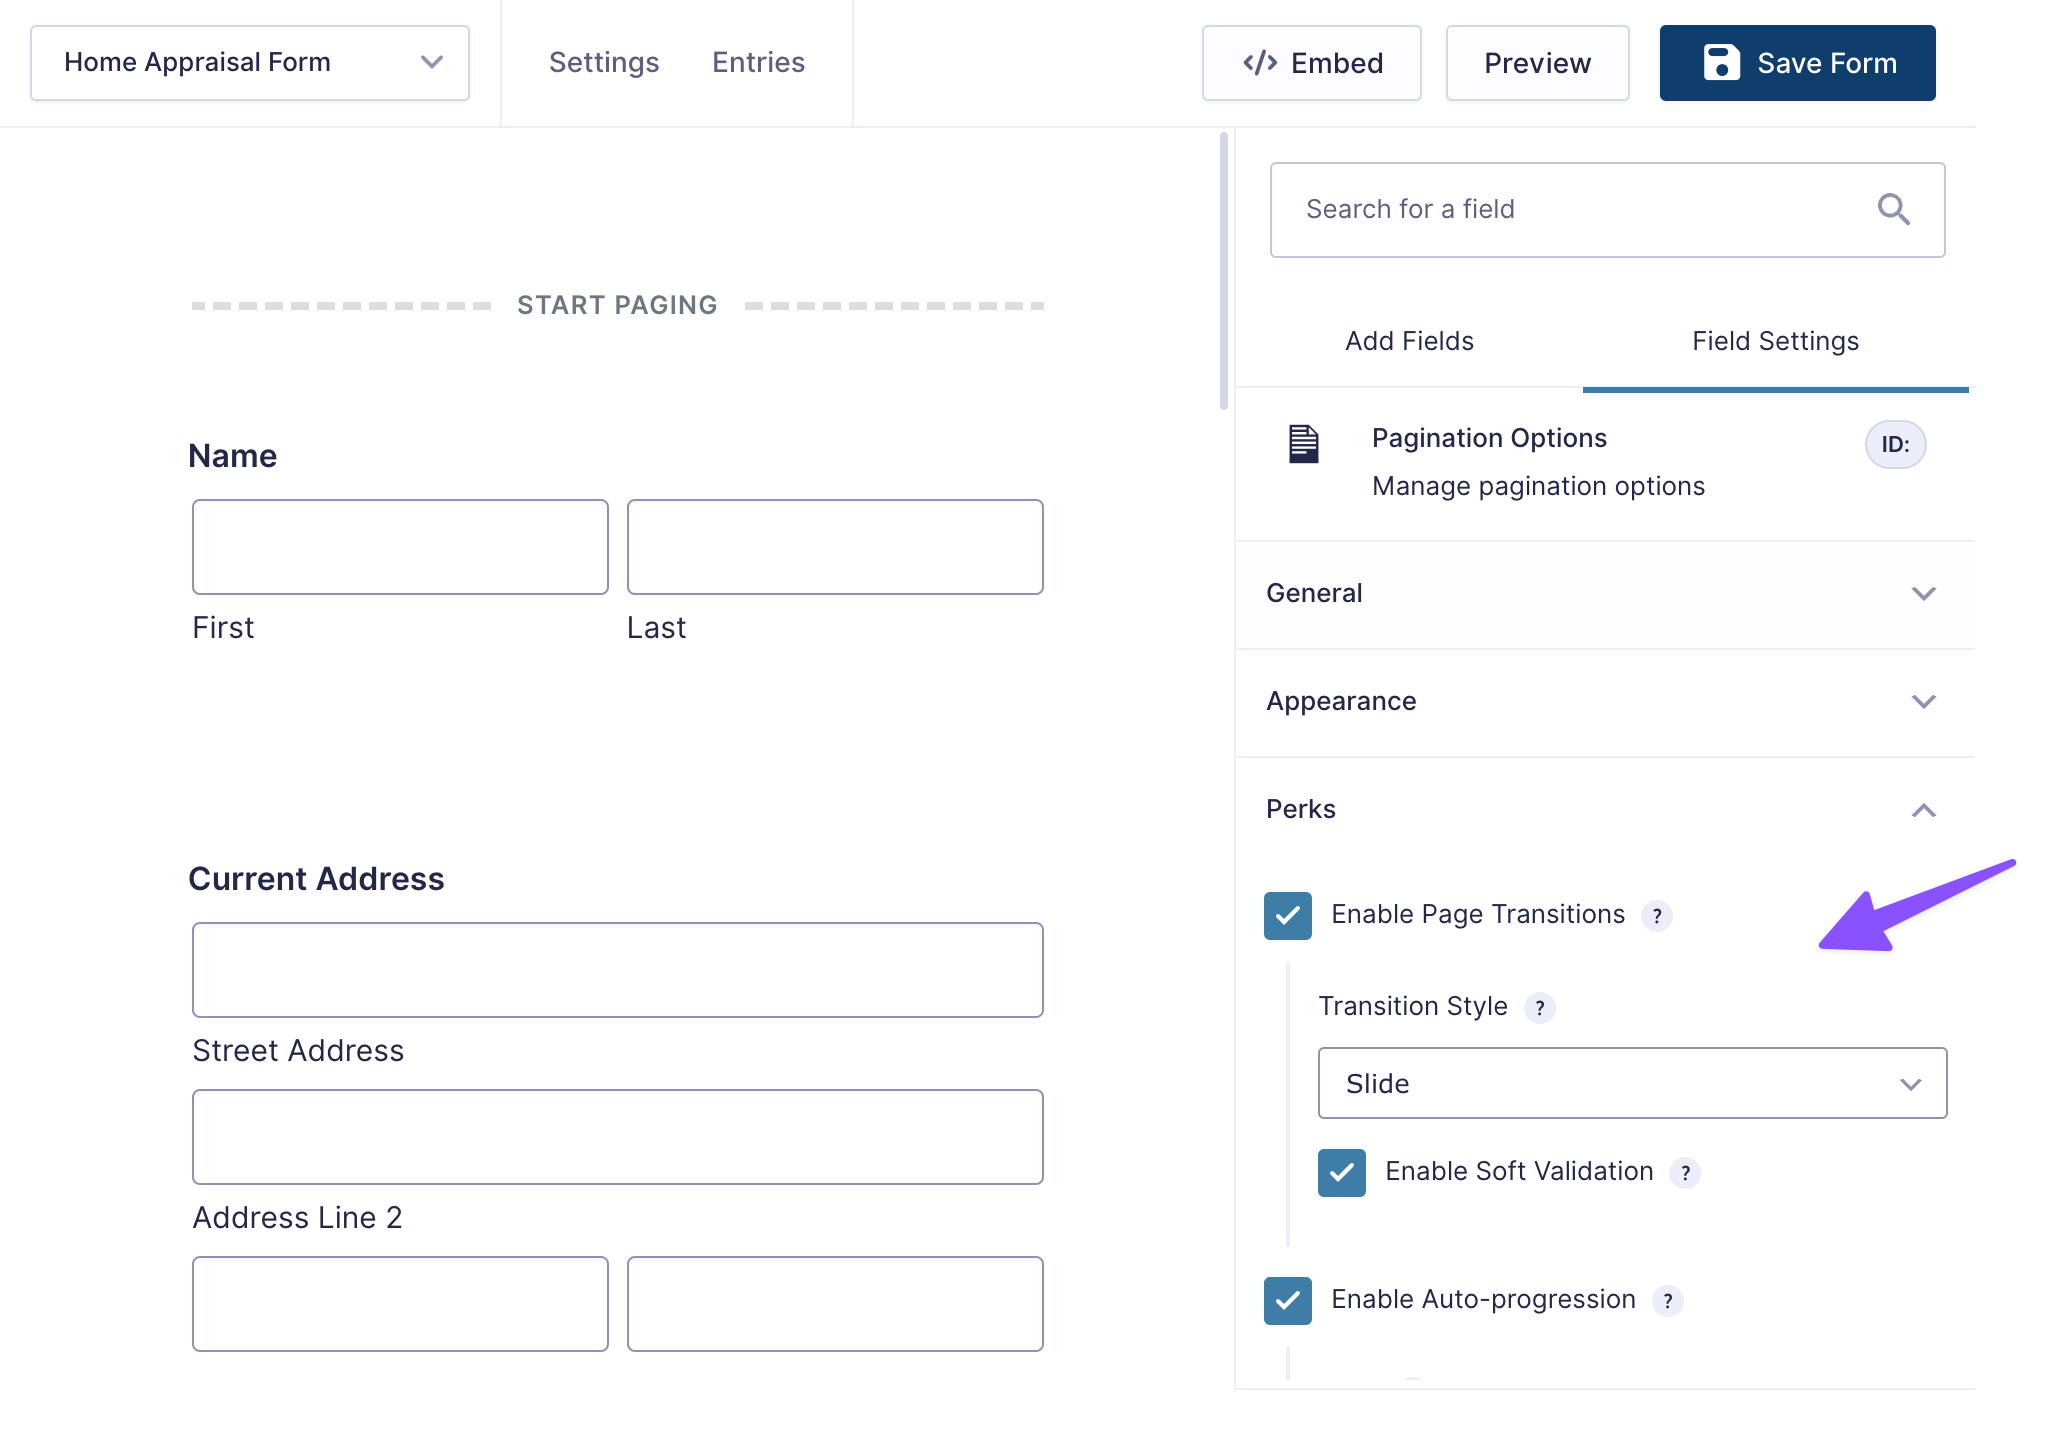
Click Start Paging at the top of your form, and navigate to Field Settings › Perks. Make sure Enable Page Transitions and Enable Auto-progression are checked. With these two settings enabled, users will have a silky smooth experience as the pages transition automatically for them.
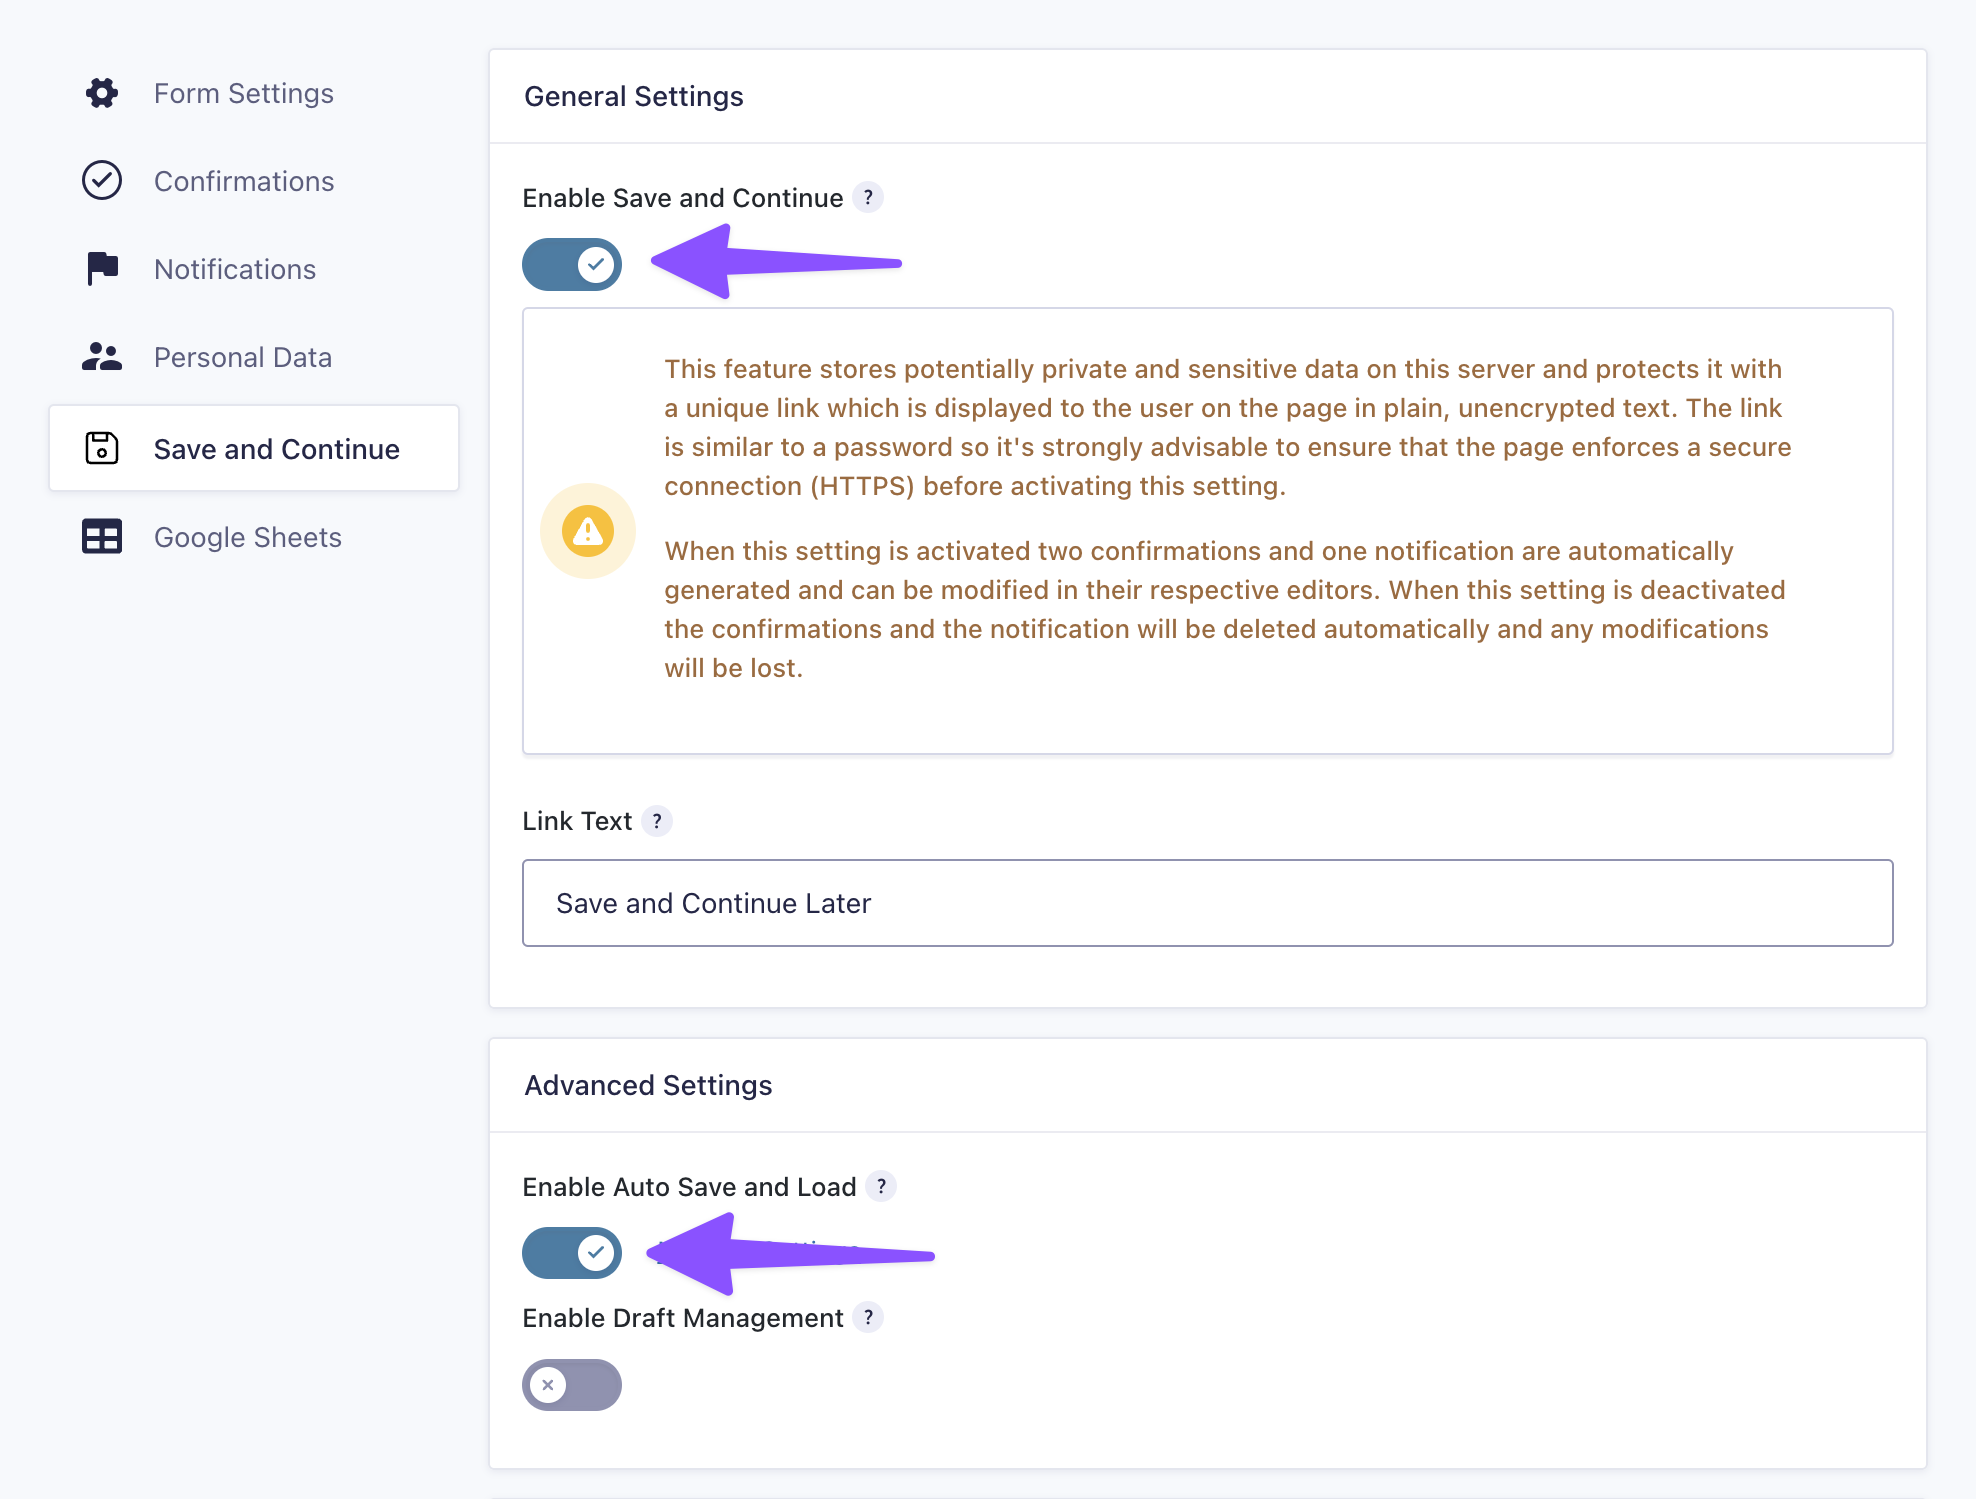
Enable Advanced Save & Continue
With the form still open, click on Settings at the top of the window, and navigate to Save and Continue. Make sure the Enable Save and Continue slider is activated. We’ll also click Enable Auto Save and Load so users have the option to start filling out the form and come back to it later.
And there you have it: a simple home appraisal form with a dose of UX magic!
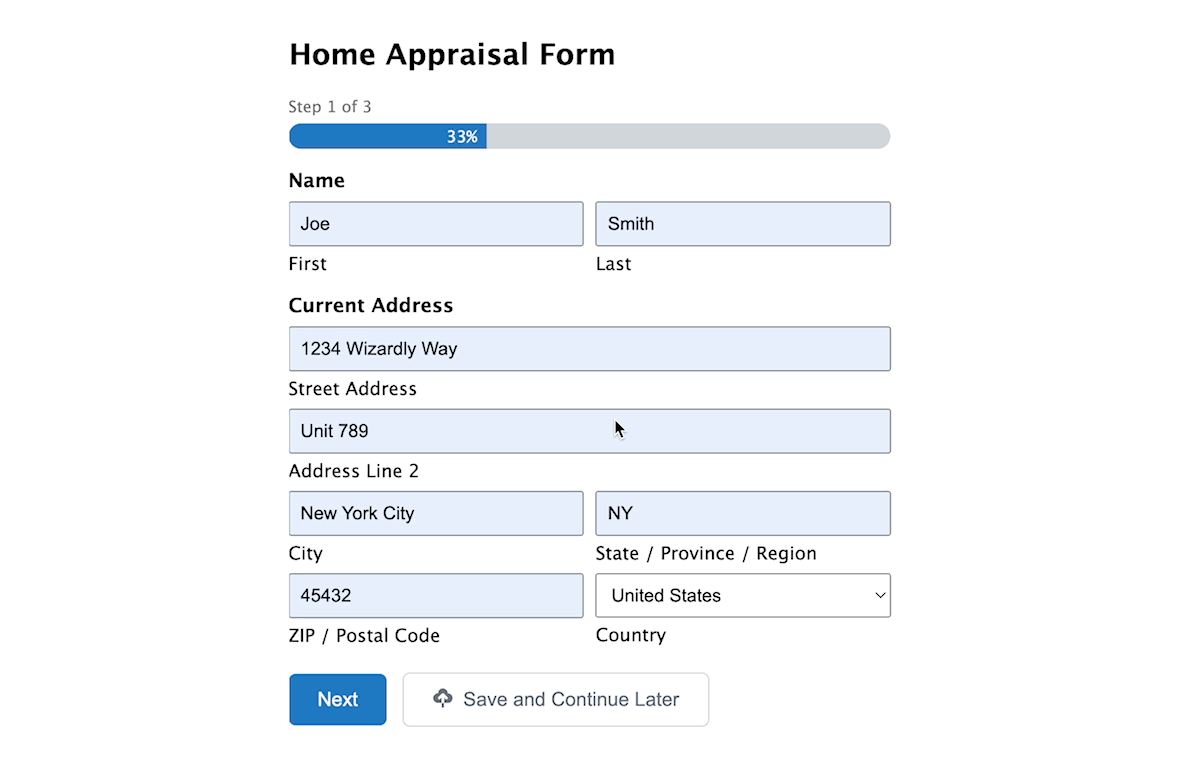
Download the finished form here and import it to your site to get started right away.
Taking it Further
Restrict Access to the Client Showing Scheduler
Let’s combine two of these projects together. What if we want to have a Client Showing form, but restrict access to the form so that it only becomes available after the Home Appraisal Form gets filled out.?
Gravity Forms Submit to Access is the perfect tool for this scenario, and best of all, it’s free!
To start, locate your Home Appraisal form and find its form ID. Next, download and install Gravity Forms Submit to Access. Follow the instructions under Locking Down a Page to lock down the page where your Showing Scheduler is located. Once you’re there, just replace gwsa_form_ids with the Home Appraisal form ID.
Now, your users will only be able to access the Showing Scheduler after they complete the Home Appraisal Form.
Learn how to gate any content with Gravity Forms: entire page, specific blocks, or via shortcodes (which work great in tricky spots like sidebars, footers, or page builders like Elementor).
Export Booking Data to Google Sheets
After adding all these nifty ideas to your site, what happens if you get a flood of form responses? You could go through them one-by-one in WordPress, but that can get tedious very quickly.
One option is to export these entries to Google Sheets, and use Google Sheets as an easy database to store all of your clients’ contact information.
Check out our Gravity Forms Google Sheets documentation for a step-by-step guide to setting up Google Sheets with Gravity Forms.