The Definitive Guide to Integrating Gravity Forms with WooCommerce
Leverage Gravity Forms and WooCommerce to enhance your customer experience and supercharge your online store.
Gravity Forms is perhaps the most popular forms plugin for WordPress and, by extension, WooCommerce. A Gravity Forms WooCommerce integration lets you supercharge your online store, deliver more value to your customers, and generate user engagement.
With this in mind, in this article, we’ll walk you through a complete tutorial explaining how you can integrate Gravity Forms with WooCommerce using Gravity Perks to:
- Connect Gravity Forms to WooCommerce
- Add conditional pricing to WooCommerce
- Let only logged in WooCommerce customers submit a Gravity Form
- Collect repeating data from a Gravity Form
- Load logged in users’ personal information
- Create coupons for WooCommerce
- Send WooCommerce order data to Google Sheets
Let’s put everything into context before we begin.
Benefits of Combining Gravity Forms With WooCommerce
For those unfamiliar, Gravity Shop Product Configurator allows you to seamlessly create highly customizable products by embedding a Gravity Form directly into your WooCommerce product page. Take full advantage of WooCommerce’s powerful e-commerce foundation to manage payments, shipping, and taxes, while using Gravity Forms to easily handle the business logic on your form. It’s the best of both worlds!
Benefits
There are several ways you can benefit from a Gravity Forms WooCommerce integration. For example:
- Add powerful WooCommerce features such as advanced payments, shipping, reporting, and tax features to your existing Gravity Forms workflow.
- Create configurable WooCommerce products with dynamic pricing that automatically updates when users interact with your Gravity Form.
- Use Gravity Forms’ core functionality within the WooCommerce ecosystem.
- Seamlessly integrate with several Gravity Perks such as GP Populate Anything, GP Page Transitions, GP Conditional Pricing, and GP Google Sheets.
Limitations
Before Gravity Shop Product Configurator was released, there were several solutions available to combine Gravity Forms and WooCommerce. However, many of these legacy solutions are bloated and rely on sub-optimal integrations that don’t follow the best practices for each ecosystem.
Furthermore, these solutions may be more heavily weighted towards one instead of both Gravity Forms and WooCommerce. This can cause UX, code duplication, and even accessibility issues for the product that the solution is less weighted towards, which can all lead to a poor admin and end user experience. You can see a few examples in this comparison between WooCommerce Gravity Forms Product Add-ons and Gravity Shop Product Configurator.
Introducing Gravity Shop and Gravity Perks.
Gravity Shop is a product line from Gravity Wiz with a special focus on enhancing Gravity Forms in the e-commerce space. Gravity Shop Product Configurator is a plugin that makes it easy to seamlessly connect Gravity Forms to your WooCommerce products.
Furthermore, Gravity Perks is a suite of plugins that lets you combine Gravity Forms and WooCommerce in many advanced ways. Each perk adds a new feature to Gravity Forms and extends its core functionality. The best part is that they’re incredibly easy to manage directly from within the WordPress admin and they integrate seamlessly with Gravity Forms’ existing interfaces.
Now that we have a better understanding of why you might want to go for a more advanced Gravity Forms WooCommerce integration, let’s take a look at how this is possible.
Connect Gravity Forms to WooCommerce
Gravity Shop Product Configurator creates a tightly-knit integration between Gravity Forms and WooCommerce. With Product Configurator, you can embed a Gravity Form directly within a WooCommerce product, and can even update a product’s attributes based on how the user interacts with the form.
Product Configurator is fully native to both the Gravity Forms and WooCommerce ecosystems, and was built to maximize compatibility between the two. This compatibility allows you to take full advantage of AJAX, multi-page forms, conditional logic, and more!
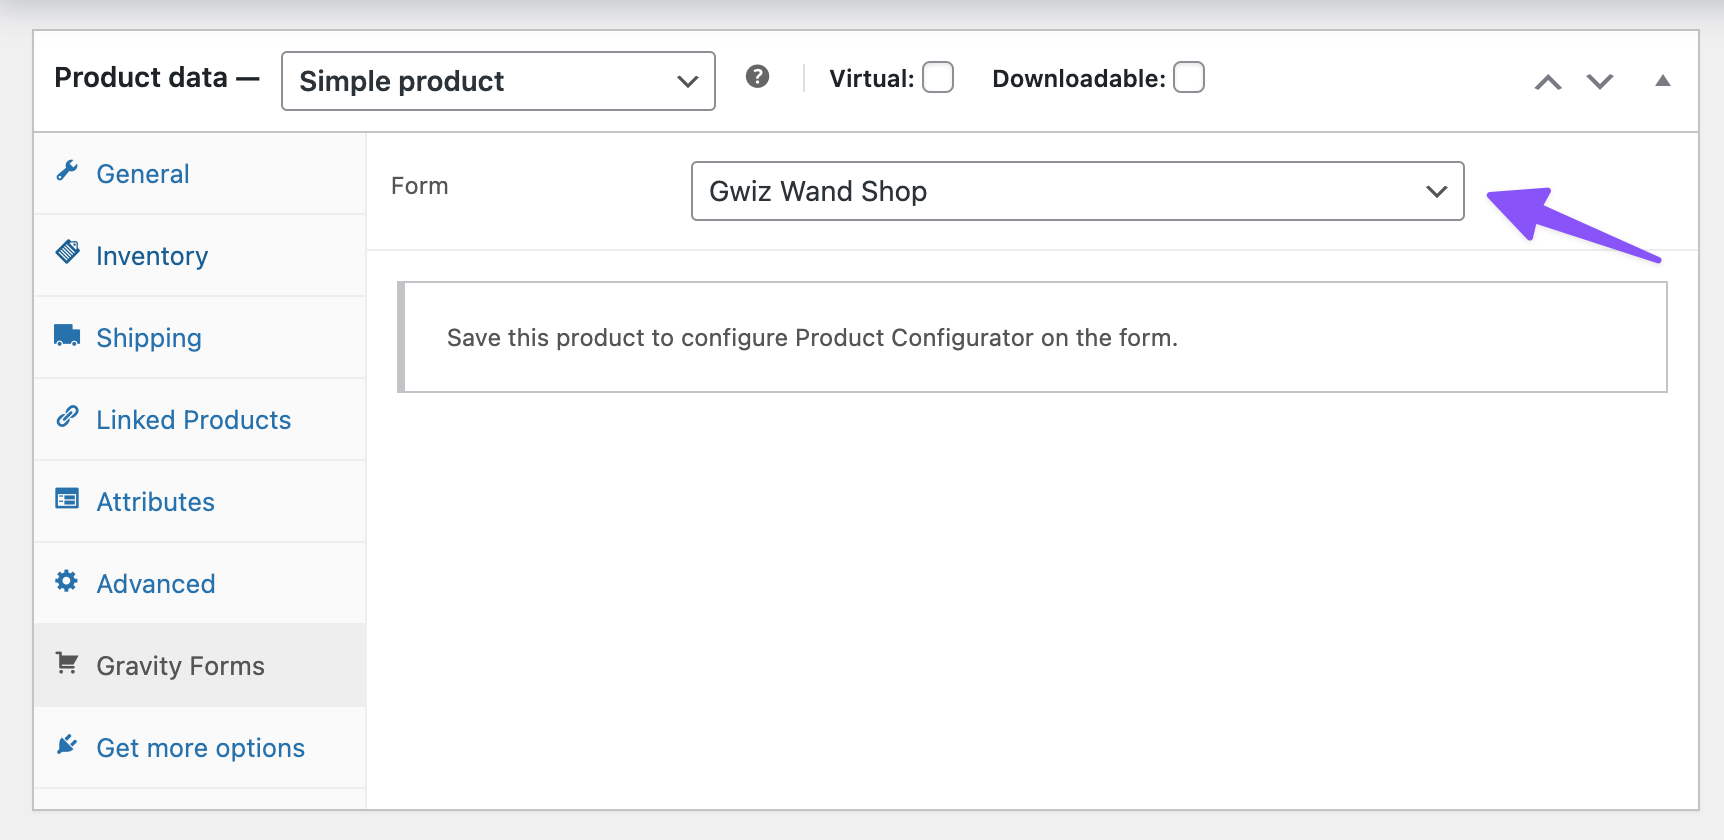
To use Product Configurator, you’ll need to first create a Gravity Form with fields that will be used to customize your WooCommerce product. Once your form is created, you can map the form to your WooCommerce product by opening the product and navigating to: Product data › Gravity Forms › Form. Choose the form you want to map to the product:
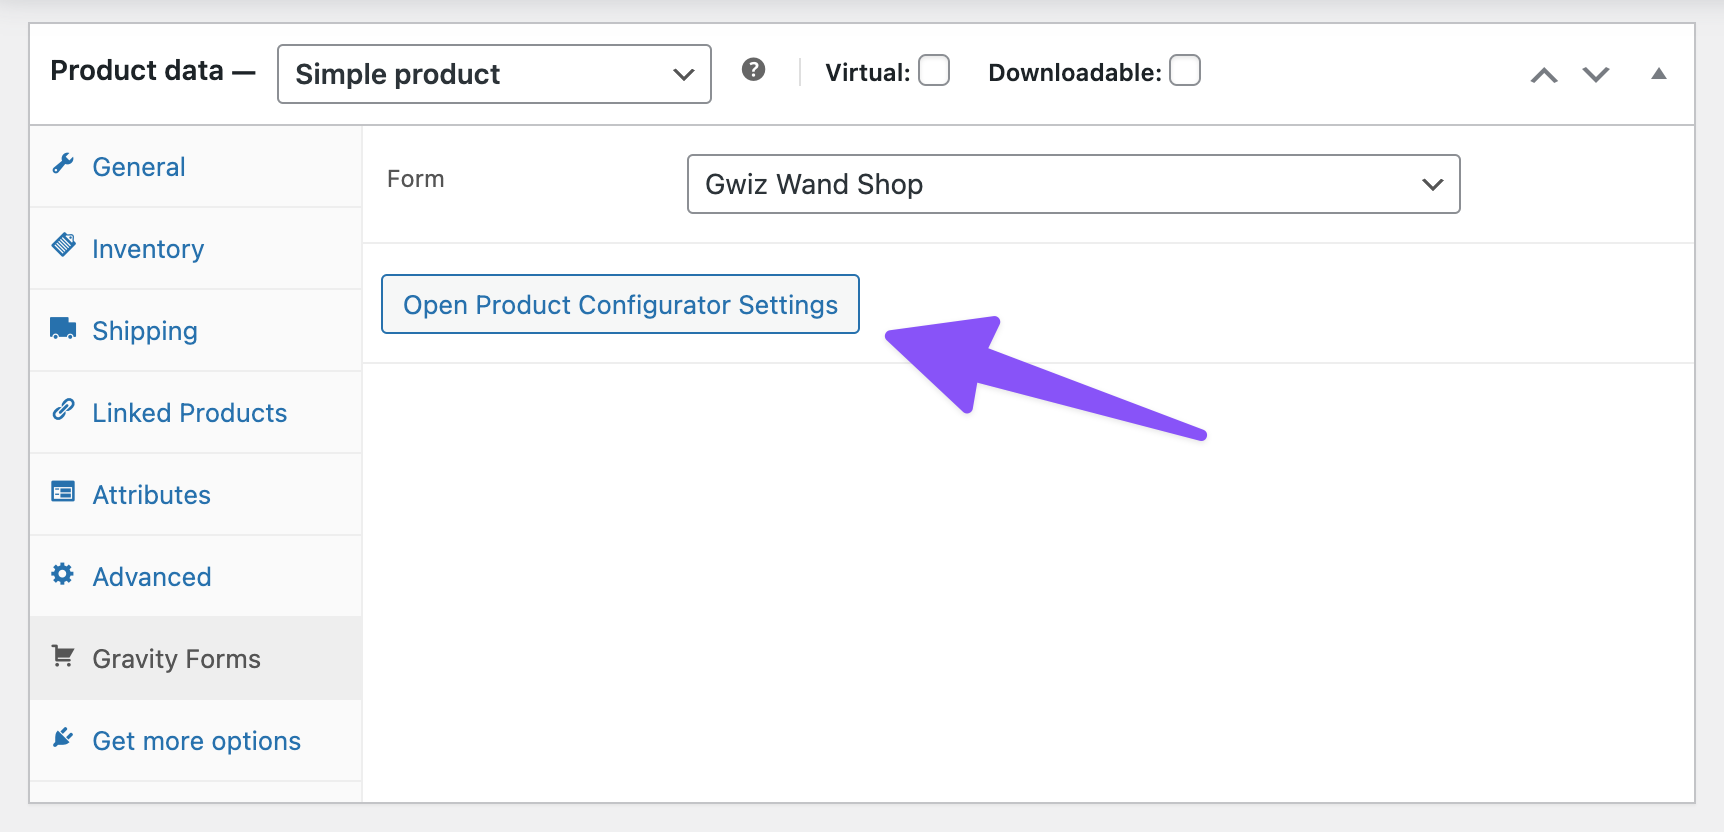
Once your form is mapped, save your product. You’ll see a new button called Open Product Configurator Settings. Click on it to start configuring your feed!
For a full list of feed settings that can be configured, take a look at our Product Configurator documentation here.
Link Gravity Forms Entries to WooCommerce Orders
Another great feature in Product Configurator is its ability to link a Gravity Forms Entry to a WooCommerce Order ID.
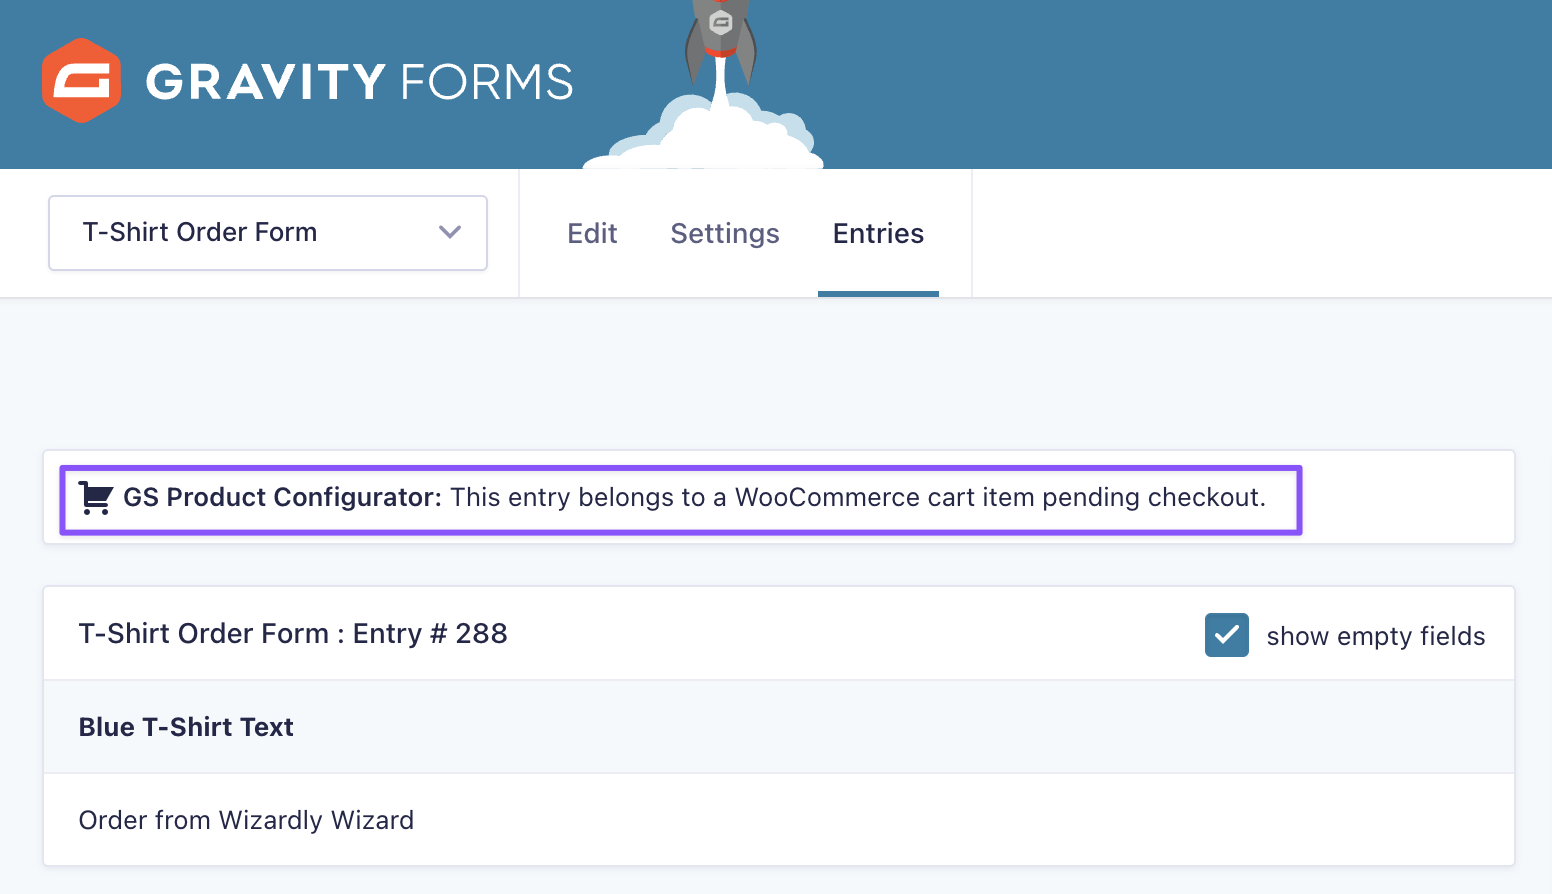
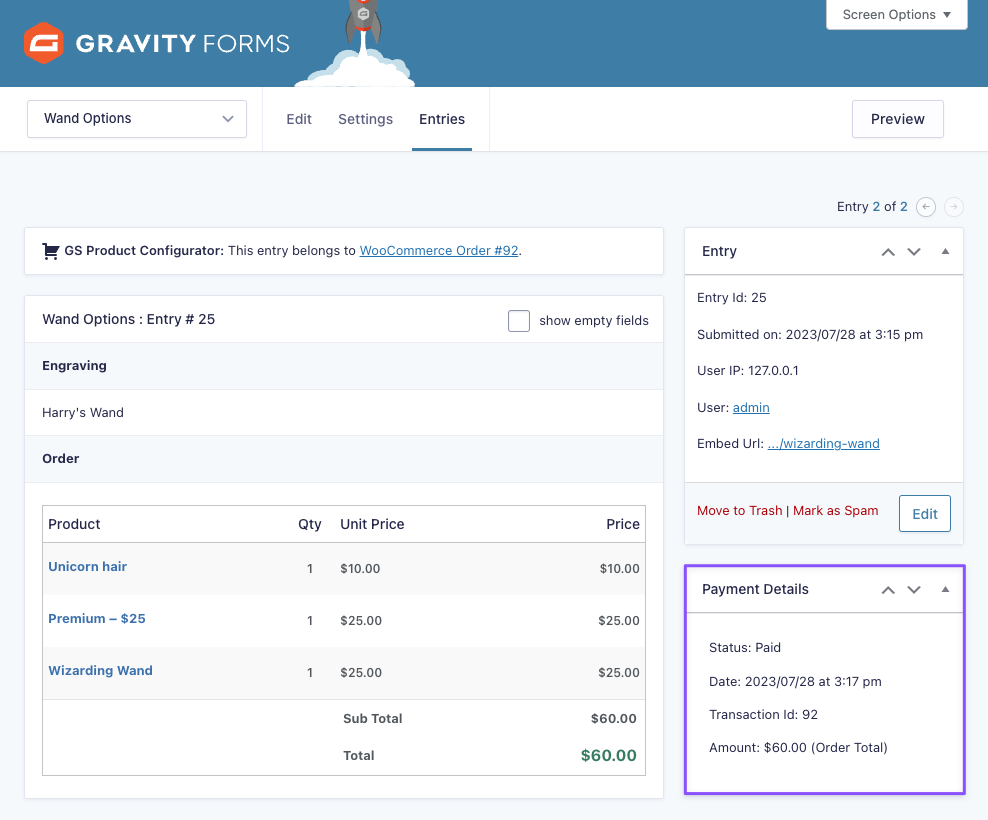
How does this work? When a user submits a form with a WooCommerce product linked to it, that entry will have a notice at the top of the page that shows it belongs to a WooCommerce Cart Item or Order:
From the moment the user adds the WooCommerce product to their cart, cart events such as placing the order, checking out, recording a payment, and more are linked between the order and the form entry.
Furthermore, each Gravity Forms entry includes the WooCommerce Order ID as its transaction ID. This helps ensure that everything remains tightly linked:
An alternative option is the Gravity Forms Product Add-ons extension, which also lets you connect Gravity Forms to WooCommerce. While Gravity Forms Product Add-ons provides many of the same features as Product Configurator, it lacks the seamless integration and robust support for Gravity Forms that Product Configurator provides.
Furthermore, Product Configurator provides an unmatched level of integration and support for other Gravity Perks and third party Gravity Forms add-ons.
For these reasons, Product Configurator is the preferred choice to provide the best possible experience with WooCommerce and Gravity Forms.
Add Conditional Pricing to WooCommerce
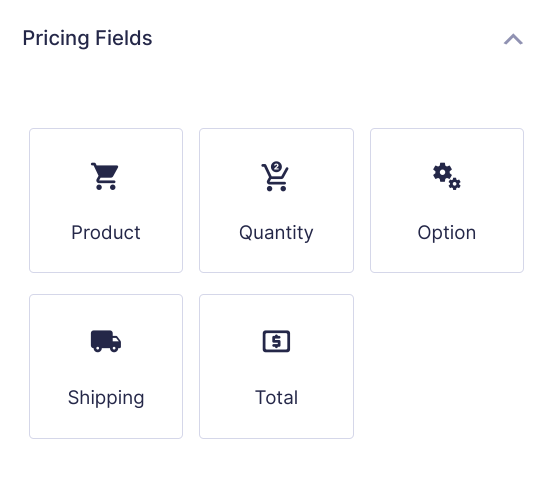
The Gravity Forms Conditional Pricing plugin (part of Gravity Perks) lets you create flexible pricing levels for your Product fields based on conditional values in your form. Simply put, instead of creating dozens of different Product fields, you can create a single Product field (found under Pricing Fields) with variable pricing.
All you have to do is set a price and define pricing rules that will determine which pricing level is displayed on the front-end. Here’s what you need to do to get started:
Create a new form using Gravity Forms and add a Product field to it. You’ll find the Product field under Pricing Fields.
Next, head over to the Conditional Pricing configuration screen by clicking Settings > Conditional Pricing. Click on the Select a Product drop-down menu in the top-left corner to view a list of Product fields in your form.
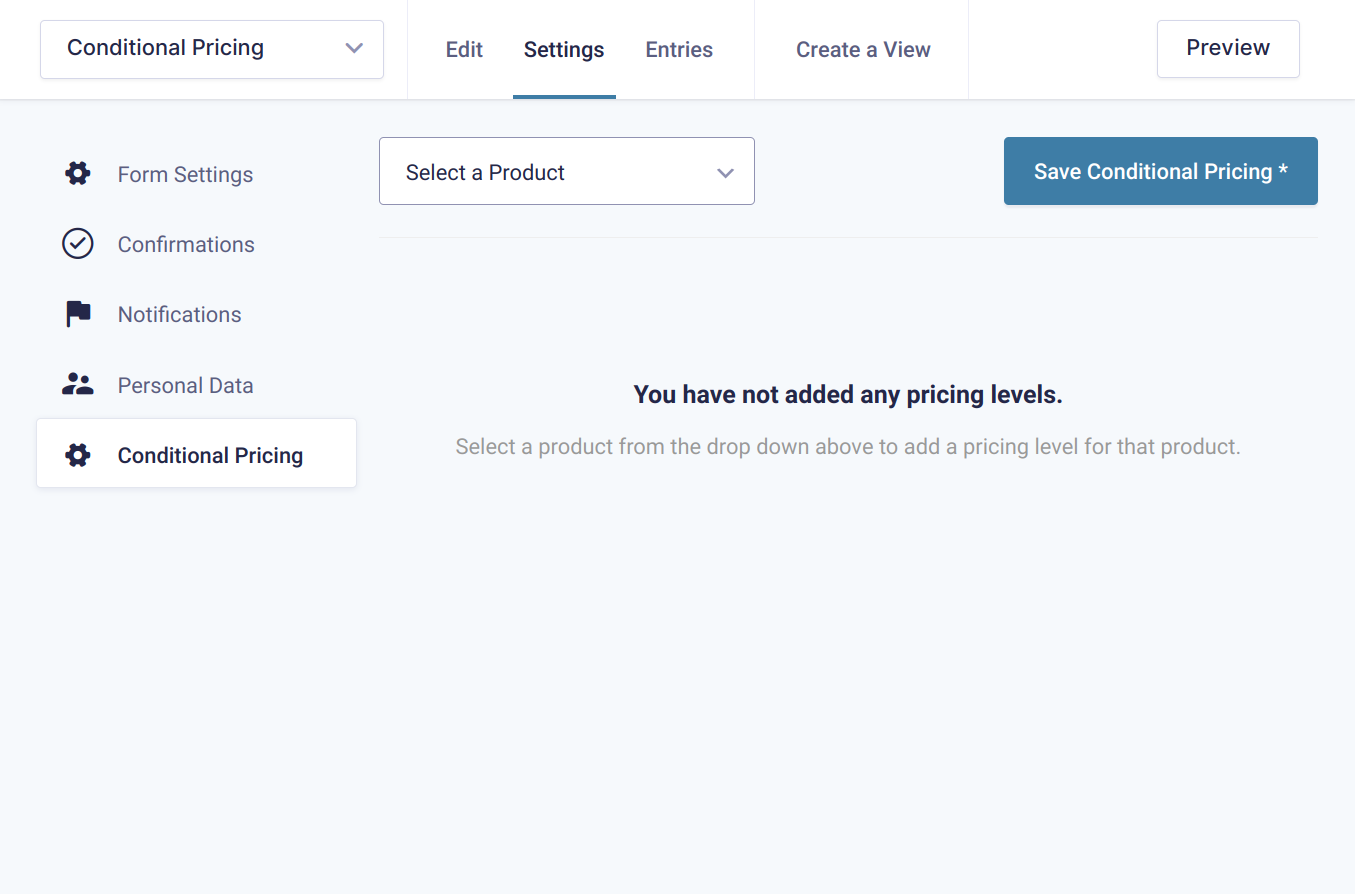
Select the Product field you’d like to add conditional pricing to. The first pricing level will be created automatically. You can set a price for this pricing level and define the rules that should be met for this pricing level to be applied to the product. You can add as many rules as you’d like per pricing level.

Finally, use the Add New Pricing Level button to create as many pricing levels as you’d like. Click the Save Conditional Pricing button to proceed.
The Gravity Forms Conditional Pricing plugin can be used for offering:
- Tiered pricing and bulk discounts to customers.
- Conditional pricing based on the user’s input.
- Date based pricing for membership sites or online courses.
- Field-based pricing (Get 10% off by signing up for our email newsletter!)
Gravity Forms Conditional Pricing is unconditionally the best solution for providing dynamic, interactive pricing for your future customers.
Let Logged in WooCommerce Customers Submit a Gravity Form
With the Gravity Forms Limit Submissions plugin, you can configure your WooCommerce store to only let logged in customers submit a Gravity Form. It also lets you limit the number of entries that can be submitted by several different factors including user, role, IP address, URL, and field value.
This Gravity Forms WooCommerce integration is useful for stores that need a way to accept user-generated content submissions or let registered customers enter contests or giveaways.
The plugin lets you limit who, what, when, where, and how many times the Gravity Form can be submitted. However, for the purpose of this tutorial, we’ll explain how you can set it up in a way to only let logged in WooCommerce customers submit forms. Here’s what you need to do to get started:
Open up the Gravity Form you’d like to make available only to your WooCommerce customers. Head over to the Limit Submissions Feeds screen by clicking Settings > Limit Submissions. Click the Add New button to begin creating a new limit feed.

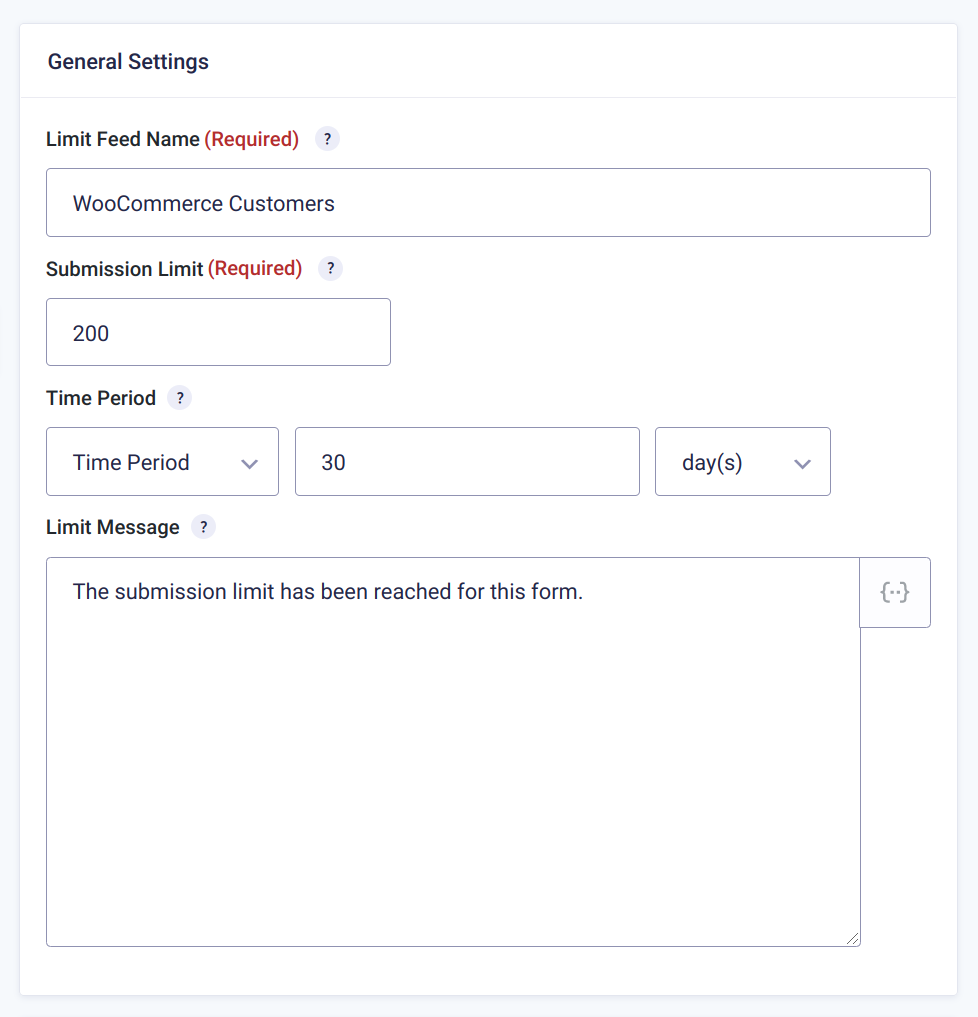
Configure the New Limit Feed settings by entering a feed name, submission limit, and time period. Optionally, you can also enter a limit message.
Next, use the Rule Groups option to let only logged in customers submit the form. Start by setting the first drop-down menu to Role. The second drop-down menu will automatically load all of the user roles you can restrict access by. Select the Customer user role to let only logged in customers submit the Gravity Form.

You can add as many rule groups as you’d like!
Click the Update Settings button to proceed.
To take it up a notch, you can also lock it down to registered users with Gravity Forms’ Restrictions feature which lets you:
- Limit number of entries
- Schedule form
- Require user to be logged in
Alternatively, you can combine Gravity Forms Populate Anything plugin with Gravity Forms Limit Submissions plugin to restrict members. This is possible if you’re using the WooCommerce Memberships plugin on your website. To do this, simply populate the membership expiration date in a field and then link the limit to the date. This way, your members’ yearly form limit will be refreshed automatically when they renew their membership.
Take control over who can submit your forms and how often they can be submitted with Gravity Forms Limit Submissions.
Collect Repeating Data From a Gravity Form
Using the Gravity Forms Nested Forms plugin with Gravity Shop Product Configurator, you can collect repeating data from any form on your store’s product page. This sort of implementation is useful for when you need to manage complex forms (such as nested forms). For those unfamiliar, nested forms are forms within forms.
For example, if you need to put up a form on your product page that lets customers enter even more (repeating) data, you could use the Gravity Forms Nested Forms plugin to make it happen.
In simple words, the plugin lets you add a nested form field to your form which lets you select another form that you can use to gather child entries from users. These child entries will automatically be linked to the parent entry once they’re submitted. In addition to this, you can view, edit, and delete the child entries directly from the parent form where they’re displayed in a table layout.
Here’s what you need to do to get started with Gravity Forms Nested Forms:
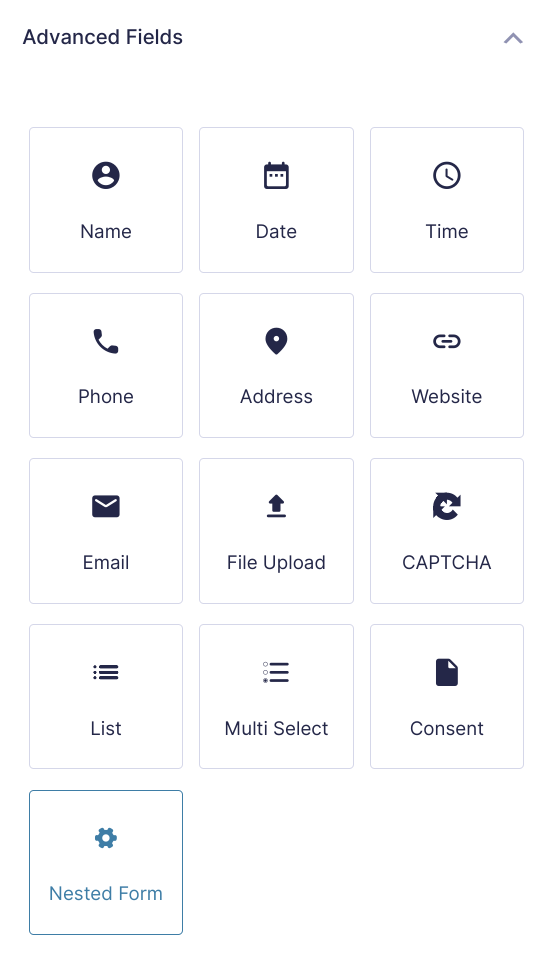
Create two forms in Gravity Forms. One will be the parent form and the other will be the nested, child form. Next, open up the parent form and add a Nested Form field to it. You’ll find this under the Advanced Fields.
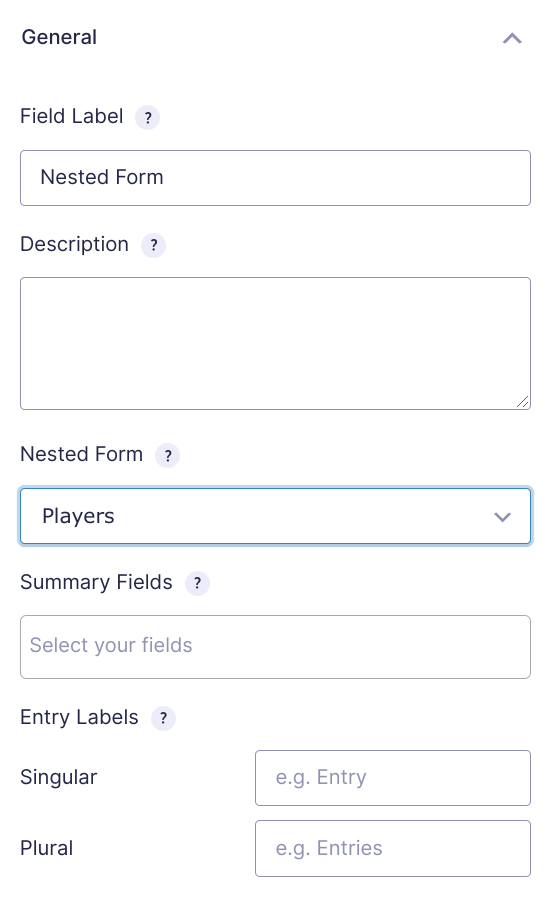
In the Nested Form field’s settings, use the Nested Form dropdown menu to select your child form.
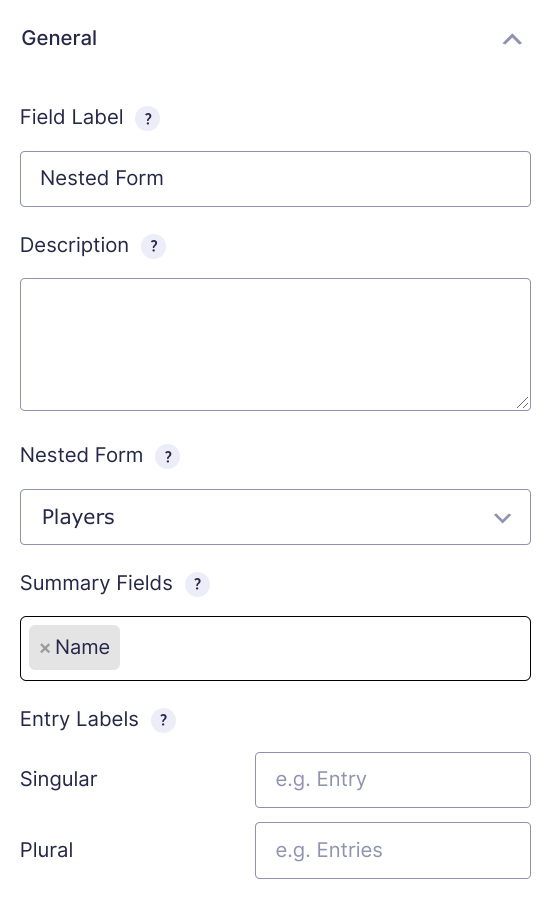
Finally, use the Summary Fields option to select which fields from the child form you’d like to display in the parent forms Nested Form field.
That’s it! You can now use your parent form to collect repeating data from your customers.
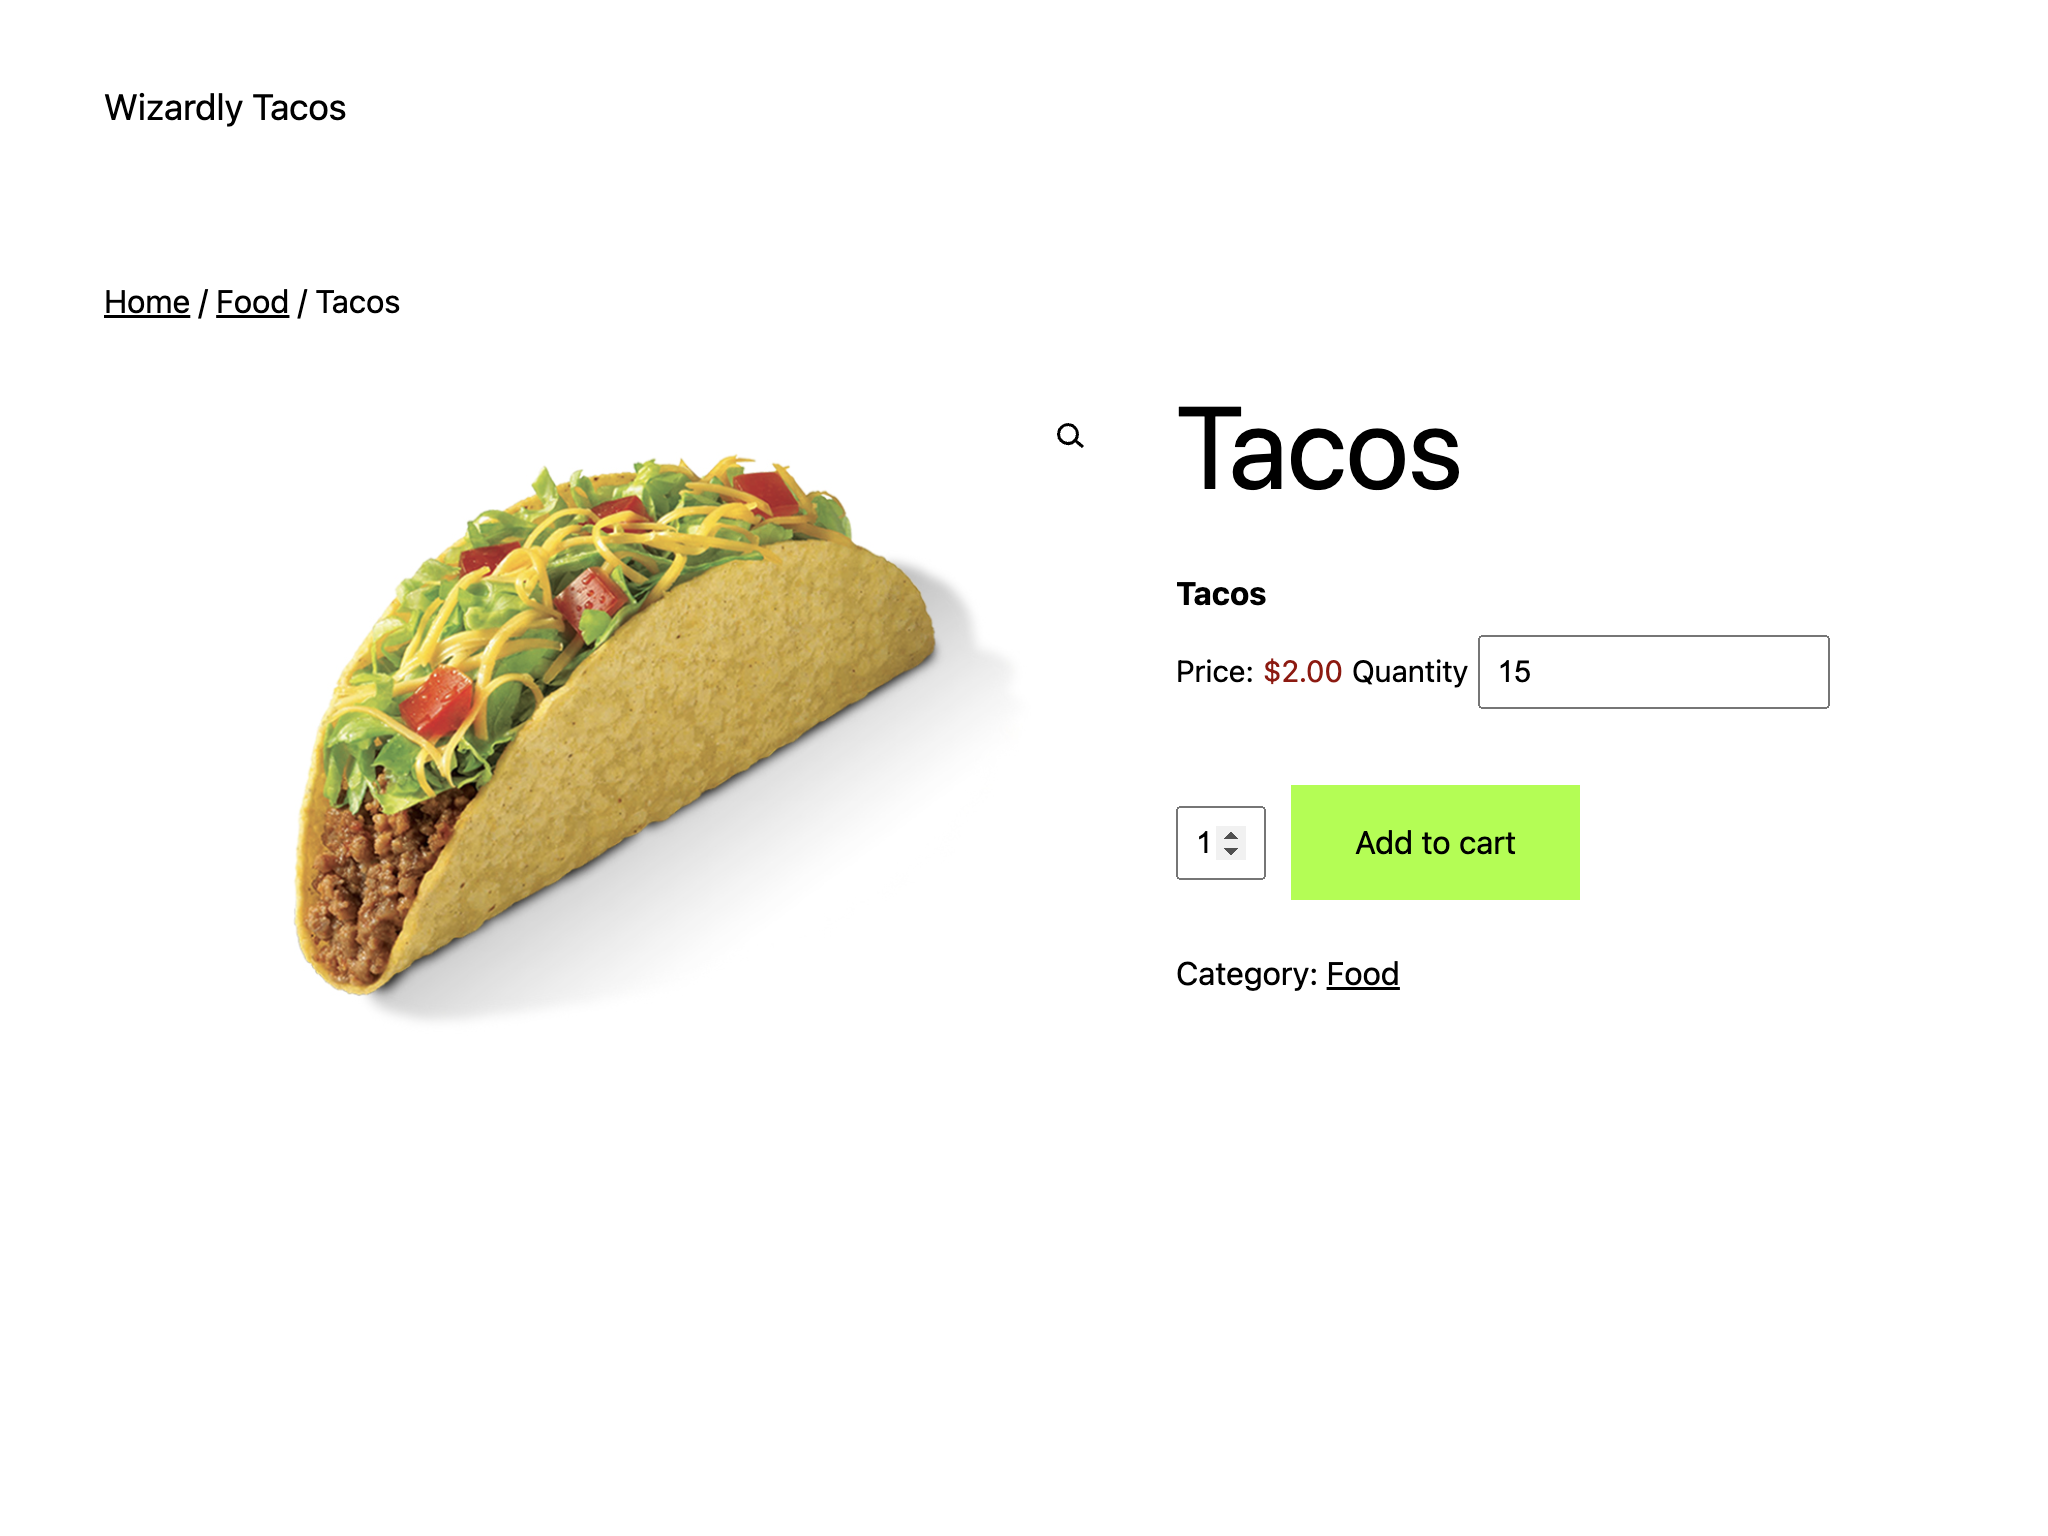
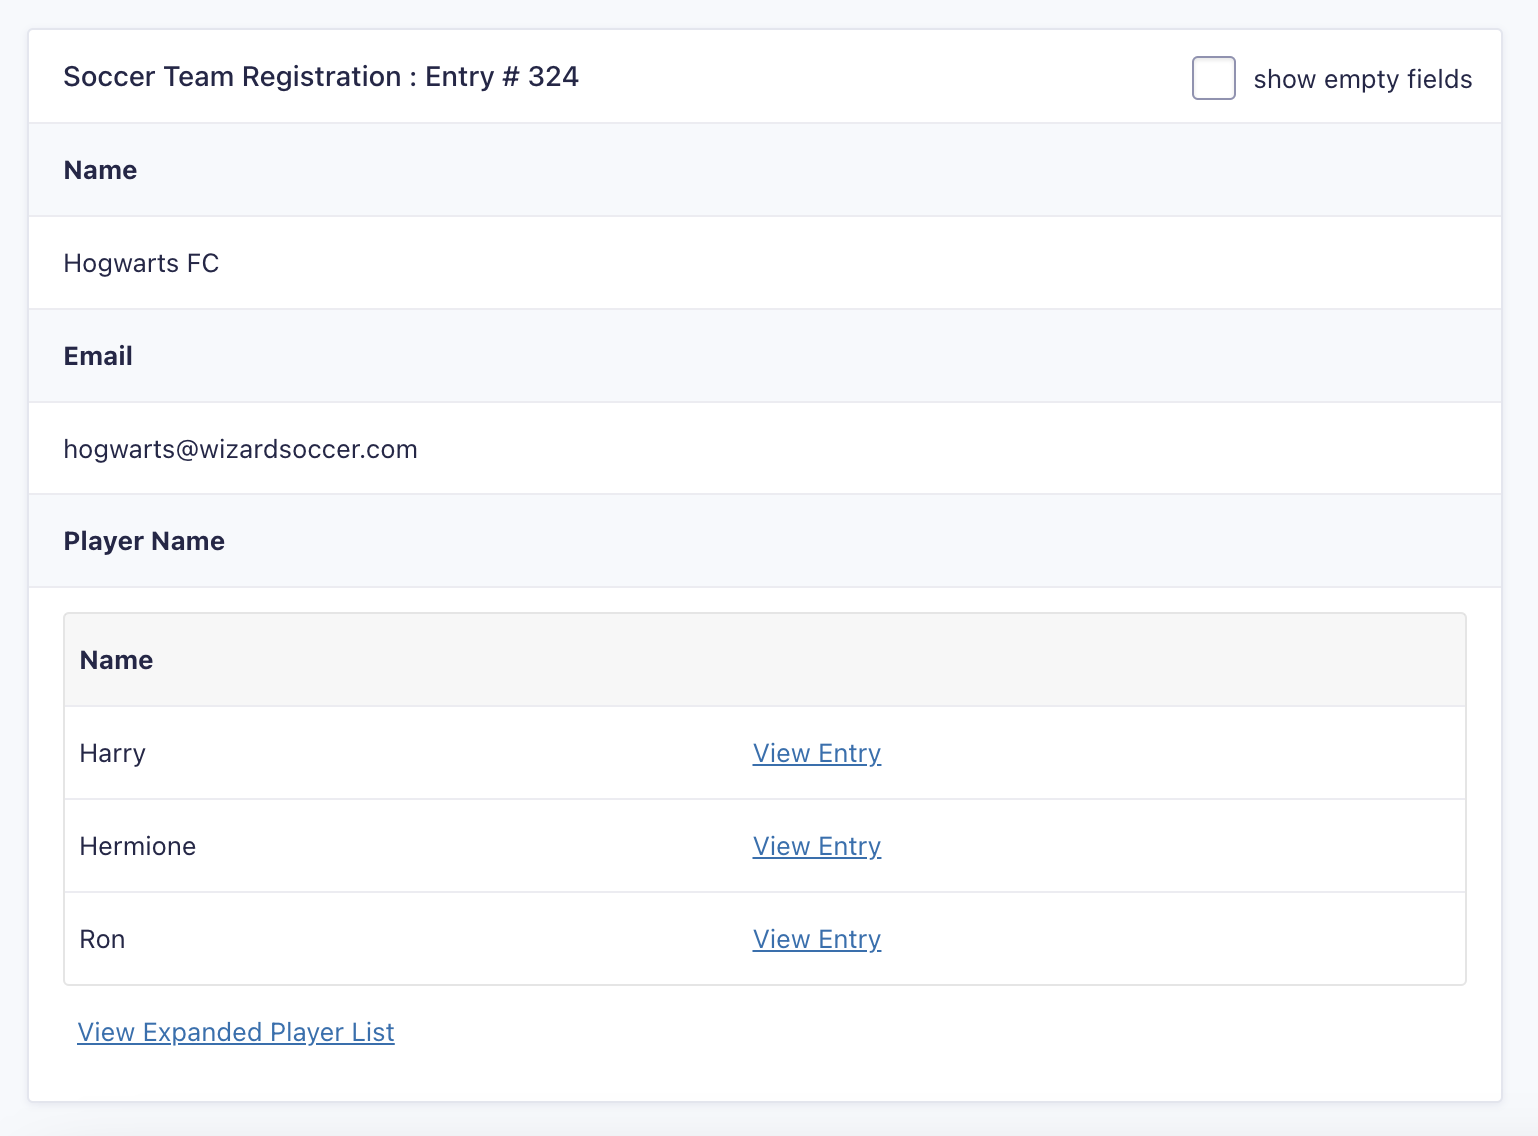
Here’s what it can look like from the frontend:

This Product Configurator integration makes it incredibly easy for store owners to collect repeating data from individual customers. The Gravity Forms Nested Forms plugin stores the data in a neat table layout in the back-end. It will look something like this:
To take things to the next level, you can go into the Nested Fields advanced settings to set minimum and maximum entry limits, form visibility, and enable conditional logic.
The most robust, full-featured repeater solution for Gravity Forms. Collect and organize your form data like never before.
Load Logged in Users’ Personal Information
The Gravity Forms Populate Anything plugin provides a flexible and powerful way to dynamically filter and populate field choices and values in Gravity Forms.
In the context of WooCommerce, you can use it to automatically load a logged in user’s personal information, as long as it’s stored in your site’s database. So, this would work seamlessly for your WooCommerce customers, previous WooCommerce orders, and WordPress users.
Here’s what you need to do to get started:
First, add a field to your Gravity Form that supports choices such as dropdown or text-based fields. For the purpose of this tutorial, we’ll add a Drop Down field to our form.
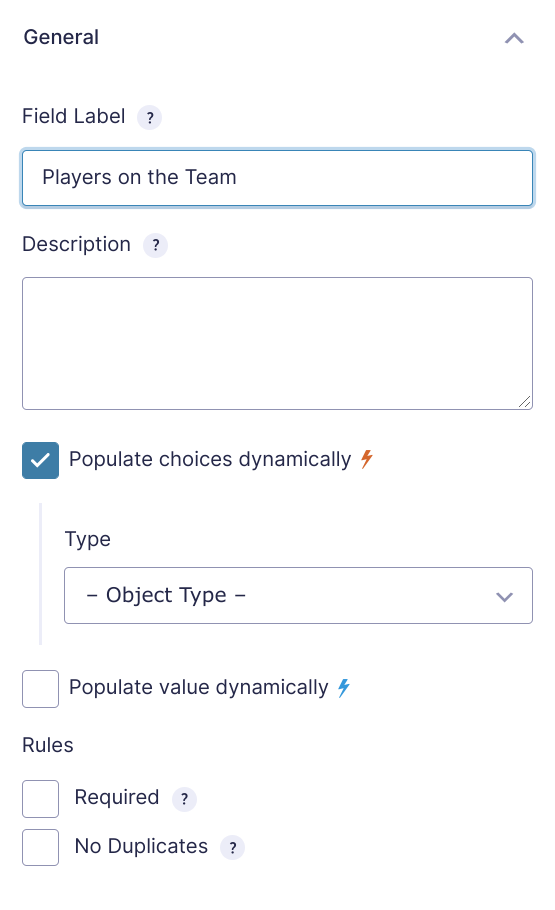
Next, go into the field’s settings and enable the Populate choices dynamically option. You’ll be prompted to select an object type. This is the object type that you can choose to populate the field with. For example, you might choose to populate the field with entries from your database, posts, taxonomy, or even a Gravity Forms entry.
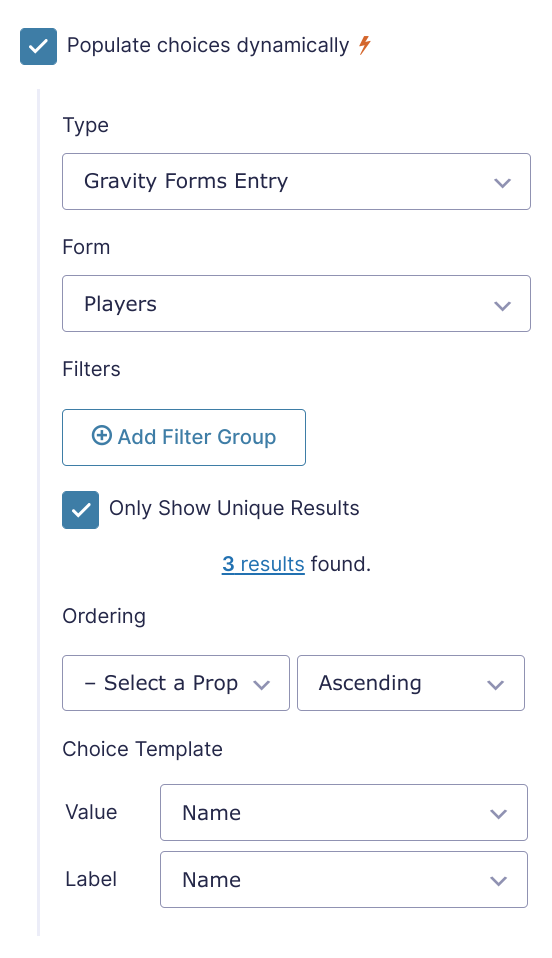
Finally, use the Value Templates option to designate what object properties should be displayed.
The Gravity Forms Populate Anything plugin also lets you set filters to further refine the data that’s dynamically populated into the field. You can do this by defining rules.
It’s also worth mentioning that the Gravity Forms Populate Anything plugin lets you dynamically load just about any WooCommerce data into a form. This opens you up to many possibilities. For example, you might configure it to dynamically load product prices or product SKUs from a database. Typically, the product price is automatically included as the base price and the Product fields on your Gravity Form will be added to that base price.
There are several neat things you can do with the Gravity Forms Populate Anything plugin in WooCommerce. For example, by using the taxonomy option, you can populate WooCommerce product attributes (such as sizes or colors) into a Gravity Forms powered product form.
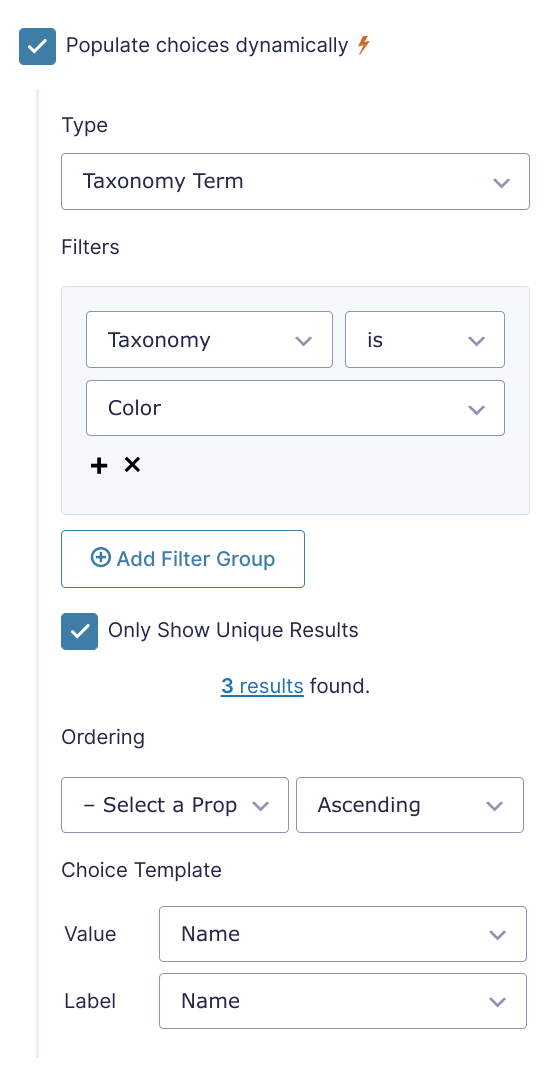
This way, you won’t have to manually update your product form if you decide to add or remove any product attributes later down the line – it’ll happen automatically!
Finally, this is also useful for when you need to dynamically populate customer order information for, say, a returns form. You could do this by using the customer’s order ID along with filter groups.
Like magic tricks? Populate Anything will make your content magically appear in your forms, fields, labels, descriptions and more!
Create Coupons for WooCommerce
Offering customers and site visitors coupons is a great way to encourage them to:
- Fill out a form (e.g. sign up for your email newsletter or participate in a quick survey).
- Share this product with a friend-style form that gives the customer’s friend a discount.
- Create coupons for WooCommerce products when a visitor submits a form.
If this is something you’re interested in implementing on your own WooCommerce store, be sure to check out our in-depth tutorial on Creating Coupons for WooCommerce with Gravity Forms for step-by-step instructions.
Need more ways to manage your data? Automatically sync form data with Google Sheets using Gravity Forms Google Sheets, and unlock Google’s suite of features, including collaboration, industry-standard encryption, and integrations with Data Studio, BigQuery, and others.
Send WooCommerce Order Data to Google Sheets
Product Configurator integrates directly with the Gravity Forms Google Sheets plugin. This powerful combination enables you to send order data from your form entries directly to Google Sheets. For large sets of data or complex order requirements, Google Sheets is an extremely powerful tool that can organize and analyze your order data at scale. It’s also great for collaborating and editing sheets with other users, accessibility from the web, and its ability to integrate with other Google tools.
Best of all, Product Configurator has an option to only export order details after the order has been paid for:

Set Up Your Gravity Forms WooCommerce Integration Today
Whether you already have a Gravity Forms WooCommerce integration set up on your online store or are looking to get started, Gravity Perks’ suite of add-ons is a must-have. You’ll be able to leverage advanced features like:
- Adding conditional pricing to WooCommerce.
- Letting only logged in WooCommerce customers submit a Gravity Form.
- Collecting repeating data from a Gravity Form.
- Loading logged in users’ personal information automatically.
- Create coupons for WooCommerce customers when they submit a form.
We explained how you can set up a Gravity Forms WooCommerce integration by yourself and, hopefully, you’re in a good position now to take the next steps.
Which Gravity Forms add-on will you use to enhance your customer’s shopping experience? Share your ideas in the comments section below!


Gravity Forms needs to be integrated with woocomerce to create a robust and easy-to-use customer support portal. Handling returns and exchanges would be so easy to do by integrating with Gravity and Woo. You could build out custom support forms that allow you to have them submit return and exchange requests off of their order numbers.
Could not agree more, Michael!
I want one feature for gravity form woocommerce integration.if payment through woocommerce is successful only gravity form entry submit to gravity form entry table
Hi Sruthy,
I’m not sure I’m following. Are you looking to have Gravity Forms remove entries where the payment isn’t successful in WooCommerce?
I need to have the ability to exclude some fields from cart screen, currently it shows all the form fields, is there a way to do this?
Hi Ayla,
We have a snippet that adds support for this. Once installed, it adds a new option under the Advanced tab for Product fields.
If I collect contact information in a Gravity Form as party of a product being purchased, can that be passed to the corresponding WooCommerce checkout fields? For example, name and address data?
Hi Karl,
I’m not sure if this is possible by default with the WooCommerce Gravity Forms Addon. You may have to write some custom codes to get this done. In case you need a developer to assist you, you can hire one from Codeable.io
Best,
hi Currently there is no integration available to Add an order in Woocommerce on submission of a gravity form or turn gravity form submissions into WC customers or to add a subscription in WC on GF submission or add a order note in WC on GF submission – I am sure that there is a huge demand for this feature If possible you can do this – it will be a great success
Hi Arvind,
These features appear to be a more suitable use case for the Advanced Post Creation add-on, so I will suggest you also get in touch with Gravity Forms support, to let them know about your feature request. That said, I will pass your request over to our developers. Thanks for the feedback.
Best,
Hi Everyone, I am writing to find a solution to integrate Gravity Forms Populate Anything with woo commerce, after I used this plugin to change label in gravity forms which its worked very well, but after the payment in woo commerce label of gravity forms gone and show just merge tag of Gravity Forms Populate Anything. could please help to solve this problem.
thank you
Hi Abido,
To be able to determine the cause and solution to this issue, we’ll have to take a look at your setup. If you have an active Gravity Perks License, can you get in touch with us via our support form with your account email and attach an export of the form, so we can dig into this and assist you further.
Best,
Hi Samuel, Thank you for replay, merge tag of this perks plugins (Gravity Forms Populate Anything) works fine in gravity forms the problem after customer place a order then in checkout page the merge tag get failed and come just like @{field ID: Number}. I think the problem of woocmmerce even I bought a new version (Woo Commerce Gravity Forms Product Add-Ons) still the same problem.
Hi Abido,
This looks like an issue that will require some digging. As I mentioned earlier if you have an active Gravity Perks License, can you open a ticket with us via our support form, with your account email so that our developer can take a look into it.
Best,
This is bogus, ive had so much difficulty with connecting GF with the Woo checkout (i paid for both plugins) — I can’t believe how difficult it was to do this, I had to hire a developer for $75/hour to integrate it… AND im still getting issues with this as Im trying to make a website that a person selects a couple options and it simply goes to the WooCheckout — Its not linking. I need help please. try it yourself — It just becomes an error and checkout doesnt work https://www.mainbaemerch.com/product/mini-sized-custom-pillow/
Hi Tim,
Sorry about the issues you’re facing but unfortunately Gravity Forms and Woo Checkout are actually not our plugins, so this goes beyond the support we offer. This tutorial we posted is how we expect Gravity Forms to work with WooCommerce, but in case there happens to be a technical issue with the setup, it’s best to get in touch with either Gravity Forms Support or the developers of Woo Checkout and see if they can be of help.
That said, from what I see on the website, I am not really sure if you’re adding the Gravity Forms to the WooCommerce Products page correctly. Are you using the WooCommerce Gravity Forms Product Addons plugin for this? You may want to check out the documentation on how the WooCommerce Gravity Forms Product Addons works.
Best,
Hi, I am a GF ( elite) user, and I have the Perks. My problem is that I want to track the payment status after they submit a payment to PayPal – since it seems many either close the browser such that the status is “Processing” forever, or payment gets rejected for whatever reason. Does the woo integration somehow advance a notification feature by sending out notifiers to see the status of the payment?
Hi Edward,
We do not have a Perk for sending advanced payment status notifications, but I’ll suggest you get in touch with aGravity Forms Support. They are the developers of the Gravity Forms Paypal Addon and they will be in the best position to assist you with your issue.
Best
Hi… for the past 6 days, ive been breaking my teeth on my desk!
I though this would be easy, but as everything, turns out to be difficult.
I have paid for the license of Woocommerce Gravity Form add-on I have paid for the License of Gravity Forms Basic (although I just purchased PRO but I would like to stick with Basic if possible because of some following reasons detailed further)
I’ll try to keep it short… I am trying to start up an eCommerce website that a customer can go to and UPLOAD a photo of them which we will then add the product to their order. (please refer to the website on the hidden private section of this submission)
Once the customer has submitted, I would like them to press SUBMIT… and it would take them to the WOO Checkout page… (which I thought is the reason i had to purchase the WOO add-on plugin for $100) ?? Such a simple process has caused hair ripping. Would really love to get this running. \ Process of what i did: -So I created a form. (including having the “confirmation redirect” to go to the CHECKOUT page (woo) -Then I created a product, and linked the Gravityform. -Then I went and created a “single product” page in the Theme Builder section (i really required to do this because I need to add some content to inform the customer before they process their upload of the image in gravity forms) -Also… instead of using the above mentioned option… i also simply did it through the Product Page section as well. but that didnt work.
So what i REALLY need (which i thought the Woo Add-on would make possible,) is: I wish the gravityforms would go to Woocommerce checkout, where customers can pay but it causes errors and redirects to a home wordpress page of my site.
And ive TRIED EVERYTHING!!! — i even redid my website from the start! but the same issue persisted.
I really appreciate your assistance with this, and really hope you can assist soon. I need some human help please. Please get in touch with me at 778-847-9513, because this gravity forms feature has really exhausted me.
Oof. Sorry, Tim. It seems like you’re having a rough time. I don’t want to add to your frustration but, unfortunately, getting this 3rd-party add-on working is beyond the scope of what we can assist with. Have you tried reaching out to the developer of the WC GF Product Add-ons plugin that you’re using to link Gravity Forms and the WooCommerce product?
Worst case scenario, I’d recommend hiring a developer to get this discouraging kink ironed out. We use codelabe.io ourselves.
We sell furniture and want to offer customers the ability to get material swatches sent to them for free. If a customer is looking at an outdoor patio chair woocommerce product which comes in 10 different colors, we want to put a link near the product options which when clicked will open a modal with a Gravity Form inside which populates the color attribute variations Is there some combination of addons with Gravitywiz which would accomplish this?
Obviously the link would be placed via a WP filter/hook and the modal would be done by our developer(not expecting GravityWiz to do that), but just checking to see if a GF can be created to do the dynamic color addition.
Extending this a bit further, it would be great if we could create just 1 form for all 500 products which has the same functionality – meaning its all dynamic – always looks at the current product, pulls in the colors and displays it as an option in the new sample swatch request form.
Hello Chad, this sounds like you could use our GP Nested Forms plugin to create a modal that would allow for users to select the color attributes they wish to use. As for dynamically pulling information, you could use our GP Populate Anything perk that would allow for these selection to be dynamically populated. Let us know if you have any other questions. 😀
Hi,
Thanks for the article and I plan to use this in my next project. I do have a questions, is this support with Custom Post Types under Woocommerce Products, not like standard post type for WordPress.
CPT One – Woocommerce | Under Woocommerce Products CPT One – WordPress | Under WordPress Posts
CPT Products should work with Populate Anything. You would simply need to specify the post type in the filter if you want to populate data from that product. As far as how the CPT would work with the WC GF Product Add-Ons plugin, I’m not entirely sure. Presumably it should work, but you might want to reach out to their support for a definitive answer.
Wow… this is awesome! I want to set u a service that can be booked with a form. And I want the price 1. To be generated from the backend after the order has been placed, by simply modifying the order. 2. set up conditional pricing based on selections made by clients.
No. 2 has been duly answered by the article, will appreciate setup advice for No. 1 using these two plugins.
Thanks. great article overall. happy to find this.
Hi Victor,
I’m not really tracking your question very well but from my little understanding, I’ll say it isn’t possible to use Conditional Pricing to modify the order details after it has been placed. This may require some custom code to achieve. That said, if you have a Gravity Perks license, you can get in touch via our support form with additional information on what you’re trying to achieve and we’ll see if we have a solution for it or not.
Best,
Hello,
When having multiple products say 3 within the gravity form attached to the Woo Product. The Checkout only shows one product. But still see the 3 products created on GF. Is there a function to modify/edit/remove those individual products as independent identies?
Thanks in advance Amarnath J
Hi Amarnath,
We don’t have a snippet or solution for this. You may want to get in touch with Gravity Forms Support or WooCommerce Support to see if they can assist you with this.
Best,
Hi, Question: – Can I attach different Gravity forms to different products or product category? – Is it possible to manage inventory for like below details? Suppose, there are three variations of product solo, twin, & triple. Now there are 2 hotels which provide different number of rooms for different variations. Like Hotel 1 has 3 rooms available for solo, 4 rooms available for twin & 5 rooms available for triple. Similarly, hotel 2 has 2 rooms for solo, 2 rooms for twin, & 2 rooms for triple.
Let me know if this is not clear. Thank you on advance!
Hello Sangam, These are all excellent questions. It seems as if your setup may require more plugins than what is readily available out the box from Gravity Forms and WooCommerce. We do offer Gravity Forms Limit Choices is a paid addon for managing choice-based inventory. This addon provides the ability to limit per choice on your multi-choice field (e.g. Radio Buttons, Checkboxes, Drop Downs, etc). It works with Product and Option fields with these input types as well. Gravity Forms Better Inventory, a snippet solution that provides an easy method for setting up simple, one-off inventory limits on a per field basis. Let us know if you were looking for something more specific. Thanks!
Hi Ryan, Thank you for your reply.
One more question: Can I attach different Gravity forms to different products or product categories?
Thank you.
Hi Sangam,
Using the WooCommerce Gravity Forms Product Add-ons, you can attach different Gravity Forms to different Products such that each product will have a different Gravity Form.
Best,
When using WC Product Add-ons, what Gravity Perks would you recommend to send a GF notification once a WooCommerce order had completed payment the order status changes to ‘Order Processing’
Hi Chris,
We do not have a solution to Gravity Forms Notifications. You may want to check out the feature of WC Product Add-ons to send GF Notification when an order is created as explained in the documentation.
Best,
I want to use Gravity Forms to create a complicated order with many products conditionally selected and then send the result(multiple products) to a WooCommerce cart. Will WooCommerce Gravity Forms Product Add-Ons support that?
Hello Charles, This is an excellent question. On a basic level this sounds like it should be doable. Depending on how complicated the form would get and if these products have options vs separate orders. For more information on Gravity Forms Product Add-On’s, check out their documentation here.
Hi, looking at the option to Load Logged-in Users’ Information. Since Woocommerce Subscriptions forces registration at checkout, does that mean the customer is technically logged-in at that point if I redirect to a GravityForm as the custom thank you page?
Want to ask the customer additional questions immediately after checkout. Thanks
Hi Chris,
By default, WooCommerce automatically logs the user is when registering at checkout. If you redirect to a Gravity Form as the purchase thank you page, Populate Anything can populate user meta into that form.
Hello,
Question, I want: – a user pays a product in Woocommerce – is logged in after purchase – and can fill out a form (GF) – the email address needs to be dynamic populated from Woocommere directly into the GF (now I get an error “mailaddress allready exists”
Does your plugin solves this is or this is another issue? I have the feeling this is a setting in GF? Thanks a million, Mary
Hi Mary,
It sounds like there is a User Registration feed attached to the form, and it’s failing validation due to the user already existing. We have a snippet that skips registration if the email already exists.
Hi Scott,
Great, thanks for your fast & great reply. I am going to try this :).
Thanks! Mary
Hi Scott,
Tried but that didn’t work. I also get an error ‘username allready exists’, I have combined GF with pods. In the pod (Title, user login) I have dynamic populate the user name of the user name of Woocommerce (so that would be easier for the user) but WP says that should be unique… how can I fix this? If I have to buy a plugin or something, (or YOU) just let me know ;-).
Thanks so much!!! Mary
Hi Mary,
It’s strange the snippet Scott suggested to you didn’t work, but we will have to take a look at your setup to determine what may be wrong and know if any of our plugins or snippet will be a fix to it. If you are a Gravity Perks subscriber, you can get in touch via our support form so we can assist you further and dig into this issue.
Best,
Hello, I’m using Gravity forms for the registration of our members. Because they have to fill in a lot of data it’s not advisable to use the Gravity Form Product add on. I would like to add a woocommerce product with a picture in the gravity form depending on the membership they have chosen. After submitting I would like them to go to the checkout page of woocommerce.
Hello Hans, This is an interesting question. Would you be signing them up before purchases or after? Also would you be using a dedicated membership app to create this? Let us know so we can get you going in the right direction. 😃
If possible after the purchase. I won’t be using a dedicated membership because there signing up for swimming lessons that’s why I should use a woocommerce product. The data from the gravity form will also be exported to an excel file to upload it to our insurance company
Hi, I need to know how can i show this woocommerce product in gravity payment form and also when they can purchase this product also i need to redirect there in the woocommerce my account page to see order details. like before payment the passowrd filed will show to create an account like woocommerce checkout page.
Hello JH, TO better understand your question, are you currently building a Gravity Forms only WooCommerce form, or are you looking to integrate certain features from Gravity Forms into your WooCommerce site? Also are you currently using something like Gravity Forms Product Add-ons or what plugins are you currently using for you build? Let us know so we could better help you.
Hi Ryan,
Thanks for responding to my comment. Yes, I understand the order id is displayed in the entry of the related gravity form. I am trying to pass the order id to another function after form submission or after the order has been completed. Is there a way to retrive the order id related to the gravity form using the gravity forms api such as GFAPI::get_entries?
You have to use the gform_get_meta function. gform_get_meta( $entry[‘id’], ‘woocommerce_order_number’ )
Hey Kurt, thank you for further explaining your intent. I am glad that you have found your solution. We hope you have a wonderful weekend. 😎
Lots of interesting things here. But there is still one issue I have, which is getting guest details. I’m trying to pre-fill the customer email in a GF in the WC checkout page whether the user is logged in or not. Is this possible? Thanks
Hello Christopher, this is an interesting question. You could create a hidden field on your form and use the {user:user_login} merge tag to determine if the user is logged in or not. Then you could use conditional logic to either display logged in or not logged in on the form.
Hi Ryan, Maybe I’ve misunderstood your suggestion, or not properly explained what I am trying to do! …which is prepopulate a hidden GF field with the WC billing email address.
As it happens I am doing this for a Mailchimp signup. The logged-in user’s email might get me there in a small proportion of cases, but mostly it’s the people who haven’t previously created an account that are prime for signing up to newsletters.
I am sorry for misunderstanding this question! Are you currently using a WooCommerce to Mailchimp integration plugin? The issue I am seeing is that the field would have to be submitted first to pull the data properly. You could use our Gravity Forms Populate Anything perk to either display via a live merge tag or populate the information into the form.
Hi Ryan,
Yes, I already use W**chimp, which kind of works, but (a) it’s overkill for just this, as I really don’t want to suck all the other order data into MC unnecessarily, (b) it’s limited to just joining a list, whereas in my GF/MC integrations I like to offer the users list segmentation in another choice that conditionally appears when the initial box is ticked, and (c) It seems to be randomly sending delete commands, which archives some of the existing list, or sends new members straight to archive.
I do use Populate Anything (it’s awesome!) in another site, but really what I’d love is to embed the GF/MC form in WC checkout and have it all fire off at the same time on checkout.
But maybe that is wishful thinking!
How do I access the woocommerce order ID associated with the gravity form entry once an order has been placed? I can’t find it in the entry object.
Hello Kurt, The order ID will be stored within the entry itself. How are you currently populating the entry objects? Let us know so we could get you in the right direction.
We have a website that deals with multiple currencies, which Gravity Forms does not, so we are not able to build pricing dynamically using the plugin. The workaround is to use product variations and use a Gravity Form only to collect the options. However, I have found that the WooCommerce price is hidden from the page regardless of the “Remove WooCommerce Price?” setting, when adding a form to a variable product. Do you know if this a bug, or am I missing some setting? One possible workaround I found is to add the Gravity Forms “Total” price field to the form. This shows the total price in the correct currency, but it also leaves the “Total” price in the base currency visible on the page. Do you have any advice?
Hello Ola, Are you using the WooCommerce Gravity Forms Product Add-Ons? I would reach out to their support to see if they could take a closer look at this issue for you. 😃
Wow, impressive list of opportunities, thank you for this great overview :) I’m actually looking for a solution, where the shopmanager can create a new product from the frontend using a Gravity Form. Do you know any solution to achieve this?
Hello! This is an interesting question. You have the ability to allow users to submit products via the front end through this awesome tutorial, but I am not sure if you can link this into WooCommerce. We may not have a solution for this but could help out. Will you be using a membership plugin or register the users before submission? Thanks! 😃
Hey Ryan, thank you for your reply! I didn’t know much about the “Advanced Post Creation Add-On” which is the mentioned in your recommended article. I will definitely try this configuring the “Post Type” to Product and “Status” to Pending or Draft. This could possibly meet the requirements already :D
Hey There, I Just wanted to update that we have an awesome new article written just on this topic. How to Create WooCommerce Products with Gravity Forms would be perfect for what you are looking for. 😃
Great article, thank you! Does the Gravity Forms Product Addons extension for WooCommerce work for WooCommerce Subscription products too? And would all the Gravity Perks mentioned here also work on Subscriptions?
Hello, Yes the Gravity Forms Product Addons does work correctly as well as our perks. If you run into any issues, using any of our Perks, you can always contact our support and we would be more than happy to take a deeper dive. 😃