Gravity Forms Conditional Pricing
Create flexible and powerful pricing levels for your Gravity Form Product fields based on conditional values in your form.
What does it do?
This plugin allows you to create flexible and powerful pricing levels for your Gravity Form Product fields.
Save yourself the hassle and frustration of creating twenty different Product fields with different prices when what you really want is a single Product field with a variable price.
Gravity Forms Conditional Pricing can handle even the most complicated pricing variations with an easy-to-use interface for creating unlimited pricing levels per Product field.
With Conditional Pricing you can create:
- Early bird pricing
- Tiered quantity pricing
- Age-based pricing
- Member vs. non-member pricing
- Dynamic pricing for customized products
- And many more!
Features
- Pricing levels for Gravity Forms Product fields.
Create an unlimited number of flexible and powerful pricing levels. - Intuitive interface for managing pricing levels.
Manage Product pricing using familiar conditional logic rules. - Import/export pricing for bulk editing via your favorite spreadsheet editor.
Handle thousands of pricing rules with one-click export and an intuitive importer. - Offer bulk discounts, pricing based on user input, and more!
Build complex pricing rules without the headaches. - Improved performance.
A single Product field replaces twenty Product fields containing conditional logic, improving site performance. - Integrates with Gravity Forms Conditional Logic Dates.
Apply date-based pricing rules with Gravity Forms Conditional Logic Dates, also part of the Gravity Perks suite. - Automatic updates.
Get updates and the latest features right in your dashboard. - Legendary support.
We’re here to help! And we mean it.
Have a question?
We’re here to help, just send us a message.

- Version 2.0.30
- Updated June 17, 2026
- Released October 22, 2013
All Connections
All Perks
- GF Address Autocomplete
- GF Advanced Calculations
- GF Advanced Conditional Logic
- GF Advanced Phone Field
- GF Advanced Save & Continue
- GF Advanced Select
- GF Auto List Field
- GF Auto Login
- GF Better User Activation
- GF Blocklist
- GF Bookings
- GF Conditional Logic Dates
- GF Conditional Pricing
- GF Copy Cat
- GF Date Time Calculator
- GF Disable Entry Creation
- GF Easy Passthrough
- GF eCommerce Fields
- GF Email Users
- GF Email Validator
- GF Entry Blocks
- GF Expand Textareas
- GF File Renamer
- GF File Upload Pro
- GF Inventory
- GF Limit Checkboxes
- GF Limit Dates
- GF Limit Submissions
- GF Media Library
- GF Multi-Page Navigation
- GF Nested Forms
- GF Notification Scheduler
- GF Page Transitions
- GF Pay Per Word
- GF Populate Anything
- GF Popups
- GF Post Content Merge Tags
- GF Preview Submission
- GF Price Range
- GF QR Code
- GF Randomizer
- GF Read Only
- GF Reload Form
- GF Sliders
- GF Submit to Access
- GF Terms Of Service
- GF Unique ID
- GF Word Count
Documentation
How do I enable this functionality?
After installing and activating Gravity Forms Conditional Pricing, you can create Conditional Pricing feeds for any Single Product, Drop Down, Radio Button or Hidden Product field. Let’s walk through that process.
|
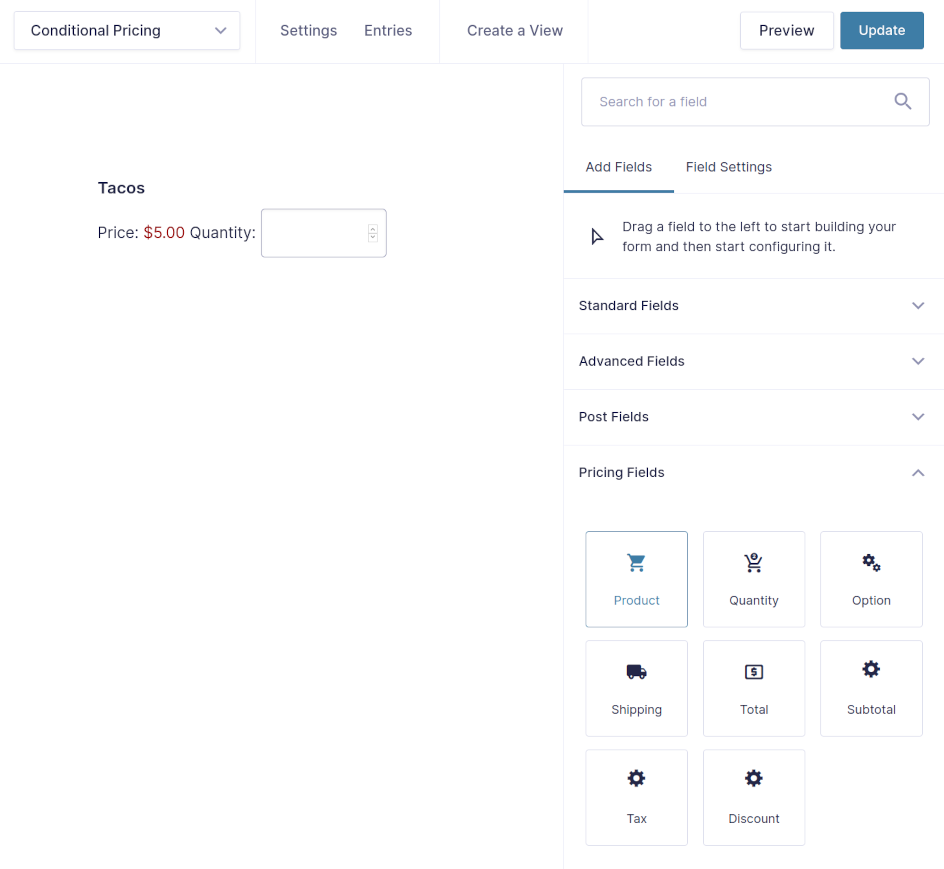
Add a Product field to your form and click Update to save your changes. |
|
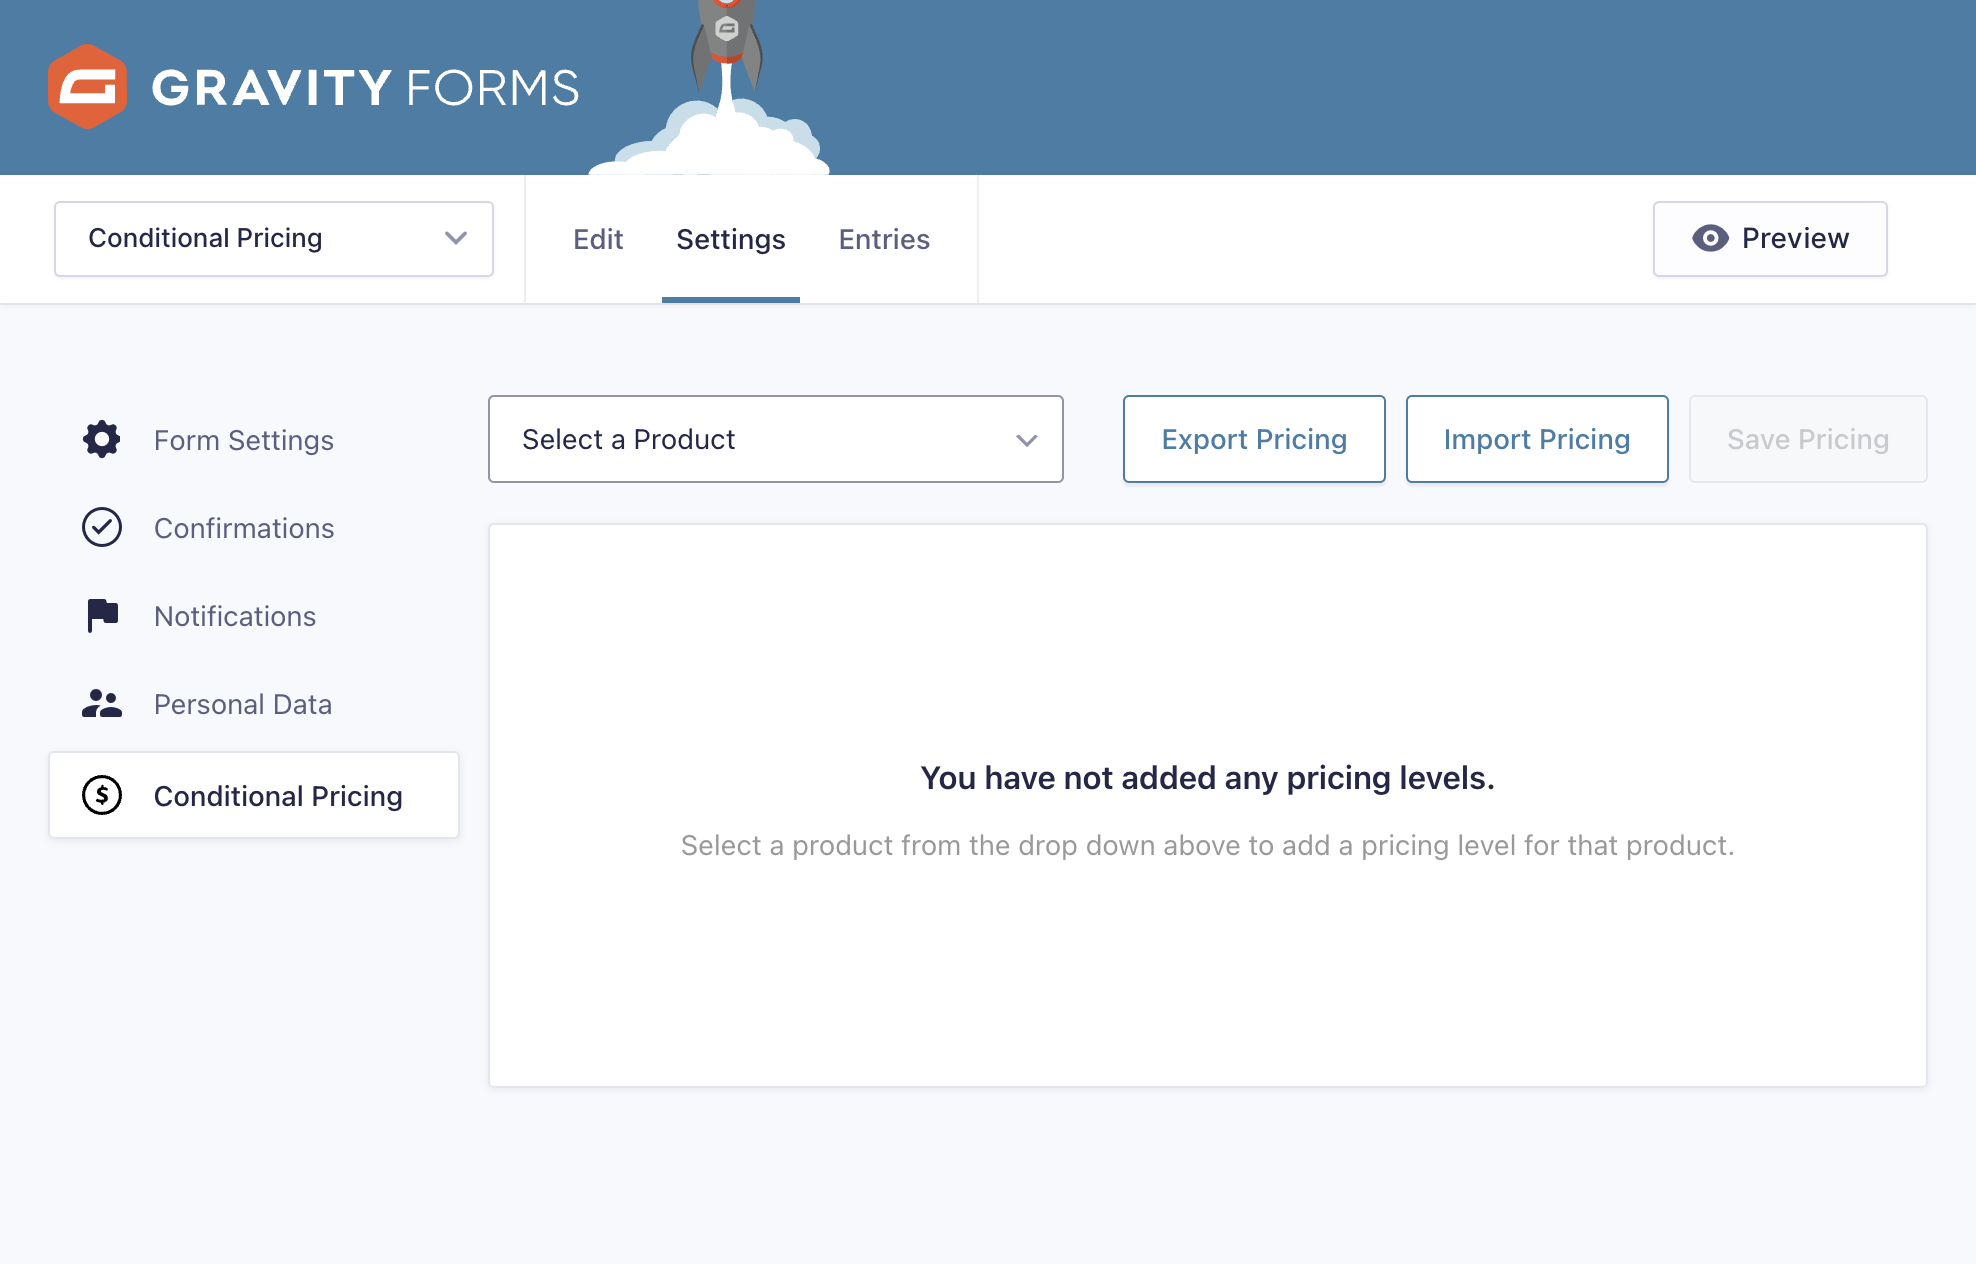
Navigate to Form Settings > Conditional Pricing and select your Product from the Select a Product Drop Down. |
|
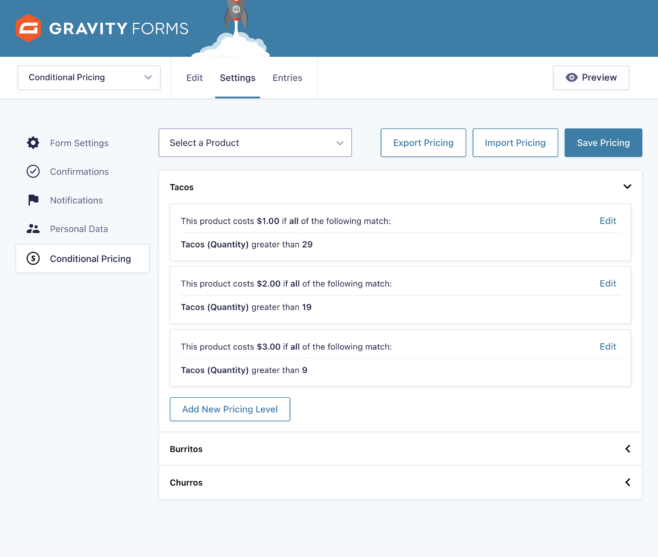
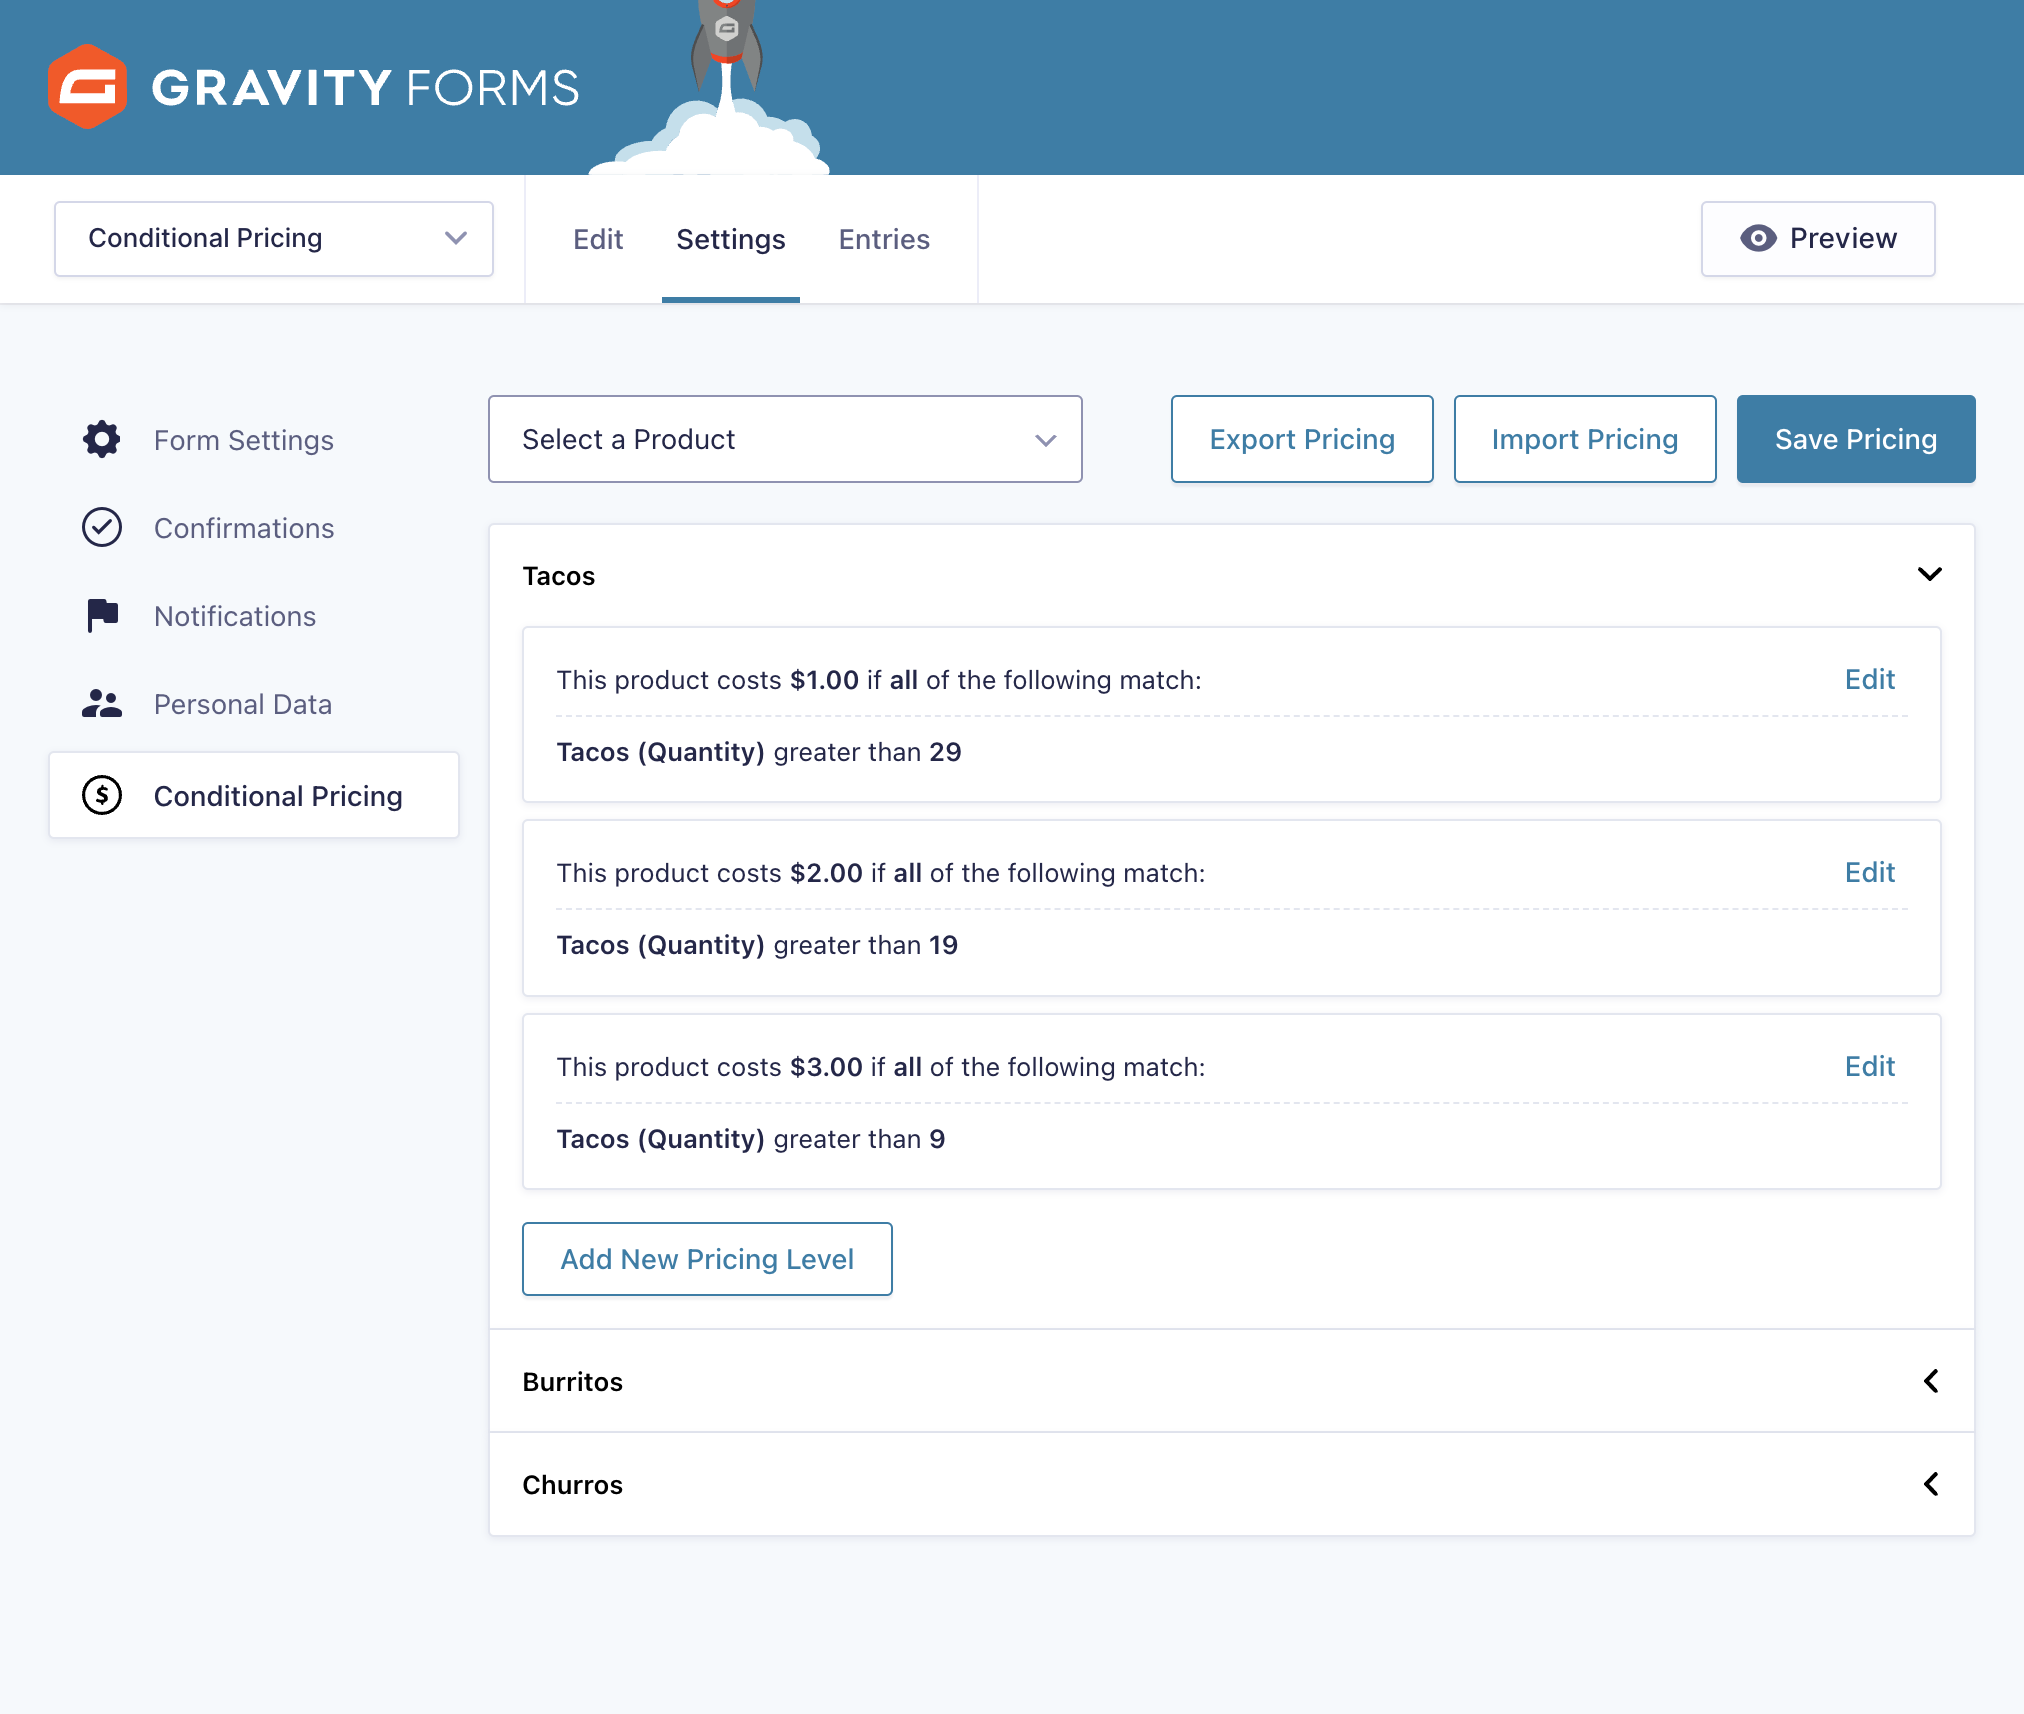
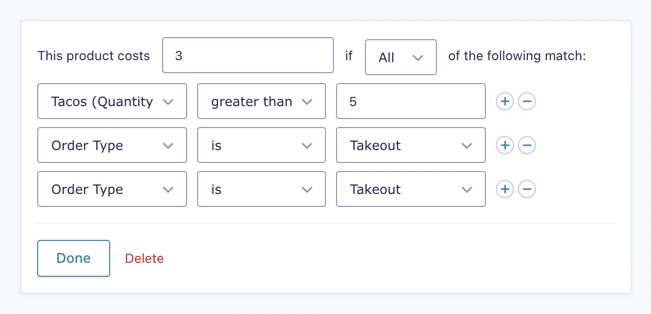
Set the price and rules to qualify for this pricing level. Add as many pricing levels as you’d like and click Save Pricing to save your rules. |
Now that you know how to create pricing rules, let’s dive into what Conditional Pricing can do.
Feature Details
Pricing Levels
Pricing Levels consist of a price and a set of Pricing Rules that determine which pricing level should be used for the Product field’s price.
You can create an unlimited number of Pricing Levels for each of your Product fields. Levels can be rearranged by dragging and dropping them in your preferred order.
Pricing Levels use a first match policy, so levels with your strictest rules should be first. This often means you’ll start with your lowest price and end with your highest price.
Pricing Rules
Pricing Rules work just like Gravity Forms’ default conditional logic but instead of showing/hiding a field, the Pricing Rules determine which Pricing Level will be used to set the price of the Product field.
Pricing Rules consist of three fields:
- A list of all fields on your form that are available for conditional logic.
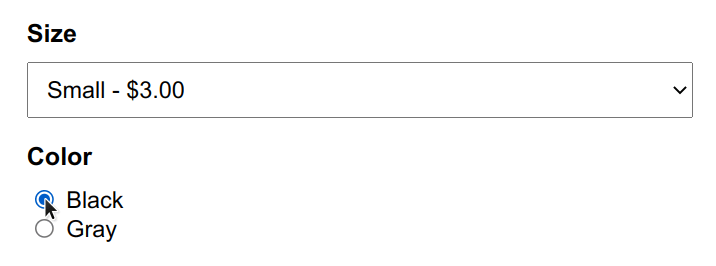
- A list of all the operators that can be used to compare the value of the first field with the value of the third input.
- The value to which the selected field will be compared. The format of this field will change based on the selected field type.

Just like conditional logic in other parts of Gravity Forms, you can add an unlimited number of rules to any Pricing Level by hitting the plus icon.
Usage Examples
- How to Setup Bulk Pricing with Gravity Forms
- How To Set Up Conditional Pricing with Nested Forms
- How to Build a Player Roster with Age-Based Pricing
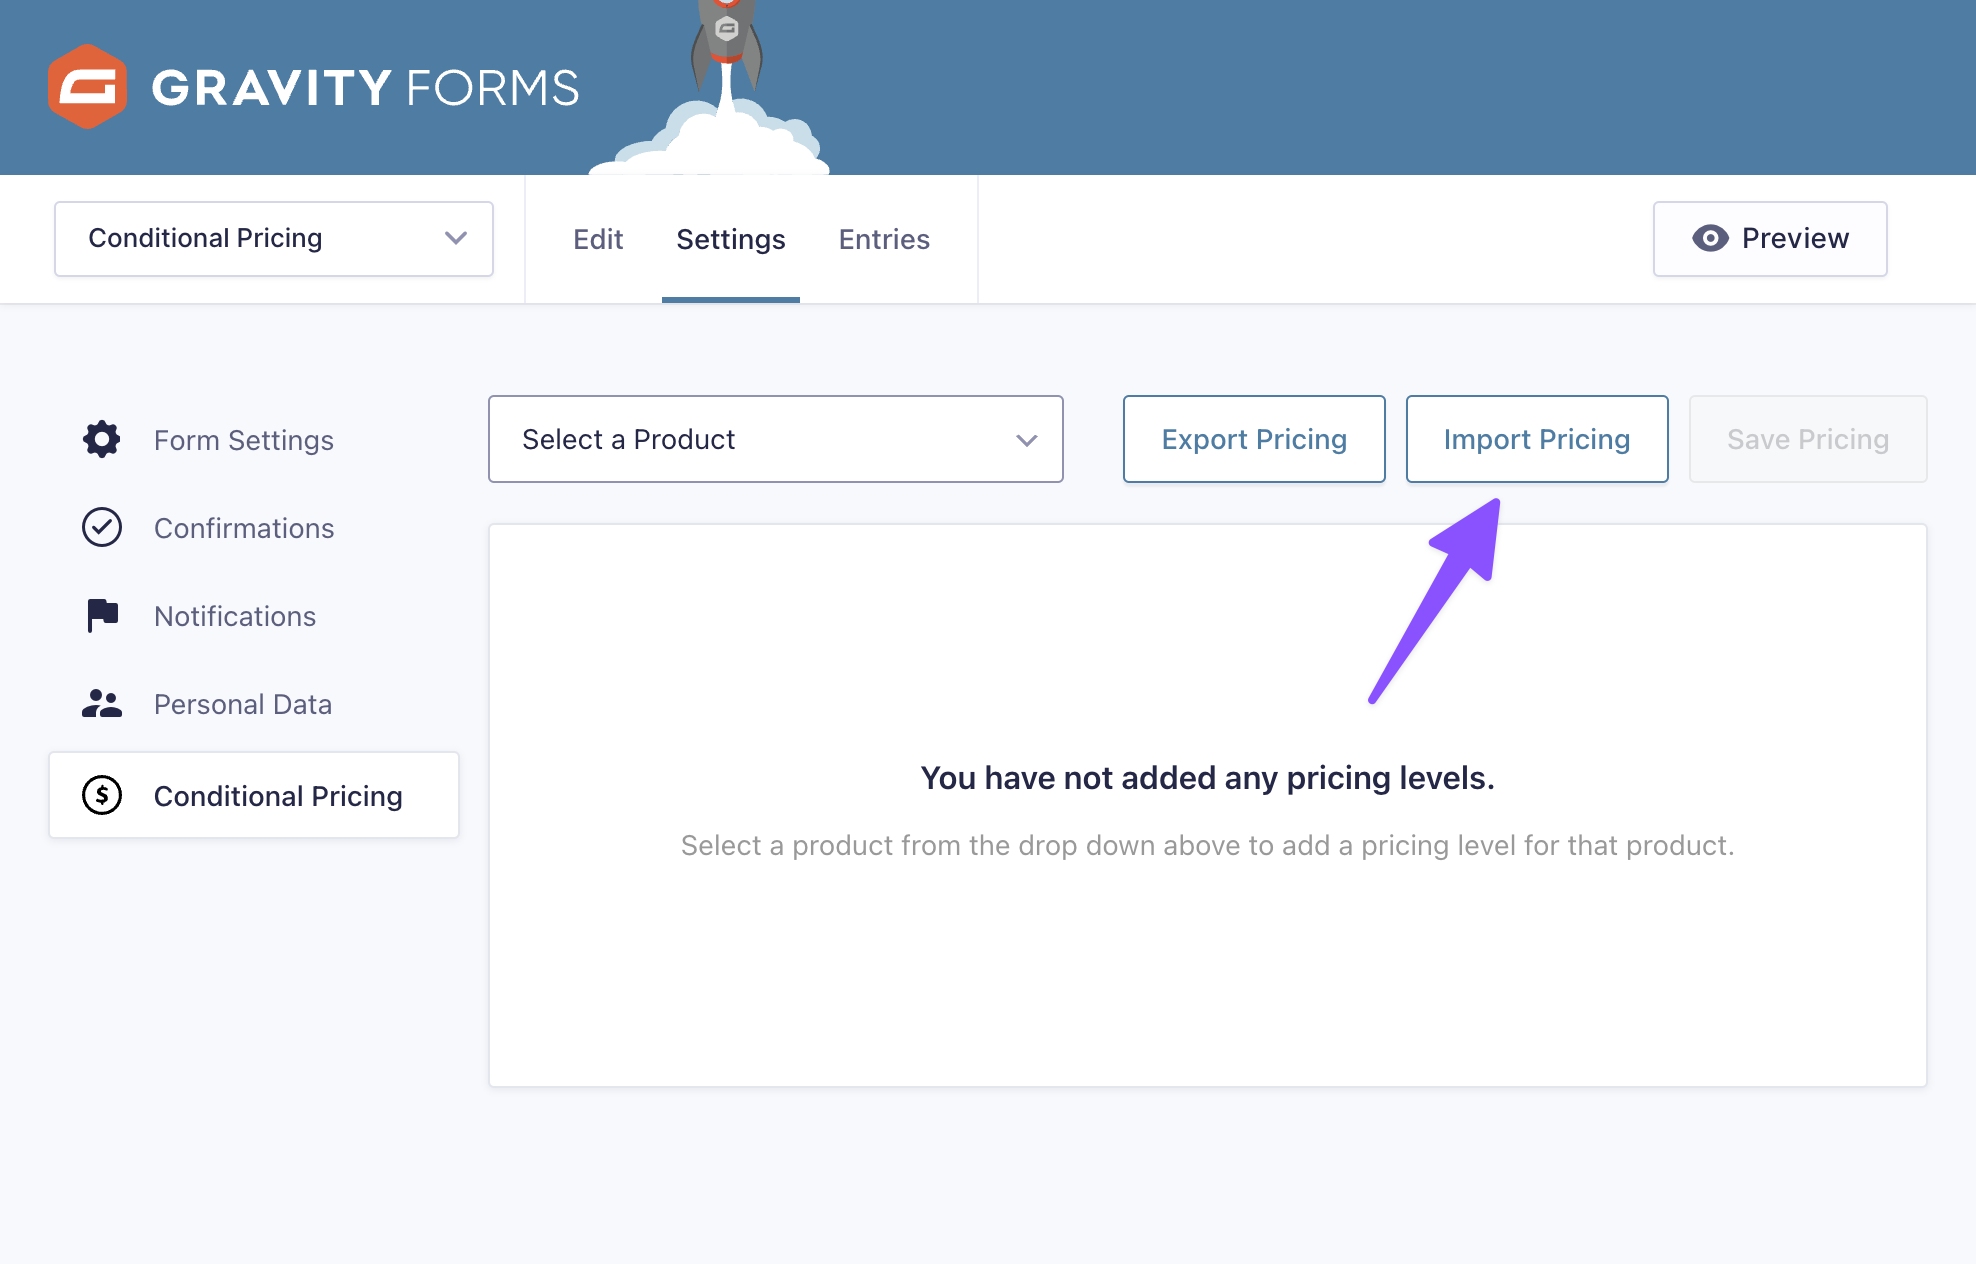
Pricing Importer
The Pricing Importer tool allows you to add new or update existing pricing rules in bulk from a CSV file.
Navigate to Form Settings › Conditional Pricing, select the product you want to update, and click Import Pricing Levels:
Choose your CSV file and click Prepare Import.
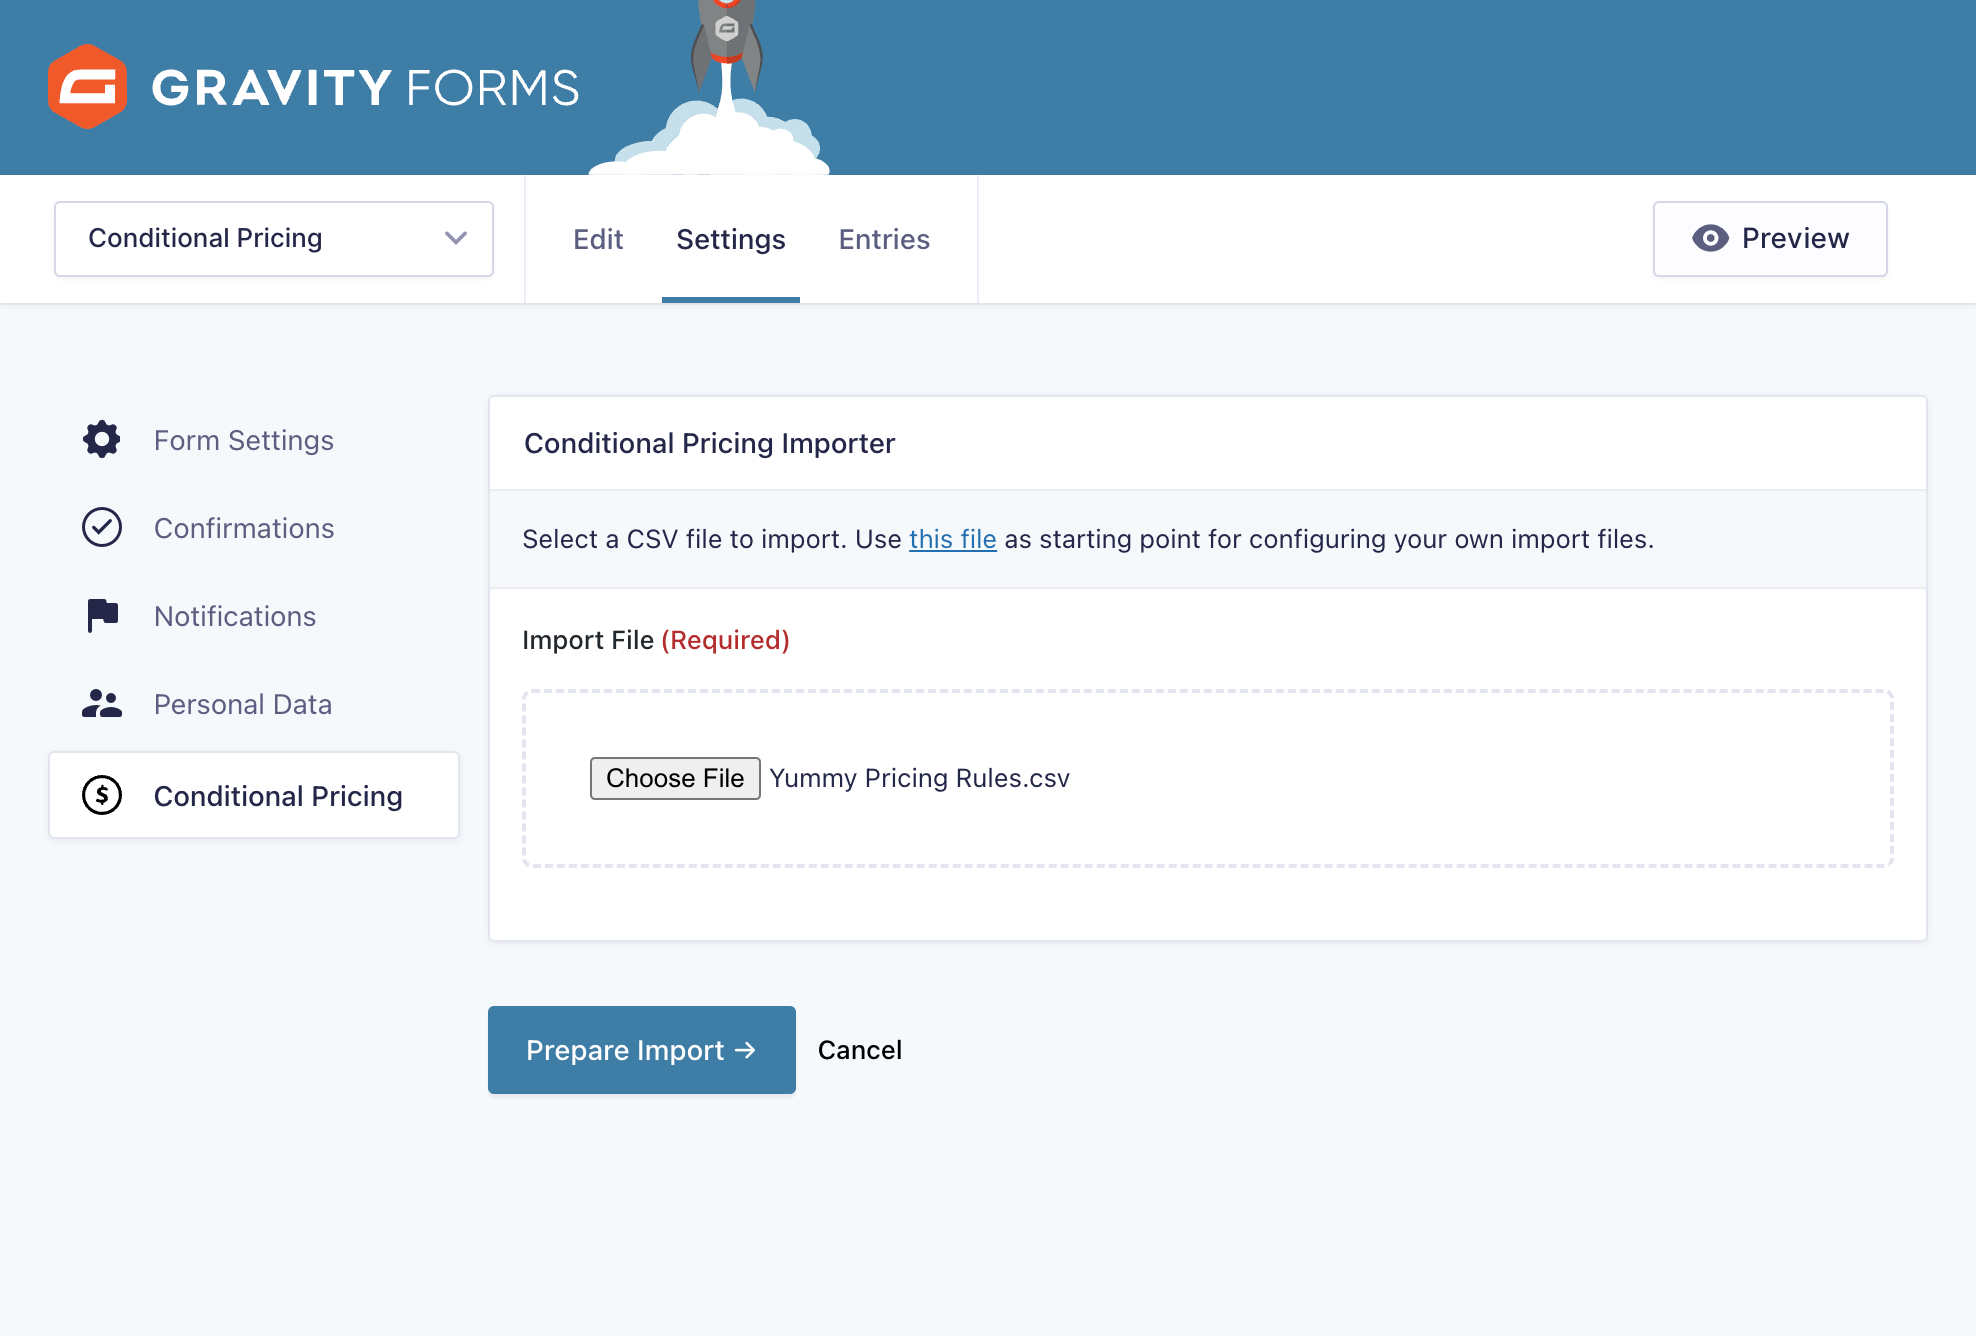
Curious about what your CSV file should look like? See Importer Rules for detailed guidance.
Inside this UI, you’ll find a list of importing options, including the ability to append new pricing rules or replace existing pricing rules.
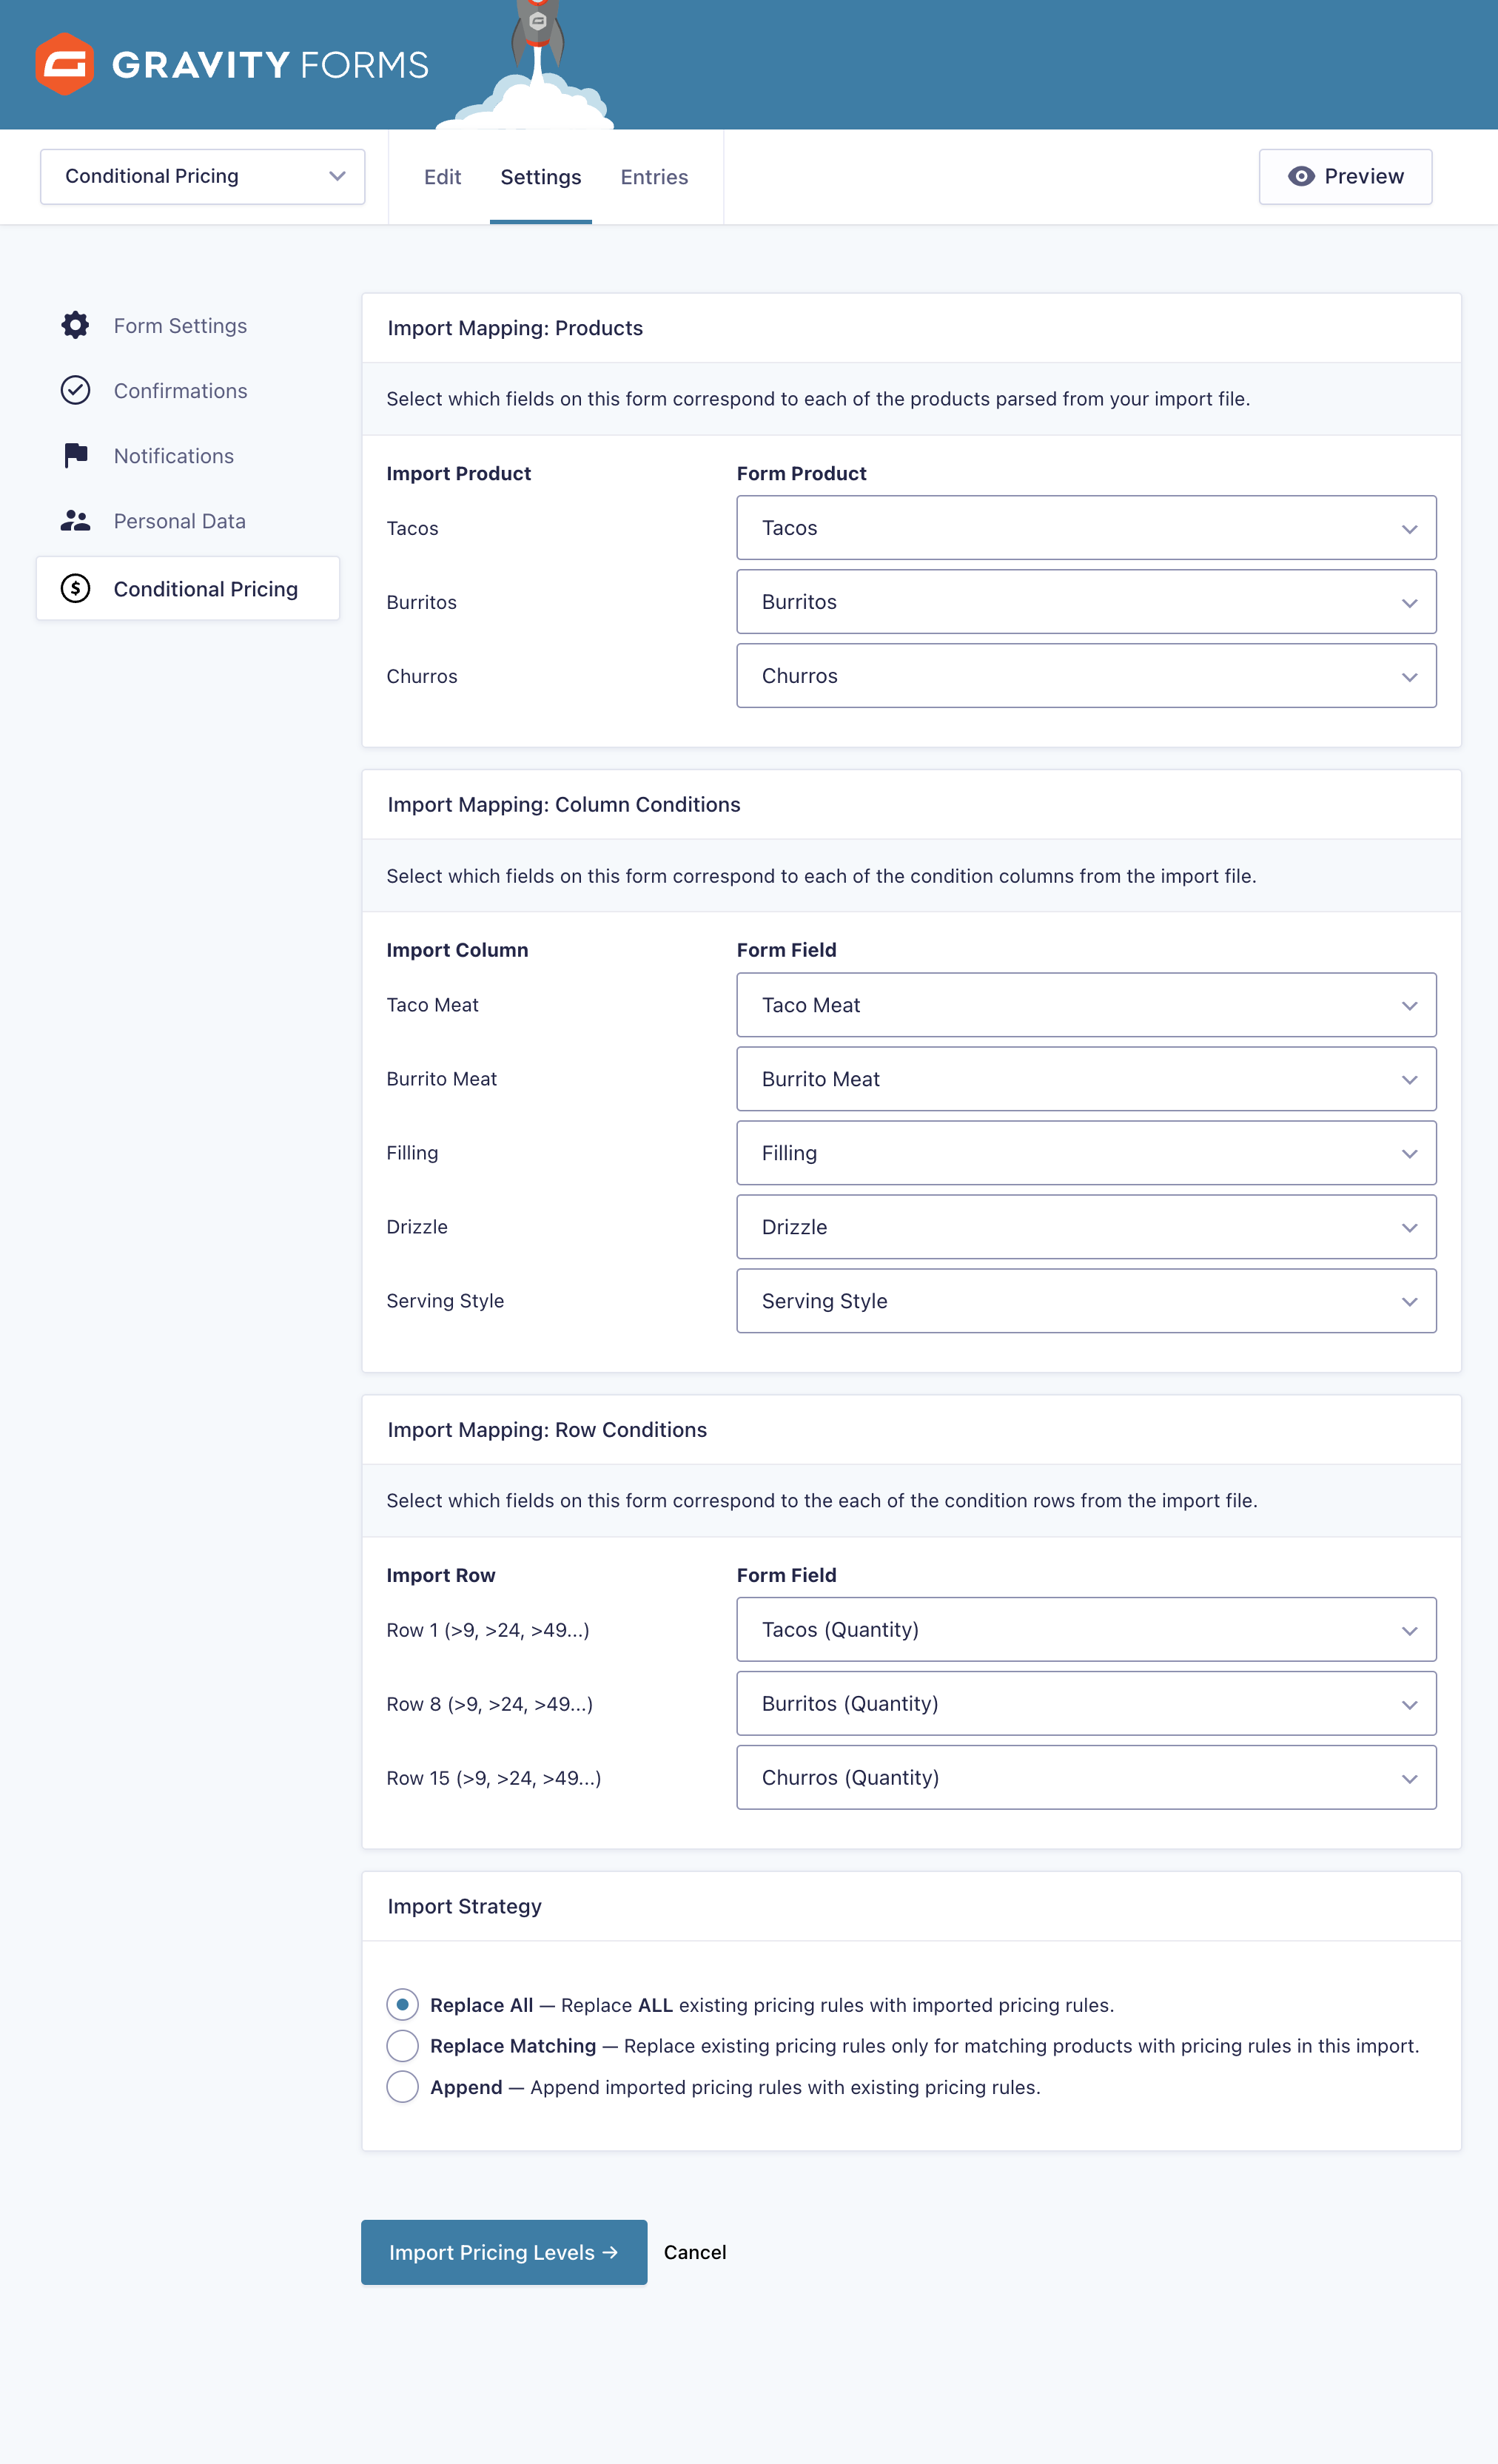
Here’s an example of what things look like post-import:
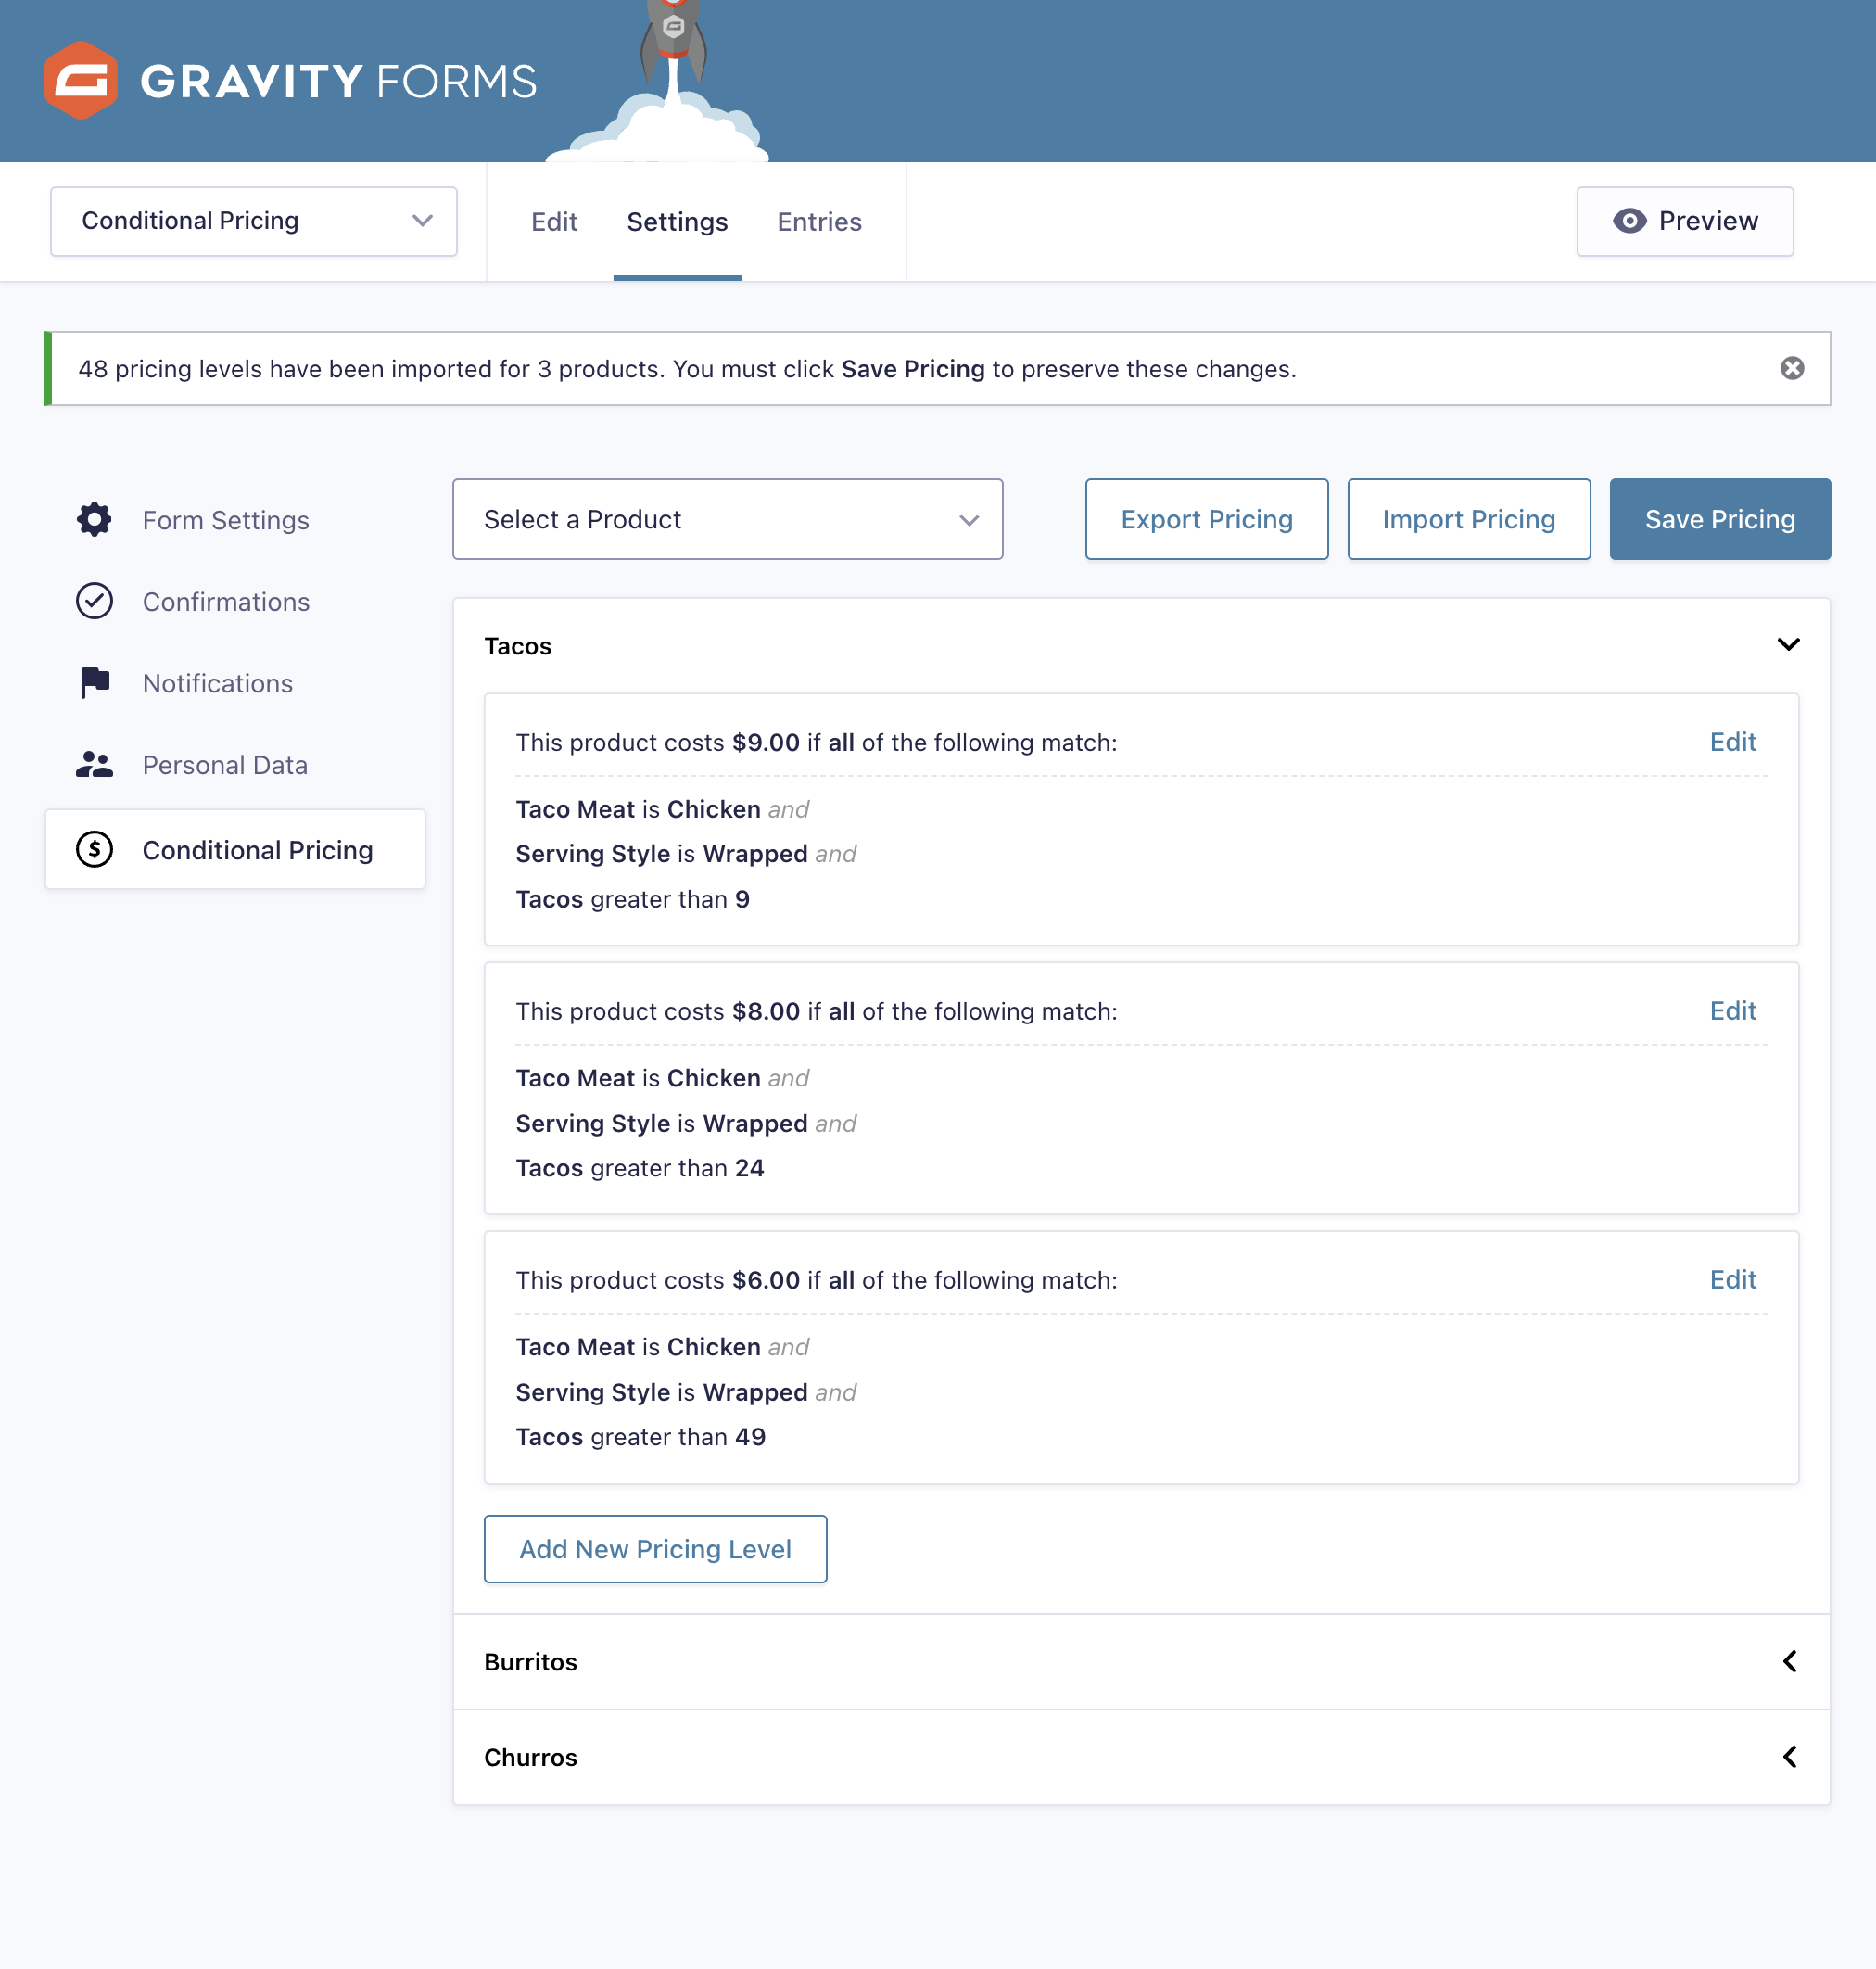
Reminder: Make sure to click the Save Pricing button to save the imported pricing rules.
Import Strategy
The Conditional Pricing importer provides a number of ways to handle imported pricing rules.
Replace All
This will delete all existing pricing levels and replace them with whatever pricing rules are provided in the import file. This is the preferred way of interacting with Conditional Pricing when you have hundreds of pricing levels. You create a CSV with all of your pricing levels that becomes your source of truth. Any changes are made there and then imported with the “Replace All” option keeping the rules in the editor and the rules in your CSV completely synced.
Replace Matching
This replaces all pricing levels for matching products.This is useful when you have separate CSVs for the pricing levels for each product (or group of products) and works similarly to the “Replace All” option above except it is product-specific.
Append
This will simply add new pricing levels based on the import. It will not update any existing pricing levels.This is useful when you’d like to add new pricing levels while leaving existing pricing levels intact.
Importer Operators
The conditional pricing importer supports the following Gravity Forms conditional logic operators.
| Operator Symbol | Operator Label |
|---|---|
| is | |
! | is not |
< | less than |
> | greater than |
* | contains |
^ | starts with |
$ | ends with |
To use these operators in your import file, just prefix the value for which you would like to compare (e.g. $value would create rule where the mapped field ends with “value”).
Note: The “is” operator is the default operator. Any value without a prefixed operator will be compared with the mapped field using the “is” operator.
Importer Special Values
Empty values in import files are ignored. Use these values to create conditions that explicitly check for an empty (or not empty) field value.
| Value | Description |
|---|---|
EMPTY | Use to check for an empty value. |
!EMPTY | Use to check where a value is not empty. |
Importer Rules
The best way to get started with creating an import file is to create some of the rules you’ll need via the UI and then clicking the Export Pricing to generate a CSV. You can add additional products and rules to this CSV and click the Import Pricing button to import the new rules.
If you’d like to customize the import file to better suit your needs, it is actually quite flexible. See the sample import file and sample form for a more comprehensive starting point.
Even still, it may benefit you to have a clearer understanding of the rules that govern the importer.
View Import/Export File Format Specifications
Usage Examples
Pricing Exporter
As of version 2.0, Conditional Pricing includes a one-click Export Pricing button that will export all of your pricing rules to a CSV file. Use this CSV file to add new rules and remove or modify existing pricing rules. When your changes are completed, import these files back into Conditional Pricing by clicking the Import Pricing button.
Required Capabilities
To interact with GP Conditional Pricing, users/roles are required to have specific GP Conditional Pricing capabilities via WordPress user roles.
| Capability Label | Description | Capability Slug |
| Conditional Pricing: Form Settings | Lets user configure GP Conditional Pricing form settings. | gp_conditional_pricing_form_settings |
Integrations
Invoicing Templates by Gravity PDF
GP Conditional Pricing integrates with Gravity PDF’s Invoicing 2.0+ templates. These templates allow for business-ready invoice generation from Gravity Forms submissions. They’re highly customizable, translatable, support conditional logic, and are GST/VAT compatible.
There’s a variety of modern templates to choose from and all templates integrate with GP eCommerce Fields, GP Advanced Calculations, GP Inventory, GP Unique ID, and GP Price Range. Learn more about Gravity PDF’s invoicing templates here.
Known Limitations
- Gravity Forms does not have a reliable way to uniquely identify choices in choice-based fields. As such, pricing rules for individual Drop Down and Radio Button products are index-based. Removing or reordering choices in a Drop Down or Radio Button Product will corrupt your pricing rules.
- User Defined Price, Calculation Product, Option, and Shipping fields are not supported.
Troubleshooting Issues
If Conditional Pricing isn’t working as expected, here are some troubleshooting tips you can try.
- Make sure there are no JavaScript errors appearing in the browser console, as they can disrupt Conditional Pricing on the frontend.
- Double-check the pricing rules to ensure they are set up correctly.
- Perform a theme or plugin conflict test to determine if another plugin is affecting the functionality of Conditional Pricing.
- Conditional Pricing evaluates rules from top to bottom, meaning a general rule placed before a more specific one may override the intended pricing. To prevent this, position more complex pricing rules at the top, followed by broader rules, ensuring the most specific conditions are applied first.
- Role management plugins may sometimes hide the Conditional Pricing page or display the error: “Error fetching pricing rules”. To resolve this, go to the Role Management plugin settings and grant the necessary permissions for the user’s role to access Conditional Pricing.
- If you run into an
Amount Mismatchvalidation error or payment failures, first check that all Product fields (and their choices) have prices set. If any are missing, set them to $0 to see if this resolves the validation issue. Also, confirm that the submitted total matches the total shown on the frontend before diving into payment gateway troubleshooting. - If you are using Elementor, try disabling the Element Cache setting, as this has been known to conflict with dynamic form elements, including Conditional Pricing. This setting can be found under Elementor › Settings › Performance.
FAQ
Can I show updated prices in choice-based Product fields?
We have a two-part snippet that will display prices in choice-based fields and update them when pricing conditions change. Follow these steps to use it:
- Paste this PHP snippet into your theme’s
functions.phpfile. - Add this JavaScript snippet to your form. We recommend using our Code Chest plugin to make this part easy.
With the two snippets installed, prices for choice-based fields will automatically update as the user interacts with the form.
Does Conditional Pricing work with the WooCommerce Gravity Forms Product Addons plugin?
Yes; however, the WooCommerce Gravity Forms Product Addons recommends using a hidden-total class in their documentation. Do not do this as it prevents Gravity Forms (and Conditional Pricing) from including that product in calculated total. Instead, add the gf_invisible class to achieve the same result.
Does Conditional Pricing support Multi-Currency?
Yes. IdeaWP’s Multi-Currency for Gravity Forms Addon supports Conditional Pricing.
Why isn’t the importer importing all of my pricing rules?
If your import file contains over a thousand unique products, condition columns, or condition rows, you will exceed PHP’s default max_input_vars limit of 1000. You can increase this limit as needed via your php.ini file. The process for editing your php.ini file differs by host. Contact your host for instructions.
Can I use Conditional Pricing with Shipping fields?
No, GP Conditional Pricing does not support Shipping fields, as noted in the Known Limitations section. However, you can work around this by using a Product field to represent your shipping cost and applying your conditional pricing rules to that field. Once configured, you can then use this snippet to convert the Product field into a Shipping field.
Translations
You can use the free Loco Translate plugin to create translations for any of our Perks. If you’ve never used Loco translate before, here’s a tutorial written for beginners.
Related Snippets
Hooks
Gravity Forms has hundreds of hooks. Check out our Gravity Forms Hook Reference for the most thorough guide to Gravity Forms’ many actions and filters.
Related Resources
- Conditionally Display a Field Based on a Recurring Date
Automatic Conditional Logic with wildcard dates. - Gravity Forms eCommerce Tutorial | The Comprehensive Guide
A comprehensive guide to Gravity Forms eCommerce and the addons, snippets and tutorials you need to amplify your eCommerce store using Gravity Forms. - How to Add Three Decimals with Gravity Form Currencies
Most default currencies in Gravity Forms will be set to two decimal places. If you need to change this to three decimal places, or some other number, this guide will show you how. - How to Build a Player Roster with Age-Based Pricing
Register players with age-based registration fees in a single form submission. - How to Do Calculations with Gravity Forms
If you’re using Gravity Forms on your WordPress website, you might need an easy way to do Gravity Forms calculations on form fields and user submissions. - How To Set Up Conditional Pricing with Nested Forms
Want to provide discounts for large groups? Learn how to offer quantity-based discounts with Nested Forms and conditional logic. - How to Set Up Early Bird Pricing with Gravity Forms
Discount your Gravity Form products if your form is completed before a certain date or specific amount of time before today's date. - How to Set Up Rush Pricing with Gravity Forms
Charge a little extra if the user selects a delivery date that is within a certain time frame of the current date or a specific date in the future. - How to Setup Bulk Pricing with a Calculated Unit for Gravity Forms
Calculate how much of a product is being ordered and dynamically set the unit price based on the calculated value. Useful for dimension-based calculations like square footage and volume. - How to Setup Bulk Pricing with Gravity Forms
Offer your customers discounted rates when they buy in bulk. The more they order, the lower the price. - Spotlight: Building a Registration Form with Conditional Pricing
Jesper Dinesen replaced a conference pricing spreadsheet with a Gravity Forms registration form that handles group sign-ups and dynamic pricing on its own. - Spotlight: Creating Dynamic, Customizable Quoting Forms with Jennifer Erdman
We explore how Jennifer Erdman built a quote calculator — based on highly customizable product offerings — step by step. - Spotlight: One Perk for 25,000 Pricing Levels with AdhamDesign
Learn how one concierge service uses Conditional Pricing to accommodate 25,000 pricing levels for their booking form. - Unlocking Gravity Forms Conditional Pricing’s Secret Features with Yearbox.com
See how one customer used a secret bulk importer feature in GP Conditional Pricing to create one product with 960 price points and save dozens of hours in the process.