How To Build a Company Directory with GravityView
Make a form for employees to easily add and edit personal profiles. Build a View to display those profiles on the front end.
This article requires the GP Media Library perk.
Buy Gravity Perks to get this perk plus 48 other premium Gravity Forms plugins!
Putting a company directory on a website is extremely common. Most sites have an About page that contains photos and a short bio for each employee. Internal company directories will typically display even more information for each employee when you drill down from the directory view to a single profile.
There are plenty of different ways to build your company directory – indeed, a brief search through WordPress.org will turn up several dedicated directory plugins – but our absolute favorite method is to use GravityView. Why? Because GravityView lets you build pages whose content is sourced from Gravity Forms entries.
Hold up! Scott from the future here.
While we still love GravityView, our new absolute favorite method for building a company directory is GP Entry Blocks. Check out this article to understand the similarities and differences between Entry Blocks and GravityView.
Using it, you can build a company directory that employees can add entries to using a Gravity Form on the front end. It even handles entry permissions, so you can let an employee edit their or profile without having access to anyone else’s.
In this tutorial, we’re going to show you how to build your business directory with GravityView. We’ll then use Gravity Forms Media Library to automatically add photos in the directory to the WordPress Media Library, so the photos in the directory are properly sized. Let’s get started!
Getting Started
Installing GravityView
To start building your Gravity Forms Directory, you’ll first need to install GravityView, a WordPress plugin that will set you up with the functionality to generate pages from form submissions. GravityView also has a host of other useful functionality, including Google Maps integration, data tables, and shortcodes to enable you to put View widgets to display Gravity Forms entries anywhere on your site – including sidebars and headers.
To get started with GravityView, first pick up a license from the GravityView site. Then you can start the installation process:
- Log in to your GravityView account, and click the “Downloads” tab.
- Download the latest version of GravityView.
- Log into your WordPress admin.
- Navigate to the Plugins page and click the “Add New” button to the right of the page title.
- You should now be on the “Install Plugins” page. Below the page title is a series of text links. It will start with “Search,” followed by “Upload”. Click the “Upload” link.
- You will now see a file upload field. Click on this field, then browse to the GravityView zip file you downloaded to your computer and select it.
- Click the “Install Now” button.
- After the plugin has been installed, click “Activate Plugin”. This will take you to the Getting Started screen.
- From here, click on “Settings”, enter your GravityView License Key into the License Key field, and click “Activate License”.
- Your account details will now appear. Click “Save Settings” to complete the installation.
Plugin number one installed! Onto the next one…
Installing Gravity Forms Media Library
Gravity Forms Media Library is a plugin that enhances Gravity Forms with the ability to automatically import uploaded files (images, documents, etc.) to the WordPress Media Library when the form is submitted. This plugin is crucial for the smooth running of your company directory – without it, headshots uploaded by your company members won’t display correctly in your finished directory.
Gravity Forms Media library is just one of an entire suite of 33+ essential Gravity Forms add-ons called Gravity Perks.
To get up and running with Gravity Forms Media Library, you’ll first need to purchase a license. Then simply install it in the same way you did with the GravityView plugin:
- Download the Gravity Perks zip file from the Account / Downloads page to your computer.
- Log into your WordPress admin.
- Navigate to the Plugins page and click the “Add New” button to the right of the page title.
- You should now be on the “Install Plugins” page. Below the page title is a series of text links. It will start with “Search”, followed by “Upload”. Click the “Upload” link.
- You will now see a file upload field. Click on this field, then browse to the Gravity Perks zip file you downloaded to your computer and select it.
- Click the “Install Now” button.
- After the plugin has been installed, the installation summary will offer an “Activate” link. Click this link to activate Gravity Perks.
Now that you’ve installed Gravity Perks, you’re ready to start browsing the available Perks! If this is the first time you’ve installed Gravity Perks, you will see a little pointer indicating where you can find the “Perks” menu item under the Gravity Forms primary “Forms” navigation. Once you’ve dismissed this pointer, it won’t bother you anymore.
The “Manage Perks” page provides you a list of all of the perks you have currently installed. Go ahead and click on the “Add New” button to the right of the “Manage Perks” page title.
You will now be directed to the “Install Perks” page. All you need to do from here is select “Gravity Forms Media Library”…and voila! It’s that easy.
Each “perk” like Gravity Forms Media Library is a complete plugin in and of itself that adds new features to Gravity Forms – from generating unique IDs on Submission and adding eCommerce fields, to nested forms and dynamic field population! All the perks are managed seamlessly through the central Spellbook plugin. So when you purchase a Pro license for Gravity Forms Media Library, you’ll also unlock a complete wizard’s spellbook of brilliant new Gravity Forms plugins!
Once you have GravityView and GF Media Library installed, follow the steps below to build the necessary Forms and Views for your directory.
Steps
Step 1 – Build Personal Bio Form
Start by building a Personal Bio form. Your employees will use this form to input their personal information. Add field types for all the relevant information you’d like to collect and make sure to include a File Upload field for a photo.
It’s important to note that, by default, when a file is uploaded to a Gravity Forms form field, it is stored in its original format – Gravity Forms won’t resize those files for you. The problem this introduces, particularly with a company directory where you might show 50 directory listings per page, is that your users might upload large photos of themselves. Loading all of those photos in the directory without pagination will increase load times significantly.
While you can specify a maximum file size in the field, requiring your users to resize the image before uploading can be problematic, and having to go through and edit entries manually yourself would be very time-consuming. GF Media Library resolves this issue seamlessly. It uploads files to WordPress’s Media Library, which automatically processes images and generates alternate smaller sizes. You can then use merge tags to show one of those smaller sizes in your Gravity Forms directory.
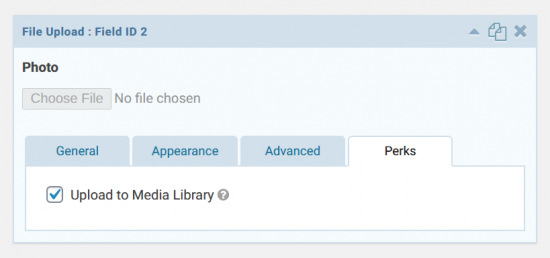
To activate GF Media Library on your File Upload file, navigate to the Perks tab and check Upload to Media Library.
We recommend using File Upload Pro to give your users a preview of the uploaded profile picture and the ability to crop their pictures.
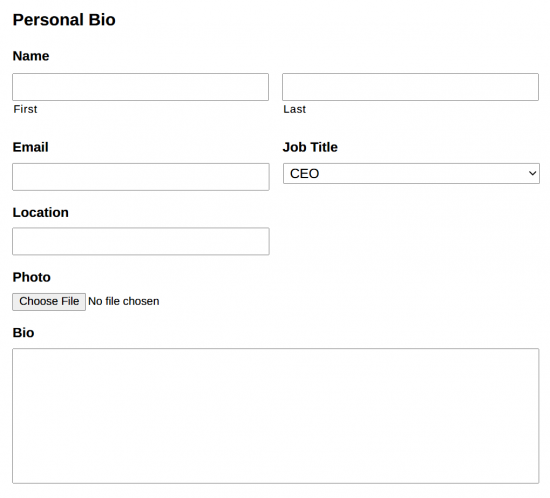
Here’s what our Personal Bio form looks like on the front end.
Step 2 – Build The Multiple Entries View
With our Personal Bio form finished, it’s time to focus on building our View.
If you’ve never set up a View before, check out this article on how to set one up.
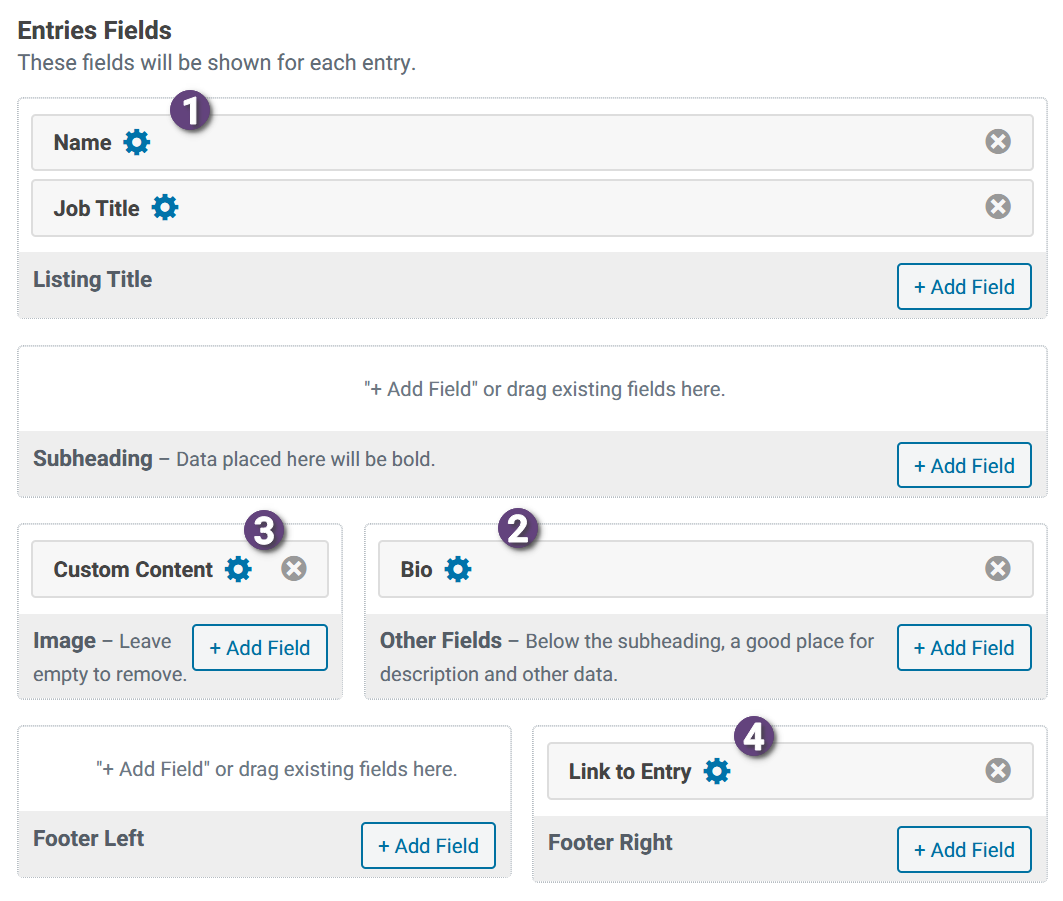
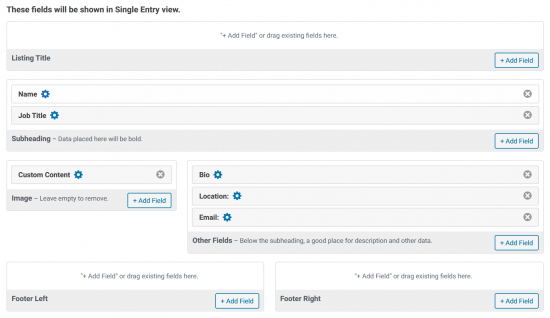
The basic layout for our View is simple:
- Insert the Name and Job Title fields into “Listing Title”.
- Place Bio in “Other Fields”.
- Use a Custom Content for the “Image”.
- Add a Link to Entry in “Footer Right”.
With this layout, we’ll get a directory-style layout that a user can click on to view the full employee profile.
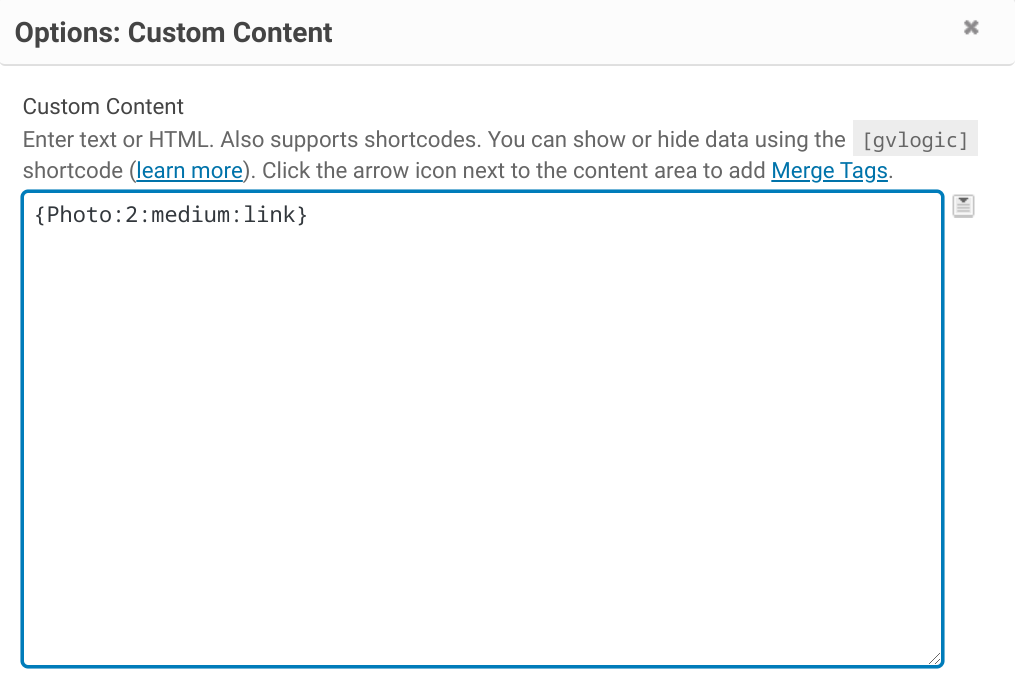
Adding the Profile Image the Right Way
Notice that we didn’t insert our File Upload field into the “Image” portion of the view. Instead, we opted for a Custom Content field. The reason for this is because we’re using GF Media Library to upload the photos to the WP Media Library, and instead of inserting the full-size image into the directory, we’re going to use a special merge tag modifier to output a specific size: {Photo:2:medium:link}. This modifier will output a smaller version of the image that is linked to the full-size picture.
Here’s what this View looks like on the front-end with this layout:

Step 3 – Build the Single Entry View
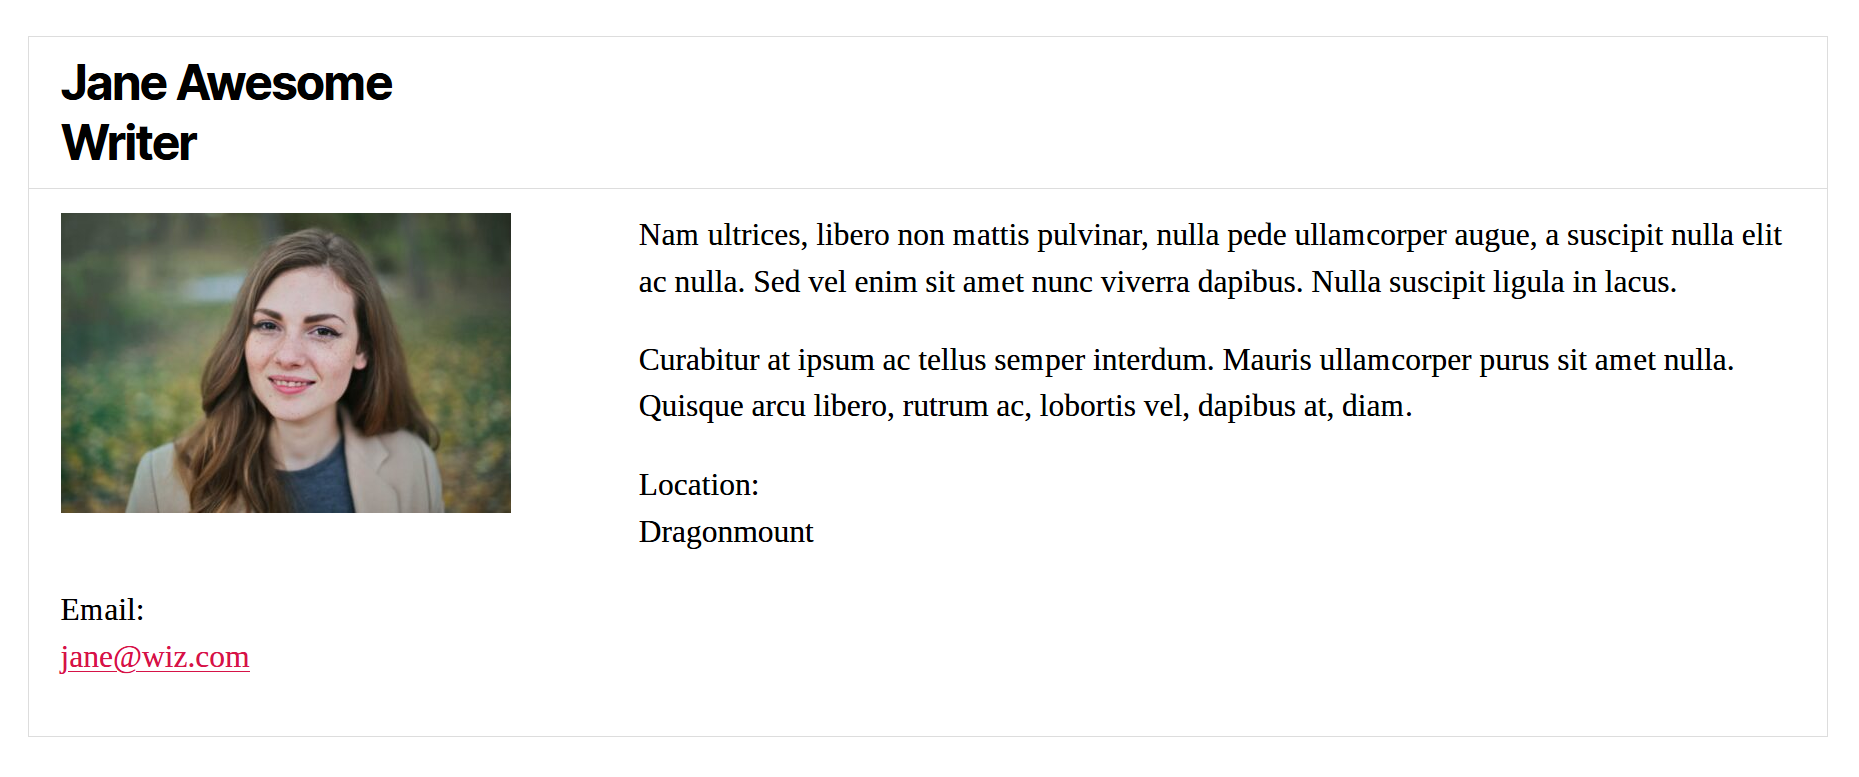
With the Multiple Entries View completed, it’s time to build the Single Entry View, the post type shown when the user clicks the View Details permalink.
The only difference between this View and the Multiple Entries View is the number of fields displayed. On this page, you can show every field from the Personal Bio form without cluttering the layout.
Here’s what this view looks like on the front end:
Improving the Directory user experience
Gravity Perks is a powerful toolkit with loads of potential applications, so once you’ve got your hands on GF Media Library – why not use a couple more to take your Gravity Forms directory to the next level? The Gravity Wiz Pro license gets you access to over 36+ perks, and you can put them to good use in improving the user experience of interacting with your new Company Directory forms:
Advanced Photo Uploads
Gravity Forms’s core File Upload field is a really useful piece of design that makes uploading files directly into form submissions a piece of cake – and it’s a really solid foundation to add some fantastic new features! With File Upload Pro we’ve reimagined the Gravity Forms file uploader to be more in line with what users expect from a modern web app: improved UX, image previews, powerful image cropping, file sorting, and more.
Even better, File Upload Pro integrates with GF Media Library to seamlessly upload your images to the WordPress Media Library – so your users will have the best possible experience uploading images to your new directory.
Let users preview their submissions
There’s nothing worse than hitting “submit” on a form and realising you’re not entirely sure if you were happy what you just submitted – but there’s no way to go back and check. It’s even more embarrassing if that form creates an incorrect entry directly in your company directory!
With Gravity Forms Preview Submission you can add a simple submission preview to your forms, providing users with an opportunity to confirm the information they’ve entered is correct. This allows users to go back and edit their entry if they spot mistakes, or confirm they’re happy to submit – a potential lifesaver!
Limit the number of submissions users can make
Perhaps by definition, your company directory is only going to have one entry for each member of your team. The last thing you want, therefore, is an overzealous (or possibly less-technically-gifted) member of the team to submit their entry multiple times, whether because they’ve forgotten they already did it, because they’re trying to fix a mistake, or because they hit the submit button too many times. Gravity Forms Limit Submissions limits who, what, when, where, and how many times a form can be submitted based on the user, user role, IP, or any field value. For example, you could allow a particular name/surname combination to be submitted only once, or only allow a single submission from a single IP address. This will allow you to ensure your company directory avoids confusing your team – and customers – with multiple entries
Get GravityView and Gravity Perks Today!
By now, you’ve seen how in only a few simple steps, you can quickly and easily build and edit forms to allow your employees to fill out an attractive company directory page, all using the power of Gravity Forms.
GravityView and Gravity Perks are essential tools in your Gravity Forms toolbox, and expand Gravity Forms’ functionality far beyond simple contact forms. Why give them a go today?


I will making this one for my client website
Hi Pakar,
You’re welcome. Glad to know the article is helpful to you.
Best,
Does Gravity View work with checkboxes and radio buttons and URL field? Or only text fields? Thanks!
Hi Lorene,
GravityView should work with the other field types. However, I suggest you contact the GravityKit Support Team if you have further questions regarding GravityView since this is one of their products.
Best,