How to populate Simply Schedule Appointments data anywhere in Gravity Forms
In one of our first collaborative guest posts *ever,* we explore dynamically populating Simply Schedule Appointments data anywhere in Gravity Forms for powerful personalization and automation.
Note: This is a guest post made in collaboration with Simply Schedule Appointments.
Simply Schedule Appointments (SSA) is one solution that truly lives up to exactly what its name suggests — with comprehensive scheduling features for any meeting type, straightforward setup without code, and integrations exclusively built for WordPress.
SSA comes with a booking form of its own and handles availability windows, per-day limits, group appointments, managing team schedules, and a few other key features. If you seek SSA’s scheduling features inside Gravity Forms (for example, conditional logic, multi-page forms, or super cool plugins called Gravity Perks), we’re going to explain how you can get all of your SSA data, with Gravity Forms data, in one submission.
These three create a trio of unmatched scheduling potential. Gravity Forms handles the form backbone, SSA handles scheduling, and Gravity Perks adds a unique edge for enabling completely customizable and personalized booking solutions for your site.
There’s a lot we can explore here. Let’s go with one of the most popular use cases — getting information from Simply Schedule Appointments into your Gravity Forms entries using Gravity Forms Populate Anything.
Enhancing Gravity Forms Appointment Booking Integration with Populate Anything
The integration between Simply Schedule Appointments and Gravity Forms is one of simplicity — the addition of a new field, called the Appointment field. By dragging and dropping the Appointment field into Gravity forms you can display the booking start time, timezone, and date in an entry.
Yes — you can always view the SSA dashboard for more information regarding that appointment, but as a Gravity Forms user, it may be more efficient to have everything in your Gravity Forms entry.
And what if you want to use this data elsewhere? For example, in Gravity Forms notifications, or in sending it to other Gravity Forms add-ons and integrations (like your CRM) to pass information about booked appointments. Or, maybe you want to trigger additional WordPress automations.
How is this done? Let’s talk about Gravity Forms Populate Anything.
Populate Anything helps out with:
- Allowing SSA merge tags to be used within a live form.
- Pulling information directly from the SSA databases to be used elsewhere.
Use Cases for Populate Anything and SSA
Some situations where this may be helpful:
- Populating a field value, choices, description, or label with additional SSA appointment information, such as Appointment Type title, reschedule link, or generated web meeting links.
- Populating a hidden field with the number of past appointments made by the same email address.
- Creating a dynamic scheduling process based on the user’s information, which products they’re interested in, or how users have previously interacted with your business.
Gravity Forms Preview Submissions also integrates with Simply Schedule Appointments, giving users the ability to preview appointment information prior to submission.
Integrate Populate Anything with SSA in 3 Steps
- Configure an SSA Appointment Type.
- Add a Name, Email, and Appointment field.
- Add a field for populating extra appointment information.
Step 1 — Configure an SSA Appointment Type
Note: The Appointment field is available for premium editions of Simply Schedule Appointments.
First, create an Appointment Type in the SSA dashboard. An Appointment Type represents a booking calendar and all of its rules. You can set up your availability, scheduling options, and other integrations like Google Calendar from there.
SSA has a Setup Wizard to help you complete this first step right after installation. Head to the new Appointments tab in your WordPress dashboard to start.

The Simply Schedule Appointments Help Center provides helpful guides to walk you through configuring the Appointment Type settings and a few other add-ons like Google Calendar syncing and Webhooks.
Step 2 — Add a Name, Email, and Appointment Field
Add a Name, Email, and the SSA Appointment field in your form. These fields are required because they get mapped to SSA to be used with email notifications as well as Google Calendar syncing.
After you’ve added the required fields, it’s up to you to where you want to take it. 😏

Step 3 — Populate Appointment Information Anywhere
Populate Anything’s Live Merge Tags are the secret sauce behind dynamic population, allowing you to reference and pull from pretty much anything to populate your form as users fill it out. In this case, values, descriptions, labels, and anything else related to your booking can also be dynamically populated elsewhere in your forms.
There’s a lot you can do when it comes to dynamically populating appointment information. To simplify things, let’s cover the essentials of using Live Merge Tags.
Note: For these steps, you’ll need to have Gravity Forms Populate Anything installed and activated on your site.
Use Live Merge Tags to Dynamically Populate Fields from Simply Schedule Appointments
SSA provides merge tags specially for their Gravity Forms integration, which pair nicely.
Here’s a list of those SSA merge tags:
{FIELD_NAME:FIELD_ID:customer_start_date}— Appointment start time using the customer’s timezone.{FIELD_NAME:FIELD_ID:appointment_type_title}— Appointment Type title.{FIELD_NAME:FIELD_ID:public_edit_url}— Appointment edit URL for rescheduling or canceling the booking.{FIELD_NAME:FIELD_ID:team_member_name}— Team member assigned to the appointment.
To add these as Live Merge Tags, you’ll need to use the @ symbol as the prefix for the merge tag. These can then be dropped anywhere in your forms.
The SSA merge tags can be used to customize field labels with additional appointment details. Or, you can use them to pass information to the entries using Hidden fields. For example, you might want to see the Appointment Type title to know which booking calendar the user booked in. Or, allow your client to review information about a Team Member assigned to their appointment.
Now let’s put our new wisdom to the test!
Use Case: Conditionally Display a Field Based on the Appointment Type Selected
In this example, we’ll show you how to apply the steps above for a common use case: displaying a new field depending on the Appointment Type a user selected. This comes in handy when you’re using SSA’s Appointment Type list view and you want to collect additional information based on the service a user is booking.
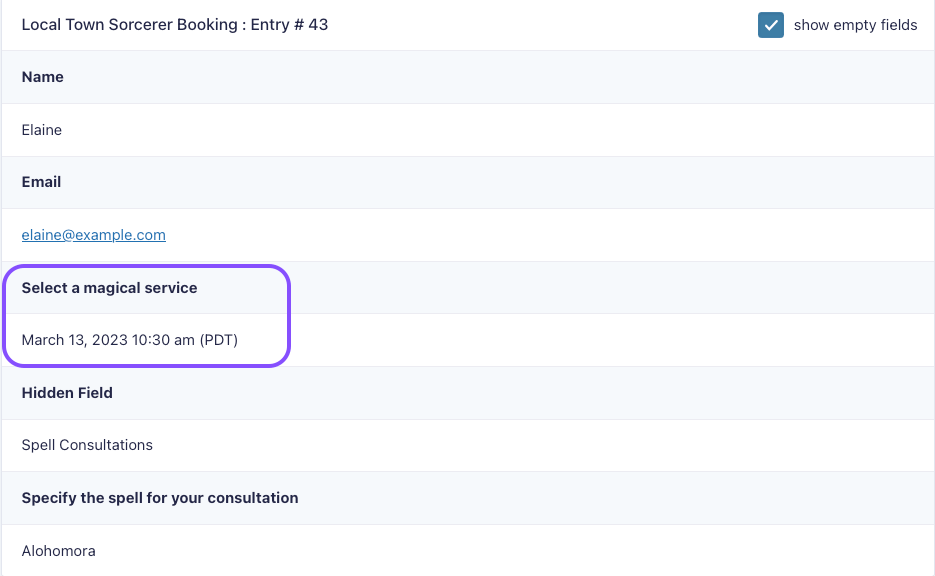
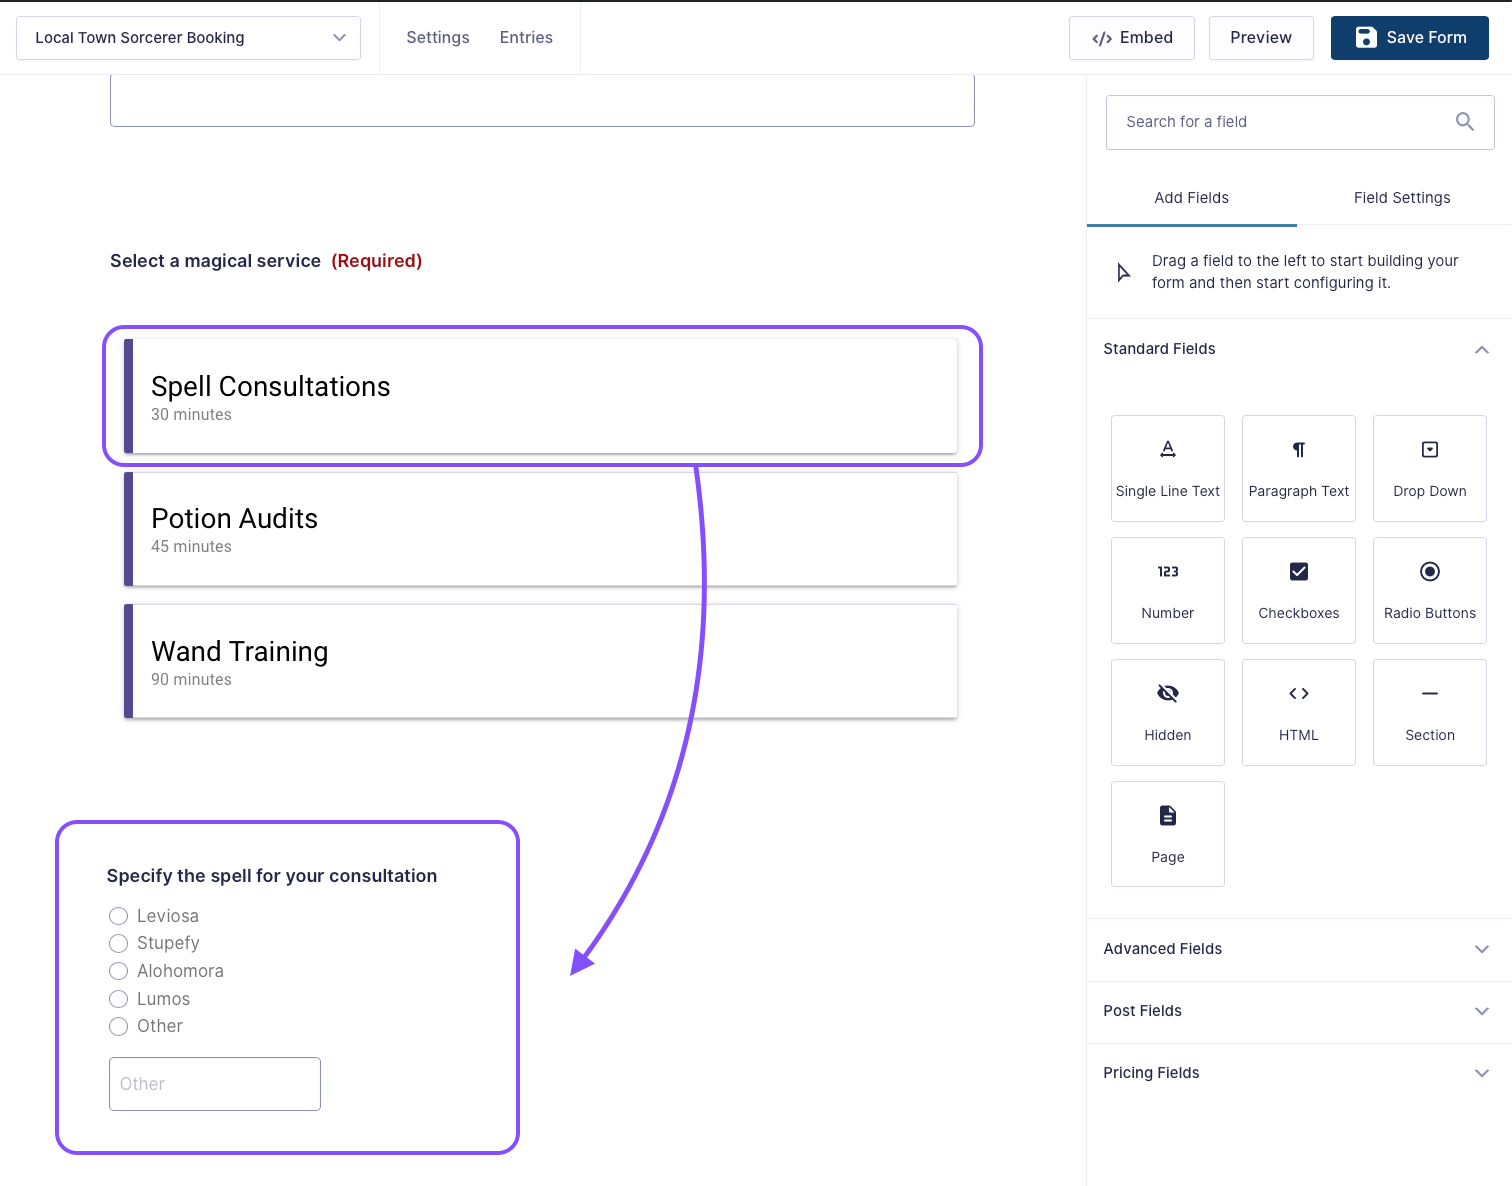
For this example, we’ll be using an enchanted booking form where the local town Sorcerer is scheduling meetings for his Spell Consultations, Potion Audits, and Wand Training.
Set Up Field(s) to Collect Additional Info & To Display Conditionally
Let’s assume that we want to conditionally display a radio button field. In this case, I’ve made the following field to collect information on the spells our Sorcerer can cover during the Spell Consultation.
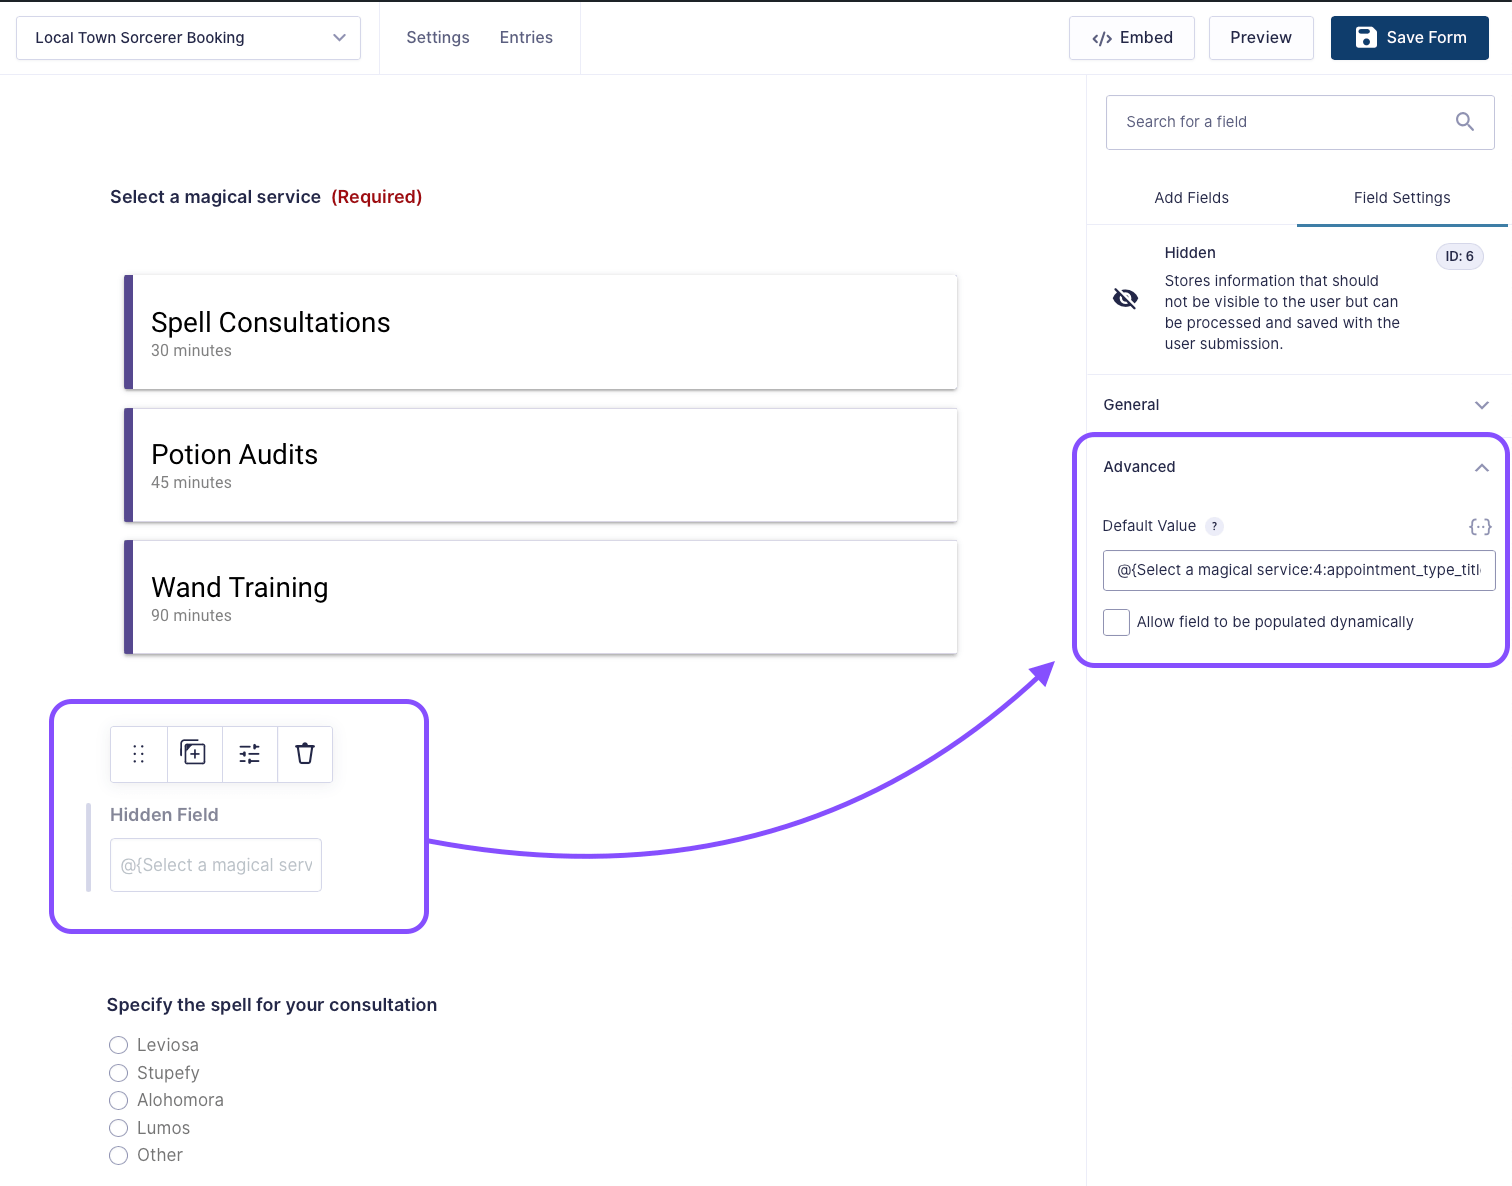
Create A Hidden Field to Hold Our Appointment Type Title
Next, let’s create a new hidden field that contains a Live Merge Tag for the SSA Appointment Type Title. We’ve chosen to keep this hidden because the user does not gain anything from seeing the Appointment Type title in this particular form. We’re just interested in using this for our conditional logic.
We’ve used the following live merge tag and added it to the Default Value: @{FIELD_NAME:FIELD_ID:appointment_type_title}
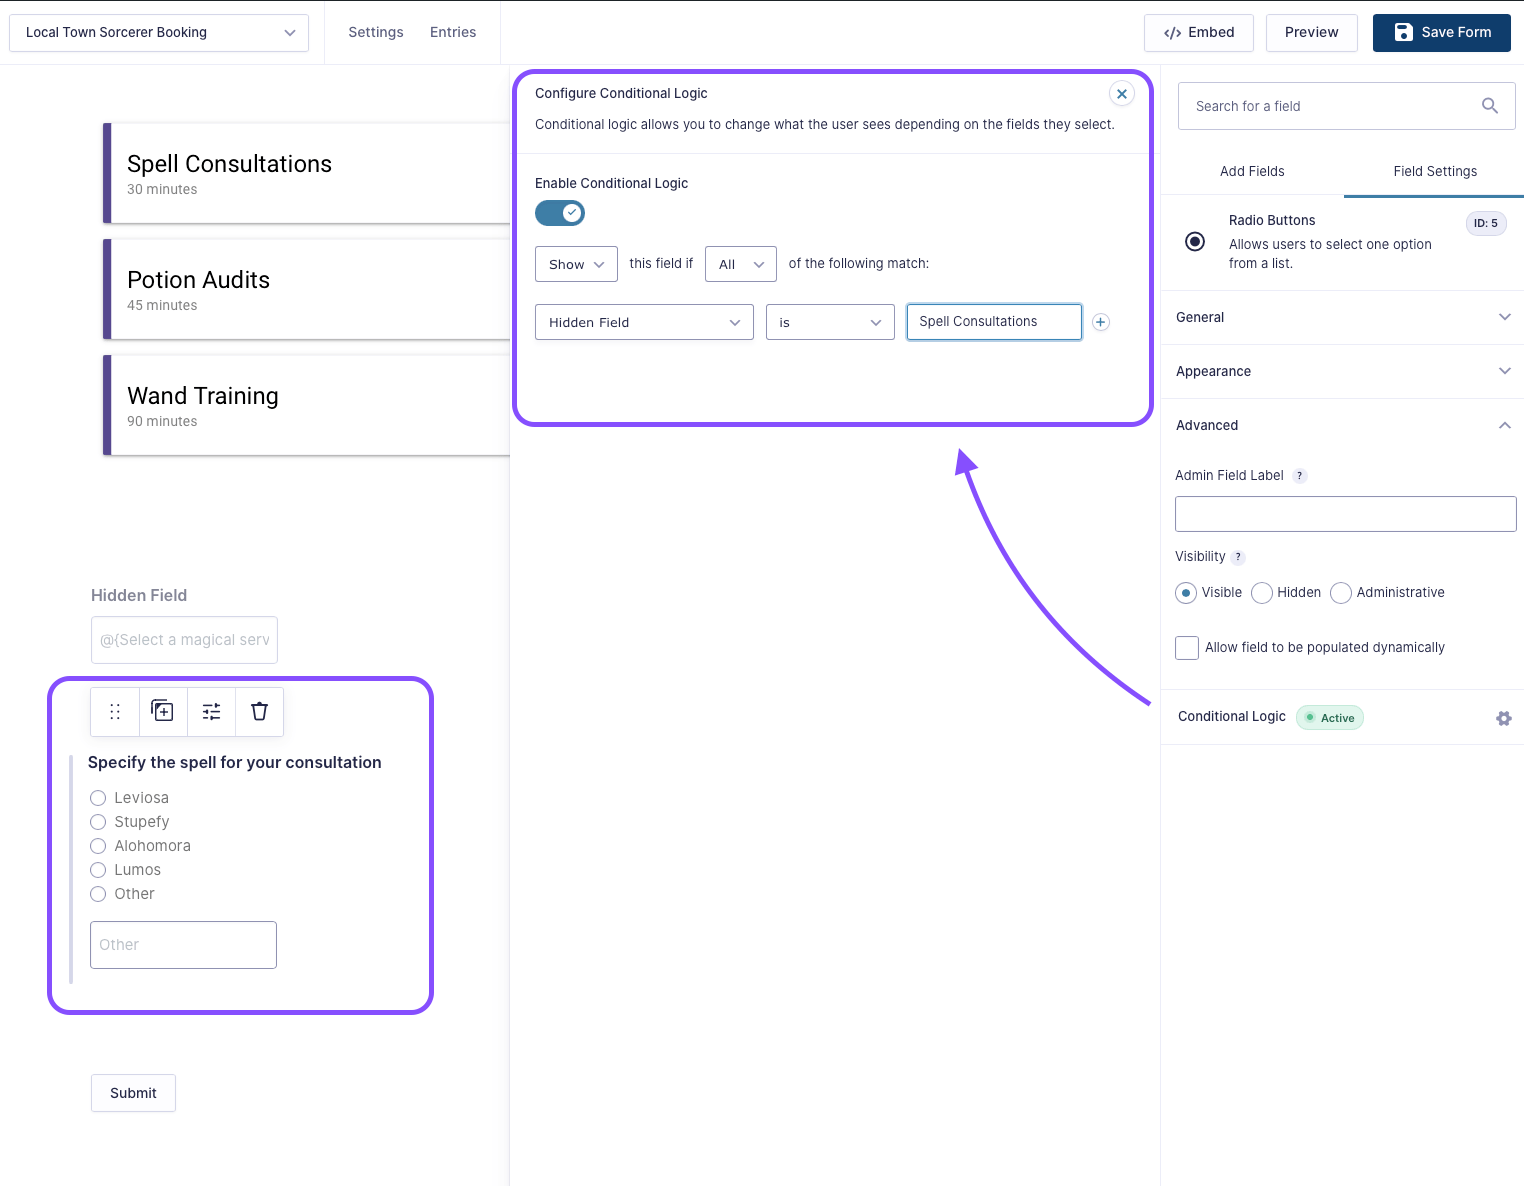
Apply The Conditional Logic To The Fields For Additional Info
Now that we have access to the SSA Appointment Type Title from within our form, let’s set up conditional logic. Head over to the settings for our additional info field and enable the conditional logic option.
Within the conditional logic settings, arrange the dropdowns so that our field is shown if our hidden field is equal to the desired Appointment Type Title.
In our example, we want to only show the “spells” Radio Button field if our hidden field is equal to “Spell Consultations”.
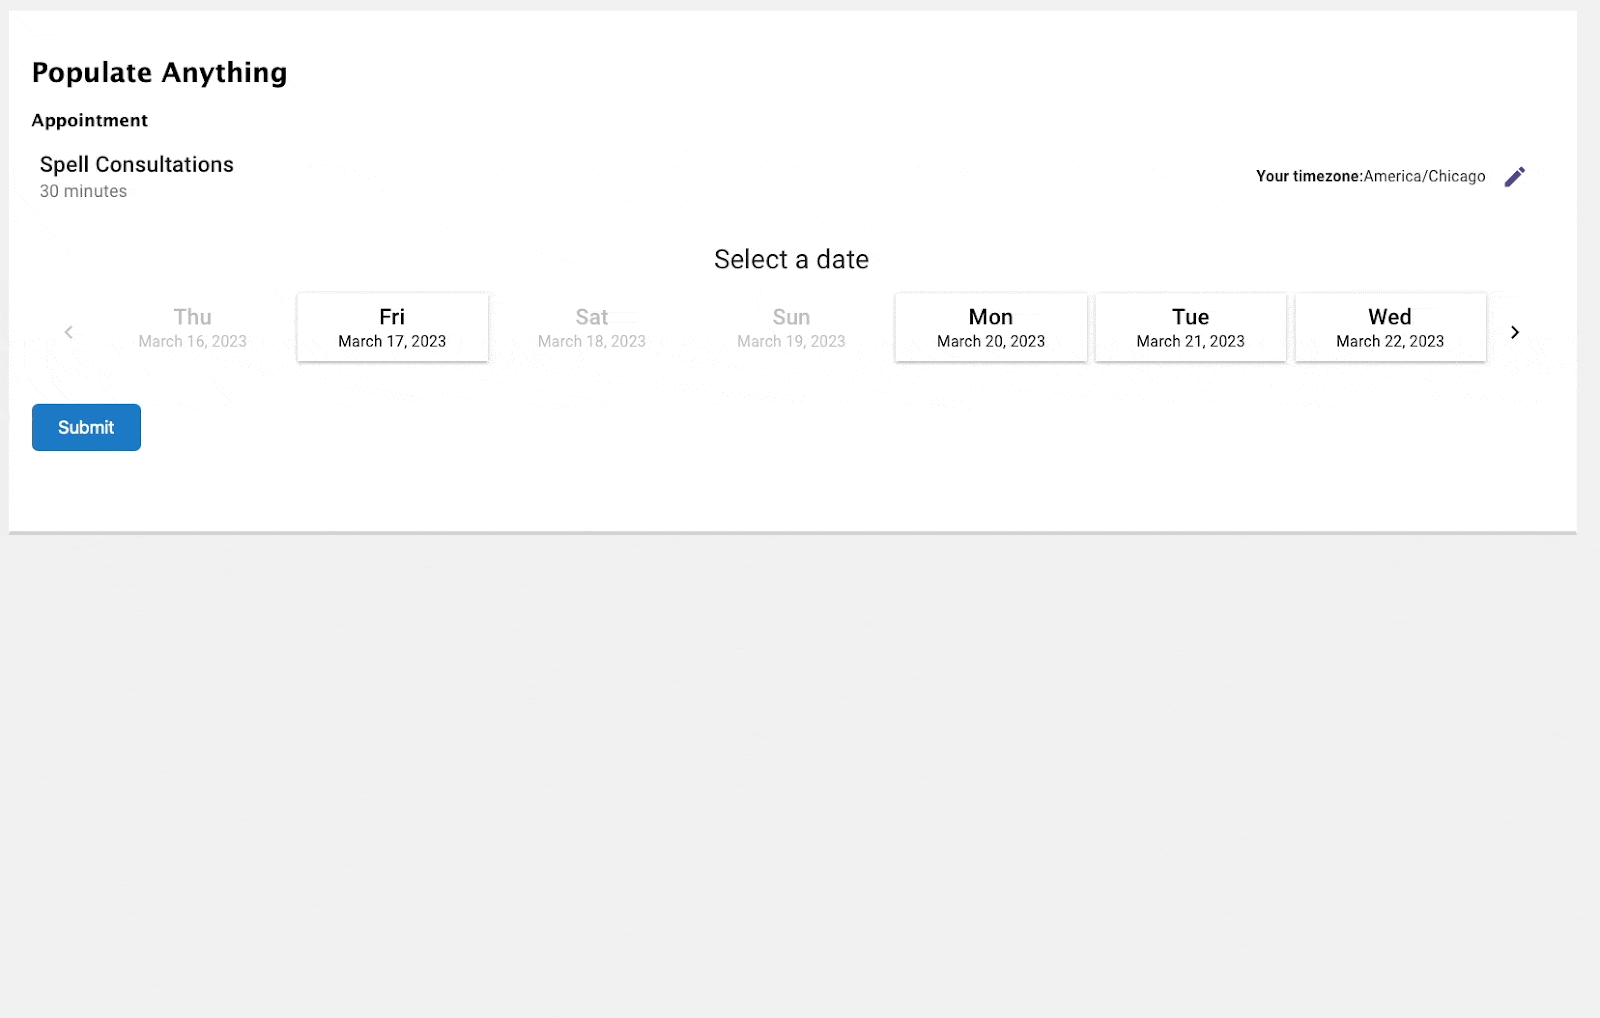
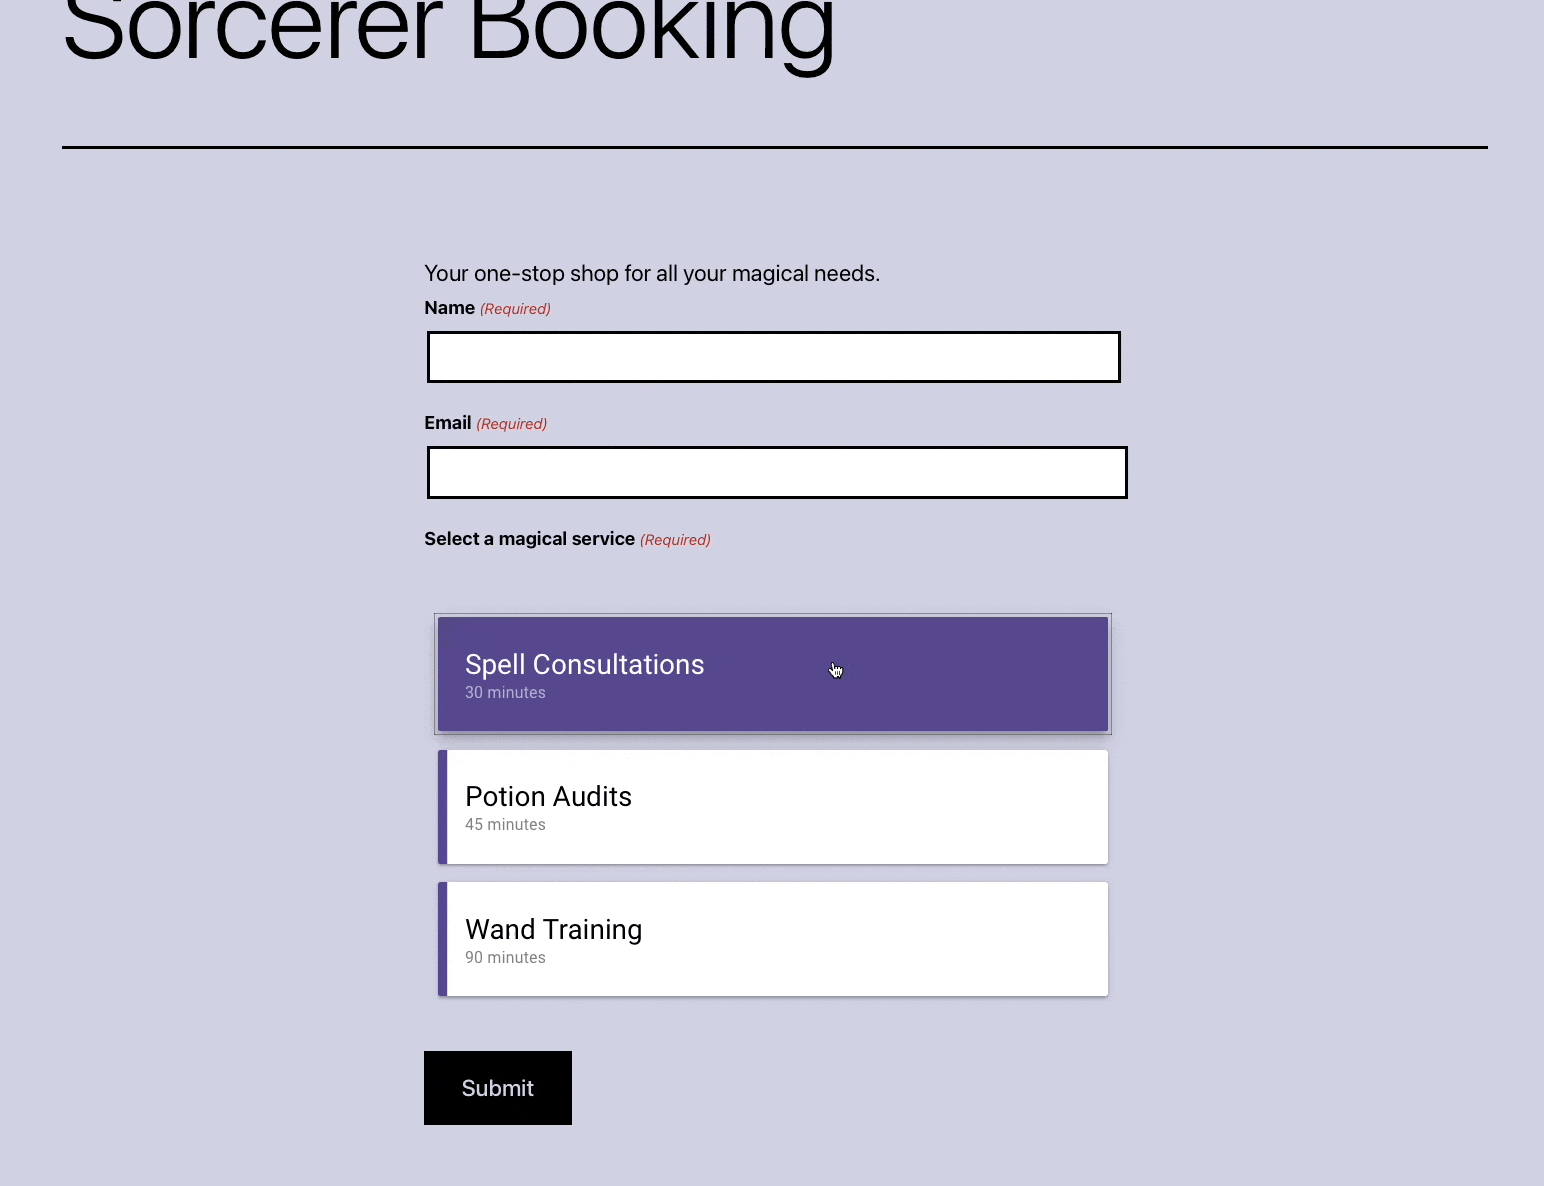
Previewing Our Form
Let’s take a look at what the Sorcerer’s form looks like now. As you can see, if we select a time in the Spell Consultation booking calendar, our spell radio button is instantly revealed.
That’s it!
Using Live Merge Tags you can pull appointment information, appointment types, information about how your team members are involved in each appointment, and anything else stored in SSA. Having total access to using SSA data anywhere in your forms allows you to customize and personalize the form experience to your exact needs. Still hungry? Learn more about configuring database tables and live merge tags.