Gravity Forms Populate Anything
Dynamically filter and populate field choices and values with posts, users, taxonomies, terms, Gravity Forms entries, databases, and REST APIs. Pretty much anything!
What does it do?
GF Populate Anything allows you to dynamically filter and populate field choices and values with posts, users, taxonomies, terms, Gravity Forms entries, databases, and REST APIs. Pretty much anything! Choices and values can be filtered based on the values entered/selected in other fields allowing you to fetch and populate fresh, dynamic data as the user interacts with the form.
GF Populate Anything also provides support for Live Merge Tags which allows you to display dynamic, filterable data in your field labels, descriptions, and content.
With Populate Anything you can create:
- Preferred contact method selectors that dynamically pull in a user’s details
- Automated member registration forms with pre-approved email domain checks
- Automatically selected service packages
- Filtered preferences based on other choices
- Chained selects
- And many more!
Features
- Dynamically populate field choices.
Populate any choice-based field (e.g. Drop Down, Radio Buttons, Checkboxes) with dynamic, filterable data. - Dynamically populate field values.
Automatically populate field values with dynamic, filterable data. - Dynamic filtering by user-specified input.
Filter and populate fresh, dynamic data based on values/selections made in other fields. - Chain selects, radio buttons & more!
Chain the available field choices based on selections in other fields. - Live Merge Tags.
Add auto-updating merge tags anywhere inside your form (e.g. labels, descriptions, choices, values, HTML content). - Specialized, built-in data sources.
Populate Posts, Users, Taxonomies, Terms, and Gravity Forms entries with specialized options for each. For everything else, populate directly from the WordPress database. - Flexible choice and input templates.
Complete control over the populated value and label for choices and inputs. - Results preview.
See the exact data that will be populated based on your filters right in the field settings. - Improve data accuracy.
Improve accuracy by allowing users to select from an existing datasource rather than entering the information manually. - Automatic updates.
Get updates and the latest features right in your dashboard. - Legendary support.
We’re here to help! And we mean it.
Documentation
How do I enable this functionality?
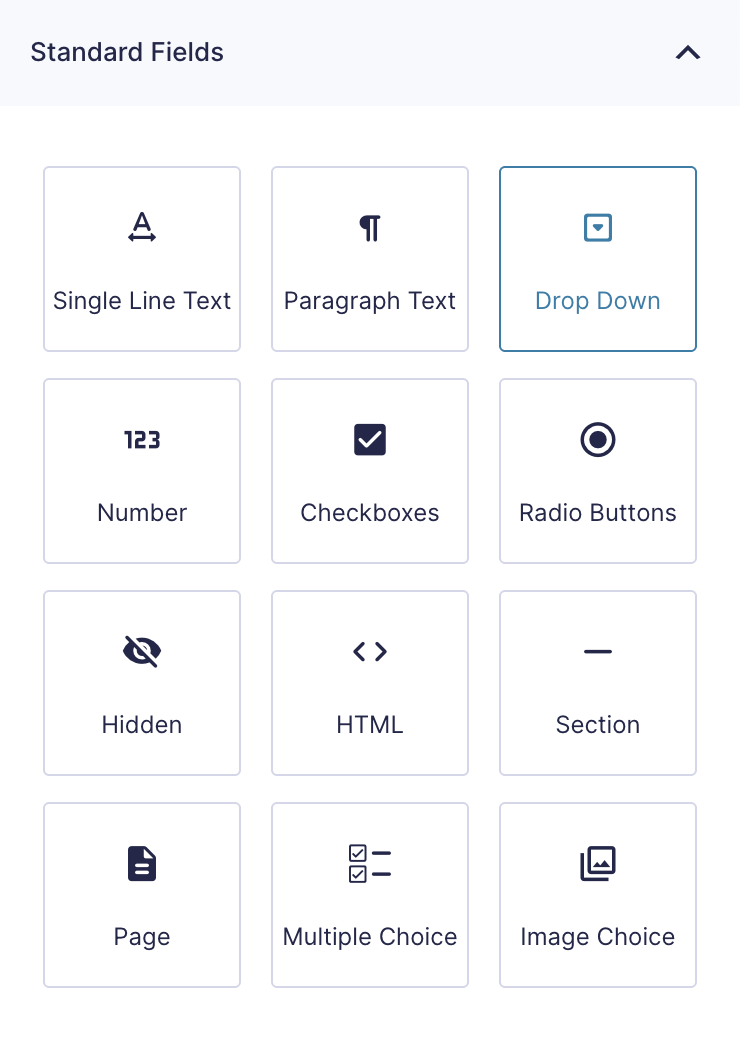
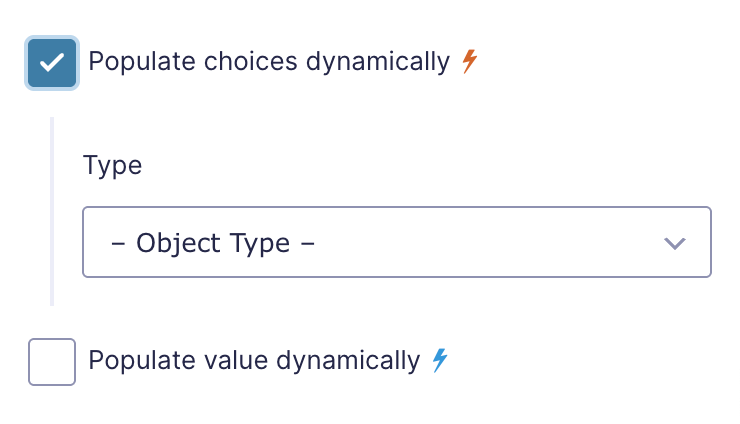
After GF Populate Anything is installed, you’ll want to enable “Populate Choices Dynamically” or “Populate Value Dynamically” for a given field in the Gravity Forms Form Editor. Here’s what that looks like when populating choices.
Feature Details
Populating Choices Dynamically
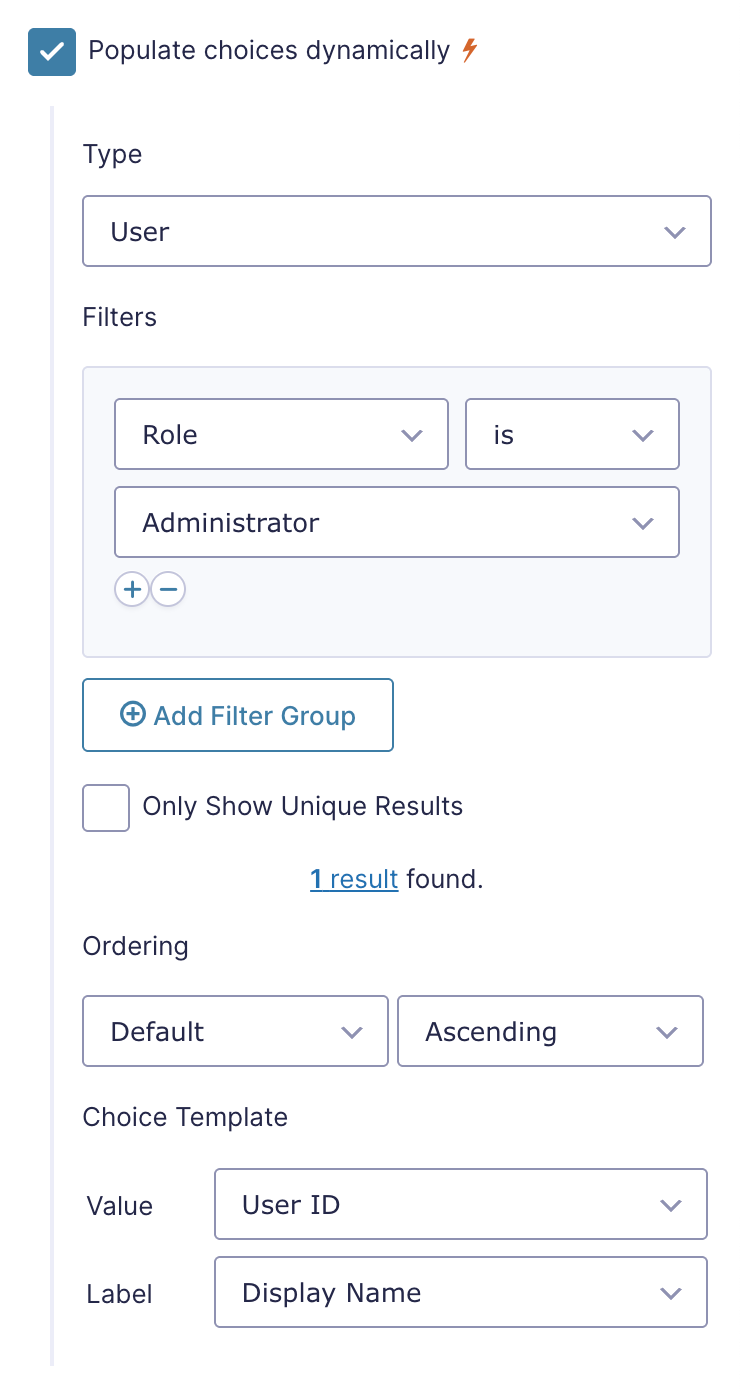
If you wish to dynamically populate a choice-based field’s choices, you can do so by enabling “Populate choices dynamically” in the field’s settings.
Example Configuration
In the example below, we configured a radio button field to have its choices dynamically populated with users who have the “Administrator” role.
Frontend
Here’s what the configured radio button field looks like on the frontend.

Usage Examples
- How to Populate Data Based on the Current User
- Create Smart Forms and Advanced Conditional Choices with Gravity Forms
- How to Create Conditional Choices with Gravity Forms
- How to Dynamically Populate a Ranked Survey Field in Gravity Forms
- How to Dynamically Populate Drop Down Fields in Gravity Forms
- How to Populate WooCommerce Order Data into Gravity Forms
- Using Gravity Forms as a Simple Database
Populating Values Dynamically
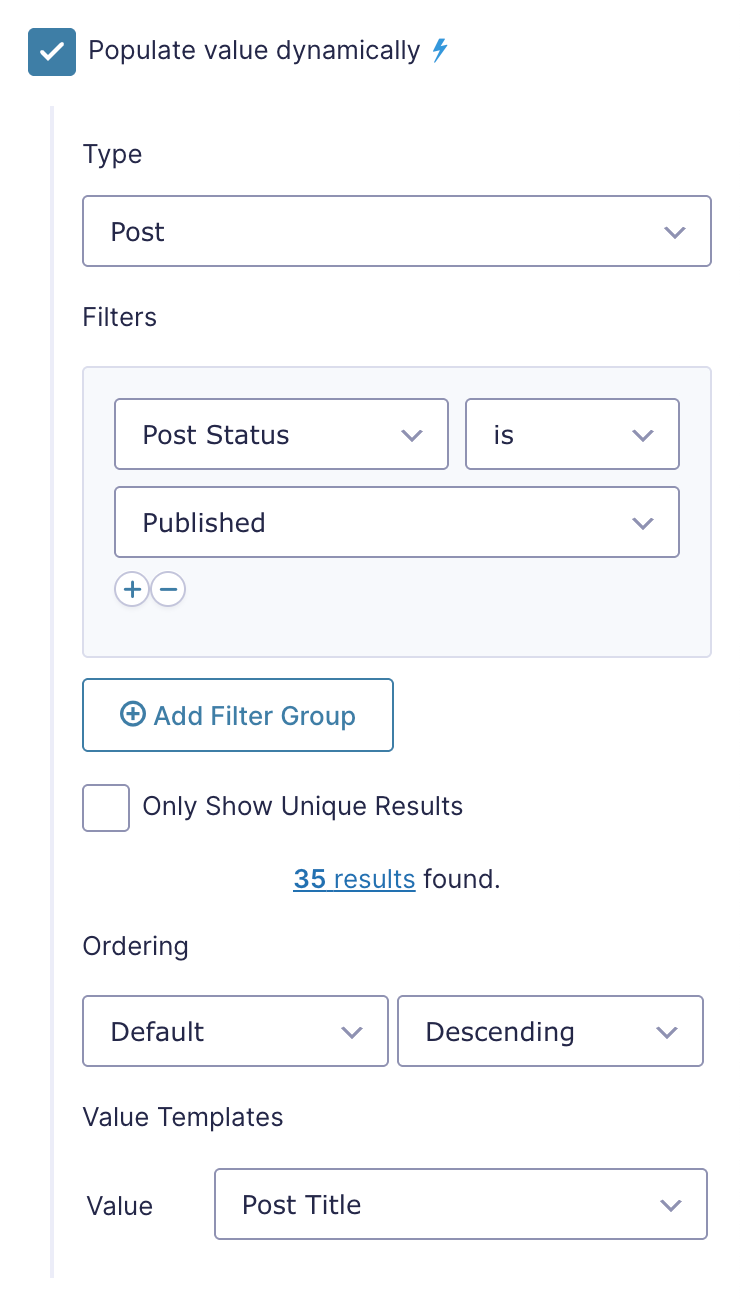
Populating values with GF Populate Anything is similar to how populating choices work. Enable “Populate value(s) dynamically” in the field’s settings and then configure it accordingly.
Example Configuration
In the example below, we configured a single line text field to have its value populated with the post title of the most recently added post.
You can dynamically populate a field’s choices and value(s) if it supports choices!
Frontend
Here’s what the configured single line text field looks like on the frontend.

Usage Examples
- Gravity Forms Email Validation: Check Emails Live Prior to Submission
- How to Check Checkboxes (and Other Choice-based Fields) Conditionally
- Spotlight: Linking Inventory to Dates Across Forms with Gravity Perks
Custom Value Templates
When populating choices or values, you may want to combine different properties of the object being populated. This is possible with Custom Value Templates.
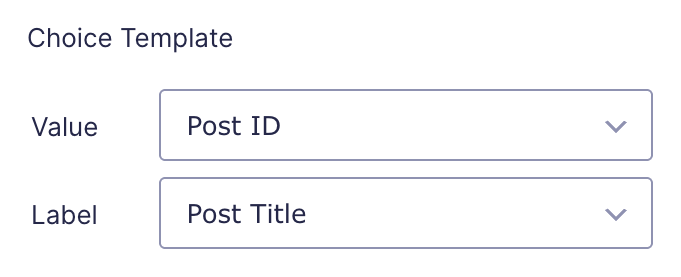
To enable, scroll to the bottom of your Value or Choice template dropdown and select the “✎ Custom Value” option. Use the merge tag selector to insert your desired object properties and any static content you would like to display.
When targeting an object property with an array-like value, you can target a specific property of that array by adding it as an additional modifier. Examples: {post:meta_key:property}, {post:address:country}.
Object Types
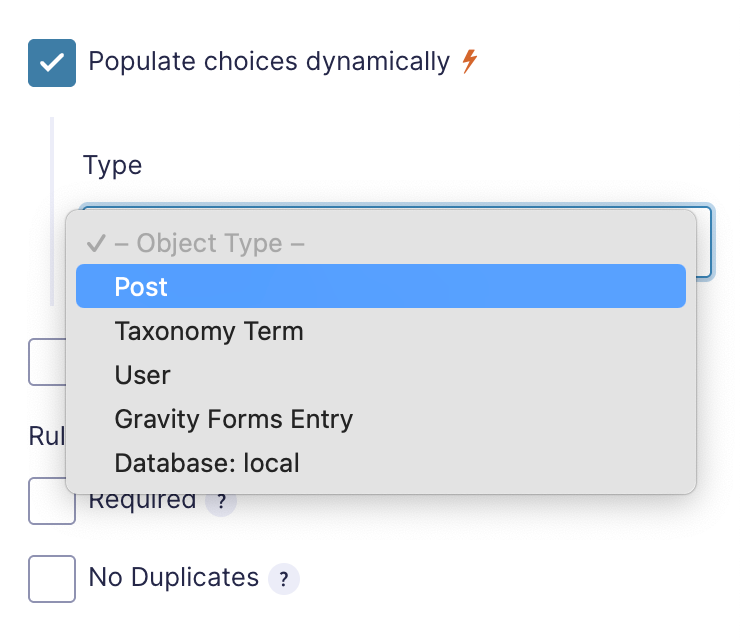
Populate Anything supports populating from multiple object types, each with their own unique properties and filtering options.
Post
Populates from WordPress posts, such as post title, post ID, and content, post taxonomies, and post meta. The Post object populates from anything that is identified as a post in the database, including pages and custom post types.
Usage Examples
Taxonomy Term
Populates from taxonomies, such as term name, term ID, parent term, and term meta.
Usage Examples
User
Populates user information and user meta. This object is useful when you want to populate data based on the user who is currently logged-in.
Usage Examples
Gravity Forms Entry
Populates from Gravity Forms entries, including field data and entry meta.
Usage Examples
- Using Gravity Forms as a Simple Database
- How to Dynamically Populate a Ranked Survey Field in Gravity Forms
- Spotlight: Turning Gravity Forms into a Lean CRM
- Spotlight: Hidden Fields’ Hidden Magic with Populate Anything
Database
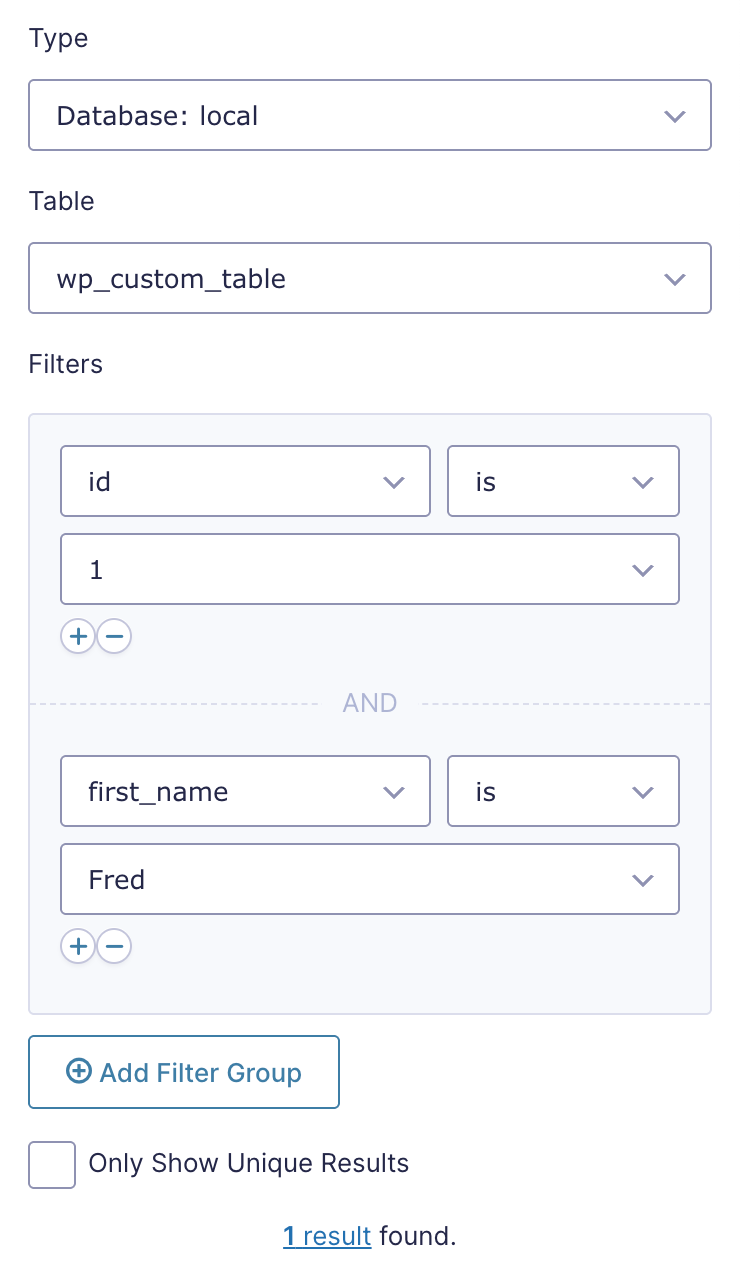
Populates directly from the WordPress database. This is useful when you need to populate data that doesn’t fall into any of the above categories. Do note that this object can only populate from a single table, and WordPress often stores data across multiple tables. You can create a custom view with joined tables to work around this.
Usage Examples
Field Value Objects
Populates from a field with dynamically populated choices. More details on this object type.
Integrations
In addition to the standard object types, Populate Anything integrates with a number of our other products to allow for population from additional sources. Read more about these integrations here.
Custom Object Types
Developers can add custom object types by extending the GPPA_Object_Type class. Some examples of custom object types can be found in our Snippet Library
Usage Examples
Filtering Objects
Filter Groups
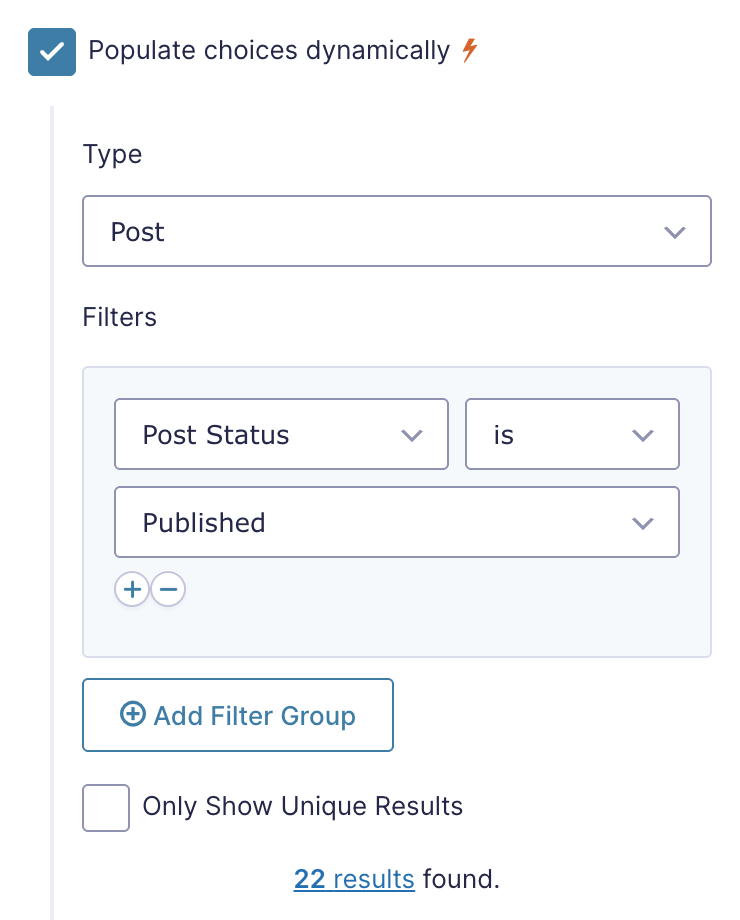
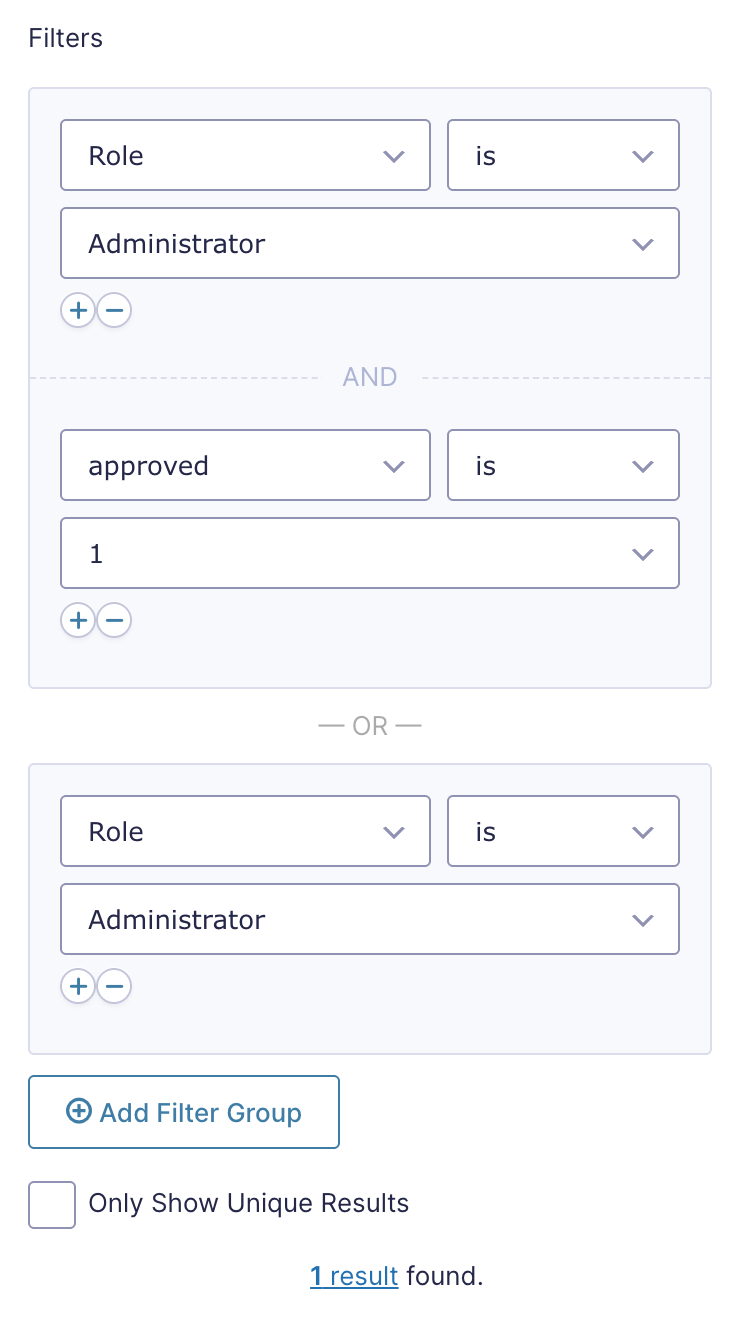
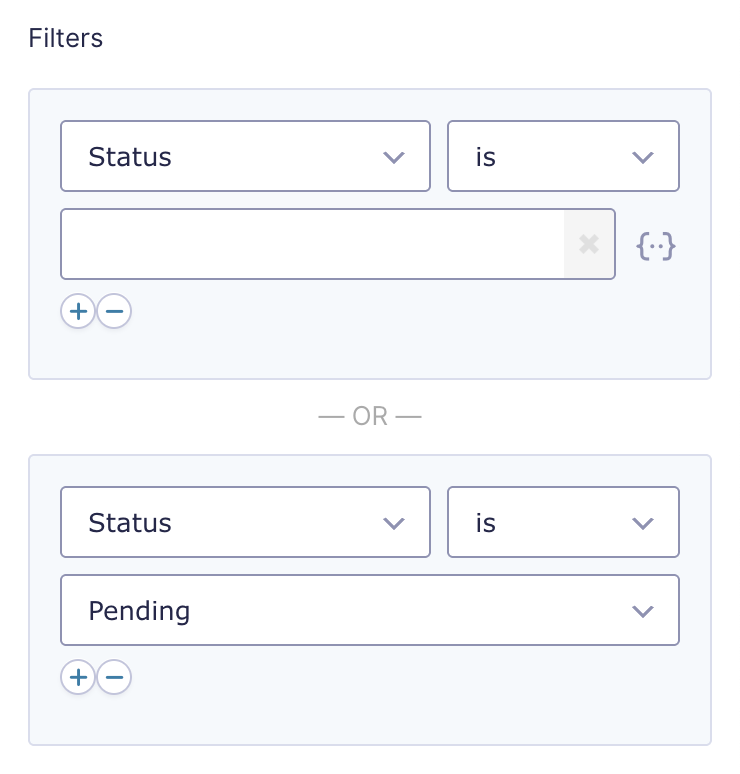
Create groups of conditions that filter which objects are populated into the field. Add a condition to your group with the (+)/(-) icons to the right. All conditions in a group must be true for the group to match. Add another group by clicking the “Add Filter Group”. Objects that match any group will be populated into the field.
You can use the plus icon to add an AND filter condition. Adding Filter Groups creates an OR condition, but multiple filters in a single group are considered an AND condition.
Filter Operators
isis notis in— filter by a comma-separated list of valuesis not in— filter by a comma-separated list of values>(greater than)<(less than)>=(greater than or equal to)<=(less than or equal to)containsdoes not containstarts withends withis LIKE— filter by a single value
Available wildcards:
%– Zero, one, or multiple characters_– Single character
Filter Property
Depending on the object type you select, you will have different properties to select from.
Post
- Author
- Parent Post
- Post Content
- Post Date
- Post Excerpt
- Post ID
- Post Name (Slug)
- Post Status
- Post Title
- Post Type
- Post Taxonomies (Dynamic)
- Post Meta (Dynamic)
Taxonomy Term
- Name
- Object ID
- Parent Term
- Slug
- Taxonomy Term
- Term ID
- Term Meta (Dynamic)
User
- Display Name
- Role
- User Email
- User ID
- User URL
- Username
- User Meta (Dynamic)
Security Note: On multisite installations, the User object type will only search users from the current site. This can be overridden using the gppa_object_type_user_limit_to_current_site hook.
Gravity Forms Entry
- Created by (User ID)
- Date Created
- Date Updated
- Entry ID
- IP
- Payment Method
- Payment Status
- Status
- Transaction ID
- Fields (Dynamic)
- Entry Meta (Dynamic)
Database
The Database Object Type’s properties are dependent on the table you select. Once you select a table, the properties will be all available columns on the MySQL Table.
Populate Anything only supports populating a field from a single database table at a time. If you have data spanned across multiple tables, you can populate from a MySQL view.
Security Note: On single site installations, the Database object type is only available to administrators.
Only the database that the current WordPress installation is on will show by default. Use this snippet if you need to connect to a different SQL database.
Filter Values
Default
After selecting the filter property, the Filter Value dropdown will be populated with a list of values that apply for that property. For example, if you are populating posts into a field and add a filter condition for the “Post Status” property, the Filter Value dropdown would be populated with a list of available post statuses (e.g. Draft, Pending Review, Published).
Form Field Values
Objects can also be filtered by values entered by the user when the form is filled out. After selecting the filter property and operator, select the desired field from the Form Field Values option group. When a user enters a value into the specific field, the objects populated into this field will be filtered by that value.
Additionally, you can also select Custom Value and use merge tags, including modifiers and multiple tags.
Usage Examples
- How to Filter Checkboxes by Checkboxes using Dynamic Population
- How to Filter One Field By Another and Create Gravity Forms Chained Selects
Ordering
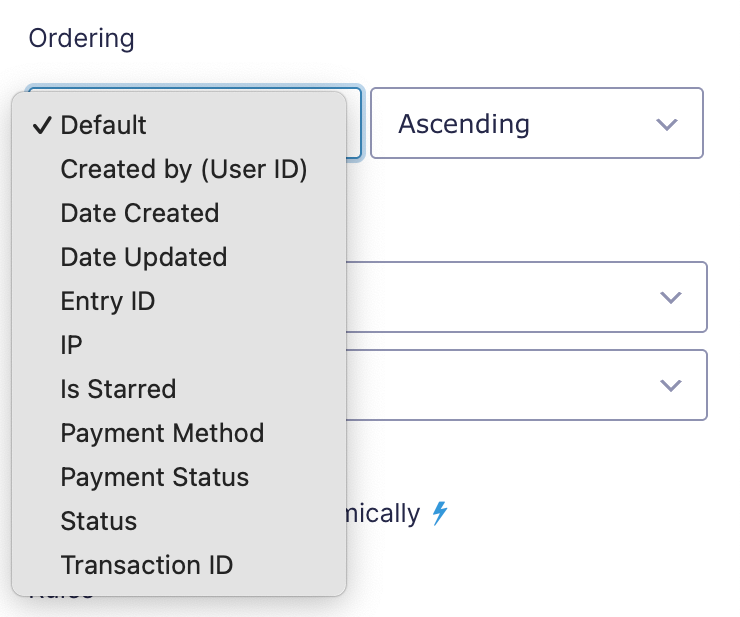
You can choose both which property to sort on and the sorting order for the results returned by Populate Anything. Like Filtering, the sorting options available are dependent on the selected object type. The available ordering will match the Filtering properties.
Sorting order has three options:
- Ascending (A–Z, 1–99)
- Descending (Z–A, 99–1)
- Random
Each object type has a “Default” sorting property. This is typically set to the property that is tied to the database index. For example, Posts will default to Post ID; Users will default to User ID; Google Sheets will default to the row ID; etc.
Field Value Objects
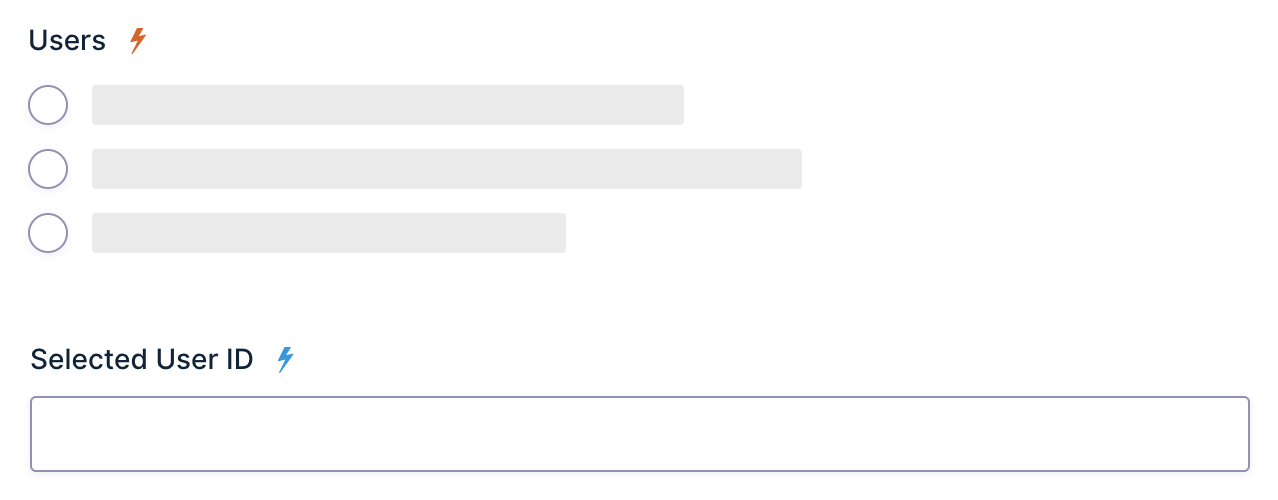
One common use case with GF Populate Anything is populating field values from a field with dynamically populated choices. You can do this by manually configuring the Object Type and Filters to use field values, but an even easier way is to use a Field Value Object.
Field Value Objects are available on any field that supports values when there is another choice-based field that has dynamically populated choices on the same form.
Example Field Value Object Configuration
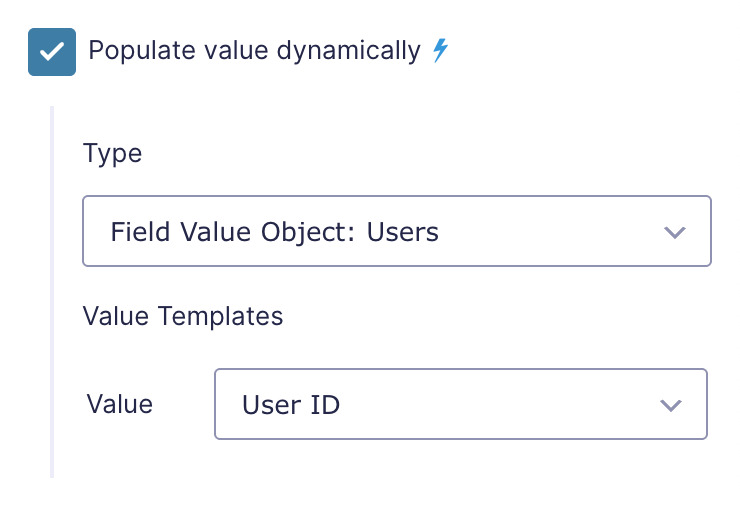
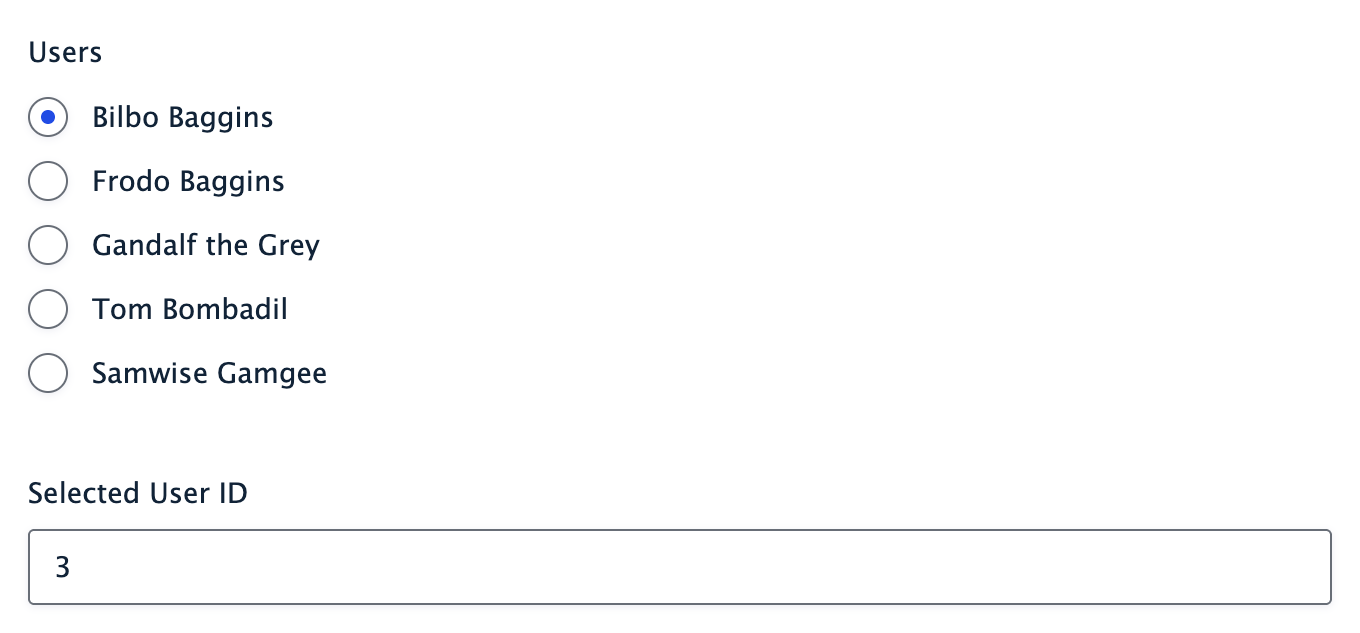
In the example below, we wired up a single text field to display the user ID of the selected user in the radio field above it.
The Fields
The Selected User ID Field Settings
The Frontend
Live Merge Tags
When GF Populate Anything is activated, any merge tag prefixed with an @ will be automatically replaced when its associated field is updated. Live Merge Tags can be used anywhere within your form (labels, descriptions, choices, values, and HTML content).
Fallback Modifier
Live Merge Tags support a special modifier :fallback which can be used to display content when the merge tag does not have a value. For example, if the user can optionally provide their name but you want to greet them regardless, you could use, Hello @{Name:1.3:fallback[there]}. If a user entered their name as David, it would read Hello David but if the user entered no name, it would read Hello there.
Example: Use Field Value in Another Field’s Label
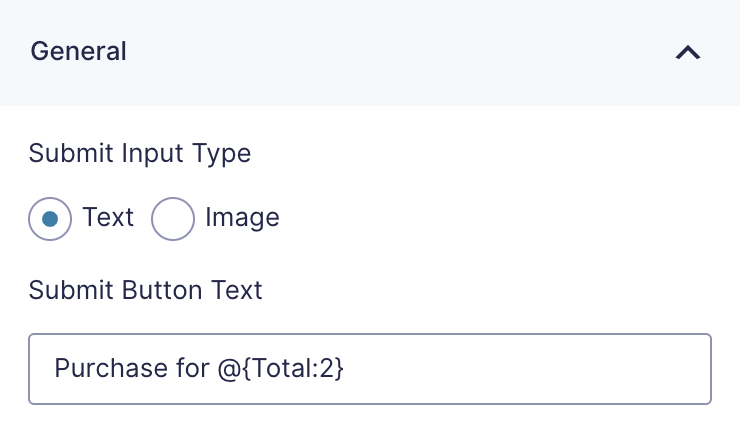
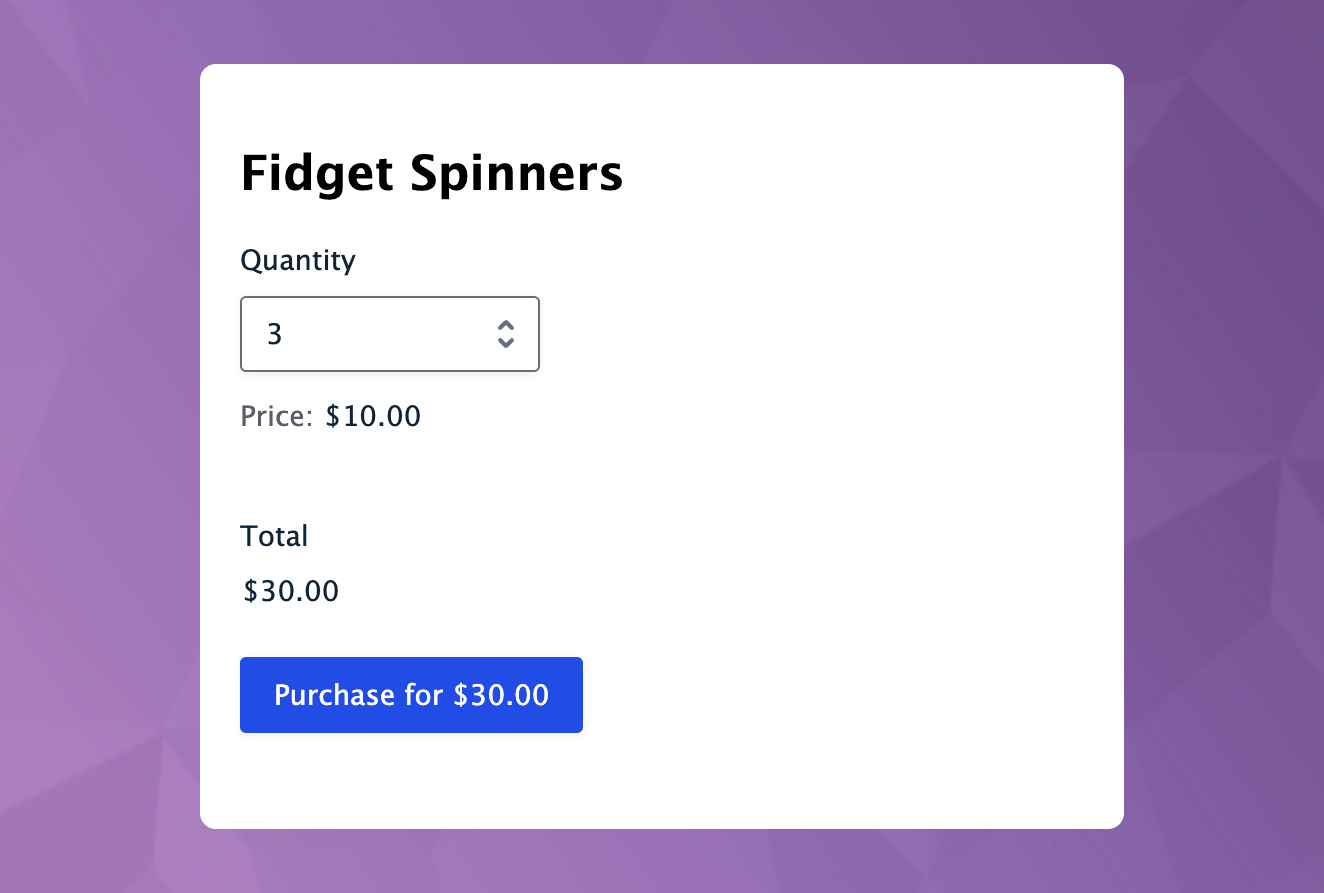
Example: Show Total in Submit Button
Usage Examples
- Append and Prepend Values to Gravity Forms Merge Tags
- How to Use Merge Tags in Field Labels with Gravity Forms
- Adding Preferred Contact Method Option in Gravity Forms
Count the Number of Results
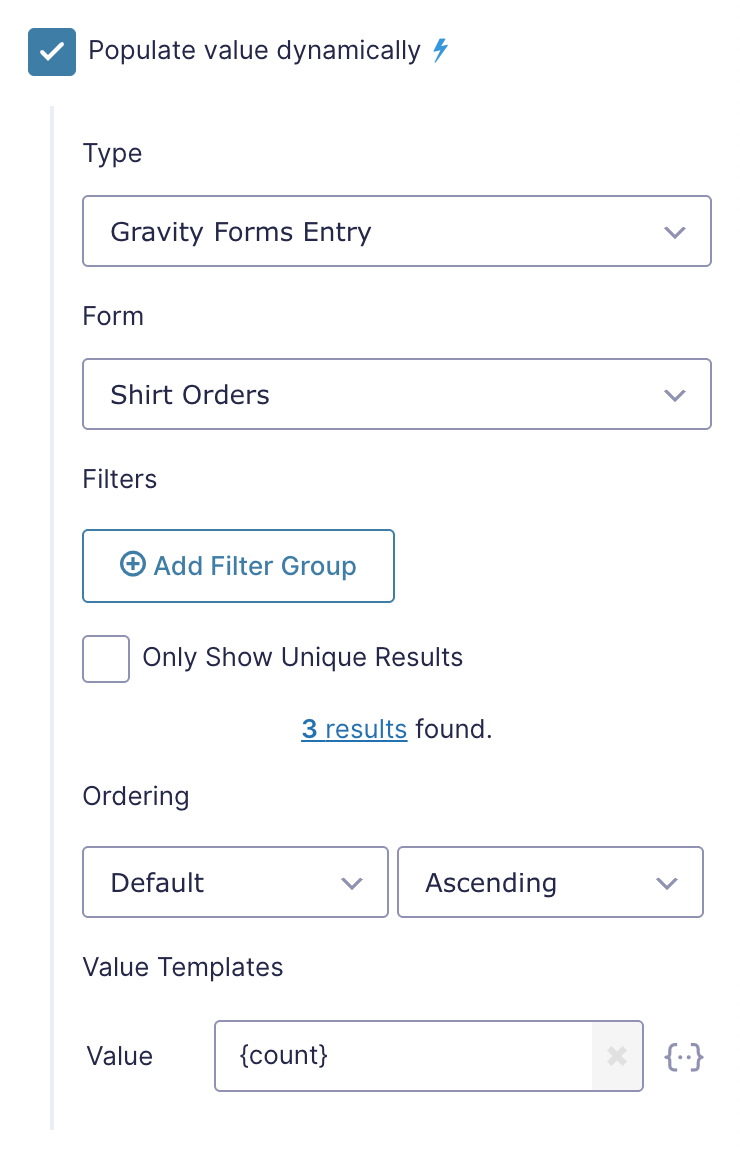
Use the {count} merge tag as a Custom Value Template to populate the number of returned results instead of a value. This is useful for conditional logic where you want to show or hide a field based on how many objects exist.
For example, say you have an order form and the first 50 customers to purchase should receive a discounted price. Populate a hidden number field with the entry count.
That count can be used with conditional logic to show a GP eCommerce Fields Discount field to the first 50 customers.
The “Only Show Unique Results” checkbox applies to the {count} merge tag. Uncheck this to count all entries.
Usage Examples
Related Snippets
Integrations
Google Sheets
This integration requires GC Google Sheets.
Populate data directly from Google Sheets with this dreamy integration powered by our very popular Google Sheets connection.
Connecting a Spreadsheet
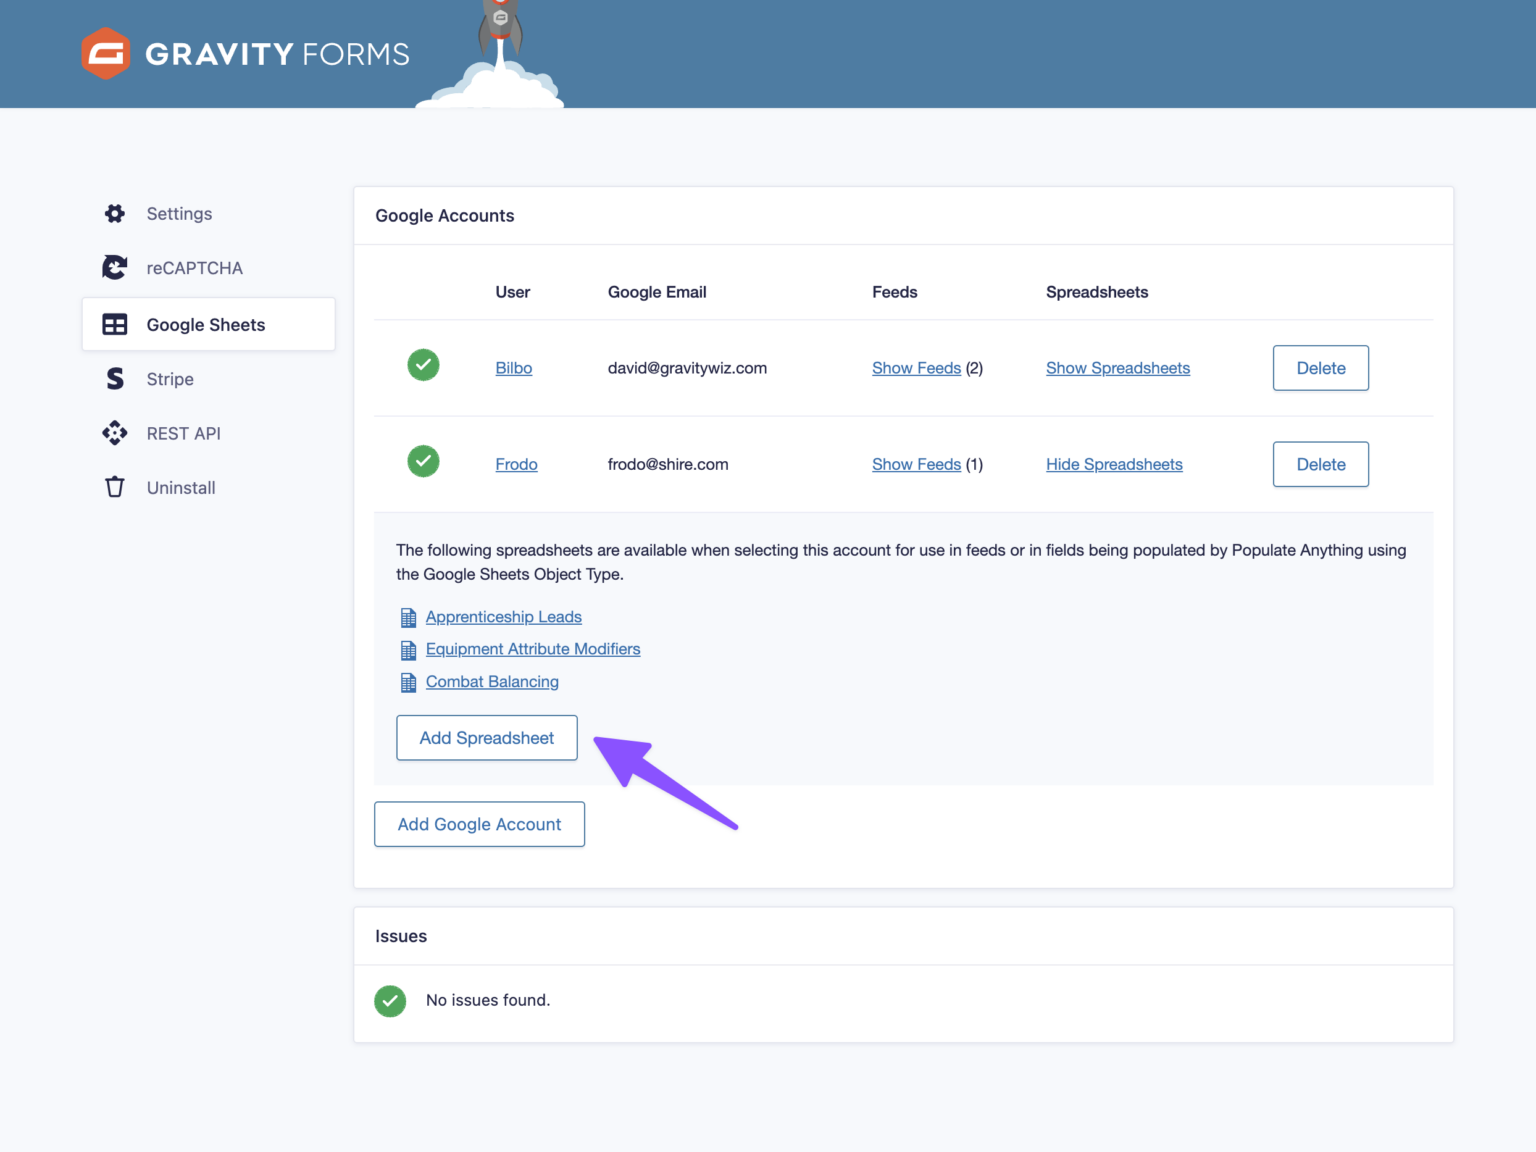
- Activate GC Google Sheets and authorize your Google account via the Google Accounts plugin setting.
- Click Show Spreadsheets to reveal a list of spreadsheets that have been connected via this account.
- Click Add Spreadsheet to connect an existing spreadsheet and give Populate Anything access to populate data from that Google Sheet.
Note: Populate Anything will automatically have access to any sheet that has been authorized for use with GC Google Sheets.
Populating from Google Sheets
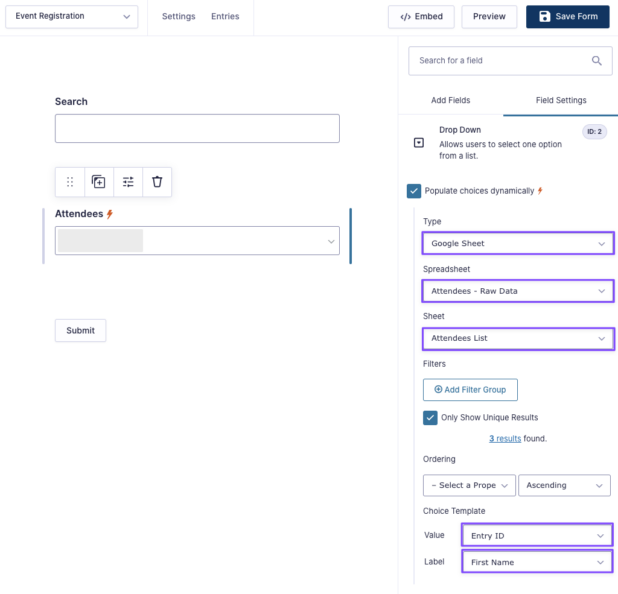
This example will walk you through populating choices into a Drop Down field but, remember, you can also populate values for fields as well.
- Navigate to the field settings for your desired field.
- Select “Google Sheet” as the “Type” setting.
- Select the desired spreadsheet and sheet name from which you would like to populate in the “Spreadsheet” and “Sheet” settings.
- Configure which columns from the Google Sheet should be used for the choices’ value and label respectively.
Pro Tip: Use the “✎ Custom Value” option to combine data from multiple columns.
Usage Examples
Notion
This integration requires GC Notion and GP Populate Anything 2.1 or newer.
Populate data directly from Notion with this enchanting integration powered by the Notion connection.
Connecting Databases For the First Time
- Activate GC Notion and add your Notion account via the Notion Accounts plugin settings.
- In Notion’s authorization screen, select the top-level page containing your database to give Populate Anything access to populate from databases under that page.
Connecting Additional Databases
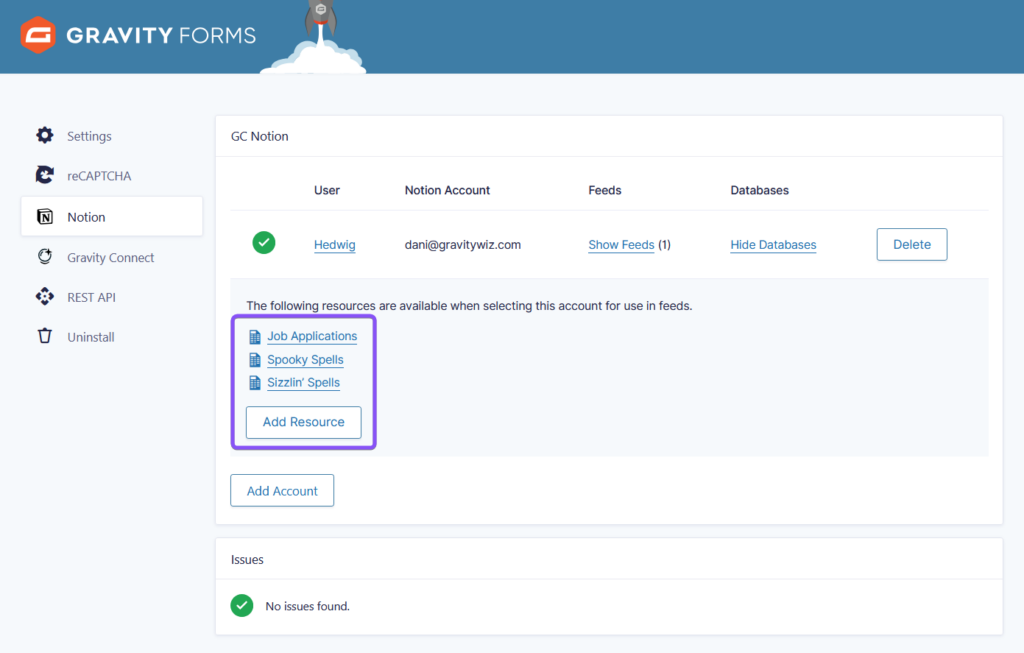
- In the Notion Accounts plugin settings, click Show Databases to reveal a list of databases that have been connected via that account.
- Click Add Resource to connect an existing database through its top-level page, giving Populate Anything access to populate data from databases under that page.
Note: Populate Anything will automatically have access to any database that has been authorized for use with GC Notion.
Populating from Notion
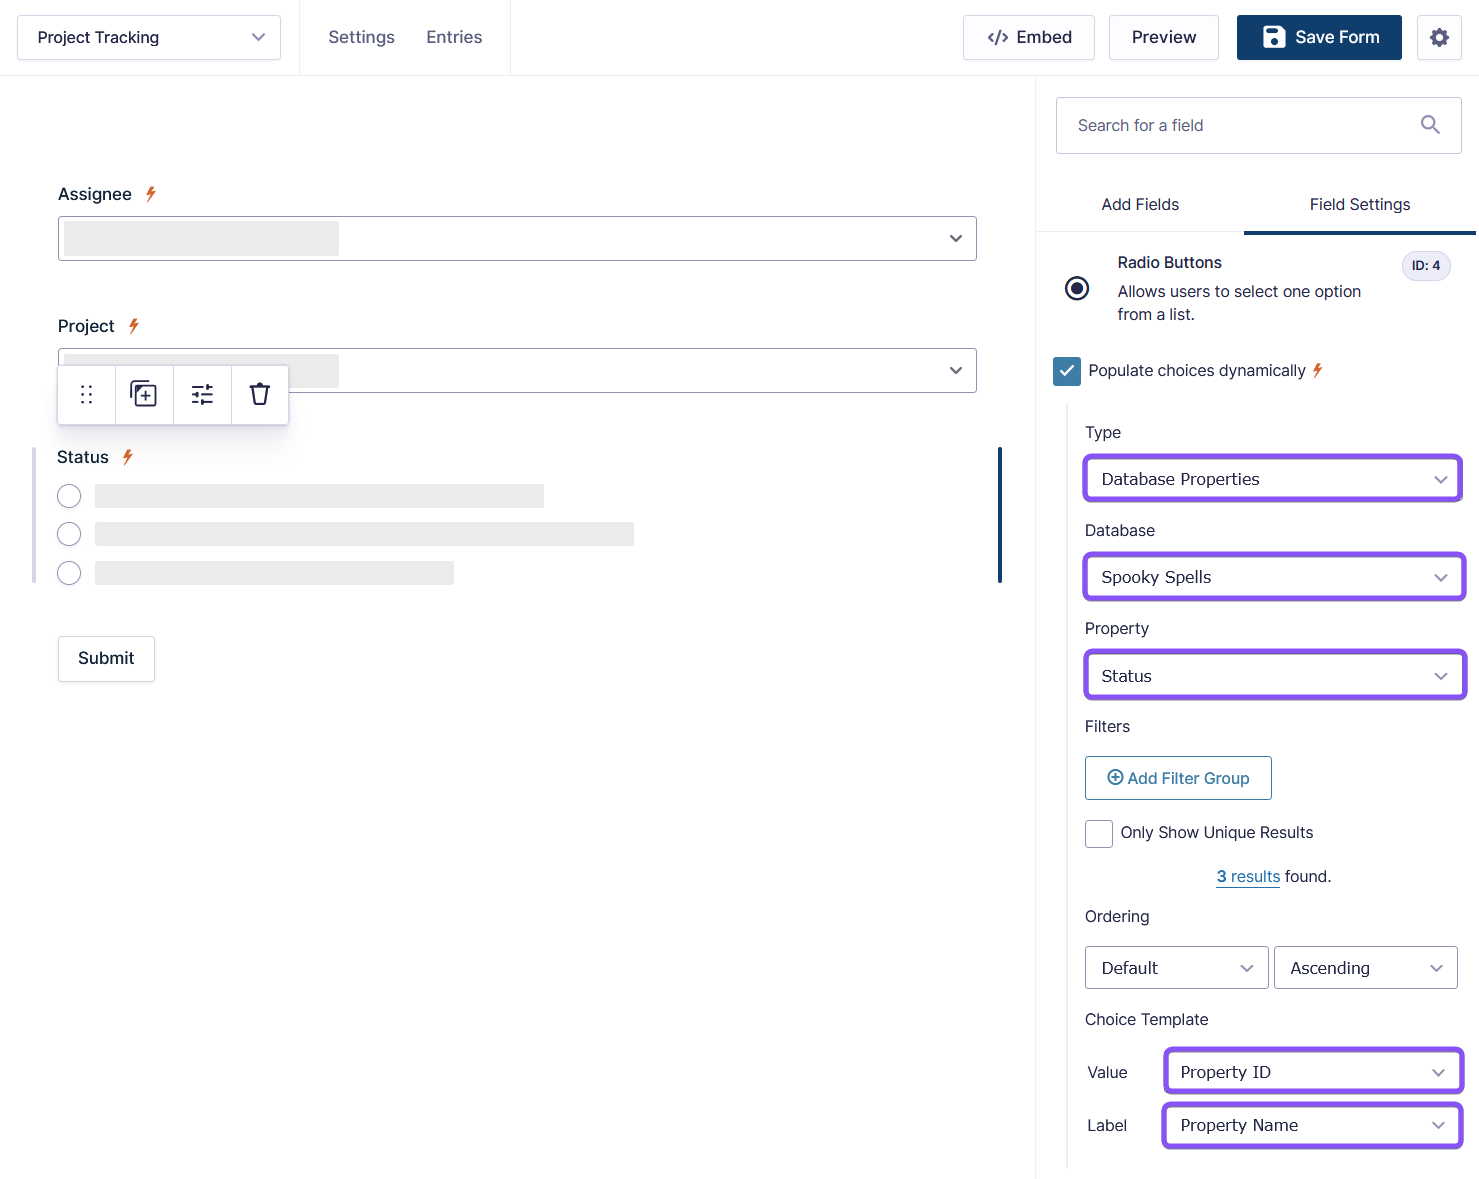
This example will walk you through populating choices but, remember, you can also populate values for fields as well.
- Navigate to the field settings for your desired field.
- Enable Populate choices dynamically.
- Choose one of the three object types listed under “Notion” in the “Type” setting.
- Set up your options based on the selected object type:
Pages: Select the desired database from which you would like to populate from in the “Database” setting.
Database Properties: Select the database in the “Database” setting, then pick the property you would like to populate from in the “Property” setting.
Users: Select the desired workspace from which you would like to populate in the “Workspace” setting. - Configure which Notion values should be used for the choices’ value and label. It defaults to the object ID (e.g. Page ID) and the object name for value and label respectively.
Note: You can control the order of your Notion Pages when populating them into a field with Populate Anything.
API Alchemist
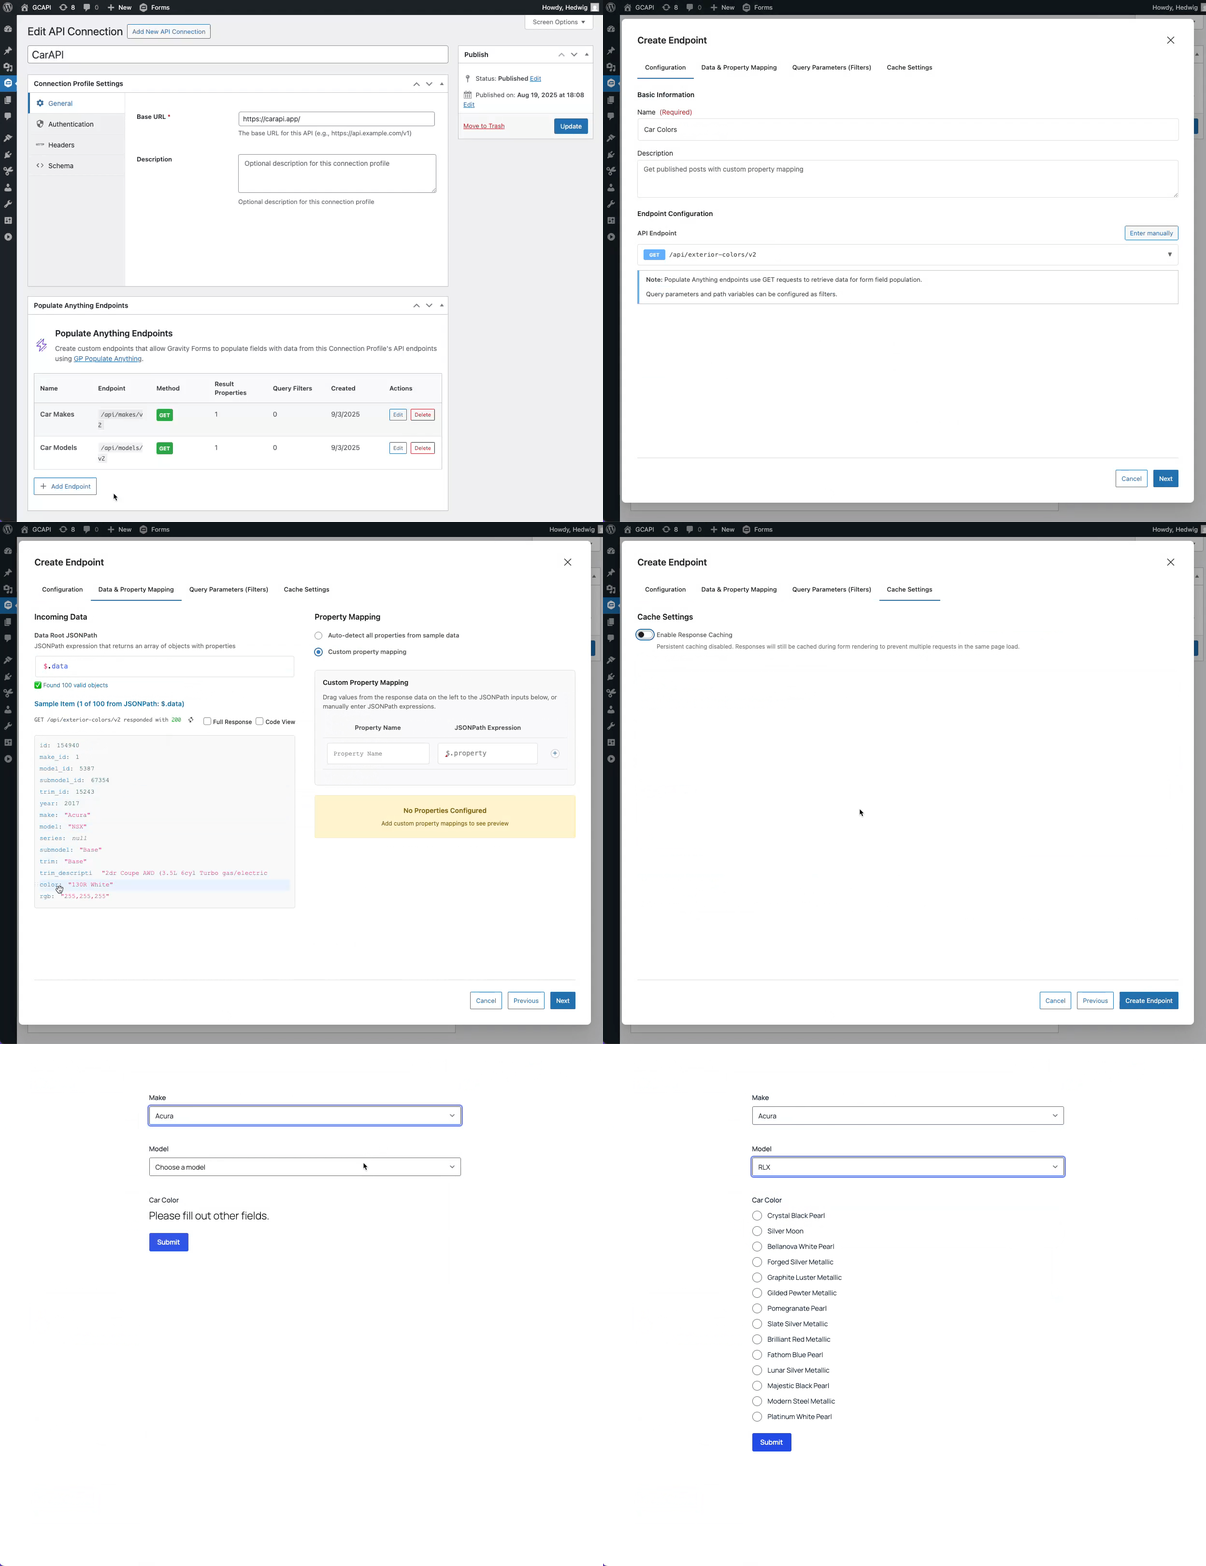
Populate data from any REST API with the ingenious help of API Alchemist. Learn how to set it up over at the API Alchemist docs.
Developer’s Notes
By default, Gravity Forms will display choice values in Entry List and Entry Detail views. Populate Anything shows choice labels instead. We made this decision due to overwhelming customer demand and the fact that Populate Anything is often used with values that aren’t easy to read (like posts, terms, and entry IDs). For these scenarios, the label is often easier to understand.
Use this snippet to revert to the default Gravity Forms behavior of showing choice values in the Entry List and Entry Detail views.
Known Limitations
- List fields can only be populated to/from other List fields. If you’re using multi-column lists, the column titles must match.
- Dynamic checkboxes are not available when exporting form data.
- When populating from custom database tables, the primary key must be the first column of the database.
- Populating File Upload fields is not supported.
- Using checkboxes as Form Field Values in filters is not supported
- Live Merge Tags do not work with HTML fields in GravityFlow Workflows in the WordPress Admin
- Live Merge Tags in field labels of the form connected to a WooCommerce Product with the WooCommerce Gravity Forms Product Add-ons do not render in the cart
- Live Merge Tags cannot be used within
<script>tags. - Live Merge Tags cannot be used within shortcodes in HTML fields.
- Solution: As a workaround, consider using a normal merge tag within the shortcode, alongside GP Preview Submission and our Live Refresh snippet. This will refresh the shortcode each time a field value changes.
- Only works with database types supported by wpdb (default options are MySQL and MariaDB). PostgreSQL is currently not supported.
- Populate Anything supports hydrating choices in GravityEdit, but it does not support updating choices that depend on other field values.
- If populating from wpDataTables, you will need the premium version of wpDataTables, as the free version does not store the data in a format accessible to Populate Anything.
- Due to restrictions around the Google Sheets API, Populate Anything’s filtering does not work well when populating large (more than one million cells) Google Sheets datasets.
- Solution: As a workaround, consider using a plugin such as wpDataTables to create a custom MySQL table from a Google Sheet. Then, you can use Populate Anything to populate the data from this table as a Database object type for the most optimal performance. Note, you will need the premium version of wpDataTables, as mentioned above.
- Populate Anything does not work when editing an entry via wpDataTables edit modal.
- Populate Anything does not support populating from the Pods Framework using the Posts object. We suggest switching to using Custom Post Type UI and ACF instead.
- If you can’t switch, you’ll need to populate using the Database object instead of Posts. This will offer limited functionality.
- Populate Anything cannot populate from a default value set in an ACF field, as this value is not stored against a post in the database. The value needs to be saved on the actual post, rather than using the ACF default value.
- Populate Anything is not compatible with the read only snippet provided by Gravity Forms.
- Solution: Use GP Read Only instead, as this is fully compatible with Populate Anything.
Troubleshooting Issues
- If not all rows from Google Sheets are populating, check each cell in the column has the same format type. When a column contains a mix of formats, the Google Sheets API will only return values that correspond to the most frequent format in the column.
- Example: If a column contained mostly numbers and a few strings, only the numbers would be returned by Google.
- Solution: Set all cells in the column to the Plain text format.
- When sorting choices by date from Google Sheets, the date column must be formatted as a true Date value (not plain text), otherwise the results will be sorted alphabetically instead of chronologically.
- Solution: Format the column as a Date in Google Sheets (
Format → Number → Dateor a customMM/DD/YYYYdate format).
- Solution: Format the column as a Date in Google Sheets (
- Populate Anything loads data dynamically on the form. Server-side caching can prevent dynamic population. We recommend using our Cache Busting plugin to prevent this. Alternatively, you could exclude the page from being cached.
- If your ACF field data is not populating, check you are using the correct meta key in the choice or value template. ACF will add two similar meta keys for each field. One will be prepended with an underscore like so:
_my_meta_key. The other will be the same, but without the underscore, like so:my_meta_key. It is the one without the underscore you should use when using Populate Anything. - If you are using WPML’s Gravity Forms Multilingual plugin, this is particularly aggressive with caching and can cause issues with fields using Populate Anything. We have a snippet to resolve this.
- Ensure the form isn’t embedded on the page more than once, including in any popups. Embedding the same form multiple times on a page isn’t supported in Gravity Forms, and can cause issues with features such as Populate Anything.
- You can read more about this limitation in the Gravity Forms docs here.
- If you need to include the form more than once on a page, consider duplicating it, to create an identical form with a different ID.
- If you have custom code listening to changes in fields, you may need to re-bind event listeners due to the contents of the field being replaced with an XHR request. You can see examples of how to do this here.
FAQ
Why aren’t users created with the Gravity Forms User Registration Add-on populating in my multisite?
When a user is created with the GF User Registration Add-On in a multisite install, they aren’t given a primary_blog meta key in the database, and Populate Anything specifically looks for that key to determine which site they belong to.
Use the gppa_object_type_user_limit_to_current_site hook as a workaround.
I’m not seeing all results?
By default, Populate Anything will only display up to 500 results to guarantee the best performance, but we do have a way of increasing this number.
Use the gppa_query_limit hook to adjust the maximum number of results that can be returned in your query.
Do note that increasing the limit to allow for large queries will increase memory usage on your site. Depending on the number of results queried, this can cause out-of-memory errors. Some object types, such as the Entry object, also require more memory. One way to combat this is to set up a field (or multiple) that can filter down the results of subsequent fields.
When using the “Only Show Unique Results” setting, the unique results are filtered from the first 500 results. This means that not all unique results may be returned if there are more than 500 total results.
As an alternative to increasing the maximum query limit, this handy snippet will check if the Order By, Value Template, and Label Template across the results are all the same. If so, it will update the query to only select the distinct values from the Order By column. This process ensures that all unique results are returned while avoiding any performance issues that could result from increasing the query limit.
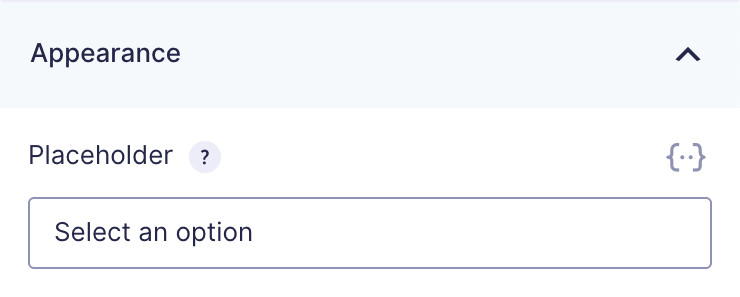
How do I add a placeholder or a blank space to the first populated option in a Drop Down?
You can use the Placeholder setting on the Appearance tab to add a default choice:
Please note that Gravity Forms won’t let you add a space as the placeholder, but you can add a non-breakable space ( ) and it will create a blank choice.
How do I add Checkbox Values as Choices?
By default, Gravity Forms stores checkbox values as arrays separated by commas, and when Populate Anything pulls in those values, it populates them as they are stored. Luckily, we have a snippet that will populate checkboxes from an entry as choices.
How can I differentiate similar items when populating into a Drop Down?
When populating items with the same or similar choice labels, you can differentiate between the similar items by following these steps:
- Activate GP Advanced Select on the Perks tab.
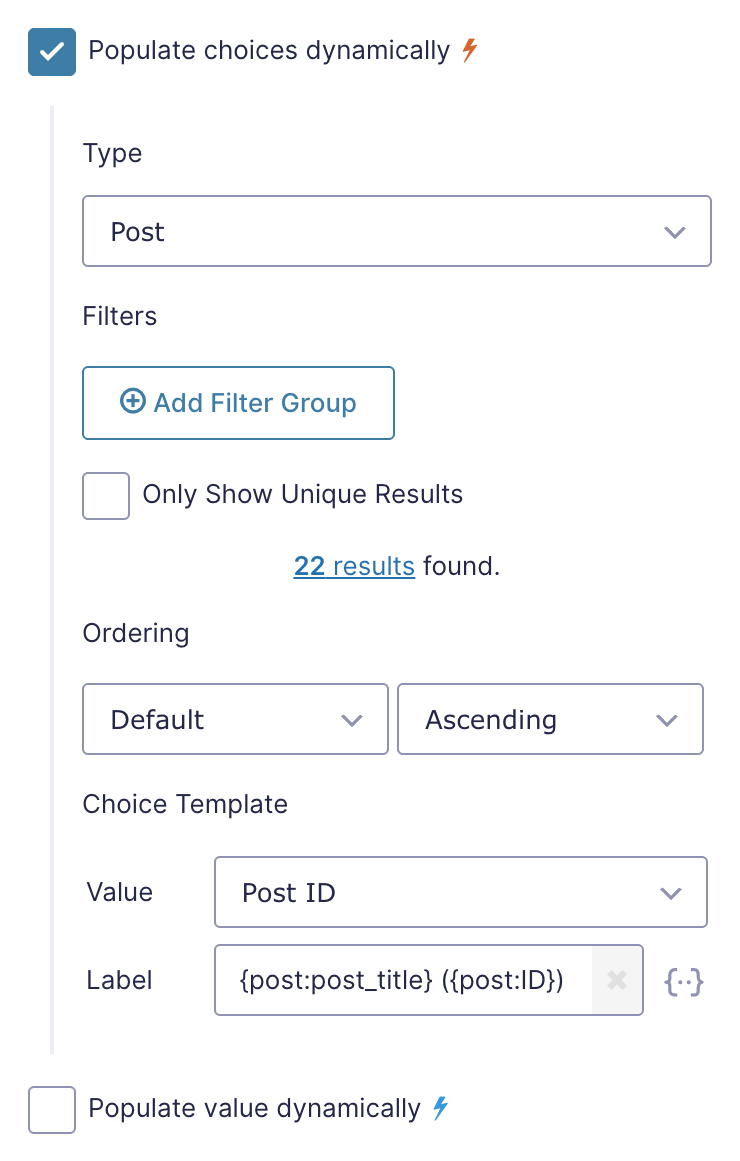
- Set the Choice Template’s Label to a custom value by selecting “✎ Custom Value” from the Drop Down and then entering a custom template. For example, this will show the post title and the post ID.
The result is a searchable Drop Down field with a unique identifier for each choice.
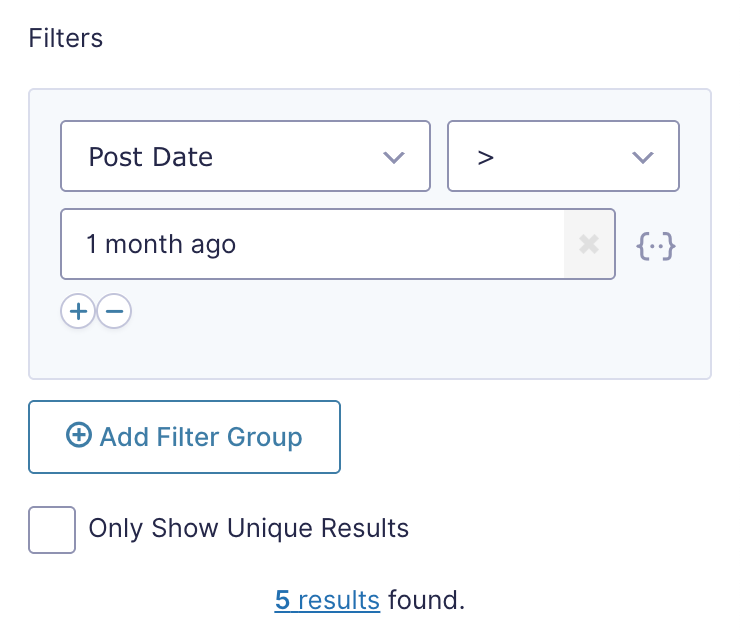
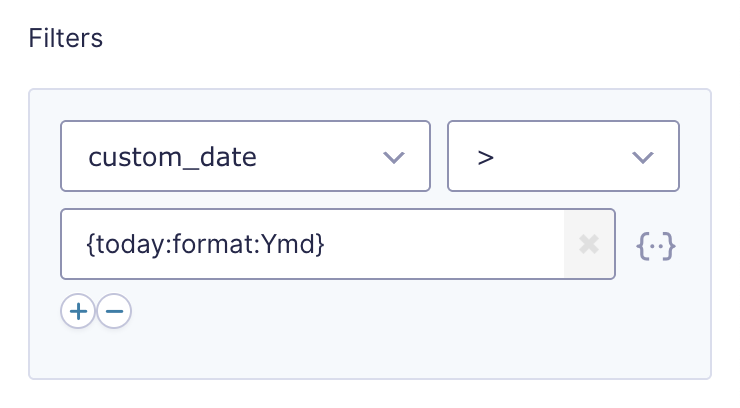
How can I filter Posts published in the last month?
Populate Anything’s results can be filtered on relative dates using PHP Relative Formats as a Custom Value. For example, to filter Posts that were published in the last month, set the Filter like this:
In the context of relative dates, greater than > means “after” and less than < means “before”.
Why isn’t my Custom Post meta key selectable when filtering?
When a meta field is created with a custom field editor, such as Advanced Custom Fields, the newly created field is simply a placeholder. Until it is used in a post, it won’t be found by Populate Anything.
Some Post meta values are missing from the filter drop down.
By default, Populate Anything has a 1000 record limit when accessing meta values for a Post. We have a snippet that will let you modify that limit. To use it, change 1000 to whatever limit you’d like to set.
How can I disable GF Multi-Page Navigation links while Populate Anything is loading data?
Add the following CSS to automatically disable Multi-Page Navigation links while data populates.
Can I populate data from another database?
By default, Populate Anything will only show the database that the current WordPress installation is on. Use the following snippet to register an additional database with custom credentials. Do note that only SQL databases are supported.
The snippet requires some configuration, which is covered in the installation video linked in the snippet’s description.
Can I populate from multiple database tables at once?
Populate Anything can only populate a field from a single database table at a time. However, Populate Anything does support populating from MySQL Views.
If you go into your database and create a view of the desired information, Populate Anything can handle pulling data from that view.
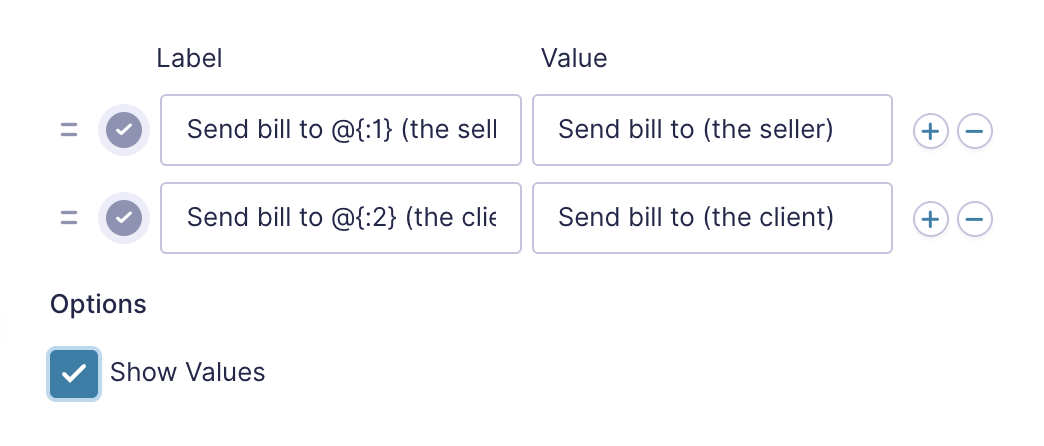
Why doesn’t conditional logic work when using Live Merge Tags in choice-based fields?
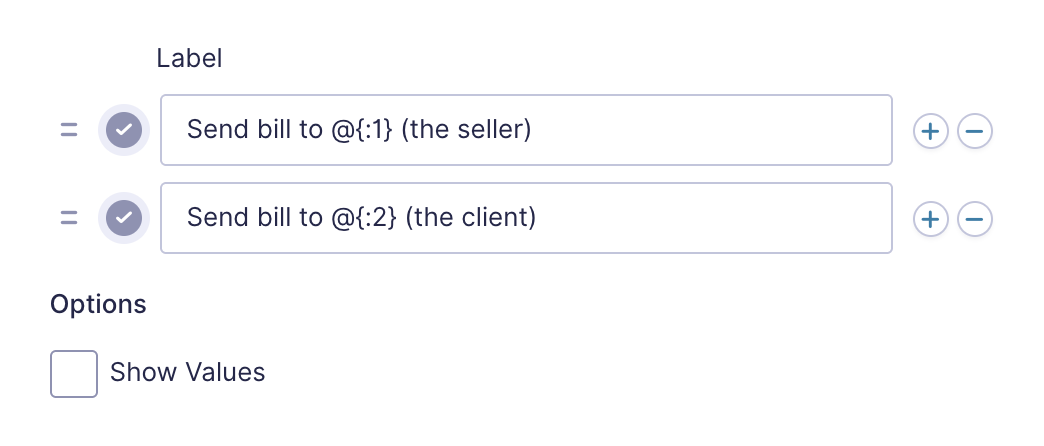
Conditional logic will not trigger when using Live Merge Tags in choice-based fields. For example, say you are using Live Merge Tags to populate the previously entered seller and client names in a Drop Down field.
In order to use conditional logic with these choices, you need to check Show Values and remove the Live Merge Tags from the values for each choice field.
How can I use empty field values as filter values?
It’s possible to allow empty field values as filter values by using the gppa_has_empty_field_filter_value filter hook. This is useful when you want to populate a value when a filter’s value matches or is blank.
To use the filter, replace “123” with the form ID and “4” with the field ID for which empty filter values should be honored.
add_filter( 'gppa_has_empty_field_filter_value_123_4', '__return_false' );How can I return only posts with future dates?
When working with a custom post type for date-specific content, such as events, you’re probably storing a “Start Date” in a custom field, using a tool like Advanced Custom Fields.
If you’re also populating those “events” in your form with Populate Anything, there’s a good chance you’ll only want to populate “events” that start in the future.
To accomplish this, you will set up the filter using the {today} merge tag with the format modifier, to match the format the date is stored. For example, ACF Date values are stored and returned in this format, YYYYMMDD. So when setting up populate anything to get posts with ACF custom dates, in the future, you’ll use the {today:format:Ymd} merge tag like so:
How do I use comma-separated values as individual choices?
By default, when GP Populate Anything populates field choices, it treats comma-separated values as a single option. To display each item as a separate selectable choice, use this helper plugin to automatically split values like "Red, Blue, Green" into individual choices.
Can I populate choice fields with values from an ACF repeater field?
Yes! If you’re using Advanced Custom Fields (ACF) and need to populate a choice-based field (like a Dropdown, Radio Button, or Checkbox field) with values from an ACF Repeater field, you can use the following snippet to make this possible. This allows your form to dynamically pull and display repeater data without manual entry.
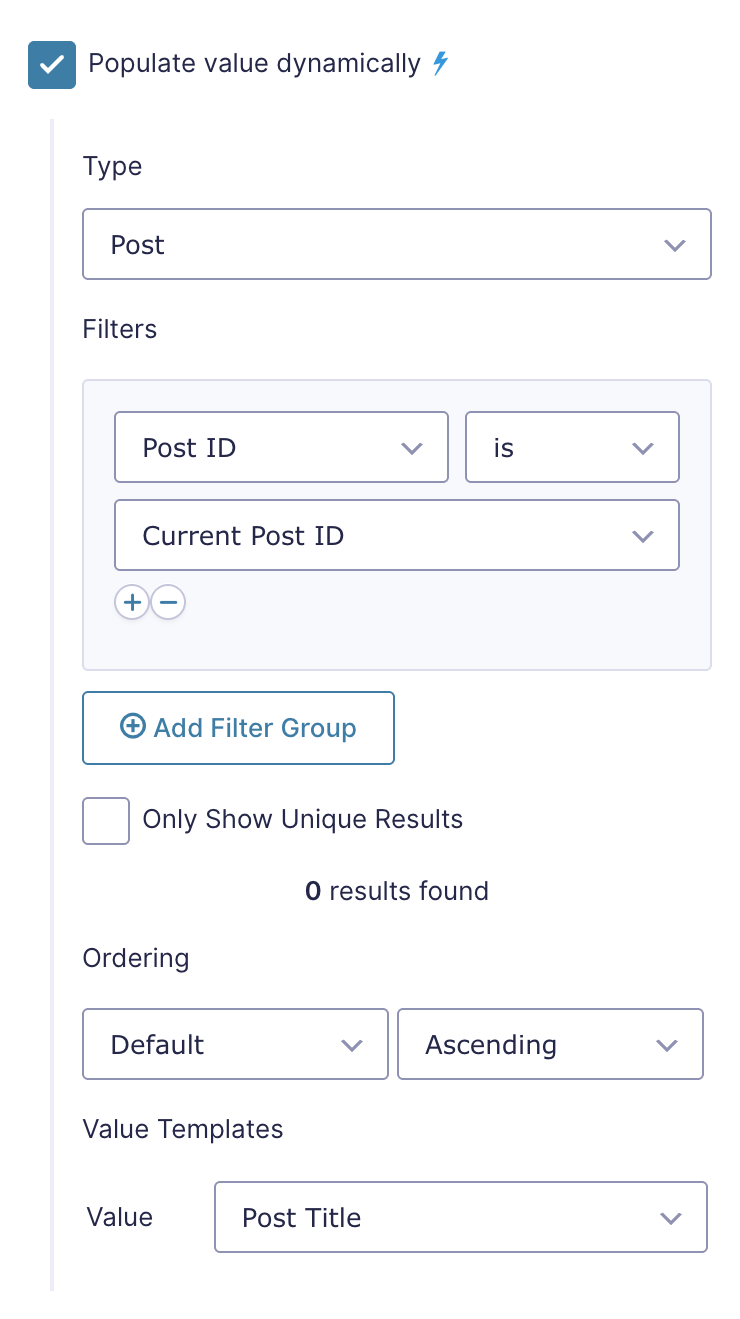
How can I retrieve data from the current post the form is embedded on?
When embedding a form inside a post or page, you may need to pull information from that post, such as its title, custom fields, or other meta data and insert it into the form automatically. The Current Post ID filter makes this possible by allowing you to dynamically populate fields based on the post ID where the form is embedded. For example, to get the post title of the current post, the filter setup would be like so:
Translations
You can use the free Loco Translate plugin to create translations for any of our Perks. If you’ve never used Loco translate before, here’s a tutorial written for beginners.
Hooks
Gravity Forms has hundreds of hooks. Check out our Gravity Forms Hook Reference for the most thorough guide to Gravity Forms’ many actions and filters.
Related Resources
- Adding Preferred Contact Method Option in Gravity Forms
Let your customers decide their preferred contact method with this magical, user-friendly combination! - Append and Prepend Values to Gravity Forms Merge Tags
Append and prepend values to Gravity Forms merge tags anywhere that they are supported. Customize how your forms display information dynamically. - Behind The Scenes: Gravity Perks for eSports
In this customer spotlight, we look at how United States eSports Academy is connecting gamers with pro coaches using Gravity Perks. - Create Shareable Health And Safety Audits With Gravity Forms
Learn how to use Gravity Forms to create shareable Health and Safety audits that your technicians and auditors will love. - Create Smart Forms and Advanced Conditional Choices with Gravity Forms
Learn how to create smart forms that dynamically update available fields based on user input. - Gravity Forms Email Validation: Check Emails Live Prior to Submission
Use this guide to learn how to validate a Gravity Forms Email field live before needing to click submit. - Gravity Forms Field Value Extraction Techniques
Master field value extraction in Gravity Forms with practical solutions to enhance data use and improve customer experiences. - Gravity Forms Zip Code Validation: A Step By Step Guide
Learn how to use conditional logic to validate a customer's postal code before they submit their order. - Guide: Populating Gravity Forms Dropdowns with ACF's Relationship Field
Everything you need to know about dynamically populating Gravity Forms dropdowns using ACF's Relationship field and creating chained selects. - Guide: Two-Way Connect Gravity Forms with Google Sheets
Learn how to send Gravity Forms data to Google Sheets and populate data from Google Sheets into Gravity Forms, even within the same form. - How to Add a "None of the Above" option to your Checkbox Field
Learn how to create a "None of the Above" checkbox. When "None of the Above" is selected, all other options are disabled. When any other option is selected, "None of the Above" is disabled. - How to Build a Simple Job Board with Gravity Forms
Learn how to build a job board using Gravity Forms and more efficiently manage the application process, display and filter job listings, and customize applicant follow-up. - How to Check Checkboxes (and Other Choice-based Fields) Conditionally
Automatically select options based on selections made in another field. - How to Collect Signatures with Gravity Forms [Complete Guide]
Discover how to navigate the world of collecting online signatures and integrate signatures into your Gravity Forms with our complete guide. - How to Create a Gravity Forms Survey and Enhance It With Gravity Perks
Learn how to use the Gravity Forms survey add-on — then, learn how to enhance it using Gravity Perks. - How to Create Conditional Choices with Gravity Forms
Learn how to use WordPress and Gravity Forms Populate Anything to create conditional choice fields that automatically change based on user input. - How to Create WooCommerce Products with Gravity Forms
Easily create new WooCommerce Products with Gravity Forms entries so users can submit new products on the front end. - How to Do Calculations with Gravity Forms
If you’re using Gravity Forms on your WordPress website, you might need an easy way to do Gravity Forms calculations on form fields and user submissions. - How to Dynamically Populate a Ranked Survey Field in Gravity Forms
Simplify your Ranking fields and make your surveys easier for your audience to complete. - How to Dynamically Populate Drop Down Fields in Gravity Forms
Learn how to dynamically populate Drop Down fields in Gravity Forms with users, form entries, database tables, and more! - How to Dynamically Populate Form Fields in Gravity Forms
- How To Evenly Distribute Leads to a Sales Team with Gravity Forms
Automate your lead distribution process in just a few minutes. - How to Filter Checkboxes by Checkboxes using Dynamic Population
Use Checkbox selections to filter other Checkboxes on your form. Example: turn a customer's selection of yoga class times into that customer's preferred times. - How to Filter One Field By Another and Create Gravity Forms Chained Selects
Learn how to use Populate Anything to create your own chained selects and filter large amounts of dynamic data in your forms. - How To Look Up Previous Entries with Gravity Forms
Populate values from previous Gravity Forms entries when a user inputs matching values from that entry. - How To Populate Data Based on the Current User
Populate any field with data based on the currently logged-in user. - How to Populate Database Data into Gravity Forms
Learn how to populate database data anywhere in Gravity Forms directly from the WordPress database — and by extension, custom databases, ACF Repeater Fields, WooCommerce, and more. - How to populate Simply Schedule Appointments data anywhere in Gravity Forms
In one of our first collaborative guest posts *ever,* we explore dynamically populating Simply Schedule Appointments data anywhere in Gravity Forms for powerful personalization and automation. - How to Populate WooCommerce Order Data into Gravity Forms
Build a form for your customers to easily contact you regarding products they have ordered. - How to Update Posts with Gravity Forms
Populate and update WordPress posts with Gravity Forms' entries. - How to Use Merge Tags in Field Labels with Gravity Forms
An easy method to use most Gravity Forms merge tags in your field labels. - Maatwerk Online's Magic Portal: agency automates customer reporting and streamlines collaboration through their own customer portal
See how one agency created a customer portal that serves as an internal collaboration tool and a client reporting portal using Gravity Perks. - Michelle Marin's Marvelous Gravity-Forms-powered Customer Portal
MichelleMarin.com's customer portal provides an automated platform for project feedback, customer correspondence & collaboration, and helped her ditch the dreaded email chains entirely. - Populate Anything’s Automation Alchemy
See how Verifyi9 uses Populate Anything and Google Sheets to automate dozens of emails on a daily basis. - Populate Gravity Forms with Google Sheets
Magically enhance your forms with dynamic field choices and values loaded directly from Google Sheets. - Show Login Link for Existing Users with Gravity Forms User Registration
Automatically show a login link when a user attempts to register with an existing email. - Spotlight: Automating Membership Registration with Populate Anything
We spoke with Michelle Hayes of Remanufacturing Industries Council about how she uses Gravity Forms Populate Anything to automate new user registrations. - Spotlight: Building an Automated Real Estate Directory in Gravity Forms
Johan d’Hollander used Gravity Forms, GP Populate Anything and GC Google Sheets to create an auto-updating real estate directory that connects buyers and sellers with their ideal agents. - Spotlight: Building an Online Award Nomination System using Gravity Forms
Butler Trust’s complete award nomination system is worthy of its own award — and shows that you truly can customize Gravity Forms into anything. - Spotlight: Creating Dynamic, Customizable Quoting Forms with Jennifer Erdman
We explore how Jennifer Erdman built a quote calculator — based on highly customizable product offerings — step by step. - Spotlight: Gamifying Language Learning with WordTap and Populate Anything
See how WordTap uses Gravity Forms Populate Anything to help customers create and share games that make learning new languages... fun!? - Spotlight: Hidden Fields' Hidden Magic with Populate Anything
Never judge a form by its cover — even a simple lead magnet form can be Populated with Anything when wizards are involved. 😉 - Spotlight: How FileStack Powers Smooth Event Planning with Entry Blocks
Joel Armsden’s FileStack helps event organizers manage event presentation files and agendas. Built entirely in WordPress, it allows his clients to ditch email chains and the added stress that comes with them. - Spotlight: How to Build a Customer Messaging Platform using Gravity Forms
BrightLeaf Consulting had an aha moment about client communications: Gravity Forms can be used to create a complete one-on-one messaging system. - Spotlight: How Vineyard Handles High Demand with Nested Forms & More
See how Vineyard USA uses Nested Forms and a few other perks to help manage web registration for their annual conference. - Spotlight: Legendary Support Form UX with Gravity Perks
See how we use our own spells to make our support form legendary for customers and support workflow alike. - Spotlight: Linking Inventory to Dates Across Forms with Gravity Perks
Tony Schwartz waved his wand to make dates from one form apply to inventory in another form. Event mischief managed! 🪄 - Spotlight: Multi-Platform Subscription Flows with API Alchemist
Jeff put aside a working middleware solution in favor of keeping his workflow magic in-house, all while saving money and not writing a single line of code. - Spotlight: Netalys' Salt Consumption Calculator
A behind-the-scenes look at how Netalys built a daily salt consumption calculator using Nested Forms and Populate Anything. - Spotlight: Populate Anything & Unique ID for Automated Referral Programs
Power tip! Chris Odell built an automated referral and rewards program with the help of Populate Anything and Unique ID. We explore how it works, step by step. - Spotlight: Powering Up Cost Estimate Forms with Advanced Calculations
Jessica Carter took a free estimate calculator from zero to hero with GP Advanced Calculations. - Spotlight: Stop Look Go Simplifies Agency Compliance with Populate Anything
See how Stop Look Go Privacy helps agencies navigate a storm of data compliance with the help of Populate Anything. - Spotlight: Turning Gravity Forms Into a Complete Hiring Platform
See how David Kendall worked his magic with Gravity Forms and Gravity Perks to build a complete recruiter CRM. - Spotlight: Turning Gravity Forms into a Lean CRM
See how Systems Master Tony Schwartz ditched his CRM software for an enchantingly easy to manage Gravity Forms solution featuring database forms and more. - Spotlight: Turning Gravity Forms into a Real-Time Medical Calculator
See how Roman Melicher turned a form into a web application that processes hundreds of lab parameters to save doctors time. - Using Gravity Forms as a Simple Database
A simple method for storing and organizing data that can be dynamically populated into your forms.


