Using Gravity Forms as a Simple Database
A simple method for storing and organizing data that can be dynamically populated into your forms.
This article requires the GP Populate Anything perk.
Buy Gravity Perks to get this perk plus 48 other premium Gravity Forms plugins!
Have you ever wanted to build a form that contains choice-based fields that are dependent on each other, a.k.a. chained selects? For example, let’s say I’m building a form that asks a user about their favorite soccer team. To help narrow down their selection, I want three fields on the form: Country, League, and Club. When the user selects a Country, the League field should populate with the leagues played in that country, and when a League is selected the Club field should display the clubs in that league.
If you’re familiar with our Perks, you might be thinking that Populate Anything is your solution, and you’d be absolutely right. But, it’s more complicated than that. Populate Anything needs a source for its data, and if you don’t already have the Countries, Leagues, and Clubs stored somewhere in the WordPress database, you’re going to need to start there.
In this tutorial, we’re going to show you how to use Gravity Forms as a simple database and populate data from that database into your forms.
Getting Started
Building a simple database with Gravity Forms starts with, you guessed it, building a form. The form will give us a way to enter values into the database, and we’ll use Populate Anything to retrieve those values in our user-facing form.
Steps
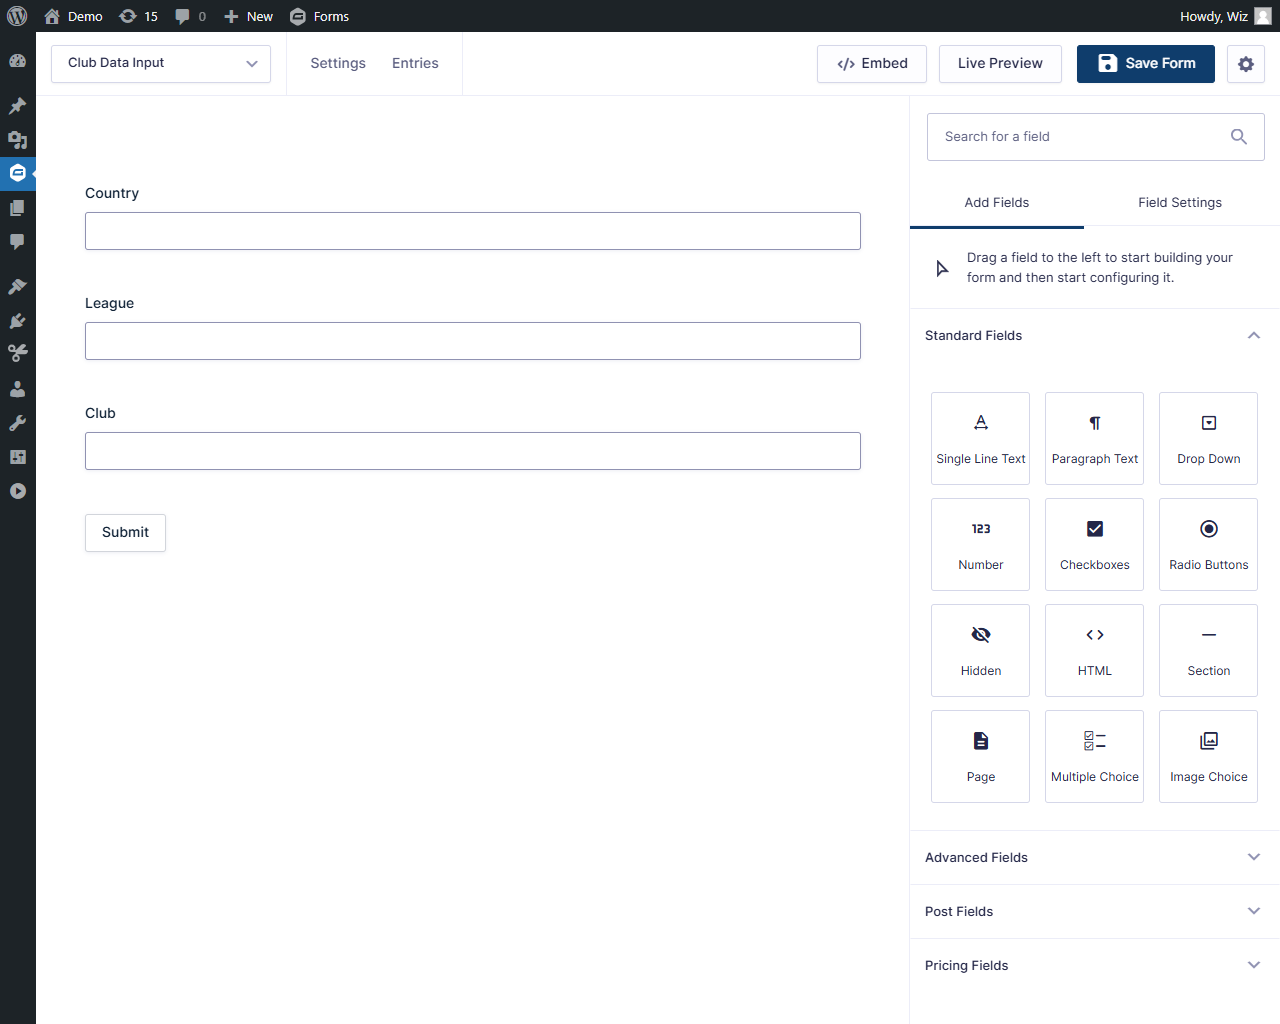
Step 1 – Create Your Input Form
Add a new Form. Then, add 3 Single Line Text fields: Country, League, and Club.
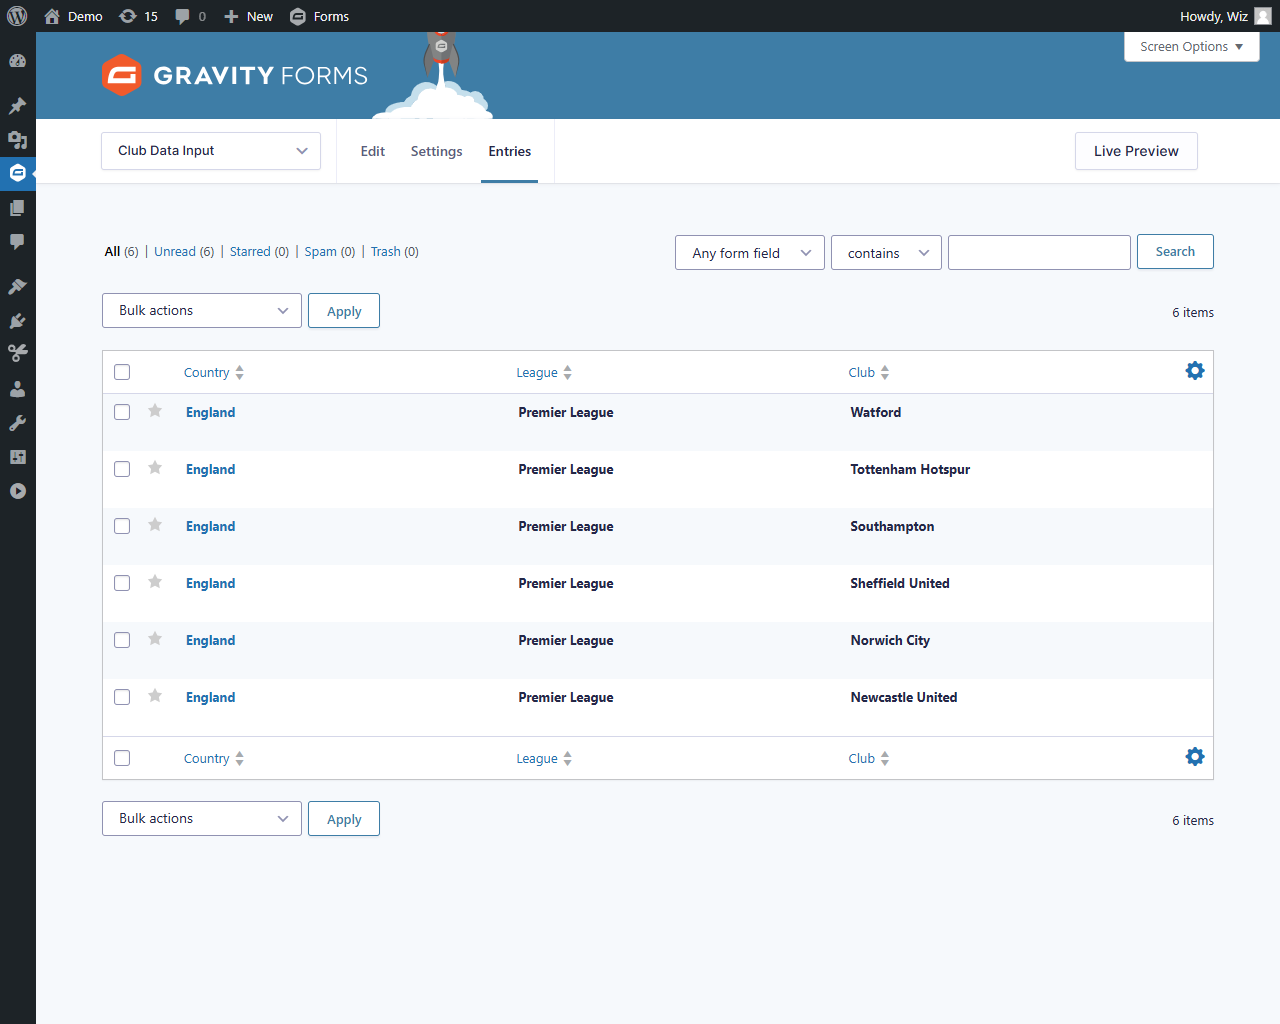
Step 2 – Enter Your Data
Now comes the work. You need to enter your club data into the form, one entry for each club. Repeat this until you have an entry for every club, league, and country you want to be available in the user-facing form.

Once everything is input, you can view the entries as a table to make sure you’ve covered every combination.
If you have a lot of data to enter, GravityView’s Entry Importer can save you some time.
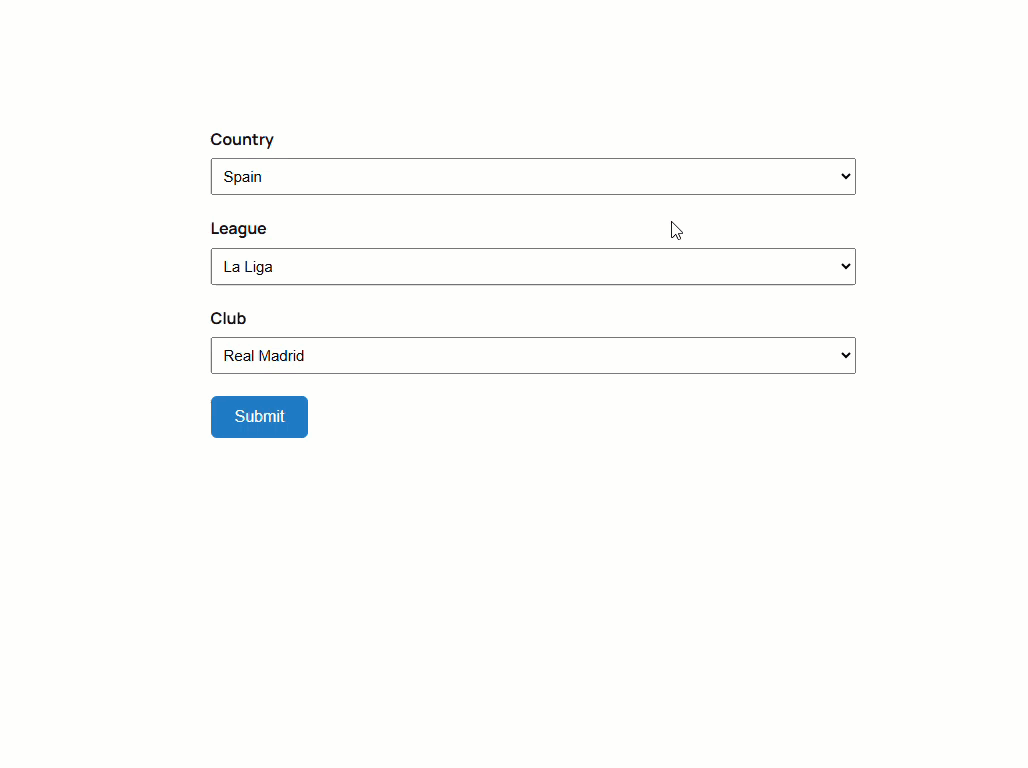
Step 3 – Build the User-Facing Form
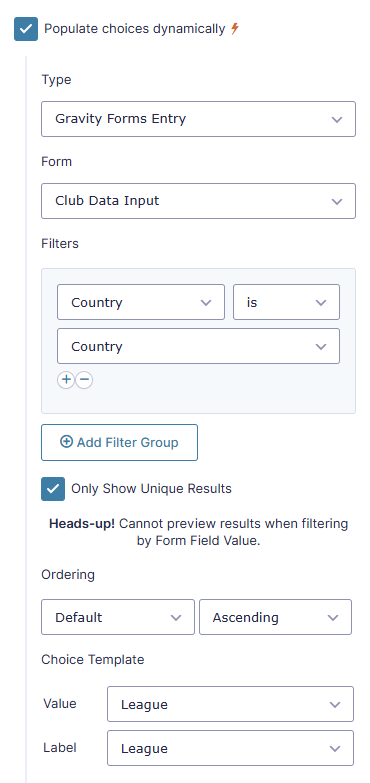
With all of your data stored in Gravity Forms entries, it’s time to build the user-facing form. The user will use this form to select a club, drilling down by country and league. Start by adding a Drop Down and populating the Country field from the Gravity Form Entries.
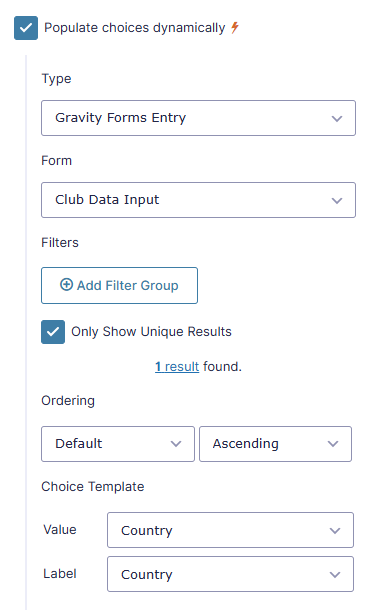
With the Country field populated, add a second Drop Down for the league. This time, populate the League into the field’s choices and add a Filter to filter the results based on the Country Drop Down.
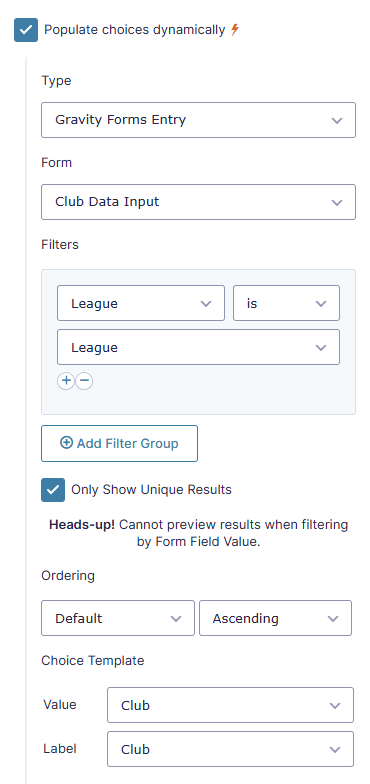
Finally, add the Club Drop Down. Similar to the field above, filter the results by the League field and populate Club values.
That’s It!
With the 3 fields in place, your user-facing form is complete. It has three Drop Down fields that automatically populate from your simple database and filter based on the user’s selections.
If you want a more robust database solution, check out wpDataTables. It can create user-editable tables that write directly to an SQL table.
Want to see another example of Gravity Forms acting as a simple database it in action? This spotlight goes over how this spell was used to bring external coupon codes to a lead magnet form.
Taking It Further
This same method can be used with choice-based fields to create conditionally selected options. For example, say you want a checkbox field that automatically checks itself when a specific choice is made in another field on the same form. Check out this article for more info: How to Check Checkboxes (and Other Choice-based Fields) Conditionally
Using Gravity Forms as a simple database lets you build forms that contain conditional choices. For ideas on different ways these can be implemented, check out How to Create Conditional Choices with Gravity Forms and Create Smart Forms and Advanced Conditional Choices with Gravity Forms.
We provide a separate solution that allows you to automatically sync Gravity Forms data with Google Sheets, if you would prefer to use Google Sheets or its integrations like Data Studio (Looker) and BigQuery.


I’m looking at using Gravity forms to allow new members to sign up to a club (I’ll also be transferring existing members in from the database) this form, call it Form A will have a lot of information on Including the names and a membership number. – No problems here.
Now what I would like is for administrators to have a sign in form for events, (Form B) where for each person they just need to enter a 4 digit membership number into the ID field and it looks at form A and populates the name fields with the name of the person linked to that number, I don’t want them to have to scroll down through numbers 0001 to 9999 to find the number, just type it in.
Is that something that would be possible ?
Hi David,
This should be possible with our GP Populate Anything Perk. The setup will be something similar to what’s in the tutorial above, but instead of the user using a dropdown, they will enter the membership ID in a text field and that field value will be used to filter the results that populates the Name field with Populate Anything. Please check out the documentation, try it and let us know via our support form, if you have any questions.
Best,
I need a pluggin that does the following:
Am I able to customize Populate Anything to do the above? If not, is there a better option?
Hi Amy,
This would be a good fit for a future version of GF Entry Blocks, but currently it doesn’t support exporting entries. For now, we recommend GravityView.
HI,
I’m looking for a scenario whereby Gravity Form entry-options will populate from a Database
e.g Database has columns 1.Name 2.Number
Gravity Forms has entries 1.Name 2.Number
I’d like when a name is selected on the Gravity Form it automatically selects the corresponding number as shown on the Database
How can I achieve this?
Hi Kevin,
You can filter the results of the field populated via the database using values in the form. Here’s a rough example:
If you can drop us a line in support, we’ll be happy to give you further details on how to set this up with your specific site.
Is it possible to input gravity forms’ fields in a database file stored in my PC (created with Python)?
Hi Paco,
Unfortunately, I am not tracking your question. Could you please provide more information on what you’re trying to do?
Best,
Hi Samuel, thanks for your answer.
I created a sqlite3 database with Python. Now, it is stored in my PC. I want to input the entries of a gravity form (when submitted) in this database.
I hope it is clearer now.
Hi Paco,
Thanks for the clarification. This should be possible with some custom codes. You’ll need to hire a developer to assist you with this.
Best,
Can gravity forms send data to a custom wpdatatables database?
We used in the past wpdatatables with gravity forms but after 2-3.000 records the filters are not working pretty stable so the better solution is gravity view
Hi Tasos,
Currently, we don’t have any Perks or snippets to create records on a database.
Best,
Can Database read be from another MySQL database on the same local host? can it read from a remote MySQL database?
If so, can you enhance this documentation to show an example of connecting to both a different local host and a remote database?
Hi Dan,
We have a snippet that lets you populate values from an external database.
https://github.com/gravitywiz/snippet-library/blob/master/gp-populate-anything/gppa-custom-database.php
Update the DB_HOST, DB_USER, and DB_PASSWORD variables to connect to a database on another server.
Also, I’ll forward your feedback so we can get this documented.
Best,
Do you have an example of how one can pull entries from a WPDataTable via Populate Anything?
Here’s the basic idea, Tarik:
…where Table A is the table I’ve added via WPDataTables and “value1” is one of the columns in my custom table. You can add as many filters as you need from there!