Gravity Forms Field Value Extraction Techniques
Master field value extraction in Gravity Forms with practical solutions to enhance data use and improve customer experiences.

- What are the benefits of retrieving field values in Gravity Forms?
- How do you retrieve and display field values in Gravity Forms dynamically?
- Tutorial: How to retrieve and display field values in Gravity Forms dynamically with GP Populate Anything
- How do you retrieve and display Gravity Forms field values after submission?
- Dynamically retrieve and display field values in your Gravity Forms
Having to fill out repetitive information on forms is one of the biggest reasons for lost conversions. What’s the point of registering as a user on an eCommerce website, if you’ve got to fill out the same information again the next time you place an order, right?
So, today’s discussion is all about how to retrieve and display Gravity Forms field values.
Why does this matter?
Dynamically retrieving and displaying field values streamlines the user experience, simplifying form completion and presenting users with tailored content based on their previous responses.
This proactive approach also keeps your forms up-to-date, bypassing the need for constant manual updates.
In this article, we’ll demystify the process of dynamically retrieving field values in Gravity Forms, using our very own Gravity Wiz solutions, Gravity Forms Populate Anything and Gravity Forms Easy Passthrough. These tools opens up a world of new possibilities, enhancing user interactions and simplifying data management.
But we’re not stopping there. We’ll also show you how to retrieve and display form field values after submission. This takes a simple form submission confirmation and turns it into a personal touchpoint, deepening your connection with your users.
So, if you’re interested in making your Gravity Forms work harder for you, let’s get started!
What are the benefits of retrieving field values in Gravity Forms?
Retrieving field values in Gravity Forms goes beyond the mere action of data collection. It’s about taking a proactive step to elevate your form functionality, adapt your content dynamically, and create a more personalized interaction for your users.
But how does this happen, and what are the real benefits? Let’s break it down.
- Enhanced user experience: The essence of a good user experience lies in relevance and ease. By dynamically retrieving field values, your forms can present only those fields, options, or information that aligns with a user’s previous inputs or relevant data.
- Reduced redundancy: Nobody likes to fill out the same information over and over. This is where retrieving field values really shines. When you automatically pull known information into subsequent fields, the form minimizes the need for users to enter repetitive data.
- Integration of external data: Gravity Forms’ ability to retrieve field values also enables form creators to tap into external data sources like APIs or databases. This integration allows you to fetch and display real-time data in your forms.
Common use cases for retrieving and displaying field values in Gravity Forms
Retrieving and displaying field values in Gravity Forms is a versatile process, providing several use cases that can significantly boost your form’s robustness, including:
Conditional logic
One of the standout uses of field value retrieval in Gravity Forms is the application of conditional logic. This means showing or hiding fields, sections, or even entire form pages based on the user’s input.
For instance, let’s say a user selects “Coffee” in a form field asking about their preferred beverage. The subsequent fields could then dynamically show related options like “Espresso,” “Cappuccino,” or “Latte,” rather than irrelevant ones like “Green Tea” or “Chamomile.”
Dynamic population
Dynamic population is another powerful use case. This involves pre-filling form fields with data sourced from the user’s profile, previous submissions, or external sources. Think of a customer support form that pulls in a user’s recent purchases from your database, allowing for quicker issue resolution.
Cascading dropdowns (chained selects)
Retrieving field values can also facilitate the creation of cascading dropdowns or chained selects. These are dropdown menus where the options in one dropdown are determined by the user’s selection in a preceding dropdown.
If, for example, your form includes fields for country and city, once a user selects a country, the city field could then present only cities within that selected country.
Real-time validation
Field value retrieval can further enhance real-time validation of user input against external data sources. This could involve checking if an email address is already registered, verifying a reference number’s existence, confirming that a zip code falls within your service area, or even ensuring a user is old enough to purchase your product or service.
For instance, imagine creating an event registration form that automatically updates the available seats in real time based on a database.
How do you retrieve and display field values in Gravity Forms dynamically?
It can seem like a daunting task, but with the right tools, it’s a breeze. Let’s look at a couple of solutions designed to dynamically populate Gravity Form fields and values.
Gravity Forms Easy Passthrough
Need to carry data from one form to another without tedious manual copying? Gravity Forms Easy Passthrough is your answer. This tool enables you to dynamically populate form fields with data users have previously submitted, streamlining the user experience immensely.
The beauty of Easy Passthrough lies in its flexibility – it allows for data transfer within the same browsing session or across multiple sessions. So, if a user fills out a form on one visit and comes back later for a different form, their previous data can auto-fill the relevant fields, saving them time and effort. ✅
Transfer data between forms with ease with Gravity Forms Easy Passthrough.
Gravity Forms Populate Anything
For those seeking more precise and wide-ranging control over the data pulled into forms, Gravity Forms Populate Anything steps up to the plate. Here’s just some of what you can do with it:
- Dynamically populate choice-based fields such as drop downs, radio buttons, and checkboxes, along with value-based fields, using dynamic, filterable data. This can help create cascading dropdown menus or dynamically present options based on a user’s previous choices.
- Enable form personalization by filtering the data according to user-specific input. This reduces redundancy and tailors the form to each user’s unique context. For instance, you could show different fields to users based on their role, location, or any other specific attribute.
- Specialized options for populating posts, users, taxonomies, terms, and Gravity Forms entries, which allows you to populate directly from the WordPress database, providing a wide net for capturing relevant data.
The combination of Gravity Forms Easy Passthrough and Gravity Forms Populate Anything can unlock the true potential of your Gravity Forms, enabling dynamic data retrieval and display, and ensuring a more streamlined and personalized user experience.
Let’s see how you can put these tools to work!
Tutorial: How to retrieve and display field values in Gravity Forms dynamically with GP Populate Anything
For this tutorial, we’re going to be using GP Populate Anything. However, if you’re looking for a straightforward solution to carry over data from one form to another, GP Easy Passthrough might be a better fit for you – check out our full walkthrough on how to set it up here.
Let’s dive in:
- Download and install the plugin.
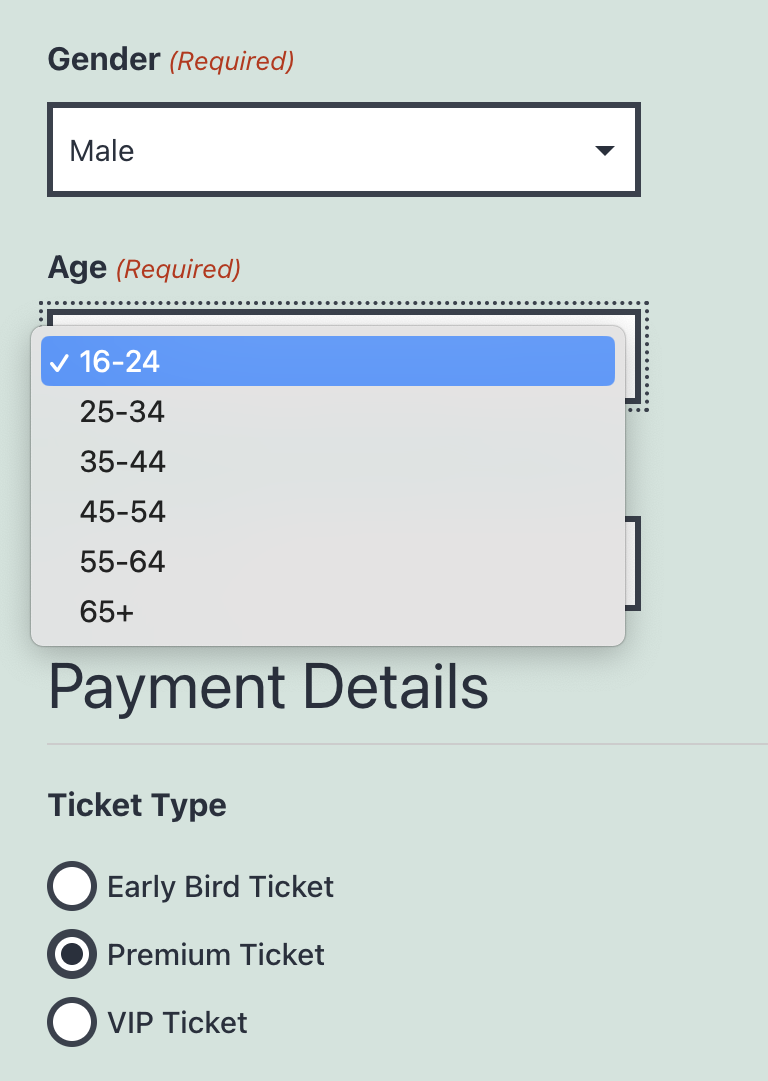
Gravity Forms Populate Anything lets you dynamically populate field choices and values with just about anything.
- Open the form you want to add dynamic objects to in the Gravity Forms editor.
- Add a field that supports choices, such as a Drop Down or Radio Button field, or a text-based field like Single Line Text.
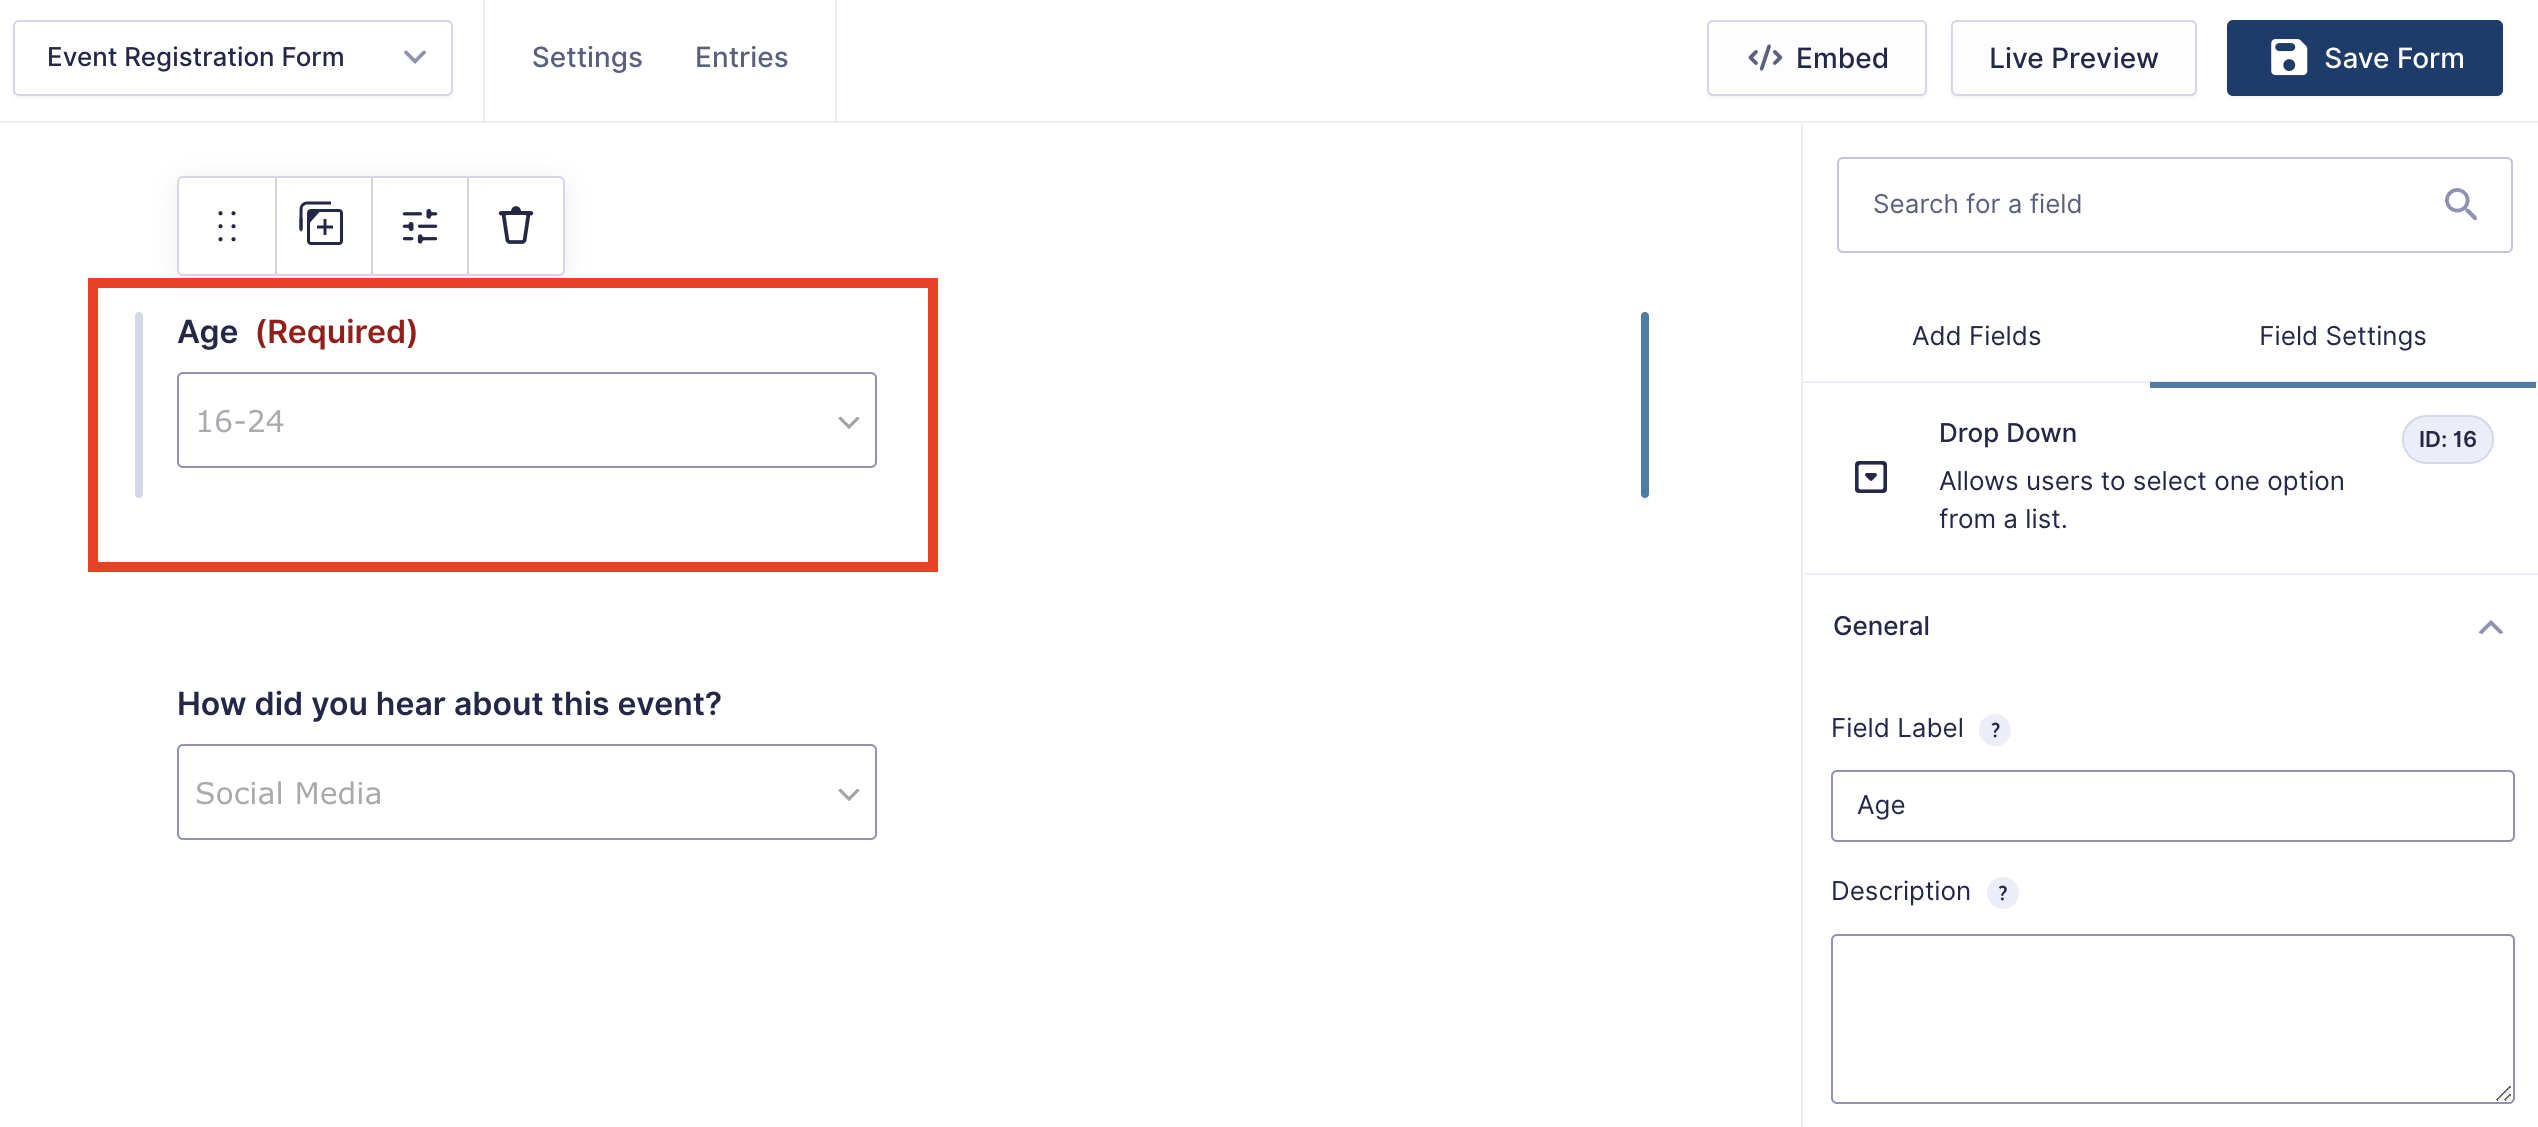
- Check the Populate choices dynamically or Populate value dynamically box (depending on whether you have chosen a choice field or text field).
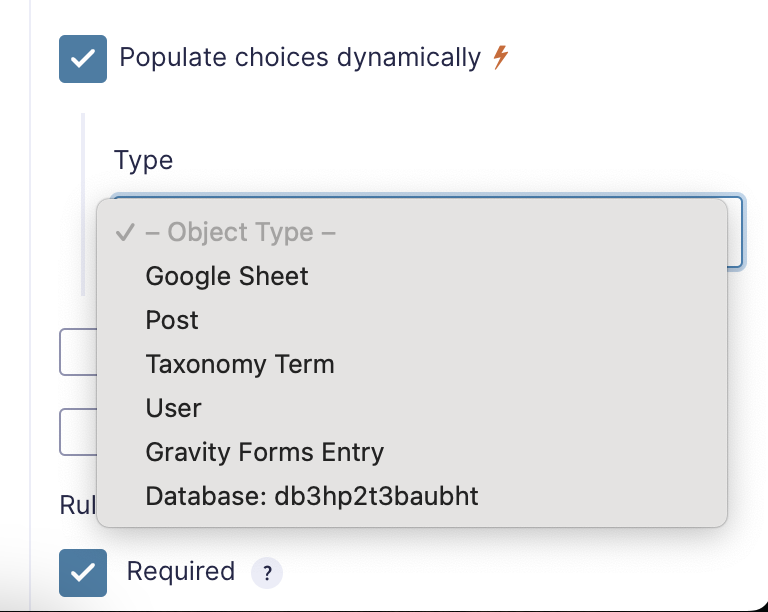
- Configure the conditions for dynamic population:
- Select the type of object you want to use to dynamically populate the field (GP Populate Anything has built-in options for Post, Taxonomy, User, Gravity Forms Entry, and Database objects).
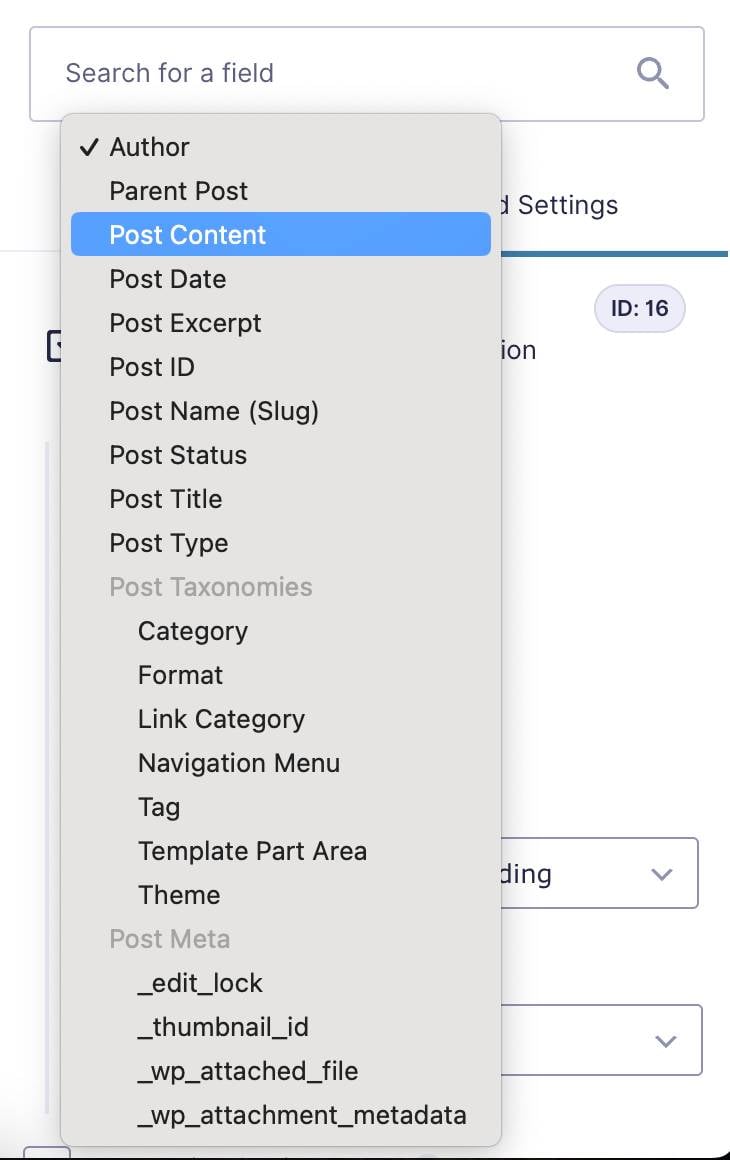
- Select the filter properties. This will filter the data set that you are drawing from, enabling you to pull specific dynamic data into your form field choices or values. These are determined by the object you have chosen – for example, if you select Post, you can choose from properties like Author, Parent Post, Post ID, etc. You can add multiple filter conditions or filter groups at once for more granular control of your data.
- Select how your data is ordered to determine which result is displayed in your dynamically populated field.
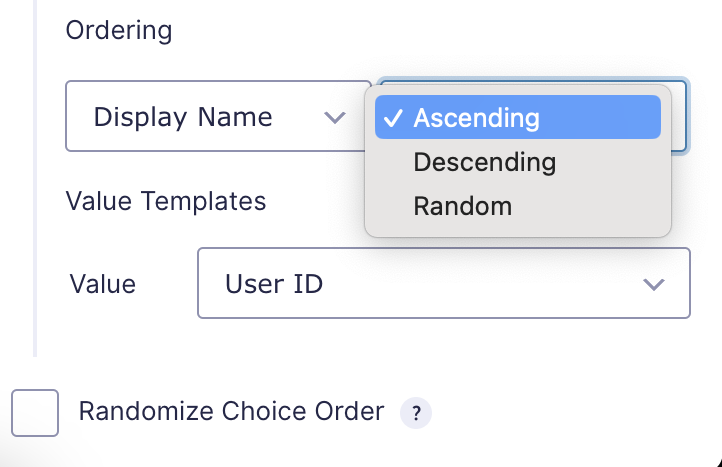
- Choose the value to be displayed in the dynamically populated field (again, your choices here will be determined by the object you have chosen).
- Preview your form on the front end to ensure that your dynamic fields are populating correctly.
GP Populate Anything also allows you to use live merge tags to include dynamic field data anywhere within your forms, including labels, descriptions, choices, values, and HTML content.
When GP Populate Anything is activated, any merge tag prefixed with an @ symbol will be automatically replaced when its associated field is updated. You can even include a special fallback modifier to use pre-defined fallback text when the merge tag doesn’t have a value.
How do you retrieve and display Gravity Forms field values after submission?
Gravity Forms offers built-in functionality to display field values after a form submission inside the form confirmation, notification message, or post content templates, using merge tags.
In order to retrieve and display this data elsewhere, such as feed submitted form data into third-party applications, you’ll need to use the gform_after_submission hook.
To retrieve specific field values, you can use the Entry Object. For this, you’ll need to use the Field ID as the key to the $entry array.
Gravity Forms provides in-depth documentation about how to use the gform_after_submission hook, which we recommend reading before you get started.
The Gravity Forms Webhooks Add-On also enables users to send form entry data to third-party applications with little or no coding required – check out their article on Triggering Webhooks on Form Submissions to learn more.
And, of course, we have a few of our own solutions for data retrieval post-submission:
- Use Gravity Forms Post Content Merge Tags to enable the use of merge tags in WordPress post content. This is great for creating dynamic templates for content like thank you pages, order confirmations, receipts, order status trackers, and more.
- Use Gravity Forms Entry Blocks to display and edit Gravity Forms entries on the front end of your site. This perk adds a new block to your WordPress Block Editor that enables you to display editable form entries in pages, posts, or widgets.
Dynamically retrieve and display field values in your Gravity Forms
The process of fetching and displaying dynamic data is made considerably easier with tools like Gravity Forms Populate Anything and Gravity Forms Easy Passthrough. These plugins allow you to pull specific data into your form field choices or values, enabling you to create more interactive, personalized, and effective forms.
Whether you’re looking to streamline user experiences, reduce data entry errors, or create more personalized forms, Populate Anything is a fantastic tool to have in your arsenal.
But why stop there? Explore the full range of Gravity Perks to unlock even more features and create forms that not only meet but exceed your needs and those of your users. Get started with building dynamic forms today and see the difference it can make. 💯


I created a form with a nested form, I don’t know how to make the nested form fields have conditional logic, (show/hide) based on the fields in the parent form fields Thank you very much.
Hey Jonatan,
You could pass the value from the Parent form to a hidden field in the Nested form using the {Parent} merge tag:
https://gravitywiz.com/documentation/gravity-forms-nested-forms/#the-parent-merge-tag
This allows the Nested form to access the parent form’s value, which can then be used for conditional logic within the Nested form.
Hope this helps!