How to Build a Simple Job Board with Gravity Forms
Learn how to build a job board using Gravity Forms and more efficiently manage the application process, display and filter job listings, and customize applicant follow-up.
Looking to build a job board? Maybe to accommodate your own applicant search, or as part of a client project?
Building a simple job board in Gravity Forms will save you from having to wade through the murky waters of old legacy job boards, having to screen applicants, or having to remember to follow up with each of them. 😅
Not to mention, you can use a combination of Gravity Forms and Gravity Perks to more efficiently manage the applicant process, filter applications to your exact needs, configure how job listings are displayed, customize applicant follow-up, and more.
In this article, we’re going to show you how to:
- Build a job postings form to store all of your job data.
- Build a job application form for users to apply for jobs.
- Review and process job applications.
- How you can take it even further with more perks and ideas.

- Create a Job Postings Mapping Form
- Create a Job Application Form
- Display Job Postings and Applications with Entry Blocks
- Taking it Further
Create a Job Postings Mapping Form
Download the finished form here and import it to your site to get started right away.
Let’s start by building a form that we can use to store all the data we need for each job posting we want to create. This will be an internal form that is used as a job database.
Build the Form
Create a new form called Job Postings with the following fields:
- Job Title
- Job Description
- Department
- Drop Down field with the following options: Marketing, Finance, Sales, Customer Support.
- Status
- Drop Down field with the following options: Active, Hidden, Filled.
- Internal Job ID
- This will be a Unique ID field.
Submit the Job Posting Data
Once all the fields are added and the form is saved, click on Preview and fill it out with the job information you need for one of your job postings. Submit the form and repeat for each job posting you want to create.
For more details about this method, check out our in-depth article about using Gravity Forms as a Simple Database!
Create a Job Application Form
Download the finished form here and import it to your site to get started right away.
Now that we have our mapping form built and all of the job postings created, the next step is to build the job application form. This form will be visible to your users, and we’ll take advantage of GP Populate Anything to display the job postings in a dropdown field for the user to select from.
Build the Form
Create a new form called Apply Now with the following fields for applicants to fill out:
- Name
- Phone
- Select Job (Drop Down field)
- Why do you want to work for us? (Paragraph Text field)
- Is User Logged In?
- This will be a Hidden field that we’ll use to hide the Application Status field from users.
- Under the Advanced header, set the default value to
{user:user_login}. If the user isn’t logged in, the user login merge tag won’t populate anything and the value of this field will be empty. We’ll assume that only admins will be logging in, and job applicants will not have a login.

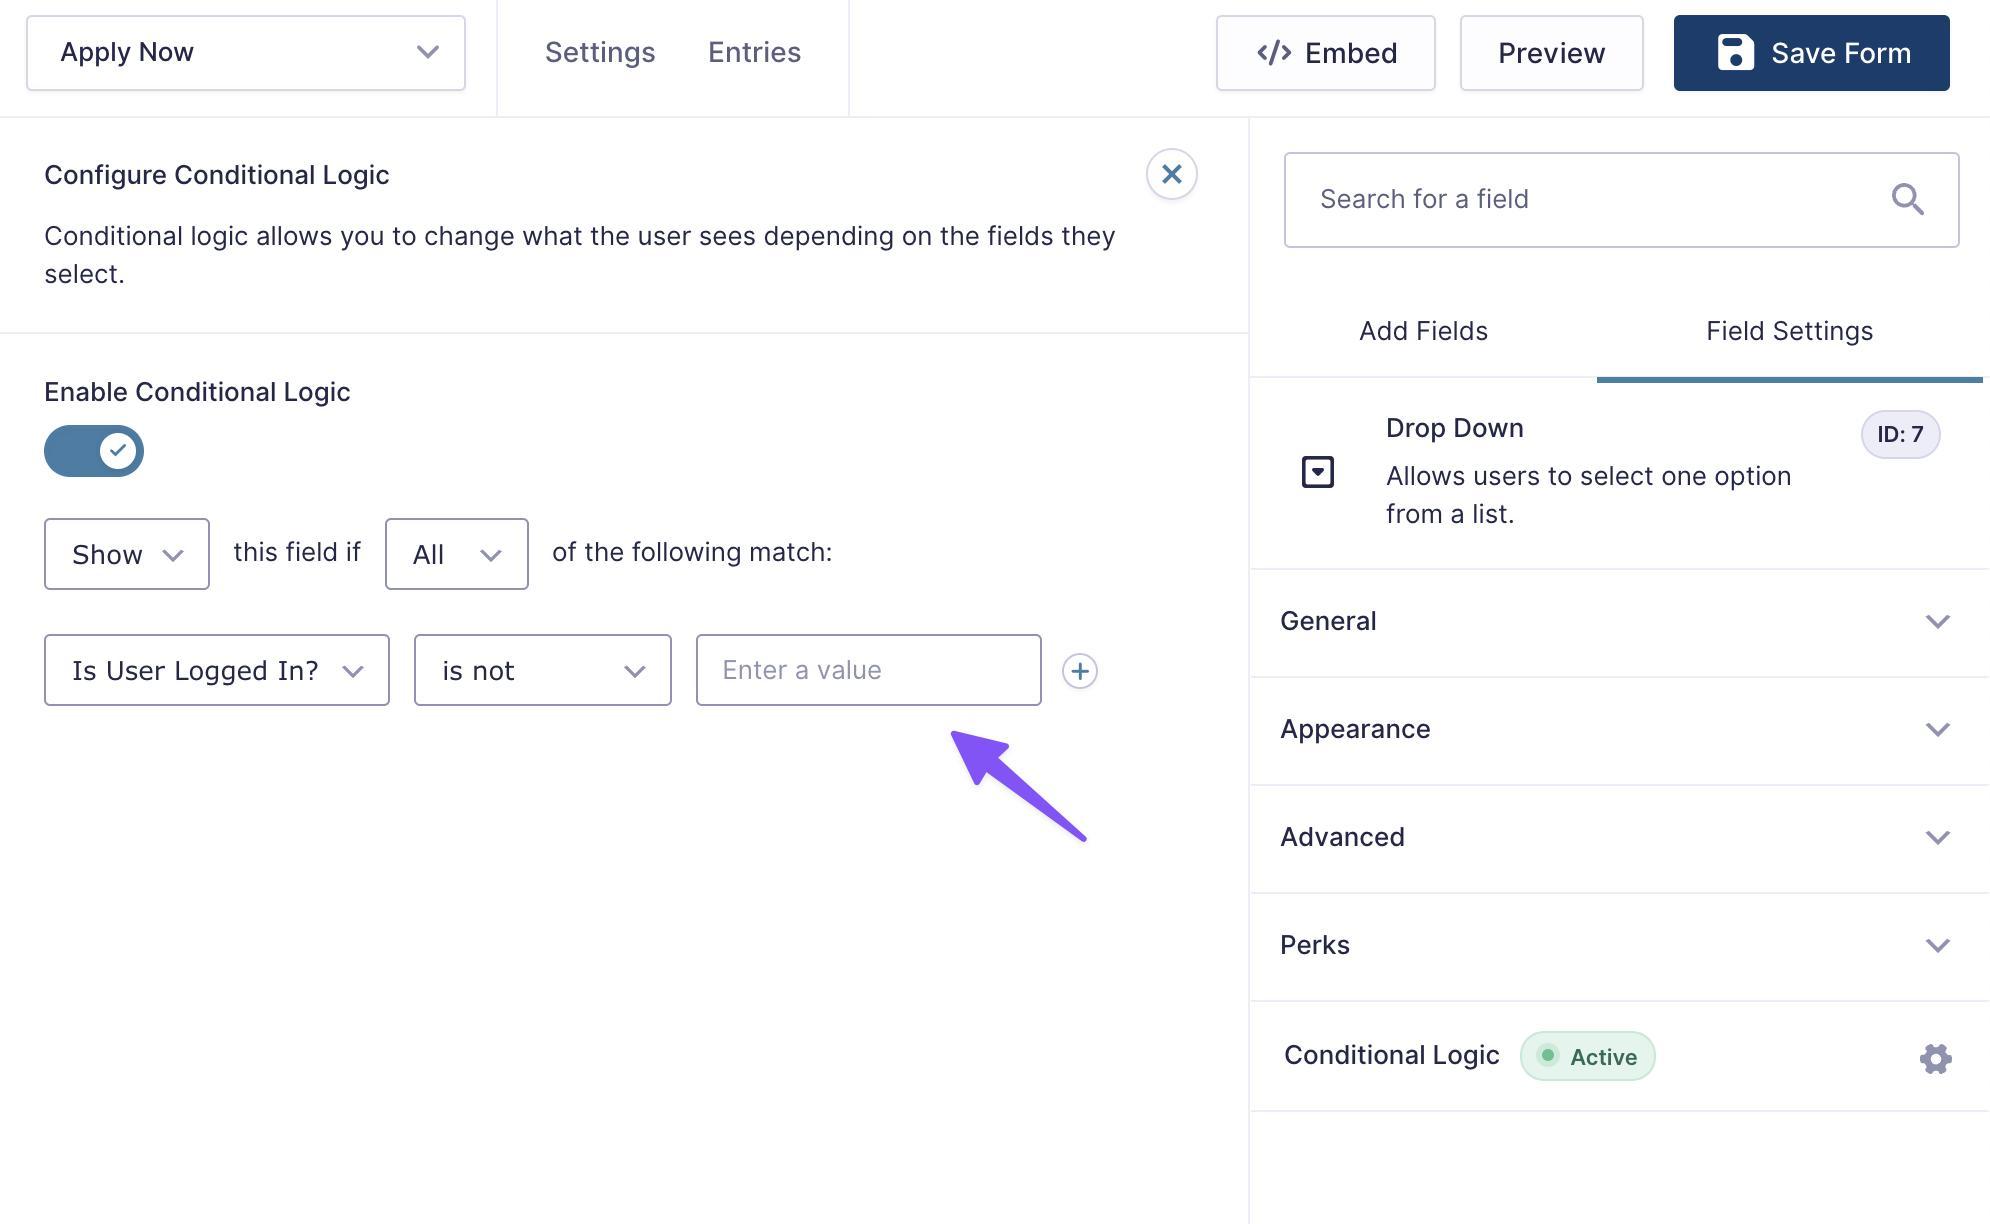
- Application Status
- This will be a Drop Down field with the following values: Pending, Interview, Rejected.
- Under Field Settings, click on Conditional Logic and make sure the Enable Conditional Logic slider is active. Set the logic to only show this field if Is User Logged In? is not empty, like this:
- Job Application ID
- This will be a Unique ID field and is automatically hidden from the user.
Here’s some more information about the different ways you can use conditional logic based on a user’s login with Gravity Forms.
Populate the Select Job Field
Once the fields are created, let’s populate the Select Job field with the job postings we created earlier.
In the form, click on Select Job. Under the General header, click Populate choices dynamically.
Under Type, choose Gravity Forms Entry. Under Form, choose Job Postings. We’ll add a filter group to ensure that only job postings with an Active status are displayed, and also set Value and Label to Job Title:
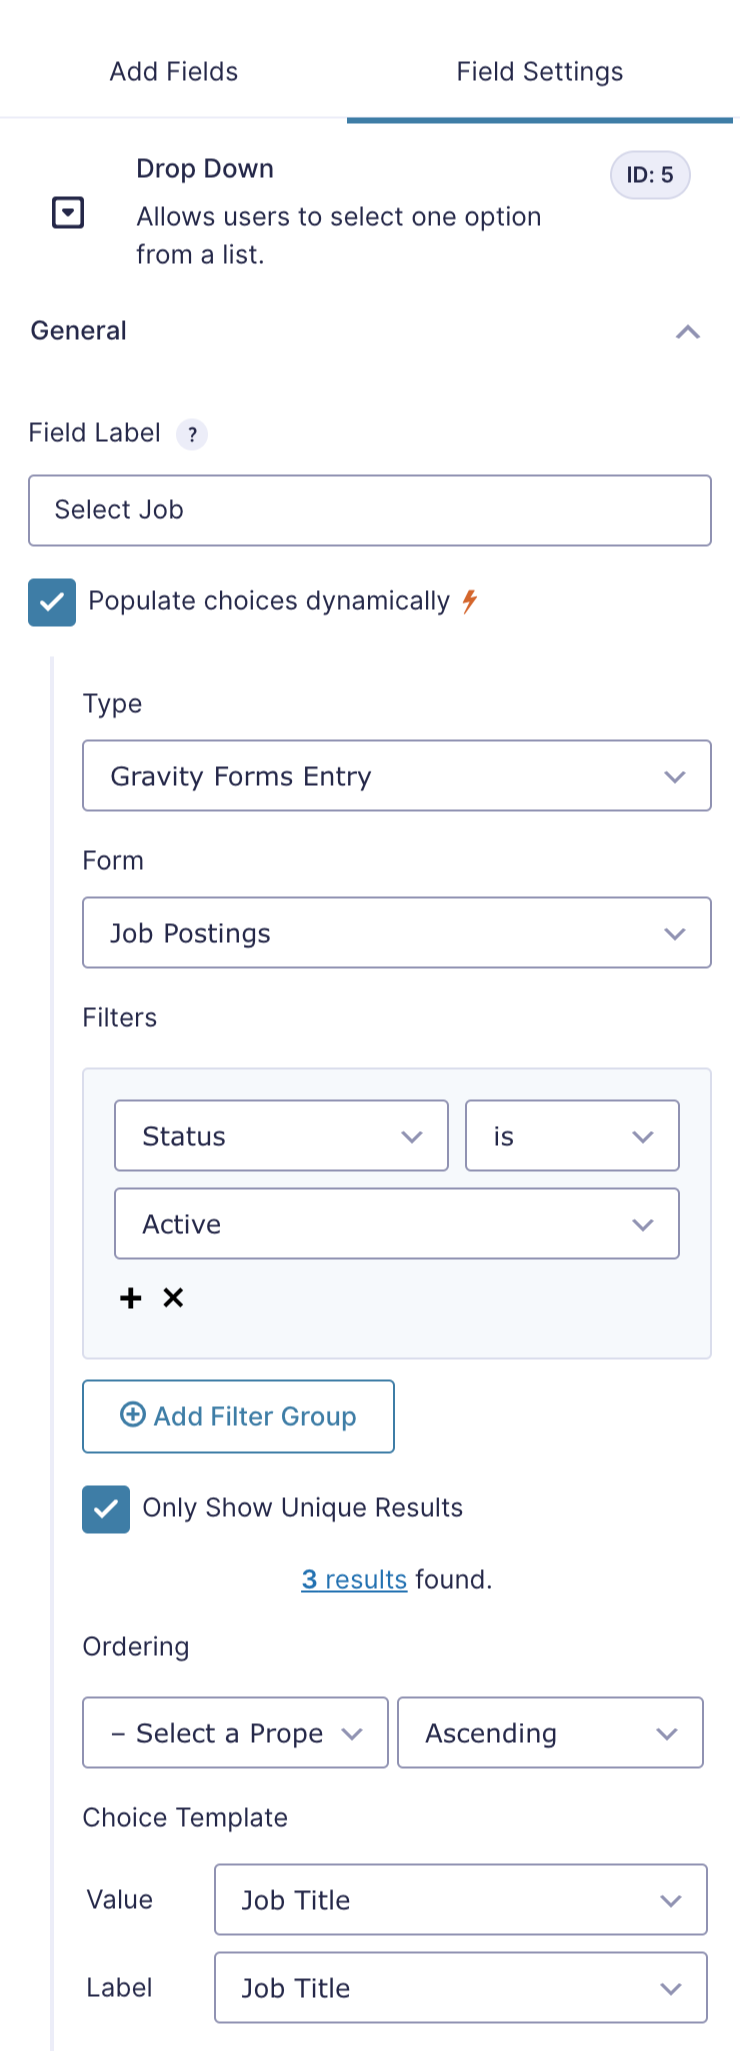
Finally, make sure Allow field to be populated dynamically is checked under the Advanced header. Under Parameter Name, set the value to be “selectJob”. We’ll use this setting later.
Your applicants will see all of the active job posting entries you created. And best of all, whenever you add a new job posting or set the status to Inactive, the dropdown field automatically updates!
Limit Submissions
To prevent duplicate submissions and spam, let’s limit the number of job applications that users can create.
Gravity Forms has a built-in No Duplicates feature that can make sure a certain field cannot have the same value. If we had different forms for each job, we could use No Duplicates to make sure the email field is unique.
However, we have just one form with many jobs, and we want to restrict users so that they can apply to multiple jobs, but not more than once for the same job posting. Thankfully, GP Limit Submissions can help!
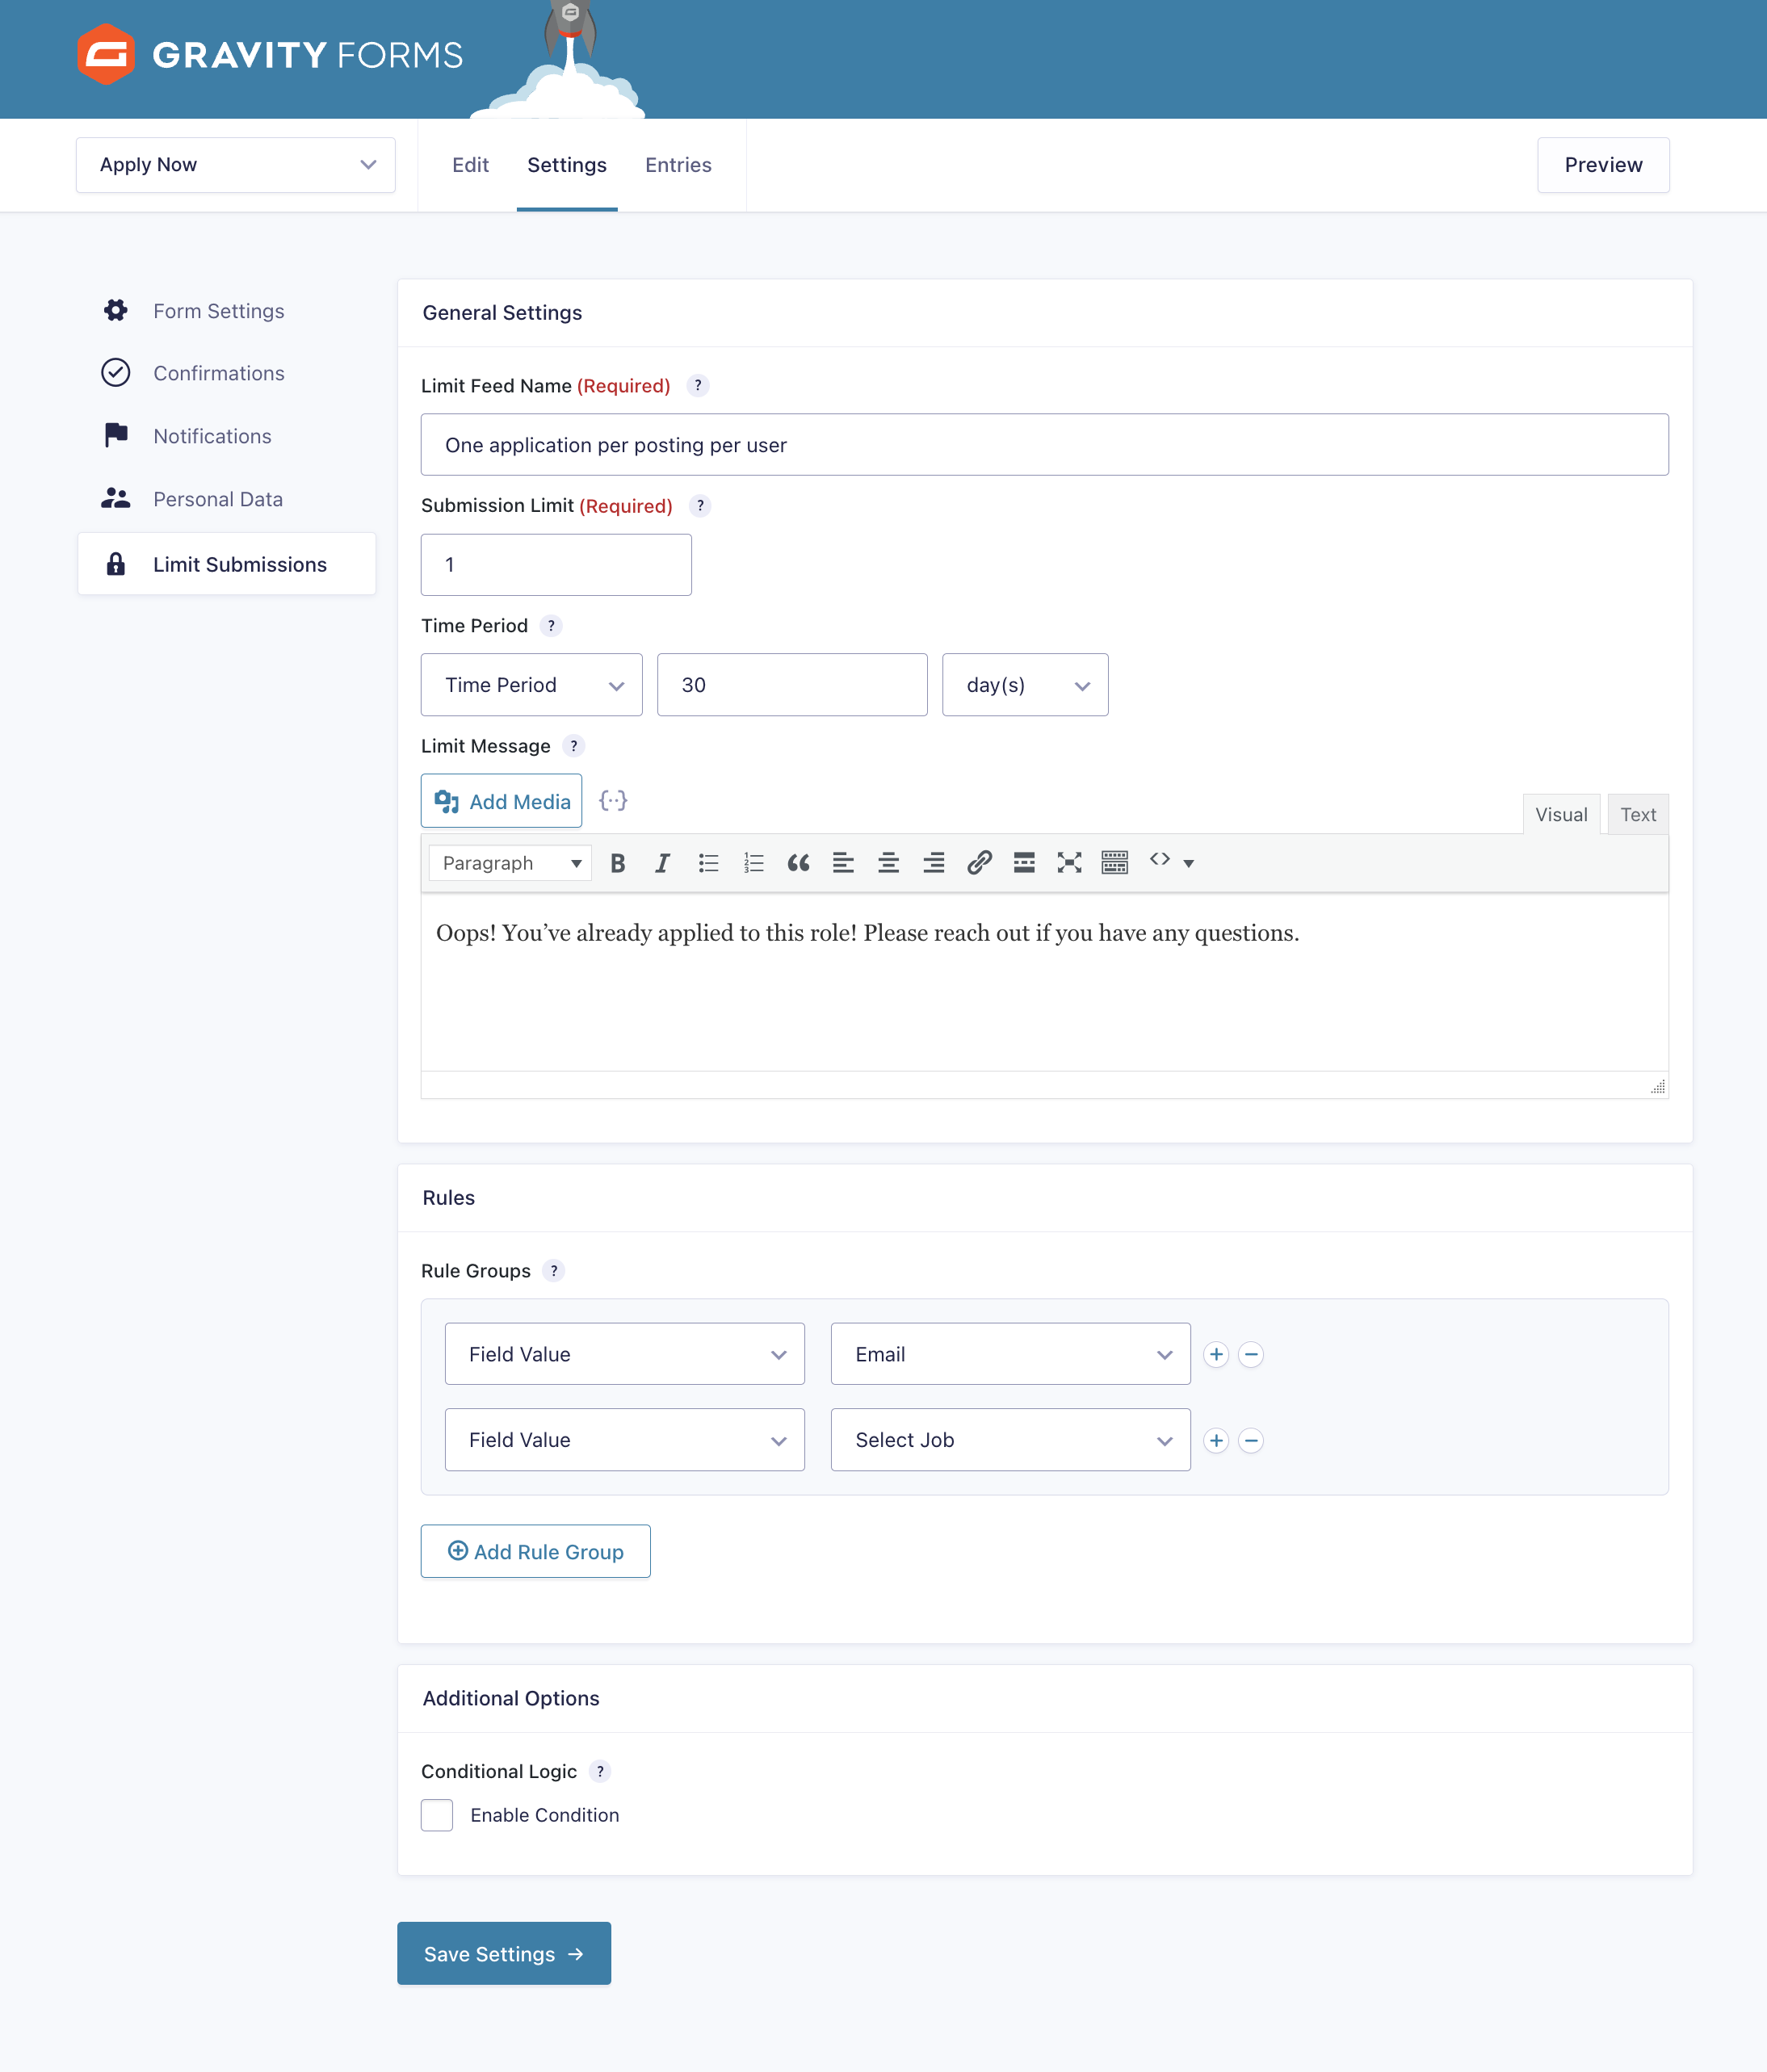
From the form view, navigate to Settings › Limit Submissions. Towards the right hand side of the Limit Feeds box, click Add New. We’ll name the fields as follows:
- Limit Feed Name: “One application per posting per user”
- Submission Limit: 1
- Time Period: Choose Time Period and enter 30 days.
- This setting allows the user to re-apply after one month.
- Limit Message: “Oops! You’ve already applied to this role! Please reach out if you have any questions.”
Let’s create two new rules that will make sure the user’s email address can only be used once to apply to a specific job. After 30 days, we’ll allow them to apply again.
Under Rules › Rule Groups, click Add Rule Group. In the new row that appears, choose Field Value › Email.
Next, click the + icon on the right hand side to add another Rule. In the new Rule row, choose Field Value › Select Job:
Display Job Postings and Applications with Entry Blocks
Display Job Postings for Users
Now that we’ve configured our job postings and job application forms, let’s create our main job board page to display all of the available jobs. We’ll use Gravity Forms Entry Blocks to achieve this.
GP Entry Blocks is a handy perk that lets users view and edit form entries, all from the front end. With Entry Blocks, we can also display the job entries in a table format, and even filter the entries to only display job postings that have an active status. This makes the application process extra convenient for applicants!
Before you begin, make sure you have a page created on your site where you’re displaying the job application form. Take note of the application page URL.
Next, create a new page on your site called Job Postings. With GP Entry Blocks enabled, type “/” and choose Gravity Forms Entries. You should see the Entries Block form appear:

Click Select Form and choose Job Postings to show the job postings from the form we created earlier.
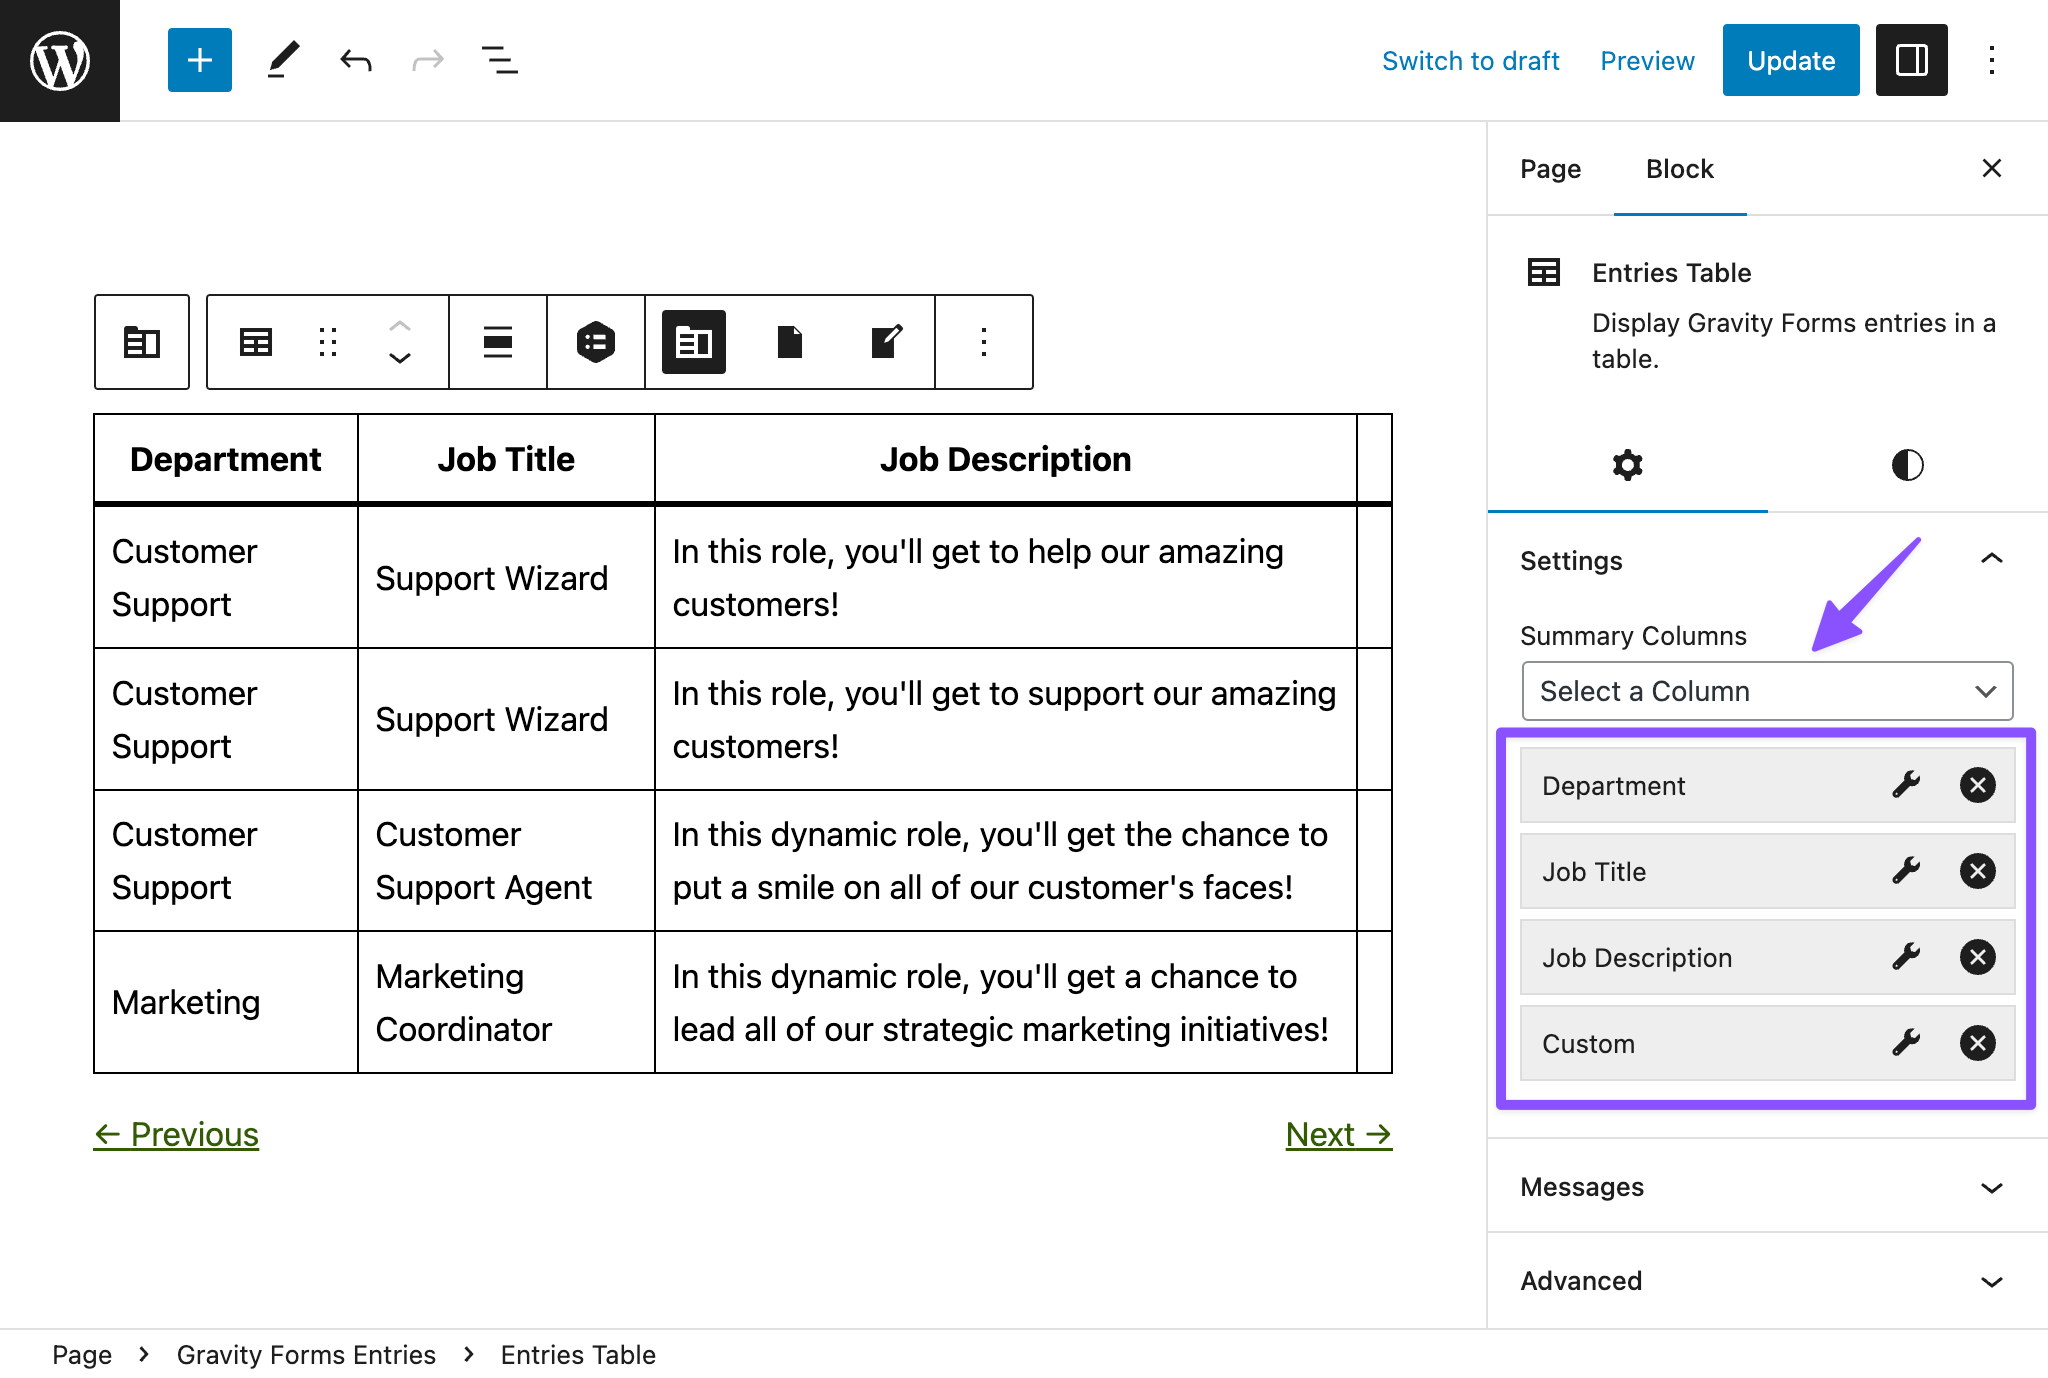
We’ll select Entries Table to display the jobs in a table format for users. You should see a table with a list of IDs loaded for each job. But how do we know which ID corresponds to each job title?
Let’s update the default table view and show the job title instead of the ID. Click on the table, and under Block › Settings › Summary Columns, we can customize exactly which fields from the form appear in the table.
Use the Select a Column dropdown to make sure the following fields are included:
- Department
- Job Title
- Job Description
- Add a Custom column. We’ll look at this more below.
Entry Blocks is similar to GravityView in the sense that they are both used to display entries in the frontend, but that’s where similarities end. Learn more about Entry Blocks and GravityView here.
Turn the Custom Column into an “Apply Now” link
Finally, we’ll add an “Apply Now” link in the entries table. This link will direct users to the Apply Now form, and will pre-fill the Select Job field with the job title they clicked on.
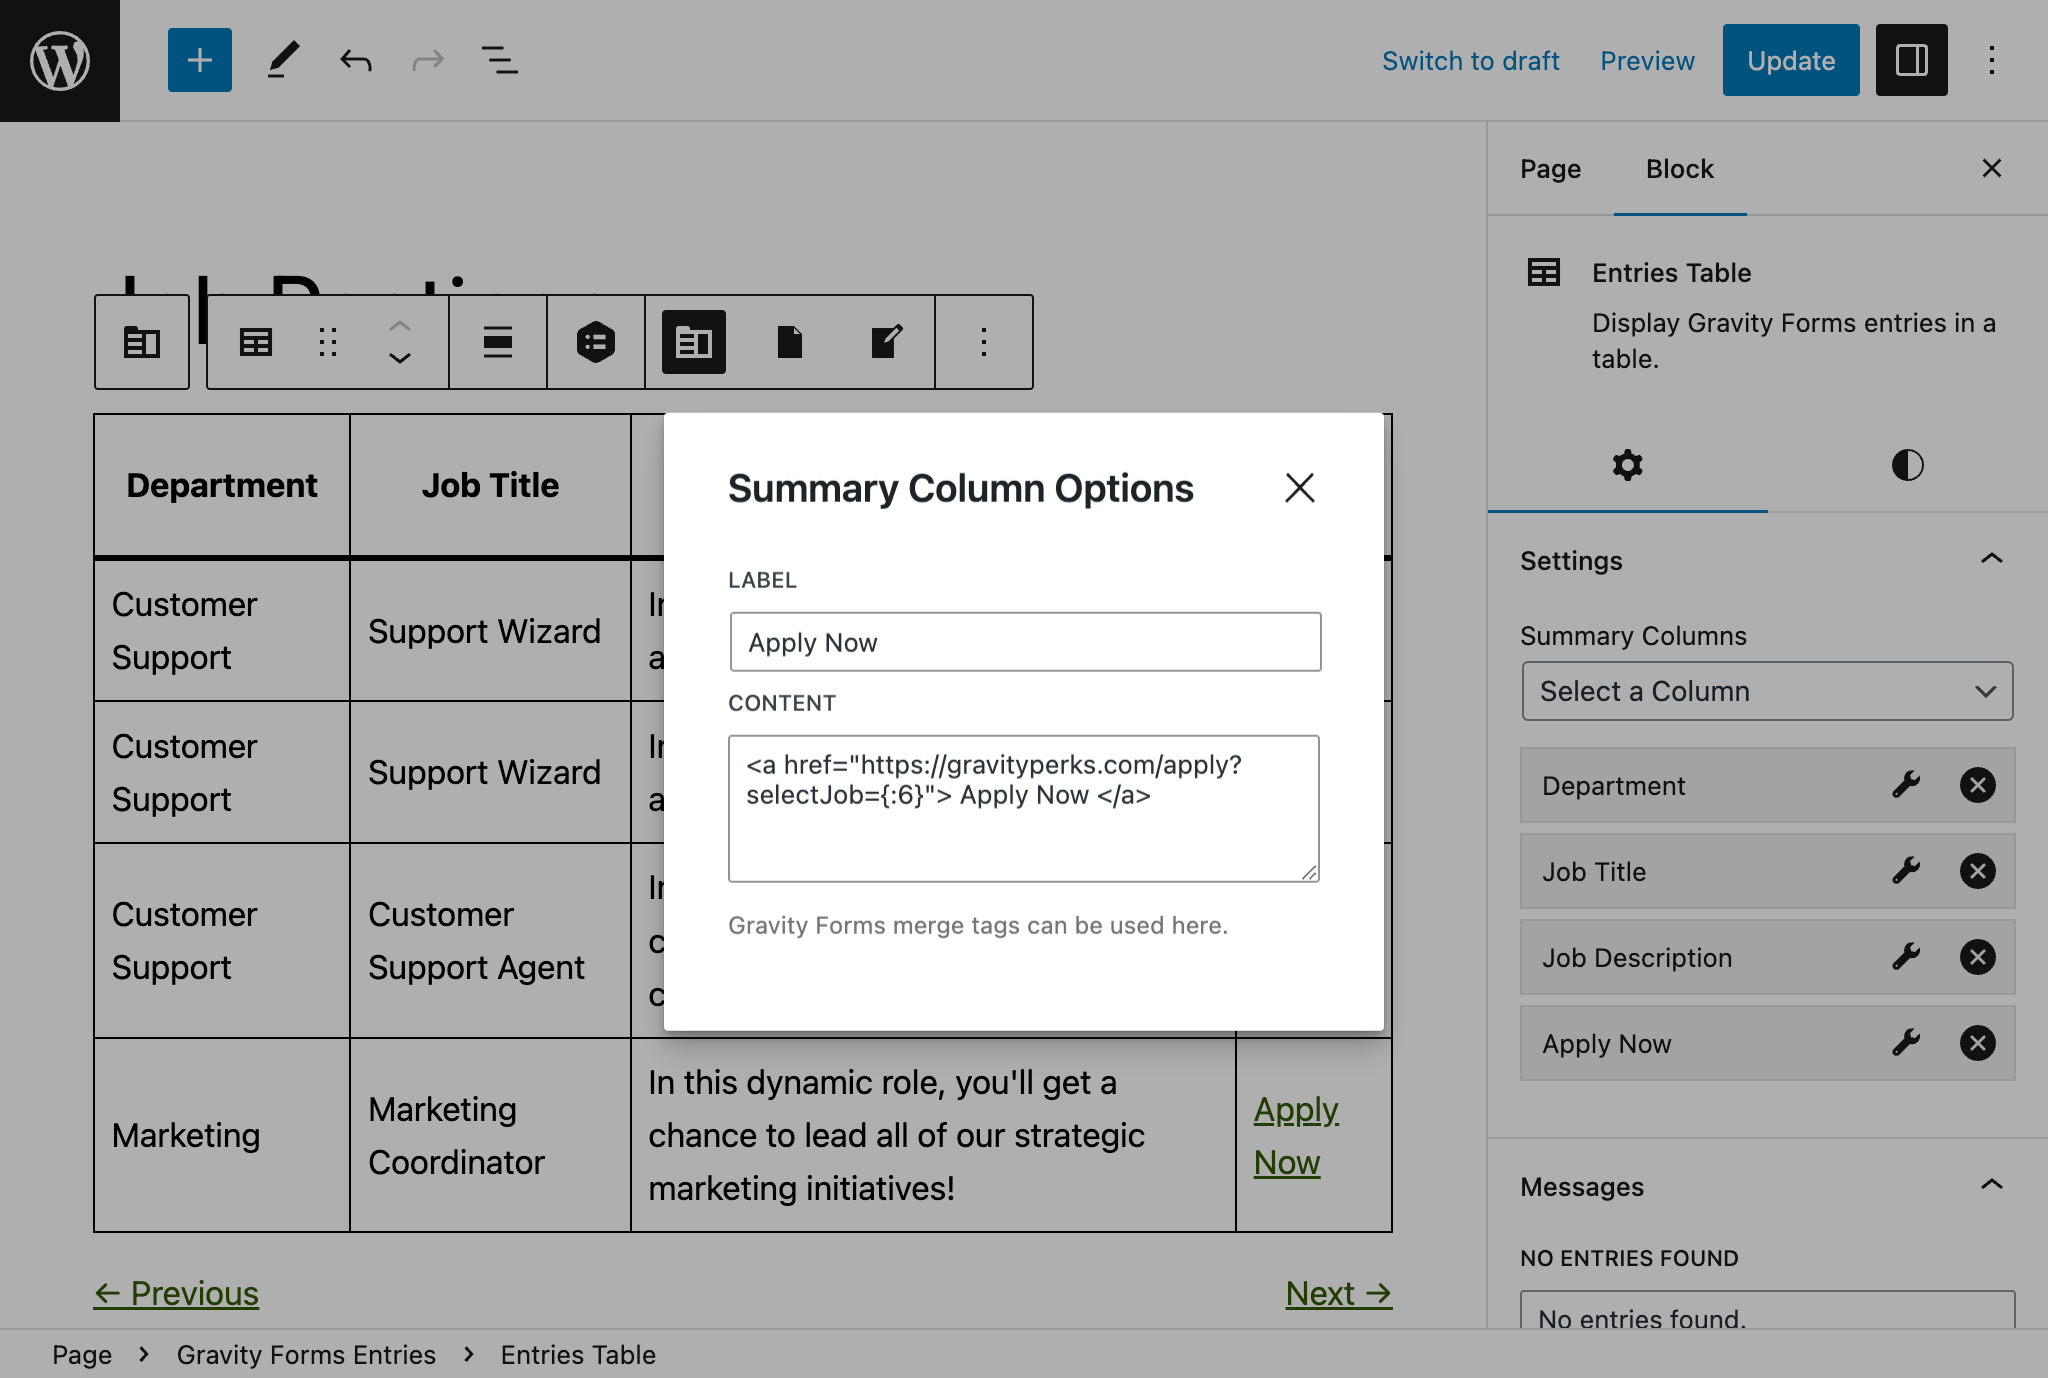
Back in the entries table, navigate to the Custom field we created above, and click on the wrench icon to open the Summary Column Options modal. Set the Label to “Apply Now”.
In the Content area, we’ll add an HTML link to our job application page. To pre-fill the job position, we’ll use a merge tag to set the selected job value in the application form to the title of the job the user clicks on from the job postings form.
The general format of the link looks like this:
<a href="https://gravityperks.com/apply?selectJob={:6}"> Apply Now </a>- Replace https://gravityperks.com/apply with your job application page URL.
- Replace 6 with your Job Title field ID from the Job Postings form.
Populating a form via the query string is just the beginning of what you can do with Gravity Forms dynamic population. For more advanced dynamic population, checkout GP Populate Anything.
Display Job Applications for HR
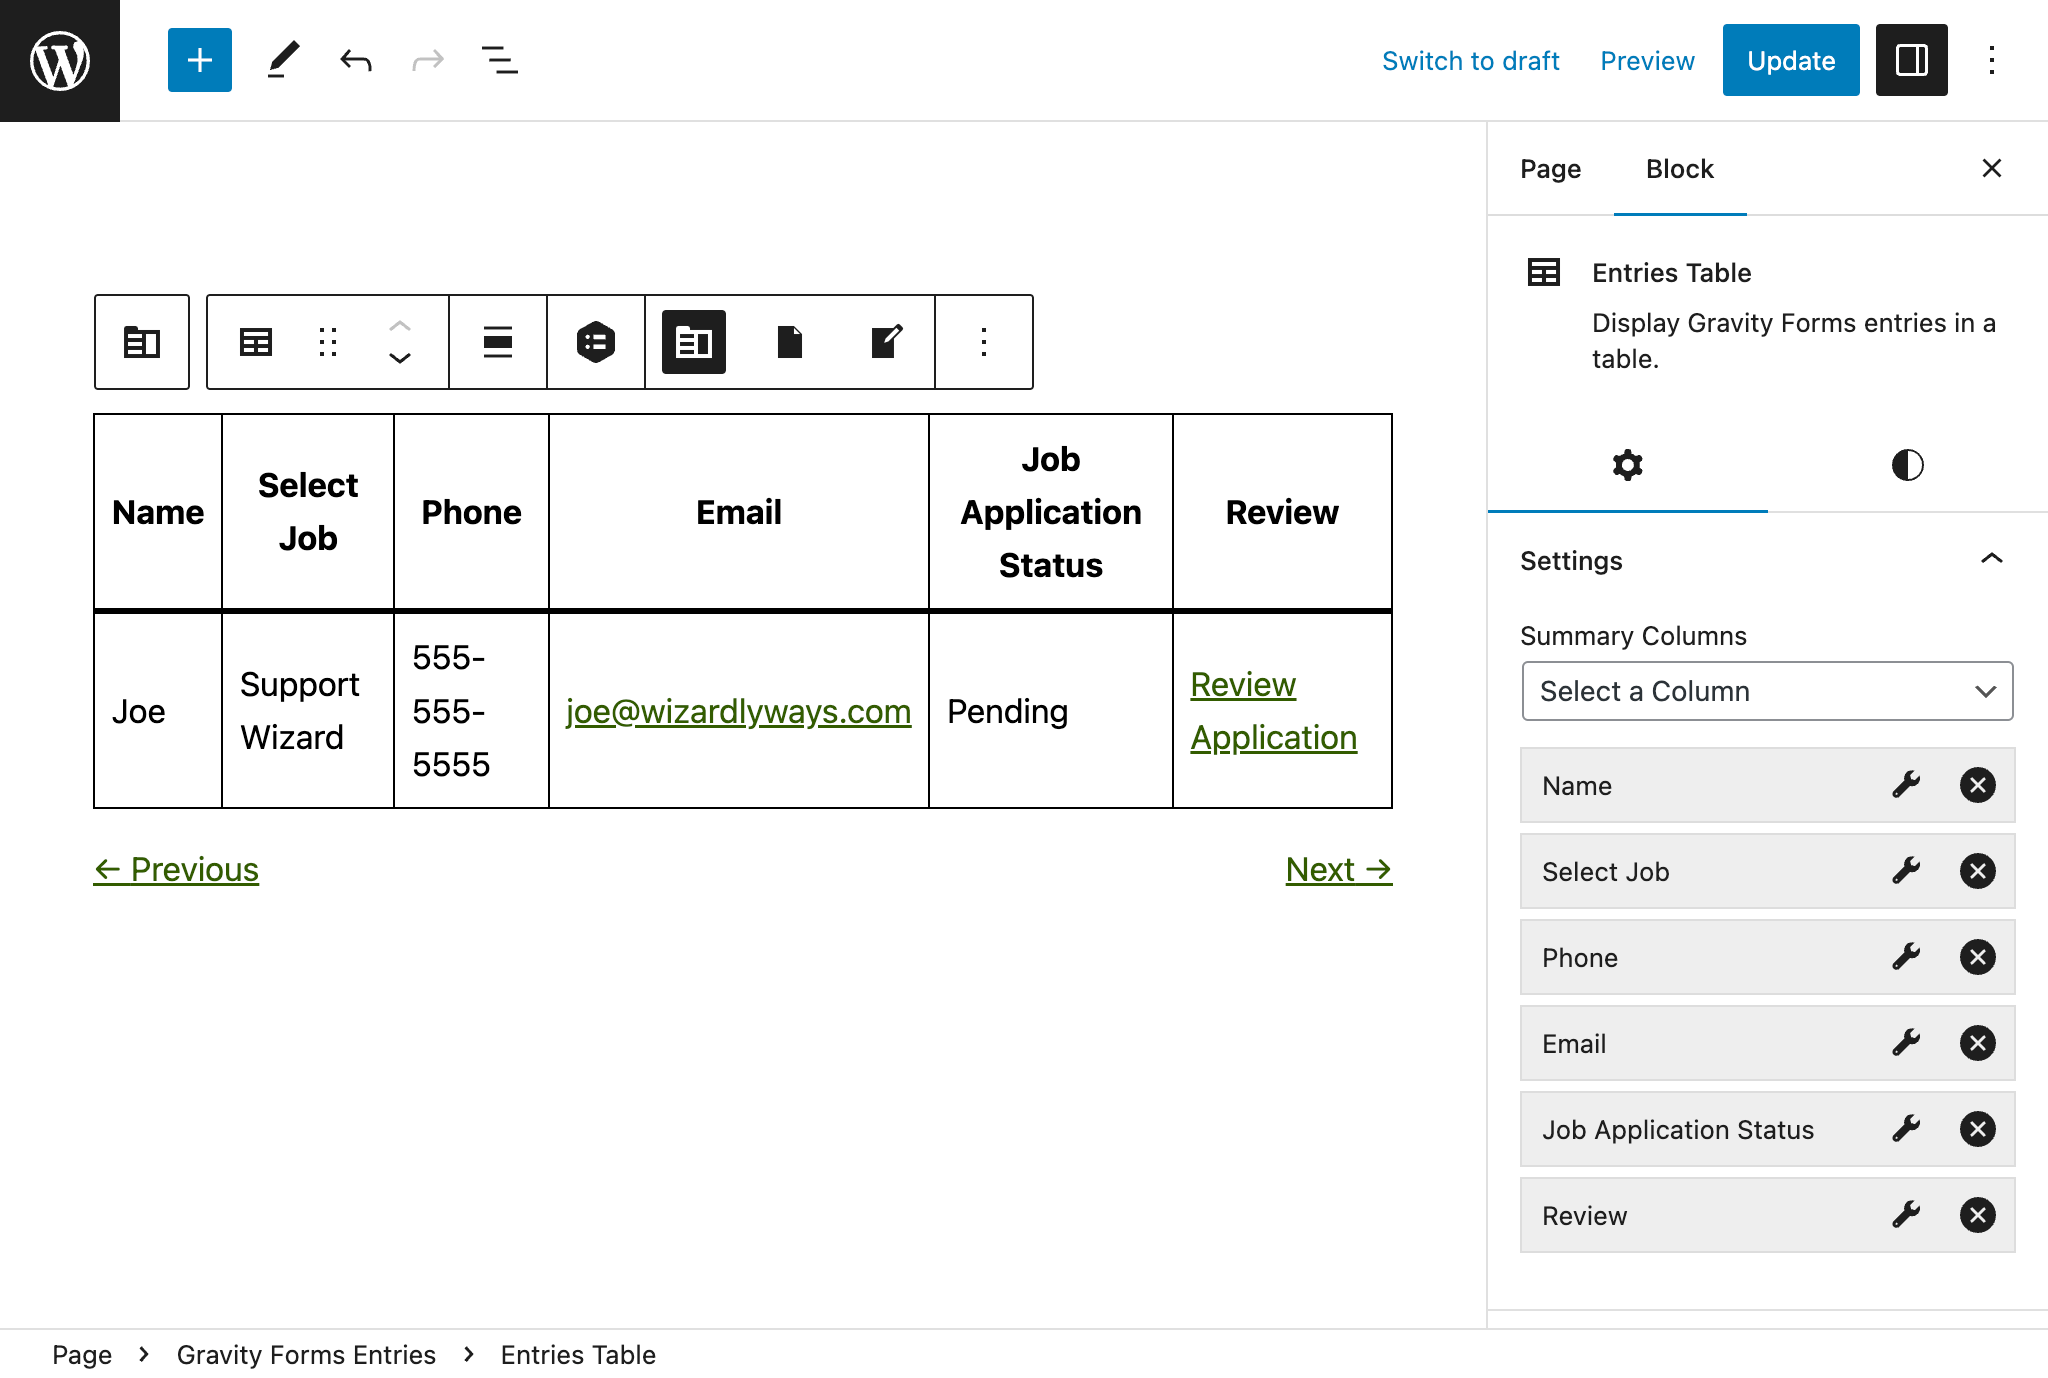
In a similar style, let’s create an admin view for the hiring manager to view all job applications. Instead of making the hiring manager click inside each individual form entry, we’ll display a table of all the job applications so the hiring manager has a clear summary view. We’ll also add a “Review Application” link in the table, so they can easily open the full details and update the application status from the front-end. This way, hiring managers won’t need full admin access – all they need is a standard WordPress login.
Create a new page on your site called Job Application Queue. With GP Entry Blocks enabled, type “/” and choose Gravity Forms Entries. Click Select Form and choose Job Postings to show the job postings from the form we created earlier.
Using the same steps as above, click on the table, and under Block › Settings › Summary Columns, we’ll add the following fields:
- Name
- Select Job
- Phone
- Job Application Status
- Edit Link
- We can re-name this to be more intuitive for HR. Click on the wrench icon and under Custom Label, enter “Review”. Under Link Label, enter “Review Application”.
Notify Applicants of Next Steps
Once the hiring manager has reviewed a job application, wouldn’t it be nice if we could notify applicants about next steps? In this section, we’ll look at how we can use a combination of GP Entry Blocks and GP Notification Scheduler to:
- Notify successful applicants about what next steps look like.
- Notify unsuccessful applicants and thank them for their time.
- Schedule these notifications to be sent with a one day delay.
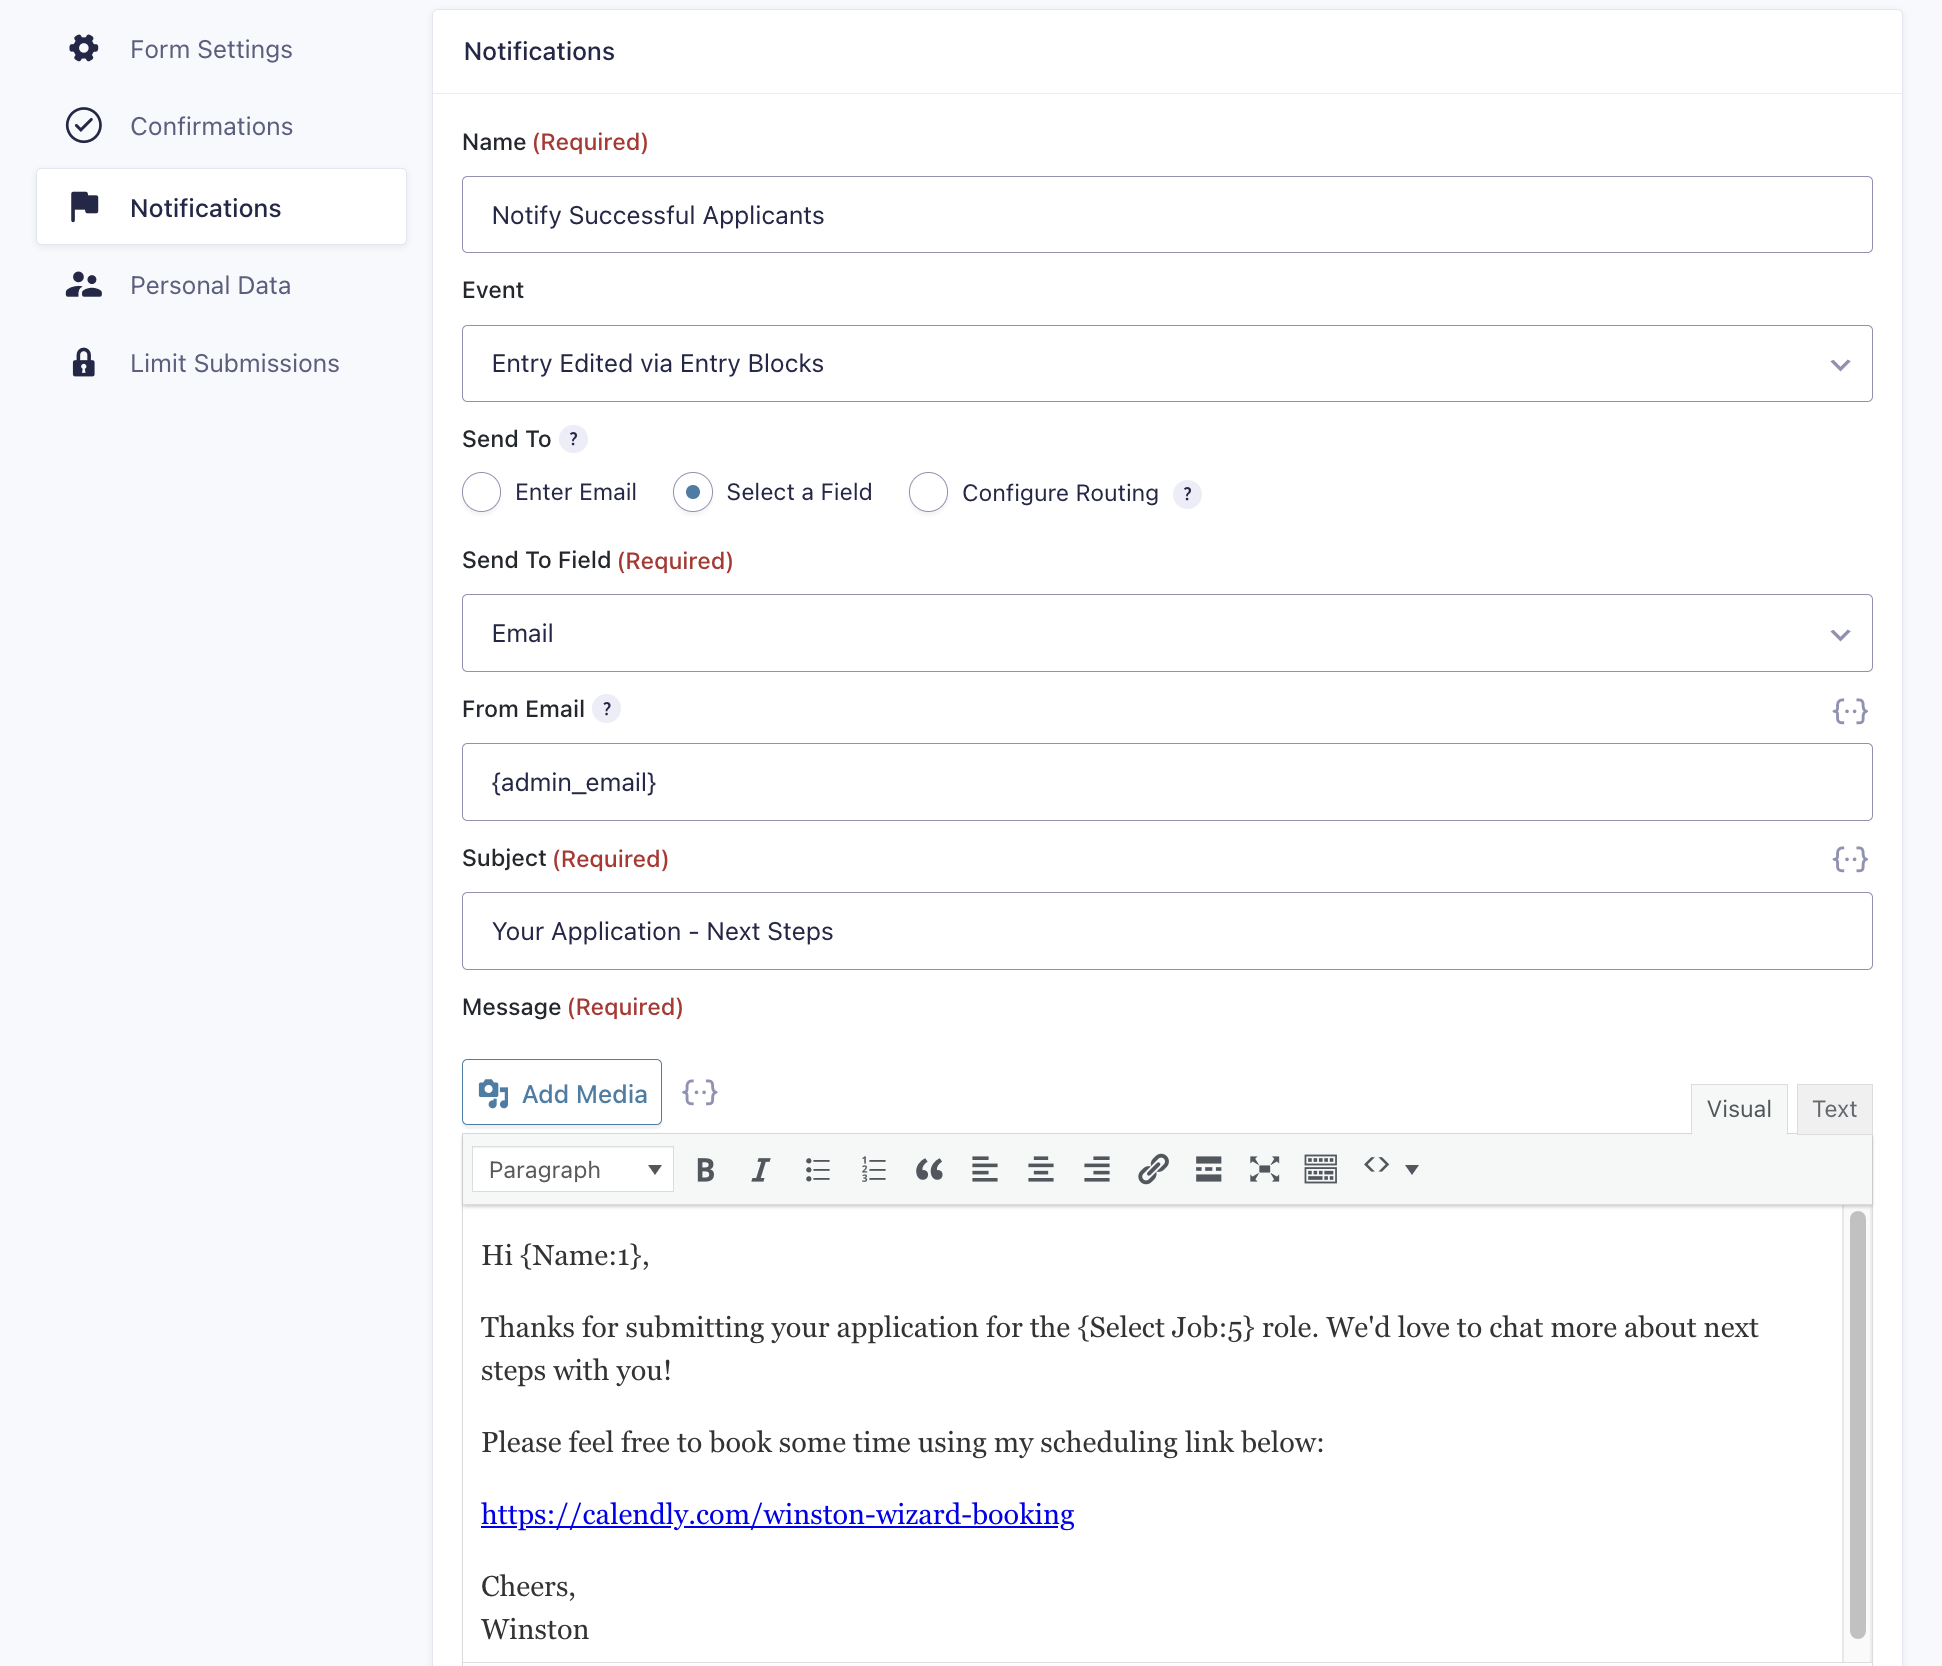
From the Apply Now form, navigate to Settings › Notifications and click Add New. We’ll create a new notification with the following values:
- Name: “Notify Successful Applicants“
- Event: Entry Edited via Entry Blocks
- Send To: Select a Field
- Send To Field: Choose the Email field from the form
- Subject: “Your Application – Next Steps“
- Message: Enter your message to your user here. This example includes an example link to a booking calendar for the applicant to schedule an interview.
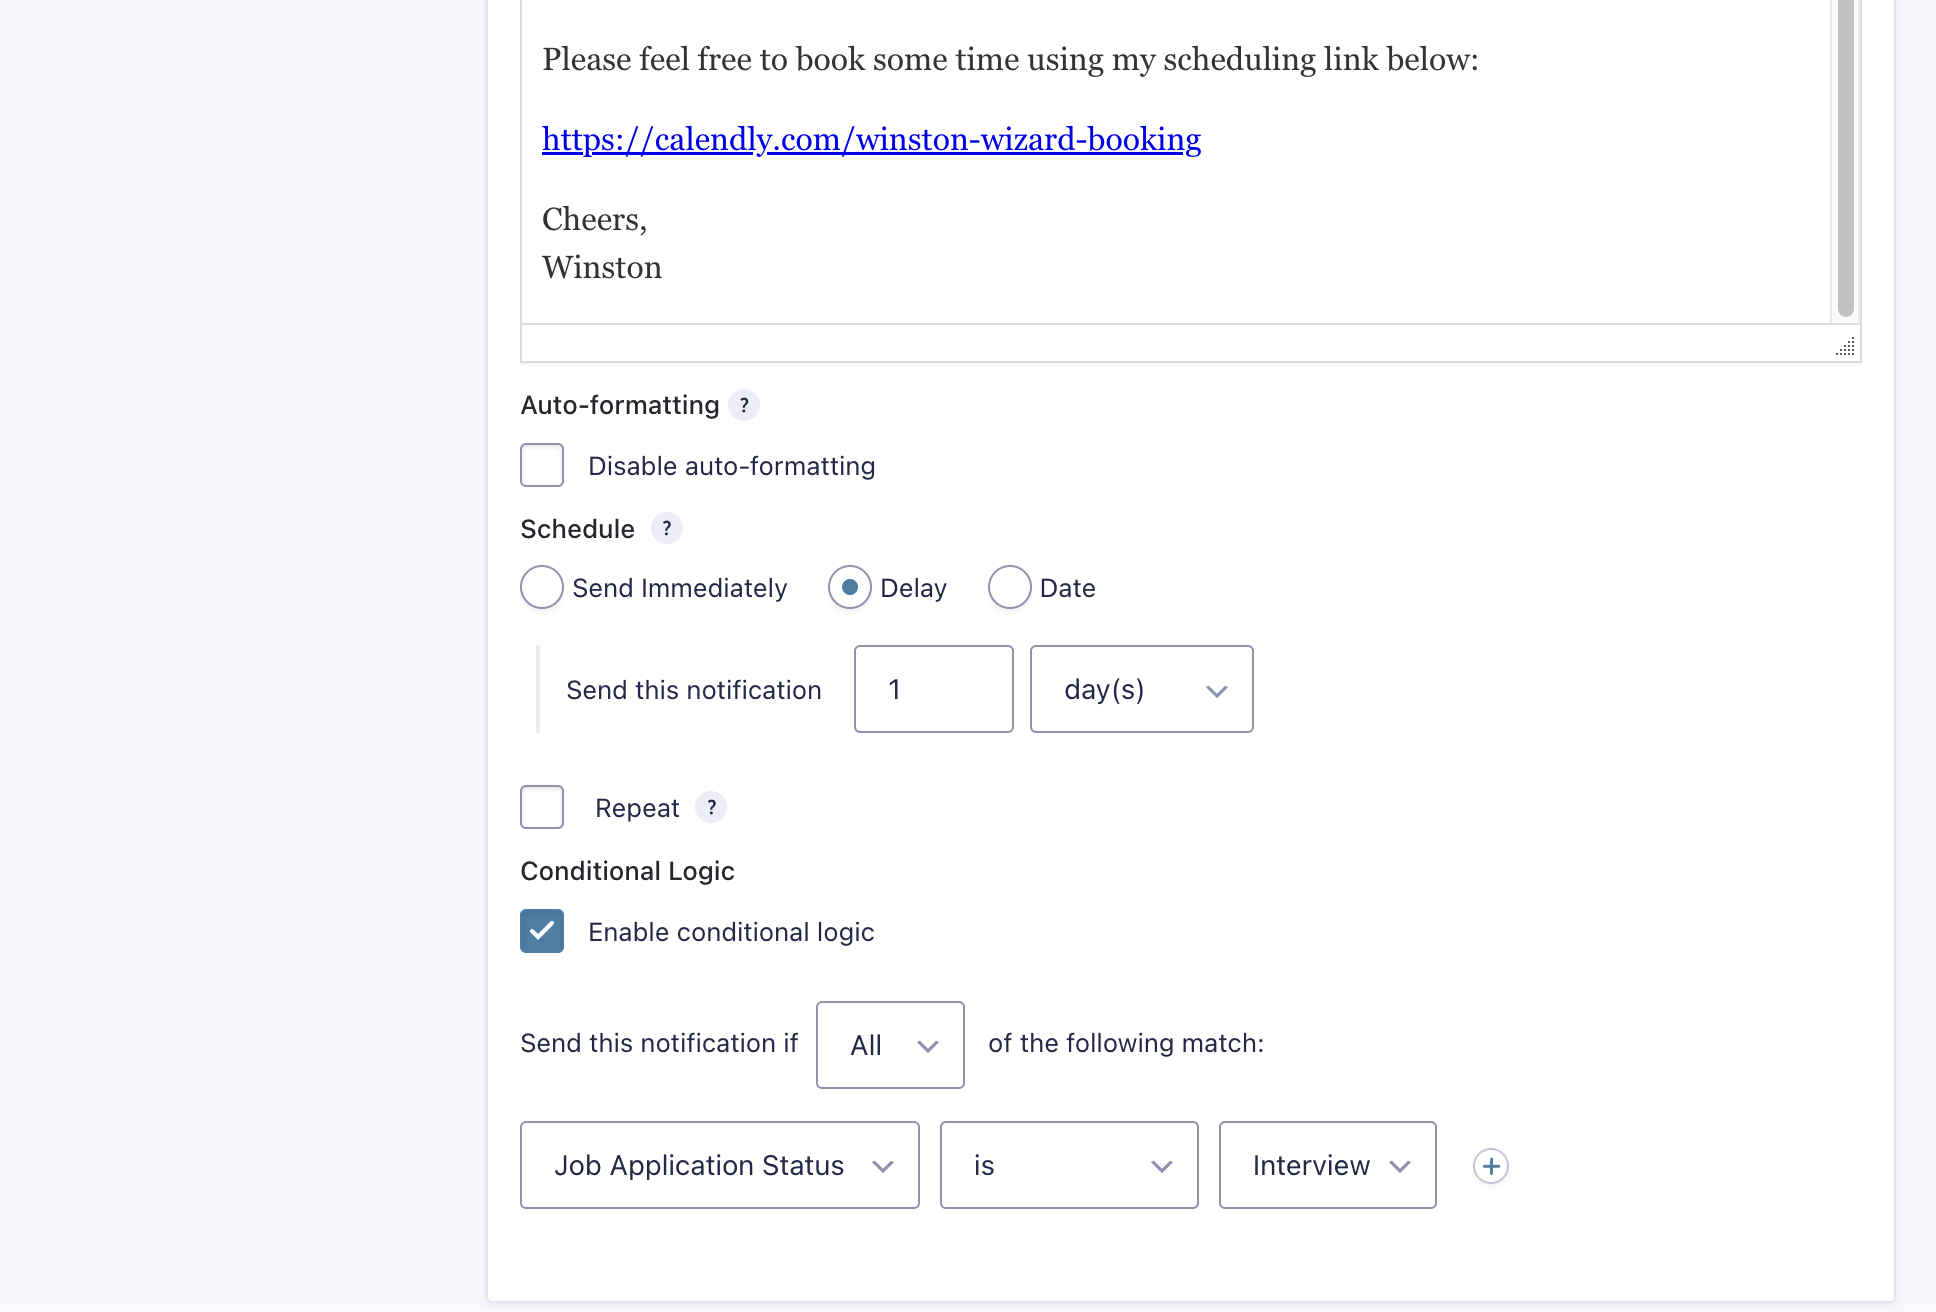
Let’s also set a delay on the timing of this notification and send it the next day so the hiring manager has some buffer time to get ready for the candidate’s interview.
Under Schedule, click Delay and set Send this notification to 1 day(s).
Finally, we’ll click Enable conditional logic and send this notification only if the Job Application Status field is Interview. This setting makes sure that we only send this email to succesful applicants, and not rejected ones:
To notify unsuccessful applicants, we’ll add a new notification by following the same steps above with these changes:
- Name: “Notify Unsuccessful Applicants“
- Message: Adjust this message to inform the applicant they were not successful.
- Update the conditional logic. Send this notification only if the Job Application Status field is Rejected. This setting makes sure that we only send this email to unsuccessful applicants, and not ones that are still interviewing.
Taking it Further
Use Google Sheets as a Job Application CRM
Gravity Forms is great for many use cases, but sometimes, a more robust view of the data may be required. Among other Gravity Forms CRM integrations, Google Sheets is an awesome option if you’re looking to consolidate job and applicant data in one place.
Check out our Gravity Connect Google Sheets documentation for a step-by-step guide to setting up Google Sheets with Gravity Forms.
Once you’ve connected your form to Google Sheets, check out the Update & Delete Rows feature. This feature can be especially useful as the hiring manager updates the application status as applications get reviewed. Once the status gets updated from Gravity Forms, it will automatically sync to Google Sheets. Pretty neat!
Use Notion as a Job Application CRM
Similar to Google Sheets, Notion is a great solution to consolidate job and applicant data in one place that can stay in sync with your form entries. Learn how to send Gravity Forms data to Notion with Gravity Connect Notion.