Gravity Forms Dev Tools
Everything you need to test and debug Gravity Forms in one extensive toolkit. Built from years of magical support.

- Who is Gravity Forms Dev Tools for?
- What are the Dev Tools?
- Install the Plugin
- Using the Plugin
- Preview Tools
- Query Monitor Integration
- Auto Field Naming
- One-click Field Delete
- Dummy Entry Generator
- Dummy Payment Gateway
- Form List Default Filter
Gravity Forms Dev Tools is a Gravity Forms add-on that provides several tools that make testing your forms a breeze and debugging almost enjoyable.
Don’t believe us? Watch this!
Who is Gravity Forms Dev Tools for?
While many of its features are geared towards troubleshooting Gravity Forms, Dev Tools has many features that will help any Gravity Forms administrator. Here’s a taster:
- One-click frontend (“live”) previewing with advanced controls (e.g. unrequiring fields, AJAX toggle)
- Quick admin bar access to all your forms and WordPress plugins
- Handy shortcuts (e.g. export current form, automatic field naming, dummy entry generation)
- Dummy payment gateway for testing payment flows
- Easy access to Gravity Forms logging via Query Monitor
What are the Dev Tools?
- Preview Tools: A collection of enhancements to the form preview feature, including frontend previewing, showing hidden fields, unrequiring fields, displaying multi-page forms as a single page, AJAX toggling, and more.
- Query Monitor Integration: Routes Gravity Forms logging to Query Monitor with bonus debugging tools.
- Admin Bar Form Manager: Quick access to forms from the admin bar with search, new form creation, and import/export shortcuts.
- Admin Bar Plugin Manager: Quick plugin activation/deactivation from the admin bar. Creates a must-use plugin that persists even when GF Dev Tools or Gravity Forms are deactivated.
- Auto Field Naming: Automatically names fields (e.g., “Single Line Text A”) and choices (e.g., “First Choice”) in the form editor.
- One-click Field Delete: Adds a one-click delete button (no confirmation) to each field when viewing the form in compact view.
- Dummy Entry Generator: Generates test entries with fake data for any form with automatic field detection.
- Dummy Payment Gateway: Works as a mock payment gateway with feeds for testing payment workflows.
- Form List Default Filter: Adds screen option to the Form List view to only show active forms by default.
Install the Plugin
Dev Tools is available for free through Spellbook.
- Download and install Spellbook.
- Open Spellbook and search for “Dev Tools”.
- Click Install on the Dev Tools card — you’ll get free automatic updates and the latest features.
Need help? Check out our guide to installing your first plugin with Spellbook.
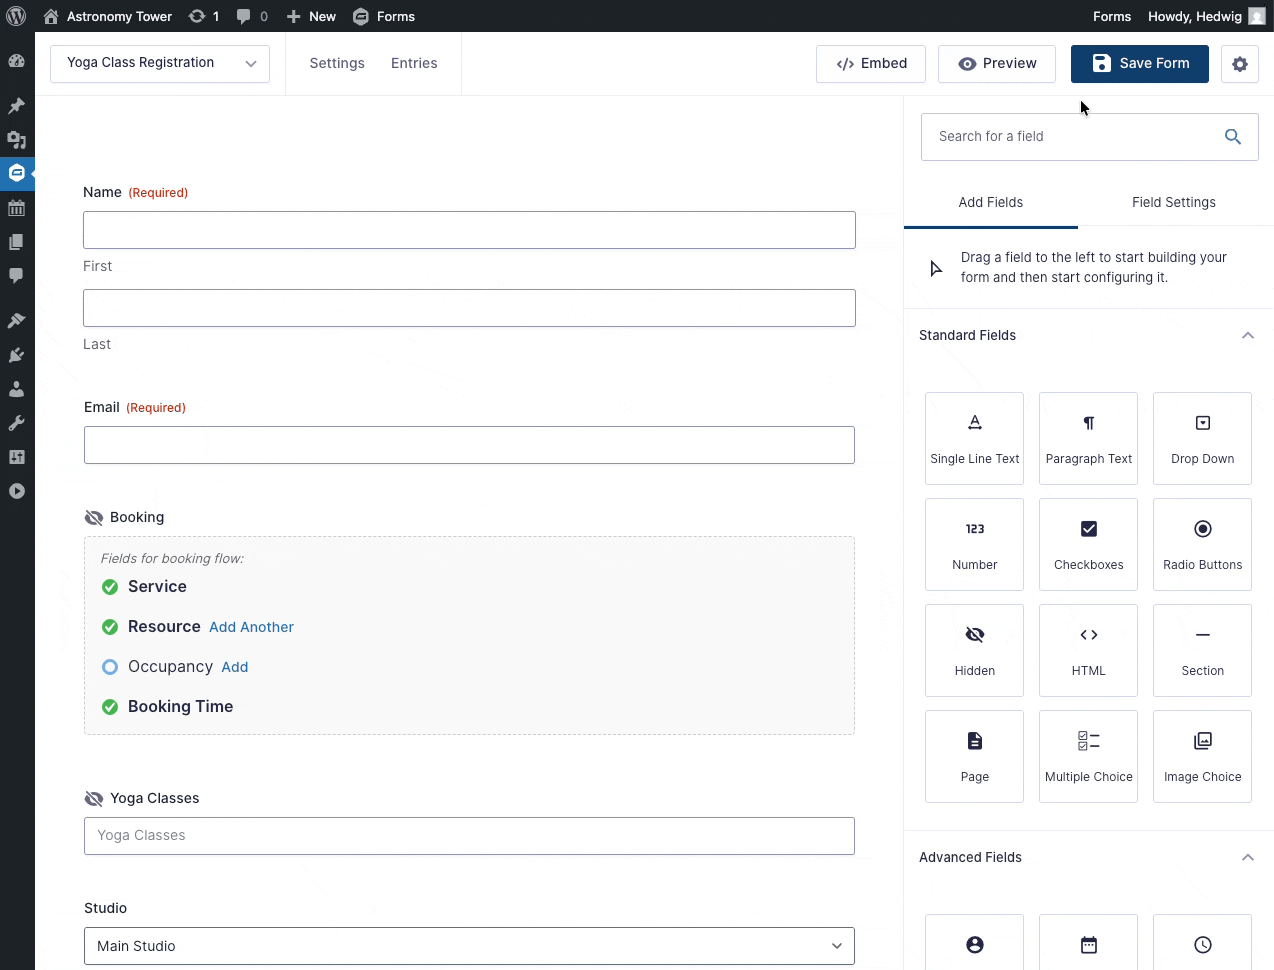
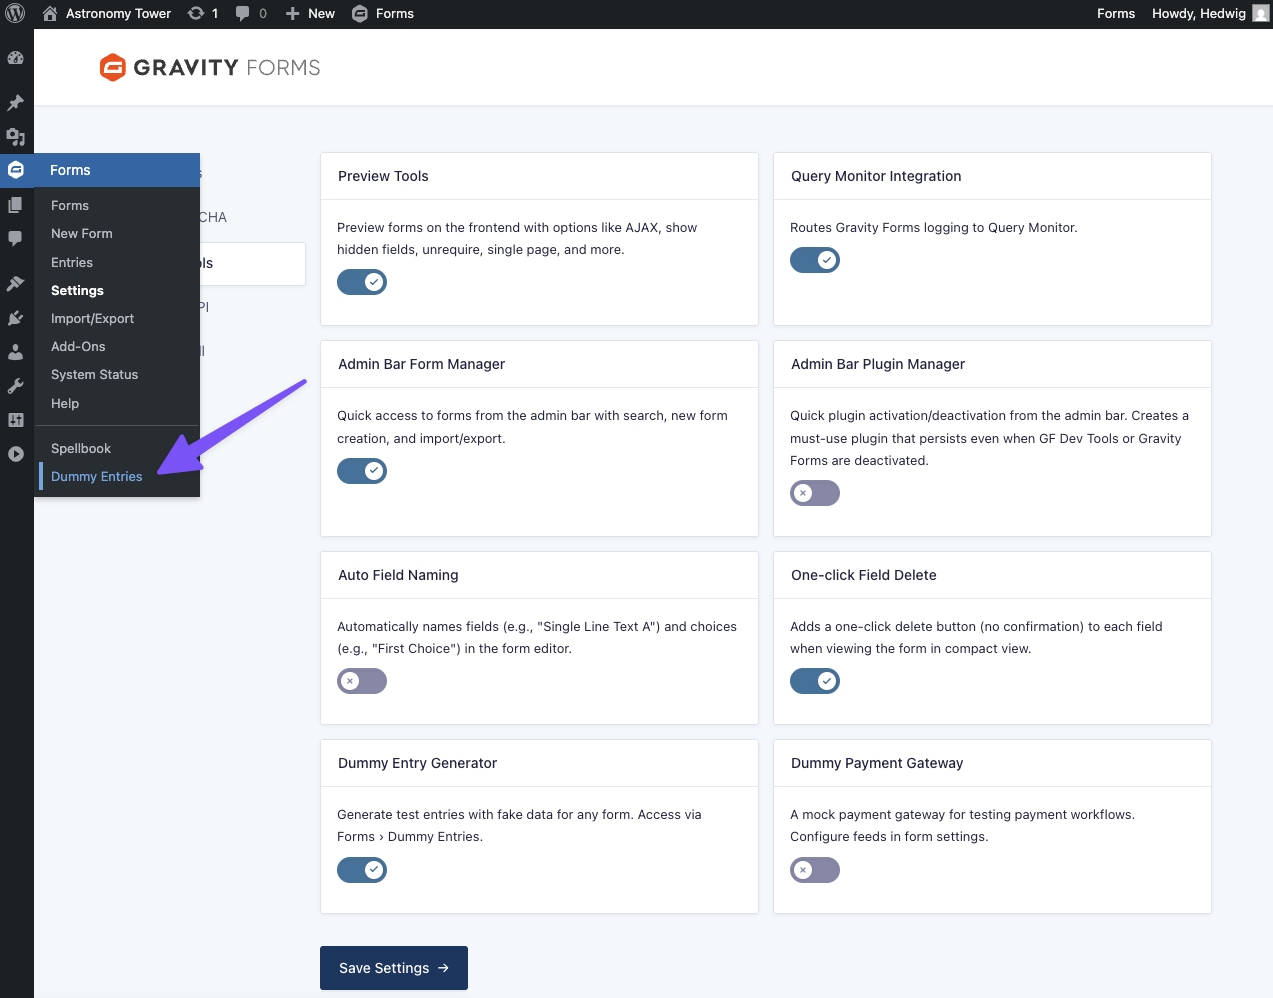
Using the Plugin
To activate (or deactivate) the tools inside Dev Tools, go to Forms › Settings › Dev Tools.
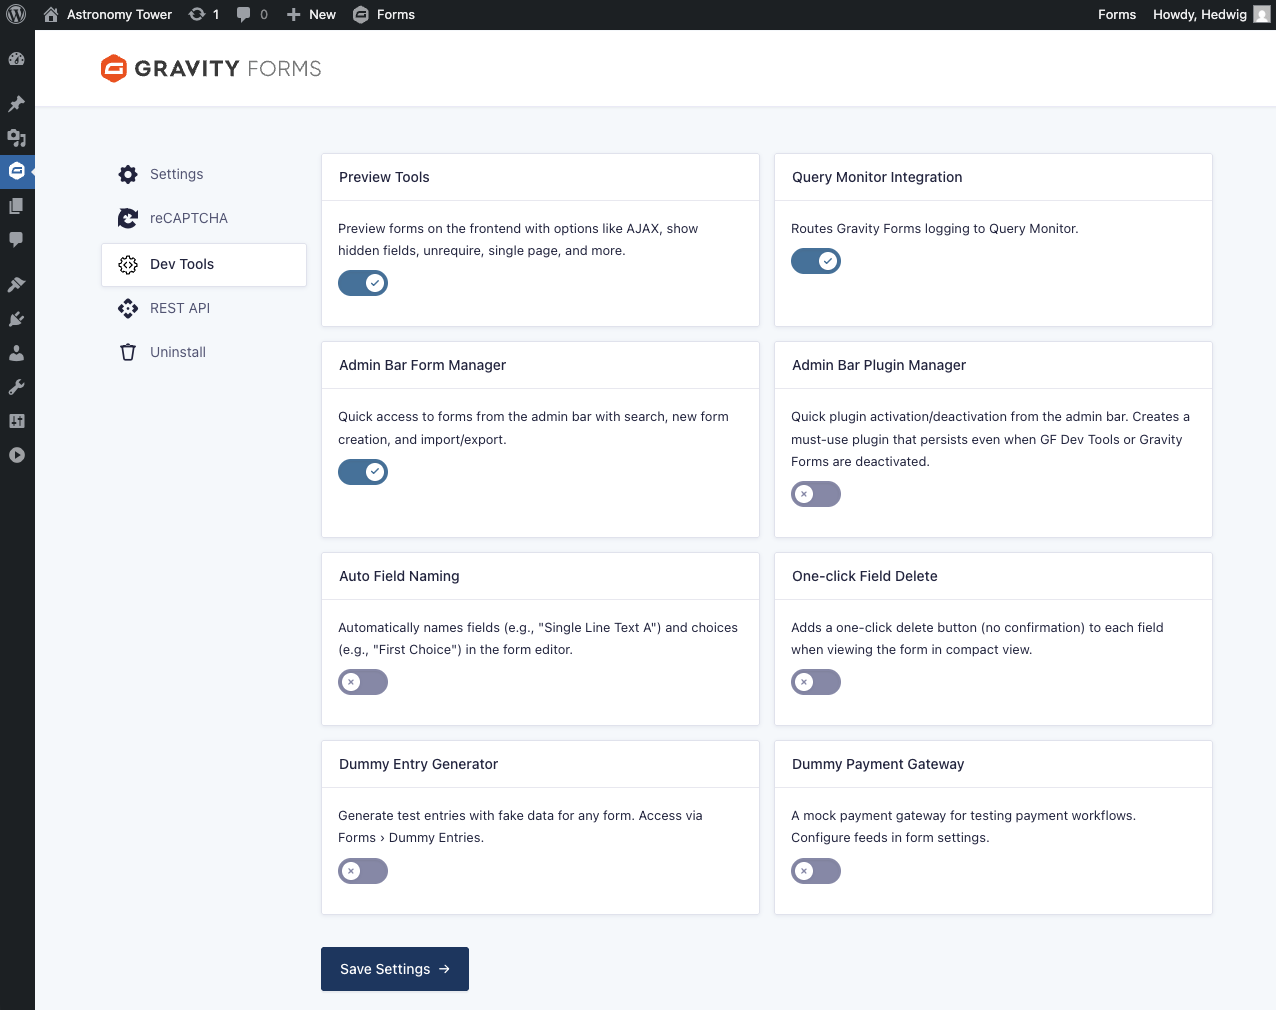
Press Save Settings after making your selections.
To see the Admin Bar Form Manager, Admin Bar Plugin Manager, or the Dummy Entry Generator after activation, refresh the page.
Preview Tools
This tool provides many tools for customizing how your form preview will be displayed and function. You can have any combination of tools enabled at the same time.
What is Preview Tools Useful For?
- Creating perfectly polished, live-ready forms before embedding them in your site
- Saving you hours of debugging time
- Seeing fully-styled previews of your forms that match your theme
- Easily checking hidden fields are working correctly
- Quickly testing parts of your form without completing required fields
- Skipping form page navigation
- Making error-free layouts without the guesswork
- Easily toggling AJAX
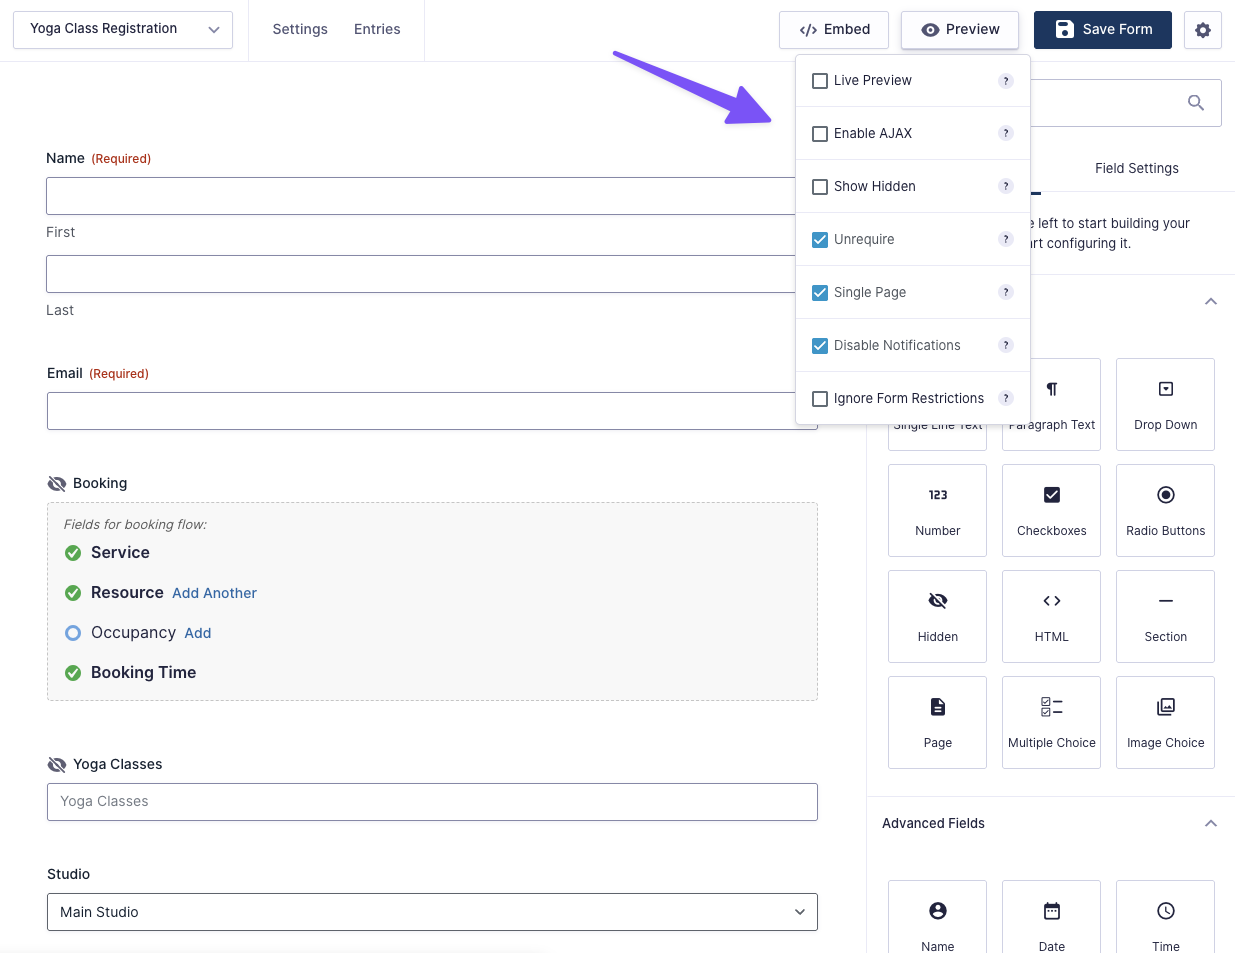
Using Preview Tools
- Navigate to your form
- Mouse over the “Preview” button on the top right
- Choose which options you want to enable
- Click on Preview (or Live Preview, if that option is enabled)
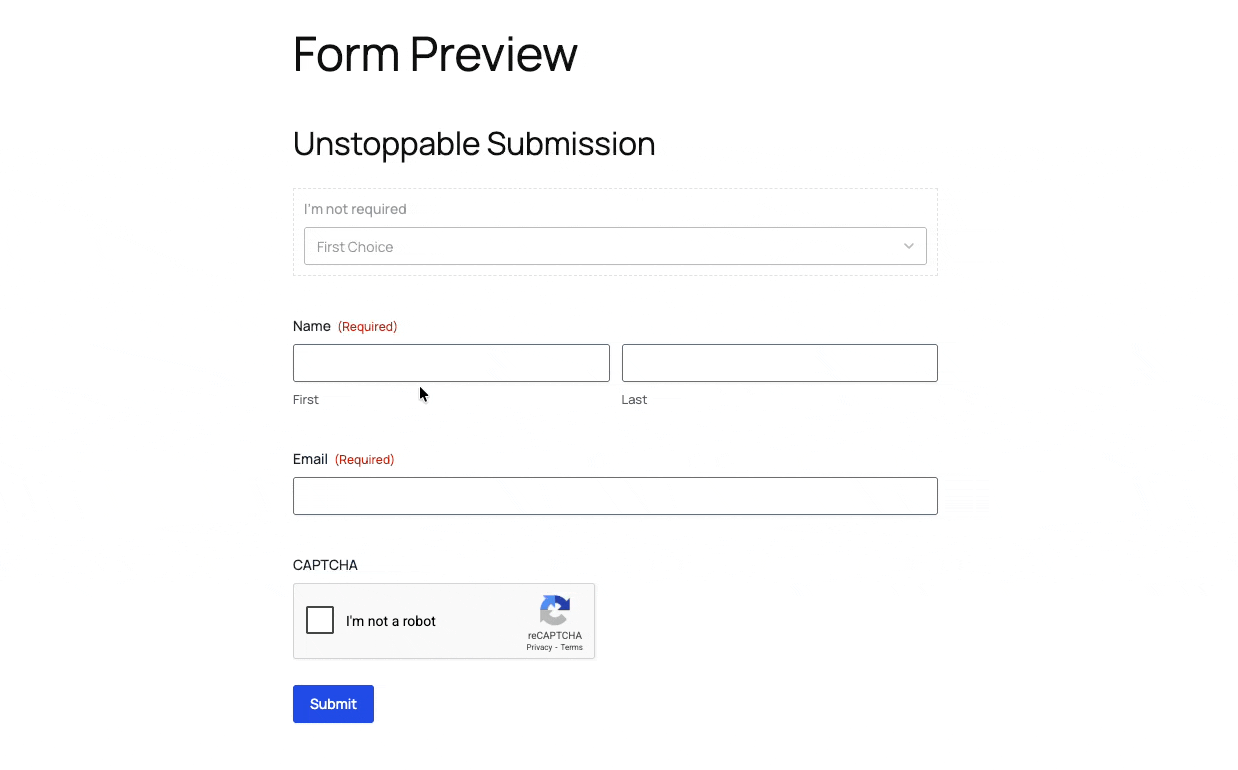
Live Form Preview
Select Live Preview to generate a preview of your form as if it were on the frontend.
AJAX Controls
Select Enable AJAX to load your form with AJAX enabled. This is useful for testing how your form is working with AJAX and for quickly disabling it when necessary.
Show Hidden Fields
Select Show Hidden to make your hidden fields visible in the form preview.
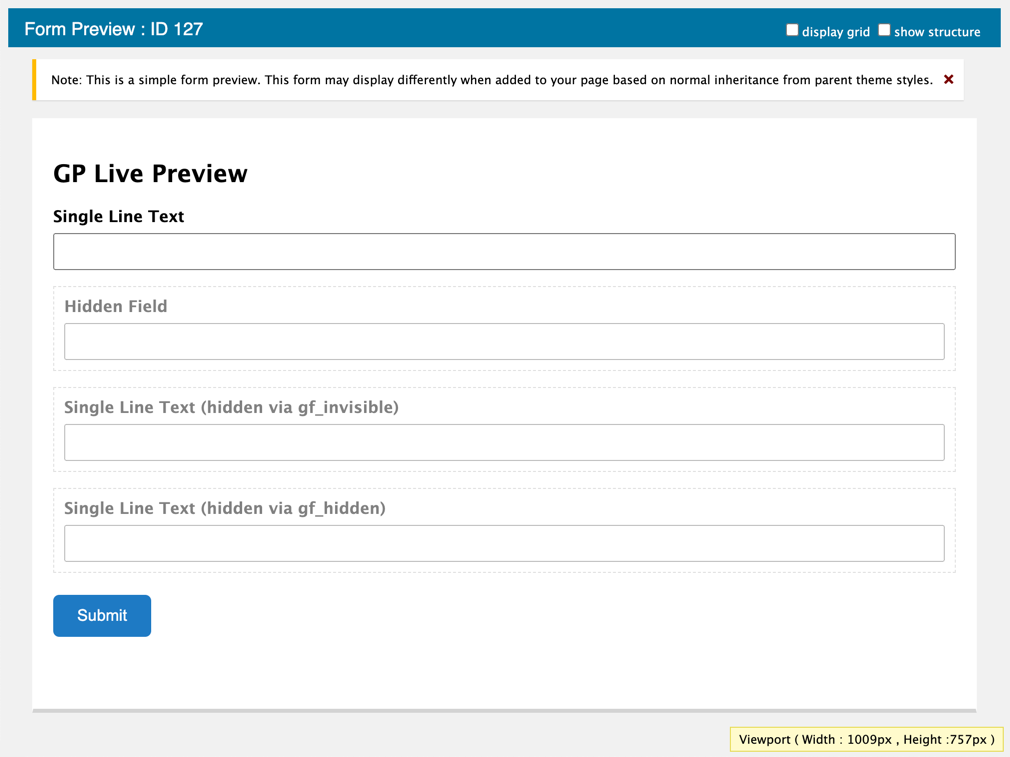
There are several types of “hidden” fields in Gravity Forms. You have:
- The actual Hidden field type
- The Hidden type for Product fields
- The advanced Visibility setting (Field Settings › Advanced › Visibility)
- The ability to hide fields via the Custom CSS Class field setting via the
gf_hiddenandgf_invisibleCSS Ready Classes.
Working with hidden fields can be tricky because, well, you can’t see them. This feature allows you to readily confirm that a hidden field is populated with the expected value.
For more info on how these classes impact Gravity Forms Product fields, check out our How to Hide Gravity Forms Product Fields article.
Skip Required Fields
Select Unrequire to automatically unrequire all required fields. The fields will still appear as required in the preview itself; however, on submission, the required validation will be ignored. This means you can leave any field blank and only fill out the fields you are currently testing.
As an added bonus, this option also bypasses reCAPTCHA.
Make Multi-page Forms Single Page
Select Single Page to consolidate the pages into a single form. While splitting up a form into multiple pages is a relief for your users, your mouse finger can become quite tired when it’s the 30th time you’ve tested the form.
Disable Notifications
Select Disable Notifications to stop notifications from being sent when the form is submitted in the preview. This is especially useful if you have notifications set to send to multiple recipients.
Ignore Form Restrictions
When enabled, it will ignore form restrictions such as “Limit number of entries”, “Schedule Form”, and “Require user to be logged in”.

Usage Examples
Query Monitor Integration
This tool integrates Gravity Forms to Query Monitor, a developer tools panel for debugging database queries, PHP errors, hooks, and more.
What is the Query Monitor Integration useful for?
- Instant access to debugging insights after submission
- Catching errors as they happen
- See if feeds ran correctly
- Easy access to Gravity Forms logs and form stats, like rendering time
Form Details
The “Gravity Forms” tab in Query Monitor shows a readout of all forms in a page, listing their name, ID, and fields. It also includes links to the form editor, entries, and form settings.
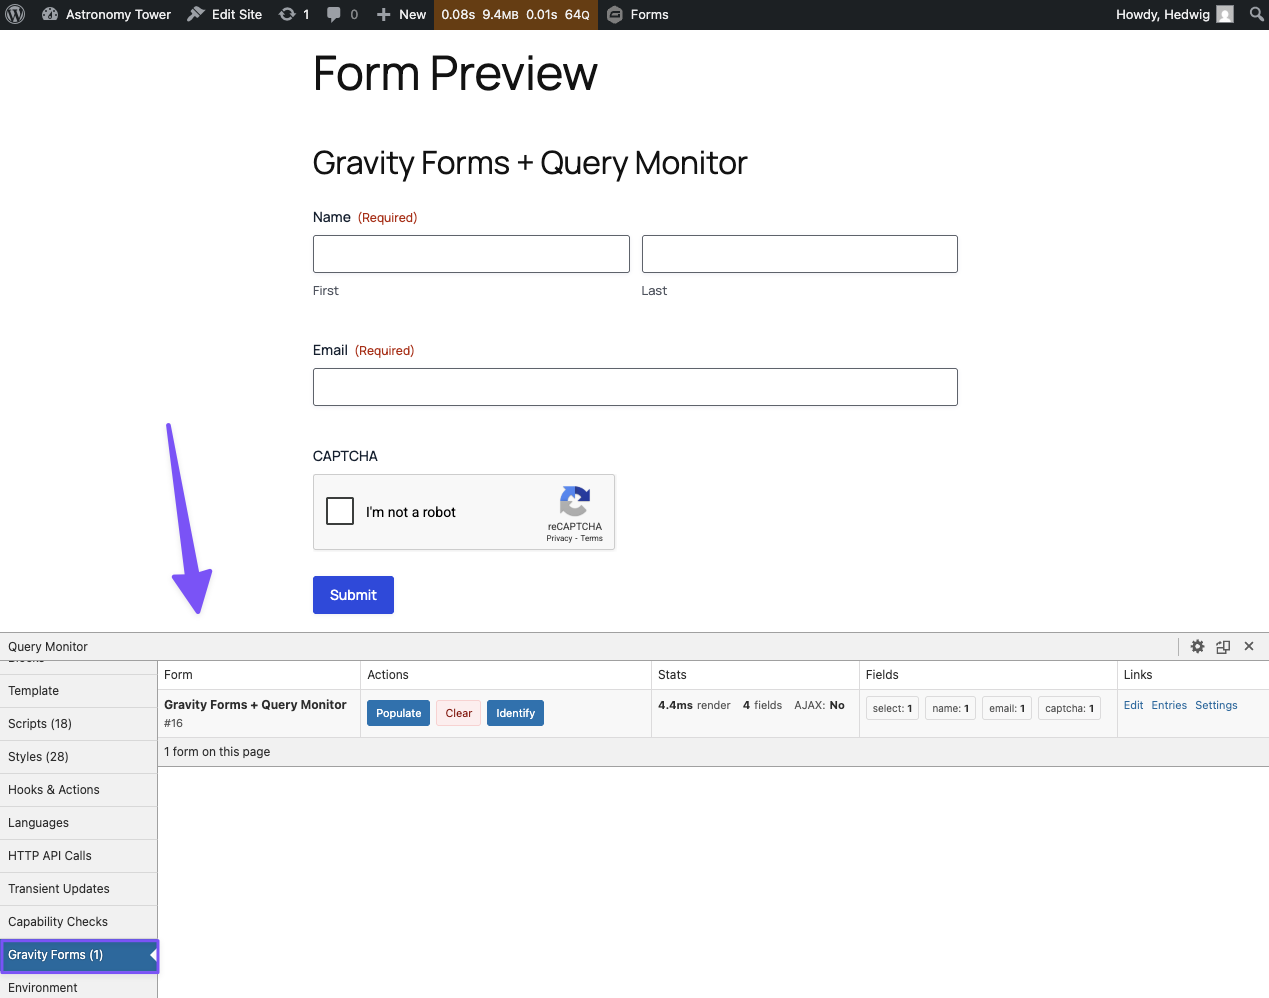
Form Actions
- Populate: Populates all fields with dummy data
- Clear: Clears all fields
- Identify: Jumps to form and pulses it
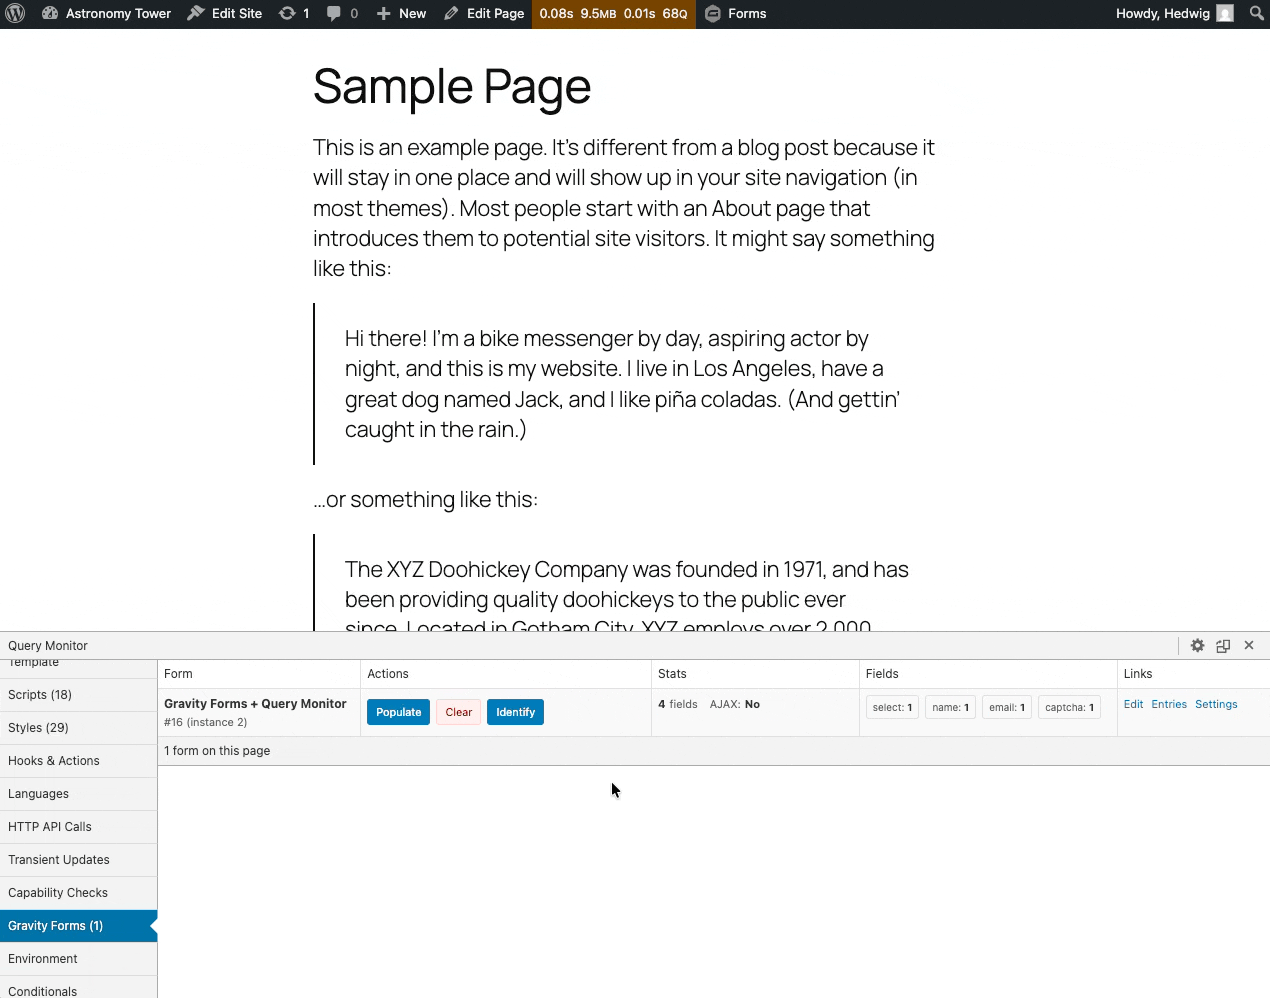
Form Stats
Get an instant readout of the following form stats:
- Time to render (in milliseconds)
- Number of fields
- Number of pages
- If it was rendered with AJAX
Direct Access to Gravity Forms Logs
Gravity Forms logs are automatically routed to Query Monitor’s “Logs” tab after submission. It takes logs from Gravity Forms core and any add-ons, adding a prefix for clarity.

You can see the whole spec trace on each one of them, and it works regardless of the “Logging” setting in Gravity Forms being enabled.
Known Limitations
- Logging doesn’t work when form AJAX is enabled due to how Query Monitor’s native logging works. Solution: Use Preview Tools to preview without AJAX while testing.
- The Identify action can’t open elements like Elementor modals.
Admin Bar Form Manager
This tool adds a “Forms” item to the top admin toolbar with a handful of form-related shortcuts you can access from anywhere in the WordPress admin.
What is the Admin Bar Form Manager useful for?
- Finding forms quickly from anywhere
- Navigating between forms like it’s nothing
- Creating new forms instantly from a single button click
- Importing and exporting forms faster
Quick Form Search and Navigation
The Forms item displays a list of all your forms on mouseover. Search for a specific form by double-clicking the Forms item or pressing Shift + F + F. Clicking on the form takes you straight to it.
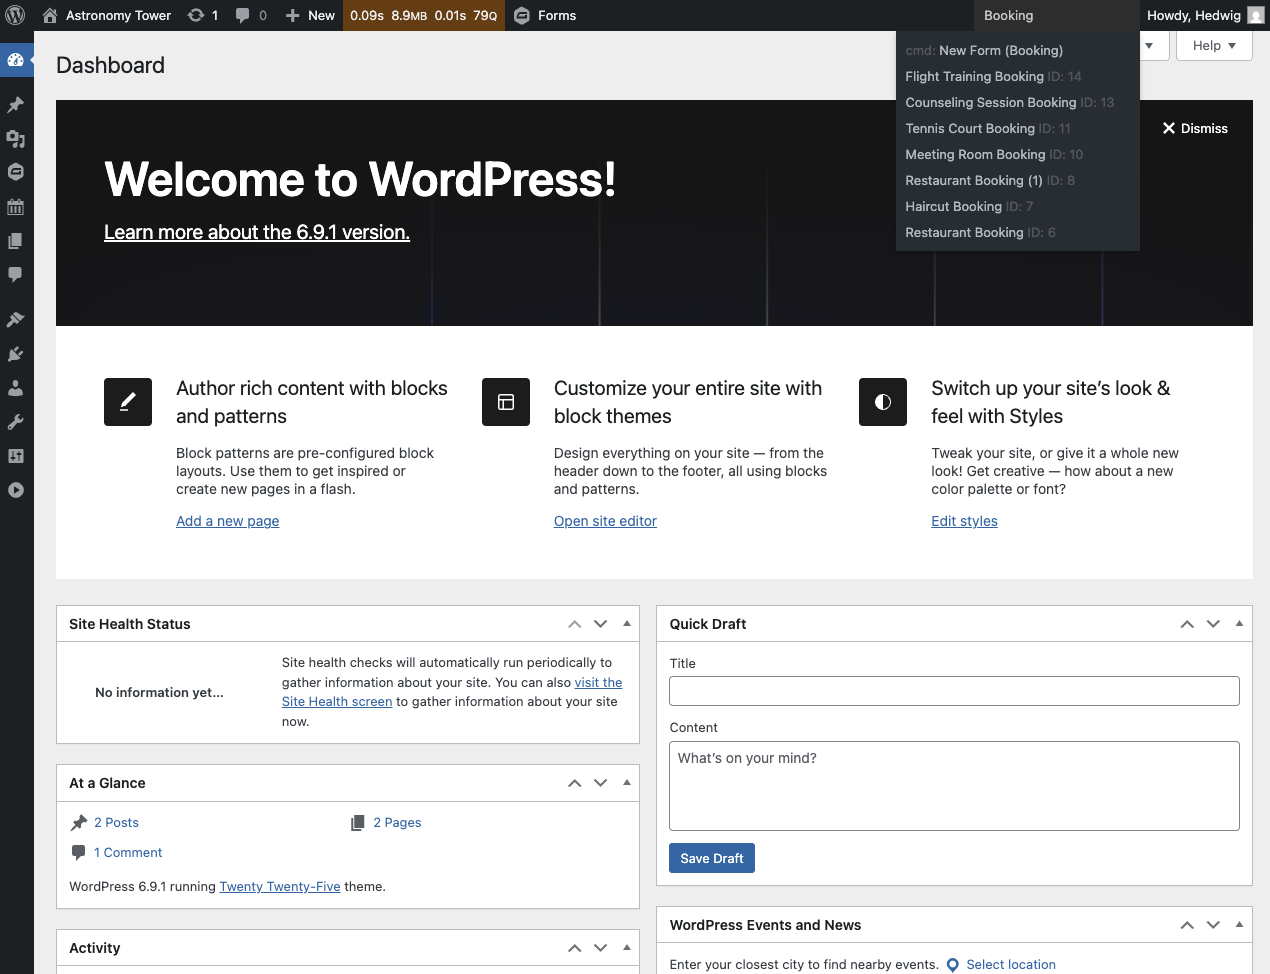
Create New Forms
Add new forms with a single click with the New Form command. By default, it names forms “Form {Form ID}“. If you click on the command with text used in the search bar, it will use your search query to name the form instead.

Export Current Form
When in the form editor, the Export Current Form command becomes available. Clicking it automatically downloads the form export. It’s the easiest way to share your forms with our legendary support team. 😉
Direct Import Form Access
Navigate straight to the Gravity Forms import page with the Import Form command.
Integrations
- GP Nested Forms: Create new nested forms from the Admin Bar Form Manager.
Admin Bar Plugin Manager
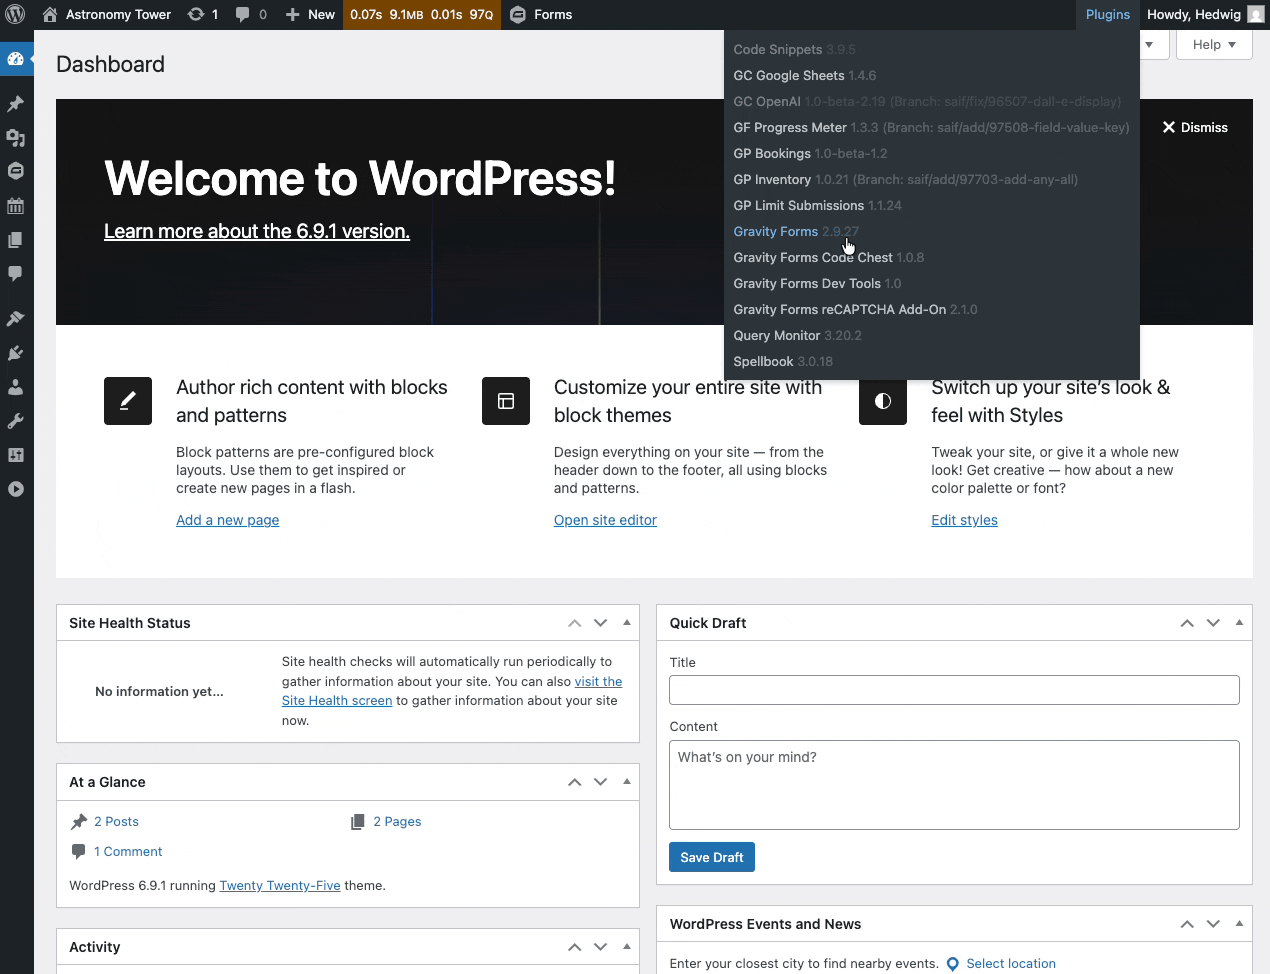
This tool adds a “Plugin” item to the top admin toolbar with handy WordPress plugins-related shortcuts you can access from anywhere in the WordPress admin.
What is the Admin Bar Plugin Manager useful for?
- Facilitating plugin version testing
- Testing and debugging how plugins are affecting your builds
- Instantly confirming if a plugin is active
Plugin Search
The Plugins item displays a list of all installed WordPress plugins and their version numbers on mouseover. Search for a specific plugin by double-clicking the Plugins item or pressing Shift + P + P.
Activation/Deactivation Management
Activate or deactivate installed plugins by clicking on them. Deactivated plugins are greyed out.
Clicking on an activated plugin deactivates it, and vice-versa.
Testing Different Plugin Versions
If you have two versions of the same plugin installed, you can activate one of them via the Admin Bar Plugin Manager and it will deactivate the other version automatically.
A Must-Use MU Plugin
The Admin Bar Plugin Manager creates an MU-plugin so you can safely deactivate Gravity Forms and GF Dev Tools during testing and still access the Admin Bar Plugin Manager.
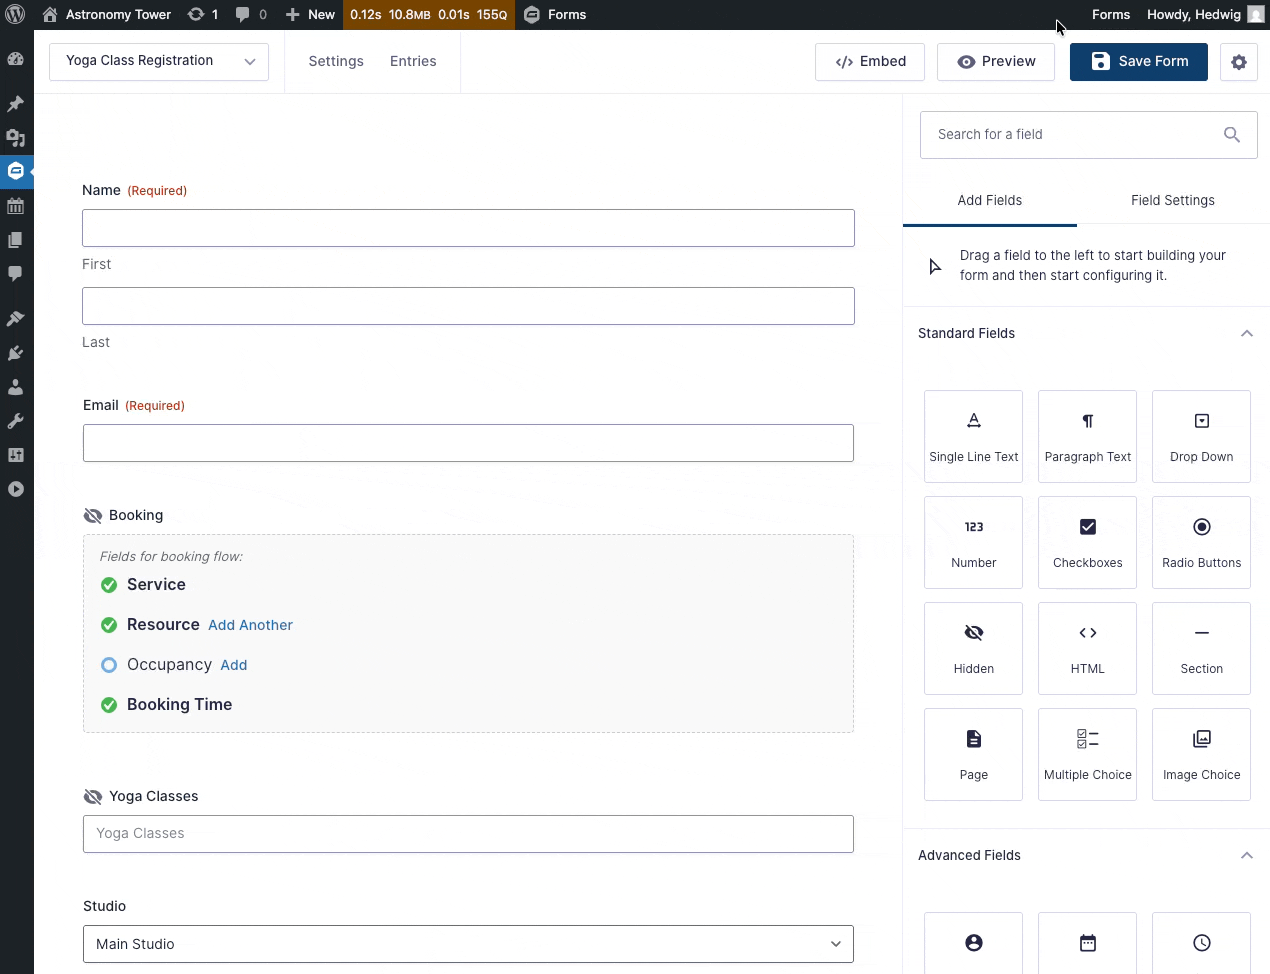
Auto Field Naming
This tool gives newly added fields distinct names (e.g. Single Line Text A, Drop Down B, etc.). The same is done for new choices (e.g. Fourth Choice, Fifth Choice, etc).
What is the Auto Field Naming useful for?
- Speed up prototyping and troubleshooting
- Making fields easy to tell apart instantly
- Adding new choices without having to name them manually
One-click Field Delete
This tools adds a single-click delete button to the form editor’s Compact View.
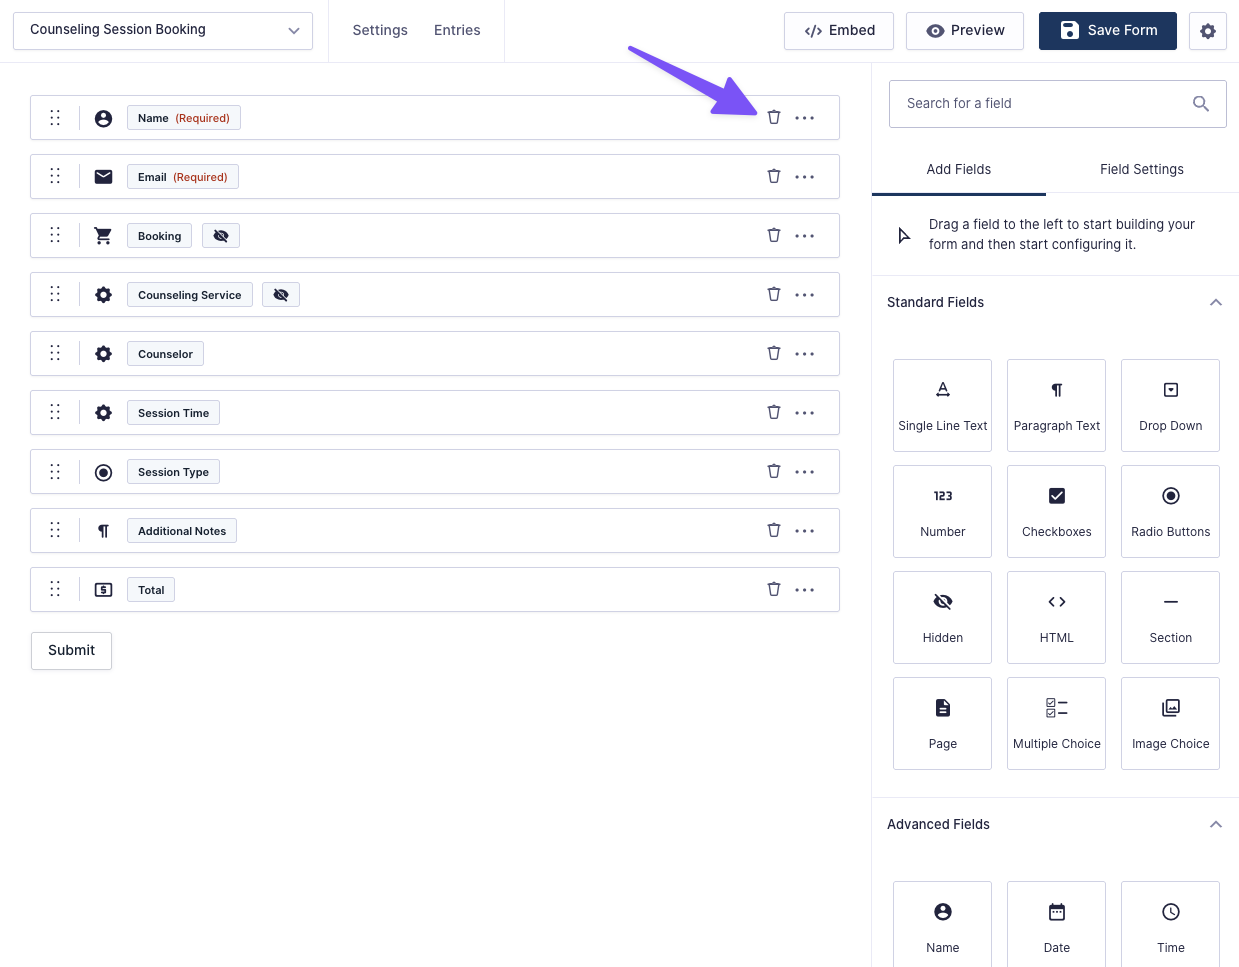
What is the One-click Field Delete useful for?
- Deleting fields instantly — no more saying “OK” to warnings
- Keeping instant deletion in a safe, intentional place
How do I enable Gravity Forms’ Compact View?
- Go to the form editor
- Click on the gear icon on the top right corner
- Toggle Compact View
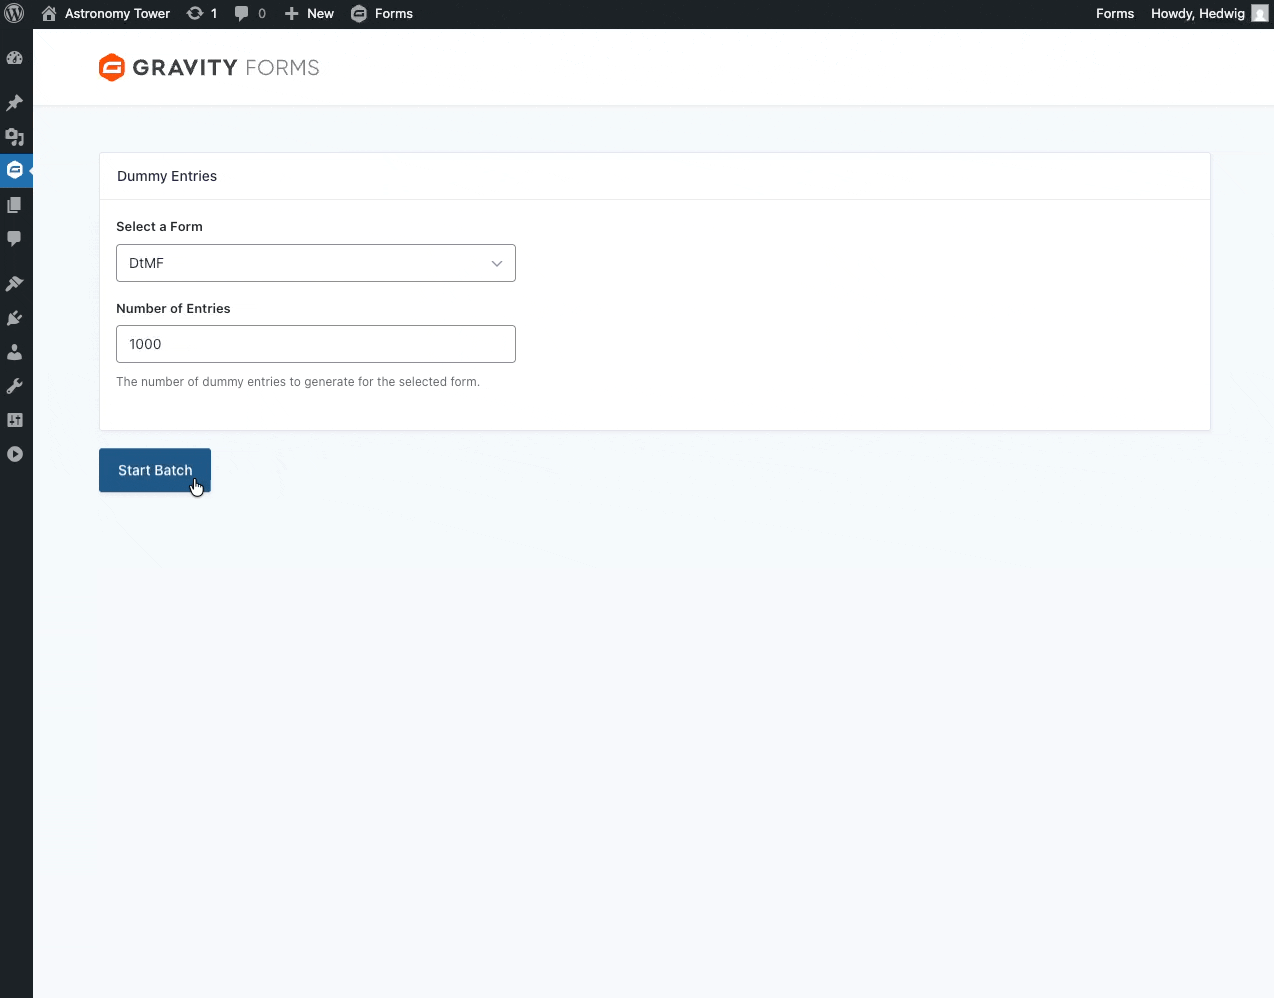
Dummy Entry Generator
This tool generates test Gravity Forms entries in bulk with dummy data for any form. The plugin detects the fields in your form and generates data accordingly.
When activated, you can access it via Forms › Dummy Generator.
What is the Dummy Entry Generator useful for?
- Stress-testing forms and integrations in a few clicks
- Testing and troubleshooting without having to come up with entry data
- Especially useful for feed-based plugins (like our connections)
Generating Test Entries in Bulk
- Select which form you want to create dummy entries for
- Specify how many entries you want to create
- Press Start Batch
The progress bar will let you know how far along in the process the generator is. Once it’s done, you’ll get a “Batch completed successfully!” message.
Developer’s Notes
- Dummy Entry Generator uses the Faker library.
Known Limitations
- Does not take conditional logic into account.
- Some field types may not be supported.
Dummy Payment Gateway
This tool lets you test complex flows in Gravity Forms involving payment gateways (e.g. Stripe, PayPal) without needing to process payments or set up testing accounts with payment gateways.
What is the Dummy Payment Gateway useful for?
- Testing conditional logic based on payment statuses (e.g. captured, failed)
- Testing form behavior with post-payment (delayed) actions
- Testing feed-based plugins
Not familiar with payment gateways? We have a guide to payment gateways in Gravity Forms that can get you up to speed.
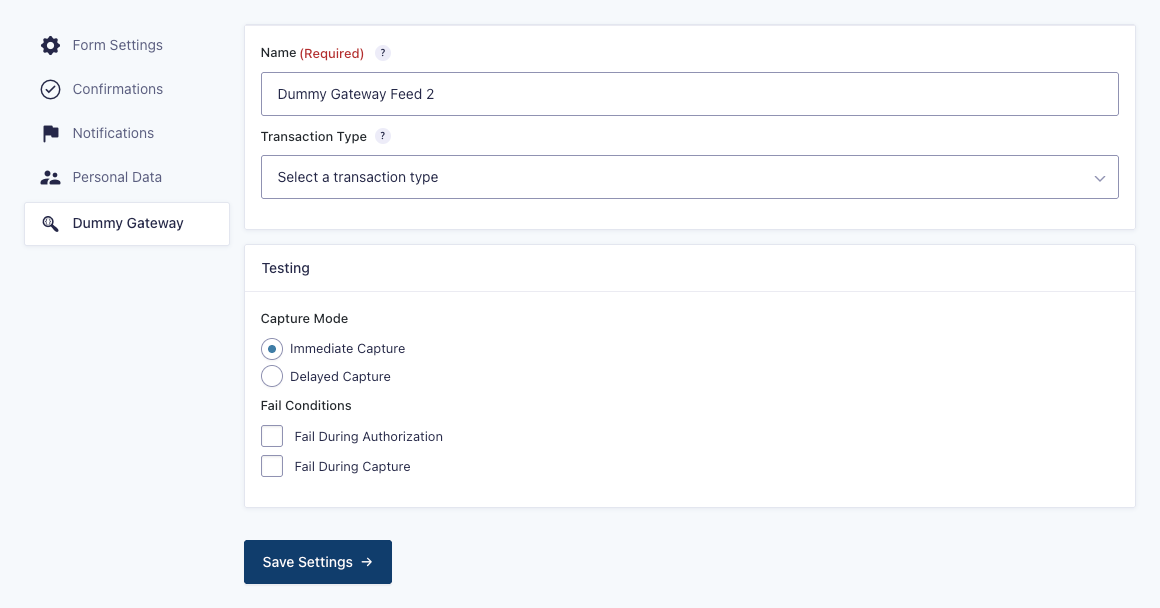
Feed Setup
In your desired form:
- Navigate to Form Settings › Dummy Gateway.
- Click on Add New.
- Select the Transaction Type
- Determine the Payment Amount
- Choose the Capture Mode
- (Optional) Set Fail Conditions
- (Optional) Enable Conditional Logic
You can have multiple feeds at once.

Payment Amount
Determine where the Dummy Gateway gets its payment amount from. You can choose from the form total or any Product field.
Capture Mode
The Dummy Payment Gateway offers the two types of payment capture offered by payment gateways:
- Immediate Capture: Payment is captured on submission, simulating direct form checkouts. If no Fail Conditions are set, the payment status is marked as
Paid. - Delayed Capture: Payment is captured after submission, simulating redirected checkouts (i.e., user is redirected to an external page provided by the payment gateway). If no Fail Conditions are set, the payment status is marked as
Authorized.
Fail Conditions
You can test the flow of failed transactions by choosing to fail the dummy transaction during authorization or capture.
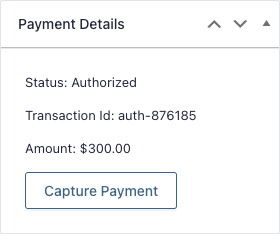
Entry Details Metabox
The Payment Details metabox gives you a readout of the current status of the payment.
- If it’s Authorized, you’ll have the option to capture the payment.
- If it’s Paid, you’ll have the option to refund the payment.
FAQ
What transaction types does the Dummy Payment Gateway support?
Currently, the Dummy Payment Gateway only supports “Payments and Services,” aka one-time payments. We want to add support for subscriptions in the future — add your vote to bump it in our roadmap!
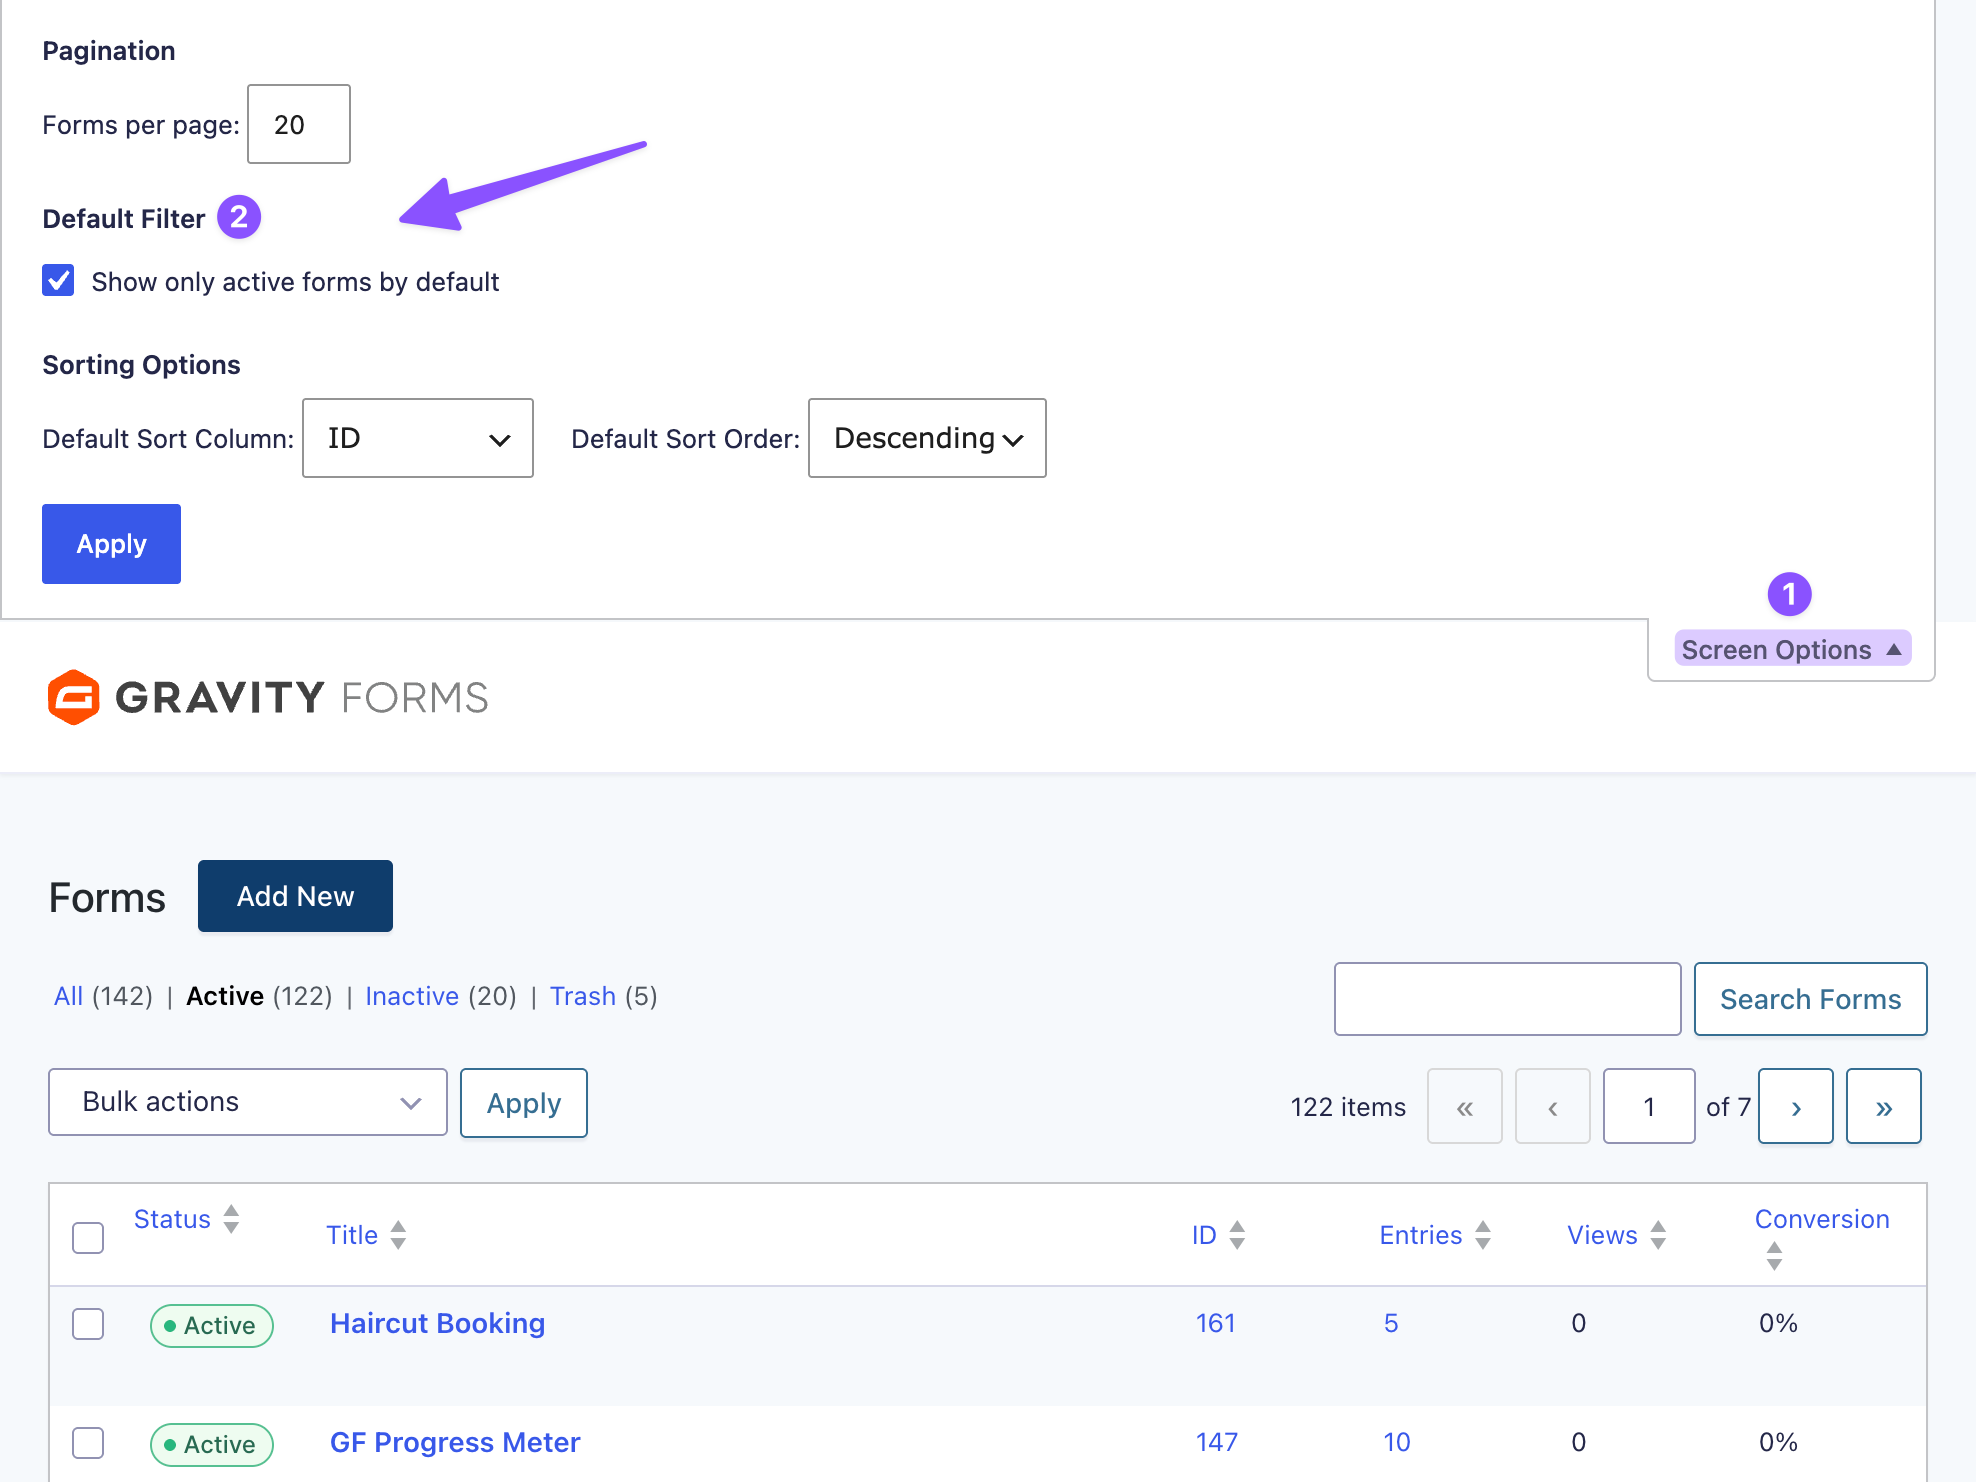
Form List Default Filter
This tool adds a screen option on the Form List to only show active forms by default.
You can view forms with other statuses by clicking on the appropriate filter (e.g., All, Inactive, and Trash).
What is the Form List Default Filter useful for?
- See only active forms by default lets you get to the forms you’re actually using faster.
- Preserves access to view inactive forms (as well as
AllandTrashforms) when needed.
How do I enable the Form List Default Filter?
- Go to Forms › Forms in the admin menu.
- Click on the Screen Options tab at top right of the page.
- Click Show only active forms by default option.


Not sure what changed, but it’s working now. Nothing I did.
Hey Brian,
Interesting. Sounds like this could have potentially been a caching issue on your site.
Glad to hear that you’re back up and running now!
I have the most recent version of spellbook as well and it’s not there.
Hey Tara,
If you are on Spellbook v3.0.18, and GF Dev Tools is not under the “Free Plugins” tab, then please send us a message via Support, and I’ll be happy to take a closer look at your site to see what’s happening here!
Open Spellbook and search for “Dev Tools”.
I’m not seeing it there.
Hey Brian,
Oh no, that’s strange!
Please ensure your Spellbook is on the latest version (v3.0.18), and please ensure that you search under the “Free Plugins” tab. After that, if you’re still having no luck, please reach out via Support, and we’ll be happy to help make sure you can get this installed!