Setting Up Gravity Forms Email Notifications Correctly
Learn how to set up Gravity Forms email notifications correctly, verify settings, create notifications, and troubleshoot bugs in this guide.
- How does Gravity Forms send email notifications?
- How do you set up Gravity Forms email notifications?
- Troubleshooting common issues with Gravity Forms email notifications
- Get more out of your Gravity Forms notifications
- Set up powerful Gravity Forms notifications that work every time
Running into problems setting up Gravity Forms notifications?
Setting up notifications correctly and ensuring they continue to work can be a bit 🤏 of a challenge, and if you get it wrong, it can lead to a slew of problems — poor user experience and potential damage to your site’s reputation among them. Doesn’t quite scream professional to have submissions and notifications not working properly!
In this article, we’ll provide actionable tips on how to set up Gravity Forms email notifications correctly, troubleshoot common notification issues, and ultimately get the most out of your Gravity Forms notifications!
Whether you’re struggling with notifications not being received or simply looking to improve the overall effectiveness of your notifications, we can help you out.
First, let’s see how Gravity Forms sends email notifications.
How does Gravity Forms send email notifications?
Like almost all other WordPress plugins, the Gravity Forms plugin uses the wp_mail() function that is included as part of the core WordPress functionality to send emails.
The wp_mail() function is a PHP mailer function that generates and sends emails from your WordPress site.
Once Gravity Forms triggers an email, WordPress will either directly interact with your web server or contact your SMTP (simple mail transfer protocol) or external 3rd-party mail server to send the email.
While this setup works fine in many cases, it’s not especially reliable for two main reasons.
- Emails sent with the
wp_mail()function don’t include any authentication information, meaning they will often be flagged as spam by email services such as Gmail or Yahoo. This can cause emails to be sent to spam folders, rather than to the intended recipient’s inbox. - The PHP mailer function is viewed as an insecure method of sending emails. As a result, some web hosts disable this function on their servers. If PHP is disabled on your web host,
wp_mail()will not work, and you will be unable to send email notifications via Gravity Forms.
This default setup can therefore lead to problems with email delivery.
To set up your Gravity Forms email notifications to give them the best chance of sending correctly, we recommend using a third-party transactional email service or an SMTP provider.
These services offer advanced email-sending features, including authentication and encryption, that help ensure that your email notifications are delivered to the intended recipients’ inbox.
How do you set up Gravity Forms email notifications?
To set up Gravity Forms email notifications, follow these steps.
If you’re already familiar with setting up Gravity Forms notifications, you can skip ahead to the troubleshooting section.
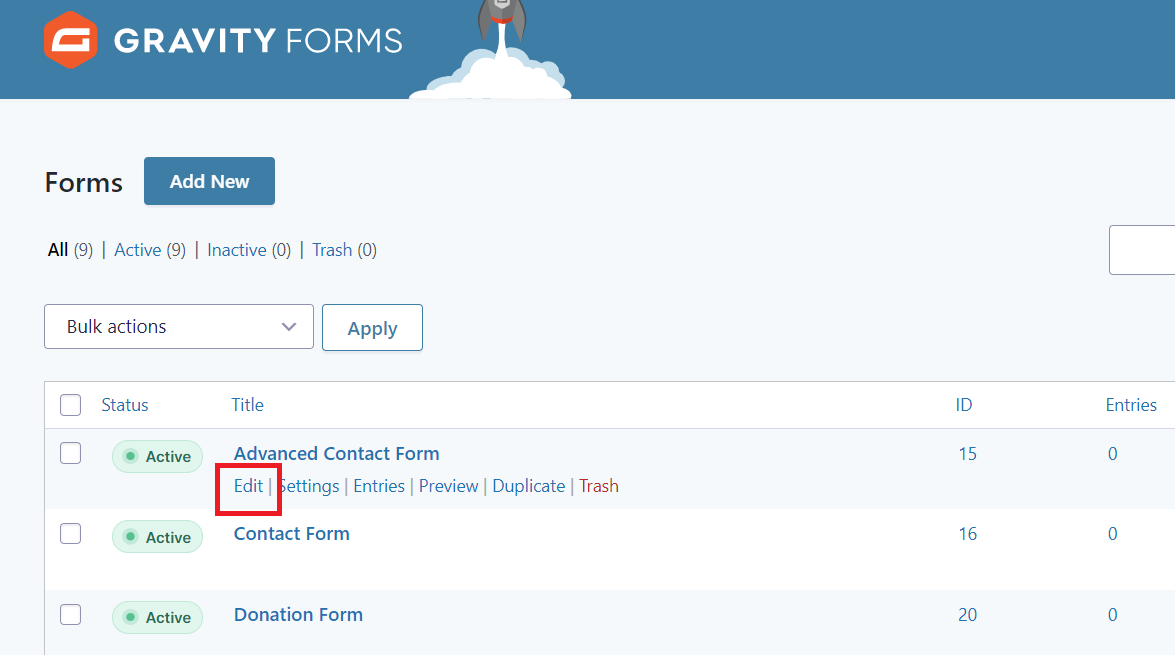
- Navigate to the “Forms” list from your WordPress backend dashboard, hover over the form you want to set up notifications for, then click “Edit” to open the form editor.
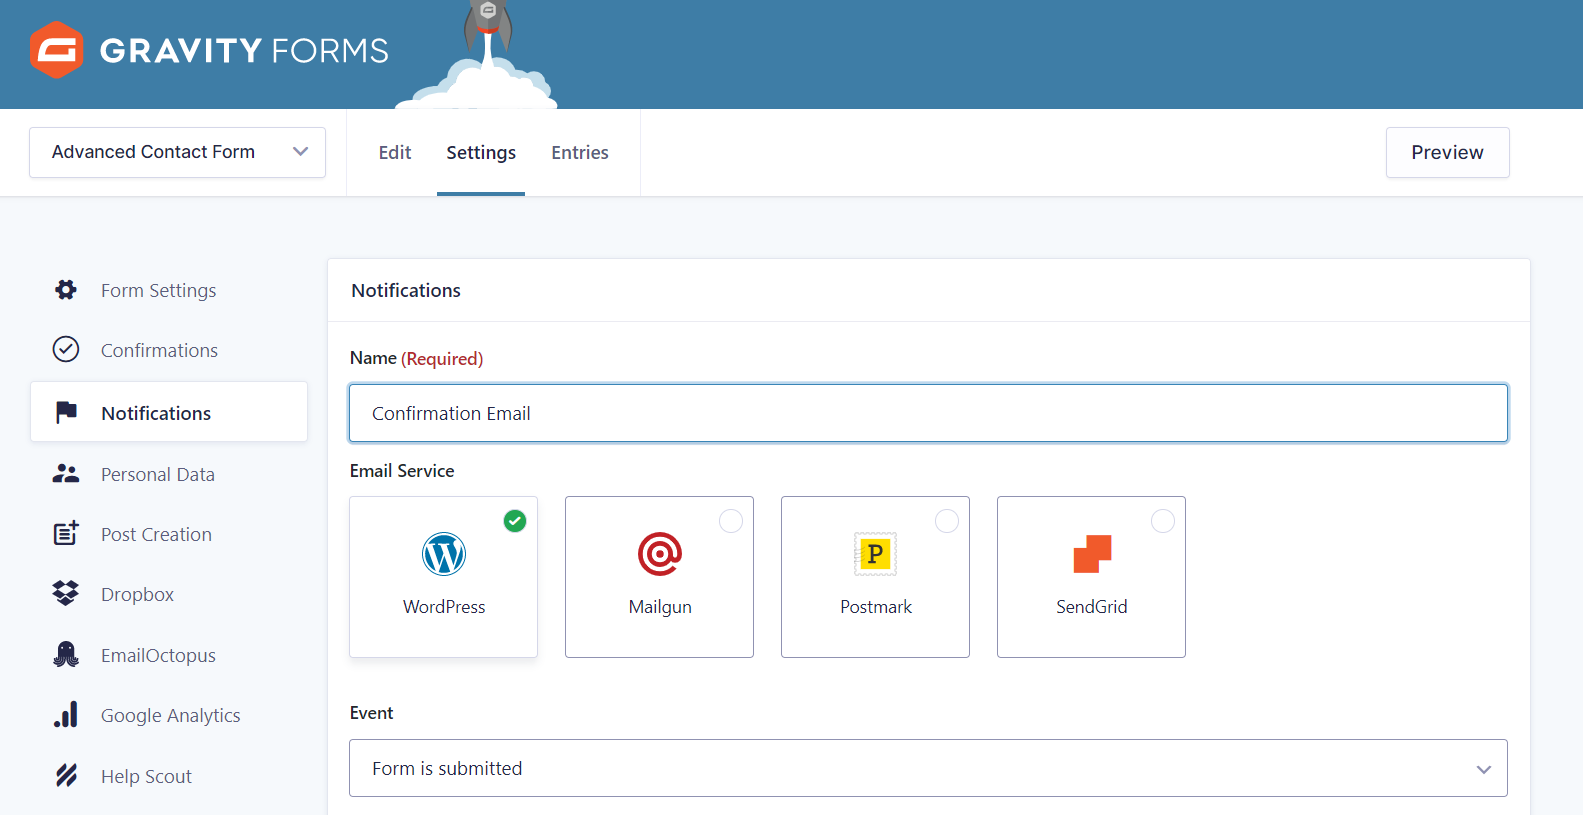
- Go to Settings > Notifications, then click Add New.
- Add a name for your new notification, e.g., “Confirmation Email”.
- Choose the email service you want to use from WordPress, Mailgun, Postmark, and SendGrid.
- Set the notification trigger. For example, Form is submitted.
- Set up who the notification will be sent to. You have three options here:
Enter Email: This lets you enter a specific email address to which this type of notification will be sent, whenever it is triggered.
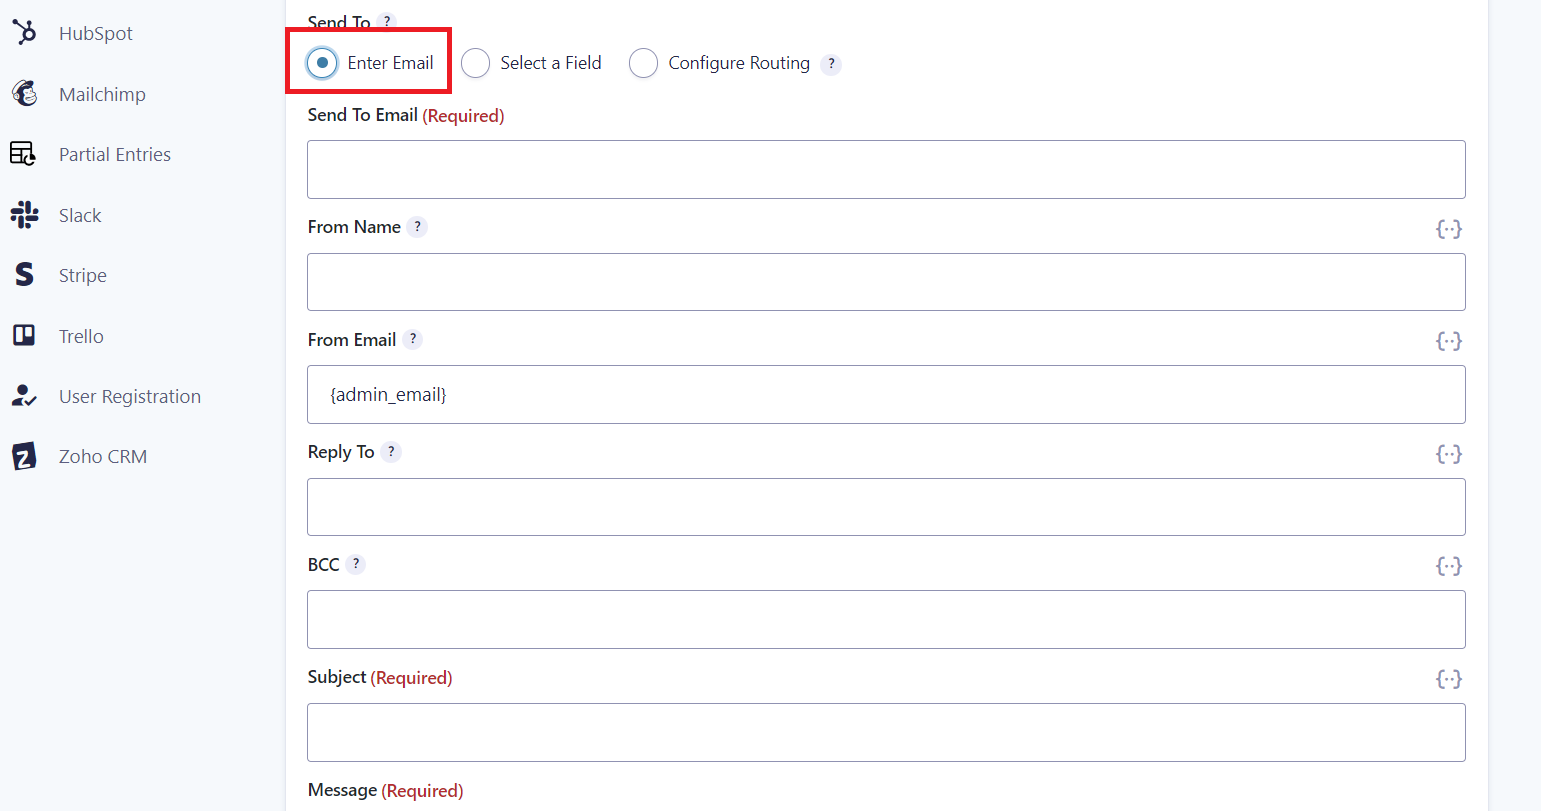
For example, if your trigger was Form is submitted, and you set the notification to send to your store admin email, you would receive a new notification to that email address whenever a new entry was submitted to your form.
Select a Field: If your form includes an email field, this lets you send a notification to the email address entered in that field. This is the option you would use if you wanted to send a notification to a customer.

Configure Routing: This enables you to send notification emails based on pre-set conditions being met in the form submission. This, in turn, allows you to send admin notifications to different email addresses based on the form responses you receive. You can select the conditional logic to be enforced from the dropdown menu.
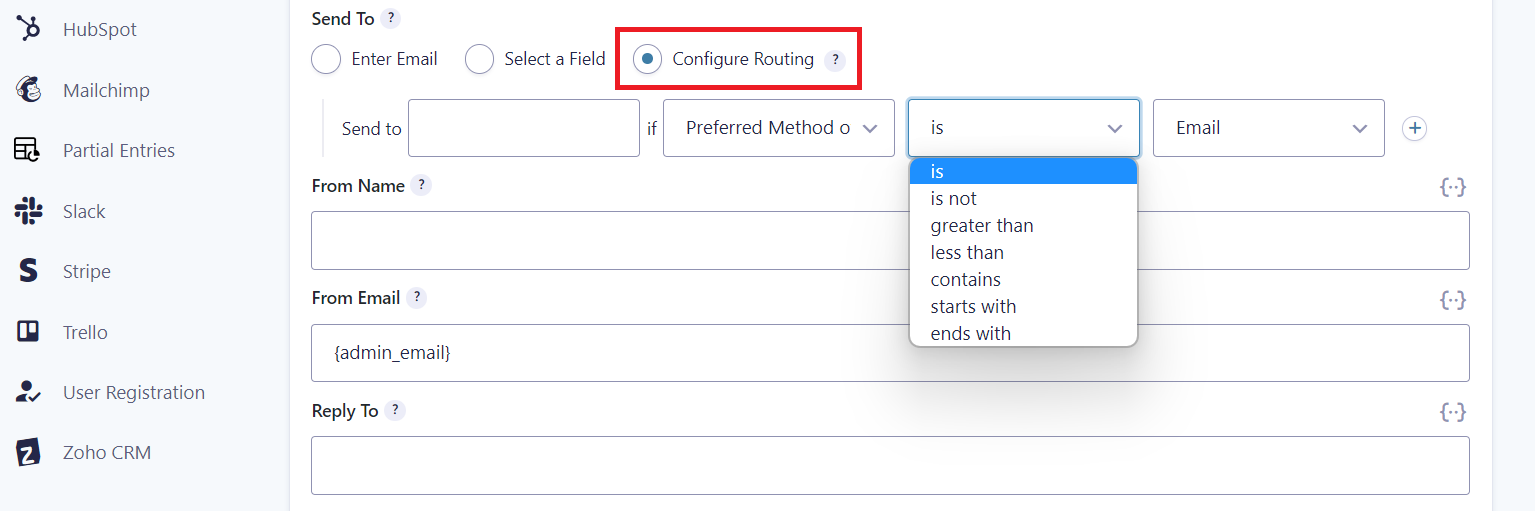
For example, if you ran a restaurant with multiple locations and took booking through an online form, you could use this function to send booking request notifications to your different branches based on which location the customer selected when filling in the form.
- Add the email destinations where you want to send the email notification, e.g., your subscriber list, or your contact form email list, and so on.
- Set the From name and email address which will show up on the notification email.
- Set the Reply To address for your email notifications.
- Set up any BCC recipients.

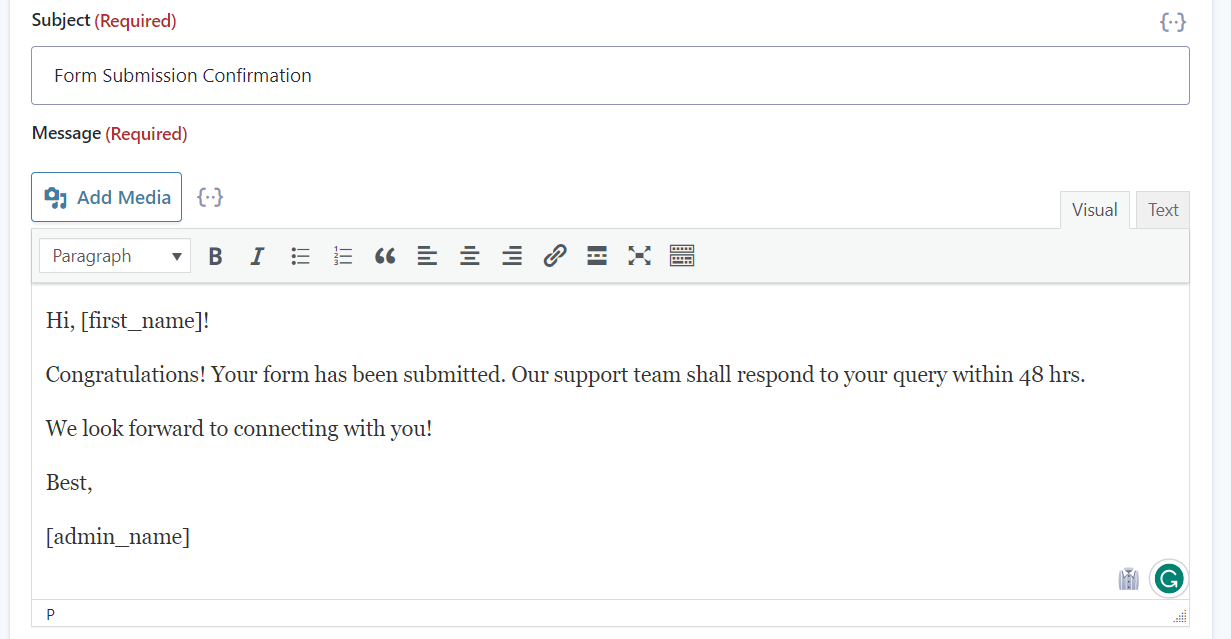
- Add the notification email subject.
- Edit the notification message. You can use Gravity Forms merge tags to personalize your message.
- Save your changes.
That’s it! Once you’ve completed these steps, your new Gravity Forms notification will be set up and ready to go.
Now, let’s move on to troubleshooting common email issues with Gravity Forms email notifications.
Troubleshooting common issues with Gravity Forms email notifications
There are two main types of issues that can cause problems with Gravity Forms email notifications: issues with notification settings and issues with the PHP mailer function.
Issues with notification settings
One of the most common reasons for Gravity Forms not sending emails is incorrect configuration of notification settings.
As each form in Gravity Forms has its own independent set of email notifications, each with its own settings, it’s likely that if emails are sending correctly for one form but not another, the issue lies within the notification settings for that specific form.
Here are some common problems that can cause email notifications to fail:
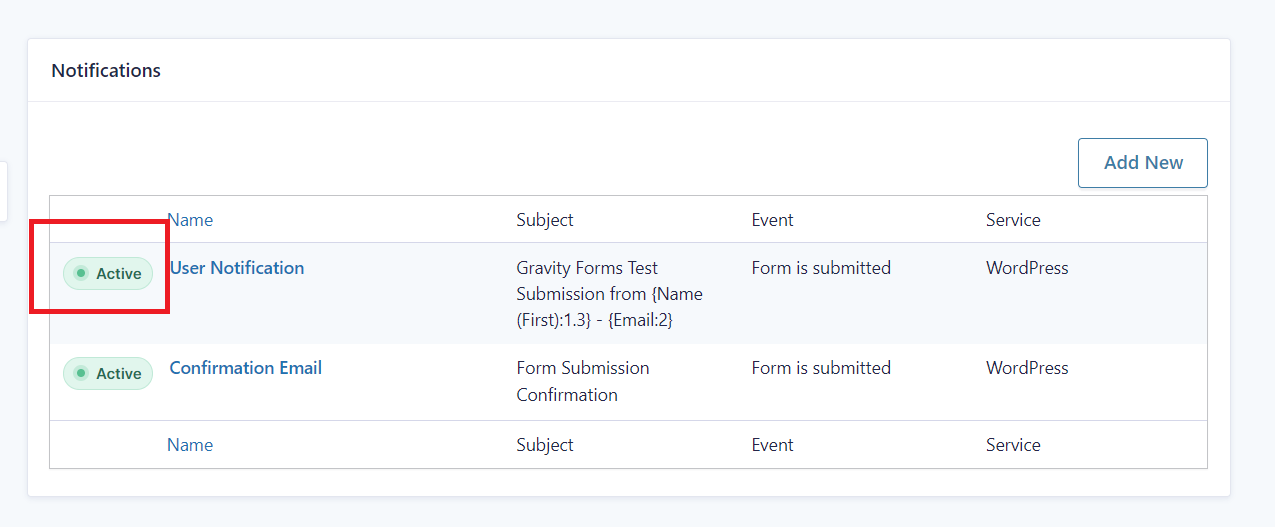
The specific notification is turned off
Check whether the notification is active or not.
Go to the form editor, then go to Settings > Notifications.
You’ll see all notifications for the form listed here – simply ensure that the notifications you want to send are Active.
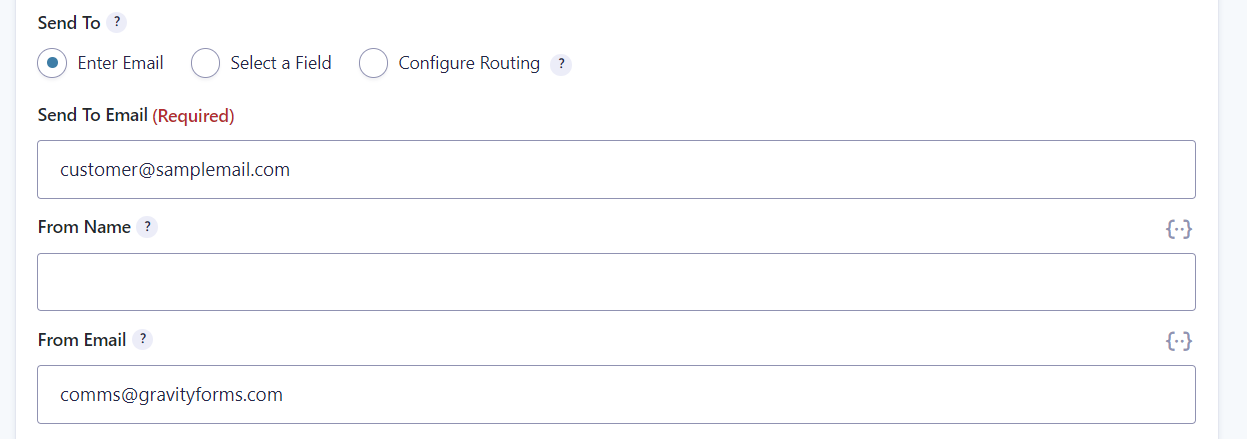
The sender and recipient email addresses are the same
If the from address and recipient address are the same, it can cause deliverability issues, including emails being flagged as spam and “be careful with this message” warnings in Gmail.
To fix this, make sure the From Email and Send To Email fields have different email addresses. You can set these email addresses by going to the notification settings page and clicking on the specific notification you want to edit.
The From Email field contains an invalid address
Email notifications are likely to be flagged as spam if the email address from which the email originates is not authorized by your server (i.e., an email using the same domain as your site).
Make sure the From Email field contains a valid email address.
The Send To Email field contains spaces or typos
If the Send To Email field includes any errors, such as spaces or typos, it can cause notifications to fail. Double-check your notification settings to ensure that everything is correct.
None of the routing conditions have been fulfilled
If you are using conditional logic in your form and have set up routing conditions for your notifications, the notification emails will not send if none of the routing conditions have been met.
Double-check that the routing conditions have been set up correctly and run a test email by filling in your form and ensuring the conditions are met.
Issues with the PHP mailer function
As we mentioned before, the default wp_mail() function that Gravity Forms uses to send emails is not very reliable and may fail, either owing to your web host’s server settings or emails sent with this function being flagged as spam.
One solution that can help to solve email deliverability issues is installing an SMTP provider or third-party transactional email service.
Using an SMTP plugin will replace the default PHP mailer configuration in WordPress with SMTP configuration.
This enables you to add proper authentication to your emails using DKIM, SPF, and DMARC – three lines within your DNS (Domain Name System) record that help stop your emails from going to spam.
SMTP plugins work by routing your email through an SMTP server instead of using the default wp_mail() function. This ensures that your emails are delivered successfully and are less likely to be flagged as spam.
Gravity Forms will work with any SMTP plugin for WordPress, and also offers first-party add-ons for the following major third-party transactional email services: Postmark, SendGrid, and Mailgun. Here at Gravity Wiz, we use Mailgun – here’s what our CTO, Clay Griffiths has to say about this add-on:
“Mailgun is cheap, reliable, and easy to set up. We’ve been using Mailgun since 2016, sending hundreds of thousands of transactional emails to our customers, and have never experienced an issue.”
Clay Griffiths, CTO at Gravity Wiz
Using these add-ons, you can integrate your Gravity Forms with these services and enjoy their benefits, such as email deliverability, tracking, and analytics.
By using an SMTP plugin or a third-party transactional email service, you can ensure that your Gravity Forms email notifications are delivered successfully and arrive in your users’ inboxes. This can help improve the user experience and the reputation of your site.
Other issues that can affect email deliverability
While switching to an SMTP configuration will help to improve your email deliverability, there are other factors that can prevent your emails from going to your recipient’s inbox. These include:
- Poor domain reputation: If your domain has a poor reputation, your emails may be more likely to end up in spam folders.
- Suspicious email content: Email content, including the use of images, color, and trigger words and phrases, can also affect email deliverability.
- High bounce rate: A high bounce rate caused by your server sending emails to invalid or inactive email addresses can reduce the reach of your emails and give inaccurate tracking data.
- Theme or plugin conflict: This can result in anything from slow or failed form submission to notification errors. To troubleshoot this type of conflict, start by ensuring that all of your plugins and themes are up to date to avoid any code conflicts caused by outdated plugin versions.
If updating your plugins and themes doesn’t fix the issue, try disabling all of your plugins and themes and gradually re-enabling them one by one. Submit a test entry for your form each time until you determine which plugin is causing the issue.
Get more out of your Gravity Forms notifications
Now that you know how to set up your Gravity Forms email notifications and troubleshoot common issues, it’s time to learn how to get even more out of your notifications.
Here are a few straightforward options using plugins from our very own suite of Gravity Perks:
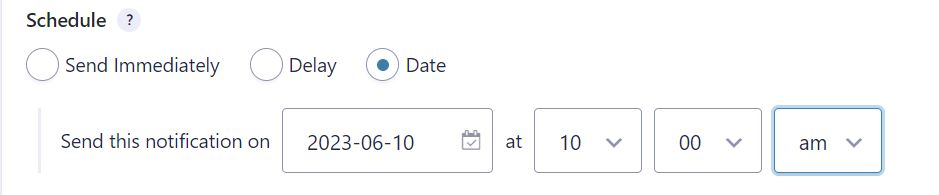
Customize when your Gravity Forms notifications are sent
With Gravity Forms Notification Scheduler, you can schedule notifications to be sent after a specific delay or on a set date and time.
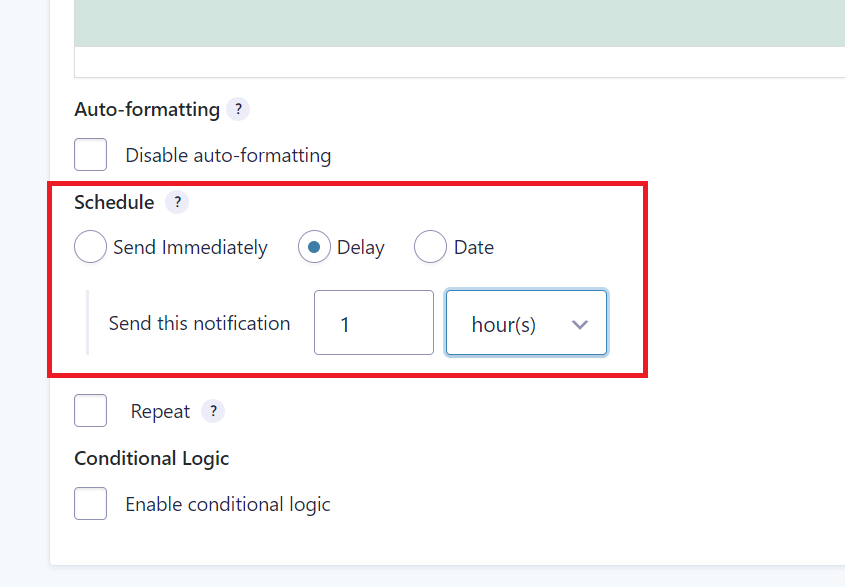
You can also trigger notifications based on values in submitted date fields, set up recurring notifications, and reschedule notifications with ease on the fly.
Send manual notifications to users who have submitted your forms
We also offer a free plugin to send ad-hoc messages to any users who have submitted your forms.
Use this plugin to email all users who have submitted a form or only users who have selected a specific field value.
Send personalized messages to users who have filled out a form
Using the Gravity Forms Email Users plugin, you can send custom notifications to users who have submitted a form. Here are some of its best features:
- A rich text editor to craft perfectly formatted email messages
- A preview setting to ensure your emails look perfect before you start sending them out
- Conditional logic filtering to determine which users receive your messages based on values captured in their submission.
More ways to enhance your Gravity Forms notifications
For readers looking for even more options to add value to their Gravity Forms notifications, we’ve also got a whole range of free code snippet solutions to help you take your notifications to the next level.
These include:
- Distribute leads evenly to a group of sales reps, schedule employees for the next available shift, or balance the responsibility of any task-oriented submission with the Gravity Forms Round Robin snippet.
- Use the Gravity Forms Spam Notification snippet to receive notifications whenever form submissions are marked as spam by Akismet.
- Create a zip file containing all of the files uploaded to a form submission and attach it to the submission notification using the GW Zip Files snippet.
- Include entry notes in your form submission notifications with the GW Notes Merge Tag snippet.
- Use any merge tag in your notification’s “Send to Email” setting using the GW Send Notifications to Merge Tags snippet.
- Notify the author when a post they submitted through a Gravity Form is published with the Notify Author When Post is Published snippet.
By using these tools and customizations, you can get even more value out of your Gravity Forms email notifications and ensure that you’re getting the most out of your forms.
Set up powerful Gravity Forms notifications that work every time
From configuring your notification settings to troubleshooting common issues, we hope this guide has provided you with the knowledge you need to ensure your notifications always reach their intended recipients.
But why stop here?
By using the various tools and plugins we’ve covered, you can use Gravity Forms notifications to accomplish functionality far beyond what they were built for.
Whether it’s customizing exactly when your notifications are sent, sending manual notifications to users, or personalizing messages based on user input, there are endless possibilities for getting the best out of your Gravity Forms notifications!
If you’re looking to boost the capabilities of your Gravity Forms, check out our full range of Gravity Perks.
Happy form building!
Thanks for this lifesaver of a guide! Been pulling my hair out trying to figure out why some of our form notifications were ending up in spam while others weren’t showing up at all. 📧 The troubleshooting section was particularly helpful – turns out our SMTP setup was the culprit. Wondering though – has anyone else noticed delivery delays with larger file attachments in their forms?
HI Dory,
You’re welcome. Glad to know the article was helpful to resolve an issue you were having. I see a possibility where delivery will delay for emails with larger file attachments, as it will take longer to upload and process through email servers. You may want to contact your hosting to check the size limits for attachments and see if something can be done about it.
Best,
Excellent content
Thanks for the positive review.
Best,