How to Build a Gravity Forms Price Calculator with a Slider Field
Learn how to add a draggable slider to your Gravity Forms price calculator so users can drag to a quantity and watch the total update in real time.

Gravity Forms lets you build forms that calculate prices as users fill them out. That got me curious about what people wanted to add on top of it.
Turns out, some were looking for a more visual way to choose a quantity — dragging instead of typing, and watching the total follow.
Gravity Forms Sliders lets you do exactly that. Here’s how to set it up.
This article requires the Gravity Forms Sliders perk.
Buy Gravity Perks to get this perk plus 48 other premium Gravity Forms plugins!
How a Slider Connects to a Gravity Forms Calculation
Gravity Forms Sliders (GP Sliders for short) is part of the Gravity Perks suite. It adds a draggable slider to Gravity Forms, either as its own Slider field, or by enabling it on an existing Number field.
Behind the scenes, the slider stores a number. Reference that number in a calculation-enabled Number or Product field with a merge tag — and the total updates as the slider moves.
What You’ll Build
By the end of this guide, you’ll have:
- A Gravity Forms price calculator with a draggable slider
- A total that updates as users move the slider
What You’ll Need
- Gravity Forms (any license)
- GP Sliders, installed via Spellbook — Gravity Wiz’s free plugin manager
- To install: open Spellbook › navigate to Perks › activate GP Sliders
- A form where users choose a quantity, amount, or value with a slider
How to Add a Slider to a Gravity Forms Price Calculator
For this walkthrough, we’ll use an event registration form where each seat costs $29. Swap in whatever values fit your use case.
Step 1 — Add a Slider Field to Your Form
- Open your form in the Gravity Forms editor.
- Under Advanced Fields › add a Slider field.
- Give the field a clear label, like
Number of Seats. - Note the field ID. You’ll use it when writing your formula in Step 3.
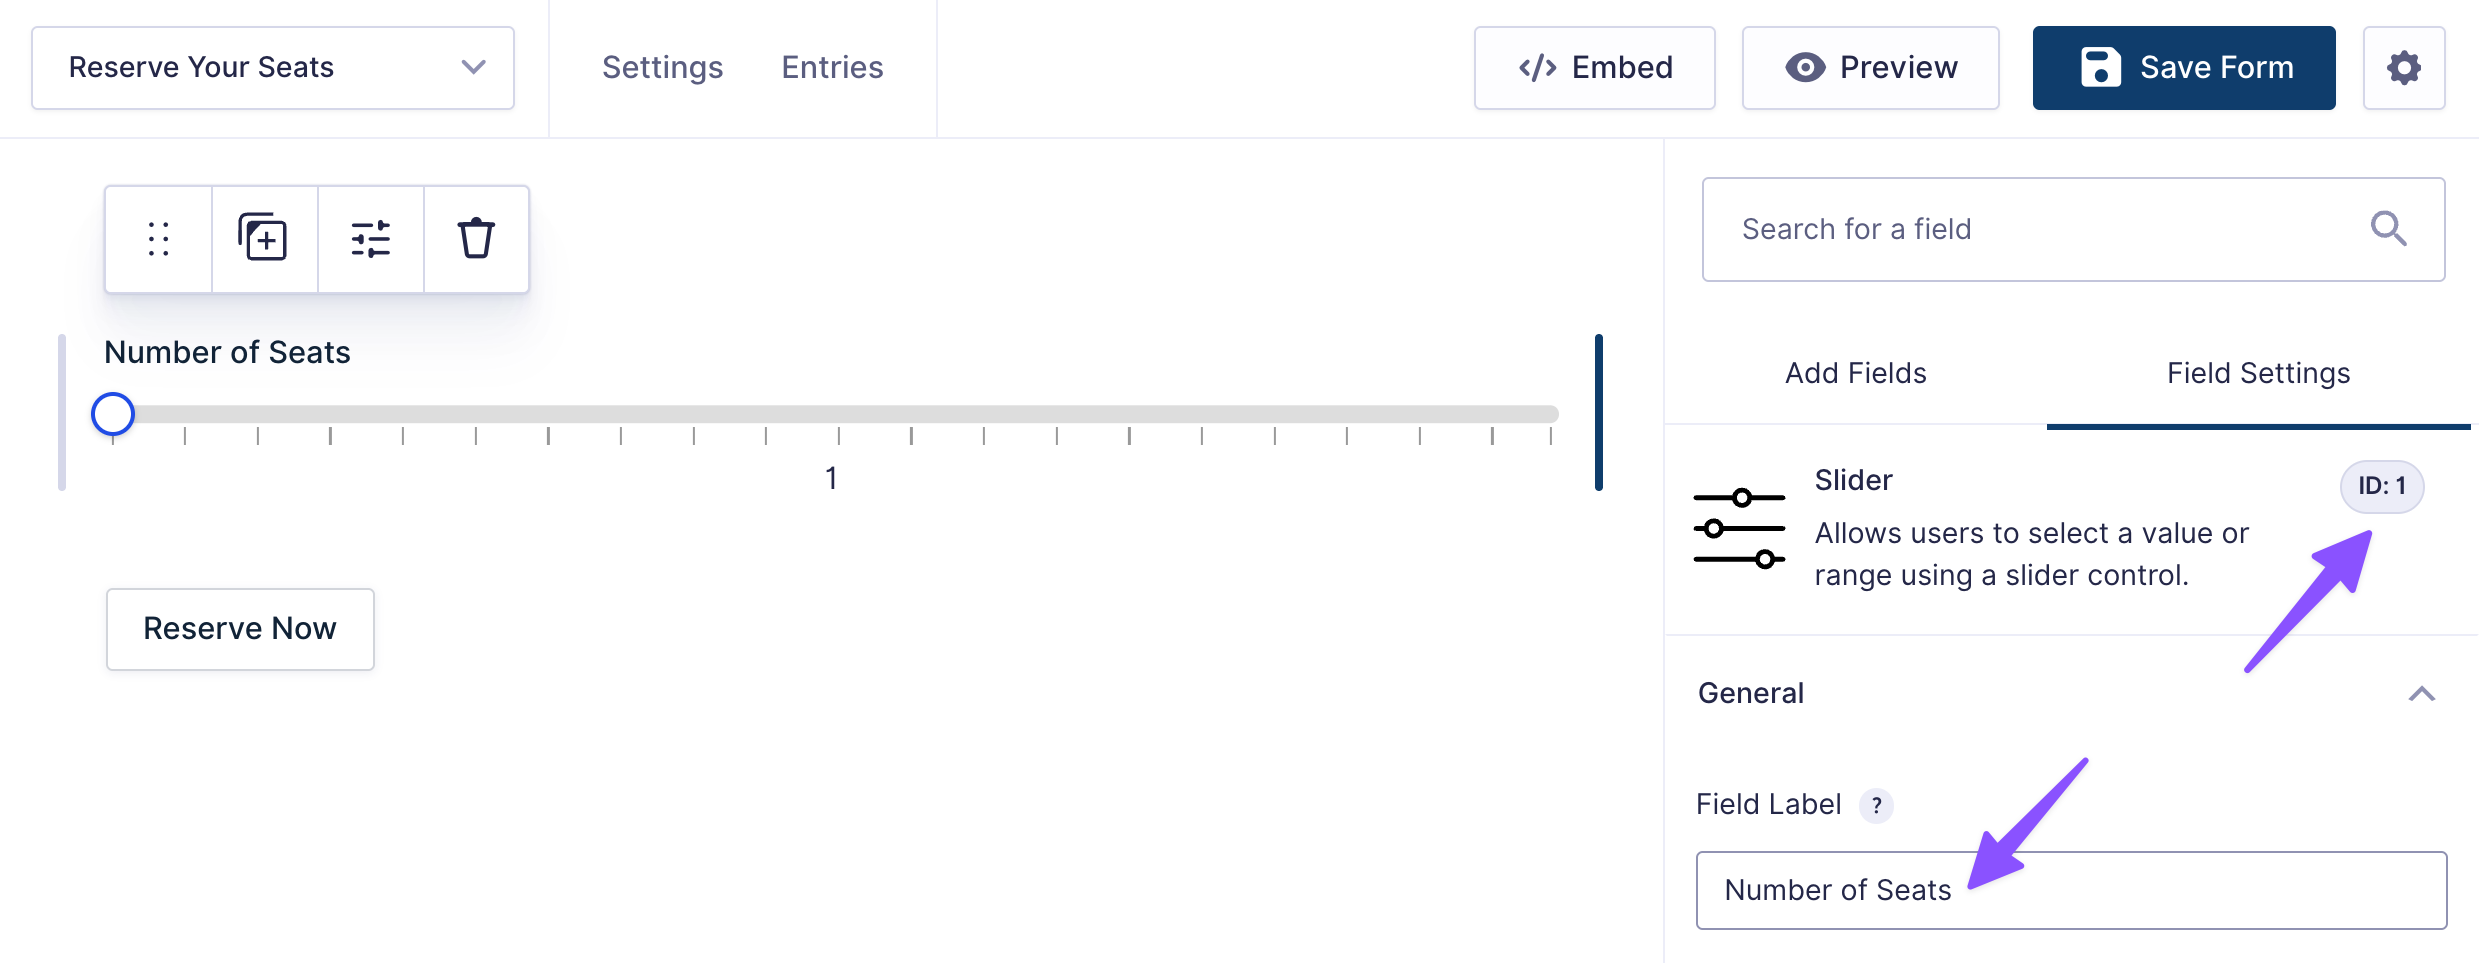
Prefer to use an existing Number field instead? Open the field settings › go to the Perks tab › enable the slider toggle.
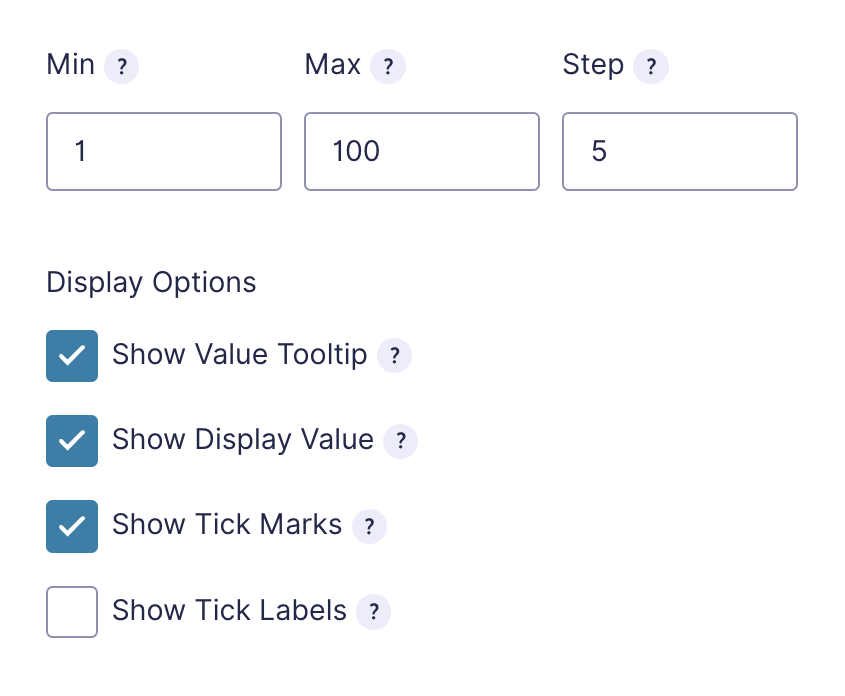
Step 2 — Configure the Slider
- Set your Min, Max, and Step values. For a seat-based calculator, try something like Min
1, Max100, Step5. - Optional: Enable Show Value Tooltip or Show Tick Marks to help users see what they’re selecting.
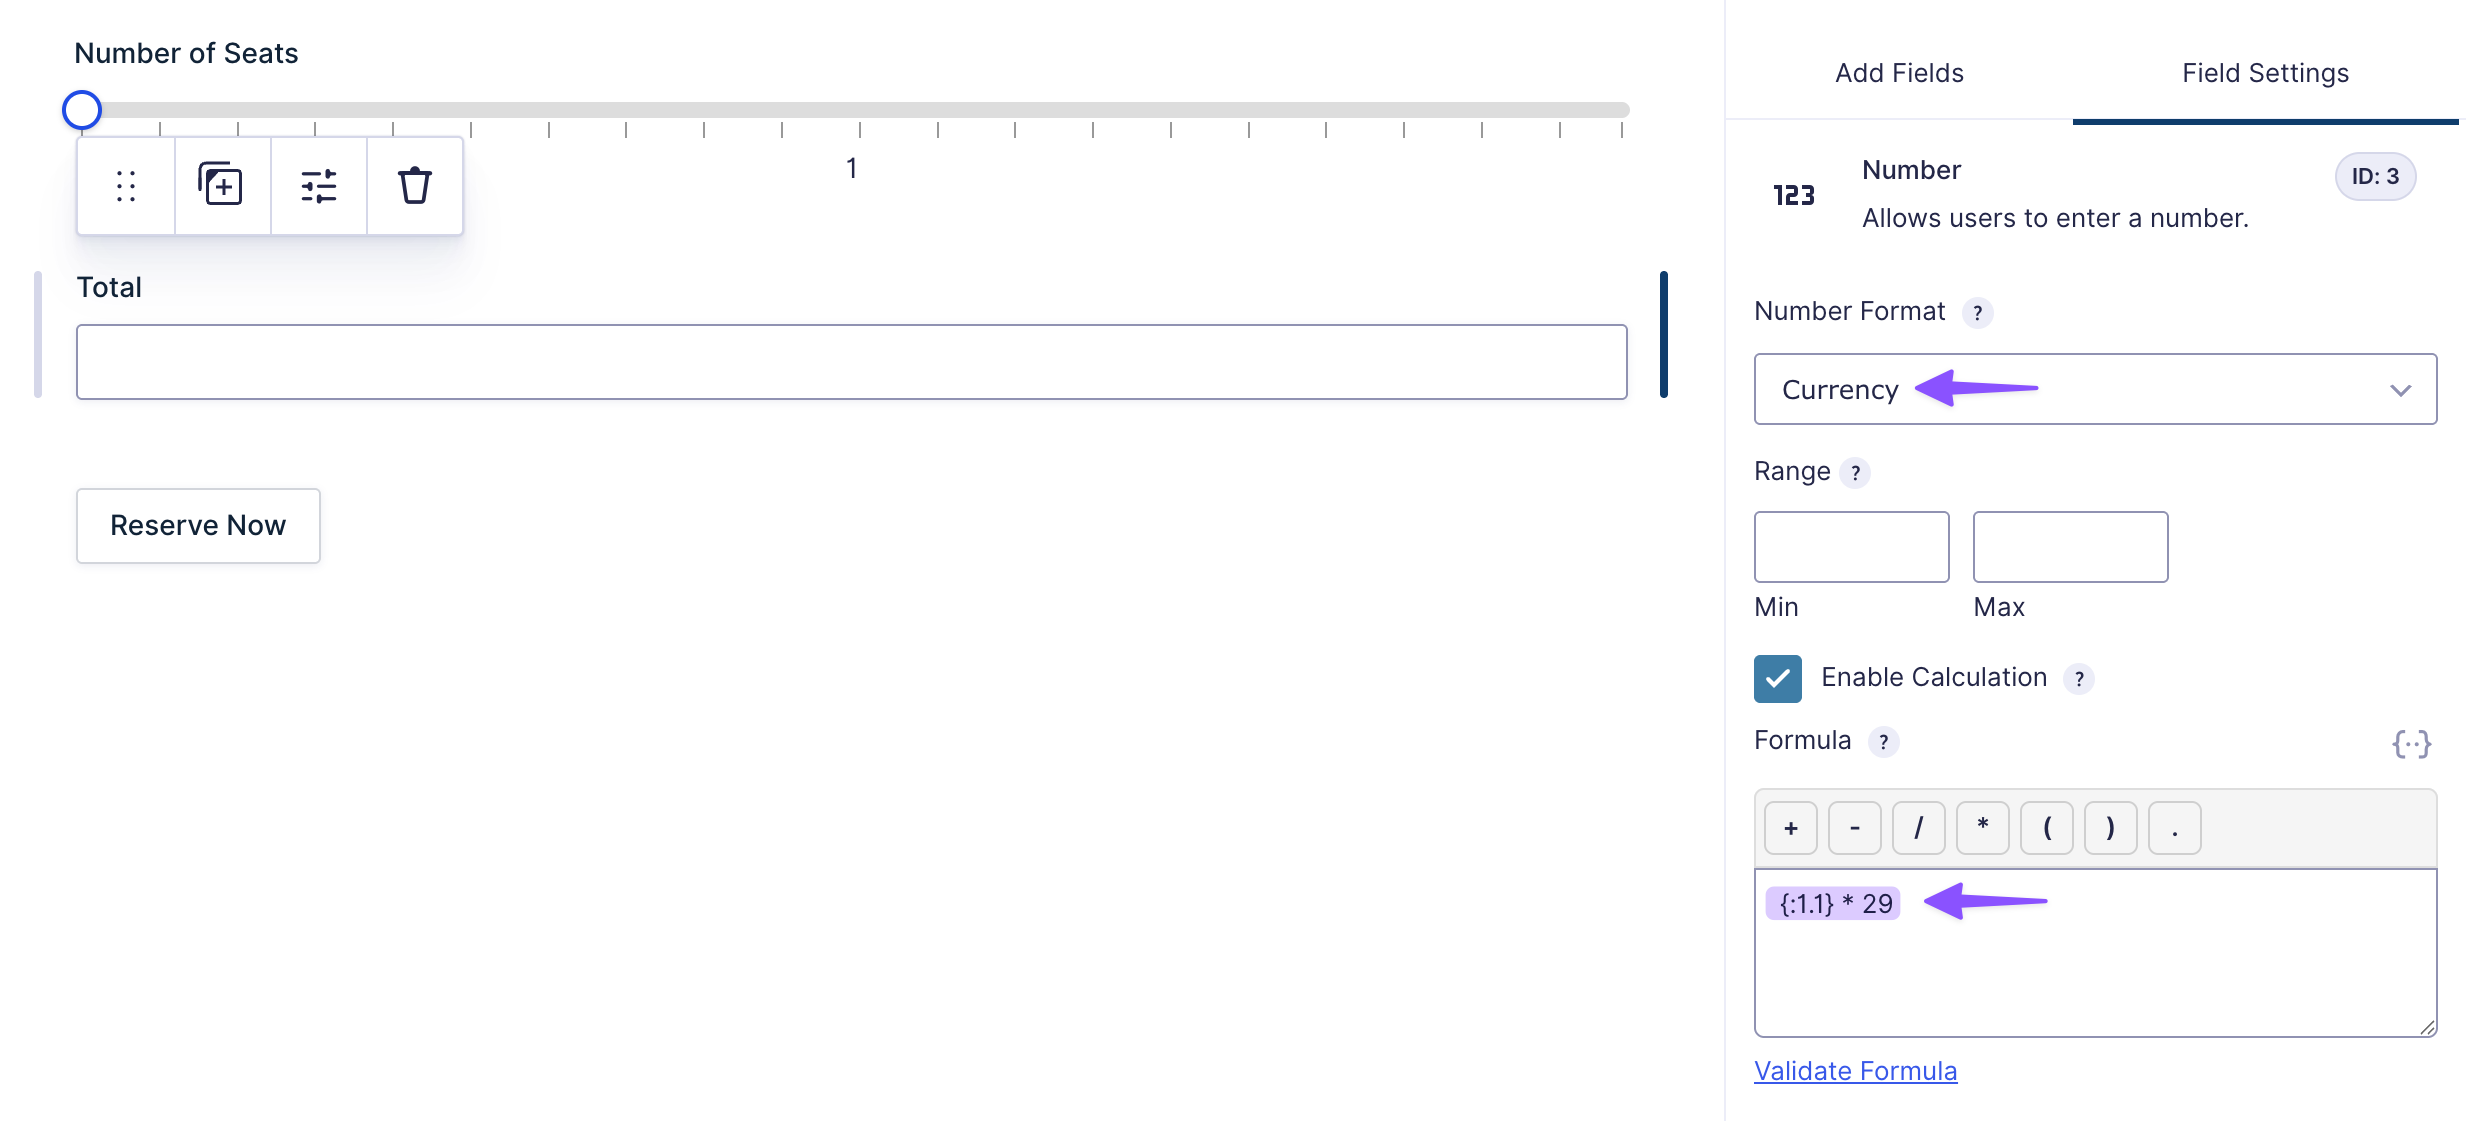
Step 3 — Add a Calculation Field and Write the Formula
- Add a Number field to your form.
- In the General tab, check enable Enable Calculation.
- In the formula editor, write your formula using the Slider field’s merge tag:
{:[field_id].1}— where[field_id]is your Slider field’s ID. Multiply it by your price per unit to get the total.- For example, if your Slider field ID is
1, and each seat costs $29, the formula would be:{:1.1} * 29
- For example, if your Slider field ID is
- In the Number Format dropdown, select Currency so the total displays with the currency.
Note
Make sure the Slider field is positioned before the Calculation field in your form, or the total may not calculate correctly.
Step 4 — Test the Calculator
- Preview the form and drag the slider across a few values — the total should update as you drag.
- Test the min and max values to make sure the boundaries work as expected.
- Submit a test entry and confirm the stored value matches the slider value.
Building a form that collects payment? Use a Product field set to Calculation so Gravity Forms can charge the calculated amount, not just display it.
Taking It Further
Once the basic calculator is working, here are a few ways to take it further.
- Want a price range instead of a single value? Enable range mode so users can drag both a minimum and maximum value.
- Want to show named tiers instead of raw numbers? Use Custom Choices mode to show labels like Starter, Growth, and Pro while storing numbers behind them. If you need to go further — tax, discounts, tiered pricing, check out our full guide to Gravity Forms calculations.
- Need rates that change based on quantity? Use GP Advanced Calculations for formulas like “$29 per seat for the first 10, then $19 after that.” For product-specific discounts, GP Conditional Pricing can also help.
Key Takeaways
- GP Sliders adds a draggable Slider field to Gravity Forms, either as its own Slider field or by turning an existing Number field into a slider.
- The Slider field stores a number, which you can use in any calculation-enabled Number or Product field.
- You can extend the setup with range sliders, custom labeled tiers, or quantity-based formulas using GP Advanced Calculations.