Gravity Forms Repeaters: The Ultimate Guide
Everything you (could possibly) need to now about using Gravity Forms repeater fields. Explore what they are, what your options are, and how to use them to collect repeatable data in Gravity Forms.
- What is a Gravity Forms Repeater?
- Gravity Forms Repeater Plugins: What’s out there?
- List Field: A simple Gravity Forms repeater alternative
- Repeater API: A built-in repeater field for Gravity Forms
- Nested Forms: A Gravity Forms Repeater Add-on
- Using Conditional Logic with a Gravity Forms repeater field plugin
- Doing Calculations with Gravity Forms Repeaters
- Exporting Data from Gravity Forms Repeater Plugins
- Applications and Use Cases for Gravity Forms Repeaters
- FAQ: Common questions about Gravity Forms Repeaters
Today we’re talking Gravity Forms and repeater fields.
Form repeater fields let you collect multiple instances of the same data type in a single submission.
For example, let’s say you’re creating an order form for a sandwich shop website. A Gravity Forms repeater field would let you create a set of fields for each person (e.g., their name, sandwich preference, what kind of chips they want, etc.) and allow one person to submit multiple orders in one go.
No need to fill out and submit the same order form multiple times — repeater fields to the rescue!
If you’re interested in how you can use repeater fields with Gravity Forms, you’re in the right place. In this article, we’ll explore the landscape of available repeater field options, share code customizations, common use cases, and more.
After reading this article, you’ll be prepared to use repeater fields with Gravity Forms on your WordPress site (and possibly be craving a sandwich).
Sound good? Let’s go!
What is a Gravity Forms Repeater?
A form repeater, also known as a form field repeater, isn’t unique to Gravity Forms. It’s a user interface component you might find in all sorts of software. For example, if you’ve built custom blocks with Advanced Custom Fields, you may have used their repeater field. Or if you’ve worked with other WordPress forms plugins, you may have encountered repeaters there.
There are loads of use cases for repeaters, ranging from simple to complex.
Simple applications might include:
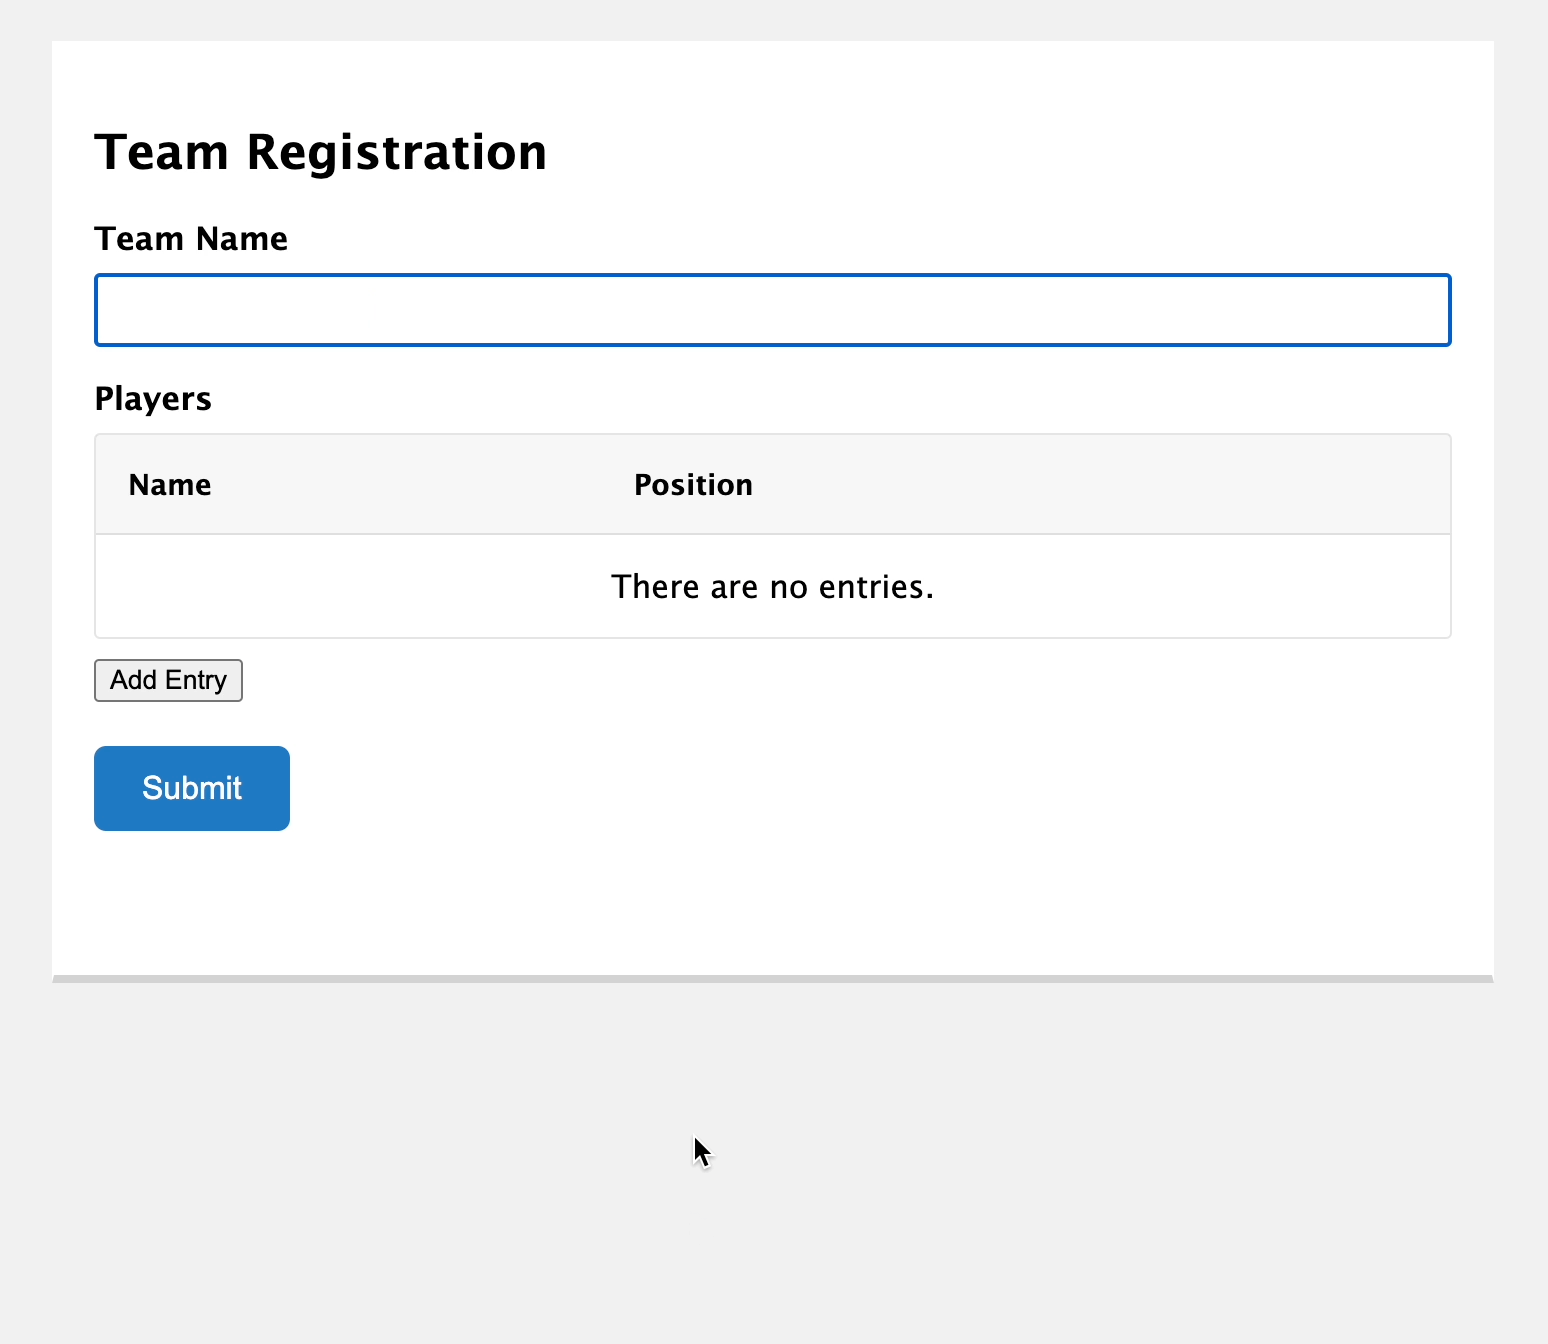
- A team roster form: add a row for each member of the team, including their name, position, and phone number.
- Survey form: collect multiple responses for a single question by allowing users to add as many rows as they need to answer the question.
- Medication form: patients can add a row with the name and dosage of each medication taken.
These are just a few ideas, but repeater fields can be used in many contexts to get structured data from users more efficiently. While you will find repeater fields everywhere, we’re keeping today’s discussion focused on our favorite WordPress plugin: Gravity Forms.
Gravity Forms Repeater Plugins: What’s out there?
What options do you have if you want to use repeater fields in Gravity Forms? Turns out you’ve got a few! And which approach you use depends on what you’re trying to accomplish and your level of comfort mucking about in code.
The three repeaters for Gravity Forms that you’ll see most frequently:
In addition to these, you may come across other Gravity Forms repeater plugins in the wild. If you do a quick Google search, however, you’ll note that many of these are either unsupported or unmaintained projects.
Each solution has its own strengths and weaknesses. We’re making a genuine effort not to position our own solution, Nested Forms, first — because we genuinely believe it’s not the best solution for all use cases. However, you will see you will still most likely find the most robust repeater functionality within Gravity Forms Nested Forms. This is not our fault, okay?
Let’s take a look at each in turn.
List Field: A simple Gravity Forms repeater alternative
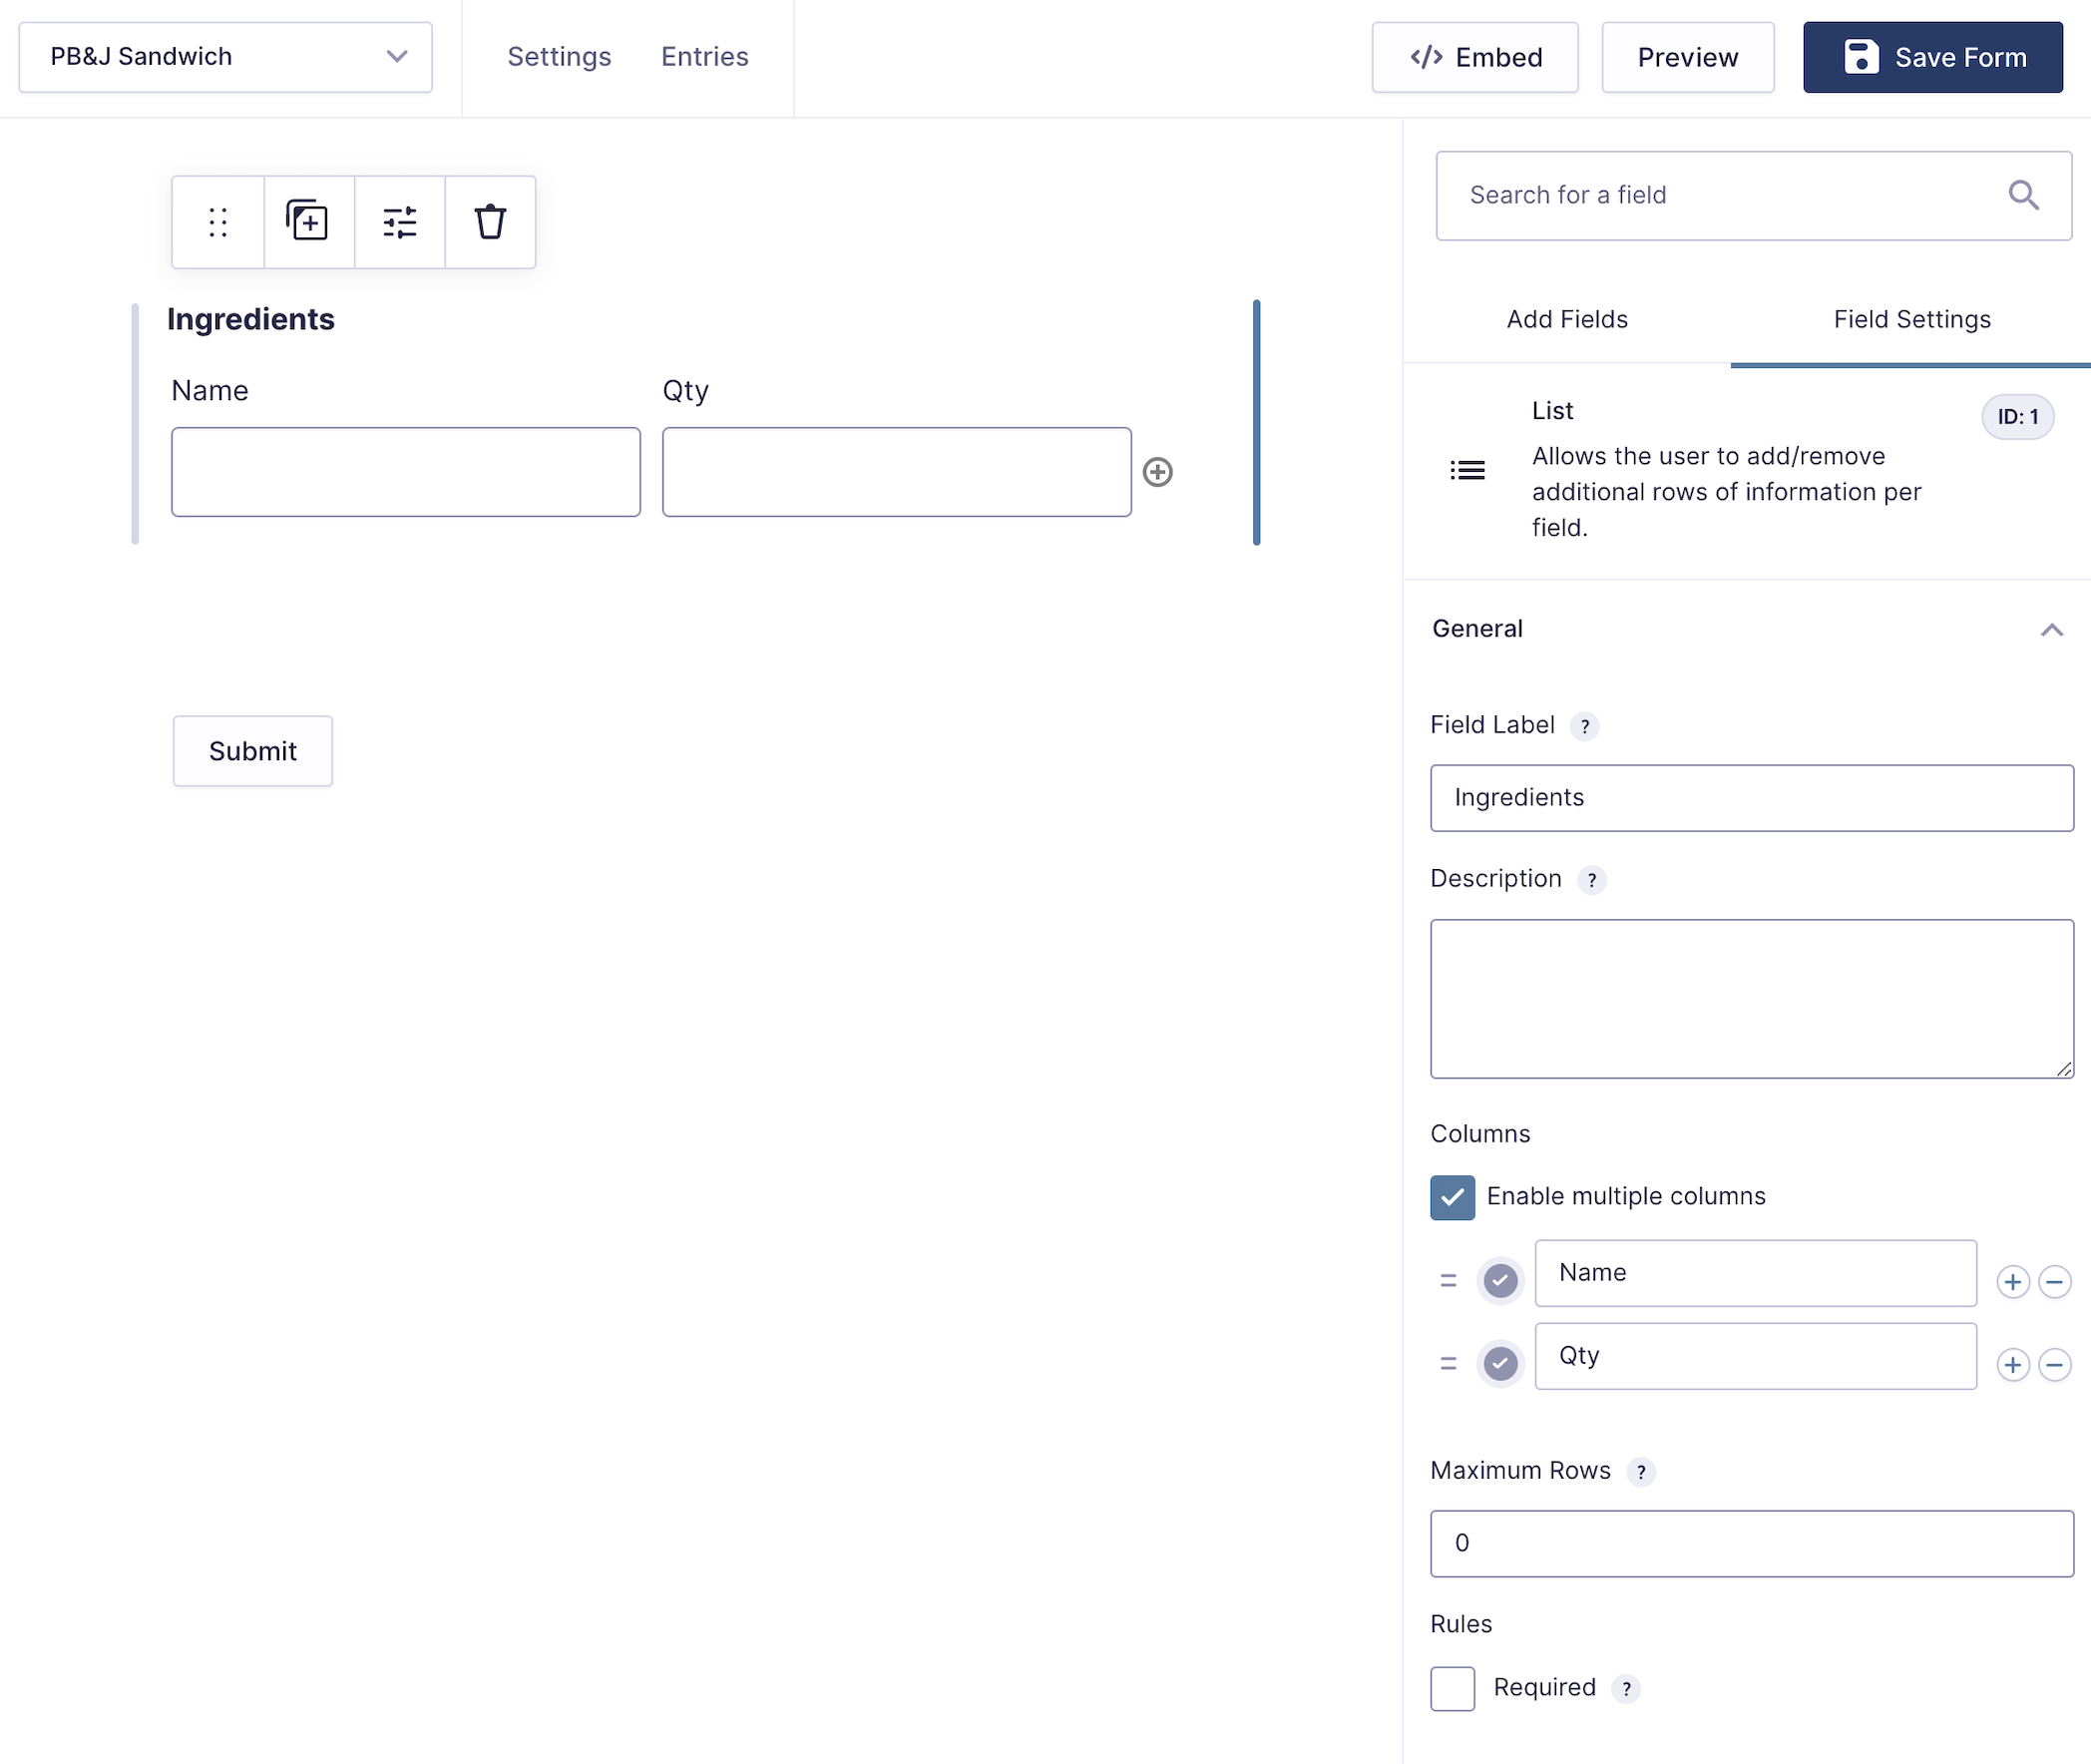
The List Field is a field type natively available in Gravity Forms and is a simple version of a repeater field.
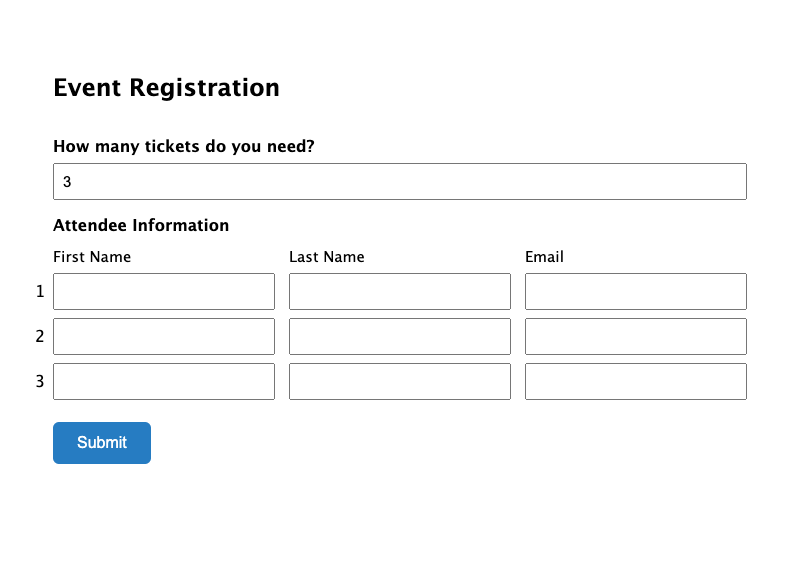
This is a great option when you need a quick way for a user to add multiple options to a list. For instance, a list of ingredients in a recipe or a list of attendees for an event.
On the backend:
It works like this:
- Create a new form or edit an existing one
- Go to Add Fields > Advanced Fields and select List
- Add a Field Label
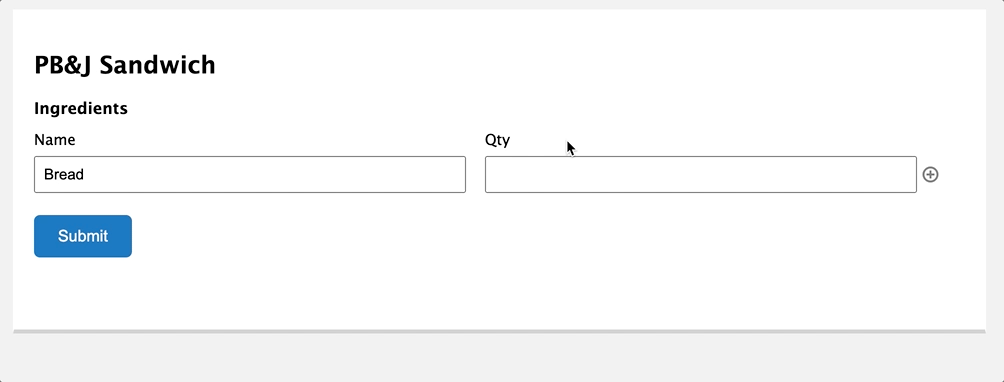
- From there, you can select whether you want a single column or multiple columns. In the PB&J Sandwich example, we’re using 2 columns.
- You can also specify whether there’s a maximum number of rows a user can enter.
Check out the official documentation for the List field for additional configuration options.
Customizing the Gravity Forms List field
Beyond the basic stuff, Gravity Forms provides a few ways to customize the List field. Warning: these are customizations you’ll need to make with code (if you’re not code friendly, we’d recommend jumping down to our section on Nested Forms).
Let’s take a look at some Gravity Forms List Field examples.
Use Drop Down instead of a Text Field
There could be scenarios where you don’t want the List field to be a text field. Gravity Forms gives you the ability to use a Drop Down or Select field instead.
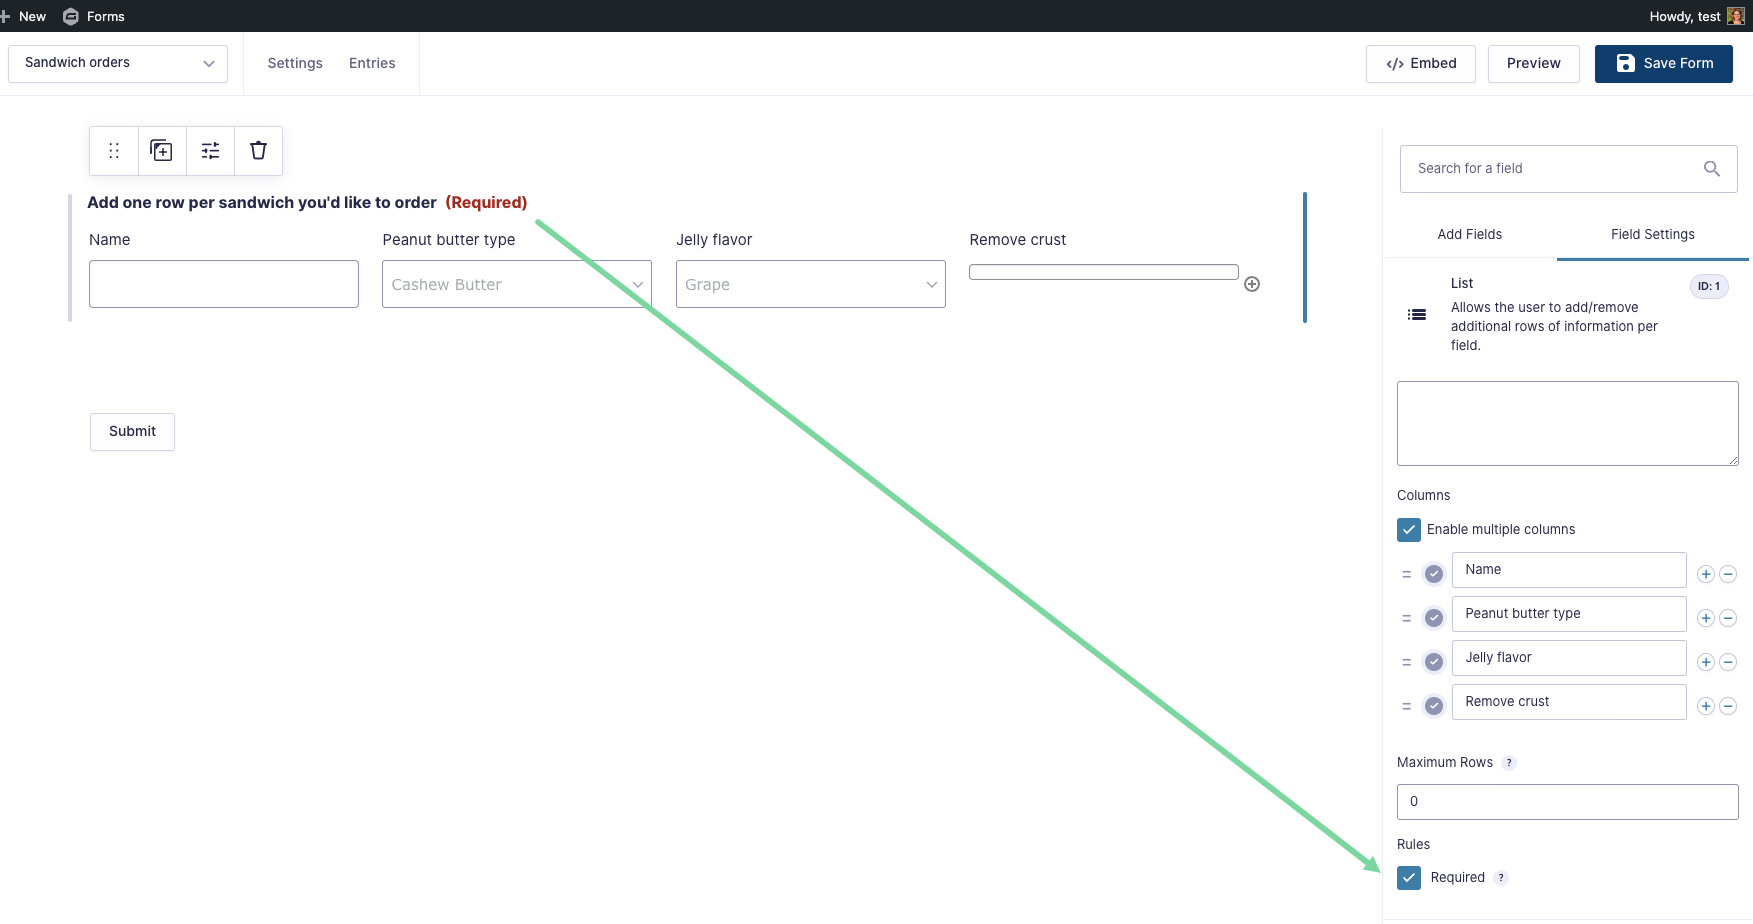
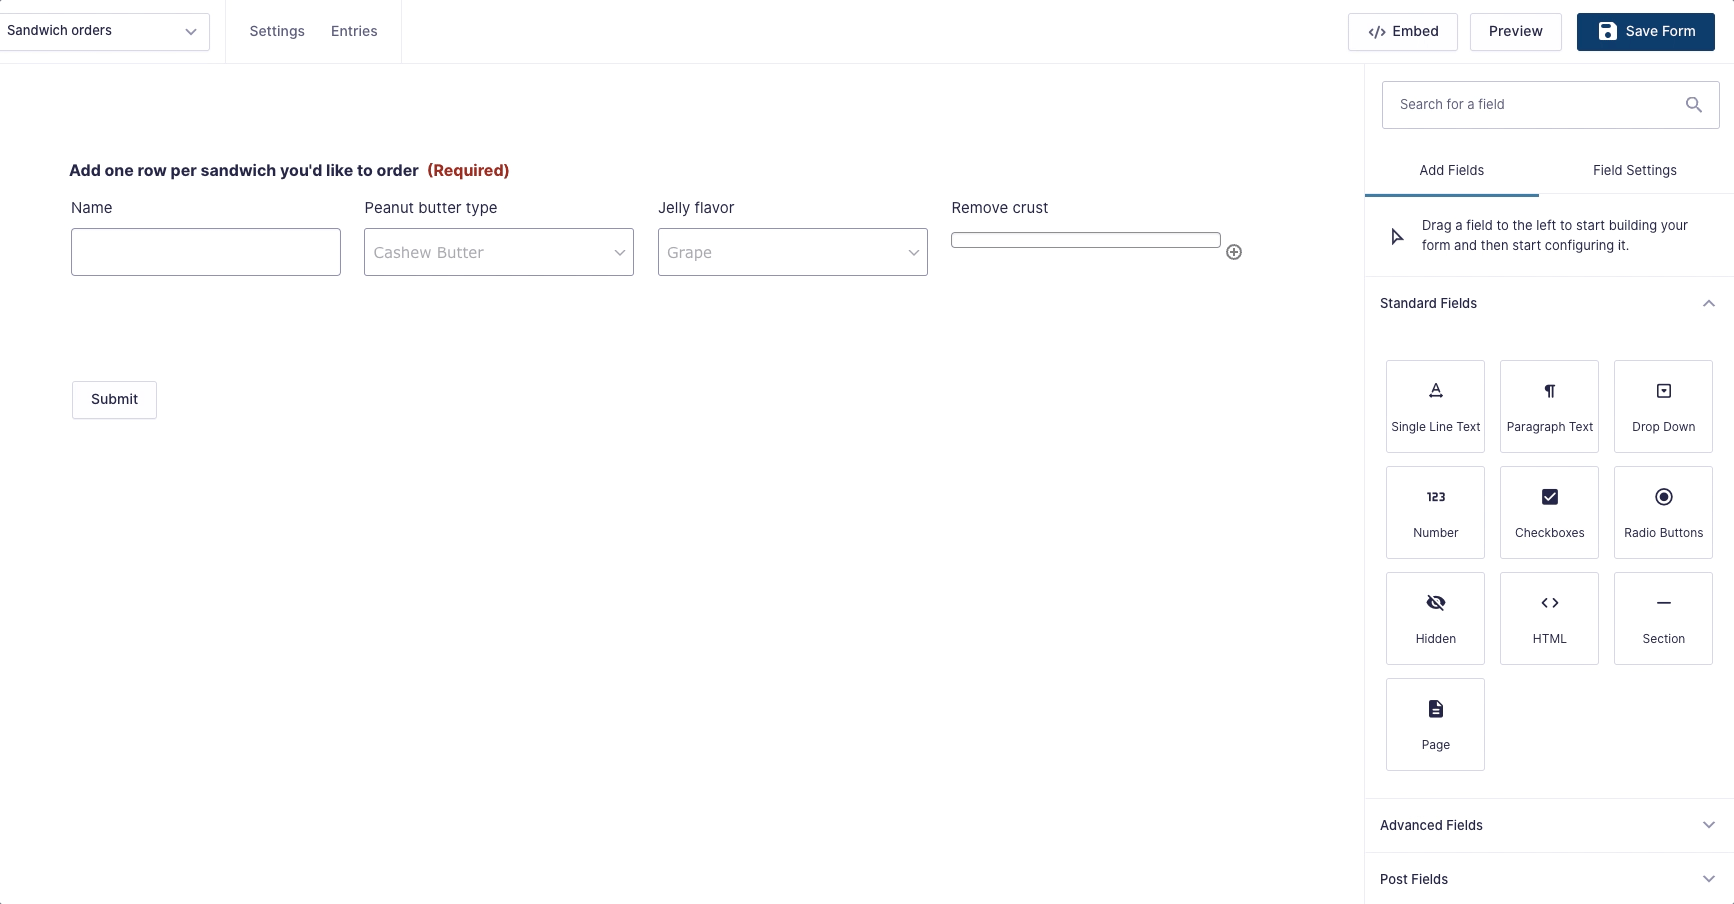
Sticking with the PB&J theme, let’s say we want to use a List field to create an order form for sandwiches.
We’ll create three columns:
- Name
- Peanut butter type
- Jelly flavor
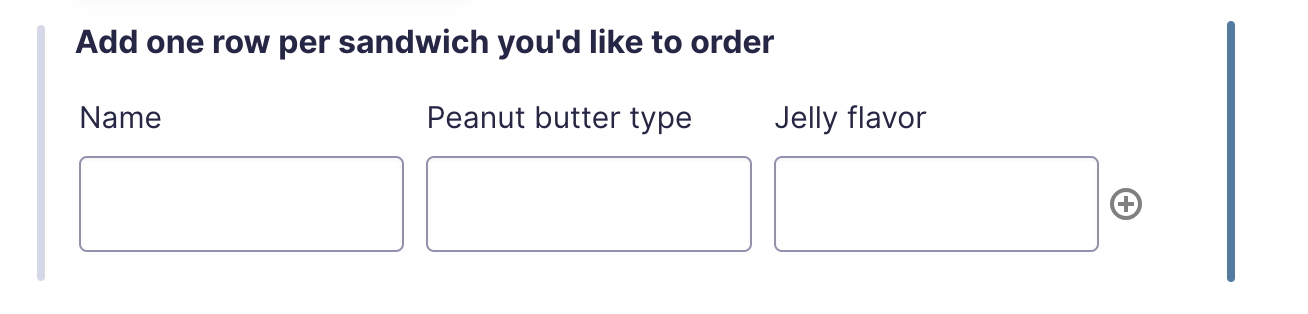
In this case, it’s OK to leave the person’s name as a text field, but let’s look at how we could create a Drop Down based-list with pre-populated options for the two other columns.
To do that, we’ll use the gform_column_input filter, which allows us to specify a different input type for a list field column. Note that currently supported field types are Select and Text fields.
We’re about to get into code. For non developers, we’d recommend jumping straight to our no-code solution for Gravity Forms repeaters, called Nested Forms.
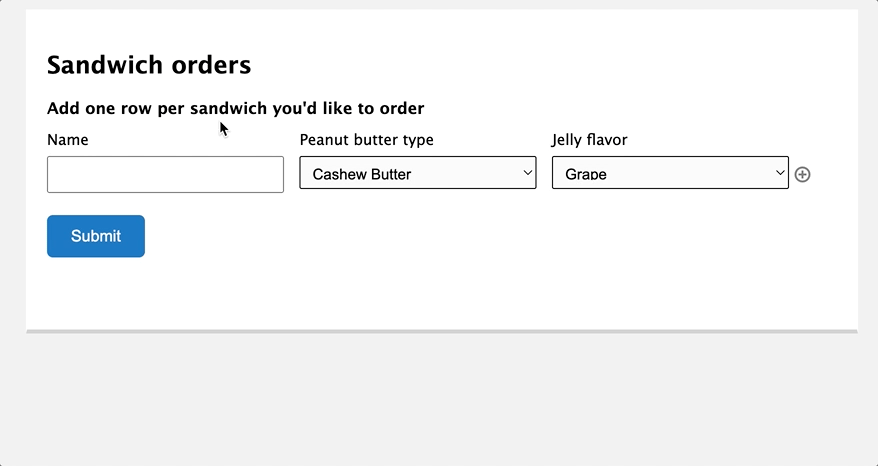
First, let’s create two callback functions, one that will turn Peanut Butter Type into a pre-populated Drop Down list and another that turns Jelly Flavor into a pre-populated Drop Down.
function pbj_pb_selections() {

	$pb_types = array(
		'type'    => 'select',
		'choices' => array( 'Cashew Butter', 'Peanut Butter', 'Sun Butter' ),
	);

	return $pb_types;

}

function pbj_jelly_selections() {

	$jelly_flavors = array(
		'type'    => 'select',
		'choices' => array( 'Grape', 'Strawberry', 'Raspberry' ),
	);

	return $jelly_flavors;

}
Then, let’s complete the process by adding two filters to hook in those callbacks. Note that we’re targeting those specific columns by adding the Form id, Field id, and column number after the filter name.
// Format: gform_column_input_FORMID_FIELDID_COLUMN.
add_filter( 'gform_column_input_3_1_2', 'pbj_pb_selections' );
function pbj_pb_selections() {

	$pb_types = array(
		'type'    => 'select',
		'choices' => array( 'Cashew Butter', 'Peanut Butter', 'Sun Butter' ),
	);

	return $pb_types;

}

// Format: gform_column_input_FORMID_FIELDID_COLUMN.
add_filter( 'gform_column_input_3_1_3', 'pbj_jelly_selections' );
function pbj_jelly_selections() {

	$jelly_flavors = array(
		'type'    => 'select',
		'choices' => array( 'Grape', 'Strawberry', 'Raspberry' ),
	);

	return $jelly_flavors;

}
Voila! And just like that, we have pre-populated Drop Downs.
Admittedly, if you need to use a Drop Down field as part of a repeater, the List field isn’t the easiest method (we’ll look at more options later), but it’s worth pointing out what you can do natively with Gravity Forms.
Use any form field instead of a text field
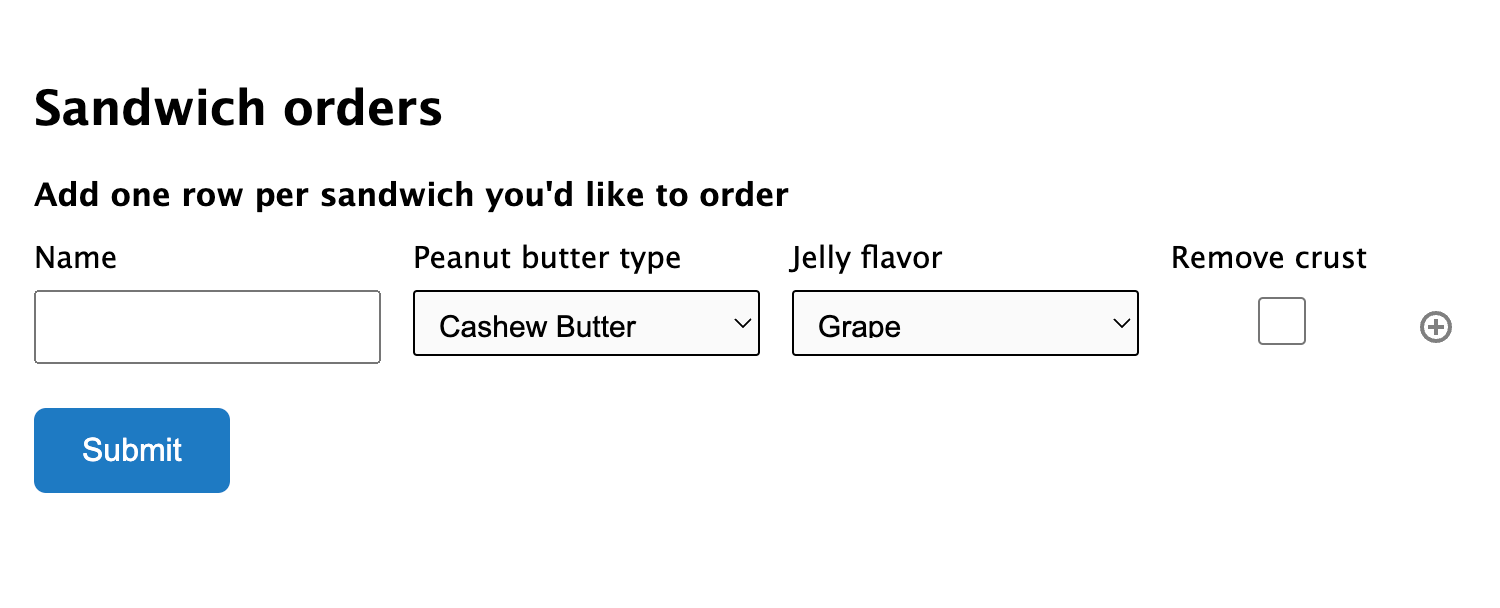
If the gform_column_input filter is handy for turning a column in a List field into a pre-populated Drop Down, let’s look at an example of when we might want to use the gform_column_input_content filter to modify the HTML content of a column.
With gform_column_input_content, you can modify the complete HTML output for a List field’s column input tag. Want a Textarea, Checkbox, or Number field? No problem!
Let’s go back to our sandwich order form and add a checkbox for whether we want the crust cut off the bread.
To do that, we would create a callback function that builds the HTML we want to output and then we would hook it to gform_column_input_content.
// Format: gform_column_input_content_FORMID_FIELDID_COLUMN.
add_filter( 'gform_column_input_content_3_1_4', 'pbj_crust_option', 10, 6 );
function pbj_crust_option( $input, $input_info, $field, $text, $value, $form_id ) {

	// Field name needs to match List field syntax.
	$field_name = 'input_' . $field->id . '[]';

	// We want tabindex for keyboard accessibility.
	$tabindex = GFCommon::get_tabindex();

	// Build the HTML output.
	$new_input = '<input type="checkbox" name="' . $field_name . '" ' . $tabindex . '"/>';

	return $new_input;
}
And now we’ve got a checkbox a user can select if they don’t want the crust on a sandwich. 😬
There’s a gotcha here worth noting: If you use any input that generates more than a single input value (i.e. Radio buttons, multiple Checkboxes), you will need to handle capturing that value correctly on submission.
Whereas the gform_column_input filter handles this for you, you’ll need to be mindful of this caveat.
Customize List field appearance with CSS
In addition to filters we can use to customize the List field, the lovely folks over at Gravity Forms have provided us with CSS selectors we can use to target the List field.
The UI will always be in the row/column format, but you can give it a bespoke appearance by customizing the icons used to add/remove rows or by applying alternating colors on rows. And, of course, you can style the form fields and buttons to match your site.
Taking it further with the Gravity Forms List field
If the List field looks like it might be a good fit for your project, you’ll be thrilled to learn how it can be extended to do even more. Let’s take a look at some examples.
Auto List Field and Calculations
Using Gravity Forms Auto List Field, you can sync the number of List field rows with a field value.
For example, let’s say you’ve got a form for registering event attendees. To start, a user could input the number of tickets needed. That number would then be used to generate a corresponding number of List field rows, in real time.
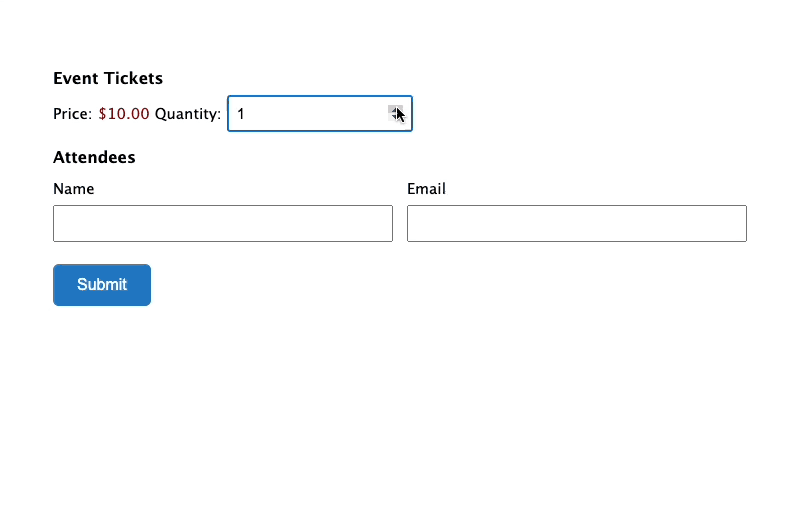
Conversely, you could use Gravity Forms Auto List Field to count the number of rows in the List field and display that number. That could come in handy for use in a calculation (more on that here) or simply to tabulate the number of entries.
You can see a demo of counting List field rows here.
Use CSS to Number List field rows
Earlier, we mentioned that Gravity Forms includes CSS selectors we can use to target the List field.
As long as you’re using Gravity Forms Auto List Field, why not auto-generate row numbers to go with it?
We’ve already written the custom CSS for you. Check out the demo and download the code!
Use List Field entries as Choices for Gravity Forms
You can populate List field entries into choice-based fields like Checkboxes, Selects, or Radio Buttons.
For example, if you’re registering attendees for an event. In addition to registering for the main event, we may want to know if registrants will attend particular sessions. To do this, we could use attendee information entered to automatically populate choice-based fields like Checkboxes, Selects, or Radio buttons.
We have an article dedicated to doing so — learn more over at Use List Fields as Choices in Gravity Forms.
Require all Columns of List Field
With Gravity Forms, you can specify any field as required. When you apply required to a List field, however, only one input from any column within that List is required.
Clearly, that doesn’t work for a lot of use cases. If you want to specify that all columns or at least certain columns are required, how can you do that?
Well, it just so happens we’d like to share the answer with the class. :)
Here’s a tutorial to walk you through requiring columns on the List field. Specifically, we’ll show you how to:
- Require all columns on all forms
- Require all columns on a specific form
- Require all columns on a group of fields
- Require specific columns on a group of fields
As a bonus, you could combine any of these with Gravity Forms Auto List Field to set the number of List field rows based on a field value.
Limitations of Using a List Field as a Gravity Forms Repeater
While there are certainly use cases for using a List field as a repeater and some neat things you can do with it, it is limited in capability.
For instance:
- If you want to change field types, you’ll need to get your hands in the code.
- When it comes to appearance, you can use CSS to apply custom styling, but you’re still limited to the column/row UI.
- The limitations around setting List field rows as required can be a bit problematic.
The List Field is a great way to go if you don’t need complex fields. That said, if you need something more robust, then the Repeater API or Nested Forms may suit you best. Onwards!
Repeater API: A built-in repeater field for Gravity Forms
As of Gravity Forms 2.4, developers can enjoy a built-in repeater field. We’re saying developers can enjoy the feature because it’s currently in beta, and there’s no UI component (yet). So if you want to take advantage, you’ll need to build the repeater fields programmatically via the Repeater API.
So what is the Gravity Forms Repeater API?
Well, we know that a repeater field is simply a set of form fields that can be combined and repeated in a single form. The List field that we just looked at is a basic implementation of this that we can control via a UI component and customize with filters.
The Repeater API is a way to build fields from the ground up, which gives us the power to create more robust repeatable fieldsets.
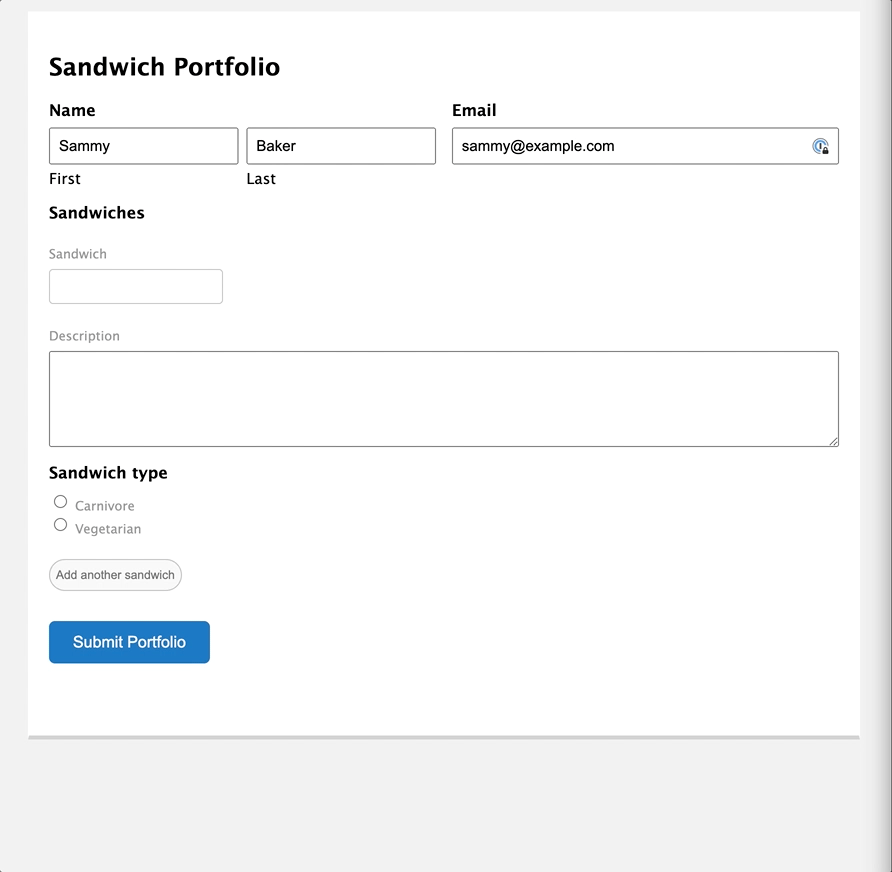
Let’s look at an example using a “Sandwich Portfolio” form.
We want a form where sandwich artists can submit a resume of sorts for their custom sandwich creations. The artist should be able to include multiple sandwiches in the submission, and each sandwich entry can include multiple details.
Maybe it goes something like this:
- Name
- Sandwiches (set of fields)
- Name (Text field)
- Description (Textarea)
- Type (Radio button)
- Submit button
Here’s a quick overview of how you’d build this out:
- Create a form and include a Name field, Email field, and Submit button.
- Leveraging the Repeater API, write a function that builds out each field in the “set” (Sandwich name, description, and type) and then bundle those fields into a repeater group.
- Hook your function to the
gform_form_post_get_metafilter.
If you’re curious to see the code that would make that work, here you go.
If you want to see more code, dig into these examples of sample code in the Repeater documentation.
The repeater field class (GF_Field_Repeater) is an extension of the standard Gravity Forms field class (GF_Field); to best understand the nuances of working with the Gravity Forms Repeater, check out the GF_Field class documentation.
Pros of Gravity Forms Repeater Fields
The Repeater field supports a much more comprehensive array of field types than the List field, including:
- Text
- Textarea
- Select
- Multiselect
- Number
- Checkbox
- Radio
- Name
- Date (Field or Dropdown)
- Time (12 or 24 hours)
- Phone (US or International)
- Address
- Website
- List
With these field options, you can build more robust repeater fields. For example, you could build an employee time tracking form that included a task name, start time, end time, and a select field for task type.
You could get fancy and add a nested repeater where task name and description were the outer fields, and employees could add a new row for each date and time they worked on the task.
Here’s some example code for including a nested repeater fieldset.
Gravity Forms Repeater fields also support the Save and Continue Later feature, an excellent UX addition for longer or multi-page forms that might be filled out across multiple sessions (if you want your multi-page forms to automatically save and reload without any additional links or friction, check out Gravity Forms Advanced Save and Continue).
Another reason to appreciate the native Repeater field is that it’s officially supported by Gravity Forms, like the List field we just looked at.
Cons of Gravity Forms Repeater Fields
The Repeater API is a great starting point for more versatile repeater fields, but it’s still young and has a lot of limitations.
For example, it doesn’t yet support conditional logic, calculations, or dynamic field population. It also doesn’t support CSS Ready classes which means extra work when it comes to laying out form fields.
Other advanced field types like File Upload, Signature, and Password fields don’t work either, which limits the application for some use cases.
Most notably, the repeater API has no UI and requires developer experience to create or make changes to.
Examples of the Repeater API in action
If you have developer chops and can make the Repeater API do your bidding, you can do things like:
- Create a Repeater field for phone numbers, allowing users to enter multiple country codes, phone numbers and associated data in one submission.
- Create a Repeater field for company registrations consisting of employee names and job titles, allowing this registration form’s submission to include more than one person from a single organization.
Though there’s no published roadmap, there’s great potential for the Repeater API and we’re keeping our eyes on it!
Now, let’s jump to a no-code alternative for Gravity Forms repeaters.
Nested Forms: A Gravity Forms Repeater Add-on
At this point, you may be thinking that all this is cool but that it’s a little too developer-oriented. Is there a Gravity Forms Repeater Add-on that includes a UI? Why yes. Let’s discuss the Gravity Forms Nested Forms add-on.
Whether you’re creating simple or complex forms, Gravity Forms Nested Forms enables you to create forms within forms to better manage complex data collection. We know you’re thinking it — go ahead and say it: formception!

How Does the Gravity Forms Nested Forms plugin work?
Here’s a high level overview of how Gravity Forms Nested Forms works. Using the familiar Gravity Forms UI, you will:
- Create two individual forms; a Parent form and a Child form. The Child form will be “nested” in the parent form via the Nested Form field.
- Add a Nested Form field on your parent form and select your Child form in the Nested Form field setting.
- Select which fields from the Child form should be displayed in the Nested Form field on the parent form.
You’re about to see lots of child and parent lingo. We use “Child” and “Parent” wording to describe repeater fields used in Nested Forms. In addition, we should emphasize that Child forms are “nested” in their Parent entries by way of the Nested Forms field.
Being able to include Nested Form fields directly from the UI during the form creation process is, well, a major perk. You get all the benefits of working directly in the Gravity Forms editor and aren’t limited to the types of fields you can use.
You can also process feeds for Child entries when submitting the Child form or when submitting the Parent form. To note once more, a Child entry refers to data from the Child form that has been submitted via a Nested Form field on the Parent form.
Gravity Forms Nested Forms makes it easier for you to create and manage forms and collect repeatable data while making it easier for your users to complete.
Doing more with Nested Forms than meets the… UI 👁️
Now that you have a basic idea of how Nested Forms works let’s talk about what makes it unique.
Child forms galore
How complex do you want to get with your forms? Gravity Forms Nested Forms can take you there. And when we say complex, we don’t mean complicated for your visitors to use or complicated for you to process data — we mean complex, near limitless applications.
Nested Forms is the only repeater that allows you to handle collecting multi-page form submissions as part of a larger submission. In other words, you can have multiple Child forms under one Parent form, and each of those Child forms could contain multiple pages.
For example, you can register multiple people from your company for a conference, book a field trip to the zoo for a classroom of kids, or submit traveler information for your entire family.
We also have a tutorial that makes it easy to register multiple people to your WordPress site at once using Nested Forms.
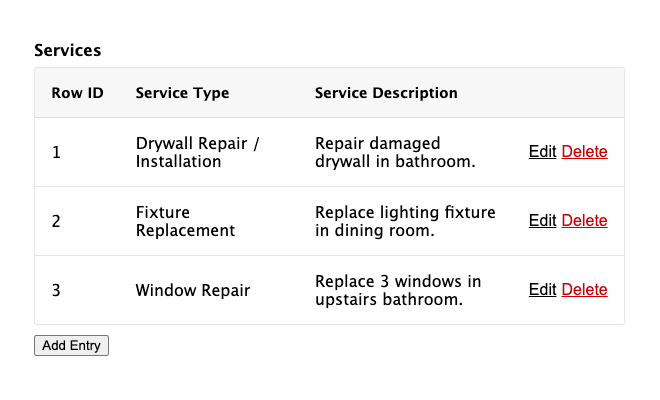
Essentially, Nested Forms can be used whenever you’d like to collect individual entries grouped together under a single form submission. Nesting forms is an efficient and user-friendly way to collect complex, repeated data and do useful things with that data.
Conditional Logic, calculations, and dynamic population (oh my!)
With Nested Forms, a Child form can use any Gravity Forms core feature, including (drumroll) conditional logic. That means you can leverage the power of conditional logic with Gravity Forms repeater fields.
Here are several scenarios where that could come in handy.
Want to use nested forms in calculations? Nested Forms enables you to perform calculations based on:
- Count (total number of Child entries* for a field)
- Total (sum of all Child entry totals)
- Sum (sum of specified Child entry totals)
- Set (a comma-delimited set of values from specified entries)
Further down, we have some examples of using Nested Forms in calculations.
If you weren’t having enough fun, you might wonder how to populate a Nested Form field dynamically. Nested Form fields can be dynamically populated in precisely the same way as other Gravity Forms fields. Nested Form fields expect a comma-delimited list of entry IDs for the dynamic population value.
More on that here if you’re curious to see an example.
Include file uploads in Nested Forms
One drawback of the earlier repeater field add-ons we looked at was the inability to use the File Upload field.
The File Upload field in the context of a repeater is powerful — think about applications like this:
- Event registration form: each attendee can upload a photo.
- Recipe creation form: upload an image to accompany each step in a recipe.
- Artwork submission content: collect multiple files from each participant.
Anytime you need to collect multiple files as part of an entry, the File Upload field combined with a repeater is the way to go!
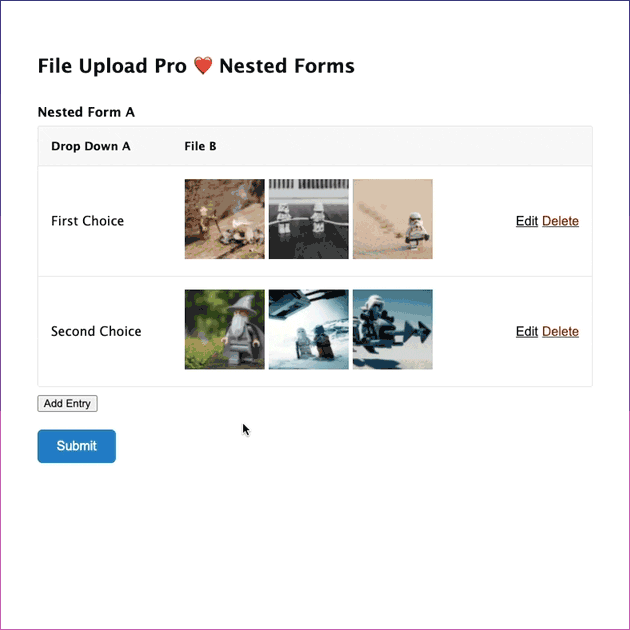
If you want an improved UX that adds cropping, sorting, and drag-and-drop functionality to the File Upload field, Gravity Forms File Upload Pro provides a seamless integration with Nested Forms, allowing things like image previews (or PDFs) in Nested Form fields.
Integrate repeater entries with maps
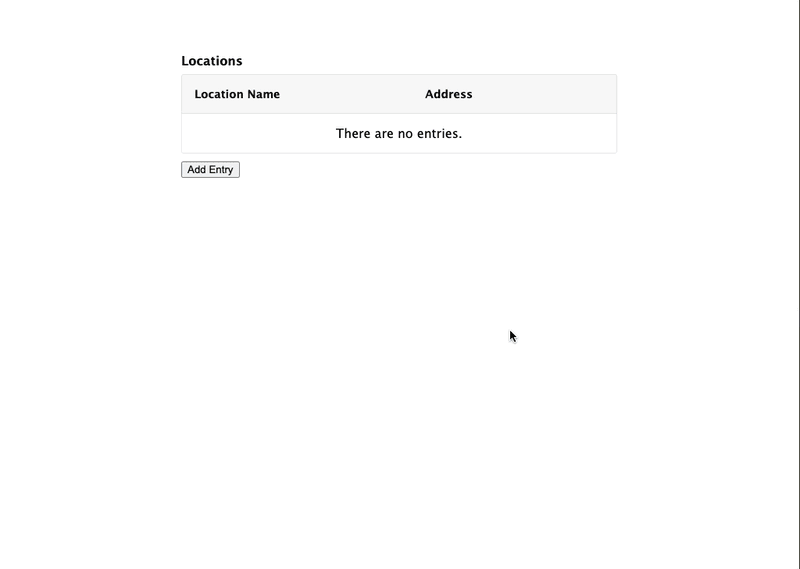
Through an integration with Gravity Forms Address Autocomplete, Nested Forms provides functionality that makes adding geo-based entries a cinch. If you have multiple stores, home addresses, or business locations you need users to add to a form, users can make rapid fire additions and with the help of autocompletion.
Do everything you could do with a “regular” form
Perhaps the real power of Gravity Forms Nested Forms is that it essentially works the same way a standalone form works.
Even with complex, nested forms, you can still do things like:
- Use the drag-and-drop builder UI
- Control the layout of the Child fields with the Gravity Forms layout editor
- Leverage custom field types and functionality provided by 3rd-party add-ons
You get full support for conditional logic, calculations, and other JavaScript-powered Gravity Forms features. Basically, if it’s a feature or functionality that exists in Gravity Forms, all that goodness and capability flows through to Nested Forms.
For easier admin management, Nested Forms makes it easy to duplicate Child entries.
Using Conditional Logic with a Gravity Forms repeater field plugin
At its simplest, conditional logic provides a way to display or hide fields, sections, pages, and more based on prior user selections — which fields they’ve selected, or what they’ve entered.
You can apply logic based on things a user hasn’t explicitly told you, like geography, the referring URL, or other analytics data generated from their behavior on your site prior to reaching the form.
Combine the power of conditional logic with repeater fields, and you can do things like:
- Show or hide a set of fields based on a user’s selection.
- Eliminate additional requests from the user (like new forms or fields) based on their input.
- Send notifications or follow-ups to more than one user and email added to a repeated contact entry.
- Send collected data to other services based on conditions.
- Dynamic pricing calculations.
While the Repeater API doesn’t support conditional logic, let’s look at how you could combine conditional logic with other repeater field options.
Conditional Logic using the Gravity Forms List field
It’s possible to set conditional logic for the List field to show and hide itself, but not for its individual columns or inputs.
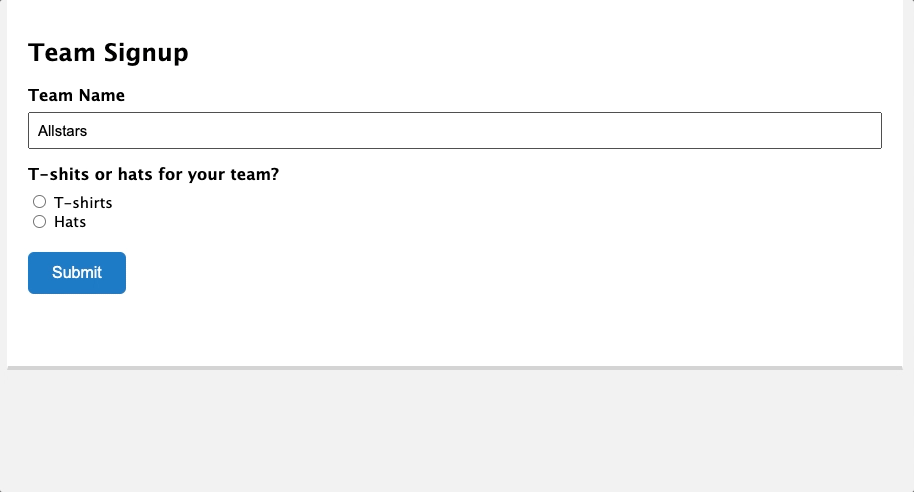
For instance, let’s say you have a team signup form and want to know if the team prefers matching hats or t-shirts. You could start with a form that has:
- Team Name (Text field)
- Select t-shirts or hats? (Radio button)
- Team member info w/ t-shirt size (List field)
- Team member info w/ hat style preference (List field)
For both List fields, you’d set conditional logic to only display them based on the value of the Radio button.
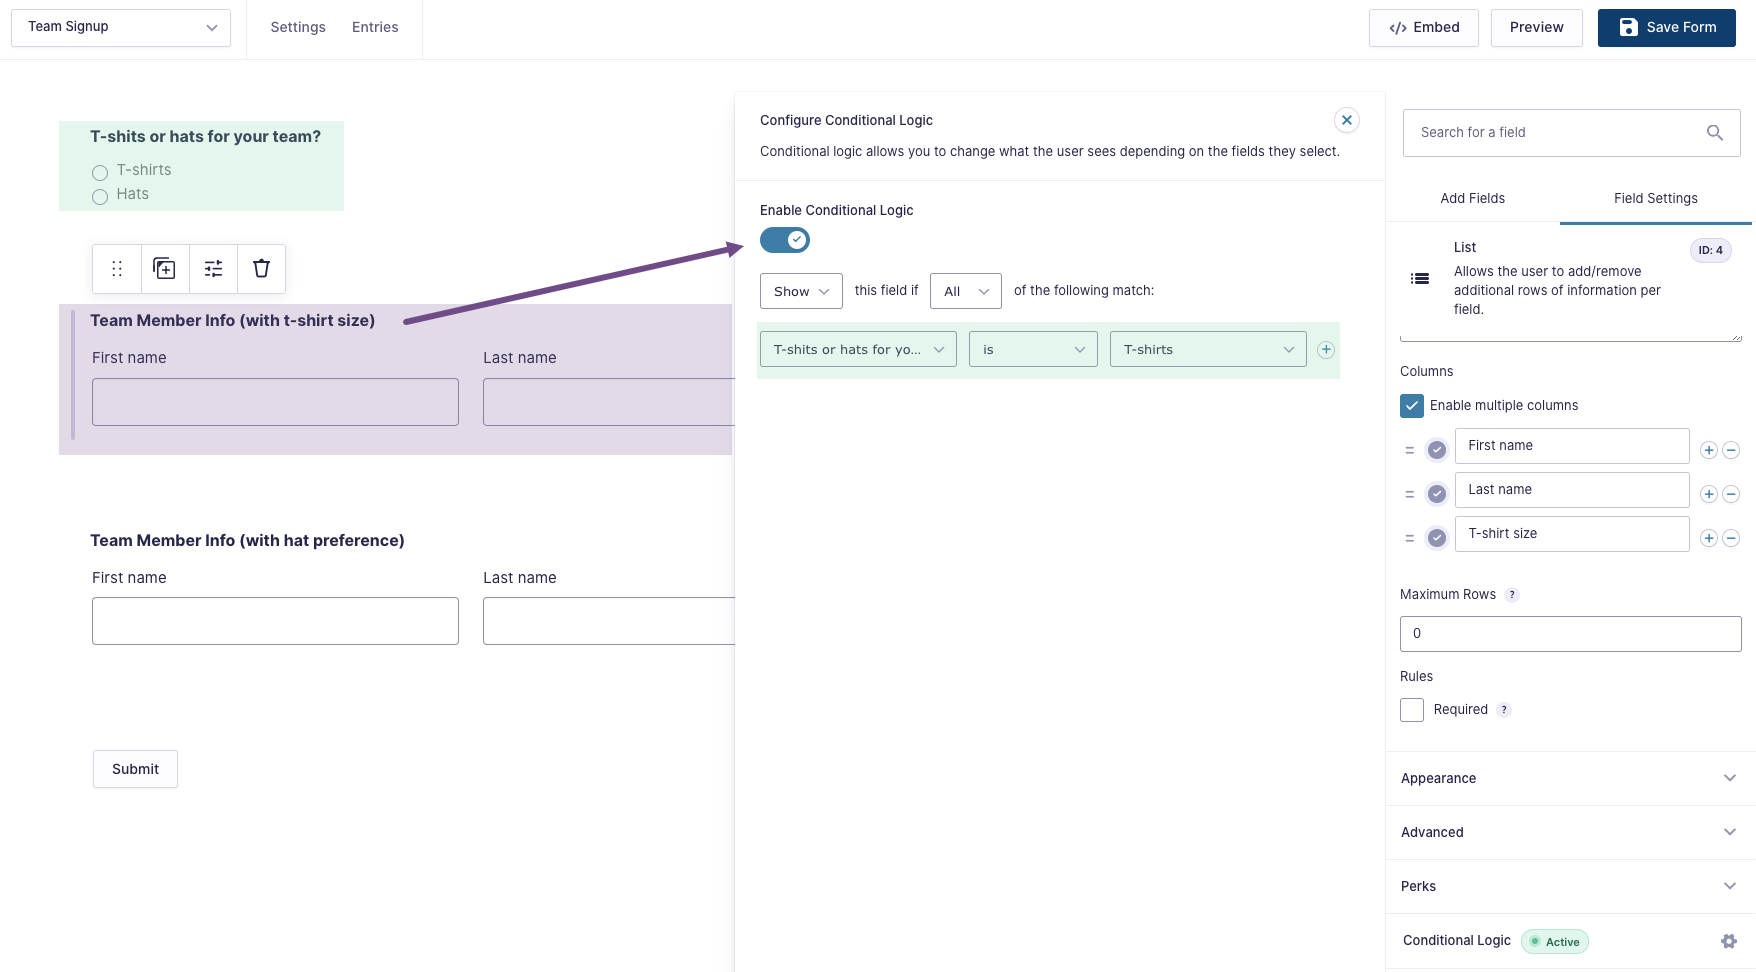
Then, when someone fills out the form, they’ll either see the list field that corresponds to their selection. Handy!
Conditional Logic using Gravity Forms Nested Forms
Unlike the List field, which only supports conditional logic to hide or show itself, Nested Forms includes full support for conditional logic on both the Nested Form field and individual fields from the Child forms.
This lends itself to all sorts of cool ways to tailor a form based on conditions.
Reduce friction and control user behavior
If you’re using repeaters, there’s a good chance you’re requesting a lot of information from users. Keeping it as simple as possible is important, and by using conditional logic with Nested Forms you can bypass fields or entire pages instead of simply displaying every field and a form. This can help tremendously with conversions and getting accurate data.
For example, conditionally display any nested forms based on previous fields:
Dynamic order forms
Create forms where customers can order and configure a number of products with a Nested Forms field. Depending on the product they choose, conditionally display new fields and forms for configuring that product. Once multiple products are added, capture each product’s total on the parent form automatically.
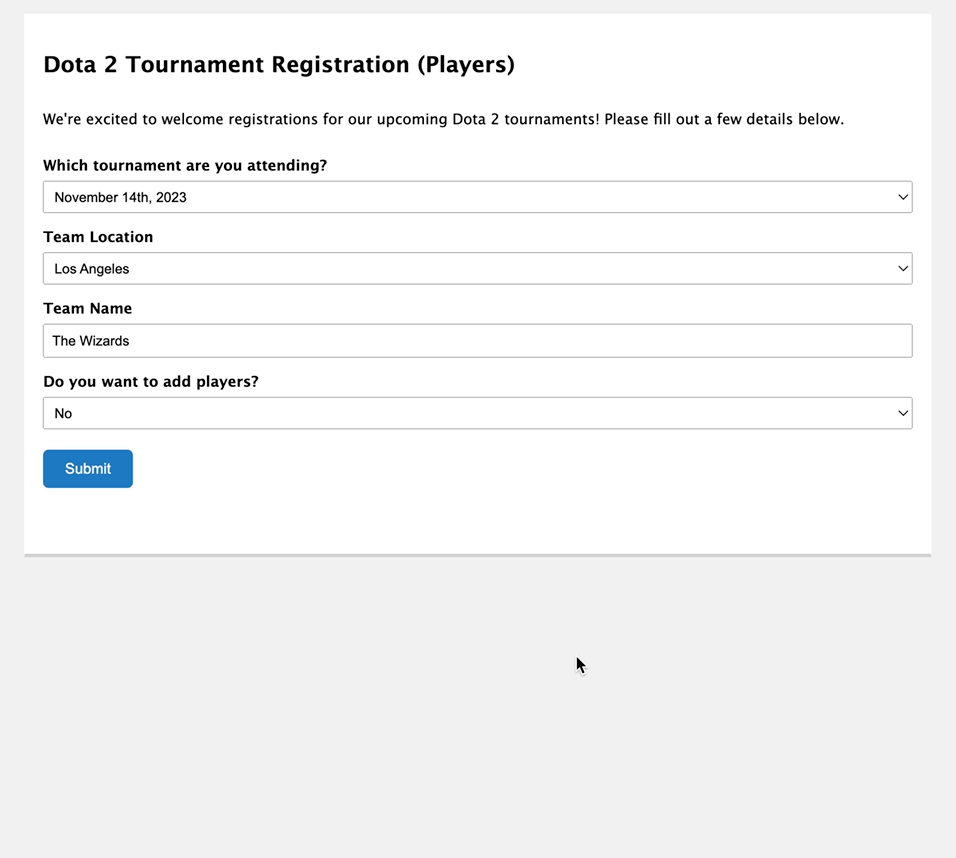
Here’s a fun example: you may have an order form for event tickets. If only one person is going, they go through the typical checkout process. However, if more than one person is selected, you want to collect additional details about each ticket holder. It might be a bit strange to show this ‘Additional Attendee Information’ field if only one user is going.
Solution: display the Child forms only if the number of tickets selected is greater than two.
If you want to learn how to do this, it involves Gravity Forms Copy Cat and some basic conditional logic, see the breakdown.
Nested Forms integrates with blockbuster perks like Gravity Forms Advanced Conditional Logic and Gravity Forms Populate Anything for getting more out of the functionality offered in both.
Doing Calculations with Gravity Forms Repeaters
Want to combine the power of Gravity Forms repeaters with the ability to perform calculations?
Easy… depending on the solution you choose. 😅
Generally speaking, you open the door to calculating the total of multiple fields entered on one form, or other opportunities involving running the numbers of repeatable fields. More complex solutions can allow for things like expense (or time) tracking tools, loan calculators, dynamic order forms for multiple products, and more.
Let’s look at how we can perform calculations with Gravity Forms Repeaters, including List fields and Gravity Forms Nested Forms (note that the Repeater API doesn’t currently support calculations).
Calculations with Gravity Forms List Fields
While List fields don’t support calculations out of the box, you can leverage Gravity Forms Auto List Field to count the number of List field rows and output that value into a field.
For instance, let’s go back to our sandwich order form and add a field that calculates the number of sandwiches we need to order.
We’ll check the “Enable Calculation” box and then use the :count merge tag modifier in the calculation.
Now, when a visitor fills out the form, the “Number of Sandwiches in Order” field keeps a tally of each row in the List field. Note that this works with the Number or Quantity field types.
If you want to perform calculations within a List field row or column, you can do that via the List Number Format Add-on for Gravity Forms. With the add-on, you can set any column in a Gravity Forms List field to support numbers, including decimals, decimals with commas, or currency. The add-on supports rounding, specifying a range of numbers to use, column totals, and calculations using merge tags.
Even though the List field isn’t the most robust option in terms of repeater fields, there are still ways we can use it for calculations. Next up: Nested Forms.
Doing Calculations with Gravity Forms Nested Forms
Nested Forms allows a near endless variety of options with calculations, and notably a few ways to run calculations on a Parent form with data from a Child form. Each of these involve merge tag modifiers.
Refresher: a merge tag modifier allows you to do more with dynamic information in Gravity Forms. See, merge tags could be considered the lifeblood for displaying and manipulating entered form values in real time, and the modifiers take this a step further, allowing us to run things like count, sum, and total calculations on dynamic data within these merge tags.
They look like this: {FIELD_LABEL:FIELD_ID:MODIFIER}
Where:
Field_label— would be the name of the Nested Form field, which could be separate from the child form’s name. Note, these usually have the same name.Field_ID— the field ID of the Nested Form field.:modifier— the merge tag modifier.
All of what we’re about to discuss can be found in greater detail within our guide on doing calculations with Nested Forms.
:count merge tag modifier
The :count merge tag modifier returns the total number of Child entries attached to a Nested Forms field. That is, if there are three child entries submitted for a given Nested Forms field, the merge tag returns three.
Example: {NestedFormFieldName:1:count}
Potential use case:
- Calculating quantities. Calculate quantities based on the number of Nested Forms entries. For example, you have a webinar sign-up form and you want to charge per attendee, especially if multiple attendees are registered at once.
:total merge tag modifier
The :total merge tag modifier calculates the sum of all child entry order totals. For example, if a form’s first child entry has a total of $30 and the second child entry has a total of $20, the merge tag would return $50.
Example: {NestedFormFieldName:1:total}
Use case: collect a single payment for multiple orders. Add as many Products to a Child form as you would like, and collect payment once in the Parent form.

Here’s how you would set that up.
:sum merge tag modifier
This modifier returns the sum of a specific field’s value across all Child entries that field exists on, into a Parent form. Example: you target the Number field on all Child entries. Each Child entry’s Number field has a separate value —the first Child entry has a value of 3, the second Child entry has a value of 2, the third Child entry has a value of 18. This merge tag would then return 23.
The syntax works like this: specify which field in the Child form you want to sum, preceded by an = sign.
Example: {NestedFormFieldName:1:sum=2}
Where: the Form ID is 1, the Number field in the Child form’s ID is 2.
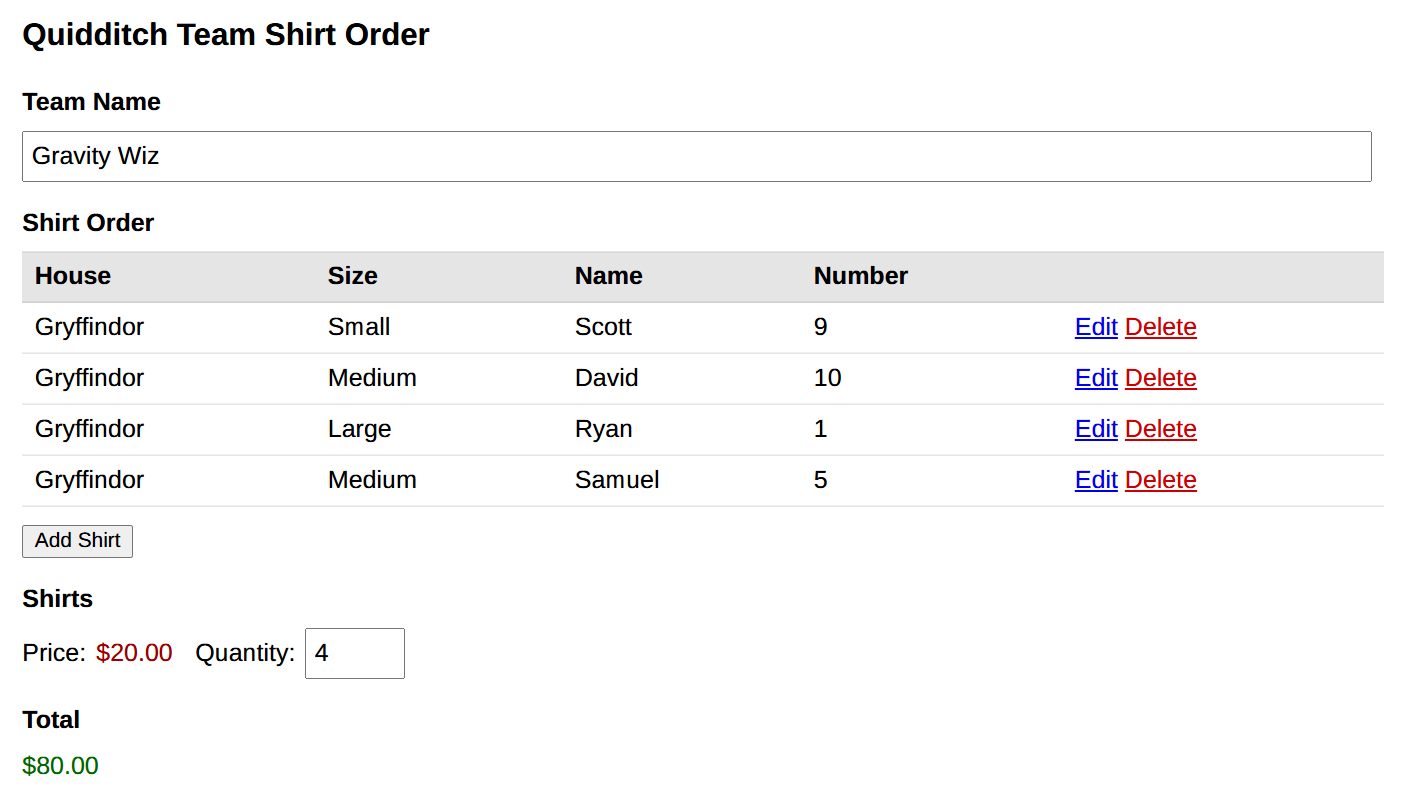
Use case: sum the number of reserved seats for an event. Pretend you have a form that will be used for different companies to register attendees for an awards dinner. Each company can reserve a certain number of attendees and those attendees can, optionally, bring a guest. Nested Forms handles registering these attendees and we can use :sum merge tag to figure out exactly how many seats are needed.
If you want to explore how to set up and calculate :count, :total, :sum, and others, head over to our article on doing calculations with Nested Forms.
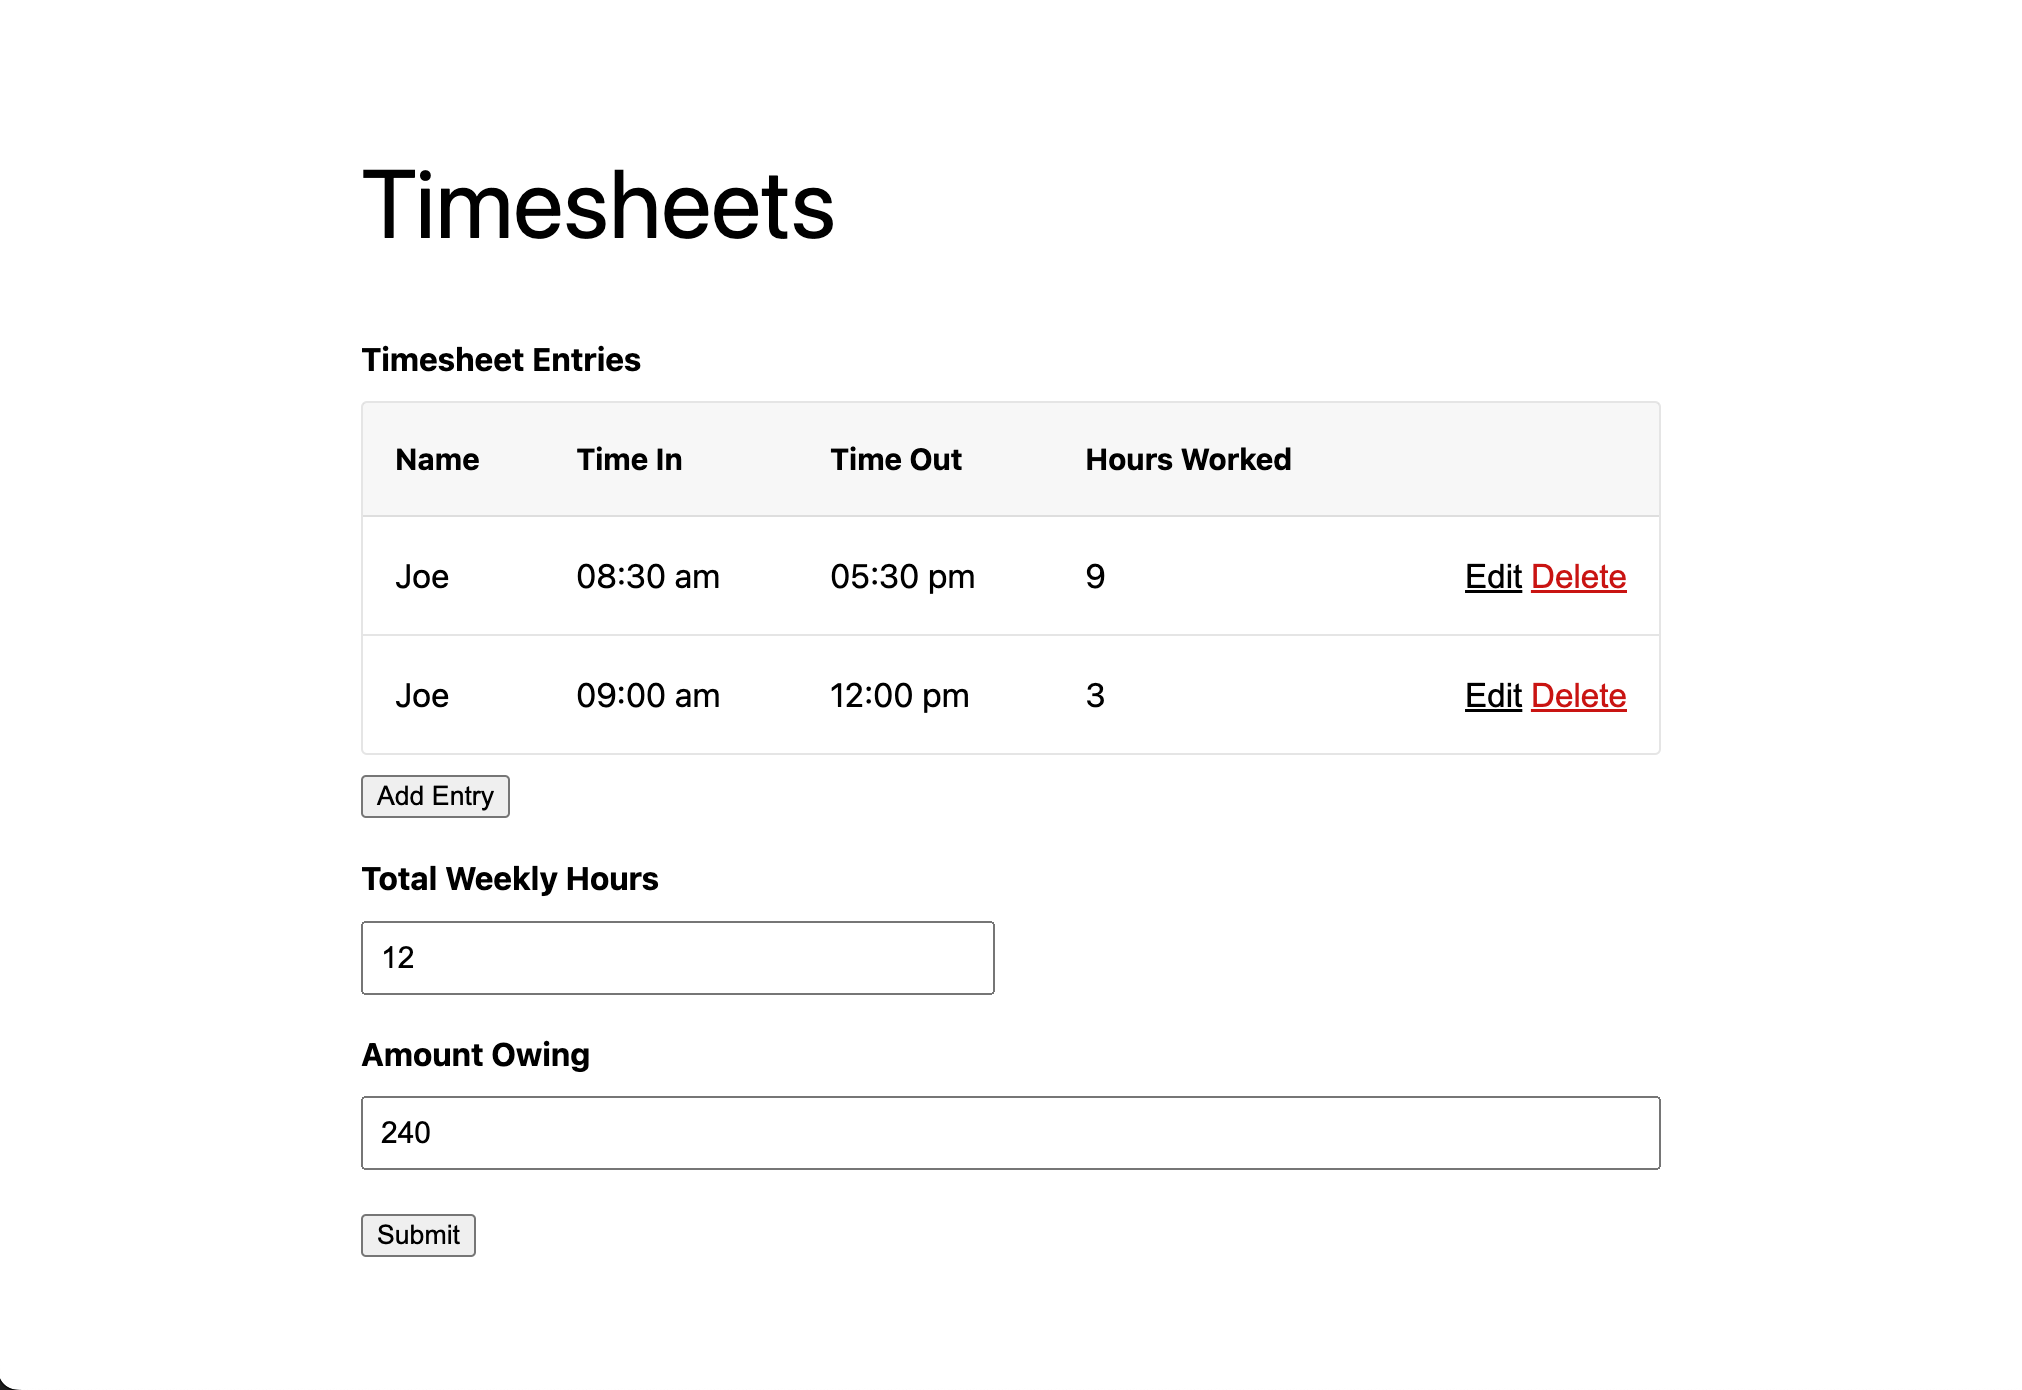
Use case: create timesheets and track time using Gravity Forms
Nested Forms makes it easy to add time tracking entries for each person you want to track time for, and calculate totals in one Parent form. You can also calculate overtime pay, restrict entries to available weekdays only, and other helpful tips. We’ve written a full guide on how to set this up: create timesheets with Gravity Forms.
Exporting Data from Gravity Forms Repeater Plugins
What makes exporting any repeater data unique is in how you’re now managing a multitude of fields amongst multiple forms. The ability to systematically view, understand and manipulate this data when exporting and using elsewhere is essential.
Exporting with Nested Forms
Nested Forms has the above exporting ethos built in. We know you may want your data elsewhere. As a result, it works similarly to simply exporting any other form in Gravity Forms, with a few additional features. Let’s explore those.
- Navigate to Forms > Import / Export from your WordPress dashboard.
- Open the Export Forms tab.
- Select your form from the drop down.
Gravity Forms will show all available fields for export, and if the form contains a Nested Forms field, it will display it, along with all child fields involved in that Nested Form.
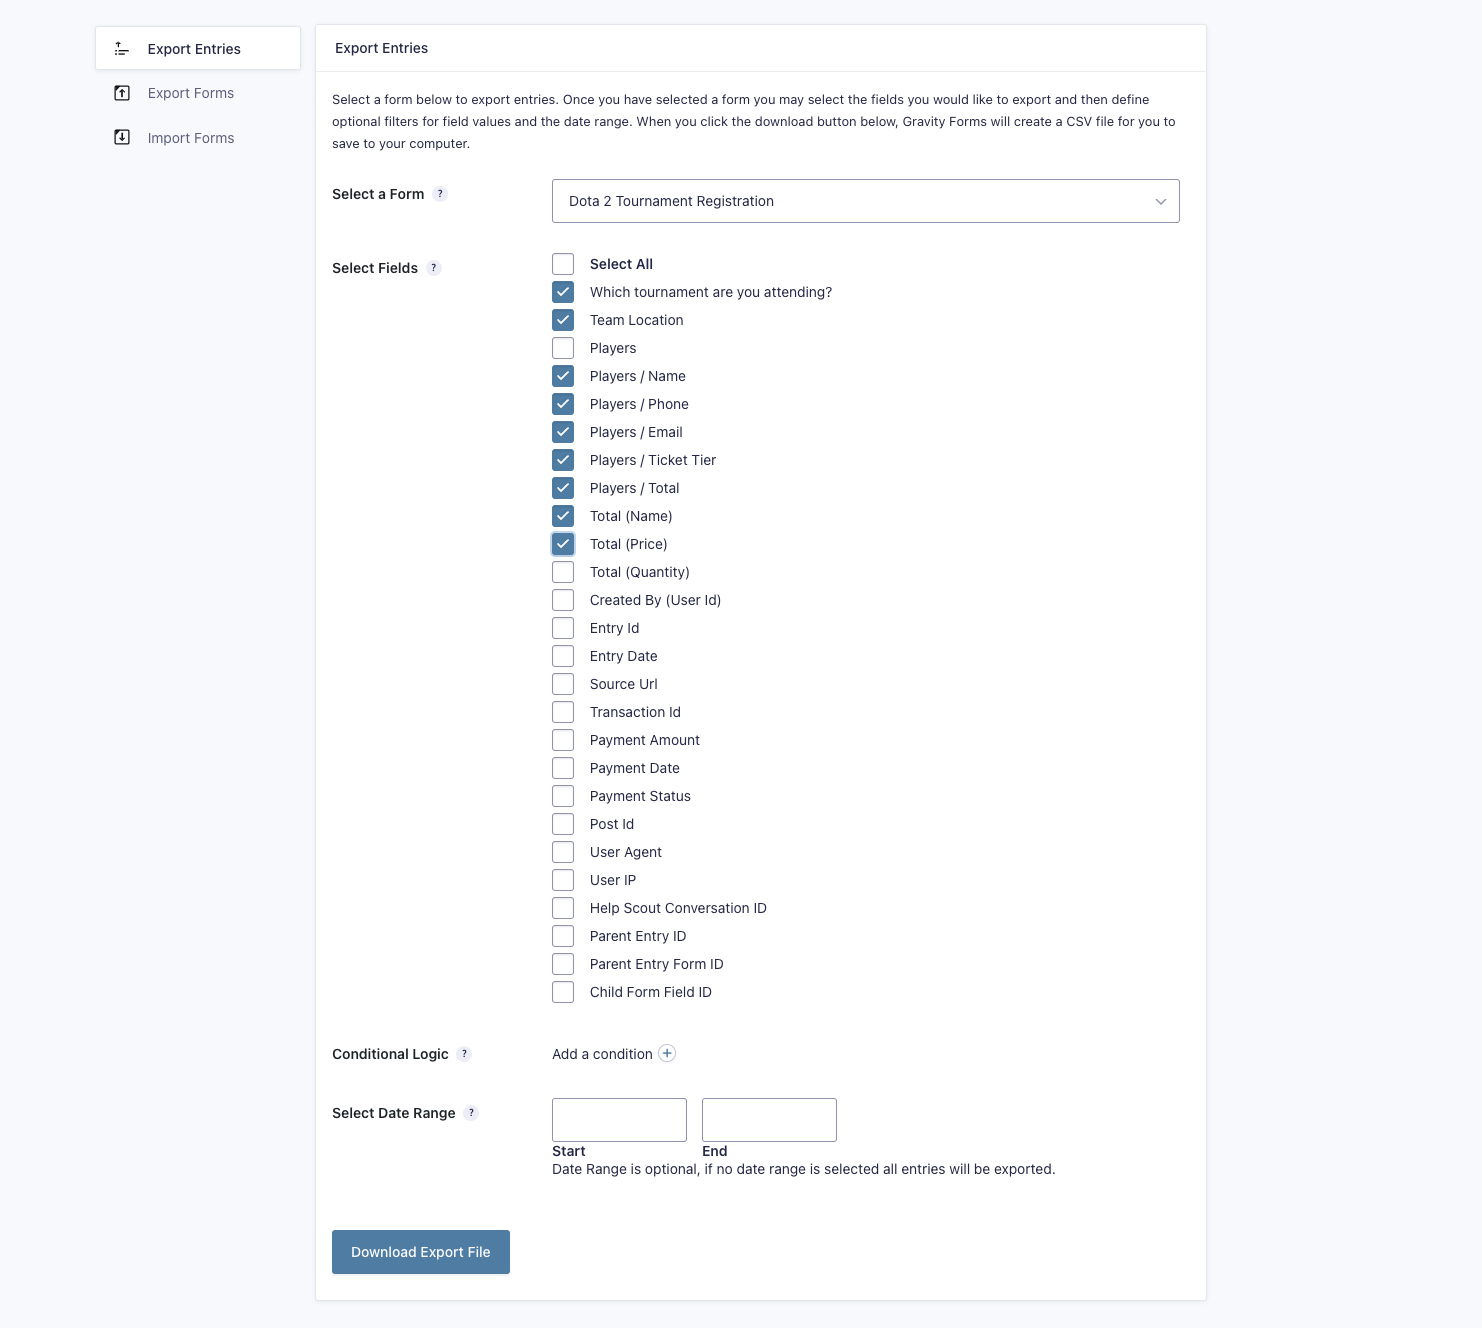
- To export child entries in a Nested Form field, find in your Parent form’s export tab and select them.
- The name will appear as Nested Form Field Name / Child Form Field Name
- When Child Form Fields are checked, your CSV file will display the child field entries as separate columns.
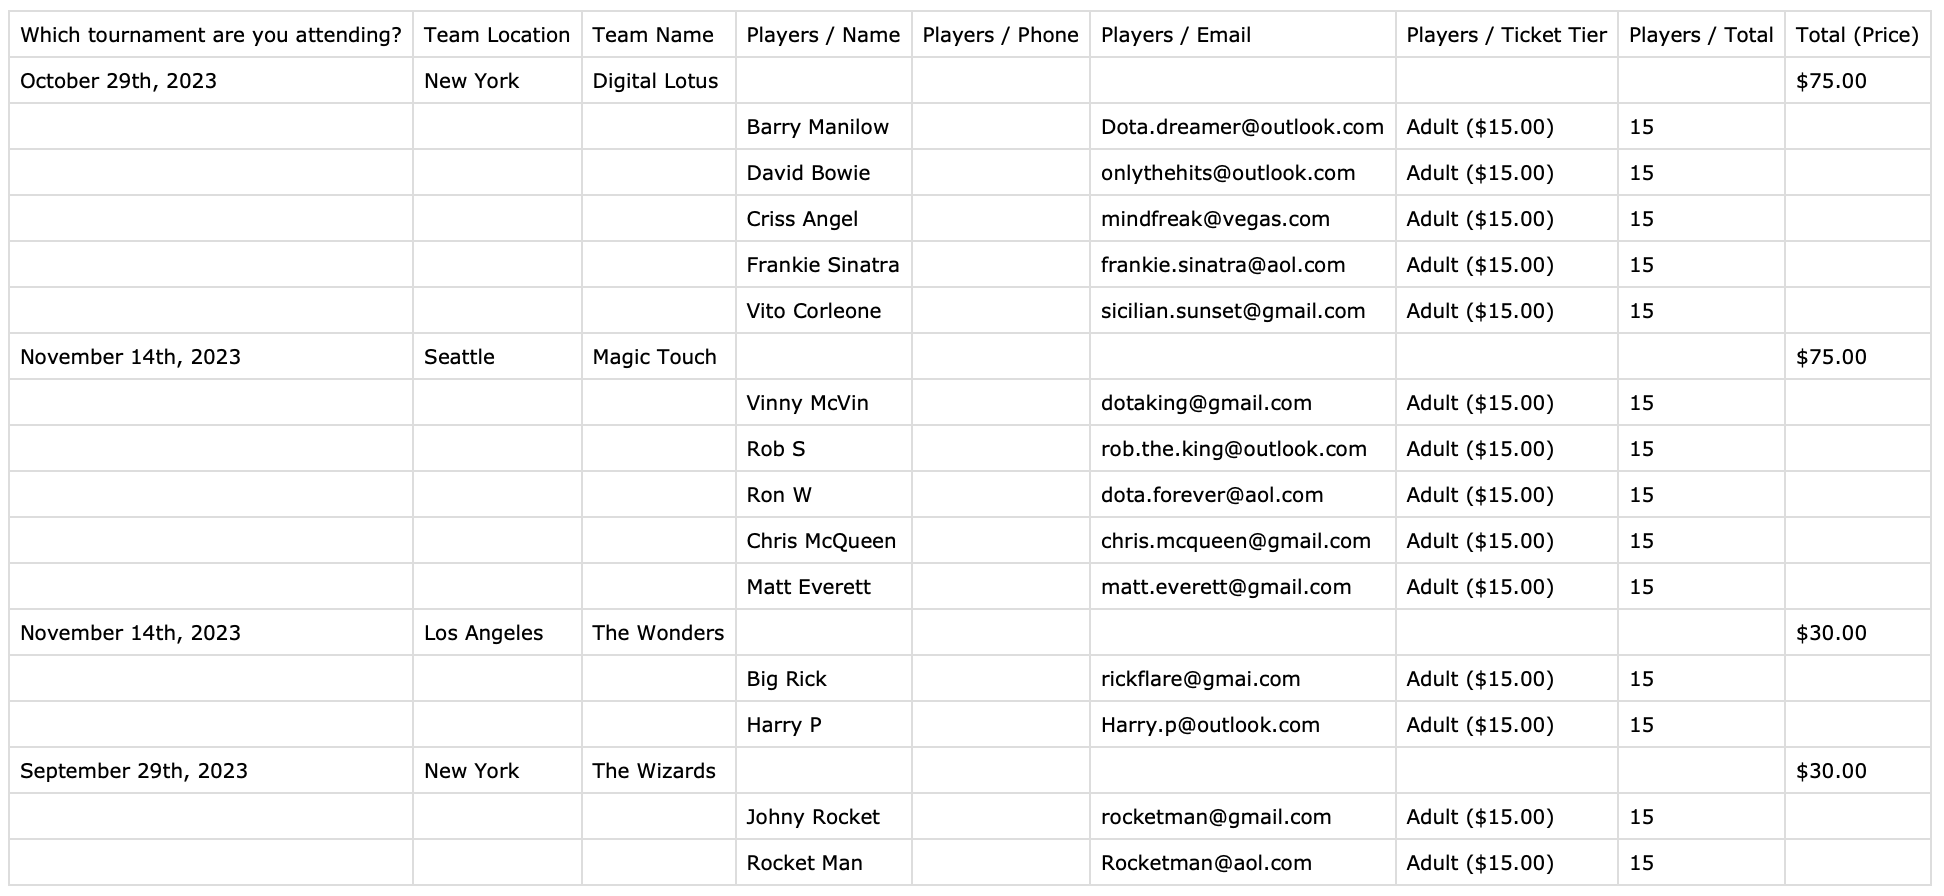
In the image above, each column represents child entries that belong to a single Parent entry.
This is high level stuff. We have a whole guide dedicated to exporting with Nested Forms, check it out!
Exporting Repeater data from the Repeater API
Gravity Forms allows exporting repeater fields via the exporting tab’s conditional logic setting. This allows you to export values of a repeater’s sub-fields.
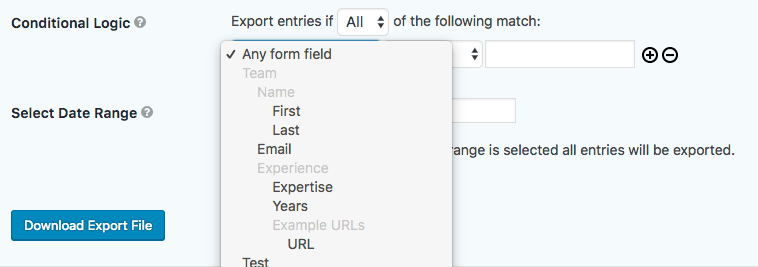
Above, sub-fields are indented.
When you export using the Repeater API, all data is exported as a single value. It will look like this:
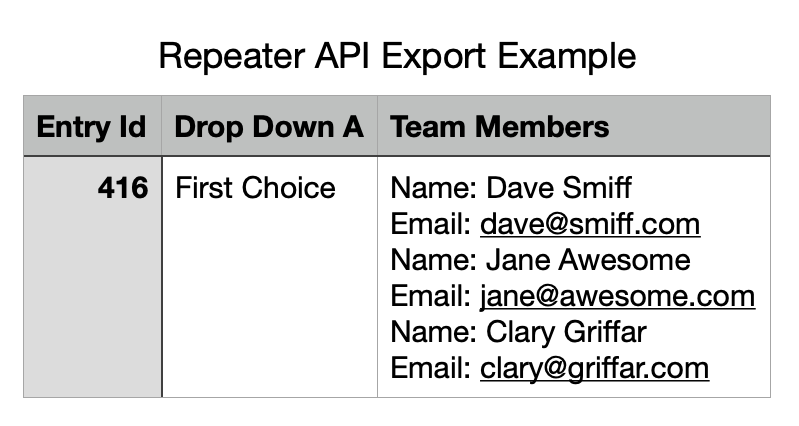
As noted previously, there is no UI for the repeater beta yet.
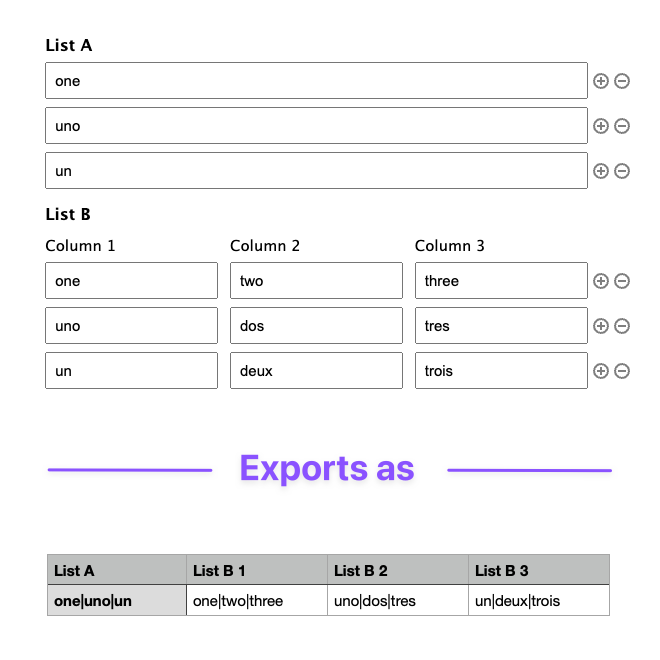
Exporting Data from the List field
Exporting data from a Gravity Forms List field works similarly to exporting any other field.
Head over to:
- Forms -> Import/Export from your WordPress dashboard.
- Open the Export Forms tab.
- Select the form from the dropdown.
There are no special exporting features for List fields — they operate the same as any field other when checked, with support for conditional logic and date control for entry values. Learn more about exporting entries in Gravity Forms.
Applications and Use Cases for Gravity Forms Repeaters
So far, we’ve covered what repeaters are and looked at some possibilities, but we want a dedicated section to highlight use cases and real-world applications you might have as a WordPress developer.
Use this section as inspiration, or if you have another use case we haven’t mentioned, please share it in the comments!
Event registration: If you are collecting registration information for an event that allows attendees to bring guests, a form repeater can simplify the process of adding multiple guests by allowing users to add as many sets of fields for each guest as they need.

Order forms: If you are collecting orders that require users to provide information about multiple items or quantities, a form repeater can allow users to add as many items as they need to the form.
User registration: If you are collecting information for user profiles on your WordPress site, Nested Forms makes the process of registering multiple users straightforward while saving time on their end. You can gather information about their education, work experience, or skills, and once registered, use their information to create a more dynamic user experience elsewhere. Learn how to register multiple users to your WordPress site from a single form.
In all of these cases, using a form repeater can save time and effort for both the form creator and the user.
FAQ: Common questions about Gravity Forms Repeaters
We’ve covered a lot of territory in this article, but we’re not quite through! In this section, we’ll cover some miscellaneous concepts around repeaters and answer specific questions you might have.
How do I repeat groups of fields?
Using Gravity Forms’ native Repeater API, you can combine fields into a set that can be used in a single form. This enables the form submitter to fill out that group of fields multiple times within a single form submission.
The Repeater API is still in beta and can only be implemented via code. If you’re looking for a code-free option, check out GP Nested Forms, which enables you to repeat a group of fields within a form using a familiar UI.
How do you create repeater fields in Gravity Forms?
Excellent question! As a recap, the three most common (and best supported) repeaters for Gravity Forms are:
- List field (native Gravity Forms)
- Repeater API (native Gravity Forms – beta)
- Nested Forms (Gravity Perks Add-on)
You’ve got options from simply repeating a row using a List field to repeating entire sections of a form within a form to repeating an entire form inside of another form.
Can I dynamically populate custom repeater fields?
We’re assuming you’re wanting to populate data from 3rd-party repeaters (like Advanced Custom Fields, JetEngine, etc) into Gravity Forms?
If so, Populate Anything is a perfect solution. You can look up repeater data (typically via the Post or Database object type) and populate that data as choices into your fields.
Here are a few snippets we have that might help as well.
JetEngine
If you’re using JetEngine to manage repeatable content for your posts, this snippet will allow you to populate that content as field choices with Populate Anything.
Advanced Custom Fields
We actually have a few snippets that work with ACF’s Repeater field.
- This snippet allows you to target an ACF Repeater field and populate all of its items as choices with Populate Anything.
- If your ACF Repeater contains multiple subfields and you’d like to combine multiple subfields to create unique choices, this advanced snippet shows you how.
- Lastly, here’s a pretty cool snippet that lets you populate child entries from Nested Forms as unique items in an ACF Repeater field. Requires the Gravity Forms Advanced Post Creation add-on.
If none of these solutions quite match what you’re trying to accomplish, let us know in the comments.
Can I have a form within a form?
Nested Forms, FTW! You can use it for straightforward or complex forms, nesting to your heart’s content!
In summary, Gravity Forms Nested Forms is a plugin that adds a Nested Form field type. This field allows you to select another form that will be used to collect “child” entries and attach them to the “parent” entry on submission. You can view, edit, and delete child entries on the parent form via a clean, compact table.
I’m experiencing Gravity Forms repeater add-on problems. What should I do?
Short answer: it depends. For example, issues we’ve seen with repeaters range from:
- Users reporting a 500 error caused by a Gravity Forms repeater
- Repeaters wrapped in HTML not working on websites
- Issues with repeater content not displaying in emails
- Having repeaters crash entire websites. 😱
Because it’s such a diverse list, we need to start with which repeater you’re using.
If the issue is with the List field, we’d recommend troubleshooting with the Gravity Forms documentation before reaching out to their support.
If you’re dealing with the Repeater API, note that this is currently in beta mode and does not have a UI component built yet. To get some help, we’d encourage you to reach out to Gravity Forms support.
If your problem concerns Gravity Forms Nested Forms, start with our documentation! If you’re not finding what you need, please do drop us a line and open a ticket — we love to help.
–
Do you still have questions or are curious about what else you can do with Gravity Forms Repeaters? Leave us a comment and let’s discuss!


Is there a way to detach a child entry from a parent entry?
In my case, I have a form ‘Students’ and a nested form ‘Classes’ where I can store each class a student is a part of. However, as time goes they move up/drop/add classes, and when they do, I’m looking for an easy way to detach the child entry. I kind of want the record of it that’s kep tin the child entry (dates they were in the class etc) so don’t want to delete it
Hi Chad,
We don’t have a ready solution for this, but I’m following up via email to see if we can cook up a solution for you.
That was helpful – thank you.
Along smilar lines…is it possible to somehow filter/set a condition on which entrie are displayed when using the merge tag to output them?
For example, I’m displaying them on the frontend through a custom content module in GravityView. Works great. However, I need a way to only display the child entrie where say field id 25 == Yes.
This provides a simpler solution than detatching the irrelevant ones – easier to keep a record of all child entries, easy to show/display certain ones, and easier to manage than manually detaching from the admin like I’d have to do with the snippet you provided me on that. (Which, by the way, was and is helpful in its own right so thank you….jus tnot as scalable since it’s a manual action in the backend I have to click to detach and can’t automate with workflows or other actions)
Is that possible or is there some way to modify the output? Even something as simple as being able to add a css class to the entry based on that value or even jut add that value as a css class…not totally ideal but would work.
Hello GW Team Thank you very much for your tutorials I have a question, I would appreciate it if you could help me I use the form to update user account information I wanted to use this option and every row I add will update my user meta For example I have a maximum of five metas with the names Exercise 1 Exercise 2 to exercise 5 I want every row I make Update the information of these fields Is it possible to access each new row in this plugin? Or do you have a suggestion for your own method?
Hi Deon,
Depending on your setup, this may be possible with custom code. If you have an active Gravity Perks Pro License, you can get in touch with us via our support form so we can assist you further.
Best,
Hi there,
Do you maybe has some suggestion how to style repeater fields output in email template?
Thank you
Hi Aleksandar,
If you’re using GP Nested Forms for your repeater, you can use templates to modify how the nested fields are displayed in the notifications: https://gravitywiz.com/documentation/gravity-forms-nested-forms/#templating
Best,
Hi GW team, You are doing an amazing work that makes our life easier!!
i have a question, I’m trying to use GF to create a new post into a custom post type. To achieve that I’m using gravity-forms-custom-post-types, which is working fine for almost all fields but not for repeater fields.
In the custom post type I have some repeater field for a FAQ question/answer, on the back end they will add a new row with question / answer that they can populate. But I want to limitate the access of the WP backend by setting up a GF that will populate those fields. When it comes to this ACF repeater field (FAQ) I cannot use the value entered in the GF to populate the Qestion/answer repeater field in the CPT
Any idea what I should do?
Hi Jeanluc,
Glad to know our plugin has been helpful to you. We currently do not have a solution to use the GF Custom Post Types plugin with the ACF Repeater Fields. If you have an active Gravity Perks license, you can open a ticket for this via our support form, so we can forward this as a feature request to our Product manager.
Best,