Use Gravity Forms to Create User-Submitted Posts
A guide to using Gravity Forms “Post Fields” to create a form which generates a WordPress post when it is submitted.

The concept is pretty simple. Using Gravity Forms “Post Fields” you can create a form which generates a post when it is submitted. All you have to do is add the desired post fields to your form. When the form is submitted, Gravity Forms will check if any post fields exist on the form and if so, generate a fresh new post based on those post fields!
Before we get too much further into this, I’d really recommend checking out the basic Gravity Forms post creation demo. If you’re new to Gravity Forms this will give you a better idea of what to expect and some context for the rest of this tutorial.
Gravity Forms Post Features
This tutorial will cover each Post Field and some of the cool features each field has to offer. Here is a quick list of post-related functionality Gravity Forms can handle right out of the box:
- Set the Post Title
- Set the Post Body/Content
- Set the Post Excerpt
- Set the Post Category (GF v1.6.3 adds support for setting multiple categories!)
- Set Post Tags
- Upload Images to the Post Gallery
- Set the Featured Image (aka, “Post Thumbnail”)
- Create custom fields for the post
- Set the default Post Status (“Draft”, “Pending Review” or “Published”)
- Set the default Post Author
- Set the default Post Format (ie “Standard”, “Link”, “Gallery”, “Quote”, etc)
- Edit Existing Posts
Not bad, huh? You can use this list to get more information on features that interest you OR if your thirst for Gravity Forms knowledge is simply unquenchable, I suggest reading from top to bottom.
One thing Gravity Forms does not currently support with Post fields is creating custom post types; however, support for this is built into the Advanced Post Creation Add-On.
For an overview of the Advanced Post Creation add-on and other methods of getting entry data in the frontend, read our How to Show Gravity Forms Data in WordPress.
1. Setting the Post Title
 Adding a Post Title field to your form will allow the user submitting the form to specify the title of the post. The Post Title field is also where you will manage the default Post Status, Post Author and Post Format of the created post. We’ll go into each of those in more detail later.
It is important to note that you can actually set the default Post Status, Post Author, Post Format from the Post Body and Post Excerpt fields as well. Be aware that these settings are all “linked” and changing one setting (the Post Status, for example) on one field will update the setting on all fields. Think of them as “form settings” managed on a field level.
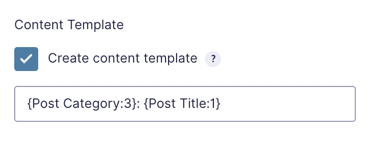
One of the really neat features of the Post Title field is the ability to specify a “content template”. Enabling this option will allow you to use merge tags to populate the title with dynamic values. When might you want to do this? How about if you have a Post Category field on your form. When submitted, you want to append that selected category name before the submitted post title. Here’s how that might look:
2. Setting the Post Body/Content
 Adding a Post Body field to your form will allow the user submitting the form to specify the content of the post. Like the Post Title field, this field also provides options for managing the default Post Status, Post Author and Post Format of the created post.
Also like the Post Title field, the Post Body field provides the option to create a content template. It is with the Post Body field that the content template can really shine! The most obvious (and arguably the most useful) benefit is being able to insert submitted Post Images along side the submitted post content. I’ve implemented this functionality in the demo here. Here is the actual configuration I’m using to achieve the effect:
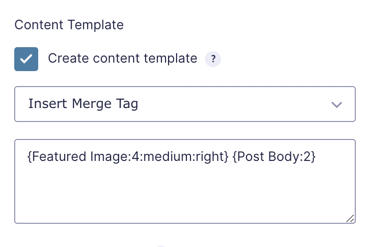
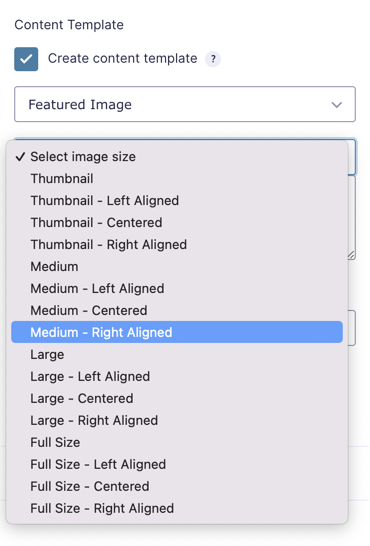
You’ll notice I’m using a pretty fancy merge tag to display the medium sized featured image to the right of the post content. Don’t worry! You don’t have to learn all that merge tag syntax. When you select a Post Image field from the merge tag drop down, a new drop down will appear with a full list of size and alignment options!
3. Setting the Post Excerpt
 Adding a Post Excerpt field to your form will allow the user submitting the form to specify the excerpt content. Like the Post Title and Post Body fields, you will be able to specify the Post Status and Post Author from this field.
4. Setting the Post Category
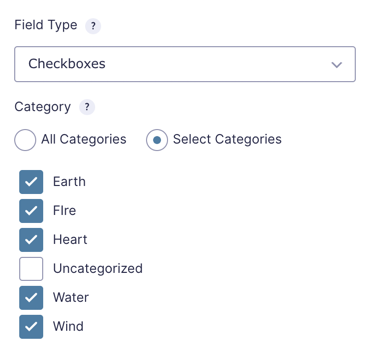
 Adding a Post Category field to your form will allow the user submitting the form to specify which category their post should be filed in. The Post Category field not only allows you to specify which categories should be available in the field, it also provides an option to display the field as one of the following field types: Drop Down, Checkboxes, Radio Buttons, and Multi Select. Selecting “Checkboxes” or “Multi Select” will allow users to select multiple categories to file their post in! This is relatively new functionality available in GF v1.6.3.
Feel free to add multiple Post Category fields on the same form. Categories from different Post Category fields will be consolidated and applied when the post is created.
5. Setting the Post Tags
 Adding a Post Tags field to your form will allow the user submitting the form to specify how their post should be tagged. Tagging is a good way to specify organizable key words and subjects that the post relates to. The Post Tags field provides the option to specify which field type the field should display as. Available field types are: Single Line Text, Drop Down, Multi Select, Checkboxes, and Radio Buttons. If using the “Single Line Text” field type, note that the expected format is a comma-delimited list of tags.
6. Uploading Images to the Post Gallery
 Adding a Post Image field to your form will allow the user submitting the form to upload an image to the post gallery. You can include uploaded Post Images in the post content using the “content template” functionality. See the Post Body section above for more details.
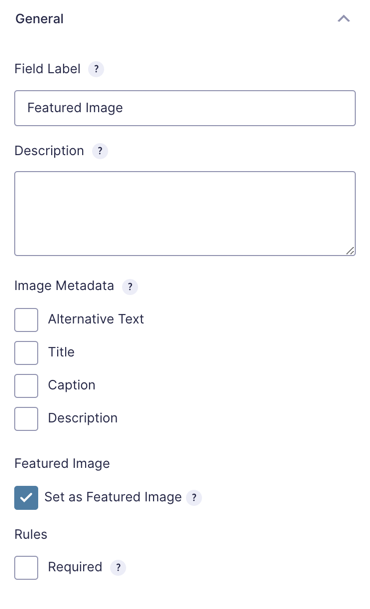
The Post Image field also provides options for collecting image meta data. Checking any of the image meta data options will add an additional input to the Post Image field which can be filled in by the submitting user. This data is then stored with the Post Image.
7. Setting the Featured Image
You can specify a particular Post Image field to also be set as the Featured Image (aka Post Thumbnail) of the created post. Just select the “Set as Featured Image” option and Gravity Forms will work it’s magic when the post is created.
8. Creating Custom Fields
 Adding a Post Custom Field will allow the user submitting the form to enter a value which will be stored in a custom field as part of the created post. Custom fields are a simple way to bind related data to a post. Here’s a real example of how the settings might be configured:
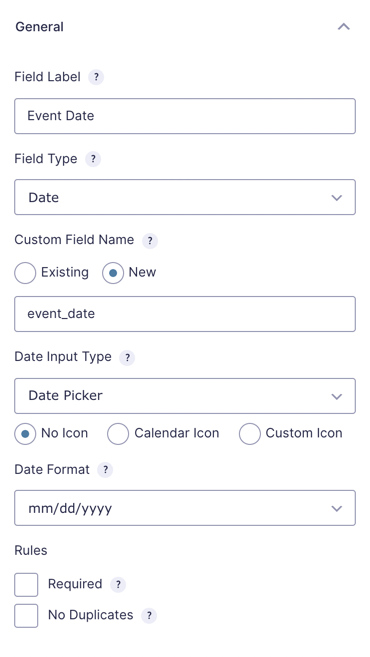
With the above configuration in mind, imagine that you’re accepting user-submitted events for a blog about your night life. The data and time of the event will be pretty important. Custom fields to the rescue! With Gravity Forms’ Post Custom Field, you can specify a custom field to which the field value (in this case, the date of the event) should be mapped.
The Post Custom Field can use a variety of different field types including all Standard Field types and most Advanced Field types. This flexible field will allow you to capture a wide range of values include regular text, dates, times, phone numbers, URLs, files and more!
It is important to note that Gravity Forms does not handle displaying the custom field data (unless you’re using a content template!); however, there are plenty of tutorials available for modifying what content is displayed with your posts including displaying custom fields! For more information, see the Custom Fields documentation on WordPress.org.
9. Setting the Default Post Status
You can specify the default Post Status from the Post Title, Post Body and Post Excerpt fields. The available options are “Draft”, “Pending Review” or “Published”. A “draft” is a post that is not yet ready to be published. A post which is “Pending Review” is ready to be published pending a review by an administrator. A “published” post is live and viewable by visitors on your website.
Gravity Forms may not support it out of the box, but it’s actually quite easy to set the post status by a user-submitted field value. Here are two handy resources that demonstrate how!
10. Setting the Post Author
Like the Post Status, the default Post Author can be set from the Post Title, Post Body and Post Excerpt fields. You must select a user from the “Default Post Author” drop down; however, if you wish to assign the post author based on the logged in user submitting the form, just check the “User logged in user as author” option. Bare in mind, this option will only work if the user is logged in when submitting the form. Otherwise, the post author will default to the user selected in the drop down.
11. Setting the Default Post Format
If you’re running a theme that supports Post Formats or if you’re using implementing them on your own theme, you’ll be happy to hear that Gravity Forms provides support for Post Formats out of the box. The Post Format can be specified on the Post Title and Post Body fields. All standard WordPress Post Formats are supported.
If you’d like some more information on post formats, I’d recommend checking out this walk-through.
If your users are creating lengthy submissions they may appreciate having submissions automatically saved and automatically loaded when they return — without having to click or email the form progress. Gravity Forms Advanced Save and Continue handles saving and reloading whether users are logged in or not and allows for users to manage multiple drafts from one place.
12. Editing Existing Posts
Gravity Forms doesn’t support updating existing posts with Post fields out-of-the-box. If that is something you’re looking for, we came up with a solution using GP Populate Anything. Read more about it in How to Update Posts with Gravity Forms.
Summary
That’s a fairly exhaustive overview of the post creation functionality. As you can see, Gravity Forms post creation functionality is very flexible and super powerful! If you have any questions, please share them with us in the comments.


Hi, is it possible to make alt and image desorption mandatory?
Hi Martin,
We don’t have a ready solution to make the Alt Text and Description mandatory on a Post Image field. I see you have an active Pro Gravity Perks license, so I’m going to escalate this to see if it’s something we could do as a minor customization. I’ve sent you an email with more details.
Best,
Will this same procedure work when trying to create a PAGE instead of a POST? I have ACP add-on . It creates a new page but does not display the form entries.
Hi Art,
Gravity Forms Post Fields can only be used to create new posts. It doesn’t support other post types, such as Pages. The APC add-on would be the way to go here. If you are having issues using it, I suggest reaching out to Gravity Forms Support.
hi. i would like to alter or hide the meta data for posts but i don’t see any way of doing it. you’ll probably tell me that i need the APC add-on but maybe there’s a way to hack to code?
Hi Mariusz,
When you say “hide”, do you mean hide the values from the
{all_fields}output? Custom Fields can already be hidden in Gravity Forms, so I presume you’re referring to the output after submission. If so, this snippet is what you’re looking for. It will hide any fields whose visibility is set to Hidden from the{all_fields}output.Can anyone point me to where to learn how to tell Gravity Forms to create these posts in Blocks instead of Classic? Its a difficult thing to google – i only get results that tell how to use the Gravity Forms block…. not creating posts formatted IN blocks.
Hi there,
We don’t have a ready solution for this one. I think support for blocks will need to be added to the APC add-on.
Hi GW team
Nice Add-on, is it possible to populate some repeater field into a post in a CPT, using this Gravity Forms Advanced Post Creation Add-On?
Thanks
Hi Jean-Luc,
We have a snippet that allows you to map child entries to an ACF Repeater field when using the Advanced Post Creation Add-on. However, this solution requires using our GP Nested Forms Perk for the Gravity Forms Repeater field. https://github.com/gravitywiz/snippet-library/blob/master/gp-nested-forms/gpnf-map-child-entries-to-acf-repeater-field.php
Best,
Can you use this feature with the Basic plan?
Hi Abby,
The solution in this article doesn’t use any of our Perks. It’s possible with the Gravity Forms Post fields.
Best,
Is it possible to have different fields like in an email form and then allow the data to be sent creating a pending post with the data in the order I like? I want people to be able to send me data and then I check/accept the posts but not just from one big content box like WP Forms.
Hi,
I’m guessing you could use custom fields for the different fields you want to accept data from the user and then map those custom fields to custom fields within the post. You can then use these custom fields to create the Post and output them.
I hope this helps.
Best,
Hi – Thanks for this tutorial. I have a couple questions…
1- Can multiple Gravity Forms fields get added to the body of the post in an ordered way? Example: GF field: video URL GF field: A description about the video.
Post body: Line 1 video URL Line 2 A description …
2- Can you host Gravity Forms on one site and still have it create posts on another site? Maybe via email > post or Json or RSS?
Thanks
Hi Julie,
We already followed up on this via email, but I wanted to post this in the comment thread so other customers could see it.
Using merge tags on the Body you should be able to add multiple fields to the Advanced Post Creation Addon. About creating posts on another site, you should be able to do that using the Webhooks addon from Gravity Forms and the WordPress API. You would just need to authenticate your API request from Site A to the credentials on Site B.
Best,
I have set up my custom post using PODS, then created a form using Gravity Forms and Gravity Wiz. Unfortunately, when I view the post, it doesn’t show all of the fields, including the category. Also when I click on a category in the sidebar, it can’t find posts with that category even though I have posts for the category.
Hi Stephen,
It should with PODS as long as Custom Post types created with the plugin are compatible with standard WordPress Custom Post Types. From your comment, no posts for the category seem to show even that you mention you’ve created posts.
That could be related to PODS configuration.
If you have an active Gravity Perks License, you can open a ticket with us via our support form, with your account email so that our developers can take a look into it.
Cheers,
Is this method in this post still valid or do you have to use the advanced post creation add on now. I’ve tried using the add on and the sanitizing it does won’t let me format the output the way I need it.
Hi Dan,
The method in the tutorial is still valid, but the Advanced Post Creation add-on is the more preferred way to create Post since it offers more features. You may want to check out this Gravity Forms doc on how to control when the submitted values are sanitized or not.
Best,
Hi all. I’m using the Advanced Post Creation Add-on and when creating the Post Creation (feed) and merge fields are being displayed in the Post Body fine. However, I tried to add some simple HTML there and it’s not allowed.
My goal was to style three single line text fields in the output and put each into a separate paragraph in order to have each on a separate line.
Do you have any tips on how to style content template output? I used to be able to use HTML, but we the advent of this new Advanced Post Creation as an Add-on, I’m lost on how to do it.
Hi Adam,
Gravity forms sanitize, field values for security sake and I am not really sure if there is a way around this. I found this hook but it doesn’t really work as expected for Post Creation feeds. You may want to get in touch with Gravity Forms Support to see if they can assist with this.
Best,
The links to the demos apart from the top one all lead to 404 pages and when submitting a test post on the top one and it says now view your post here it also leads to a 404. Do these methods still work?
Hi Ed,
Thanks for the heads up. I have fixed the broken links.
Is there a way to include the alt text for an image when it is uploaded?
Hello, Generally this could be included within the caption but this depends on how your theme has this setup. Check out the documentation here for metadata regarding images https://docs.gravityforms.com/post-image/#image-metadata.
Thanks for this. Delighted to find your site as I explore Gravity Forms’ possibilities.
One small question: does GF allow visitors to format text (bold, italic, etc) before submitting? I’ve looked at a few YouTube videos etc and none show what I’d have thought was an essential feature for certain kinds of text at least.
Many thanks again. Stay safe!
Hi Pat,
You can enable the option to use the Rich Text Editor under the Advanced Tab of the Post Body field to allow users to format text.
Best,
Question. Im using advanced post creation to create a custom post type when submitting a form. At the same time im redirection user to a second form where users can add more info if the want. Is it possible to update the post thats created on the first submission when the submit this second form?
Hi Daniel,
Post Creation in Gravity Forms core doesn’t support updating existing posts. It will only create new ones. They have an outstanding feature request to add support for this in the Advanced Post Creation Add-On. As it stands right now, the only way to update an existing post with Gravity Forms is to custom code it into the gform_after_submission hook. They have an example of how to update a post after it has been created in the link below:
https://docs.gravityforms.com/gform_after_submission/#1-update-post-after-its-creation
You can adapt that to accomplish what you’re going for. Do note that you’ll also need to add some conditional logic to the APC feed so that it doesn’t create a new post when editing. I would imagine this will likely also need some custom code.
If you need to hire a developer, we recommend Codeable.io.
Best,
If a form is edited and updated using gravity view, will the post also be updated… This is very important
Hello Bakare, If edited with GravityView here is a list of supported fields within GravityView that can be edited. Let us know if you have any other questions. 😃
Hello,
May I ask what is the difference between Gravity Forms + Custom Post Types & Gravity Forms Advanced Post Creation Add-On?
Thank you
Hello, The https://wordpress.org/plugins/gravity-forms-custom-post-types/ plugin is something that we created but was ultimately surpassed by the full functionality of the Advanced Post Creation Add-On. We’re actually phasing out support for GF + CPT in favor of Gravity Forms’ Advanced Post Creation add-on (APC). The intent is to deprecate GF + CPT, which is why we advise our customers to use the Gravity Forms Advanced Post Creation Add-On. Have a great one!
I’m more than happy to discover this site. I want to to thank you for your time for this particularly wonderful read!! I definitely enjoyed every bit of it and i also have you bookmarked to look at new things in your website.
Hello. I would like to say that I really like your writing and it was very helpful for me. However, i have a question that maybe is not related directly to this article, but i really hope you could help me.
The situation is this: We are using Gravity Forms with Paypal Add-ons, and as we know, by default Gravity Forms performs application submission and then processes payments. My question is this: When an application form includes a payment option (via paypal) how can the application not be submitted if the user has not paid.
Thank you in advance and take care
Hello Elida, this is a great question. Gravity Forms actually has a hook that you can use to delay payments for feed-based add-ons. 😃
Hi David, thanks!
Would it be possible to assign a post to multiple authors with this add-on? I would like to be able to assign a post from the form (frontend) to multiple autohors. The author list will be pre populated (from the user list).
Hello Wouter, this is an interesting question. We currently do not have a snippet that would allow for this to occur. You could use something like Gravity Forms Nested Forms to create a repeater field but at that point, you may be better off with an actual dedicated plugin.
I have a custom post type. With ACF I have also created some custom field. Now when I go to the back end to create the CPT all the custom field will display properly in the CPT view.
However when I use gravity forms to create a CPT all the custom field values will not display even though I configure GF to publish the post when I submit the form.
The only way I could get the post to display the custom field is to go to the back end and press update. I would like to have all the custom field value show up when I submit the gravity form. Help is much appreciated.
Hello Benjamin, It is important to note that Gravity Forms does not handle displaying the custom field data (unless you’re using a content template!); however, there are plenty of tutorials available for modifying what content is displayed with your posts including displaying custom fields! For more information, see the Custom Fields documentation on WordPress.org.
Gravity forms + custom post types is awesome but i have ran into an issue when deleting an entry from the front end it won’t delete the associated woocommerce product that was created. Do you happen to know how i can solve this issue?
Gravity forms provides this code: add_action( ‘gform_delete_entry’, ‘delete_entry_post’ ); function delete_entry_post( $entry_id ) {
}
Hello Rob, are you currently only using Gravity forms + custom post types to create the WooCommerce product, or are you using another plugin/snippet? If you have a Gravity Perks License and would like to send over your form, you could contact us here to take a deeper dive. 😃
I have created a form and all my custom post fields are showing except When I or a user posts via the Form the post is not published all field. It shows that the status is published, but some data field are not shown. Not showing all field from article page.
Hello Lee, what kind of custom fields are you attempting to post? Let us know and we may have a solution.
Hello, can i use a payment gateway before to allow user to pay at first and then can get access to edit their entered field.
Hello Prateek, this would require a full-fledged membership plugin as you will need to be able to limit user-created content behind a paywall. This way you would allow users to register and create a post but if they wish to edit they would have to have a certain membership level.
HI
Is it possible to use the nested forms perk to create repeater field input, that afterwards can be posted into an ACF repeater field via Advanced Post Creation?
Bart
Hello Bart, This is a great question. We have seen users in the past have success with doing just this. If you are a Gravity Perks License holder, you could reach out to our support and we would be more than happy to take a look at your form setup.
Hi, I think this is what I need to create some functionality on a site… I have a one page site with Gravity Forms installed. The idea is for a short input form (up to 160 characters of text) where a user will input their text, submit, and have a table below of the last 5-10 user submissions.
Is there a way to have Gravity forms populate a table rather than creating a post for each? This could get difficult to manage with thousands of posts.
Hello Brooke, We sadly do not have a way to display the entries as tables. Something like this could be accomplished with a plugin like GravityView.😀
Hi Katie, Thanks for the amazing step by step explanation. Is there any other forms I can use instead of Gravity Forms? I am in a trial phase and I don’t want to buy the licence at this stage before I create the exact thing I want.
Hello! Gravity Wiz required Gravity Forms to work. We do offer a 30-Day 100% Money Back Guarantee. Thank you!
This is great! Im using ACF though for custom post fields. Can I submit into these fields?
Hello Jeff, you can submit custom post fields through ACF. Check out our documentation here regarding that. 😀
Thank you for this manual! But I read it too late…
Now the posts are already created by submitting the form, but the content doesn´t make sense. So I want to refresh/recreate the posts with the correct merge tags. How could I do that?
Kind regards for your help. Winfried
Hello Winfried, You could edit the current form that is submitting these posts with the correct merge tags. Posts that have already been created can be edited within your WordPress admin under posts and edit it that way. If you are wanting users to edit on the front end, we currently do not have a 1st-party solution though it is on the roadmap for the Advanced Post Creation add-on. The only 3rd-party solution I’m aware of may be out-of-date. Worth a try though: https://github.com/jupitercow/gravity-forms-post-updates.
Is it possible to also allow users to edit their posts? Using same form but populating fields from existing post and then they could edit and save it?
Hi Mark, no 1st-party solution though it is on the roadmap for the Advanced Post Creation add-on. The only 3rd-party solution I’m aware of may be out-of-date. Worth a try though: https://github.com/jupitercow/gravity-forms-post-updates
Is it possible to update an existing post status if a form is submitted, Am looking for how to update a given post and change the status from published to private when a form is submitted. The concept is to hide the post once a form is submitted. And i will like to use the post url function already in gravity form to make any post that i embed the form into to be changed from published to private status.
Is it possible to include an uploaded file as a downloadable link in a post? We’re looking for things other than images to be accessible via the posts.
What about list field types? Are those able to be displayed?
Hi Kevin, yes, Gravity Forms uses merge tags to allow you to include your form data in the Post Content via the Post Content Template (we go into more detail on this in the article above). The merge tag for File Upload fields will automatically include a link to the file. The merge tag for the List will output a table of the entered data.
Which perk do I need to install for this?
This comes standard with any Gravity Forms license. No perk required. ?
I’d really like a way to allow the user to have the choice to enter HTML formatted text or WYSIWYG – ie. the same way that classic wordpress post editor has the toggle between visual and text editors.
I’ve been using TinyMCE Advanced and it makes a nice menu – but can’t figure out how to add HTML to the post body
I’ve searched high and low but can’t figure it out. any ideas?
The Post Body field has a setting to enable a Rich Text Editor on the Advanced tab. It won’t let the user toggle it though. It’s either on or off.
Hi,
I can’t seem to find a working merge tag that provides a URL to the created post within the confirmation page. Is this a feature, or have I gone about this the wrong way?
Thank you
I am also struggling with this. I would like to be able to access the post URLs for confirmation notifications etc but there doesn’t seem to be a way.
Hi Robert, I ended up helping Kai with this here: https://gravitywiz.com/gravity-wiz-weekly-73/#comment-359147
David, thank you for your quick reply!
I think my issue is different.
I want either the created post permalink which i can merge in an email notification once it is submitted/created.
Or alternatively to set a permalink using the entry ID for example so that i can merge that field next to the URL for the email notification to match the created permalink
Would you need to add multiple Post Image fields in order to add more than one image to the gallery? It seems odd there wouldn’t be an option to upload multiple.
Nevermind, I was able to do this with the Advanced Post Fields add-on. Thank you for your post.
Awesome!
hello thanks…i have able to follow your tutorial above
my question : how we able to display all products list were created current author inside the author front end ? so the author can view in front end (my account) all their products created
thanks
I’m not clear on your requirements. Do you want to display these posts in a Drop Down on a form? Or just a generic HTML list?
This is a great tutorial, thank you. Do you know if it’s at all possible to have Post Fields do their thing earlier than the submit button? Perhaps with a manual button/link or ideally, trigger on the Save and Continue process?
Hey Matt, I’m not aware of any solution for creating posts prior to submission of the form… one solution is to actually break your form up into multiple forms. The first form could create the post and you could direct the user to the second form on submission of the first.
Hi David,
This looks good, but I’m not clever enough to work out if it will work for me without extra functionality required? I run a small website, where I represent live cover bands that I put forward for gigs at weddings, pubs and clubs etc, and I get quite a few requests/submissions from new bands to be listed on the site, to see if I can get them some extra gigs.
Will this allow me to make a data capture form, that would allow any new bands to input their details over say 10 or so various information fields including uploading mp3 demos and band photos, and then when they submit this form, it would auto-create a new band page on my site for them, which looked exactly the same layout – literally identical like a template of my current band webpages, as all the other current bands listed on the website? Or do I literally have to build each submission into a webpage manually? Fyi, I should note that my band webpages that we built in WordPress are actually ‘pages’ and not ‘posts’, so I guess this makes a difference, not being built as posts?
Thank You, Stu
Hi Stu, this sounds like a great start for this. Let’s say each band is a Post on your website. You could use Gravity Forms to collect all of the desired information and generate a post. The extra information could be stored in the post’s custom fields. It’ll take a little exploring but you can do it!
I’m pleased you have such faith in me David! But I have almost no programming skills. Would this require any, or is it literally just insert a few fields and I’m done? It would also need to have music category tags capability and some seo considered.. title tags etc. Also, the bands would be uploading photos, videos, and then all their contact detail stuff that would need to be auto databased for me.. Are you certain this is all possible with Gravity Forms, while looking exactly like my established website band pages? If so, I presume it will only work in the paid version?
From the requirements you’ve shared, yes, this is all possible with Gravity Forms. I wish I could provide a full consultation but there just aren’t enough hours in the day. ?
There is no unpaid version of Gravity Forms so I’d recommend picking up the Basic license and seeing how far you can get.
Dear David,
I created data at post body field and inserted all the merge data, submited to the dedicated category. However no post generated.
Can you please let me know if there is any other thing i need to check to generate the post?
https://drive.google.com/file/d/1qankXlcceb9FwCot9mTKVFJEaqingo9U/view?usp=sharing
Hi Mike, your config looks good. A post should be generated if you have a Post Title or Post Body field on your form. If this still isn’t working, I’d ping Gravity Forms support.
[…] Tutorial on Creating Posts with Gravity Forms. While Gravity Forms costs money (starting at $59 at the time I write this), it’s a popular plugin and most WordPress developers will already have a copy. Plus, this version will be relatively comfortable to customize for those who already use the Gravity interface. […]
Is it possible to get the post slug using a merge tag? Got a for, that is making a draft post, and want to save the slug of the post in the entry data.
We don’t have a ready solution for this.
This is a great tutorial and I understand the concept – however I am wanting to publish all form submissions on ONE page – and not just a collection of posts that you can “go to next post, go to previous post”, etc. Can you think of any way to do that?
If you’re publishing them as posts in a custom post type, you could use the archive of that post type to show all posts for that post type and use the WordPress templating system to modify how that archive page is displayed.
I have a form that students use to create posts. I’ve been able to figure out how to use Merge Tags in the Content Template to produce the exact look I desire for these resulting posts – including both text and images. However, I also want to include videos. I want students to submit either a youtube link or even youtube embed code and have it be displayed in the post. I can’t get this to work. Any ideas?
Hi Gus, this might help: https://www.youtube.com/watch?v=gDbtksVu–Y
David, That isn’t what I’m referring to. My students do not have access to the wordpress admin side nor do I want them to have such access. They are merely filling our a Gravity form with post fields so that when they submit it automatically creates a post (just like this article talks about). I want one of those form fields to allow them to enter either a youtube link or youtube embed code and have it also appear in the post. Is there a way to do that?
I’m trying to use your CPT plugin but not all the meta fields show in the drop down. Any ideas?
That sounds like an issue with Gravity Forms’ Custom Field field type. The CPT plugin does not affect this.
Make sure you actually save some meta in the fields. I’ve noticed the fields don’t show until you actually save some content in them (assuming you are talking about the dropdown withing Gravity Forms). They may not be created and added to the DB until you actually use them.
Option to always set a “default” category for posts submitted with this? And then still allow the user to choose an additional category from the dropdown?
I’m not aware of such an option, Jon.
Hello
Can this integrate with gravity flow approval step? So that I can only allow post creation once I check it out?Thanks!
I believe so. Gravity Flow support can confirm. :)
[…] Wiz have an excellent tutorial about how to save Gravity Forms submissions as posts. Do this, then come back to learn how to […]
Thanks for this wonderful tutorial. It helped a lot.
Happy to help, Faraz!
Hi there, since the form is sending the input to a new post, does it also saves the data to the GF database/entry lisitng as well? Thanks.
Yup, it sure does. :)
Hi, thanks for your work! (I use a tons of your snippets)
I’m trying to use Gravity Forms to add Woocommerce products from frontend. Thanks to your GF + Custom post type I can insert several fields with the exception of two: attributes and upload files. To try to capture this data (attributes and files) I used in the gravity forms field: 1) Attributes: Post Field/Custom Field/Multiselect or Drop Down with Custom field name (new) pa_my-attribute-name 2) Files name: Post Field/Custom Field/Single line text with Custom field name (new) _wc_file_names 3) File upload: Post Field/Custom Field/File Upload with Custom field name (new) _wc_file_urls
where am I wrong?
Thanks Antonio
I’m guessing that the data format of the value in GF does not match the expected format by WC for those custom fields. You would first need to know which data format is expected and then use a filter like gform_post_data to format the GF data in the expected format.
Hi
Thank you for this great tutorial.
Where about on frontend the post will be posted ? And can we use a different page to display the posts, I dont want the posts to be display where the form is ?
I look forward to hearing from you.
Many thanks
Hassan
Hi Hassan, Gravity Forms simply creates the post. You (or your theme) will handle where those posts are displayed.
[…] Today Jim, Mar and I had our weekly meeting. I also worked on creating a few forms in Sandbox 2. I used this article as a reference: https://gravitywiz.com/use-gravity-forms-to-create-user-submitted-posts/#post_excerpt […]
[…] Forms have provided an excellent tutorial on Use Gravity Forms to Create User-Submitted Posts. This contains full instructions on how you can create a form with all the job board […]
Hi,
The plugin only get the posts category for the category field. I need him to create a custom post field and to register it in the categories I’ve created for the custom posts.
How can I do that ?
I’m not sure I understand what you’re trying to do, Facem?
I’m using a custom post type plugin to create listings (classified and directory) and I want to create new listings with gravity forms using Gravity Forms + Custom Post Types.
Unfortunatly, your plugin can’t detect the categories of the custom post types created for the listing, it only see the categories of the singles.
upload images
Here the “a, b, c, non classé” are categories from the single, I need to have the categories for the custom post types.
Hi Facem, it sounds like the “HOW TO LINK A FIELD TO A CUSTOM TAXONOMY” section on the plugin’s home page is what you’re trying to do.
Hi,
I’d like to use your plugin to create custom posts. But I actually can’t use the category field. It only get the classic single categories, and not the one I’ve created for the custom post.
Can U give me a solution ?
It sounds like you’re looking for this: https://wordpress.org/plugins/gravity-forms-custom-post-types/
Here is what I would like to do: Have a form where users can submit text and images. Then when the form is submitted I receive it as a draft post and the images submitted are automatically placed in a gallery. Then I approve it and the post is published with the gallery of images. And it would be nice if it was available as a widget to be placed in a sidebar. Can WPForms do this? Thanks
I mean Gravity Forms.
Yup, this sounds like a great fit for Gravity Forms. :)
Hello,
I have follow all this post on my website and its working great, thank you.
How can I use the same gravity form to allow user to edit/update the post in front end ? What is your advice about that.
Thanks a lot
Hi Jacques, we don’t have a solution for this one. :(
Hi David,
Is it possible to set automatically the post in a category, based on logical condition, after the post has been created?
i.e. If user chooses an area inside USA, should be set in Category named “North America” (lets say I have already created). Or if the user chooses Austria, then the post should be set to Category named “Europe”, using conditional logic.
Do you follow me ?? Is this possible?
Thank you !
You can probably do this by including multiple Post Category fields on your form with a preselected value. Then you can conditionally show/hide the field based on which area is selected.
Hi,
I am working on a website for a car fan club. On this website the users (so no guests), must be able to create an advert on what they are selling. So no actual selling or payment systems are needed.
I would like to show their adverts in a specific post category. So in the end I will be able to show a page full of all the user made adverts. From the front-end form they must be able to add their own adverts, following a standard format of questions. I would like them to enter their names, contact details, price, title and so on. But besides I also want them to upload some pictures (of which the first is used automatically as featured image). And besides all the images must be shown as a gallery in the post.
I would like the post to automatically format the specific information added. So I will for instance have a table on top first with the name and contact details. On a specific space with specific formatting the price etc.
And in the end they must be able to edit and delete their advert.
Is this possible with the plugin?
Thanks in advance,
Neal
Hi Neal, the short answer is yes, this is possible. You would certainly need to do a fair bit of configuring to get this working as described but Gravity Forms support should be able to provide any assistance you need along the way.
How do you show the link to the new post after submitting the form?
Hey Jim, here’s a tutorial: https://gravitywiz.com/include-post-permalink-gravity-forms-confirmation-notification/
Any chance you’d add a Save Draft feature for the front end posting?
Hey Tanner, we don’t have any plans for this functionality right now. Gravity Forms has a new add-on coming out soon to add additionally support for creating posts. Something like this might be supported there.
Is it possible with this snippet to have multiple posts created from a single form? I realize I would need all the correct fields, but if I have title1, body 1 and title 2, body 2, etc. in one form, can I have multiple posts created?
Hey Bet, this isn’t currently possible but it’ll be supported with Gravity Forms new Post Creation add-on.
Hi,
How can I add an alt text to featured image? Isn´t there an option for that?
Hi,
Is it possible admins to create posts choosing a different post author?
Thanks a lot
There is no post author field for frontend selection; however, they can specify a static post author via the field settings for the Post Title field.
Hi David,
Regarding the ‘Setting the Post Category’ bit – what if I want to populate Categories from a Custom Post Type and then restrict the options (say, show only 4 of 5 CPT categories)?
GF+CPT plugin of yours lets me populate, but I can’t cheery pick the categories thereafter.
You would need to write a bit of custom code to handle this. Here’s a tutorial which covers how to populate a drop down.
https://www.gravityhelp.com/documentation/article/dynamically-populating-drop-down-fields/
Sunit: Looking for the exact samething. Where you able to find a way ?
Hi, thank your for this info.
I need a way to get a AJAX FIELD for featured image. I have tried this plugin https://es.wordpress.org/plugins/ajax-upload-for-gravity-forms/ but it does not work with featured post images.
So I had an idea… how can I hide the featured image field and autopopulate it with the value of an ajax field?
If you can´t help me with this… I have another idea: How can I remove the featured image from any post when submitting a form? This way I can use a plugin to take the first image in content as featured image…
Waiting on an answer, please, I have tried a lot of ideas with no luck.
Thanks a milliion.
I’d recommend using the default file upload field and then setting the featured image via custom code after submission.
See gform_after_create_post and this little bit for actually setting the feature image custom field:
update_post_meta( $post_id, '_thumbnail_id', $attachment_id );Nice!
can we use this feature with web api? i mean create post via api?
I actually don’t know… ping Gravity Forms support and report back here. :)
i just want check this ability for future needs.
do you know about gravity forms lifecycle for this ability? it’s run some hook after add entry or what?
Great tutorial!
Is it possible to create multiple posts with a single form? (e.g. Publish 5 posts containing a single tag each from a single from with 5 fields.)
Possible but would require custom code. GF will only create a single post by default.
I can’t see the point in this. WordPress already allows the posting of articles. I obviously didn’t understand or it’s pointless.
WordPress requires anyone who is creating posts to be a user and to be logged into the WordPress admin. With Gravity Forms, you can allow anyone to create a post from the frontend of your website. This is a powerful feature which allows non-WP-users to submit articles, events, whatever to your site. You can set the status to draft if you’d like so you can approve it before it is published. Check out the demo.
[…] the form and program it to automatically create posts from the user submitted content, I followed these directions provided by GravityWiz.com. Rather than re-write what I did here, just follow those instructions, […]
Pretty cool. Can this be a post submission for a community fee “wall” like Buddypress? Also, can it look more like a comment and not take up an entire page?
Thanks! J
Hi J, sure. This article has more details that might help: https://gravitywiz.com/basic-wordpress-membership-site-with-protected-content-using-gravity-forms/
Great article!
Is it possible using Gravity Forms + Custom Posts to have an author submit a publish date that actually writes as the posts publish date on the backend?
Hi John, this is possible with this snippet: https://gravitywiz.com/schedule-post-date-field-gravity-forms/
is there a way you can create a page through gravity forms and then send that dynamically generated URL page to the user through a notification e-mail?
Yes, you can generate the link anywhere you want post-submission like so:
http://yoursite.com/?p={entry_id}
Hi David,
My users publish custom post types this way and it works perfectly. I’m now looking at adding ratings to the CPT submitted (5 star rating format). There would be typically 3 to 5 ratings on the form/post. Think of it as a review post (say mobile phones) where several features are rated (battery life, styles, display, etc.)
It seems to be a real pain in the a** to add a 5 star rating. GF does not have this out-of-the-box. The closest would be to use a Rating field from the Survey add-on, but unfortunately, this rating field does not save values to a custom field or taxonomy that is associated with the post submitted.
So I’m puzzled and feel that GF is really lacking 5-star rating out-of-the-box. Do you have any idea how this could be implemented?
Hi Maelga, there used to be a plugin on Code Canyon that offered this but it doesn’t appear to be for sale anymore. One solution would be to use a Radio Button field and apply this tutorial to convert it into a Star Rating field. This might be a good opportunity for Gravity Wiz to release a product but if so, it wouldn’t be for a while.
Awesome article! :D
I have a doubt, Is possible to have a dropdown field populated with a custom taxonomy and save it as a custom field of a post type?
In other words, we have a custom field called “Car Type” for instance, which it’s filled with the ID of a custom taxonomy term. It seems to be possible to create a dropdown populated with a taxonomy, but I can’t see the option to save it as a custom field.
Is that possible, folks?
Hi Alejandro, it is possible. Here’s a high level overview.
That’s it. :)
David, you’re awesome! It works perfectly!
Thanks! :)
Thanks for this article !
Is it possible to use the content template to set the post body content to {all_fields} (the table containing all form values generated by GF) ?
Thanks for your help !
Yes, Pierre, this is possible. :)
Could you recommend anywhere to find conditionals if, else, etc trying to strip out elements as a form posts to a post type.
Hi Niall, do you mean within the Post Content Template? If so, this resource might be helpful: https://gravitywiz.com/gravity-forms-conditional-shortcode/
Thanks :)
Hello, I follow this tutorial step by step, (I’ve created a form with gravity form, using create template, merge tag, chose a name….) . I am using the theme Divi. But I can’t make my custom post fields appearing in every new post… They are nowhere. What can be done? thanks a lot
Hi TP, GF adds the custom meta to the post object; however, you still need to display that post meta on the post page. For help specific to Divi, I’d reach out to their support team.
Hello and thank you for your answer. what do you mean by “you still need to display that post meta on the post page” ?? so what should be the procedure? thanks a lot
Hi TP, I’d reach out to your theme’s developer for assistance with this one.
I am trying to do the following;
{background-image: url(‘{Event Image:4:full:url}’)
Is it possible to take the feature image as a raw URL only?
It does work :) I was trying it without the image size and getting the standard embed.
{Event Image:4:full:url} works :)
Boom! Glad you were able to get this sorted. :)
Thank you for your answer. But will this be only a post, or also a web page? I need a web page… Thanks
Hello, I want to create a wordpress website that sells watches. But I want to create a structure of every new WordPress page, so that the administrator just has to complete it: I want to create fields like brand, price, sexe, location, and about 10 more details. And that when filling these fields, the new page will be created by the administrator and will be ready to be published as a page. Can this be done with gravity form easily? with no coding? Thanks
Reply David Smith says June 30, 2016 at 8:43 am
Yes, you can use a Gravity Form to capture the desired data and use a Post Content template to display the data in the Post Body, all without code.
Hello, I want to create a wordpress website that sells watches. But I want to create a structure of every new WordPress page, so that the administrator just has to complete it: I want to create fields like brand, price, sexe, location, and about 10 more details. And that when filling these fields, the new page will be created by the administrator and will be ready to be published as a page. Can this be done with gravity form easily? with no coding? Thanks
Yes, you can use a Gravity Form to capture the desired data and use a Post Content template to display the data in the Post Body, all without code.
Hi,
The plugin works flawlessly except when a user adds a title that contains say &. This gets saved in the database as &.
I added the following function to the theme’s functions.php file, but when checked in the gravity forms logs, the post data before saving has got &. It still saves as & in the database.
add_filter( ‘gform_post_data’, ‘sanitizetitles’, 10, 3 ); function sanitizetitles( $post_data, $form, $entry ) { //only change post type on form id 3 if ( $form[‘id’] != 3 ) { return $post_data; } GFCommon::log_debug( METHOD . ‘(): original post_data => ‘ . print_r( $post_data, true ) ); $post_data[‘post_title’] = htmlspecialchars_decode( $post_data[‘post_title’] ); GFCommon::log_debug( METHOD . ‘(): modified post_data => ‘ . print_r( $post_data, true ) ); return $post_data; }
Gravity support say that they cannot provide any help on this as the form sends the correct data as shown in the gf logs.
Anyone else facing this problem?
V
The problem with this > Setting the Post Body/Content is that people cannot add links to the articles [html] so this is useless when you have articles with links in it
Hi P.Maes, using the default Post Body field you can add links but you would need to write them out in full HTML. With GF2.0, the Post Body field will support a Rich Text Editor so you can add links with the click of a button.
Ehm. I’m not the brightest light as it comes to technical stuff but what you say is with the new GF2.0 people can copy paste articles from other websites incl HTML and redirect links into the body content field and this will automatically “converted” into WordPress?
I’m just saying that both fields support HTML. The Rich Text Editor might be able to handle copying HTML-like text. I’d recommend giving it a try.
I will. Thanks for your help.
Paul
Hi.
Purchased the latest GF plugin.
Regards,
Paul
Hi Paul, GF2.0 is in available as a release candidate. You can download it here: https://www.gravityhelp.com/downloads/
Thanks David. The problem is that i once had the developer version and downgraded to a personal licence. This personal licence is already running on my site and this is V.1.919. I’m afraid when downloading v2.0 and upload through ftp it will overwrite all my forms etc. So i need to wait for the official v2 launch and the easy update way
Deleting the files via FTP and replacing them with the latest version will not delete your forms. :)
Ok. Thanks David. I will make a backup of my forms and then upload V2 of GF. I will inform you when i’m done. Thanks again
Great. Got V2 installed…..now i cannot select the rich editor box….it just won’t let me.
If you’re working with an existing form, you’ll need to add a new field. Field’s with existing data will not be able to be converted to the RTE.
Fan-tas.tic! Working. Thanks a lot for your support
Is it possible to save pricing fields such as product and coupon?
I’m not sure I understand?
I’m trying to create a subcontractor portal that allows logged-in subcontractors to submit bids on projects via the website. I want them to be able to view their own bids and make changes if they need to. I imagine I could potentially allow users to submit bids as posts, but is there a way that I can only allow certain roles (ie. Administrator) and the user that submitted it to view the post? I can’t allow other users of the same role or guests to view their posts.
Hi Mike, this sounds like a good fit for Gravity View.
Hi David,
You mention in 10. that setting the post author can only be done when the user is logged in. However I have a form that is both creating the user account as well as creating the post at the same time, so I need the new post to be assigned to the author, so they can login and edit it, for example.
Would I need to auto login the user or could I run a cron or an update to change the post author after submission?
Hi Shaan, nope, Gravity Forms provides an option for this: https://gravitywiz.com/set-registered-user-as-post-author/
Is it possible to save the post ID of the newly created post back in as a custom field so it can be passed through a gravity forms addon?
We’re trying to pass the post ID into an entry in our Constant Contact list. We want to be able to email people back at a later time with a link to their post which we will accomplish using website.com/?p={postID}.
Since there is no post ID at the time the form is viewed, we can’t enter that information into a field as a default value.
I hope I was clear enough on what we’re trying to do. If not, please let me know.
Thanks! /Bradley
It really depends on when the Constant Contact add-on is sending the data off during the form submission processes and how it aggregates the data. I would ping the developers of that plugin as they’ll have a better idea of how to make it work on their end. :)
Will it allow the user to submit more than one photo?
Yes, sir. Just add as many Post Image fields as you need. :)
And one more question David, is it free to use Gravity Forms in this way? Allowing non-registered users to submit text and multiple images that automatically create a draft post for me to edit and publish? Or will I need to upgrade to any paid features to do this?
Oh I see now that Gravity Forms costs $39. Will I need to purchase any additional ad ons to create the User-Submitted Posts form with multiple photo uploads?
Nope. Post creation is available with the core Gravity Forms plugin.
My website takes in user-submitted content which will eventually become posts on my website. One of the fields that are submitted on my site is a link to a picture.
As of now, we are using the directory option to display all submitted content. Is there a way we can customize the field so that the image linked to the URL submitted is displayed.
I’m not sure I follow. Could you clarify what you’re trying to do?
Follow up:
As of now, the links in single-entries are viewed like this using the directory method
http://i.imgur.com/qNDdZIQ.jpg
As you can see, all it is showing is a link to the picture. What I would like to happen is have something like this:
so that the image is actually embedded into the single-entry view.
Sorry, it seemed like the code I posted wasn’t allowed:
Instead of a hyper link showing I’d like for the image to be embedded such as this:
*******
I’m sorry, I’m trying to post some html code you can see an example of what I want but it keeps getting scrubbed.
Hi Carlos, I believe I understand what you are trying to do now. Unfortunately, I don’t have a solution for this currently. :/
Would I be able to modify the code somewhere to do this?
The gform_post_data hook is probably your best bet. You could parse the content for URLs and then handle fetching the actual image from the URL based on the website.
is it possible to add multiple pictures for a blog and to let it show in a blog grid used in visual composer? I only see the featured images, but adding more post images won’t show the other pictures in the grid like a clickable slider, eventhough i didn’t turned on the checkbox. If it’s possible, how to?
This is possible but may require some custom work. I’d reach out to the Visual Composer guys for more advice on integrating with their blog grid.
Hi, i’ve set a form so that the user can submit articles. No problem, But how can i make a menu link so that the user can see the articles created by himself, and not but other users? Regards
Hi Pedro, we don’t have a solution for this currently.
I start using it to create a form to collect dogs information but the post is not formatted. Where i have to start to create a pretty visual article like the form ? Is there a guide to obtain a awesome article and not only a collection of input ? Thanks
You might be interested in the Rich Text Editor that will be included in Gravity Forms 2.0. You can download the beta here: https://www.gravityhelp.com/downloads/
Custom field is not showing in post. What’d be the problem ?
Hi Shohag, you’ll want to contact Gravity Forms support for issues with Gravity Forms.
Hi David,
I would like to use this feature to build an interest finder. The form would generate a post which displays a list of posts and pages according to the tags and categories selected by the user. Do you know how I would do this? I am thinking I would need to somehow capture the users input and merge it into an appropriate widget shortcode in the body of the post.
You’ll probably want to collect all the required user input and run all the calculations within the form itself using Gravity Forms calculation features. Then you can use the Post Content Template feature to display the calculation results to the user.
[…] the Multi-File Upload field has a merge tag that can be used in Notifications, Confirmations, Post Content Templates, and more. It looks something like {Files:2} (where “Files” is the field label and “2” is […]
Hi David,
Great stuff and thanks for sharing. I’ve just finished up an extensive post submission form and have one little thing not working as I expect and that’s trying to wrap the website field merge tag around a text field merge tag in order to have that text linked to the submitted url.
I’m using this but it’s not working. Do you have any thoughts?
<a href="{Website:3}{What's the name of your business/blog?:5}"
and in case that didn’t show up above, here’s the same without double quotes in the href
<a href='{Website:3}{What’s the name of your business/blog?:5}’
Hey Adam, I would expect that to work. Can you email me an export of your form?
Fantastic article. I have a question that I didn’t see asked in the comments. Is there a way to select a page template and / or a page parent?
Thanks!
Hi Frizzle, you can specify a parent page with the GF Custom Post Types plugin. Just populate a Drop Down field with posts (on the Advanced tab) and then check the “Try to set parent” option.
Setting the page template appears to be possible by manually populating your page template slugs into a Custom Field (in the GF form) with the input type set to Drop Down and then set the custom field name to “_wp_page_template”.
I was wondering if this feature can be combined with the User Registration add-on so that a visitor can submit content via a form, and also register for an account on the same form.
Ideally the post would show the new user as the author, but if not, we could later assign the post to their account, correct?
Hi Joel, yup. User Registration supports this out of the box: https://gravitywiz.com/set-registered-user-as-post-author/
Hello. Can we put a tool bar for the body post ? Like the WP dashboard ( bold, titlle, add media etc ) ? Thanks you :)
Hi Wil, this plugin might help with that: https://wordpress.org/plugins/gravity-forms-wysiwyg/
Hi David, Thank you for your incredibly helpful article! The WordPress theme that I’m using has a separate “Listings” admin menu item to store the free business listings submitted by readers. This “Listings” section is separate and apart from the standard “Post” section within the WordPress admin panel. It seems that Gravity Forms is designed to store user submitted data within the “Post” section of the WordPress admin panel. Do you know whether Gravity Forms is capable of directing user submitted data into the “Listings” section instead? This will save me the step of manually transferring the data from the “Post” section to the “Listings” section before approving each business listing.
Many thanks for your insights!
Cheers, Sean
Hi Sean, yes, with the assistance of this plugin:
https://wordpress.org/plugins/gravity-forms-custom-post-types/
The “Listings” is most likely a custom post type. You can use this plugin to create the “post” as a “listing” instead. :)
Thanks David! Gravity Forms + Custom Post Types worked perfectly with the majority of the inputs on my new Listings/Items submission form. The title, body and category post fields worked like magic once I selected the correct “Post Type” and “populate with a taxonomy” values. I’m still struggling with the Custom Fields for the remaining inputs, namely the URL, email, telephone and business address fields for the listings. These fields exist in the theme already but do not appear in the existing custom field name drop down menu. I added the meta keys for these inputs as new customer fields without success. I have followed up with the theme developer to make sure that I’m using the correct meta keys for these fields. Almost there :)
Hm, yeah, if you’ve added the right meta keys to your GF Custom Field I would expect it to work. If not, you might need to reach out to GF support to get to the bottom of it.
I am using GF to create my drat posts, I am also using simple fields to attatch diferent images to the drafts. How can i, on upload save the images to the simple fields within my draft?
I’d recommend using Gravity Forms Custom Field fields and set the input type to File Upload. You can then use this plugin to upload these files to the media gallery rather than just the Gravity Forms uploads directory.
HI David,
I am currently looking for a solution to create Front End User Submitted Content and is wondering could Gravity Form can do what follows:
1) Enable non registered user to submit Post 2) Can upload image 3) Can have extra field like phone and address on top of the regular email and name 4) Extra form field where the content can be part of the post. Example with the following 4 questions
About Yourself Your Favorite Color and why? Your Favorite Book and why? Your Favorite Movie and why?
When non registered user filled the above questions, the question and answers will appear as part of the Post content.
Looking forward for your expert advise
Thanks
Jason Ser
Hi Jason, yes, this is possible. You’ll want to follow this tutorial to only show the fields to users who are not logged in. You can then use the Gravity Forms Conditional Shortcode to show those values conditionally in the Post Content template (discussed in the article above).
[…] The CUNY Innovation Survey is a crowdsourced site with a folksonomy of CUNY-based digital projects. Because of the scale of the CUNY system, overcoming information silos, discovering new projects and finding colleagues for collaboration across campuses can be a major challenge. The CUNY Innovation Survey attempts to aggregate information from across the system to make connecting easier, and to demonstrate the breadth of work underway. The contributions are searchable via an extensive tag cloud, by campus and project type. After taking initial results via a survey form and converting contributions to posts, ongoing additions are added using Gravity Forms’ Post Fields. […]
Hi David, great article, I want to protecting the post submission in a different way, for prevention unwanted posts, can you tell me how to make a post live in the blog by activation from email?
I don’t have a ready solution for this one. If you’d like to commission the functionality, get in touch.
Hi, after the post has been submitted, how are you able to get the URL of the submitted post?
I used the demo and after I submitted the article, the confirmation page has this: Your post has been created. View your post here!
And it links to the submitted post.
Thanks for your help!
Hi Alex,
Easiest way to generate the link is to use the “short url” version, which just includes the post ID. Here is how it works:
http://yoururl.com/?p={entry_id}
Hi, David Do you know if it is possible for one of the fields in the multi-field, user-generated posts to feed into a poll? Very helpful article and conversation. Thank you!
Hey Whitney, not sure I understand what you mean? Could you clarify?
Sorry… Yes, I see that GF does have a “poll add-on.” What I’m needing to do is to create a form for user post submissions to my site which has multiple data fields – one of which would be a question related to a running poll that displays its results as a ratings distribution chart. In other words, a way to mimic the amazon product review platform which collects information into fields – one of which captures the number of reviews for each star-rating and is displayed in the chart at the top. Ratings-type plugins that one might use for this kind of functionality generally do not allow for the many fields I am needing and are therefore not usable for my purposes. Thank you for any suggestions!
Hi Whitney, I’m still not following entirely. What does your form look like? What should the end result look like?
The form would give the user fields for title, essay body and several other data fields. The end result would look like a page from a list of “amazon product reviews” with each post showing an avatar, components from the various post entry-fields but the page would feature a “ratings distribution chart” that reflects the selection made by the posters in just ONE of those fields within the form. I have read that GF can create a “ratings distribution chart” with their “Poll Add-on”… but could it come from the data-selection on a SINGLE field in a multiple-field form or does it need to come from a stand-alone form? Thanks so much for your patience!
The Poll Add-on adds a “Poll” field type which can be added to any form. The field type then has a variety of input types available (such as ratings). I’m not super experience with the Poll Add-on so I would ping Gravity Forms directly for a definitive answer.
I was wanting to give a customer a way to submit a listing to a custom post type is this possible i saw their was an old plugin but see it not been updated for years.
Hi David, it is safe to use the old plugin. It has not been updated because not much has changed in regards to this functionality in that time.
Hi David, there is a way to post a comment when a form is submitted?
HI Giacomo, there sure is. Here’s a snippet to get you started: http://pastie.org/private/p6it0jfugjcqlzukf5hfua#4,8-9,11-12
And here is an export of the form I used to test this: http://pastie.org/pastes/10443294/text?key=yb7ahgzbwc1ugi63jclicg
Save that as a .json file and import it to test.
Is there a way to make it the default for these comments that follow the post to be “closed” until a reader would like to “open” and read them? (ala the “comments” feature at the bottom of any amazon product review?) Thank you!
Hi Whitney, here’s an snippet I wrote for this: https://gravitywiz.com/close-comments-when-post-created-via-gravity-forms/
Hi, I am trying to find a way to allow the user to create a post that has multiple steps in it, kind of like a DIY post. And within each step, the user can upload multiple images.
So a post will have the following:
STEP 1: Title, Description, Image(s)
STEP 2: Title, Description, Image(s)
STEP 3: Title, Description, Image(s)
and so on….can this be done with gravity forms?
Thanks in advance!
Assuming that each step in your example represents an image to be uploaded and it’s title and description (and not an entirely new post), this can be done with Gravity Forms. Currently, you would have to create a static page for each possible image and then you can add a checkbox to the bottom of each page: “Would you like to add another image?” You can then use conditional logic to show/hide the subsequent image pages so they’ll only see as many of these pages as they need to add as many images as they want.
So just to clarify, by separating the fields into separate pages, gravity forms would still recognize all these fields within each of these pages as part of one form?
How would i tie in all these fields together so that when the final “submit” button is clicked, all the fields go into one form?
Gravity Forms supports multi-page forms out of the box. As long as all pages belong to the same form, Gravity Forms knows to process all pages together and will only create a single post from these pages.
First of all, thanks for the quick answers and being so helpful!
One last question, is there a way that the fields for the additional “steps” or “pages” to be created on the fly?
Or would they have to be created ahead of time? So I would have to create say 10 pages so a person can upload a maximum of 10 steps within the form?
Please disregard my last question.
Is it possible to insert the SUBMIT button at any page within the multi-page form? Say if the user does not want to add any more STEPS, meaning they’re done with the form, can the SUBMIT button be available at this stage?
Let’s say there’s a max of 10 STEPS and the user decides he’s done at STEP 5? Can the SUBMIT button be visible at STEP 5?
Thanks again!
Did a quick test and it doesn’t look like this is possible out of the box. To be clear, the next button will actually submit the form if there are no “visible” pages after it but it won’t display as “Submit”. It’ll just read “Next”.
I’m thinking I could just hard code the submit button inside an HTML field? This should work? Or use jQuery to trigger the submit button?
I am only going to be using 1 form throughout the website. So it will be easy to manage.
Just match up the HTML in your custom submit button with that used for the real submit button (ID can be different). It’ll make your life a little easier.
Hello, great post. Was wondering how to add a wysiwyg to the post body so the users can so some formatting. This plugin https://wordpress.org/plugins/gravity-forms-wysiwyg/ isn’t supported anymore Thanks
This alternate plugin looks promising: https://wordpress.org/plugins/gravity-forms-wysiwyg-ckeditor/
Hi, your site is great and I wonder if you or some one else can help with a idea.
I want to get the answer of a form (some of then only will be displayed depending to some conditions) insert then into a editable box witch will be publish as a post.
Ok, the form is done and its last page has a body post field in witch I insert (as default value) the basic text os the post with a lot of merge fields.
The problem is the formatting and style. It would be great to insert html blocks in the post body edit field, but I can not do it, and using normal text fields I have problems with the final formatting.
Does anyone have any idea who can help me?
Hi Victor, have you considered to use the Post Body Content Template to add the custom markup you want?
Yes, I try, but using the default value its better for me, cause I can edit the text before send the form.
Anyway, the problem is the formating of the merge fields.
For example, I want to make a paragraph quoting the name of all products chosen in the form, but I have problems with the break line.
Ex: {productA:1} {productB:2} {productC:3}
One of the thing that I want is that if the protuct B was not chosen the result show this:
{productA:1} {productC:3}
And not this:
{productA:1} <— blank space {productC:3}
Do you know how to make it?
Can Custom Post Field act like Post Image like what you explain in: 6. Uploading Images to the Post Gallery
What do I mean is that: Can the user, upload images using Custom Post Field(as multiple file upload type), then show all images uploaded as a gallery in that Post?
Please help us?
Thanks, Best Regards, Assalole
Hi Assalole, here is someone who is trying to do the same thing. It looks like they found a solution: http://wpquestions.com/question/showChrono/id/7080
I have a specific case where I want the title of the post to include the name and optional company. The problem is that while the name is required, the company is not. So to Create a content template with the merge tags:
{name:1} {company:2}
How would I conditionally add a comma in between these ONLY if a company has been filled out?
Hi Chris, the GF conditional shortcode will really help here. I just published an article on it: https://gravitywiz.com/gravity-forms-conditional-shortcode/
I think you’ll want something like this:
{name:1}[gravityforms action="conditional" merge_tag="{company:2}" condition="isnot" value=""], {company:2}[/gravityforms]This was a really great tutorial David! Perhaps you can solve a problem I’m having trouble getting an answer for.
I’m building a site based solely on user-generated content, and I would prefer to eliminate the registration process, so I created a GF submission form, and tested it out. Everything seems to work exceptionally well, except for the “user-author-link” in the entry meta. What I’m trying to do is have the user’s website (if one is provided) linked to the author name, rather than the author page, but I simply can’t find any resource which touches on this topic.
I’m more of an “idea” person, and not a coder but I am able to do the basics and was able to find the author-link in the functions, but can’t figure out how to get the GF website field to link to that line, so if you have any ideas in layman’s terms, I’d be forever grateful!
If the author is not an actual “user” on the site, you may need to modify your page template to pull the author website from wherever you’re storing it. If it sounds like I’m not understanding your setup, please do clarify. :)
[…] This panel will let you add fields to create a new WordPress post. Post Fields is a bit more complex and you can find detailed instructions on how to use post fields here. […]
Hi David,
I am developing a property developer website and i want to have a simple property booking form which allow user to book the apartment there by just entering few basic information such as name, email phone and apartment no. listed as dropdown list. Once the selected apartment no. is booked it should become disable for further booking unless site admin enable it. Also on the admin side i want site admin to approve and reject the booking which will basically disable or enable the apartment no in the dropdown.
I tried many time but not able to find any solution also new to GF. Your prompt response is highly appreciated.
You can visit following http://ibtikarrealestate.com/our-projects/ongoing-projects/project-1/ check for reservation list.
Hi Sarah, this will require some custom development. I’d recommend reaching out to a service like WP Curve or Codeable.
Hi David!
Thanks for this tutorial, it’s very helpful. How would I add a link to the newly created post in the User notification email and/or the form confirmation?
Thanks! Anne
Hi Anne, check out this new snippet/tutorial: https://gravitywiz.com/include-post-permalink-gravity-forms-confirmation-notification/
David!
Thank you so much! That was exactly what I needed. I had tried something similar, but just couldn’t get it to work.
You’re the best! Anne
Hi, thanks for this tutorial, I’v learned a lot. Can you cover how to add the Link to the Post in the confirmation / notification message please? Thanks!
Hi Ehe, check out this new snippet/tutorial: https://gravitywiz.com/include-post-permalink-gravity-forms-confirmation-notification/
Hi David,
Is there a way for a Dropdown Field to be dynamically populated by a specific Woocommerce Product Attribute? GF+CPT used to do this for me, but since it’s abandoned there is no other way to do it. Any ideas?
This plugin is abandoned or a different one? https://wordpress.org/plugins/gravity-forms-custom-post-types/ Did you reach out to the plugin author and let him know it isn’t working?
Hey, David. Awesome article, again!
I’m creating a form where logged in users can post, but I need them to be able to choose the author from a list. I know I can add a dropdown menu that lists all the authors on the site on a form, but how to do I attribute that value to the post’s author field?
Hi Zack, give this a shot:
http://pastie.org/private/paoqylehot5ogzmtvqauw#
Beautiful! Works great!
In case anybody wants it, here’s how I populated my dropdown (borrowed from here.
http://pastie.org/private/sbil7ubnnp38dce6nawua
Awesome! Thanks for sharing, Zack. I moved the code into a pastie for legibility.
Hi David, Any way to connect a date field to be the “publish date” for a post?
I’ve setup and have a mostly working GForm that takes article submissions for a school weekly bulletin. It maps the categories and I’ve used 2 plugins to get a WYSIWYG post body and ‘Media’ button for uploads working, along with the plugin you have mentioned in the comments “Gravity Forms: Post Updates”.
The final part is getting the submissions to be scheduled for a specific date, I’ve just started looking into how to do this and thought I’d drop you comment in case you had come across this idea?
I also have a fall back to create a tagging setup for term and week then have the editor update the blog each Monday to the correct week and term tags only.
Also <3 GWiz, Thanks!
This might be what you’re looking for:
https://gravitywiz.com/schedule-post-date-field-gravity-forms/
Hope it helps! :)
Thanks David! that helped a lot =)
I had to modify the snippet slightly to fit with my desired workflow but it works great in testing so far.
Awesome! Glad you got this working. :)
What about HTML tags and adding images within the post body?
What they really need is a custom editor for this.
You could try something like this:
https://wordpress.org/plugins/gravity-forms-wysiwyg/
Hi there. I want to do something very simple, but I’m not sure how. I have a course evaluation form that has many fields (radio buttons, text fields, etc.) and I just want to create posts that contain all the information entered in the form, as well as the field labels, etc.
I like the format of the entries that I can view in my WP dashboard and I’d be happy for the posts to just look like that. How can I “convert” these entries to posts, using the course title as the post title?
thanks. Jacques
Hi Jacques, I don’t know of any solutions for converting existing entries to posts; however, for new entries, you can add a Post Title field to be used as the Course Title. When the user submits the form, the value will be assigned to the newly created post. The rest of this tutorial will demonstrate how you can convert the other fields to Post-based fields and then those values can also be captured in the created post.
Thanks for your article, David. I’ve been trying to figure out if it’s possible to use Gravity Forms to charge someone to post content on my site. I’m thinking it would be a per-post charge, but I might also consider charging a monthly fee. Any ideas?
Hi John, using one of Gravity Forms’ payment add-ons, you can charge for the form submission. Since the form submission is what generates the post, this would also allow you to prevent the user from posting to your site without payment.
If you’re going to require a subscription, you’ll want to go the membership route where the user must register and can then submit the form to add content. Here is a breakdown on Membership sites with Gravity Forms: https://gravitywiz.com/basic-wordpress-membership-site-with-protected-content-using-gravity-forms/
David,
This article was awesome! I wanted to know the best way to do this. I am creating a memorial site where I want people to be able to post thoughts about their friend that has passed on. I want it simple. Go to the page, type your name, type your content and publish. It’s just an online guestbook.
I have two questions: 1) I don’t see featured image anywhere in my list to add to the body content and 2) I don’t want people to register. Should I just create a basic user that everyone logs in under?
Thanks so much
Hi Bodie,
[…] Gravity Wiz: Beschreibung wie ein “Post” Formular erstellt wird, mit welchem Beitrage erstellt und ge… […]
In gravity forms when adding a custom field in the post fields section, when selecting the drop down field type, is it possible to add the “Populate with post type” option when using the Gravity Forms + Custom Post Types plugin?
This works for a standard drop down field but not a custom field with the field type set to drop down.
Hi Rob, I’m assuming this is not possible out of the box with that plugin. If you’d like to map it to custom field you can add a hidden custom field type and also a standard drop down. Enable the populate with post type option on the standard drop down and then map the value from the standard drop down to the custom field with either this snippet or GP Copy Cat (which now supports automatically copying a value without having to check a checkbox).
Hi David, Thanks for getting back to me. I managed to adjust the plugin to include the custom field so it now works like a standard drop down.
Is it possible to use this to create accounts for the persons creating the pages with a form? I would like to sell themed mini-sites and this looks good, but there is a lot to it… user accounts, and the ability to login and make changes, etc. Any ideas or direction would be appreciated!
Hi Suzan, the Gravity Forms User Registration plugin will allow you to register users on your site and also let them log in and make changes to their profile data. Here’s some extra coverage we’ve provided on this topic: https://gravitywiz.com/basic-wordpress-membership-site-with-protected-content-using-gravity-forms/
Hey David,
You’ve been so helpful in the past, I figured I’d give this a shot here. I’d like to be able to allow the creation of a new category by the user when filling out the form.
So, “Joe” comes to the site, uses the form to create his post, and one of the fields is for the category. However, instead of a pre-populated list to choose from, he is given the option to create the category by typing in whatever he’d like.
Is this remotely possible? Thanks in advance!!!
Hi Robby, yep, this is definitely possible. I’d use the gform_after_create_post hook to create the category (here’s the WP function to do that) and also assign the post to the newly created category. This hook passes the $post_id so you can assign the category to the post with the wp_set_post_categories function.
If you’d like to commission me to write this for you, get in touch. :)
Hi, thank you for the awesome article. Is there a way to add not just featured image, but several images and than display them in picture gallery associated with post created with GF backend?
This would require custom code. Here is one solution I found: http://wpquestions.com/question/showChronoLoggedIn/id/9250
Hi! Is it possible to update post(not create a new)?
Here is a plugin that adds support for this: https://wordpress.org/plugins/gravity-forms-post-updates/
Hello is it possible to have the form turn into a post automatically with out the user having to submit a picture or category. Example: A resume submission form that creates a post so we can have a page that shows all of the resume submissions. Thank you
Hi Chris, this would make a great tutorial. I’ve added it to the queue. In the meantime, here’s a top-level list:
You can also have only some categories offered, but only offer one, then make that field hidden. It will by default go to that category and automatically have an archive, etc.
Is it possible to create a form where the user could create theoretically an unlimited number of posts connected to one form entry?
Here’s the scenario: In addition to filling out a project planning guide through a form on my website, I’d like for my clients to be able to submit page content for each of their pages directly to me. Each client is different and will have a different number of pages to submit. Is this possible?
To be clear, regardless of what client is submitting the form, all the posts would be created on the same site?
Yes. This would all be done on my site before their site is setup.
Rather than creating multiple posts from a single entry. It might be easier to allow the user to signup for an account or simply require they use the same email address. Then you can let them submit the form as many times as they need, each submission being a separate page.
If you’re collecting other stuff on that form that you don’t want them to have to repeat, breaking the post fields into a separate form would solve that.
Hi David
Is there a way to use Gravity forms as in http://www.trackbook.co.za/zipcall/
to post to a specific page as in http://www.trackbook.co.za/zipcallsuppliersarea-3/
?
Best
Peter B
Hi Peter, yep. You can create a confirmation that redirects to that page.
Hi thanks for the great post Ive just created a testimonial type system using this and I was wondering would there be a way to add a star rating to these testimonials perhaps using the survey extension on GF as it has a star rating option.
Hi Jade, the Survey add-on does offer a star rating field; however, it isn’t possible to map this to the created post.
Here’s a quick and dirty solution that might help.
End result should look something like this: http://grab.by/EKKS
Is there a way to have the user register in that same form where he publish the post and then let him edit the post when ever he wants to with those registration details?
Thanks, Ben
Hi Ben, I’d do this as two forms. One form to create the initial post and register the user. A second form to make updates to the users post. You would use the GF User Registration add-on to register the user from your first form. You can use something like the Gravity Forms: Post Updates plugin to update posts on your second form.
Hope this helps! :)
Thanks for the awesome article. We are currently looking at different ways (i.e the best way) to allow users to submit User Generated Content from the front end. So far this seems to be the most elegant way.
One question though, do you know if it is possible to only allow registered users to submit the form to a post. Or even if we could restrict to a certain user level (i.e Contributor).
Cheers, Chris
Hi Chris, allowing only registered users is possible with Gravity Forms by checking the “Require user to be logged in” option on the Form Settings page. Limiting to a specific user level would require another plugin I’d recommend, Members. For a quick overview on how to set it up (don’t worry, it’s really simple), check out step 3 of this article for membership sites with Gravity Forms: https://gravitywiz.com/basic-wordpress-membership-site-with-protected-content-using-gravity-forms/#step-3
Perfect! Thanks again.
Ideas on assigning a specific category to all posts created through a given form?
A codeless solution would be to add a Post Category field with the desired category preselected. You can then hide the Post Category field with the “gf_hidden” CSS class – or – mark it as Read only.
I’d set it to admin only but it didn’t allow preselection. However, by setting it to only allow certain categories, and only allowing one, it assigned it to the only available … um … of course :)
Thx CT
“I’ve just responded to your email. Short answer, is yes, you can use GF to create WooCommerce products. Use the GF + Custom Post Types plugin (link in the first tip of this article) to create “product” post types instead of “post” post types. Then use GF Post Custom fields to allow the user to define the price and other options.”
I’ve installed both plugins, but there is no option to link a new post via GF to products post type. Is there additional PHP that needs to be added anywhere? It seems the GF plugin doesn’t have any settings of its own. I’d really appreciate your help.
Hi Ronel, the documentation from the GF + Post Custom Types plugin says:
How to map a form to a custom post typeAdd a post title field to your form and under the advanced tab, tick the "Save As Post Type" checkbox. A dropdown will appear with the available post types. Select the one you want.Are you not seeing this option? If so, the developer of the plugin might be able to help you get that sorted.
is it possible to use Gravity Forms to Create Product for woocommerce? I want to know if you have any suggestions to send the contents of a module in a product that after I’ve checked it, I can publish and sell it in woocommerce. thanks
I’ve just responded to your email. Short answer, is yes, you can use GF to create WooCommerce products. Use the GF + Custom Post Types plugin (link in the first tip of this article) to create “product” post types instead of “post” post types. Then use GF Post Custom fields to allow the user to define the price and other options.
When you use Lists to popular a WP post body, the content is submitted in a table format which is hard to style.Especially the column headers show up and I have no way of hiding that. Do you know how to get Gravity Forms not to pass the Column header data (I can’t leave it blank in the form because users still need to know what to write in the columns).
Can you provide me an example of the generated content you’re working with? A URL is preferable to a screenshot.
Hello,
I have the steps in your tutorial down. It works and creates instances of custom post types as required. The issue I am having is that the created posts don’t have a WPML language attached to them and I, therefore, can’t generate a synchronized translation. Is there a way to make the created post explicitly in the website’s default language which is English? I was wondering if you had insight into this thorny problem.
Best Wishes, Evren
Hi David. Great post, thanks. Do you know whether it’s possible to use conditional shortcodes in the post body content template?
Thanks Richard
Hello,
thanks for your article. I just wanted to know if the user had to be registred to fill the form and then generate the post ? I’m looking for a solution for non registred users. also does it work with custom post types ? thanks a lot !
Scratch my last post. User error – Under the Advanced tab on the Title field, the Save As has to be set to the target type.
David,
Thanks for this…
I know it’s only been a month since you answered this, but I am not seeing Woo Product as a Post Type using WP 4.0 and the latest version of all the plugins. There seem to be similar posts on WordPress.org
My post is at https://wordpress.org/support/topic/wp-40-and-301-dont-show-woo-product-as-a-custom-type?replies=1#post-6237320
Thanks for the great article! I was hoping you could clarify something for me. I’m working on a content site where registered users can share videos accompanied by commentary. If I have an existing template, is it possible to populate a section of that template with text submitted through a form?
For example, if the top half of the body is always the same, can I use this plugin to just populate the bottom half with the form submission? Additionally, if someone copy/pasted a youtube embed code would that show up and work on the post? Thanks again for your time!
Hi Mike, yes to both questions.
1 – Use the “Post Body Content Template” to append the “static” text before the user-submitted text in the post body. This would look something like this:
This is static text
{My Post Body Field:12}
The “merge tag” would be different based on your Post Body field label and field ID and the static text would be whatever you’d like.
2 – Embed codes should work automatically. WordPress supports automatically embedding YouTube videos just by using the YouTube link as well which is probably the cleaner option.
Thanks for the reply!
Can I use this form to add tags to an existing tag base?
On this page, if I want to add more “brands”: http://certifiedhophead.com/listing/total-wine/
Can I make a small form widget to submit more tags specifically to that listing?
Gravity Forms does not support updating an existing post out of the box. This plugin might be able to help:
https://wordpress.org/plugins/gravity-forms-post-updates/
Thank you very much for the quick response. I have reached out to the authors of that plugin to see if it will work for my needs.
Have a question relating to the options described. How would I use a form to create a posting but for a Q and A section. It would collect on the back end once the forms answer line is filed out could be auto posted our with click. Also the form with the question and answer would get email to the submitting party when posted. Any help would be great. Thanks
Hey Matthew, I’m not sure I understand your scenario. The form would contain several questions and the user would provide answers or each form would be a question from the user which you would answer?
My form wouldbe a single form. The form fields would be name, email, question, and answer. The form would show on front end every field but the answer field. The answer field would only show on the back end. Once the answer field is filed in from the back end the form would post to add custom post type and email a copy to the user that submitted the question.
My recommendation would be to create the post based on the question. Rather than answer the question via the entry editor, I would answer the question in the generated post. You can set the post as draft by default and one you’ve answered the question (in the post editor) and then publish the question (and answer) as a single post.
If I follow your advice would this articles solution work with it? See link below. Essentially would creating the post as a draft allow me to answer the question then hit publish and the solution noted above would email its been published. https://gravitywiz.com/notify-user-when-submitted-post-is-published/
Yep! Exactly. :)
Hi David,
I was just wondering if there was a way to integrate these front end posts to user profiles in buddypress by including a tab that directs them to a list of their posts?
Thanks for your response!
Hi Jon, I’m not super familiar with BuddyPress but it looks like it is possible. Here’s a thread (there is a full plugin down at the bottom):
https://buddypress.org/support/topic/resolved-show-posts-written-by-user-on-profile/page/2/
Hi, Thanks for the demo. I understand it for adding 1 picture but what if i need the user to be able to add as many pictures he wants? your demo seems to work only for 1 picture added to the post body… Also, do you if it is possible to add links and video on the post body…. thanks
Hi Dugue, if you simply have multiple single-file upload image fields on the form, you can use the Post Body Content Template (available on the Post Body field settings) to output each image. If you’re using multi-file upload field, checkout this article:
https://gravitywiz.com/customzing-multi-file-merge-tag/
I want to achieve the same effect you did on your post creation demo: a page that generates a link to the post created. Obviously I would set the post to ‘published’ in Gravity Forms instead of ‘pending review’ or ‘draft’. But how would I get the link? Can that be set dynamically in GF?
Thanks!
Hi Kim,
Easiest way to generate the link is to use the “short url” version, which just includes the post ID. Here is how it works:
http://yoururl.com/?p={entry_id}
Great post! The plugin you referenced for creating custom post types – Gravity Forms + Custom Post Types – hasn’t been updated in over 2 years, so I’m reluctant to use it. I have the WP Types plugin which is capable of creating custom post types. I’m assuming I can use that in its place and achieve the same effect? Any suggestions? Thanks!
Hi Kim, WP Types will actually create new custom post types. GF + Custom Post Types doesn’t create new custom post types. It lets you say, “This Gravity Form should create a post of “x” post type. You’ll need both. :)
As far as GF + Custom Post Types not having been updated in a couple years… Haha, short answer is, not much has changed in a couple years. I know Gravity Forms support still recommends this plugin and there’s been no reports of users having issues with it.
Happy to answer any other questions. :)
Really helpful post thanks. Please could you let me know whether this Gravity Forms add-on allows the user to select a format when they create a post using the form? For example, can the user choose whether it will be a video post, a link, etc.? Thanks very much
Yep, Gravity Forms provides support for Post Formats out of the box. :)
Hay David, I am looking for a quick minute of your time to to bounce my requirement with you
I want to create a petition entry Form I want to collect several data fields to include User NickName First Name Last Name City Country Custom 1 Reasons for signing And some options from pre set field drop downs Drop down Field 1 Drop down Field 2 Drop down Field 3
I want to display each individual petition submissions as a post.
Page to look something like this. (I can set up the Petition description as a sticky post)
https://www.change.org/p/theresa-may-british-home-secretary-end-the-detention-of-women-who-seek-asylum
I want to generate posts for each petition submission and to show specify fields only.
NickName Reason for signing Drop down Fields 1 Drop down Fields 2 Drop down Fields 3
So my question is really : Can I generate posts to contain more just the “Reason for signing” but include other specified data fields collected from a Form
My site is a non profit – seeking public awareness
Many thanks for your time to respond.
J
Hi John,
Yes, Gravity Forms can store almost any data with the generated post. Most commonly, this is done with the “Custom Field” field type. After adding a custom field to your form, you can select which “type” of field it is (i.e. drop down, single line text, checkbox, etc) and also specify which custom field it should map to on your post.
To actually display the custom fields on the frontend with your post you will need to either find a plugin that can help with this or write some custom PHP that handles this. See the “Custom Fields” section in this post for more details.
Tried your snippet to replace the merge tags in the Post Excerpt default value and it’s not working .
https://gravitywiz.com/use-gravity-forms-to-create-user-submitted-posts/comment-page-2/#comment-131545
Hope it’s not on my end , so maybe can you take a look on it again? Thanks !
Try this version: http://pastie.org/9504256
Added the code , nothing happends . It’s supposed to add the post merge tags to advance tab > default value field dropdown , right ?:D Fyi , using gravity forms 1.8.11 along with Gravity Forms + Custom Post Types , if that’s of any use .
Thanks for the quick reply ;p
Hey David,
I’m pretty sure this is exactly what I need. I just want to run this by you before I buy.
I just need to know if it’s possible to reformat the post and style it like so:
What it looks like What I need it to look like
Seems obvious that it’s possible, but I just need to know how feasible it is. Thanks!
Hi Mason, yup this is possible. Your example would just require a little configuration of the Post Content Template (a default Gravity Forms feature) and some CSS styling. You won’t need Gravity Perks to accomplish this but if you want to use our affiliate link when you purchase Gravity Forms, we’d be much obliged. :)
Buy Gravity Forms
Thanks David. Definitely will purchase through your link. Will definitely be purchasing GP as well. One more question for you, since you guys are so helpful and GF doesn’t have sales support.
If I want to tie in user submitted posts with the membership feature, do I need the dev, biz, or basic license? Thanks again!
You’ll want a developer license so you can register the user with the User Registration add-on. This add-on also handles attributing the post to the newly created user after the form is submitted.
Hi, thanks for the article. Is there a way to build the body of the post, from several individual fields? I’m thinking of asking a couple of questions to people and showing the answer like an interview (question, + answer of the user; next question + answer on second question; …) and this combined with a upload from a picture and that kind of stuff. categories and tags would be insterted automaticly (and not shown to the user). Would I be able to do that with Gravity forms and some extensions?
thx for the support
Hi Patrick, yes, this is possible with the “Post Content Template” (see the second paragraph of the Post Body section). You can use pretty much any field merge tags you’d like here to configure as needed.
Very informative, thanks! I’m thinking of going with Gravity Forms to achieve what I’m looking for – I’m creating a nightlife directory where users will submit events (custom post types) and venues (pages) to be featured on the site.
My only question is what is the best way to achieve an area where users can manage their submissions? (ie, whether the post is Pending or Approved/Published)
Obviously this would require a user login/registration page so I’ve been looking at the WooCommerce+Gravity Forms extension, but got a little scared when it said “Not yet supported: Post creation fields”
Was hoping you could point me in the right direction for the extensions I would need to make this work
Assuming you’d like to keep as much of the management on the front-end as possible here is a list of plugins I would use and why:
It provides the basic functionality for user-submitted content, in your case, events and venues.
Allows you to register users on your WordPress site per form.
Any of the Gravity Forms payment add-ons will allow you to charge users to either register on the site or per submission.
I have not personally used this add-on but reading the feature list it sounds like it would allow you to let your registered users manage the posts they’ve created via Gravity Forms from the front-end.
You should also check out our article on creating membership sites with Gravity Forms. Lots of good info in there. :)
Thanks for the tut ! Now , here’s one for you : will i be able to filter my posts based on the custom fields used ? Let’s say i add a country field , which users needs to select to be displayed in post . Can i filter/sort my posts to only show posts made from specific contry ? Thanks !
Hi Alex, this isn’t currently possible without additional custom code as the Address field type does not offer a merge tag for accessing individually inputs, such as the country. All the address data is provided in a string. If you are comfortable using a separate country field, you could add this as a Custom Field which would map it a custom field on the generated post. You could then create a custom query on whichever page you want to show country-specific posts using the Custom Field parameter of the WP_Query class.
Is there a method for pulling the auto-generated post’s URL to be included in a notification that is sent upon completion of the form?
Thanks for this article, it has been awesomely helpful. The folks at Gravity Forms suggested it to me when I outlined our goal.
Hi Brandon, here is a snippet that adds support for a {post_permalink} merge tag. Just copy and paste into your theme’s functions.php file: https://gist.github.com/spivurno/c87eab3aa56a5c6bded1
I am trying to use gravity forms for an interview type thing. I have uploaded the custom gravity form that you link to and I can view the filled out forms, but it will not populate into an actual post… what am I doing wrong?
THanks for the reply David (re featured and post image) It makes sense …
But on your demo the featured image shows twice, as an attachment and as the top featured image above the post. This seems to be a common problem with front end submission plugins. How to prevent this? Thanks.
Hi Richard, in this case, I’ve added the image to the post body intentionally just to demonstrate that you can do this automagically with Gravity Forms via the “Post Content Template” setting. The featured image above the post is handled by the theme but you don’t have to output the image in the post body as well.
Hi David,
me again struggling with the query…
I have set up the form for user submission with gravity forms (excellent product!!!) and everything works fine now. But how can i do sth. like this: I have captured the name (user-name) and email (user-email) and want make the displayed user name clickable (with a query to list all posts of this user. Or the field nationality (user-nationality) clickable with a query to list all post of this nationality.
Sorry for this dumb questions, but i don´t know how to solve it. I have seen http://codex.wordpress.org/Class_Reference/WP_Query#Custom_Field_Parameters but don´t know how to use it.
Can you please advise me with one example? Best way for me would be to use the “Allow field to be populated dynamically”-function of gravity. Thanks a lot in advance.
Hi David,
thank you very much for this tutorial. This is exactly what I´m looking for. But I have one question. I want users to submit posts with pictures without registration. But I want to manage the users, i.g. show a list of users with the number of pictures they have posted, etc. Can I do that with custom fields like “Contributor” and ask the users in the form for their name? And how can I relate/connect the data (user, picture, text, date, etc). Thanks in advance. Oliver
Absolutely. If you want to store the name of the contributing user as a custom field on the generated post, just created a new Post Custom Field field and set the “Custom Field Name” setting to “contributor” (or whatever you’d like it to be called). To make it more identifiable to a single user, I’d probably also capture the user’s email as a custom field as well.
As far as connecting the data, I assume you mean query for all posts submitted by a user (as defined by the “contributor”), the WP Query class provides a powerful and flexible way to search posts by post meta (aka custom fields).
Great run down of the post creation functionality. I’m actually having a challenge to auto create excerpts based on data from the submission – wonder if you can help.
I am working with CPTs in this case and creating job postings for employees advertsing jobs. All data from the forms get put into a nice tidy table – no problem.
Thing is, I also want to create a custom excerpt based on the submission showing: Employer, Job type, location and start date – 4 of the fields on the job submission form.
Unfortunately the merge tags are not available on the excerpt creation field….
Any ideas?
Hi Robert, assuming the user is not entering their own excerpt, here is a system that might work.
1 – Add an excerpt field to the form. 2 – Add a default value to this field using the “Default Value” setting (on the Advanced Tab). The default value can include any merge tags that you want. 3 – Add the “gf_hidden” class to the “CSS Class Name” setting so the field will be submitted with the form but not be visible to the user. 3 – Paste this snippet into your theme’s functions.php file: http://pastie.org/8603929 It will replace the merge tags in the Post Excerpt default value.
This code was written on the fly and not tested… so let me know how it works out. ;)
Hi David, thanks for the great post. I’m curious if there would be any way to make custom field (date/time) as the date/time to publish the post? (i.e, once the form is submitted, the post is saved as draft with the date/time they have chosen). Any chance to accomplish this? Thanks much!
Hi David, thank you very much for all of your info. I have 2 quick questions on this topic:
1.) If I’m using BuddyPress, how can I show the post under the authors user profile page? Sort of how BuddyPress does it by default if you post via WP.
2.) Does this process enforce a user to be logged in? If not, how can I make sure that only logged in users can post?
Thank you!
-Andy.
Hi Andy, Gravity Forms provides a an option on the form settings to require the user be logged in. Once the user is logged in and fills out the form, it will automatically attribute that post to the user if you have the “Use logged in user as author” option checked: http://grab.by/qBIo I’m assuming with the form configured as such, it will integrate automatically with BuddyPress’ profile page.
I’m trying to use the Gravity Forms survey add-on to set up a survey page where users can submit a star rating and a comment. Then, I’d like for those stars and comments to be displayed as posts on another page. There’s obviously no post fields for the advanced survey fields, but can you think of any workaround or advice? This is an awesome tutorial, by the way.
I was able to work around this by adding a new field with a merge tag that collects the rating and saves it in a custom field (then the rating can be displayed in any template).
Great tutorial! Especially for non-coders it is very easy to understand. Thanks Gravity and David!
There is one thing you might help out: How do I create a custom field for all posts and how do I make it appear on my site?
Gravity Forms provides such an option to add custom fields, but doesn’t make it appear, as you mentioned.
What I need for my submission form is a simple field in which my visitors additionally can enter the price for hotels/hostels which they are suggesting by posting on my blog. You understand?
This field should be shown below/above the post image.
I’ve seen the documentation on WordPress.org, but I didn’t understand it because it seems that this documentation only provides how to show a predefined content. Or am I wrong?
Please, need help!
Hi David,
A very useful article. Can you help me with the following. I would like to show the categories (as in “post fields > category” in a certain order. Now it is sorted alphabetically but showing numbers gives a strange result :
100 participants 150 participants 20 participants 40 participants
It would be great to re-order the categories from small (20 participants) to big. Is this possible?
Our world be a single form. The form fields would be name, email, question, and answer. The form would show on front end every field but the answer field. The answer field would only show on the back end. Once the answer field is filed in from the back end the form would post to add custom post type and email a copy to the user that submitted the question.
Hi David, great post! I saw in an above comment that you mentioned the list field can be linked to a custom field. However, I’m trying this & whether it’s textarea, input or even a repeatable field, I can’t seem to get more than the first list item to show up in the back-end. Any ideas on how to store all the list items? Thanks!
Hello. This is useful article for someone like me who is considering purchasing Gravity Forms. However, before I go ahead with it, I’m curious to know whether it can do what I need it to do for a user generated photo sharing website.
1) Is it possible to batch upload more than one image to create a WP gallery within the post? 2) If so, is it possible to automatically set, say… the first image in the upload as the featured image for the post?
Hi Rick, Gravity Forms has a “Post Image” field. You can add multiple Post Image fields to allow the user to upload multiple images to the post gallery. Additionally, there is a setting on the Post Image field that allows you to indicate that it should be the featured image for the created post.
Hi David,
God bless you man.
And thank you!
Great! Exactly what I was looking for, thanks David!
I posted this query on the WP forums with no love. I am using Gravity forms to post data for the purpose of ride sharing to the beach. I have a category post field set up for the select options of ‘give a ride’ and ‘get a ride’. I want to (if possible)combine the data from this select menu to display beside the post title info. which displays on the recent post info in the right column. I assume this can be done with some PHP manipulation, but not exactly sure how.
any ideas? Let me know if I need to explain more…
You might consider using the Post Title Content Template. You can find that in your Post Title field settings: http://grab.by/niVS
Thank you for the post David.
Could you please clarify how to create a form that allows me to create questions and and have the submitter answer these questions showing both the questions and answers on the post. I have tried adding merge tags to the post body with no success. Please Help! This is similar to marlita hill’s question.
Hello David! Hey, when I enter an image on the choose file part of the form when I preview my form it doesnt post the image, any ideas?
Works great with featured images. I have a theme that doesn’t really support featured images. Is there a way to have the image uploaded to the post content using gravity forms?
Hey David, Im considering purchasing Gravity forms today but I want to make sure it can achieve the result I am wanting. I am wanting to create a site that will allow users from my little town to post items for sale (example: Buy my Xbox, $50!) and also allow other user to post on those post with a bid/question/or offer. And I would like to incorporate my own wordpress theme into it. Is this achievable with GF? and do you maybe have an example of that? Thank you so much for your time and help, have a great day!
Does someone know a way to show to the user (and if possible send a notification) with the link of the resulting post?
Thanks
Hi Bruno, this comment has a quick breakdown on how to do this.
hey David, I wonder how to map “Advanced Form Fields” e.g “name”, “List”, etc to custom fields. Obviously these gravity form fields are not supported by WordPress standard field, but I am desperately want them on my post. Please help,
thank you
List field is available as a field type for Custom Fields: http://grab.by/kvco
I’m actually surprised the Name field isn’t available for Custom Fields, but here is a simple work around.
1 – Add a “Custom Field” field to your form and set it to the “Hidden” field type. 2 – Add a “Name” field to your form. 3 – Paste this snippet into your theme’s functions.php file: http://snippi.com/s/o0jipcx There are some instructions inline to get this configured for your own form.
Thank you so much for this tutorial. I’ve been looking for an easy way to have front page user submitted content. This works flawless on my website. One thing that i noticed in your demo that i couldn’t figure out. On your demo after i click submit, i’m sent to a page that read click here to go to your post & has the post link. How can i do this?
Thanks alot
Glad you found the tutorial helpful. To setup your confirmation with a link to the created post, just add the following in your confirmation text wherever you would like the link to appear:
View your post here!Here is what the confirmation looks like on the demo form: http://grab.by/koxY
Hi, Thank you for this tutorial. I am looking to integrate a front end user generated blog with my buddypress website. I do not wish to approve every post prior to it being published.
Is it possible and easy for the post that the user wrote, to be automatically posted on my website without admin approval?
Yep! All you need to do is set the “Post Status” option to “Published”. This will publish posts generated from the form automatically without requiring any admin approval. More info in this section.
Thank you for that. Very helpful.
Hey David. Thanks so much for this. It was a huge help. I was trying for hours to figure out how to get the image in the post body until I stumbled upon your article here and realized I needed to add the merge tag for the image.
The only thing is that it’s still not working! What happens now is that it creates a simple text post body with no rich formatting and it inserts the image URL without any formatting. This happens no matter what size/orientation I choose in the “select image size” dropdown list.
Any suggestions?
Thanks!
Spoke with Ira via email. She/he was able to resolve this on their own. There was a permissions issue with their uploads folder.
Hi David, Thanks for the tutorial! I’ve been looking for a solution like this for sometime now. In the demo, I was wondering what you did to generate the link to the post? (Where it says “Your post has been created. View your post here”). Is the link to the post generated in gravity forms? Or is a snippet of code that you placed on the thank-you page. Thanks Again!
Hi Jen, this link is created by using the {post_id} merge tag in the confirmation message like so: http://grab.by/hiMG
You guys ROCK!!!! Thanks for the help.
Hi David Smith, nice contribution. i have a very fair question here.following all that we are able to make a content post system, but how to keep a facility of editing the post while still staying at front end? if a post is added by author,subscriber or any profile(admin allow), and then how can that user edit his profile from front end? greatly appreciated.
Hi Frank,
You might try this plugin: http://wordpress.org/extend/plugins/gravity-forms-update-post/
I contacted the author but have not heard back as to whether it is still being actively developed.
When creating a post from one of these forms, I am able to insert an image of any size I want. However, I can’t figure out how to make that image a link to the original size.
Any ideas? I’m thinking I need to do something akin to:
{Image:5:small:right} .. but have no idea how to get the something in the Template.
Hi Jason, it sounds like you’re already using the Post Content Template feature of the Post Body field. If so, you’re on the right track with your thinking. If you want to display the small image but link to the large image, you should be able to use same field’s merge tag but instead of specifying the size and alignment “filters” you’ll want to add the “url” filter:
<a href='{Image:5:url}' rel="nofollow">{Image:5:small:right}</a>Hi. Thank you for your post.
I run a blog that is growing quickly and i am new to this. every month i send out questions for people to answer and then i post their answers on my blog. but i have to format everyone of them individually and it is becoming too much. I want something where the users can submit their answers. but i want the questions to be displayed in the post in blockquotes and the answer right under them like on here: http://goo.gl/KzcNN to get it to look like that i just put <blockquote> around the questions and then put the answer right under it. could i control the look of the output with any of the plugins you described? or do you know of any that would allow me to do that? thank you for your help.
Hi Marlita, Gravity Forms can handle this. The specific functionality you’re interested in can be accomplished via the Post Content Templates. Hope that helps. :)
I just purchased Gravity Forms to use on a user-generated content site I’m developing. So far, I have been enormously frustrated by the lack of (useful and grounded) documentation offered on the GF site. Therefore, I’m really grateful that you put this tutorial together. It demystifies the form to post process at least enough to brush myself off and try again. Of cours, my application varies a fair amount from your example, so I’ll still be scratching my head trying to figure it all out.
Thank you.
Glad to help!
Brilliant! Thanks very much David! :)
Very helpful, thanks for taking the time to put this tutorial together, but I wonder if Gravity Forms also allows the upload other types of files, let’s say a zip file. I’m trying to accomplish that and automatically add a download link in the post content area for download. Any experience with that?
Hi Ray, Gravity Forms supports uploading other field types via the “File Upload” field. In your case, since you want this file to be related to the post that is created, you would use the “Custom Field” field under the “Post Fields” section and set the field type of this field to “File Upload”. You can then specify a custom field key in which a URL to the uploaded file would be stored. To display this custom field on the post template, you can provide additional instruction here: http://codex.wordpress.org/Custom_Fields
How would I go about displaying the post on another post.
What I am pretty much trying to do is let users create a post on an existing post page. Whichever post page that they created the post from thats where I want the post to show.
It’s almost like looking at a user’s profile. You post the message on the user’s profile, and the message pops up on the same page.
I want to do something similar. I want users to be able to create a post on whatever post page, and then when they create it, that post will now display in the post page that they created their post in. I hope this is somehow making sense. If you know how to do it, it would be awesome.
I’ve been try to use ParentID, and I was able to prepopulate the parentID into their post. So whatever post page they were on, I am able to attach that ID into their post. Now its simply a matter of displaying it. How would I go about doing that?
Hey David! Thanks a lot for the post man, just solved a huge issue for me ;)
My pleasure!