Gravity Connect Notion
Send and sync Gravity Forms data with Notion — unleash Notion’s organizational prowess on your Gravity Forms data.
“Notion” is a registered trademark of Notion Labs, Inc. Gravity Wiz and Gravity Connect are not affiliated with, sponsored by, or endorsed by Notion Labs, Inc. Using Notion with Gravity Connect requires a Notion account.
What does the Notion Connection do?
This plugin integrates Notion directly with Gravity Forms to automatically create dynamic pages in your Notion databases using data submitted in your forms. This is done without requiring any additional software or monthly fees, and with an emphasis on security and performance.
Additionally, your Notion pages can be automatically synced with their associated Gravity Forms entries, keeping your Notion data accurate at all times. Note: changes to entries are synced to Notion but changes in Notion are not synced to your Gravity Forms entries.
With the Notion Connection you can create:
- Lead capture forms that automatically add new submissions as pages in Notion
- Job application forms that log candidates in your Notion hiring pipeline
- Product feedback forms that post responses into your Notion roadmap database
- Internal request forms that route into organized Notion tables based on department
- Order forms that send order details to a Notion database
- And many more!
Features
- Send Gravity Forms entry data directly to Notion databases.
Unlock powerful workflows by integrating Gravity Forms with Notion’s robust feature set. - Break through the final frontier of collaboration.
In Notion your entry data becomes actionable, accessible pages/tasks without your team having to log into WordPress. - Leverage Notion features via your forms.
Use Gravity Forms to tag people in your Notion workspace, select pre-created tags, or create brand new ones from form fields. - Create dynamic templates for your Notion pages.
Seamlessly integrate with custom templates designed for your Notion pages and leverage your form data in new ways. - Security first.
The Notion Connection uses Notion’s secure authentication method to ensure only you have access to your Notion data. - Money-saving, value packed.
No monthly fees or transfer limits. Just the versatility of Notion. - Automatic updates.
Get updates and the latest features right in your dashboard. - Legendary support.
We’re here to help! And we mean it.
Why Notion?
- Easy organization and task management: Notion allows you to easily organize and use your form data. Use various Notion functions and features, like database properties, tags, and task assignment, to create dynamic systems adapted to your workflow.
- Collaboration: Notion’s real-time collaboration lets your team work together on projects and documents, offering shared workspaces where everyone can contribute and stay updated.
- Accessibility: Notion can be accessed from any device with an internet connection (and has an offline mode too). Teams can access and work on form data from anywhere, using an application they’re already familiar with.
- Security: Notion offers industry standard security measures to protect your data, including access controls, activity logging, and data encryption.
- Integration with other established tools: Notion can be quickly integrated with other widely used tools, such as Google Drive and Figma, allowing you to create seamless workflows for your projects.

- Version 1.0.11
- Updated September 17, 2025
- Released August 21, 2024
All Connections
All Perks
- GF Address Autocomplete
- GF Advanced Calculations
- GF Advanced Phone Field
- GF Advanced Save & Continue
- GF Advanced Select
- GF Auto List Field
- GF Auto Login
- GF Better User Activation
- GF Blocklist
- GF Bookings
- GF Conditional Logic Dates
- GF Conditional Pricing
- GF Copy Cat
- GF Date Time Calculator
- GF Disable Entry Creation
- GF Easy Passthrough
- GF eCommerce Fields
- GF Email Users
- GF Email Validator
- GF Entry Blocks
- GF Expand Textareas
- GF File Renamer
- GF File Upload Pro
- GF Inventory
- GF Limit Checkboxes
- GF Limit Dates
- GF Limit Submissions
- GF Live Preview
- GF Media Library
- GF Multi-Page Navigation
- GF Nested Forms
- GF Notification Scheduler
- GF Page Transitions
- GF Pay Per Word
- GF Populate Anything
- GF Popups
- GF Post Content Merge Tags
- GF Preview Submission
- GF Price Range
- GF QR Code
- GF Randomizer
- GF Read Only
- GF Reload Form
- GF Sliders
- GF Submit to Access
- GF Terms Of Service
- GF Unique ID
- GF Word Count
Documentation
Terminology
Before we get started, let’s clarify a few important words we’ll use throughout this documentation.
- Database: Refers to Notion databases.
- Page: Refers to Notion pages. Everything in Notion is a page! (i.e. a database is a page that contains other pages, the entries in the database are pages, etc.)
- Top-level pages: Refers to any page that isn’t inside another page. They are listed in Notion’s sidebar.
- Subpages: Refers to pages inside top-level pages. Subpages can also have their own subpages.
- Notion Connection: Refers to this product, Gravity Connect’s Notion Connection.
- GF: Abbreviation of “Gravity Forms.”
How do I enable this functionality?
After installing and activating the Notion Connection, you can create Notion feeds for any form. Use these feeds to pass data from your forms to Notion. You can connect your Notion account directly in the feed settings.
|
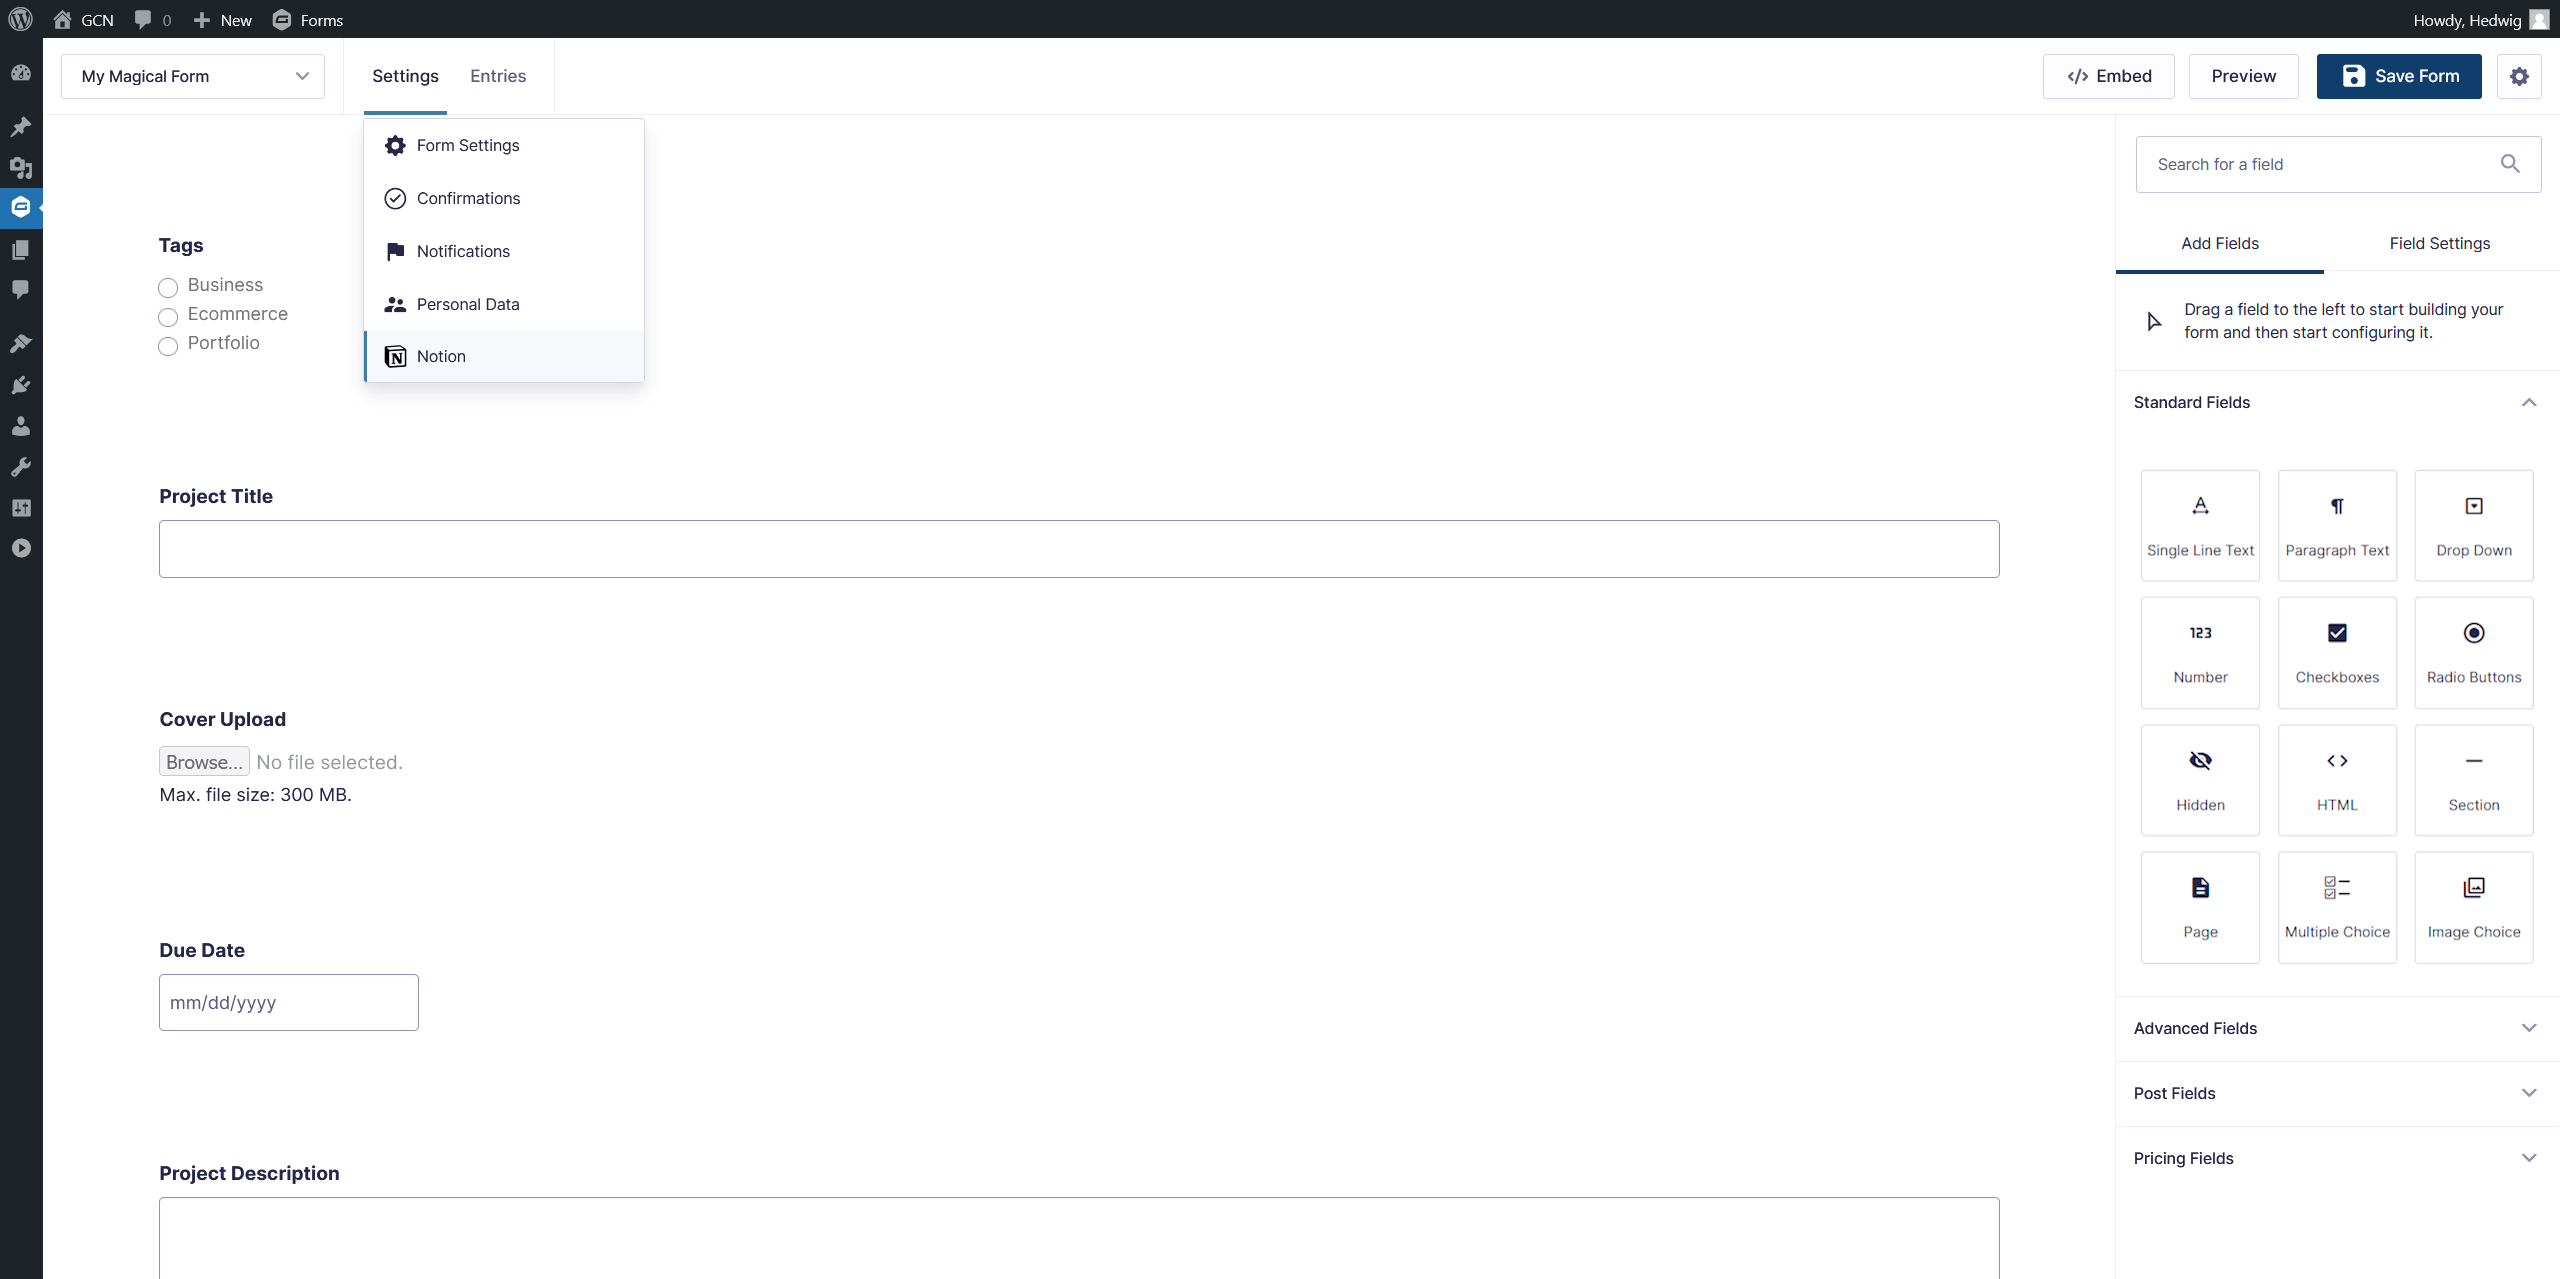
Navigate to your desired form and click the “Notion” item under the “Settings” menu. |
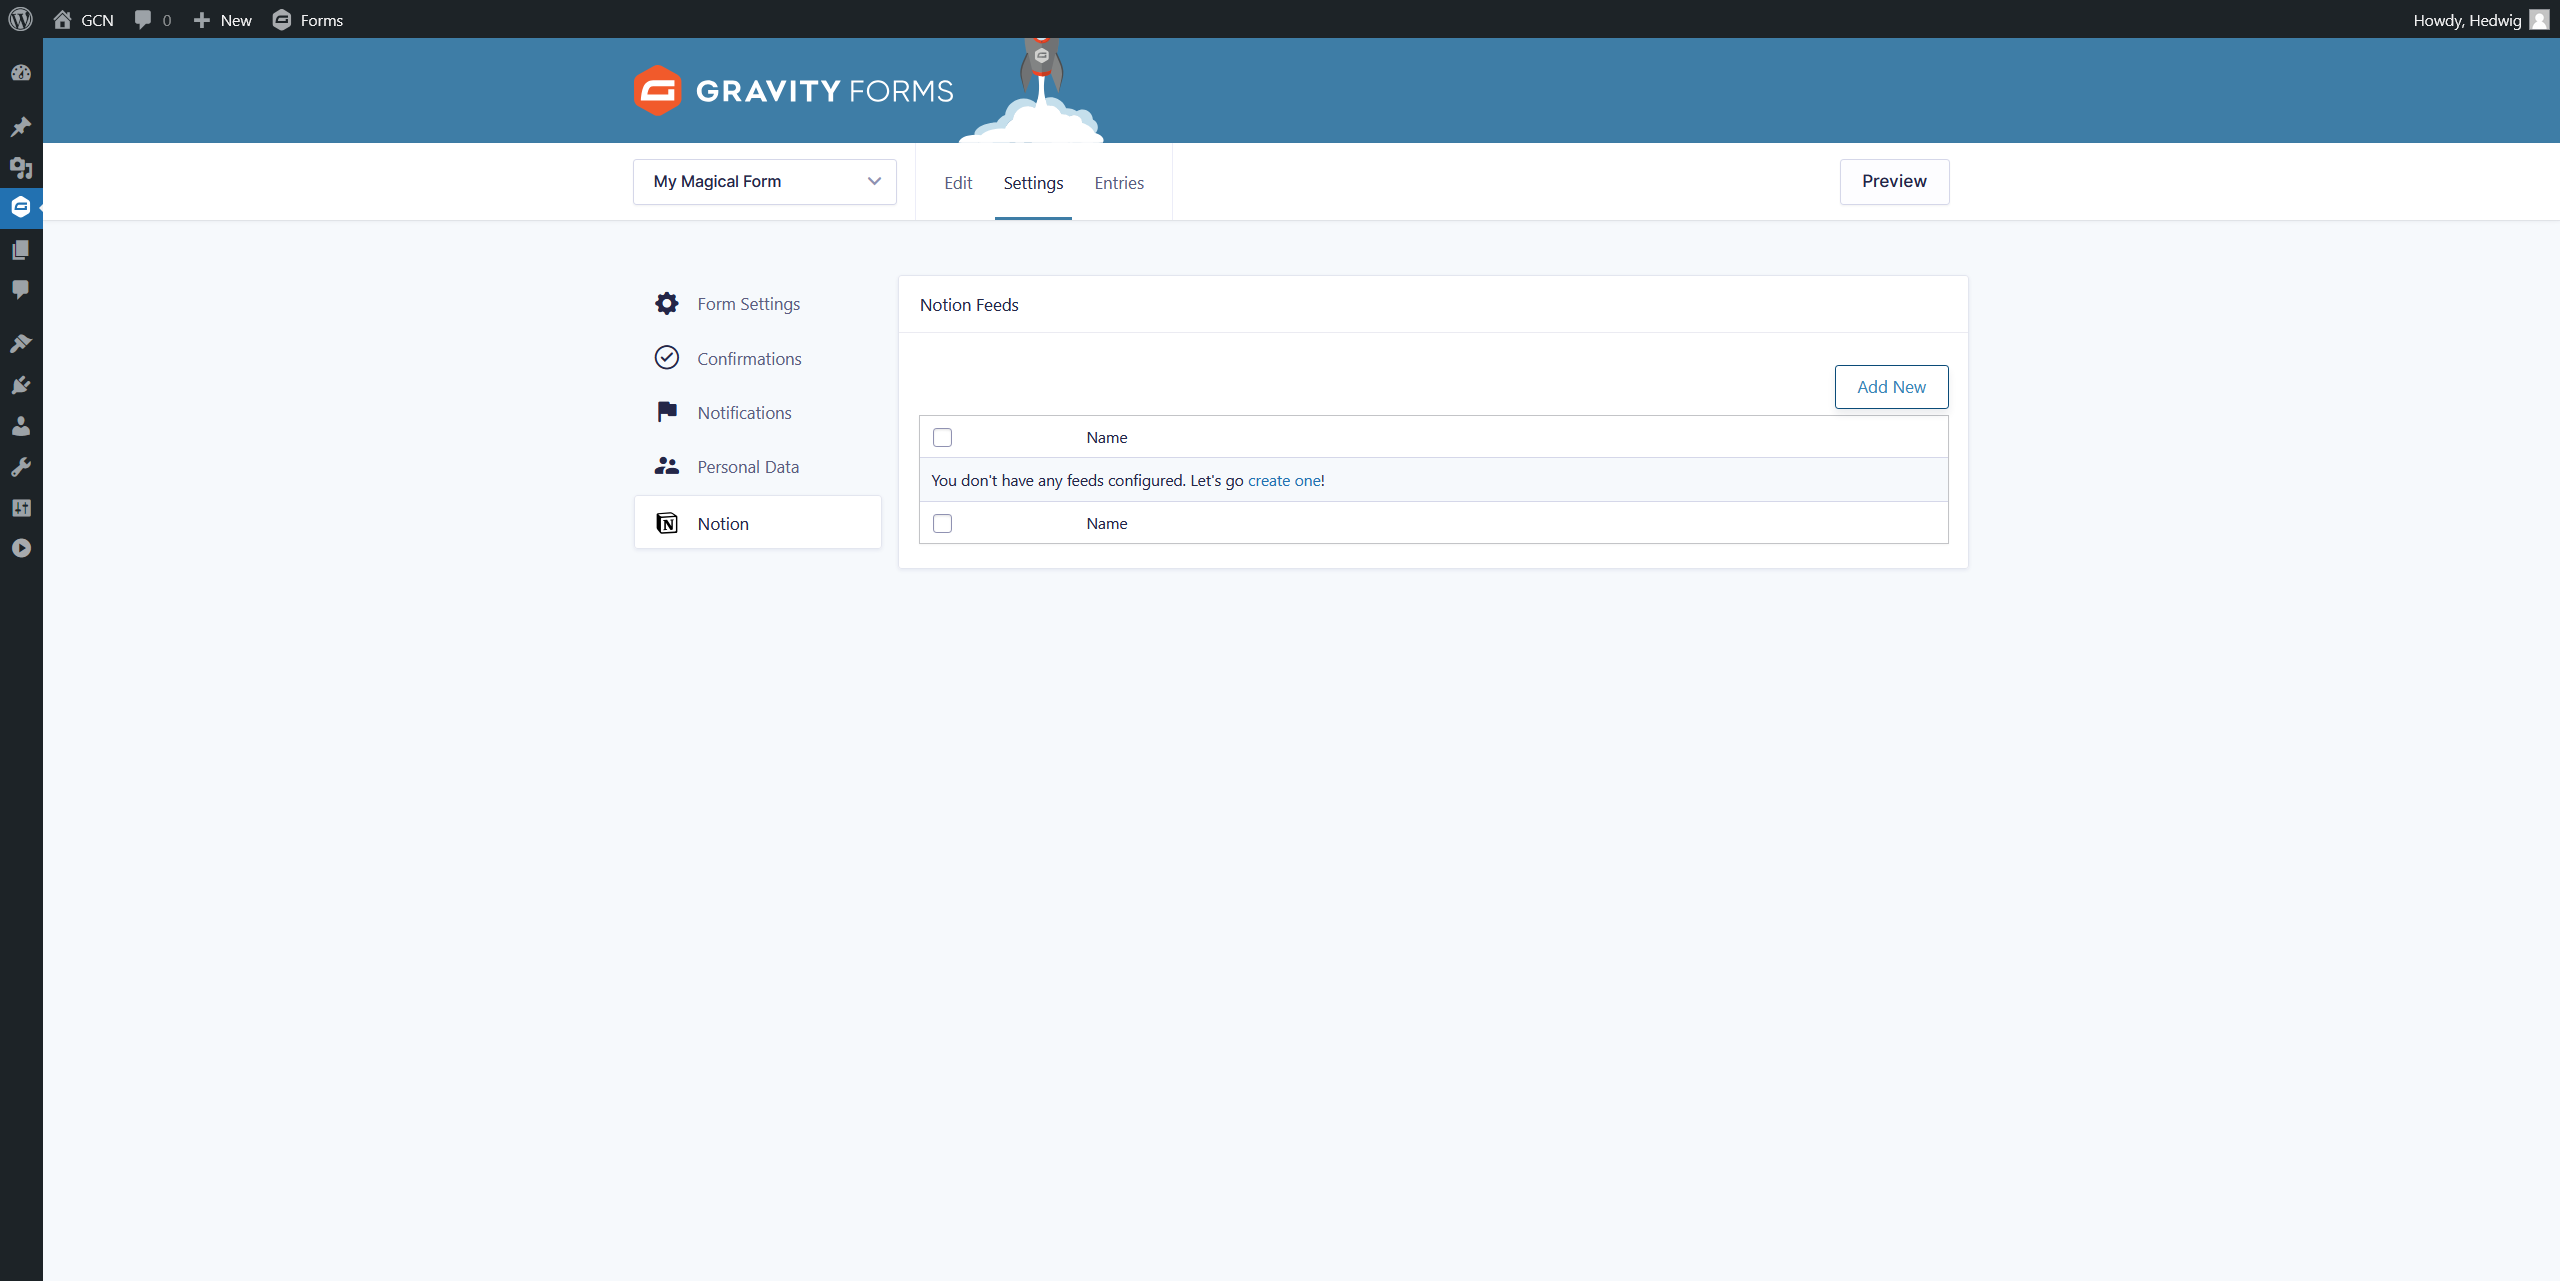
|
Click the “Add New” button to add a new Notion feed. |
|
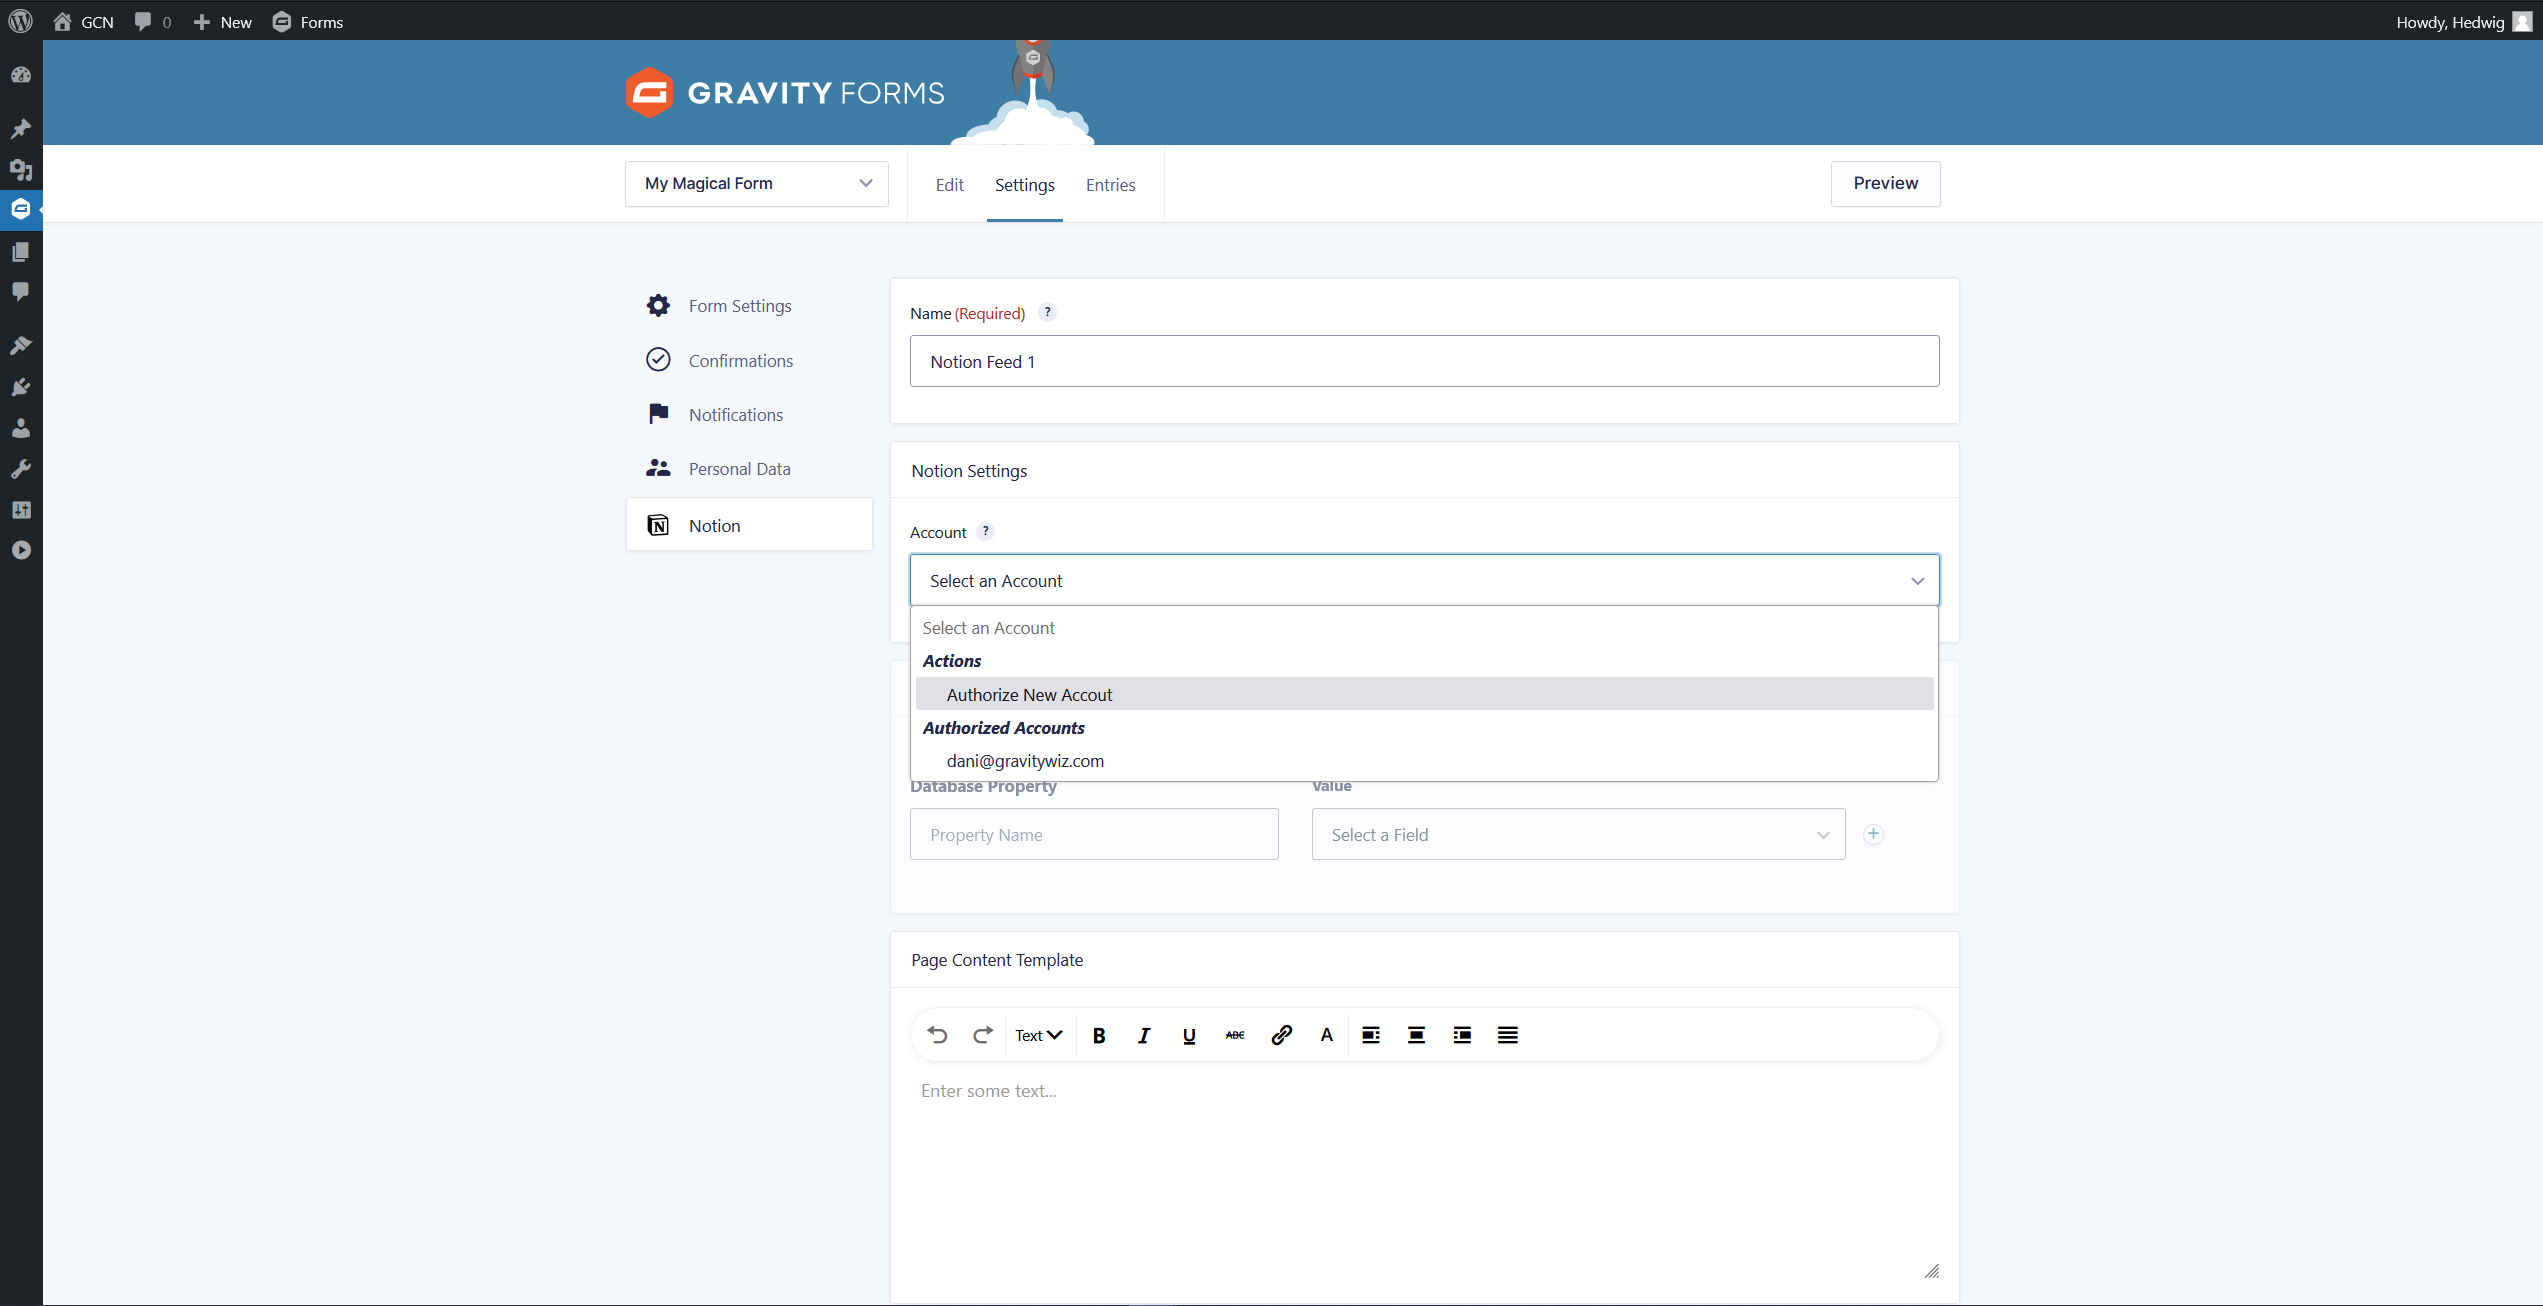
Connect your Notion account by selecting “Authorize New Account” under the Account setting. |
|
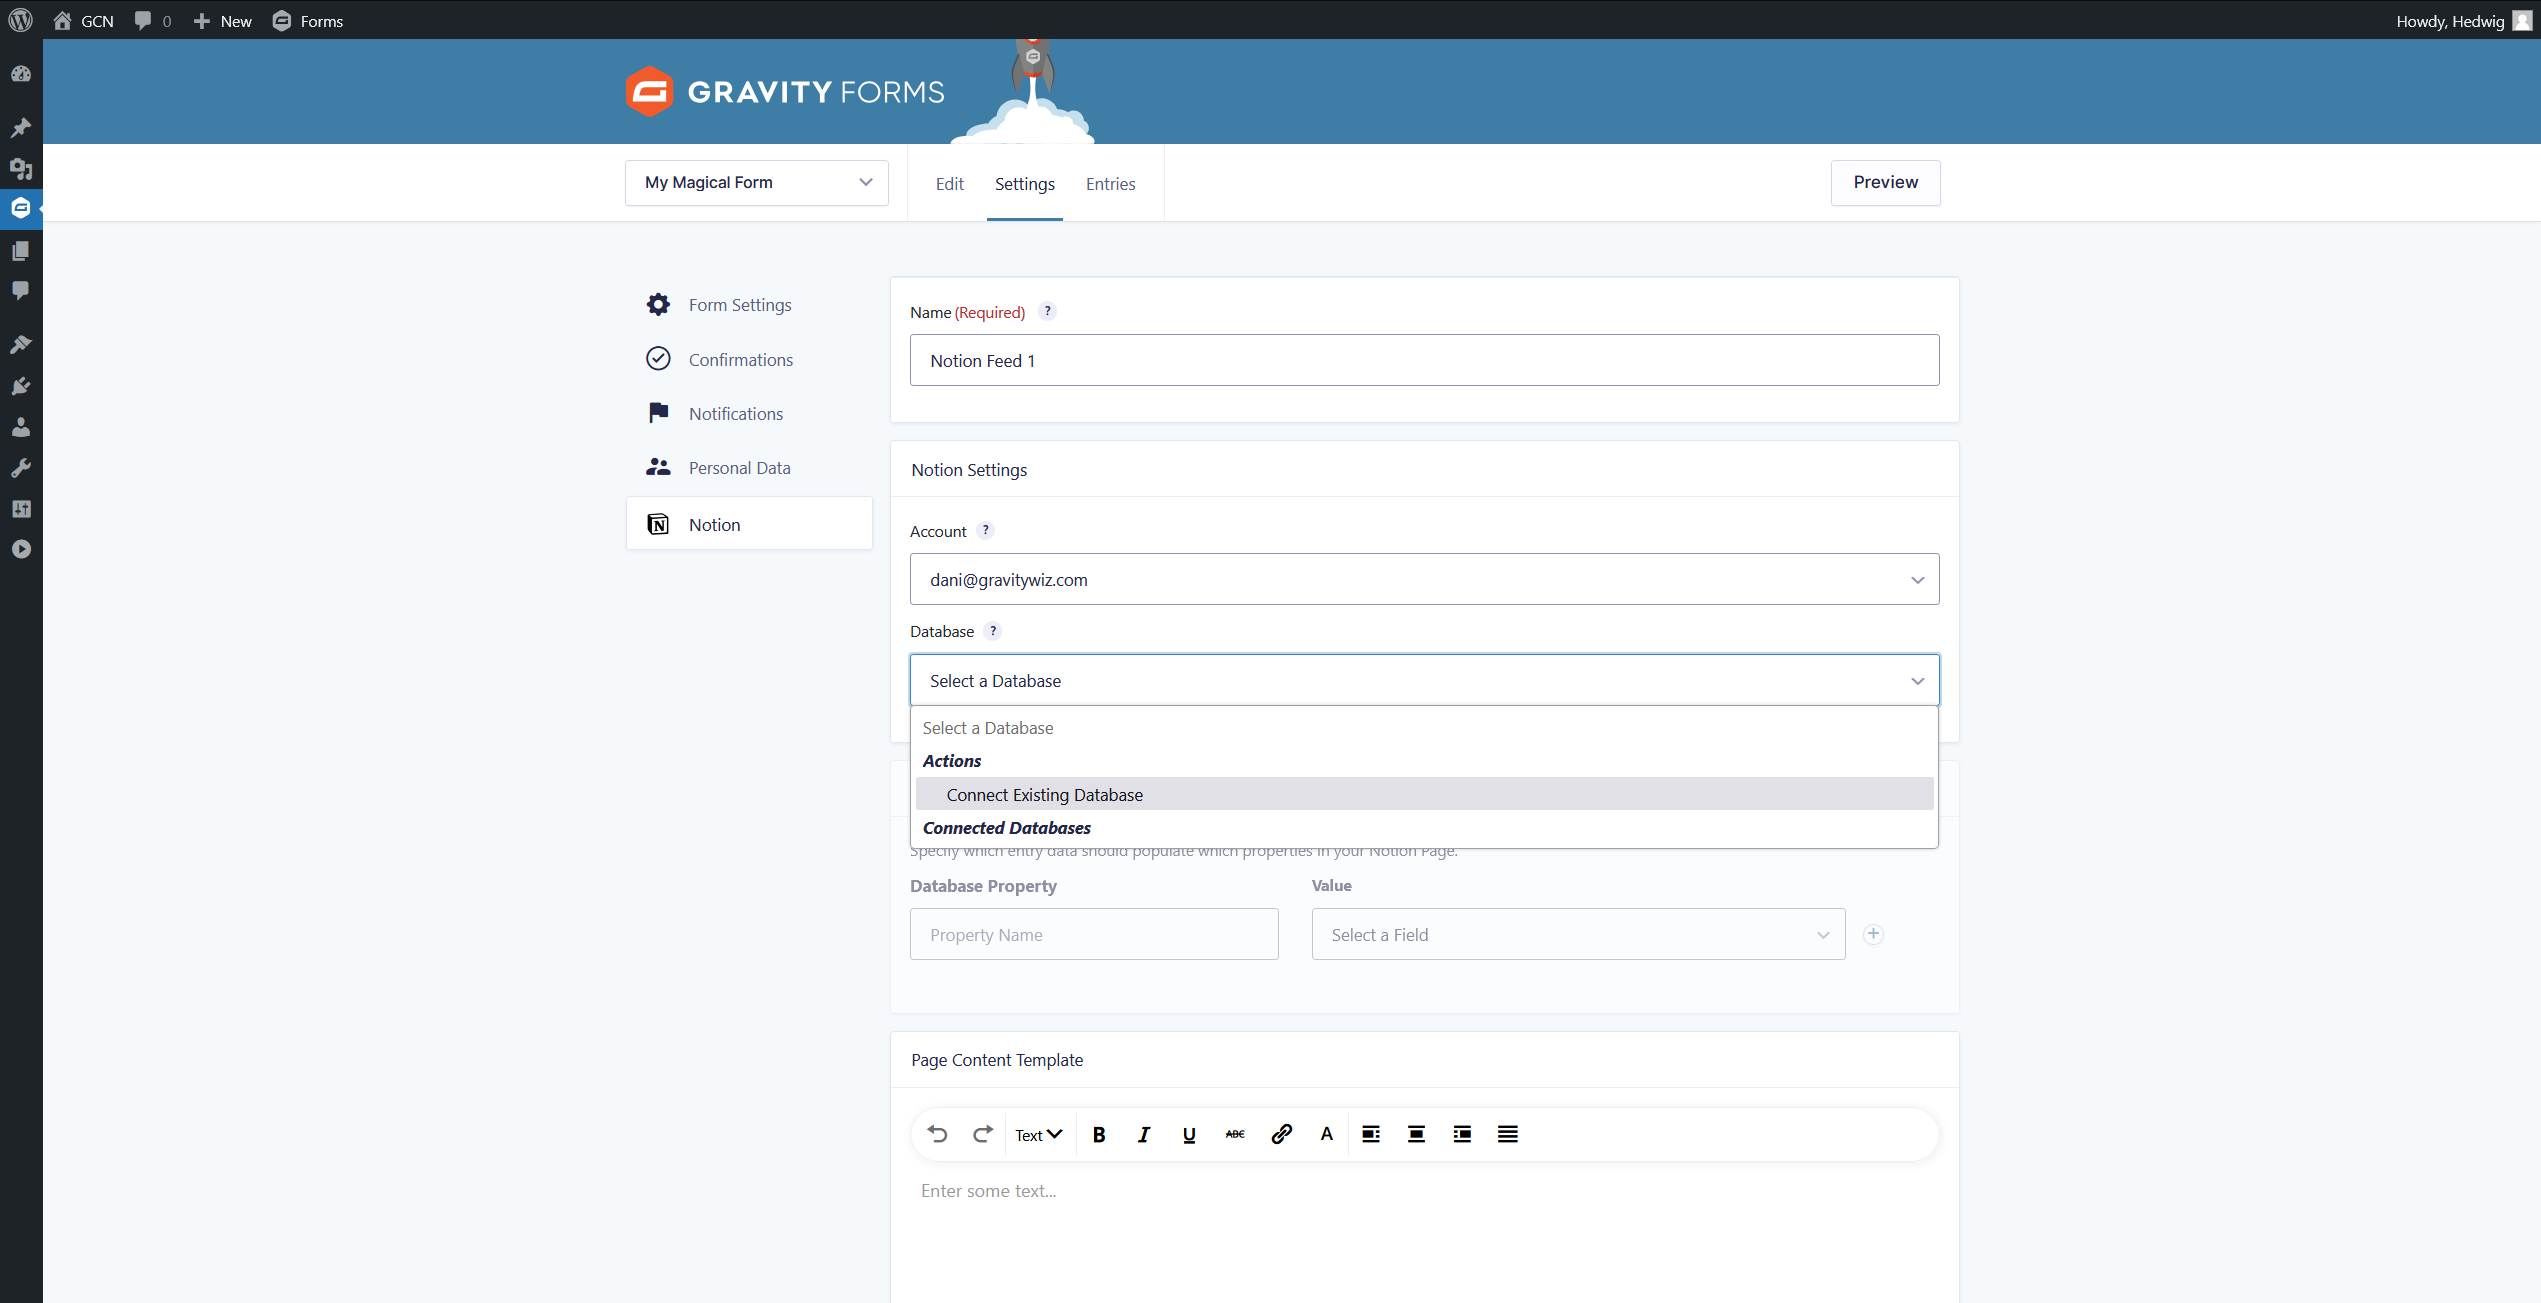
Connect your feed to a Notion database. |
|
Map your form’s fields to properties in the database. |
|
Create a template for generated page content. |
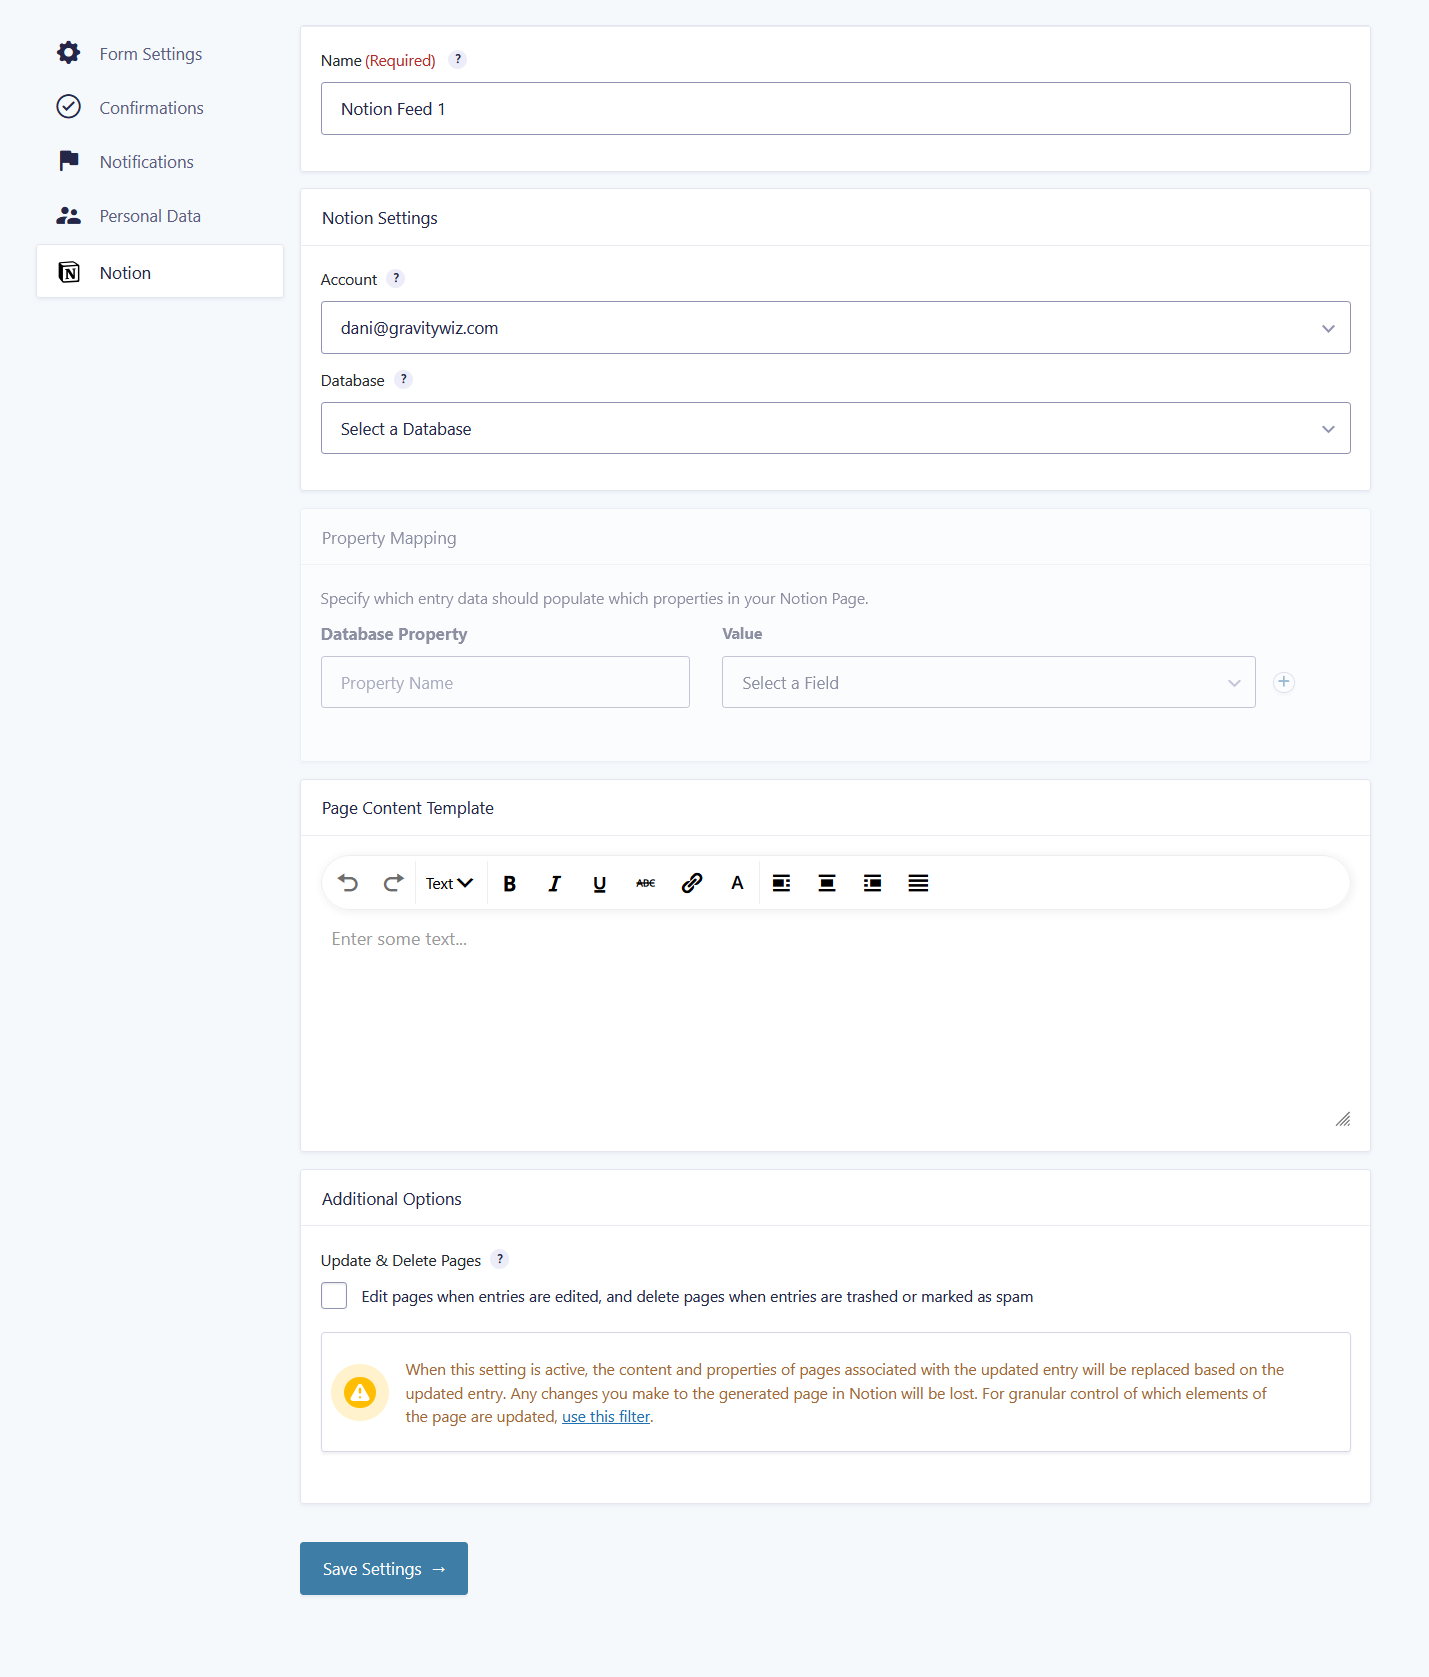
Feed Settings
When configuring the Notion Connection feeds, you will be presented with the following settings.
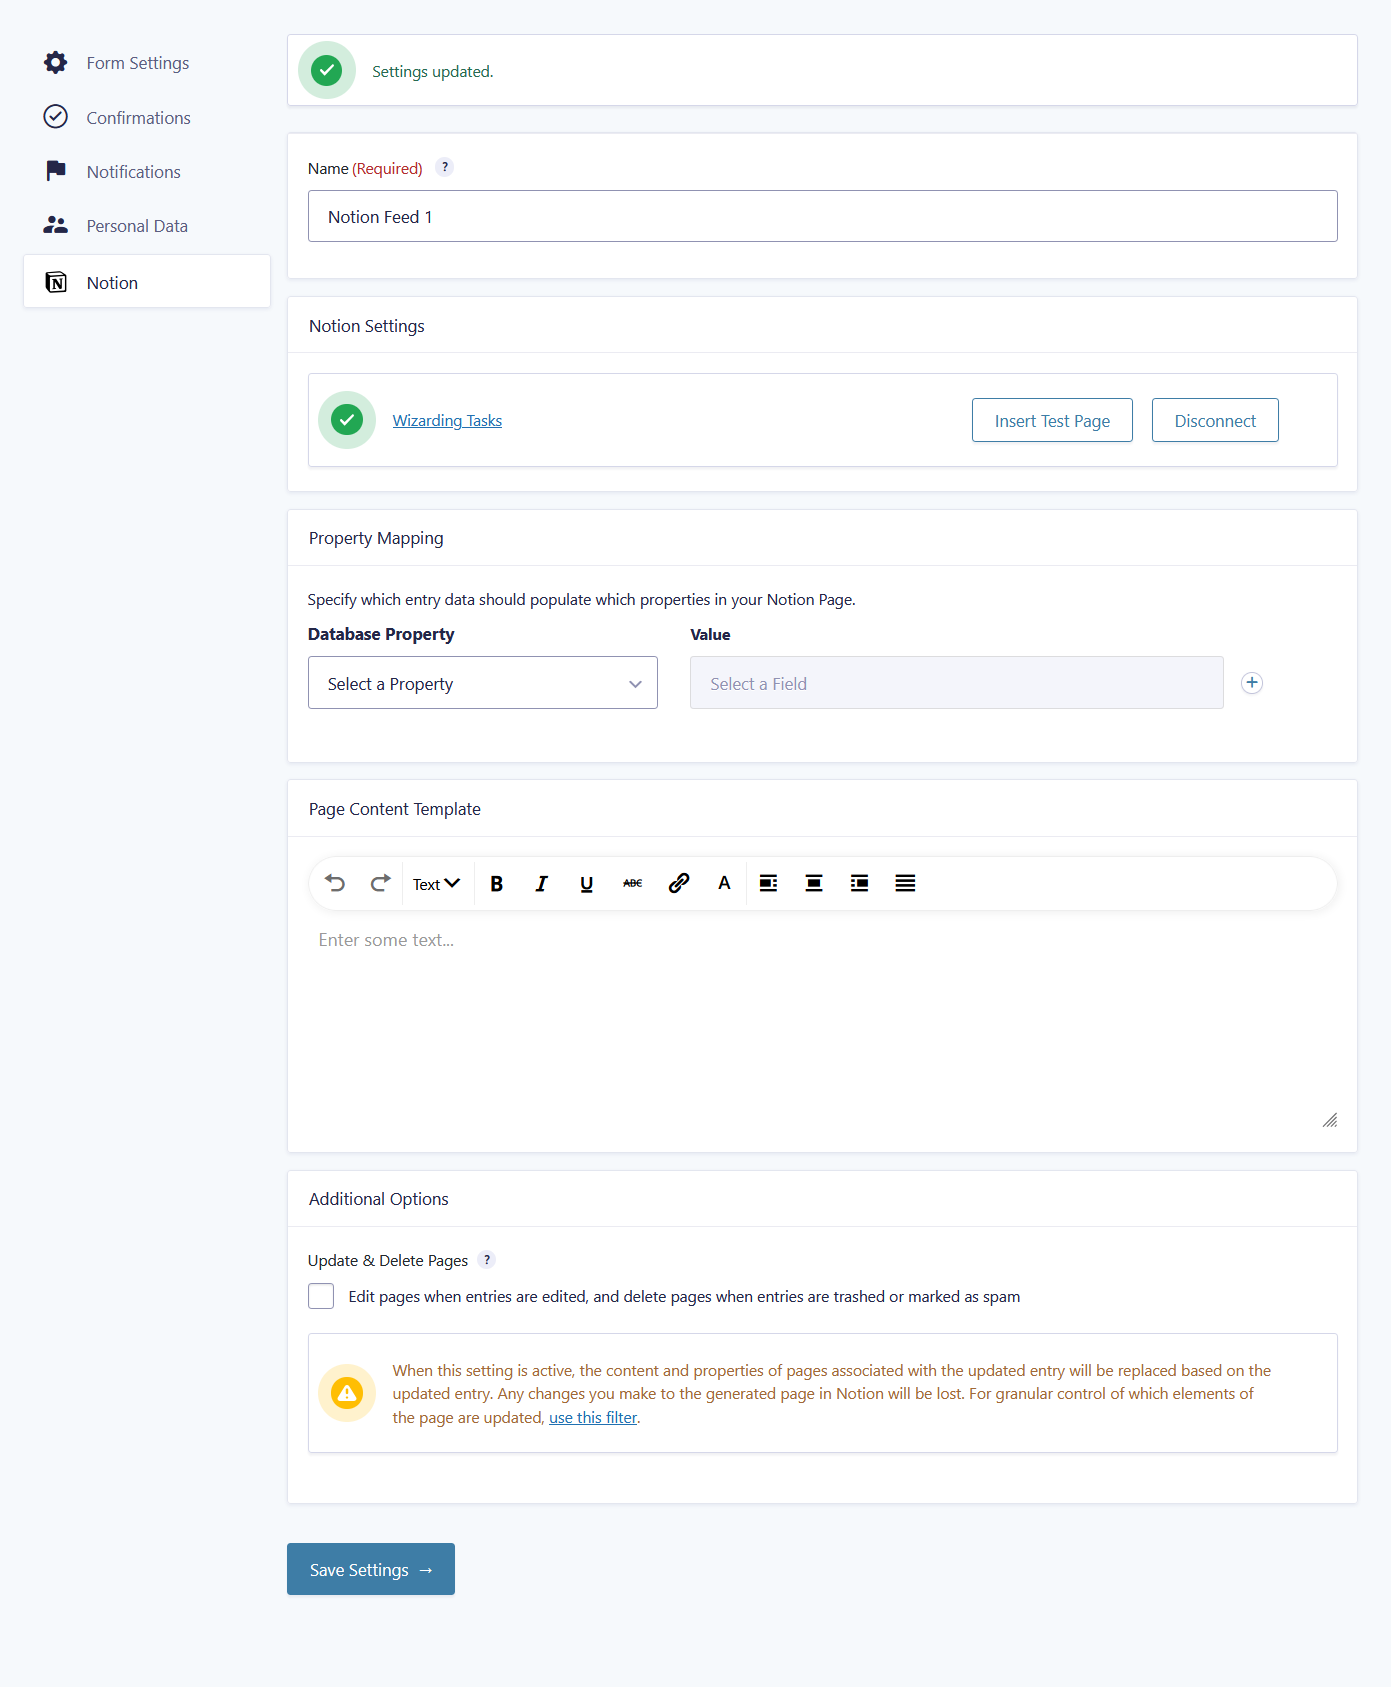
After you have connected to a Notion database, the settings will then change to the following.
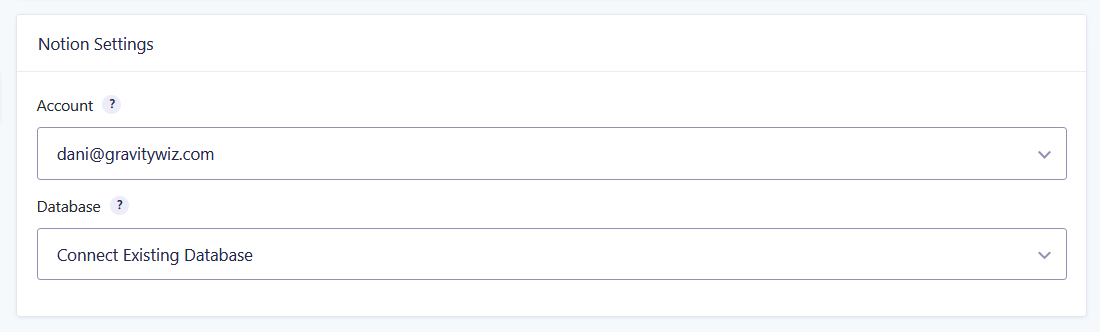
Notion Settings
Use these settings to select an existing database. There are two steps to connecting a database to a Notion feed.
Account: Select the Notion account your desired database belongs to. You can authorize a new account by selecting the Authorize New Account option or select a previously authorized account.
Database: Select the database in which entry data should be captured. You have two options:
- Connect an existing database that has not previously been connected by selecting Connect Existing Database.
- Select a previously connected database.
On submission, a new page will be created in your selected Notion database based on the feed configuration.
Connect Existing Database
To connect an existing database to Gravity Forms, select “Connect Existing Database.”
Don’t have a Notion database? Learn how to create one here!
After selecting Connect Existing Database, a new tab will open with a secure Notion authorization that will allow you to select the top-level page that contains the database you want to connect. All databases within the selected top-level page (including its subpages) will now be available for selection on the current feed and any other feed.
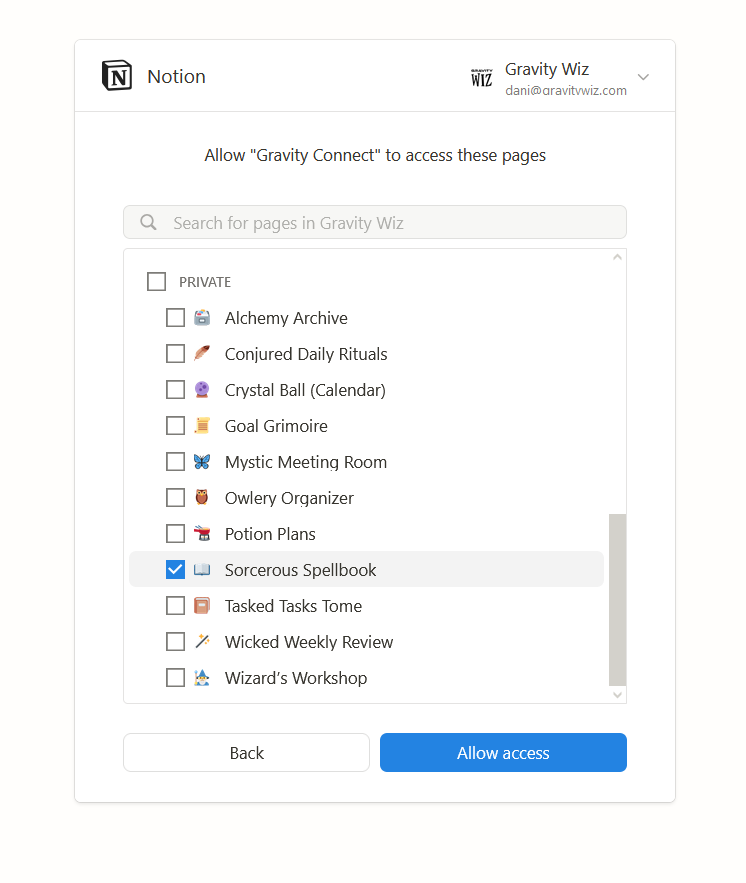
After allowing access to the selected the top-level page, you will be presented with the option to select which database to use.

After Connection
Once a database is selected, you will see an option to Disconnect the database as well as a handy Insert Test Page button to confirm that everything is working as expected.
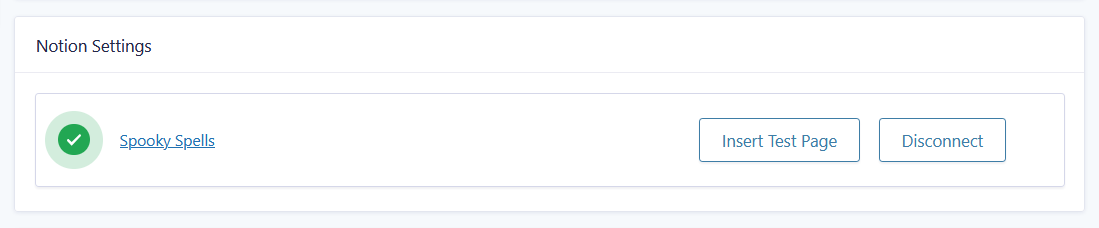
Not only does disconnecting the database allow you to connect to a different database, it can also be useful for troubleshooting the connection to a database.
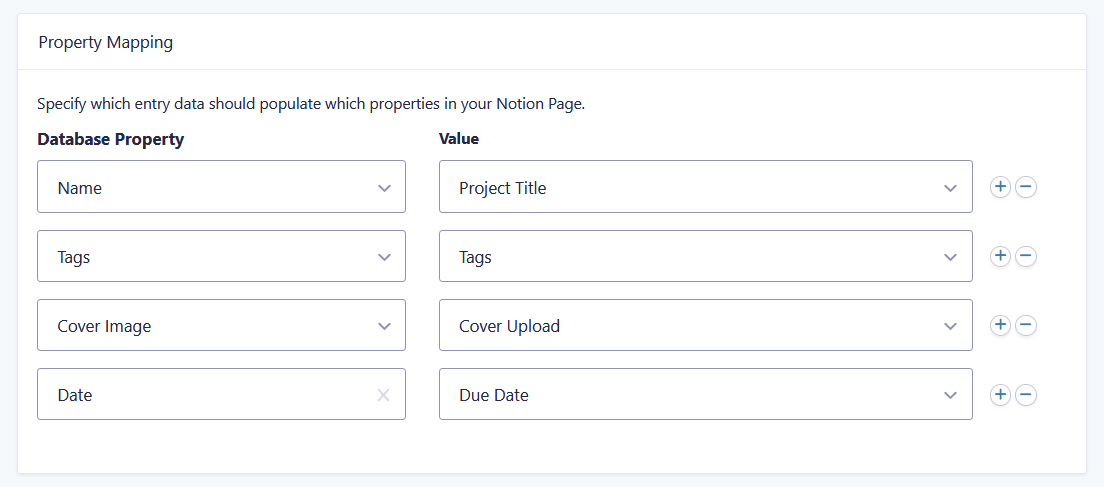
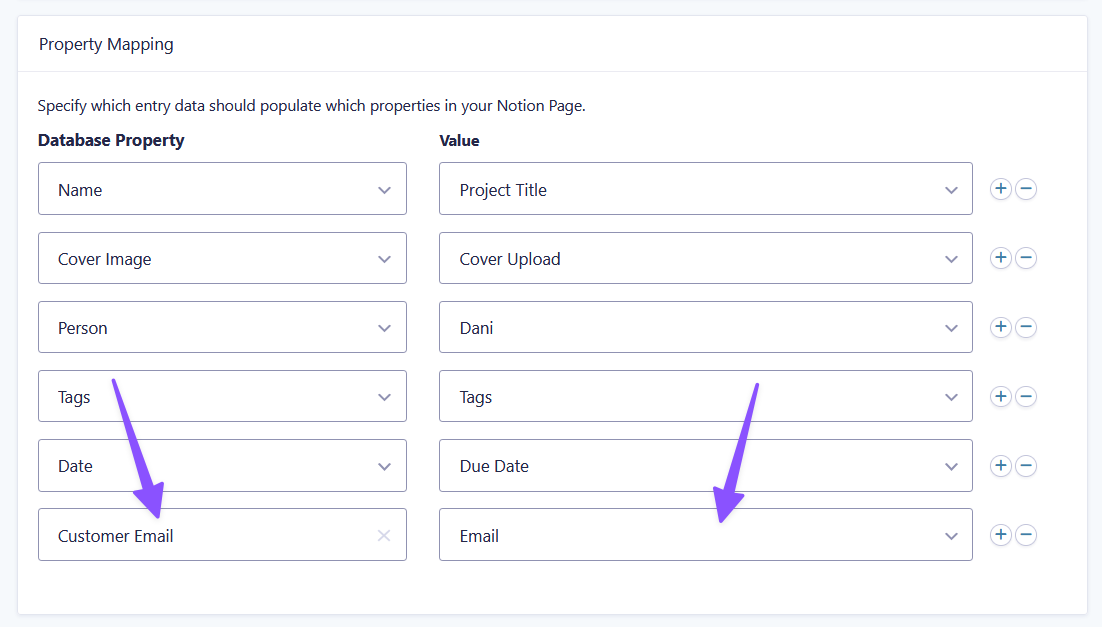
Property Mapping
Use this section to map your form fields, entry properties, or Notion values to properties in your Notion database. You can select existing properties or add additional properties by selecting “Add New Property” from the drop down.
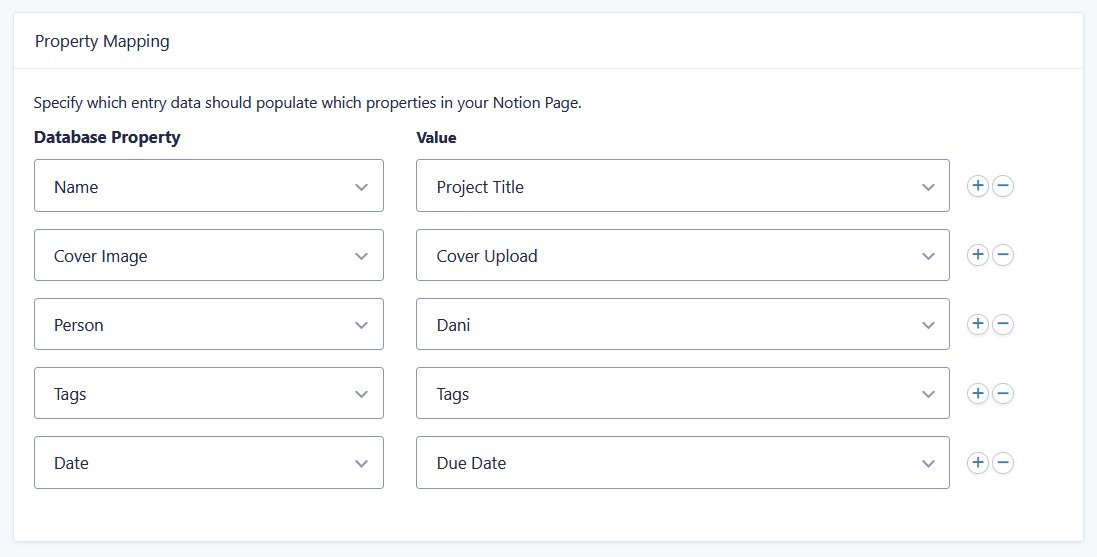
New properties will have their type set to match the assigned Gravity Forms field type or entry property. You can change the names of existing properties in Notion.
Properties can be edited and reordered in Notion without breaking the property mapping in the feed.
Notion Properties Breakdown
Below is a quick guide of Notion database properties. If you’d like to know more about the properties themselves, here’s Notion’s database properties reference.
Supported Properties
| Property Types | Accepted Values |
|---|---|
| Name Title property for the generated page. Comes default with Notion table databases. | ✓ GF Field Types: All ✓ GF Entry Properties: All ✓ Custom Value |
| Cover Image Cover image for the generated page. It will appear behind the page’s title. | ✓ GF Field Types: File Upload, Website ✓ Custom Value |
| Text Simple property: it’s just text! | ✓ GF Field Types: All ✓ GF Entry Properties: All ✓ Custom Value |
| Number Accepts numbers. Can be formatted as currency and progress bars. | ✓ GF Field Types: Number ✓ GF Entry Properties: Entry ID ✓ Custom Value |
| Select Allows one selection from a list of tags. Any new value will create a single new tag. | ✓ GF Field Types: All ✓ GF Entry Properties: All ✓ Custom Value ✓ Notion Options |
| Multi-select Allows one or more selections from a list of tags. Any new value will create a new tag. (e.g. multiple checkboxes create separate tags) | ✓ GF Field Types: All ✓ GF Entry Properties: All ✓ Custom Value ✓ Notion Options |
| Status Tracks the status of a database entry categorized by: To-do, In Progress, and Complete. Select from status tags already created in Notion. | ✓ Notion Options |
| Date Accepts dates and date ranges. The Notion Connection does not support setting a start and end date. | ✓ GF Field Types: Date ✓ GF Entry Properties: Entry Date ✓ Custom Value |
| Person Tags people from your Notion workspace. Tag one person at a time in the feed settings. | ✓ Notion Options |
| Files & media Share files or links to files. | ✓ GF Field Types: All ✓ GF Entry Properties: All ✓ Custom Value |
| URL Accepts URLs. | ✓ GF Field Types: Website ✓ GF Entry Properties: Source URL ✓ Custom Value |
| Email Accepts emails. | ✓ GF Field Types: Email ✓ Custom Value |
| Phone Accepts phone numbers. | ✓ GF Field Types: Phone ✓ Custom Value |
| Relation Connects databases and mentions database pages. | ✓ None! Supported via filter. |
Notion Options refers to the associated values pulled directly from Notion for the corresponding property.
Non-Supported Properties
Non-supported properties can be added to databases, just not mapped in the Notion Connection.
- Checkbox
- Formula
- Rollup
- Button
- Notion AI Autofill properties
If support for any of these properties would be useful for your project, we’d love to hear about it!
Properties that aren’t editable in Notion:
The following properties cannot be set via Notion’s API or edited via Notion and are not mappable via the Notion Connection.
- Created time
- Created by
- Last edited time
- Last edited by
- ID
Related Snippets
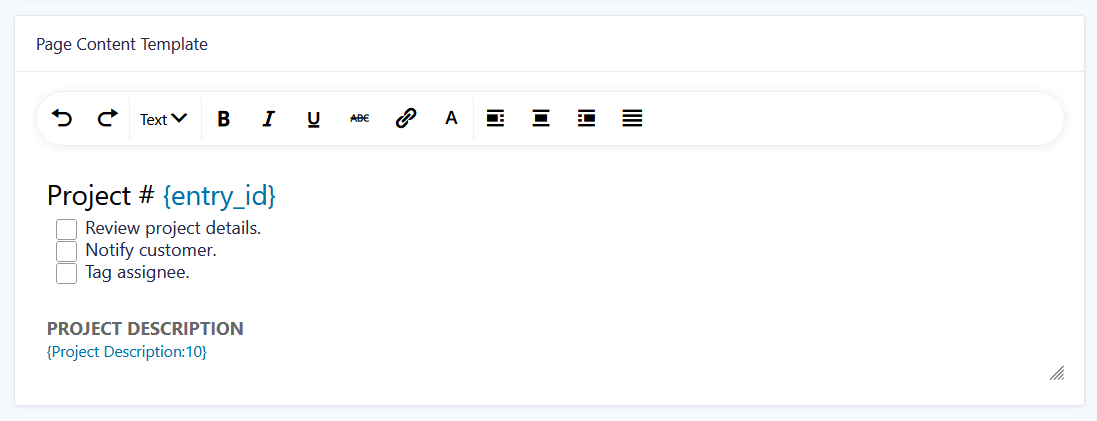
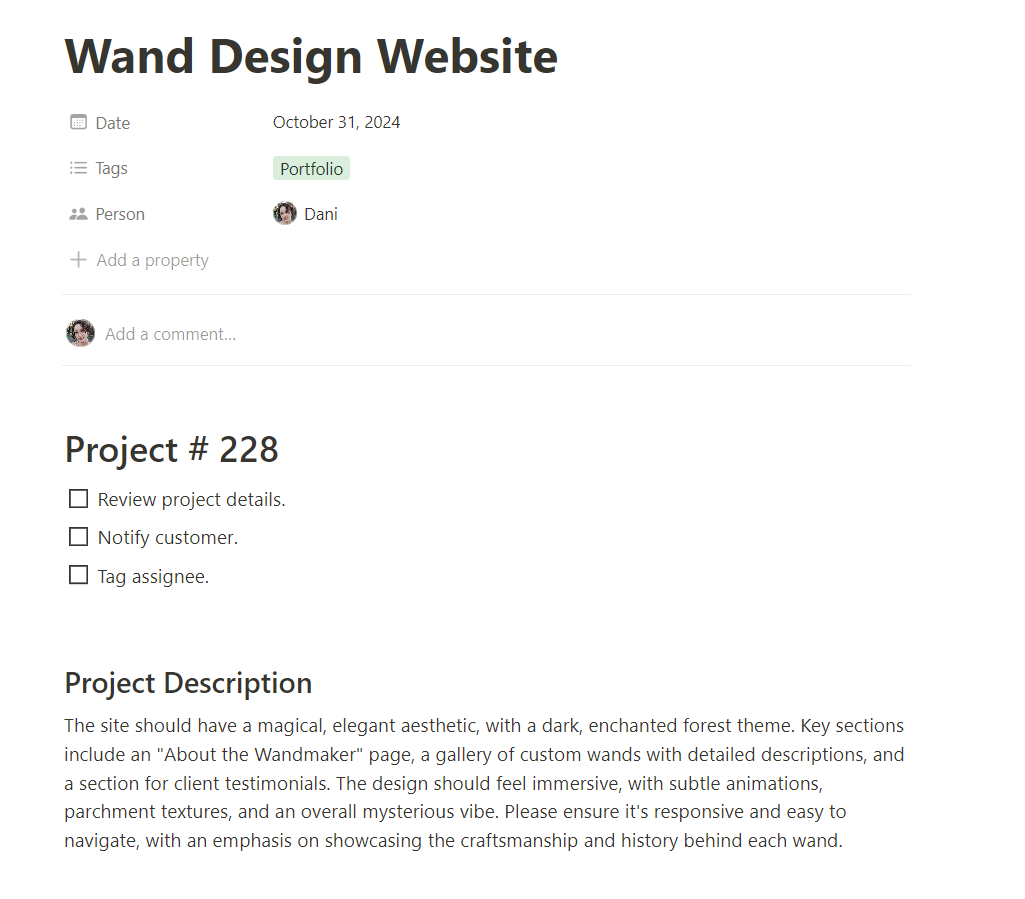
Page Content Template
Use this section to create a template for generating page content from processed entries. Include data from the submitted entry using Gravity Forms merge tags. Format your template with elements like text, headers, and lists—these will be converted into equivalent Notion content blocks when the feed is processed.
To see a list of available merge tags, type { into the text editor, and a list will appear that you can select from.
Here’s what that template might look like when generated in Notion:
Notion Blocks Breakdown
Notion does most of its formatting through content blocks. If you’d like to know more about the blocks themselves, here’s Notion’s content blocks reference.
Supported Blocks
- Text
- Headings (1, 2, and 3)
- Bulleted list
- Numbered list
- To-do list
Non-Supported Blocks
- Basic blocks:
- Page / Link to Page
- Table
- Toggle list
- Quote
- Divider
- Callout
- All of the blocks in the following categories:
- Media blocks
- Database blocks
- AI and Notion AI blocks
- Advanced blocks
- Inline blocks
- Embed blocks
If support for any of these blocks would be useful for your project, we’d love to hear about it!
Additional Options
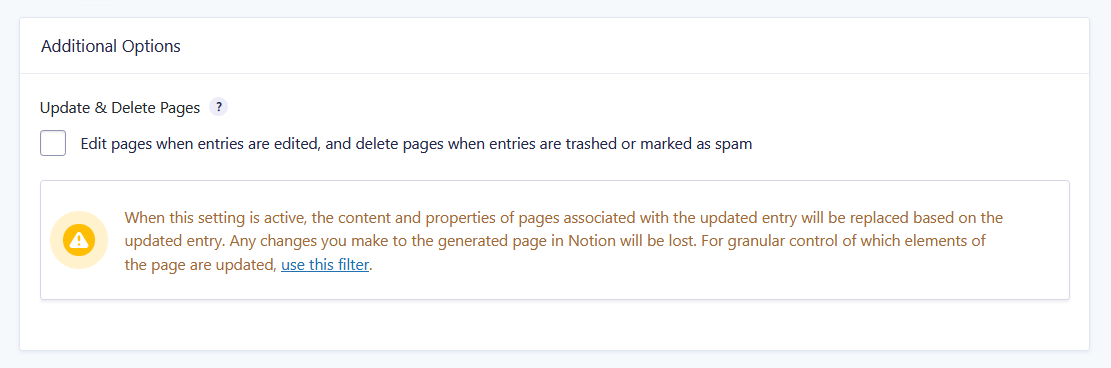
Update & Delete Pages
When this setting is active, edited entries also update the corresponding page in the Notion database. Pages are automatically deleted from the database when entries are moved to trash or marked as spam. If an entry is restored from trash or spam, it will be re-added to the Notion database.
The content and properties of pages associated with the updated entry will be replaced based on the new entry data, and any manual changes made to the generated page in Notion will be lost. For more granular control over which elements of the page are updated, use this filter.
Usage Examples
Entry Detail Meta Box
Use the Notion meta box on the Entry Detail view for an overview of which Notion feeds have been processed for the entry and which were not processed. You can see the time the entry page was inserted into a given database and, if the Update & Delete Pages option is enabled, when the entry page was last updated.
Manage Notion Accounts
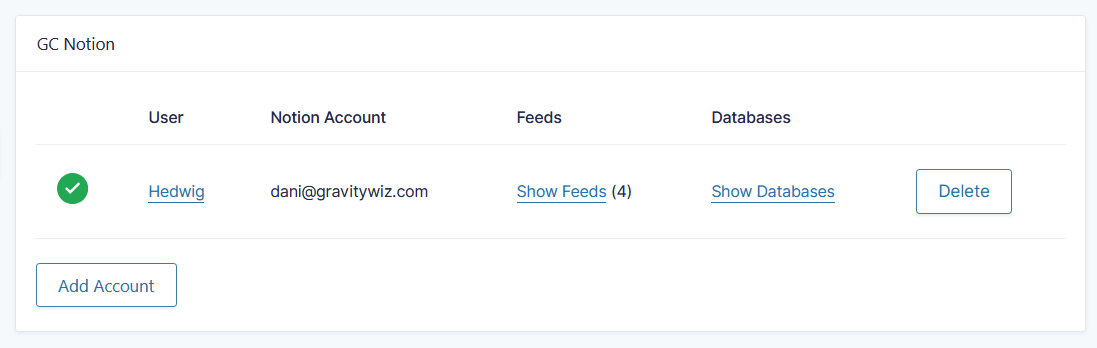
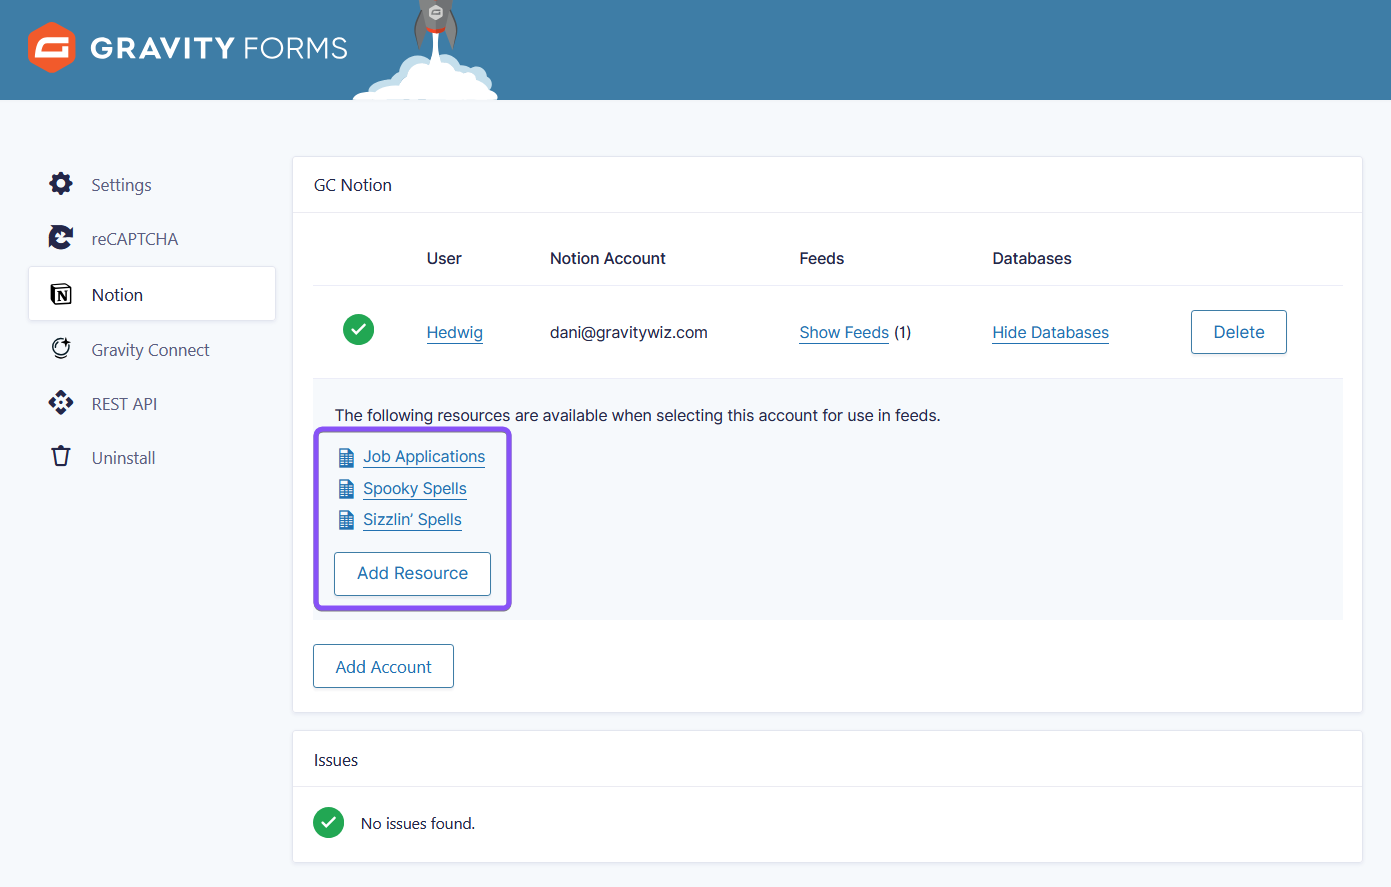
You can manage authorized Notion accounts on the plugin settings page. The Notion Accounts section provides a list of authorized accounts, including the WordPress user who authorized the account and the feeds and databases connected via that account.
You can delete a Notion account to disconnect it from the current site by clicking the Delete button. You can authorize a new Notion account by clicking the Add Account button at the bottom of this section.
Add More Top-Level Pages
If you need to authorize more top-level pages after the first connection, there are three ways to do it.
- Feed settings: Select Connect Existing Database again when setting up your Notion feed. (Same process described here.)
- Plugin settings: Under Show Databases, click on Add Resource. A separate tab will open with the OAuth steps.
- Notion: Under your Notion account settings, go to My connections. Click on the
•••on the right side of Gravity Connect and mouse over “Access selected pages.”
Required Capabilities
To interact with GC Notion, users/roles are required to have specific GC Notion capabilities via WordPress user roles.
| Capability Label | Description | Capability Slug |
| Notion: Form Settings | Lets user configure GC Notion feed settings. | gc-notion_form_settings |
| Notion: Add-On Settings | Lets user view and edit the GC Notion Add-On settings. | gc-notion_settings |
| Notion: Uninstall | Lets user uninstall GC Notion. | gc-notion_uninstall |
Integrations
Populate Anything
The Notion Connection integrates seamlessly with our popular Populate Anything plugin (available with the Gravity Perks suite), allowing you to populate pages, database properties, and users directly from Notion into your form.
When activated, Populate Anything will have access to any database authorized for use with the Notion Connection. If you would like to authorize a database specifically for use with Populate Anything, you can do so from the Notion plugin settings.
For full details on this integration, see the Populate Anything documentation.
Developer’s Notes
Notion Security
Privacy and security are core tenets of our authentication flow. Your Notion data will never touch our servers.
Our OAuth service will handle getting an access token and pass it directly back to your WordPress site. There is no database attached to the service.
You will only interact with our OAuth service during initial authentication, when using the “Connect Existing Database” and “Add Resource” functionalities or re-authenticating your connection. For all other requests, your site will communicate directly with the Notion APIs.
What can the Notion Connection access?
The Notion Connection can only access top-level pages that you authorize. This includes its subpages.
It is important to note that when you disconnect a Notion database from a feed, this does not remove the Notion Connection’s access to its top-level page. You can remove the Notion Connection’s access to a top-level page through the same steps listed here. To fully disconnect the Notion Connection from a Notion account, click on “Disconnect account” in your Notion’s settings.
Please note: Notion resources shared with Gravity Connect will be accessible to the Notion Connection on any site for which the Notion Connection is connected to the same Notion account.
For example, if you connect the Notion Connection to the Notion account for John Smith on Site A and then connect John Smith’s Notion account to the Notion Connection on Site B, resources shared on Site A will be accessible on Site B and vice versa.
Why does it work this way? We are only able to register a single authentication app with Notion. This means tokens shared with our app are shared wherever you authenticate with our app.
As such, it is important to only connect your Notion account to sites you own and/or where user permissions are in place to restrict access to the Notion Connection plugin and feed pages.
Known Limitations
- The Notion Connection can’t create new Notion databases.
- Solution: Create a new database directly in Notion and then connect it via the Notion Connection.
- Some Notion database properties and content blocks aren’t supported.
- Some Notion database properties have limited support.
- Status: Must be mapped via the feed to an existing Notion option. This cannot be mapped by field value.
- Date: Notion’s Date property supports a start and end date. The Notion Connection can only set an end date.
- GP Populate Anything filters can’t be applied to fields populated with Notion users, as the Users endpoint does not support filter parameters.
If any of these known limitations impact your project, we’d love to hear from you. While some limitations are beyond our control, understanding how these limitations impact you is incredibly important in how we prioritize ongoing product development.
Troubleshooting Issues
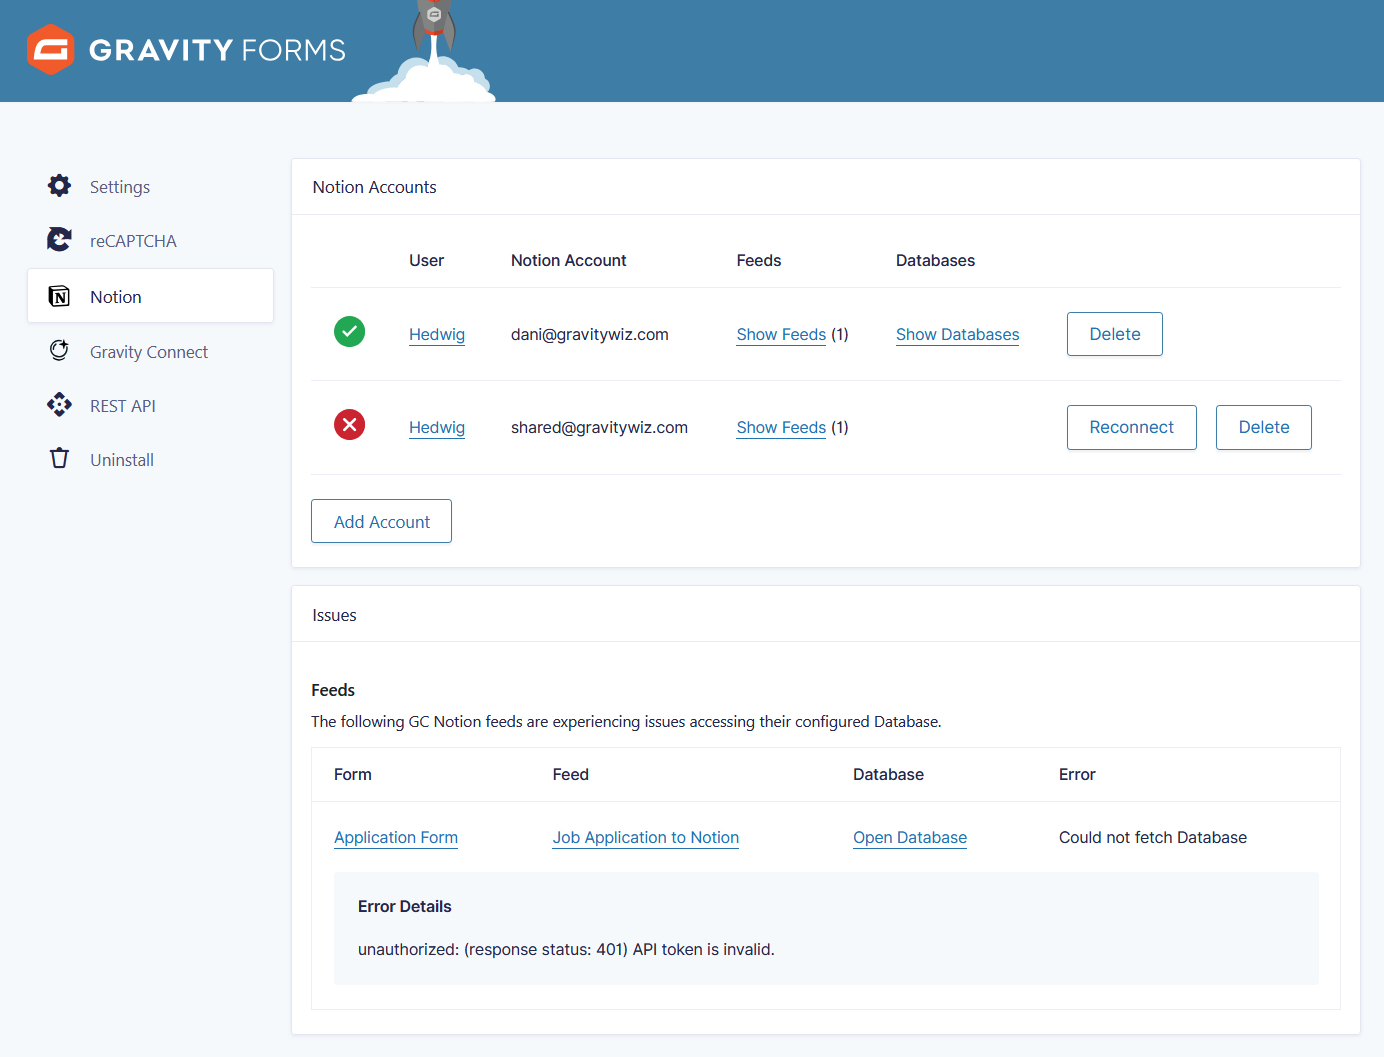
The Issues section will give you a summary of…
- any feeds that cannot access their configured database.
- any form fields being populated via GP Populate Anything that cannot access their configured spreadsheet.
A few common reasons this can happen are the associated Notion account’s password has changed, the database has been deleted, or GC Notion’s access has been manually removed from the account.
If an account becomes disconnected for any reason, the authorizing user can reconnect the account by clicking the Reconnect button for the disconnected account in the Notion Accounts section.
Error: Old Notion Connection
Accounts authorized before 1.0 will display an error for “Old Notion Connection”. The connection will still function normally but, for optimal experience, we recommend reconnecting those Notion accounts.
Notion retains previously connected top-level pages, so you’ll just need to click Select pages > Allow access to reauthorize.
Troubleshooting Action Scheduler
If you’ve confirmed that your account is connected and your Connection feed is configured correctly, you may be experiencing an issue with Action Scheduler. This tool powers Gravity Connect’s ability to handle temporary failures by automatically attempting to process the feed or entry update again.
FAQ
Can I add an icon to Notion pages created via the Notion Connection?
Yes! This is supported via the Add Page Emoji Icon snippet.
How can I populate form fields with Notion objects?
There are two ways to populate form fields with Notion:
- Populate any field choice or value with Notion pages, database properties, and users via integration with GP Populate Anything.
- Specifically populate Choice fields with
Status,Select, orMulti-selectNotion database properties using this snippet.
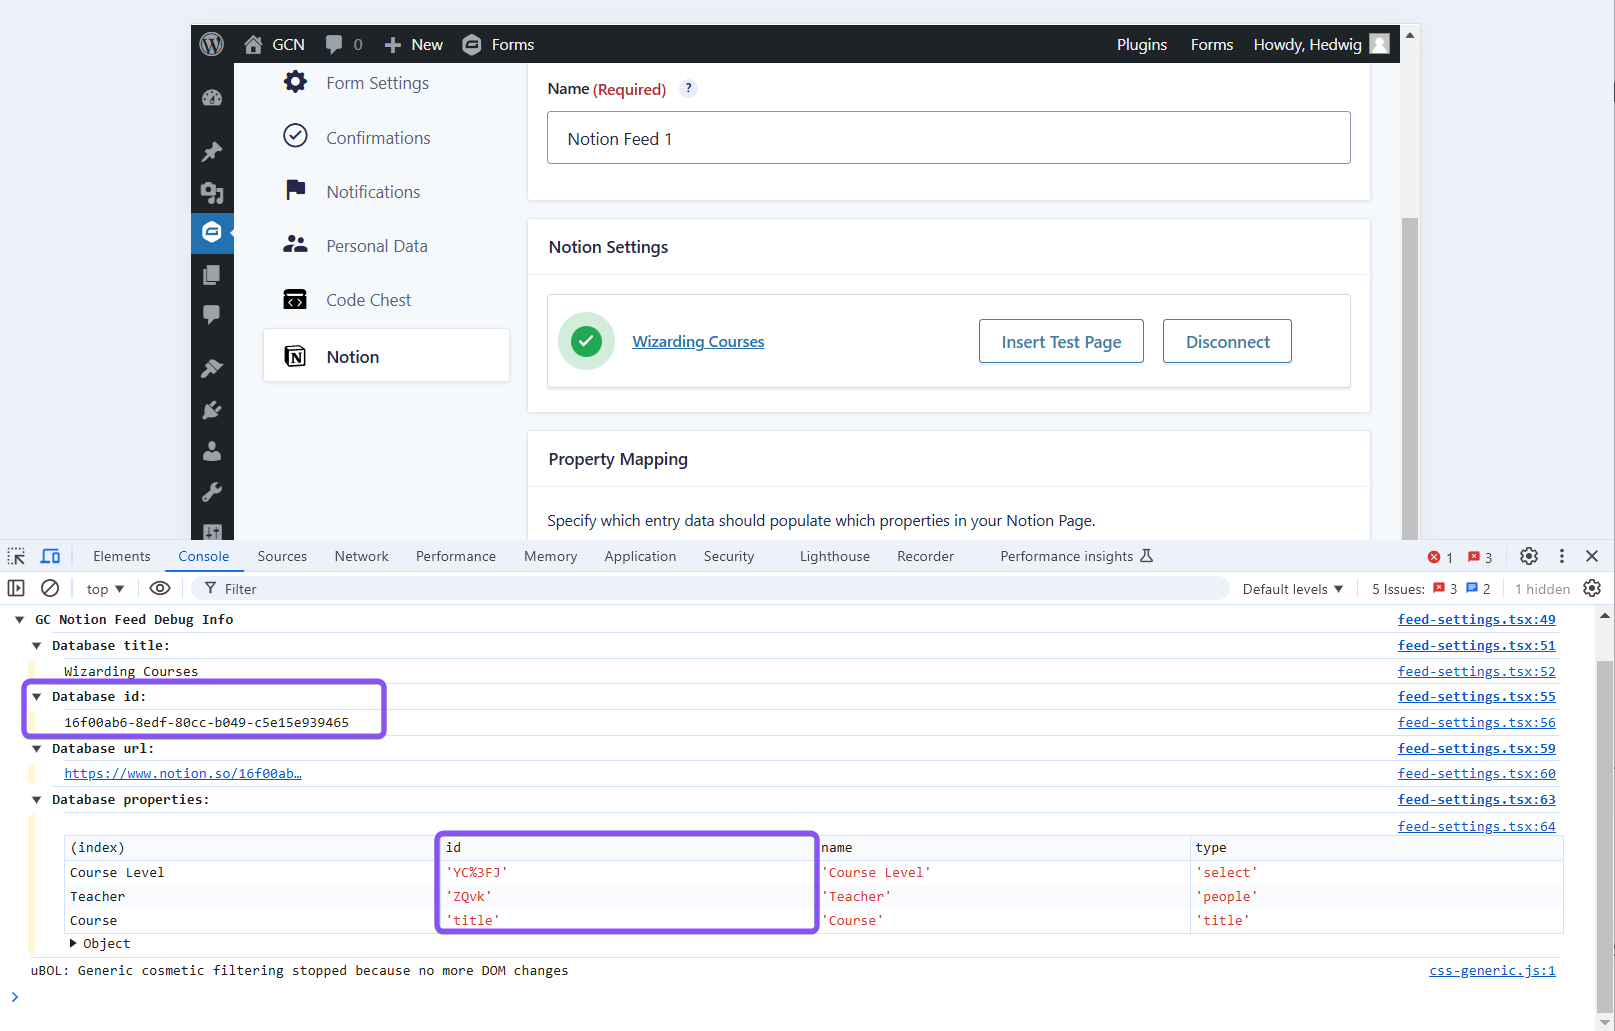
This option does not require Populate Anything, but it’s a bit more hands-on. You’ll need the IDs for the Notion database and database property you want to populate from, which can be found by following these steps:- Access a Notion feed that is connected to the database you want to populate from. If you need to create one just for this purpose, you only need to choose the Account, Database, then save.
- Pull up your browser console to find the database ID and the property IDs, like so:
Translations
You can use the free Loco Translate plugin to create translations for any of our products. If you’ve never used Loco translate before, here’s a tutorial written for beginners.
Hooks
Gravity Forms has hundreds of hooks. Check out our Gravity Forms Hook Reference for the most thorough guide to Gravity Forms’ many actions and filters.
Related Resources
- How to Populate Gravity Forms with Notion Data
Enchant your forms with dynamic field choices and values loaded directly from Notion by combining GC Notion with GP Populate Anything. - How to Send Gravity Forms Data to Notion
Your workflow just leveled up: Gravity Forms now talks directly to Notion. 🔮