Gravity Forms Better User Activation
Take complete control of your Gravity Forms User Registration activation page.
What does it do?
GP Better User Activation allows you to take complete control of your User Registration Activation page. Choose any page on your site, modify it as desired, and users will be automatically directed to this page when activating their accounts.
Features
- Redirect on Activation
Choose a custom page to redirect users after successful activation. - Customize via Post Editor
All activation content (including error messages) can be edited directly from the WordPress post editor. - User Friendly Default Content
Improves the user activation experience out-of-the-box with default content that suits most sites. - Supports Custom Page Templates
Developers who want to further customize the Activation Page can make a custom template. Users can also choose different layouts provided by their themes. - Merge Tags Make it Easy
GP Better User Activation provides over a dozen merge tags that present helpful content to the user and let you customize your presentation without creating links or writing code. - Integrates with Gravity Forms Auto Login
Automatically log users in after they activate with Gravity Forms Auto Login, also part of the Gravity Perks plugin suite. - Automatic Updates
Get updates and latest features right in your dashboard. - Legendary support.
We’re here to help! And we mean it.
Get Gravity Perks
This plugin is part of Gravity Perks, a suite of 48+ essential Gravity Forms addons with support you can count on.
Have a question?
We’re here to help, just send us a message.

- Version 1.2.13
- Updated October 30, 2024
- Released May 13, 2017
All Connections
All Perks
- GF Address Autocomplete
- GF Advanced Calculations
- GF Advanced Phone Field
- GF Advanced Save & Continue
- GF Advanced Select
- GF Auto List Field
- GF Auto Login
- GF Better User Activation
- GF Blocklist
- GF Conditional Logic Dates
- GF Conditional Pricing
- GF Copy Cat
- GF Date Time Calculator
- GF Disable Entry Creation
- GF Easy Passthrough
- GF eCommerce Fields
- GF Email Users
- GF Email Validator
- GF Entry Blocks
- GF Expand Textareas
- GF File Renamer
- GF File Upload Pro
- GF Inventory
- GF Limit Checkboxes
- GF Limit Dates
- GF Limit Submissions
- GF Live Preview
- GF Media Library
- GF Multi-Page Navigation
- GF Nested Forms
- GF Notification Scheduler
- GF Page Transitions
- GF Pay Per Word
- GF Populate Anything
- GF Post Content Merge Tags
- GF Preview Submission
- GF Price Range
- GF QR Code
- GF Randomizer
- GF Read Only
- GF Reload Form
- GF Terms Of Service
- GF Unique ID
- GF Word Count
Documentation
How do I enable this functionality?
After the GP Better User Activation perk is installed, you’ll want to start by selecting a Custom Activation page. This is as simple as visiting the Perk Settings Page under Forms > Perks. Choose any existing page from the drop-down titled “Custom user activation page” to serve as the new Custom Activation page.
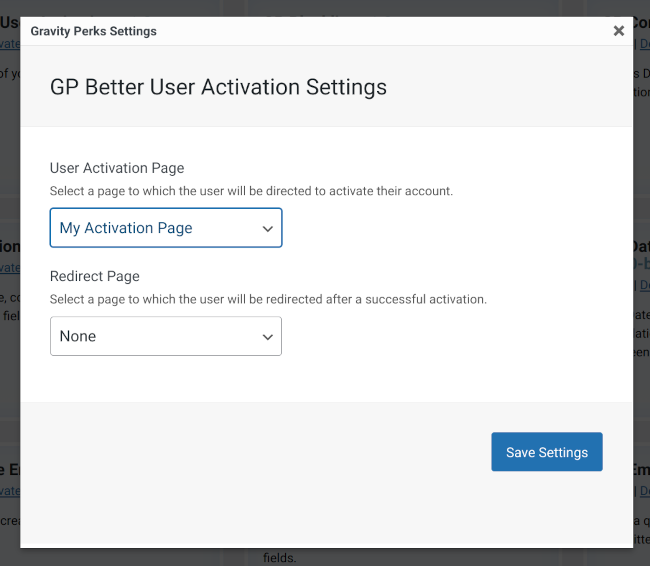 GP Better User Activation Settings
Prefer to make a new page? Simply Add New Page from the WP admin and leave the content area blank. Choose the slug that you want visitors to land on during activation, such as “/activate”. Then return to the Perk Settings and select the new page from the drop-down menu “Custom user activation page”.
After you select a Custom Activation Page, the plugin will already begin to work, sending any new user activations to the selected page. To edit the content of the page, simply visit the page in edit mode. You’ll notice the normal content editor has been replaced by a set of tabs with four different views. Edit the default content as desired.
If your site uses a visual page builder plugin, use the [gpbua] merge tag to insert the user activation content anywhere in your page layout.
Feature Details
Customize Activation Views
There are four different “Activation Views” that are used to display content depending on the result of the attempted user activation. With GP Better User Activation, you’re able to customize each of these views to cover all the different screens the user may see when activating.
This content is edited on the Custom Activation Page, which provides the tabs in the screenshot below. If you don’t see these tabs, check that you’ve set the page properly under the Perk Settings option “Custom user activation page” detailed under the documentation section How do I enable this functionality?
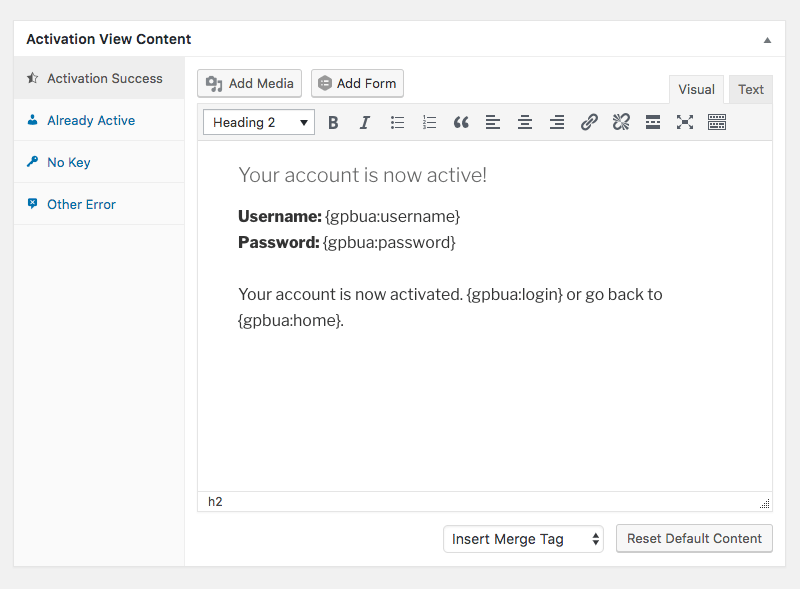 GP Better User Activation — Activation Views
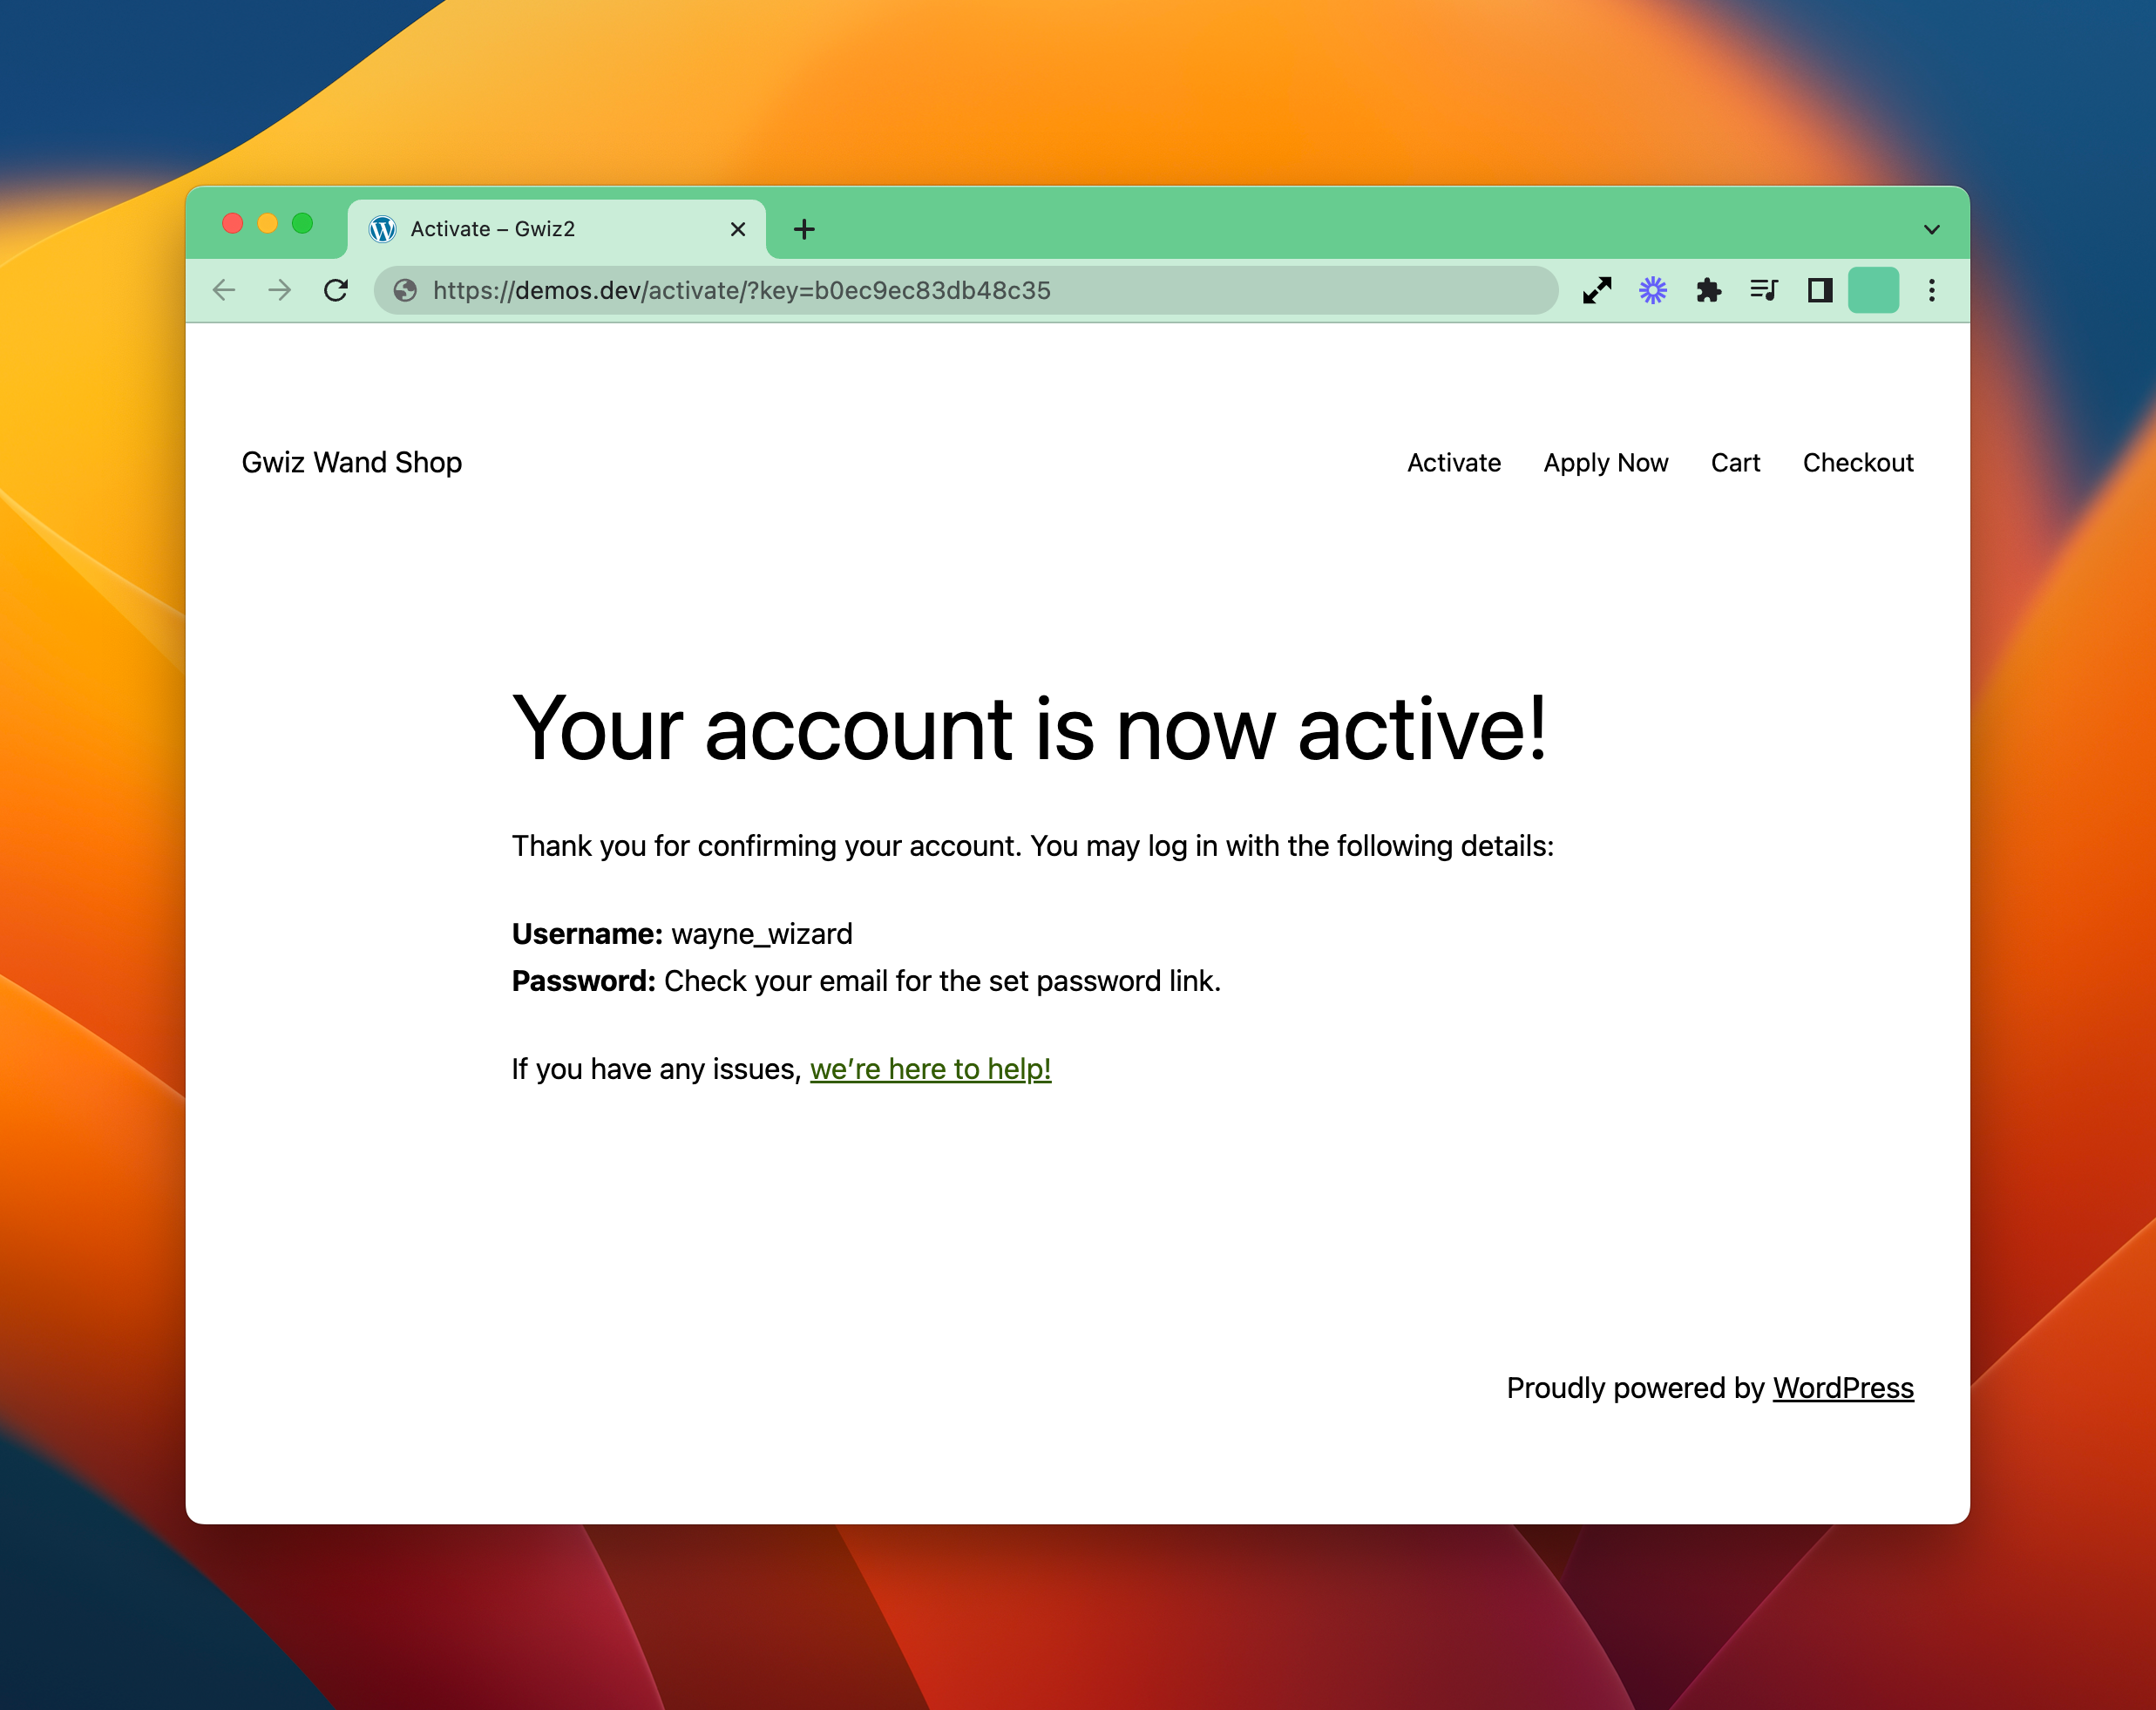
Activation Success
Content shown to the user when they successfully activate. The default content includes the users login information and link to the login page. Not shown if you redirect the user to a Custom Success Redirection page.
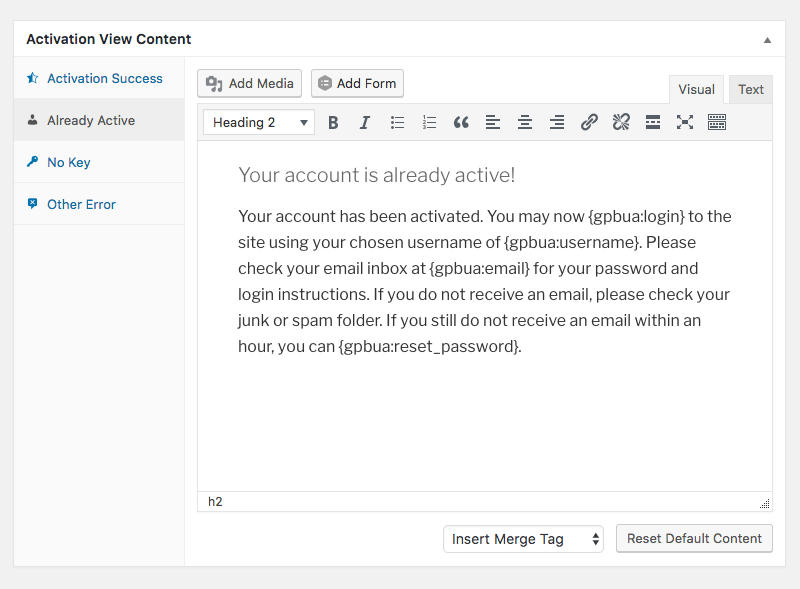
User Already Active
Sometimes users are so eager to activate, they press the activate link over and over again like chimpanzees demanding grapes from their handlers. When this happens, the User Already Active content will be displayed.
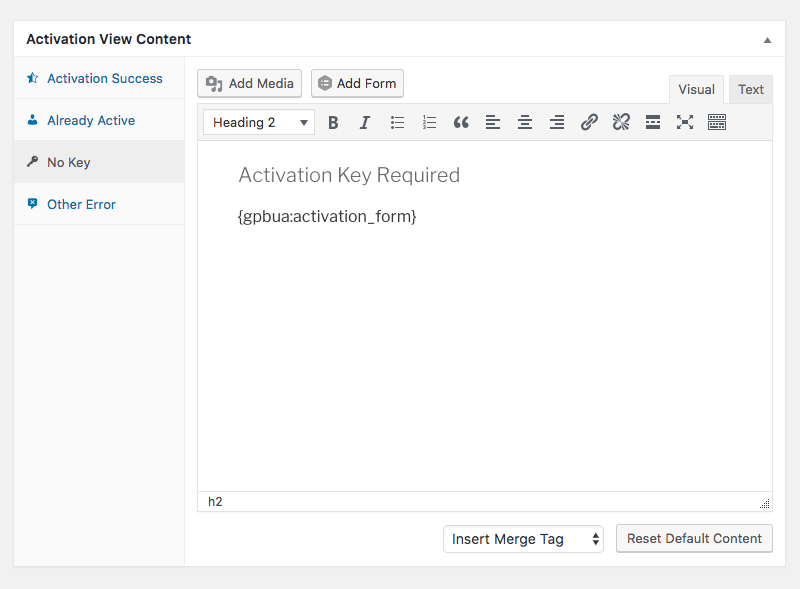
No Key
Key is missing entirely from the activation link. This typically occurs when the user copies and pastes the link or if the link is broken in the email layout. GP Better User Activation displays the Activation Key Form so users can enter their key manually in this situation.
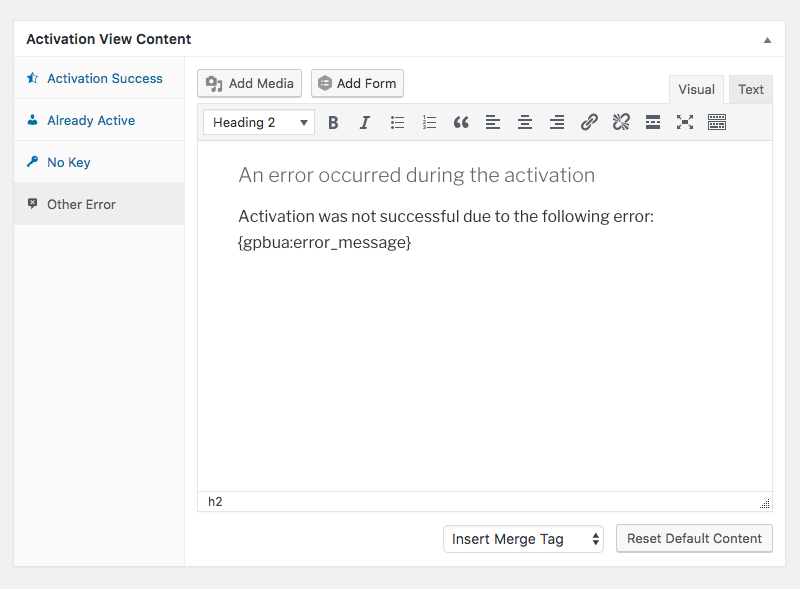
Other Error
Presented when invalid keys or any other errors that might occur block the user activation. GP Better User Activation provides a merge tag {gpbua:error_message} to display the error message to the user.
Merge Tags
All GP Better User Activation merge tags are prefixed with “gpbua” as in {gpbua:username}.
{gpbua:login}
Creates a link to the site login page.{gpbua:login_url}
Renders only the URL for the site login page.{gpbua:home}
Creates a link to the site homepage.{gpbua:home_url}
Renders only the URL for the site homepage.{gpbua:reset_password}
Creates a link to the reset password page.{gpbua:reset_password_url}
Renders only the URL for the reset password page.{gpbua:username}
Shows the username of the user being activated.{gpbua:password}
Displays “Check your email for the set password link.” as the text if the password is emailed. Otherwise, it will show “Set at registration” if the password is mapped to a field.{gpbua:email}
Show the email of the user being activated.{gpbua:activation_form}
Show the activation form that accepts the activation key. Usually used only in the “No Key” view when the activation key is missing.{gpbua:error_message}
Show the activation error message. Use only in error view shown when an error is preventing user activation.
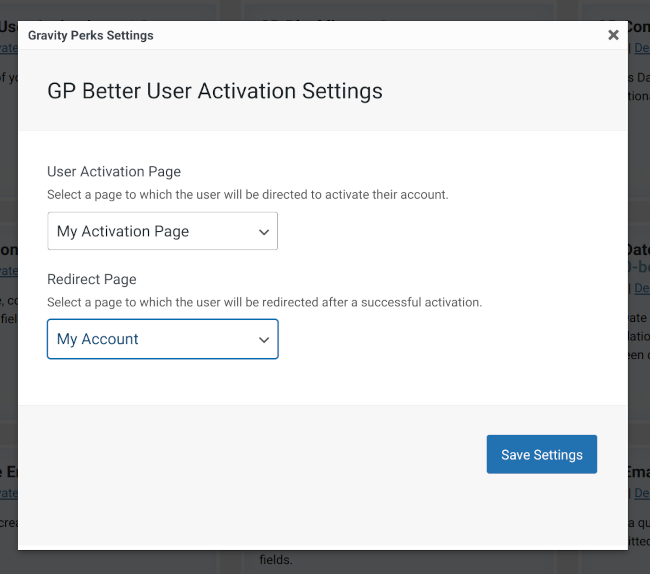
Redirect on Successful Activation
If you want to redirect your users to a different page after they are successfully activated, you can control this via the “Redirect Page” option on the Perk Settings page. Select the existing page (or make a new page) and select it from the Redirect Page setting.
 GP Better User Activation — Redirect Page Setting
Troubleshooting Issues
If Better User Activation isn’t working as expected, here are some troubleshooting tips you can try.
- If the custom activation page is not displaying as expected, ensure it is correctly set on the Perk Settings page under Forms › Perks. If the issue persists, go to Settings › Permalinks and click Save Changes to refresh permalink settings.
- If activation emails are not being sent, check that your site can send emails. You can also use an SMTP plugin to improve deliverability.
- If the user account is not activated after clicking the link, the activation link may have expired. Try resending the activation email and testing again. If the issue persists, check for conflicting plugins, such as membership or security plugins, that may be interfering with the activation process, and temporarily disable them to test.
Translations
You can use the free Loco Translate plugin to create translations for any of our Perks. If you’ve never used Loco translate before, here’s a tutorial written for beginners.
FAQs
How do I enable the post content editor when editing the activation page?
By default, the post content editor is hidden. If you’d like to enable it for whatever reason, you can do so by installing the following snippet (installation instructions).
Hooks
- gpbua_activation_page_id
- gpbua_activation_redirect_url
- gpbua_activation_success
- gpbua_activation_url
- gpbua_hide_title
Gravity Forms has hundreds of hooks. Check out our Gravity Forms Hook Reference for the most thorough guide to Gravity Forms’ many actions and filters.
Related Resources
- Complete Guide to Gravity Forms Login (Auto Login, Activate Users, More!)
Learn how to enhance the login and user registration experience on your site using Gravity Perks and other tools! - Customizing the User Activation Email for Gravity Forms
Easily create your own custom user activation emails powered by Gravity Forms notifications. - Register Multiple Users From a Single Form
Register multiple users to your WordPress site with a single form submission. - Show Login Link for Existing Users with Gravity Forms User Registration
Automatically show a login link when a user attempts to register with an existing email.