Gravity Connect Google Sheets
Automatically send and sync Gravity Forms data with Google Sheets — and unlock new possibilities for your data.
“Google Sheets” is a registered trademark of Google, Inc. Gravity Wiz and Gravity Connect are not affiliated with, sponsored by, or endorsed by Google, Inc. Using Google Sheets with Gravity Connect requires a Google account.
What does the Google Sheets Connection do?
This plugin integrates Google Sheets directly with Gravity Forms to automatically pass entry values to Google Sheets. This is done without requiring any additional software or monthly fees, and with an emphasis on security and performance.
Additionally, your Google Sheet can be automatically synced with your Gravity Forms entries, keeping your data accurate at all times.
With the Google Sheets Connection you can create:
- Lead capture forms that instantly sync to Google Sheets for team-wide access
- Event registration forms that populate Google Sheets for easy attendee tracking
- Internal request forms that auto-log data to Google Sheets for HR or IT teams
- Pre-fill form fields based on spreadsheet data*
- Dynamic dropdowns that pull options directly from Google Sheets*
- And many more!
*Requires GP Populate Anything.
Features
- Send Gravity Forms entry data directly to Google Sheets.
Unlock the vast power of Google Sheets for all of your Gravity Forms entry data. - Keep your spreadsheet and entry data perfectly in sync.
Edits to your entries can automatically sync to your Google Sheets. Rows for trashed or spammed entries are automatically removed. - Create new or map to existing spreadsheets.
Send data to existing spreadsheets or create a completely new spreadsheet specific to your form. - Fetch data from Google Sheets and use it in your forms.
Populate your forms with Google Sheets data when paired with Gravity Forms Populate Anything. - Security first.
Uses Google’s secure authentication method to ensure only you have access to your Google files and data. - Money-saving, value packed.
No monthly fees or transfer limits. Just the unlimited power of Google Sheets. - Automatic updates.
Get updates and the latest features right in your dashboard. - Legendary support.
We’re here to help! And we mean it.
Why Google Sheets?
- Easy organization and analysis: Google Sheets allows you to easily organize and analyze your form data. Use various Google Sheets functions and features, like formulas, pivot tables, and charts, to analyze and visualize your data in meaningful ways.
- Collaboration: Google Sheets allows multiple users to access and edit the same sheet, making it easy for teams to collaborate on data analysis and decision making.
- Accessibility: Google Sheets can be accessed from any device with an internet connection (and has an offline mode too). Teams can access and work on form data from anywhere, using an application they’re already familiar with.
- Security: Google Sheets offers industry standard security measures to protect your data, including access controls, activity logging, and data encryption.
- Integration with other Google tools: Google Sheets can be quickly integrated with other Google tools, such as Looker Studio (formerly Data Studio) and BigQuery, allowing you to create a seamless workflow for collecting and analyzing data.

- Version 1.4.11
- Updated April 29, 2026
- Released August 21, 2024
All Connections
All Perks
- GF Address Autocomplete
- GF Advanced Calculations
- GF Advanced Phone Field
- GF Advanced Save & Continue
- GF Advanced Select
- GF Auto List Field
- GF Auto Login
- GF Better User Activation
- GF Blocklist
- GF Bookings
- GF Conditional Logic Dates
- GF Conditional Pricing
- GF Copy Cat
- GF Date Time Calculator
- GF Disable Entry Creation
- GF Easy Passthrough
- GF eCommerce Fields
- GF Email Users
- GF Email Validator
- GF Entry Blocks
- GF Expand Textareas
- GF File Renamer
- GF File Upload Pro
- GF Inventory
- GF Limit Checkboxes
- GF Limit Dates
- GF Limit Submissions
- GF Live Preview
- GF Media Library
- GF Multi-Page Navigation
- GF Nested Forms
- GF Notification Scheduler
- GF Page Transitions
- GF Pay Per Word
- GF Populate Anything
- GF Popups
- GF Post Content Merge Tags
- GF Preview Submission
- GF Price Range
- GF QR Code
- GF Randomizer
- GF Read Only
- GF Reload Form
- GF Sliders
- GF Submit to Access
- GF Terms Of Service
- GF Unique ID
- GF Word Count
Documentation
Terminology
Before we get started, let’s clarify a few important words we’ll use throughout this documentation.
- Google Sheets: Refers to the Google product that allows you to create and manage spreadsheets.
- Google Sheet / spreadsheet: Refers to a collection of sheets.
- sheet: Refers to a specific sheet within a spreadsheet.
- GCGS: An acronym for this plugin, the GC Google Sheets Connection.
How do I enable this functionality?
After installing and activating GC Google Sheets, you can create Google Sheets feeds in any form. Use these feeds to pass data from your forms to Google Sheets. You can connect your Google account directly in the feed settings.
|
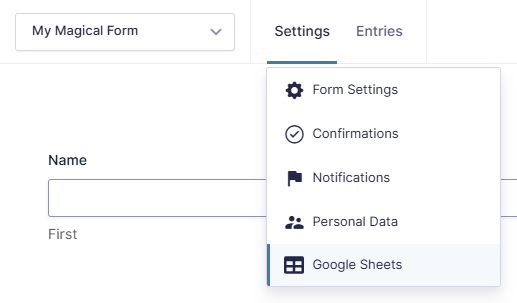
Navigate to your desired form and click the “Google Sheets” item under the “Settings” menu. |
|
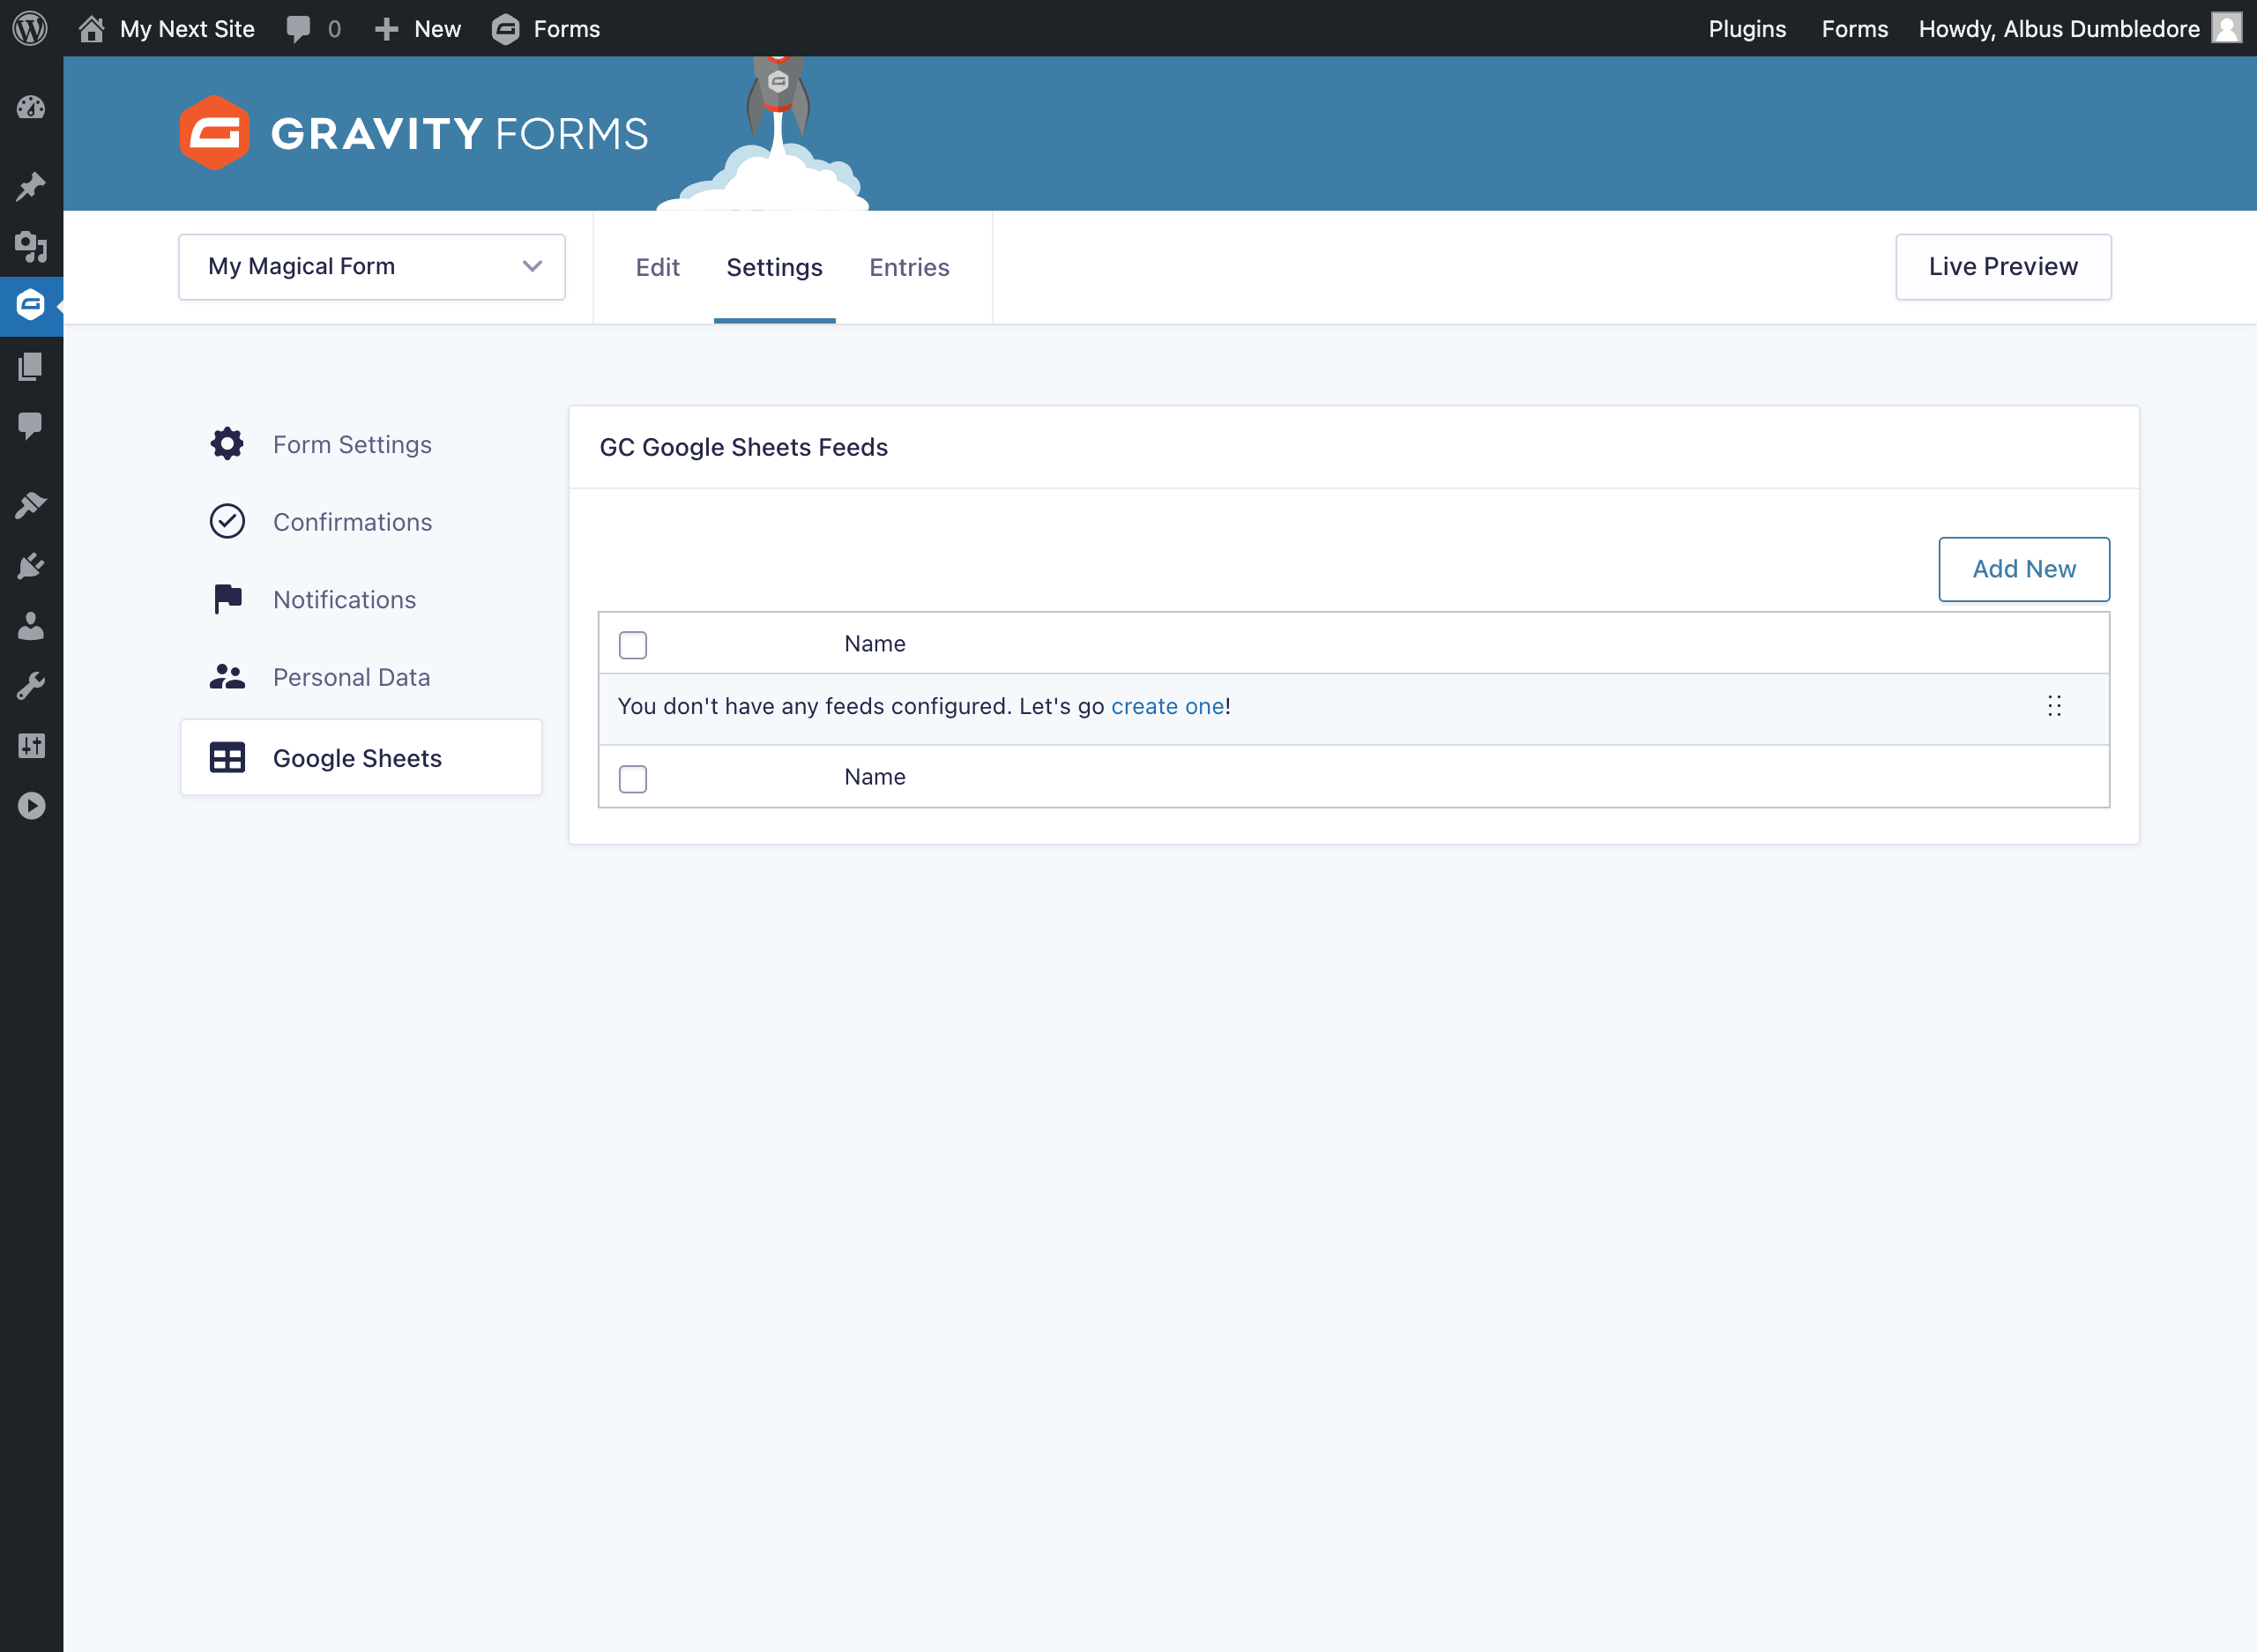
Click the “Add New” button to add a new Google Sheets feed. |
|
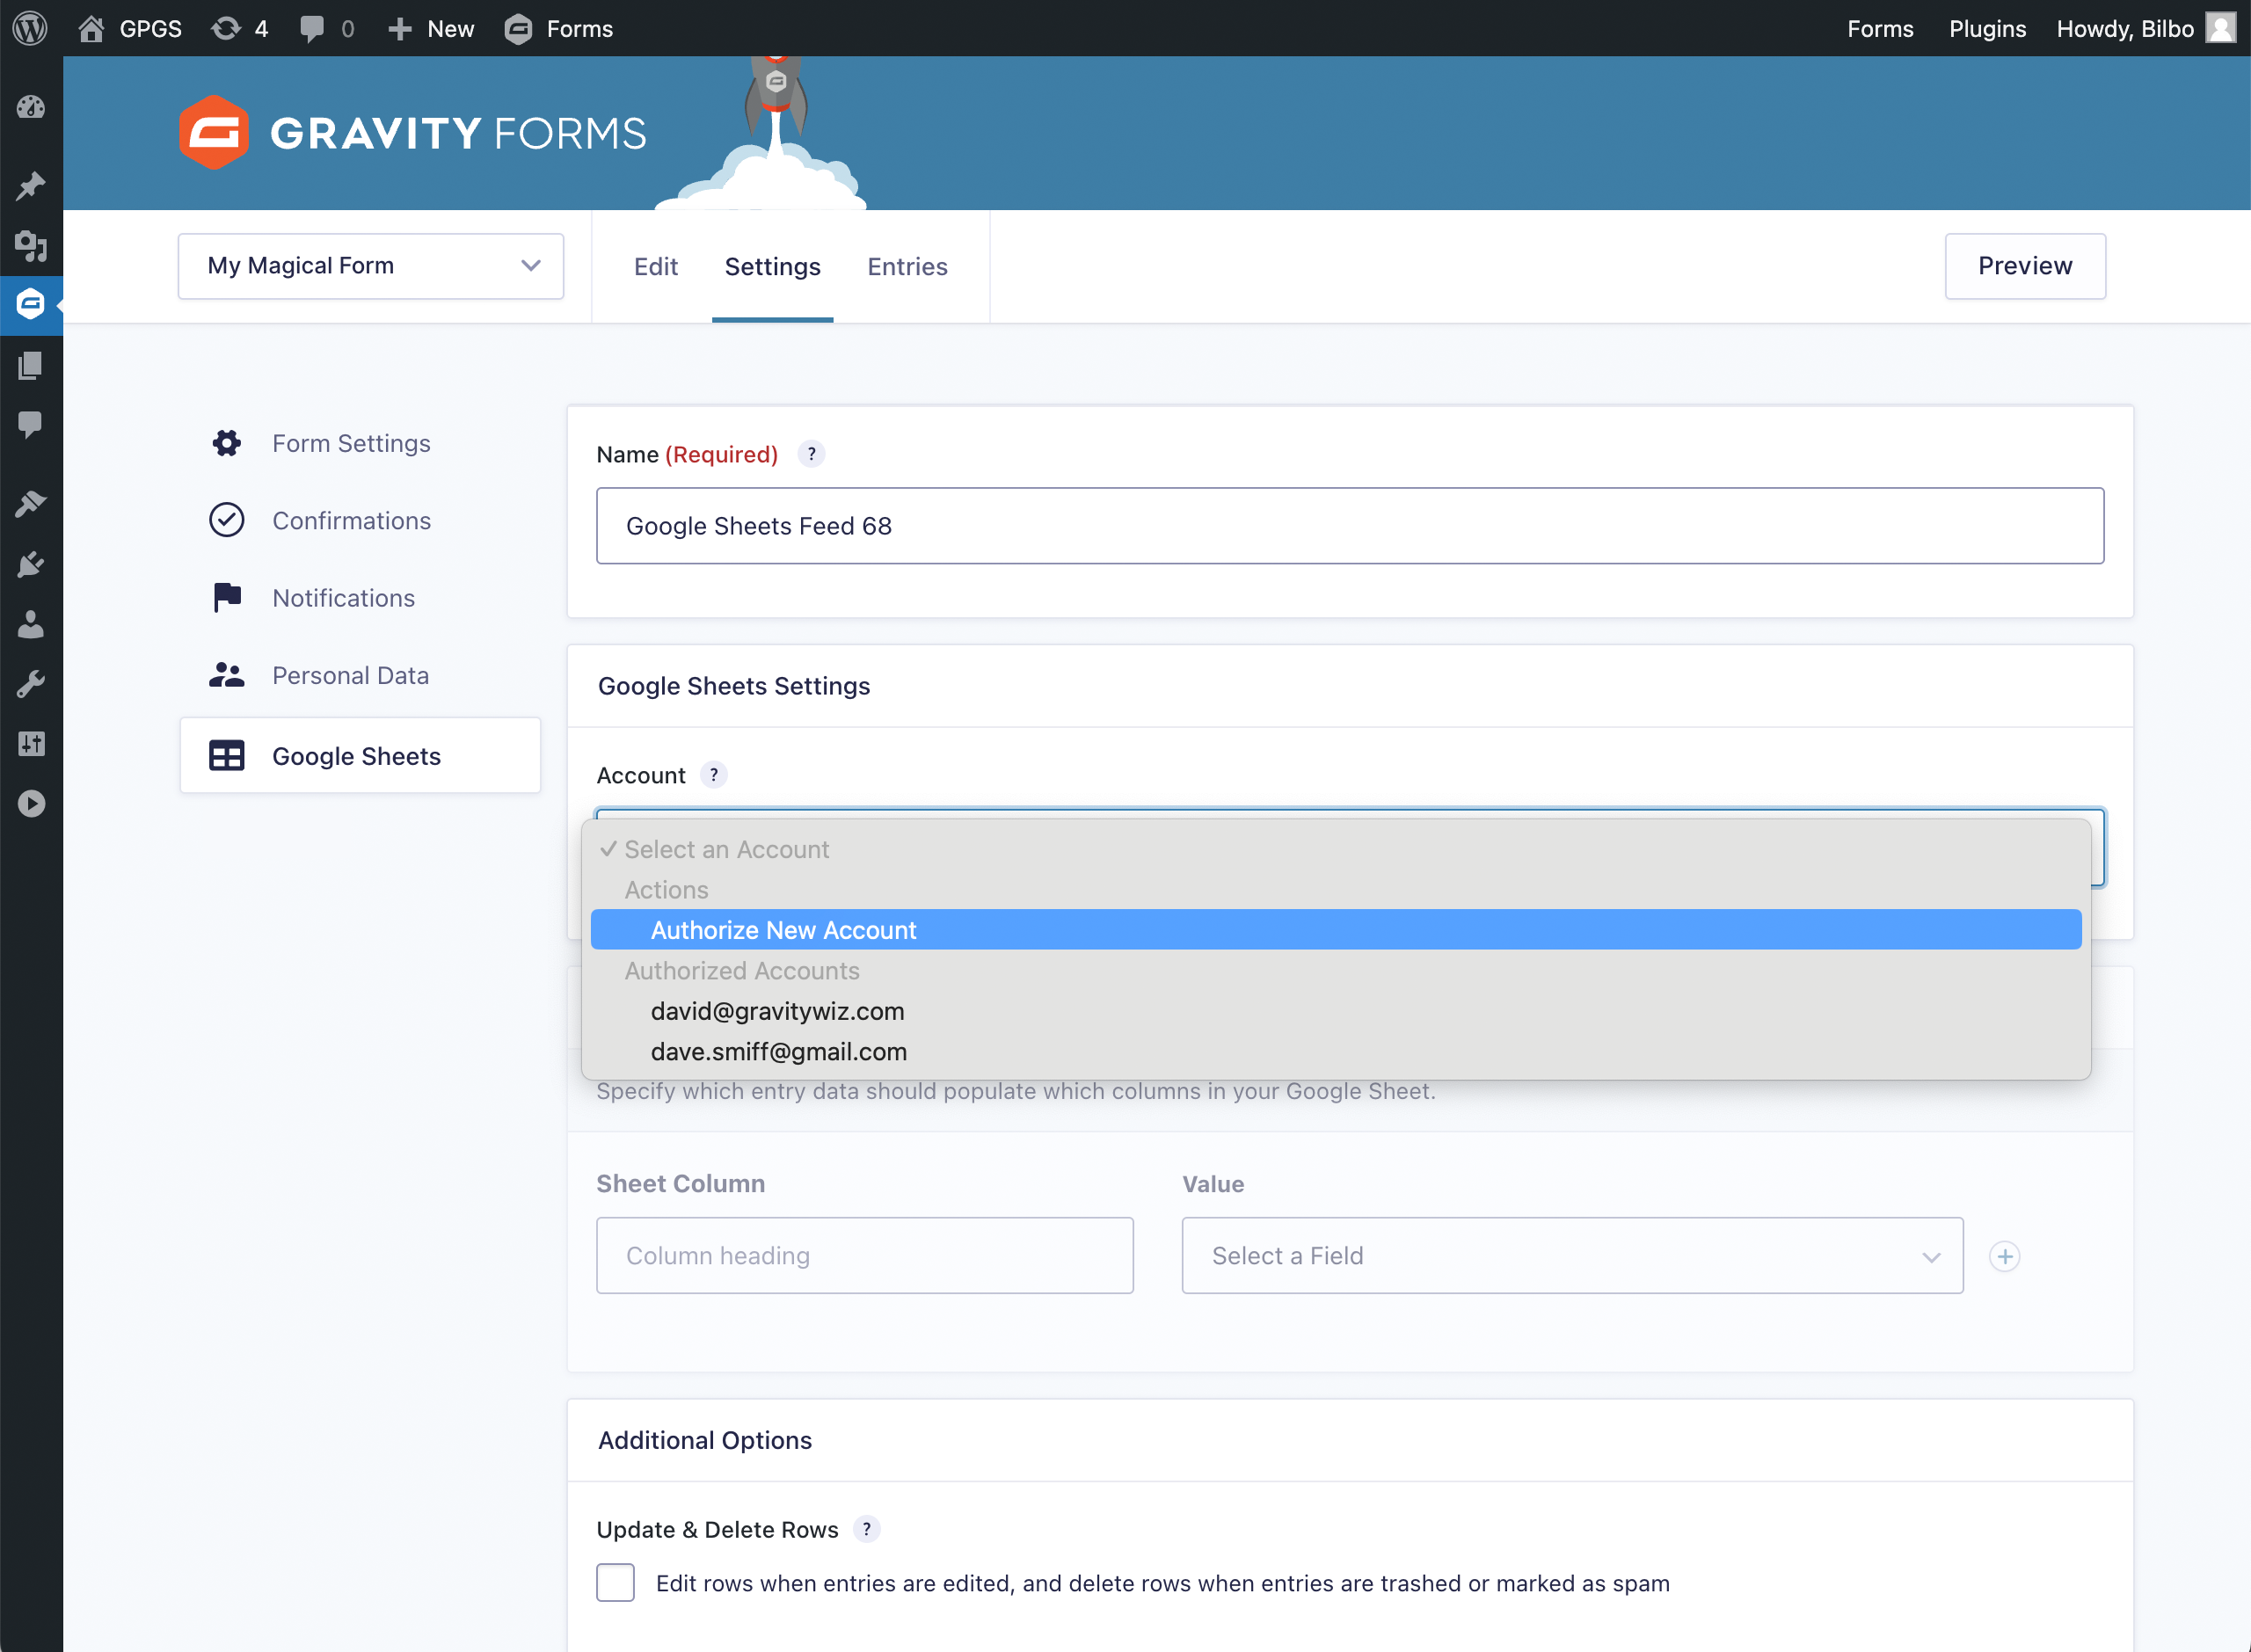
Connect your Google account by selecting “Authorize New Account” under the Account setting. |
|
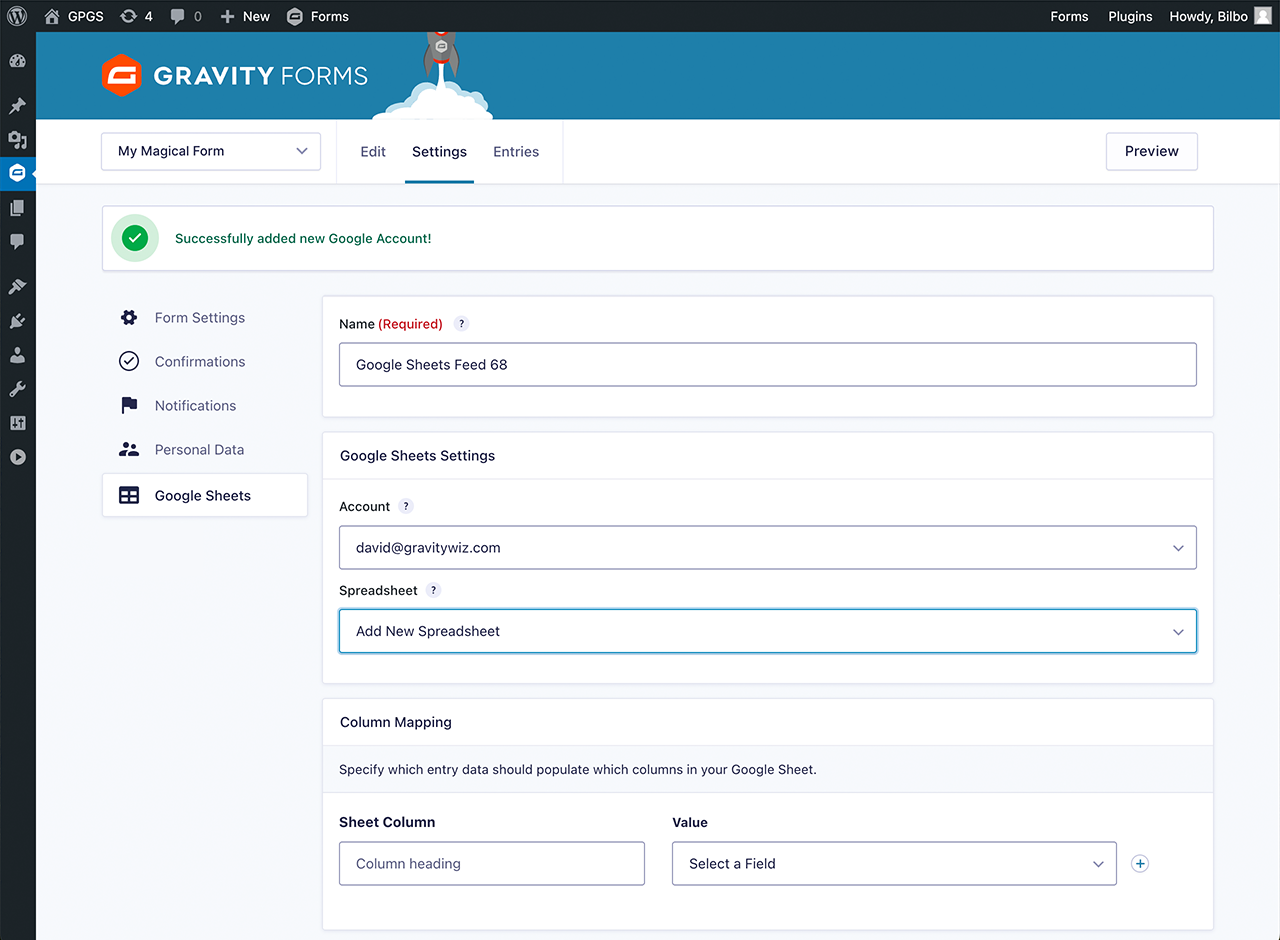
Connect your feed to a spreadsheet by adding a new spreadsheet or connecting an existing spreadsheet. |
|
Map your form’s fields to columns in the spreadsheet. |
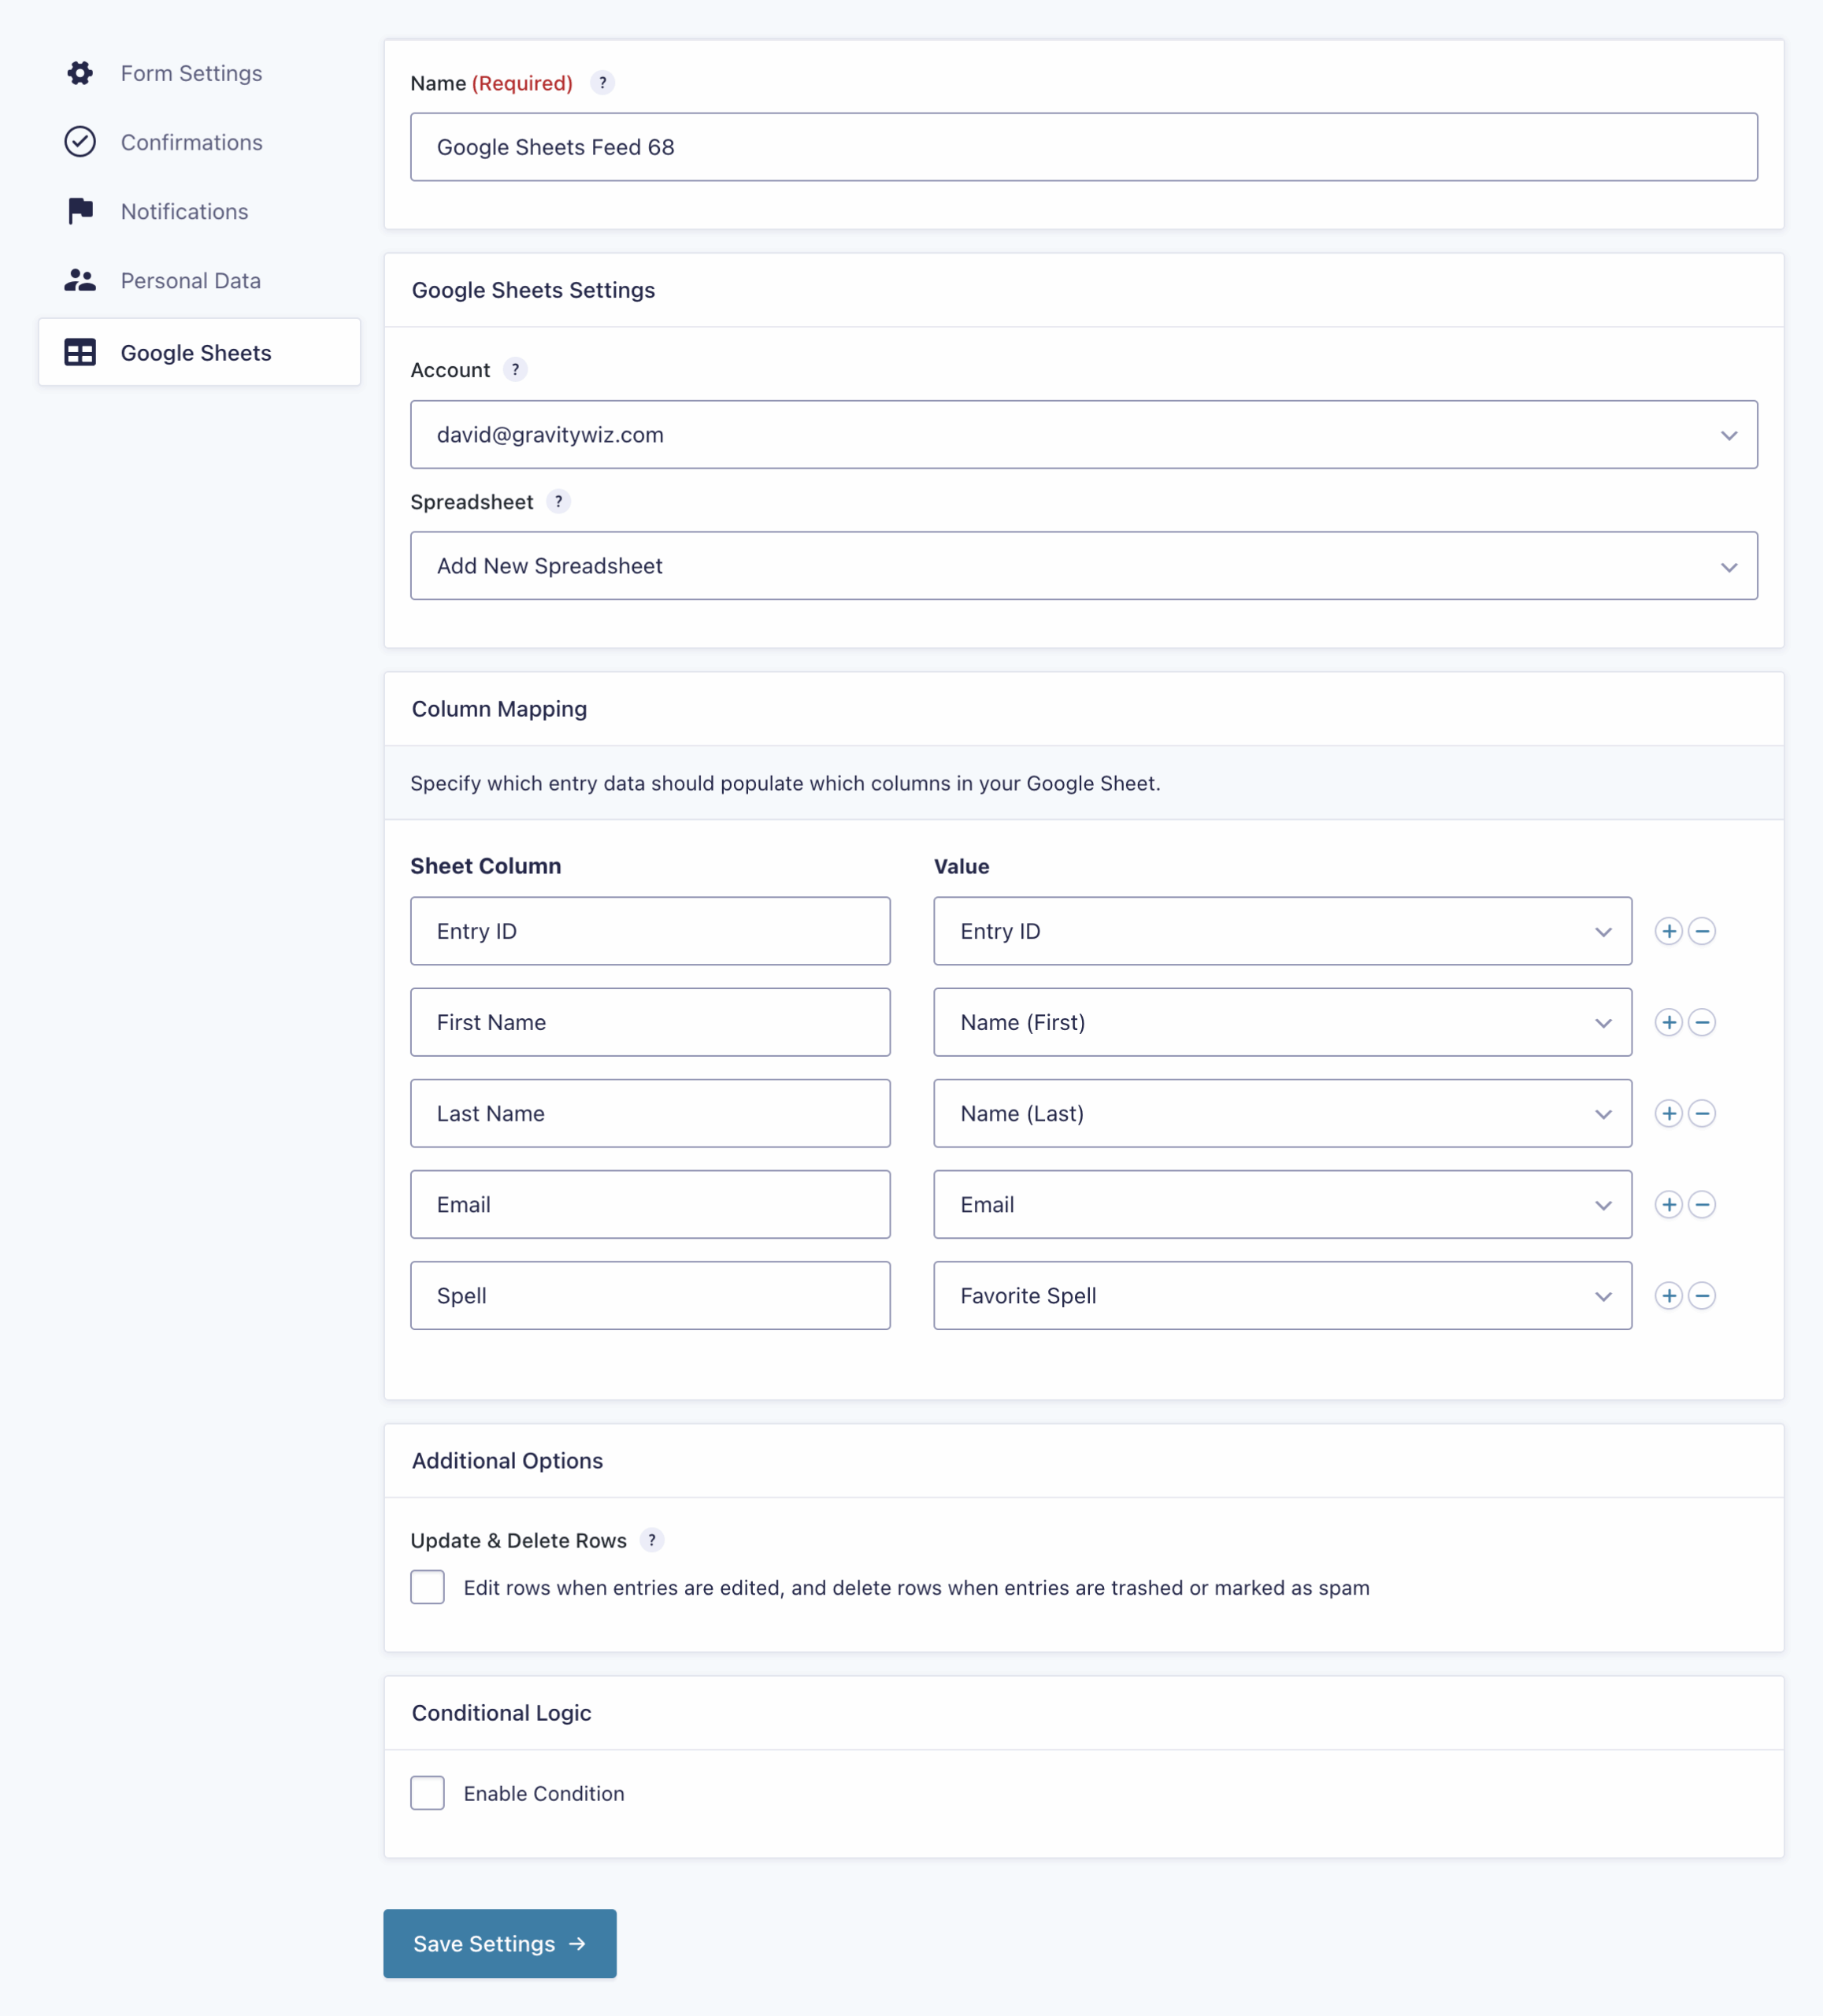
Feed Settings
When configuring feeds for the Google Sheets Connection, you will be presented with the following settings.
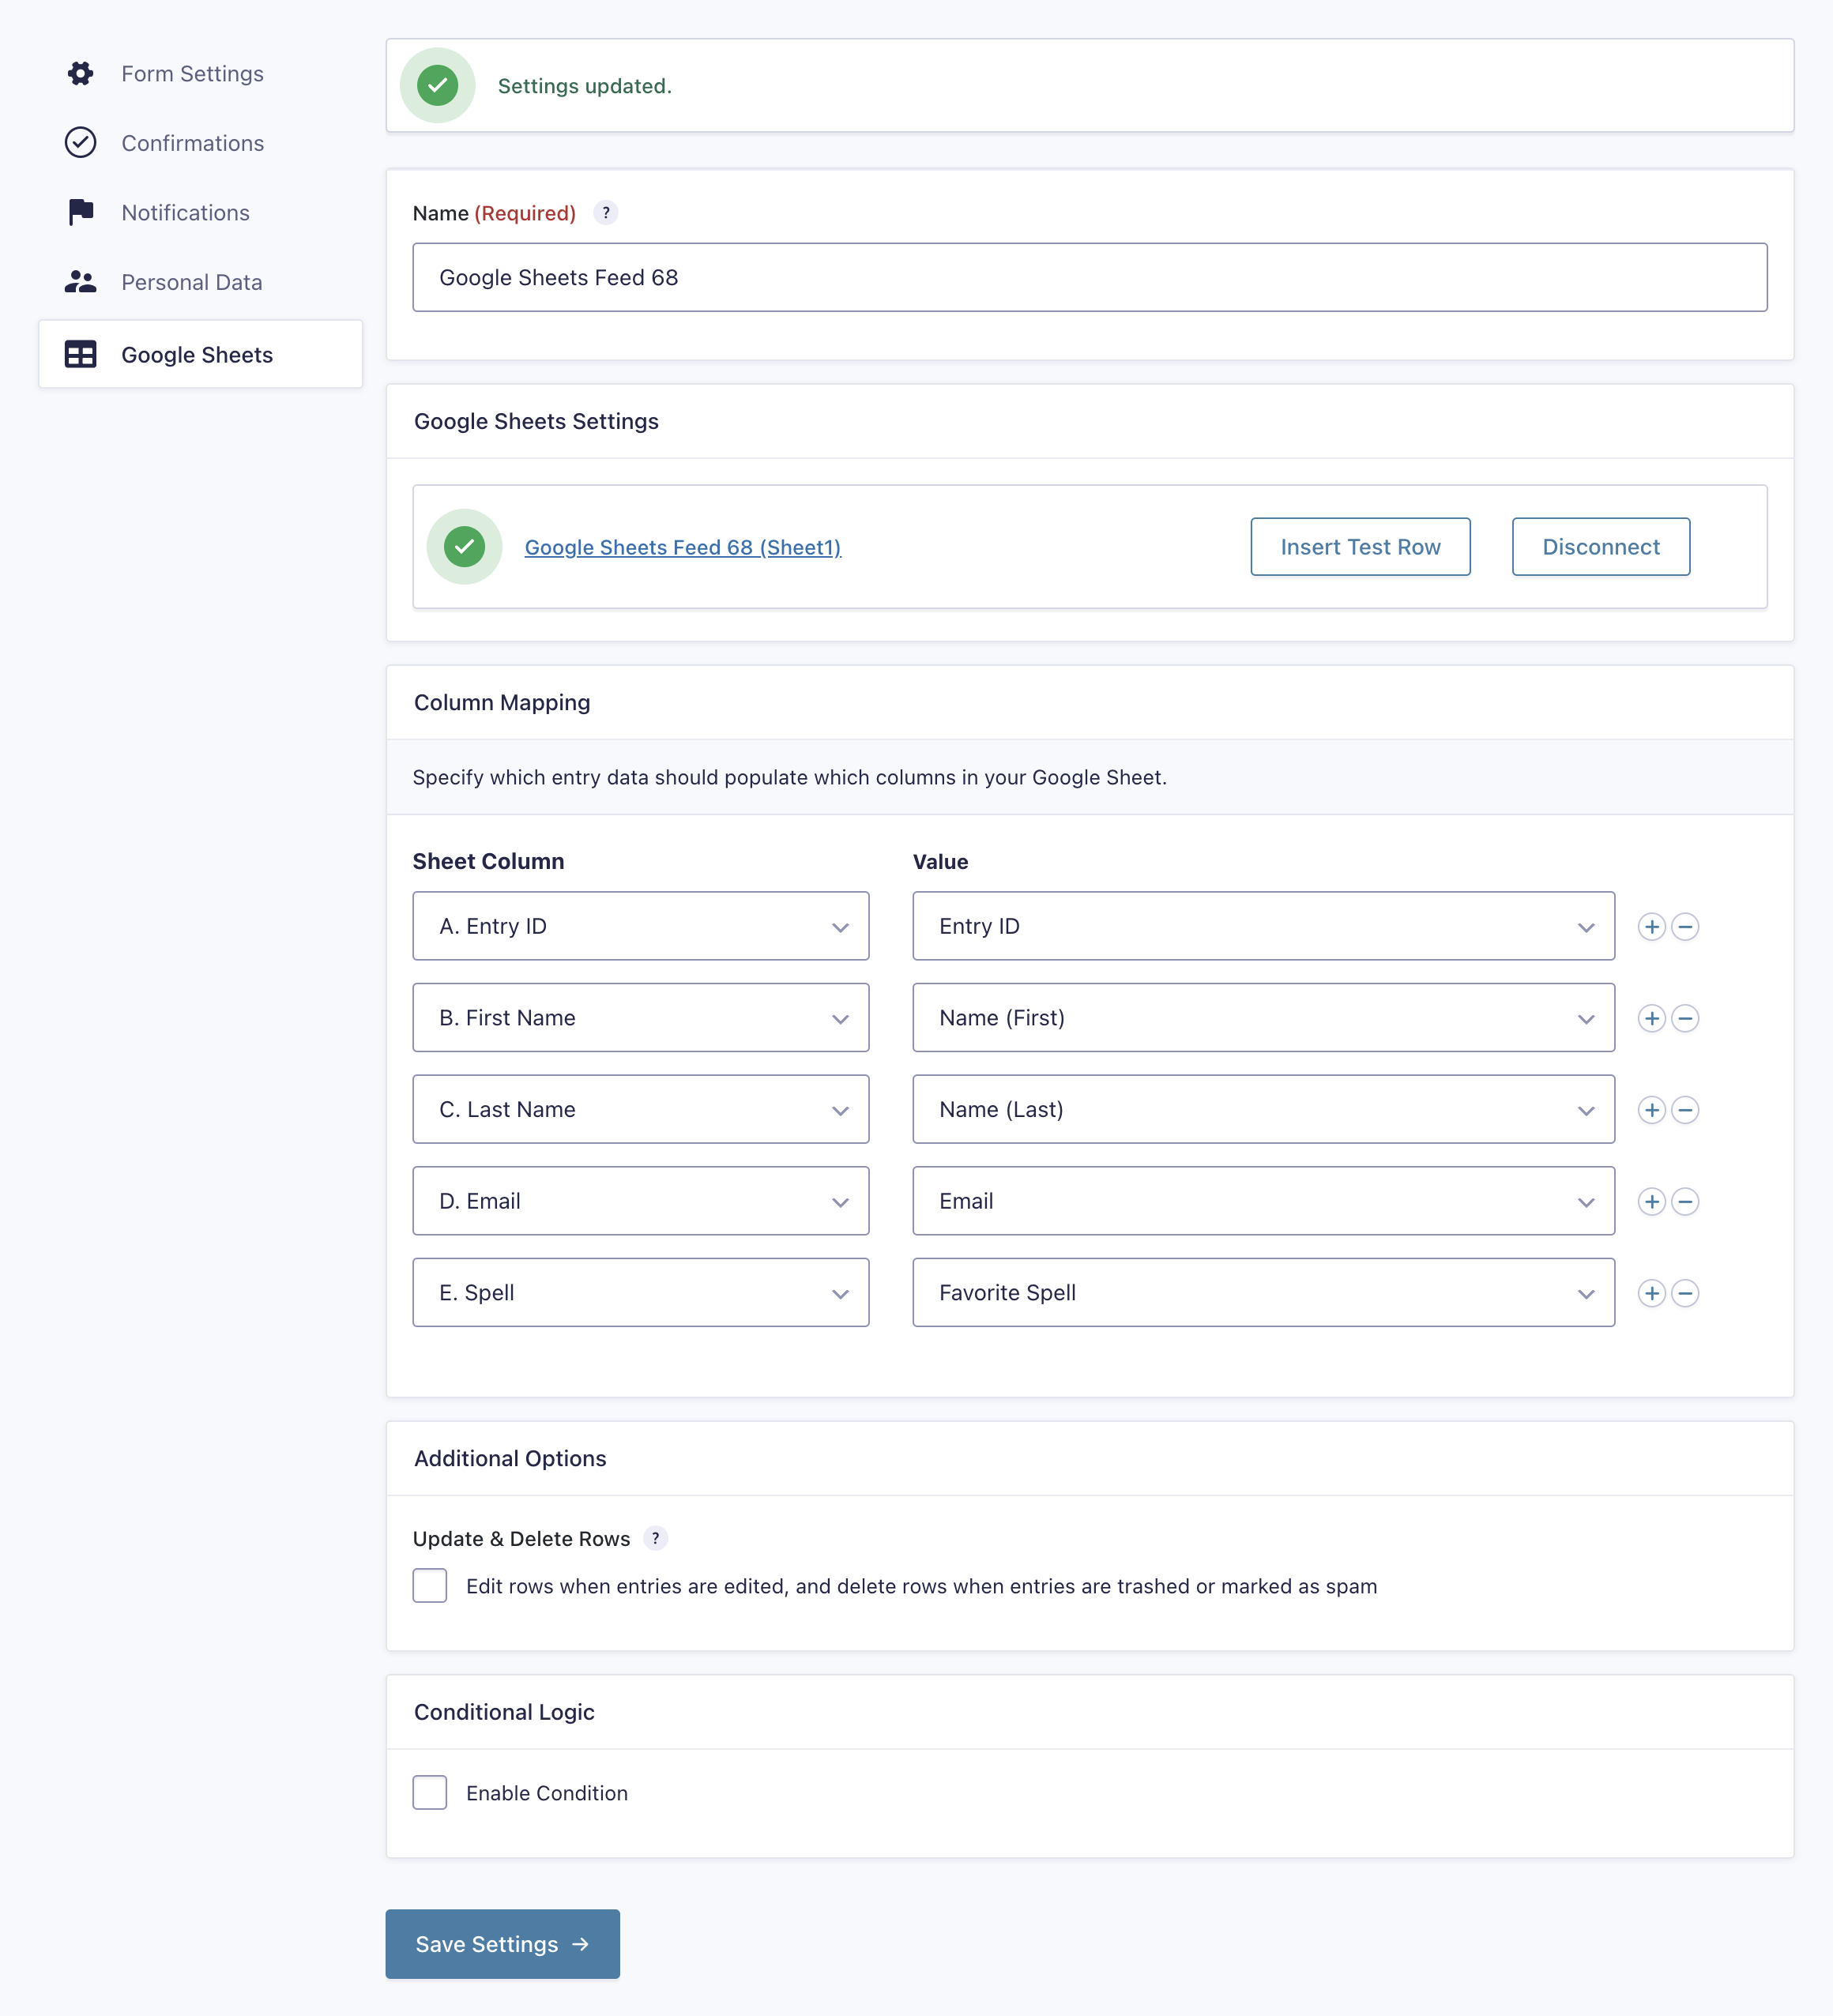
After you have either created a new Google Sheet or selected an existing, the settings will then change to the following.
Google Sheets Settings
Use these settings to select an existing Google Sheet or create a new one. There are three steps to connecting a spreadsheet to a Google Sheets feed.
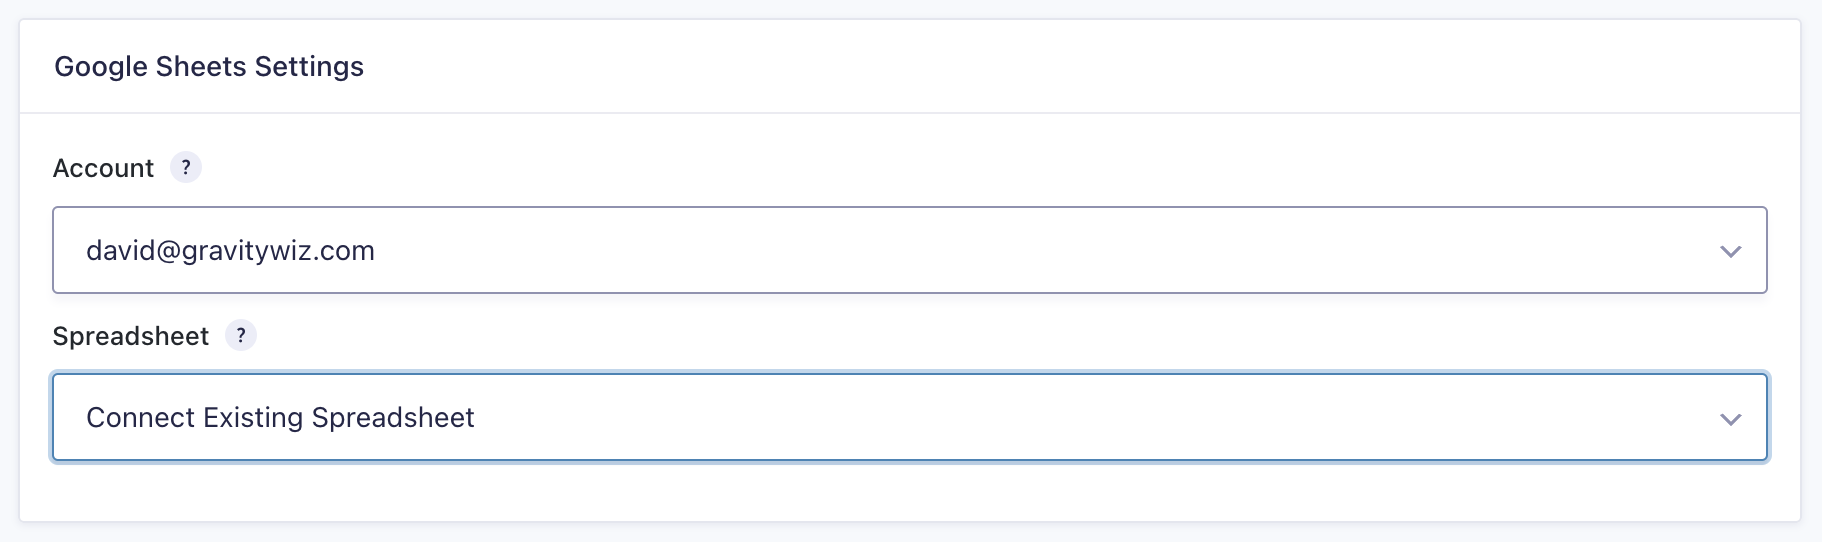
Account: Select the Google account to which your desired spreadsheet belongs or in which a new spreadsheet will be created. You can authorize a new account by selecting the Authorize New Account option or select a previously authorized account.
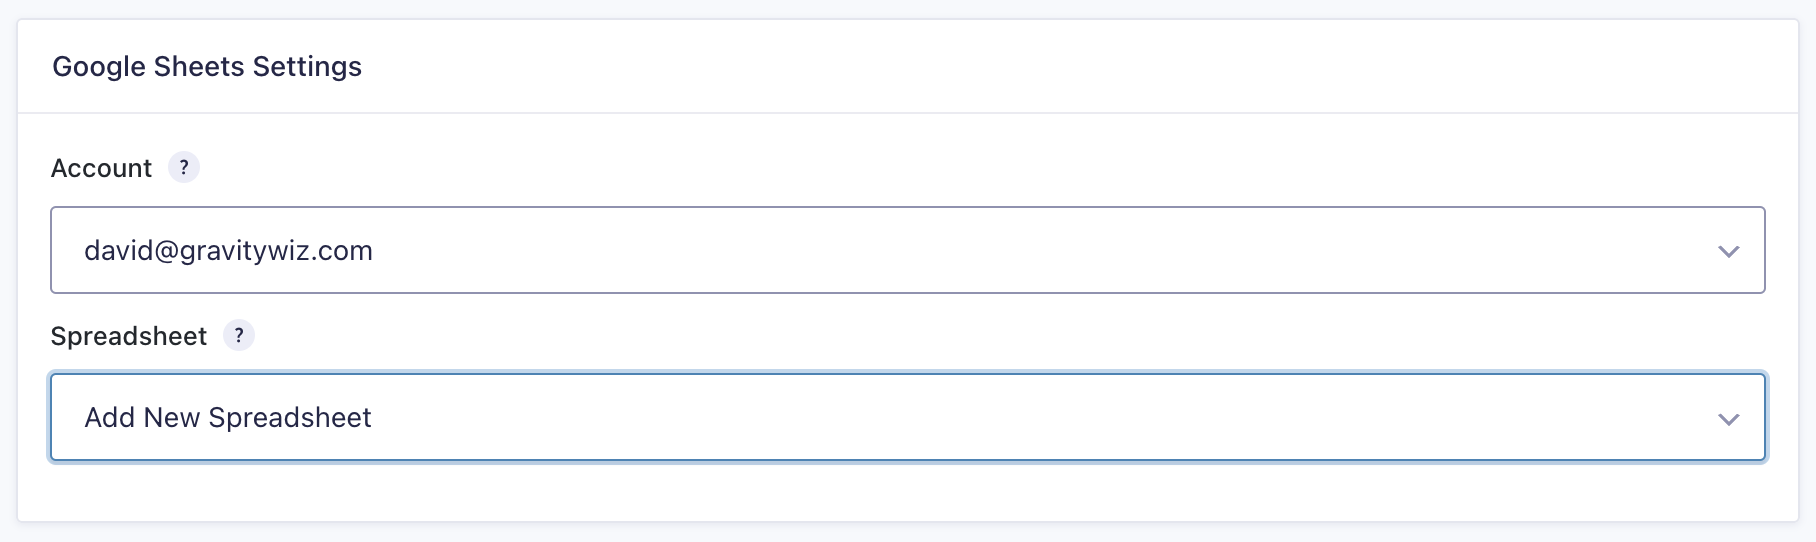
Spreadsheet: Select the spreadsheet in which entry data should be captured. You have three options.
- Create a new spreadsheet specifically for this feed by selecting Add New Spreadsheet.
- Connect an existing spreadsheet that has not previously been connected by selecting Connect Existing Spreadsheet.
- Select an previously connected spreadsheet.
Sheet: Select the specific sheet in your spreadsheet in which entry data should be captured.
Select an Existing Sheet
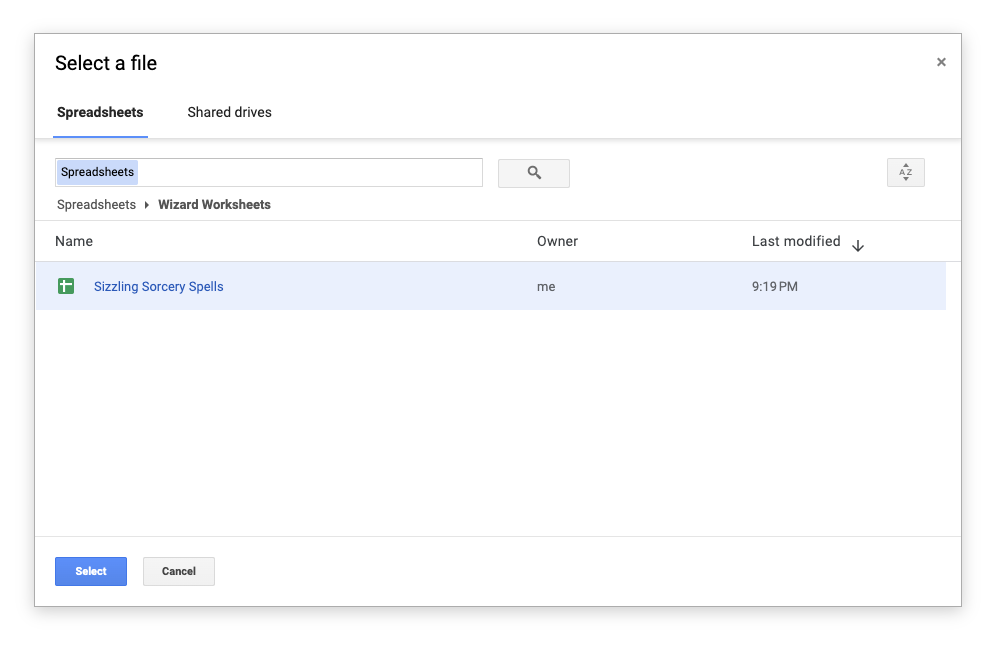
If you have an existing spreadsheet already in Google Sheets, you can select it using “Connect Existing Sheet.”
After selecting Connect Existing Sheet, a new tab will open with a secure Google Picker that will allow you to select the spreadsheet you would like to connect. This spreadsheet will now be available for selection on the current feed, any other feed, and via Populate Anything, if enabled.
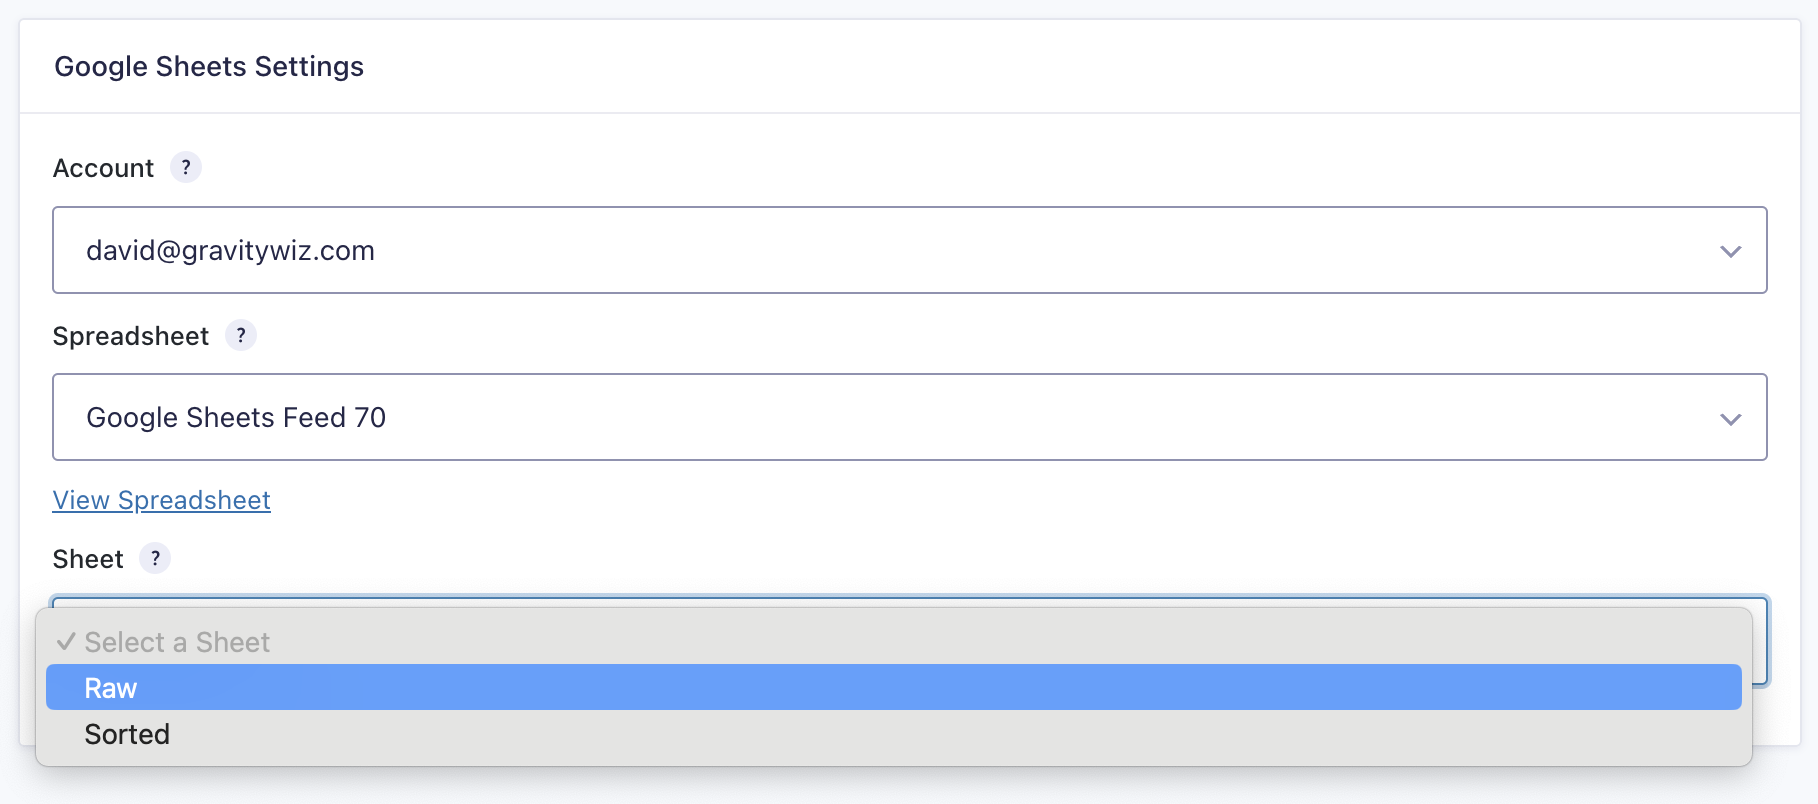
After connecting and selecting the spreadsheet, you will be presented with the option to select which sheet (or “tab”) to use in the spreadsheet.
Create New Sheet
Selecting “Create New Sheet” will create a new Google Sheet in the root of your Google Drive with the name of the feed.
The column headings will match the keys entered in the Column Mapping section.
After Connection
Once a sheet is selected or created, you will see an option to Disconnect the sheet as well as a handy Insert Test Row button to confirm that everything is working as expected.
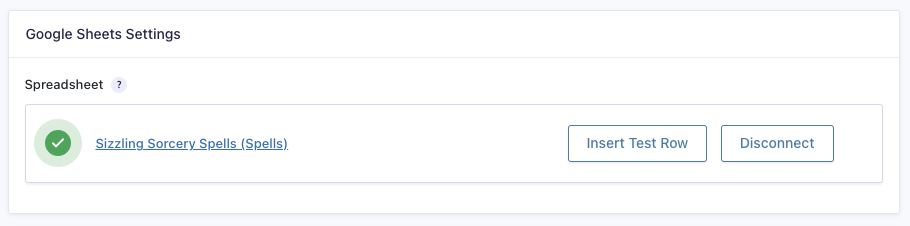
Not only does disconnecting the spreadsheet allow you to connect to a different sheet, it can also be useful for troubleshooting.
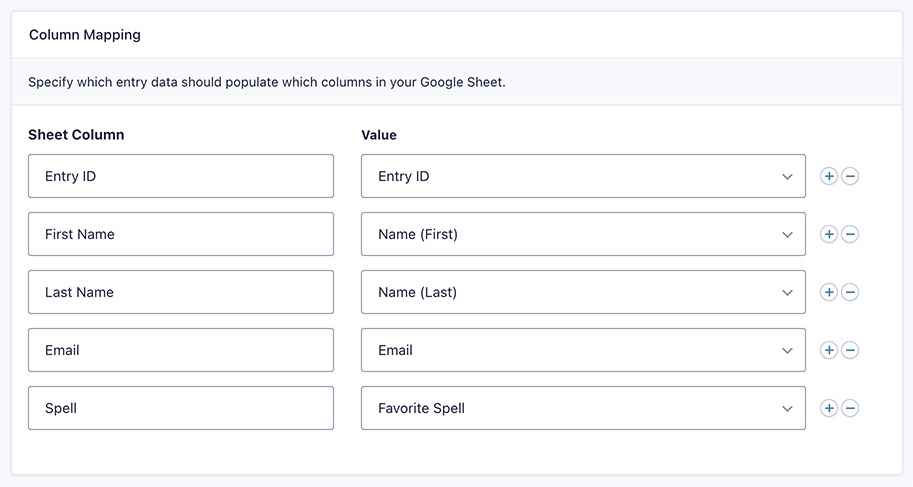
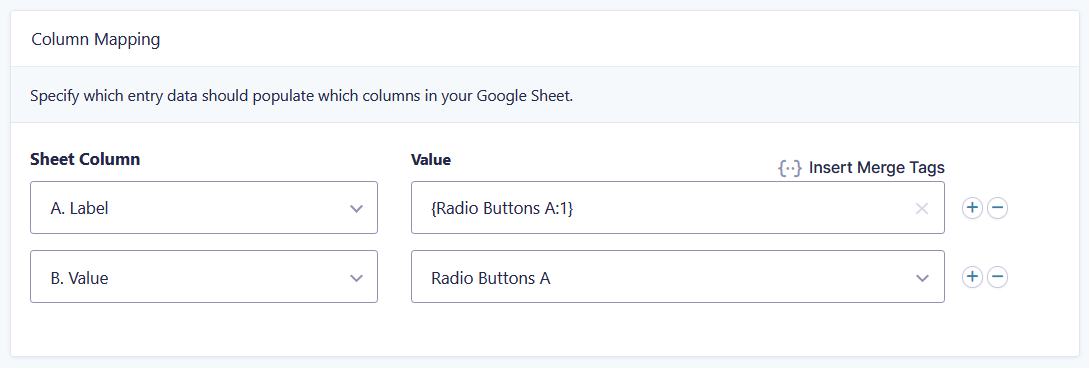
Column Mapping
Use this section to map your form fields to columns in your Google Sheet. For a new spreadsheet, you can write in any column names you’d like. For existing spreadsheets, you can select existing columns or add additional columns by selecting “Add a Custom Key” from the drop down.
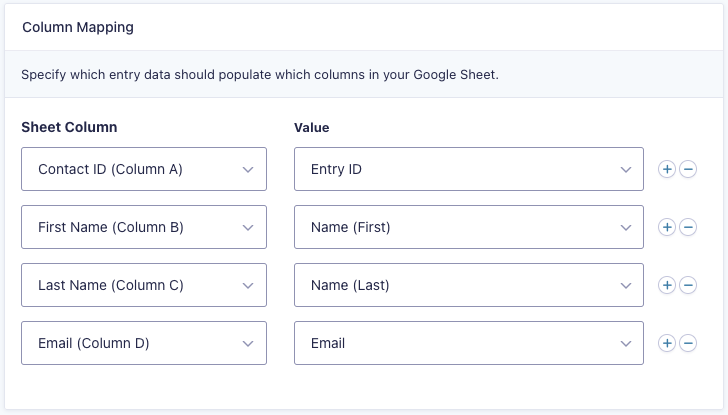
Columns can be reordered in Google Sheets without breaking the column mapping in the feed.
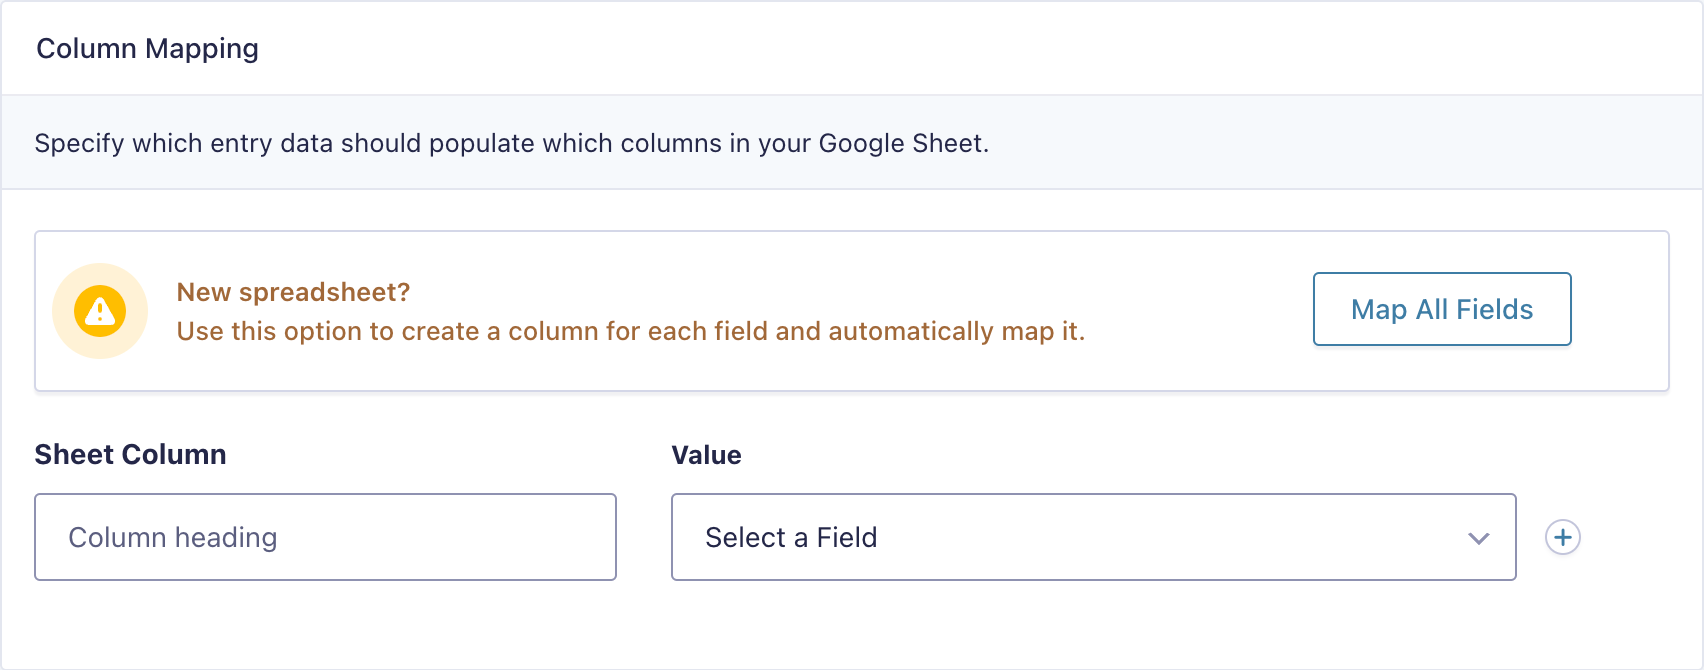
Auto-mapping Columns
On large forms, mapping columns to fields can be quite a chore. Auto-mapping will dramatically expedite this process.
For new spreadsheets, the “Map All Fields” button will add a column for each form field, preselect the corresponding field, and name the column based on that field.
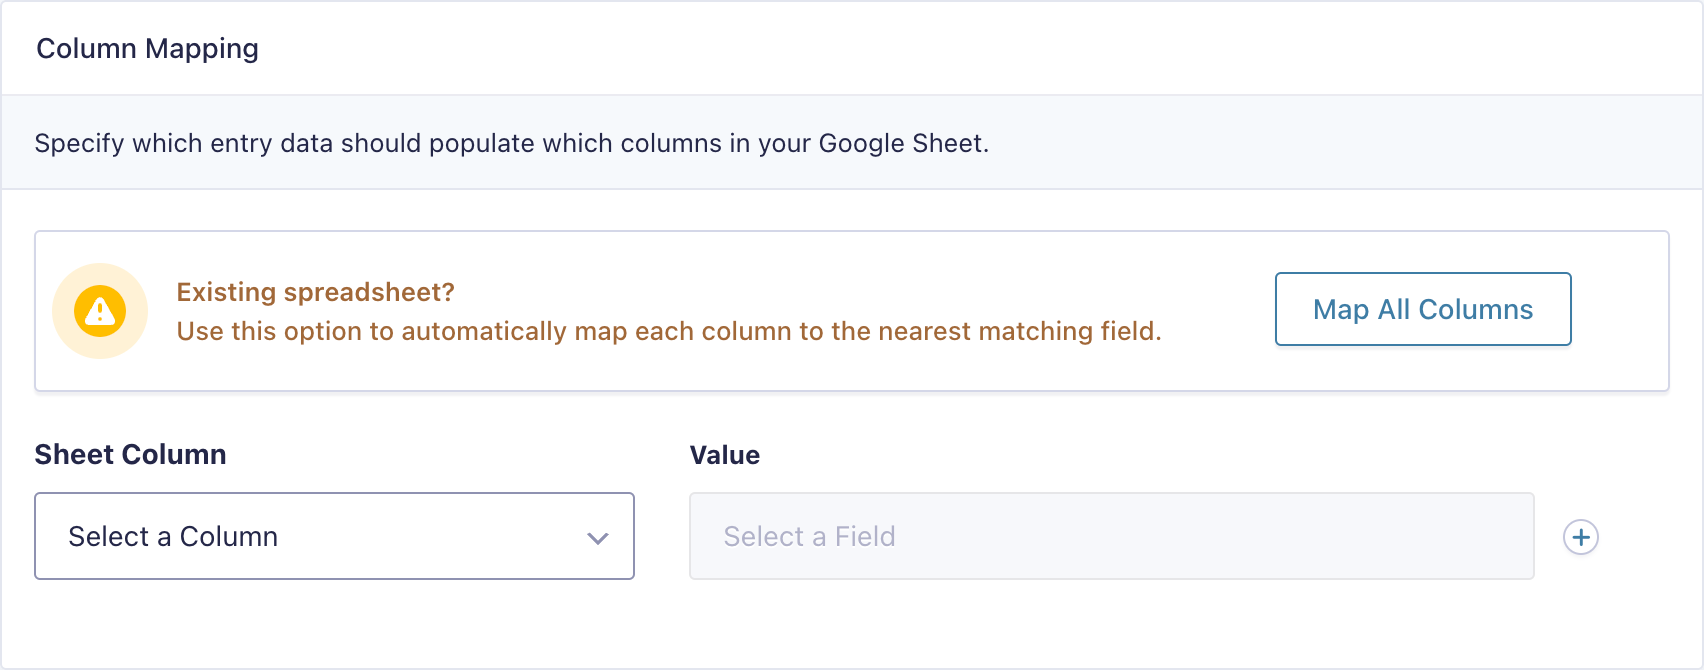
For existing spreadsheets, the “Map All Columns” button will add a mapping row for each column and preselect the the best-fit field based on the column name. You should always validate the mapping to ensure you’re happy with the results.
Additional Options
Update & Delete Rows
If you would like to keep your Google Sheets data synced to your entry data, enable the Update & Delete Rows option. When enabled, rows will be edited when entries are edited and deleted when entries are trashed or marked as spam. If an entry is restored from trash or “unspammed”, the entry row will be reinserted at the end of the spreadsheet.
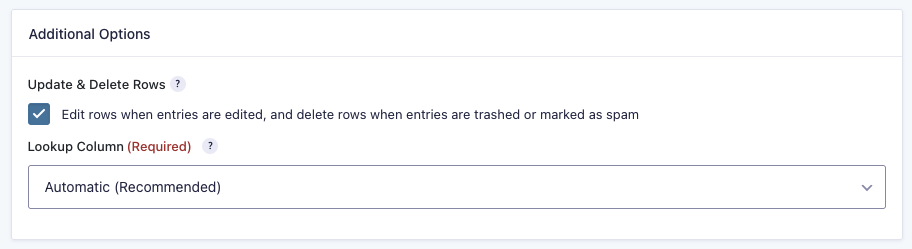
Lookup Column
The Lookup Column is the column GCGS uses to find which row to update in your sheet by using the field value mapped to that same column in Column Mapping. GCGS compares the value of that mapped field with the values in the Lookup Column and updates the first row where a match is found.
You can choose between:
- Automatic (Recommended): Adds a “GCGS Lookup ID” column to the sheet and a hidden “Entry Hash” field to the form.
- Any other column: Use an existing column in your sheet instead.
Automatic is set as recommended because it automatically generates a unique Entry Hash for each entry, preventing accidental double row edits. If you’d like to hide the GCGS Lookup ID column created in your sheet, there are two ways:

Simple Hide
Toggeable Group
- Right click the column.
- Select Hide column.
- To unhide, press the ➡️ arrow on the column to the right of the hidden column. If you do so, you’ll have to repeat these steps to re-hide the column.
- Right click the column.
- Select View more column actions.
- Select Group column.
- To hide or unhide the column, click on the ➖ /➕ toggle right above the sheet.
Keep in mind: Entries created before Automatic is selected won’t retroactively get an Entry Hash, so GCGS won’t be able to match or update them.
About feeds that were using Update & Delete Rows before version 1.4
Update & Delete Rows will continue to work as it used to and you will see an additional Legacy option under the “Lookup Column” drop down. This option utilizes Google’s developer metadata instead of a column to search for rows, which can cause issues due to unreliability and low storage capacity.
We highly recommend switching to column lookup. Learn more.
Conditional Logic
You may not want to send data from every entry to your Google Sheet. In this case, use conditional logic to filter which entries get sent or which entries do not. Add as many conditions as you need.

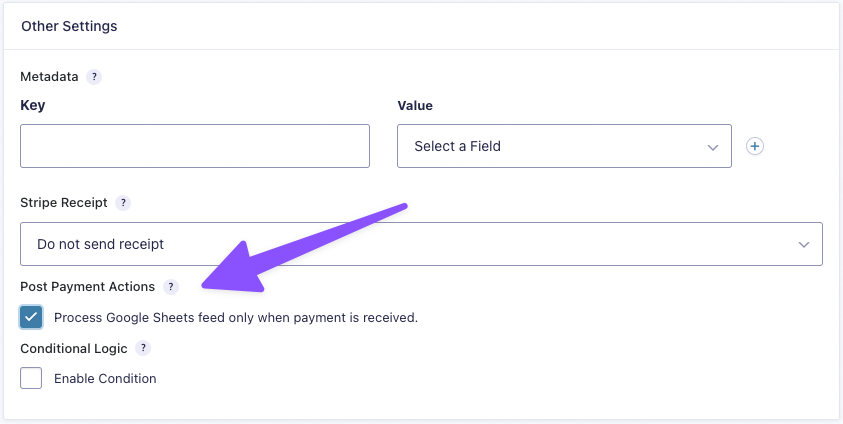
Post Payment Actions
The Google Sheets Connection integrates with Gravity Forms “delayed payment” system, allowing feeds to only be processed after a payment has been received. This means you can wait to insert the entry row into a Google Sheet until after the user has completed their payment.
Please note: This setting is available only in the feed settings of your payment add-on when using the checkout option. It does not appear when using the payment card field option, and it is not available in the Google Sheets Connection feed. Here is an example from the Stripe add-on.
Usage Examples
Related Snippets
- Custom Query Build Arguments
- Force Field Value to be Added to the Sheet as a String
- Process Feed when Partial Entry is Saved
- Process Feed when a New Entry is Created via Gravity Flow Form Connector
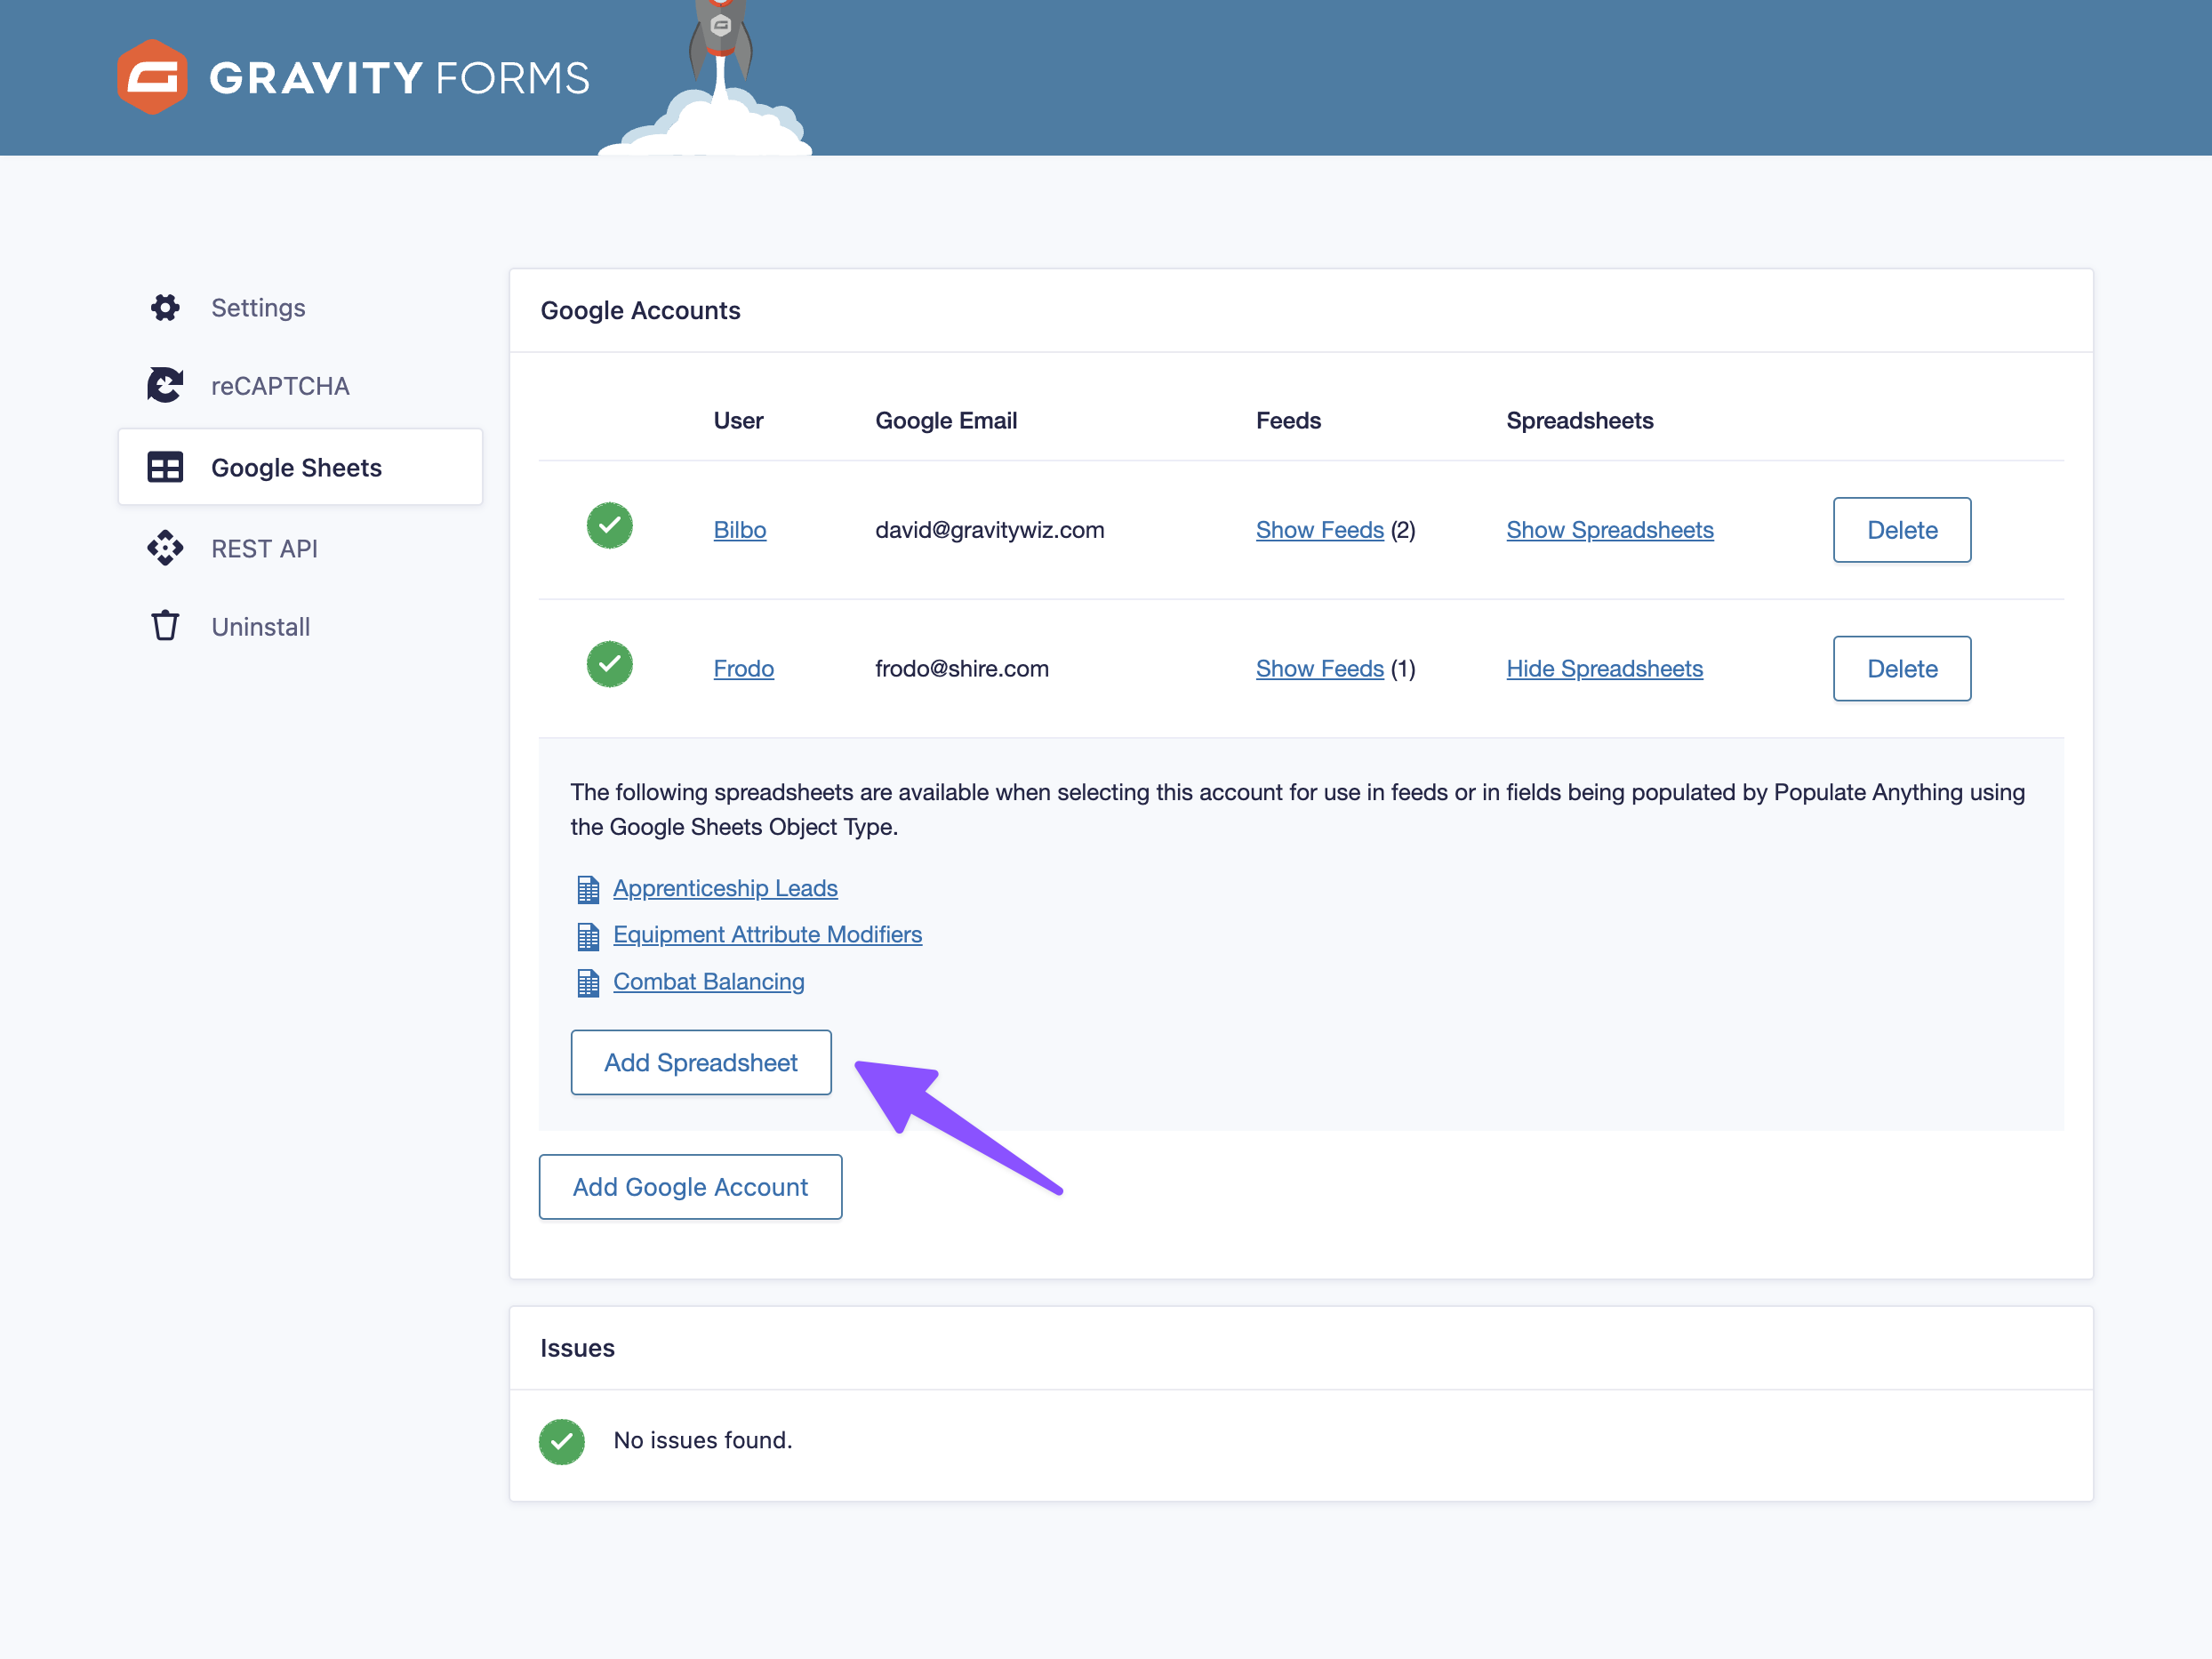
Manage Google Accounts
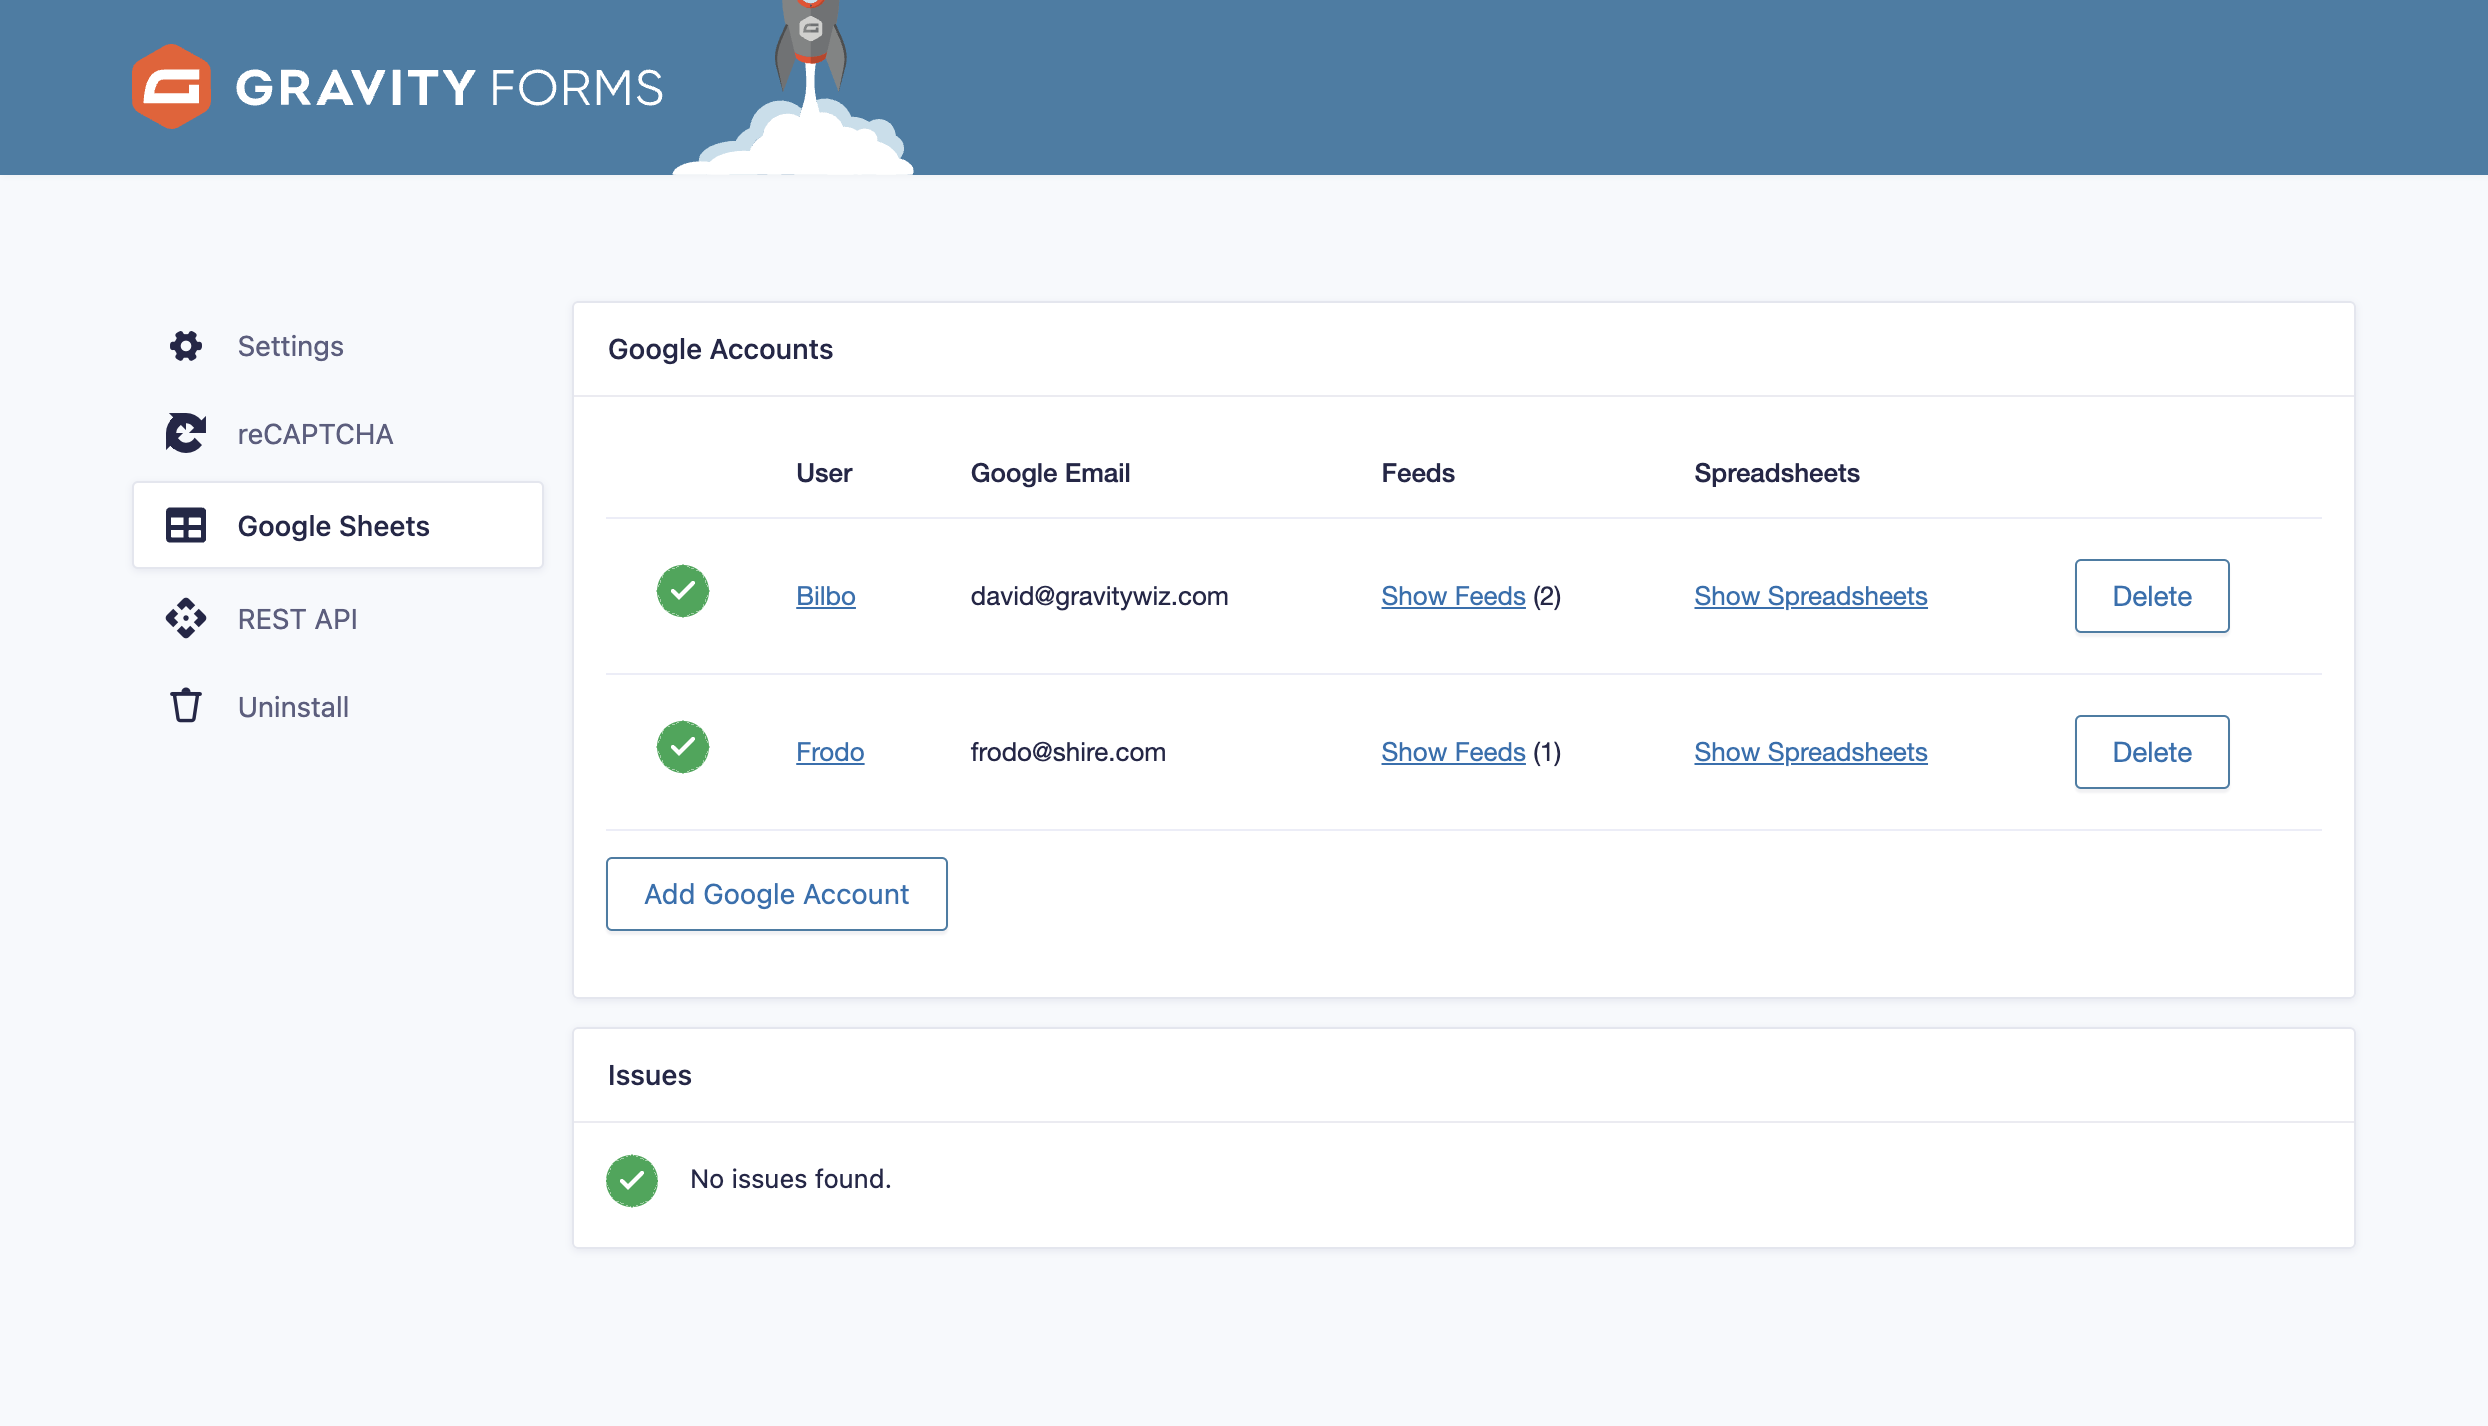
You can manage authorized Google accounts on the plugin settings page. The Google Accounts section provides a list of authorized accounts, including the WordPress user who authorized the account and the feeds and spreadsheets connected via that account.
You can delete a Google account to disconnect it from the current site by clicking the Delete button. You can authorize a new Google account by clicking the Add Google Account button at the bottom of this section.
Related Snippets
Send Existing Entries to Google Sheets
If you’re implementing the Google Sheets Connection on a form that has existing entries, you may want to send those entries to a spreadsheet. Here are two ways to do this.
Bulk Process Feeds
Our free GF Feed Forge plugin allows you to bulk process feeds for most feed-based add-ons (including the Google Sheets Connection). This is by far the easiest way to send existing entry data to your Google Sheets.
Process Feeds on Import
GravityImport allows you to automatically trigger the feed for each imported entry.
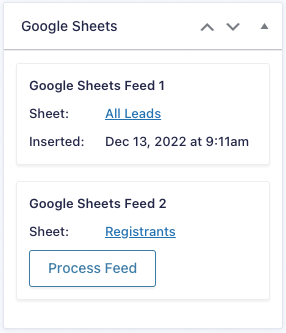
Entry Detail Meta Box
Use the Google Sheets meta box on the Entry Detail view for an overview of which Google Sheets feeds have been processed for the entry and which were not processed. You can see the time the entry row was inserted into a given spreadsheet and, if the Update & Delete Rows option is enabled, when the entry row was last updated.
Please note, when reprocessing a feed, the feed’s conditional logic is ignored.
Required Capabilities
To interact with GC Google Sheets, users/roles are required to have specific GC Google Sheets capabilities via WordPress user roles.
| Capability Label | Description | Capability Slug |
| Google Sheets: Form Settings | Lets user configure GC Google Sheets feed settings. | gc-google-sheets_form_settings |
| Google Sheets: Add-On Settings | Lets user view and edit the GC Google Sheets Add-On settings. | gc-google-sheets_settings |
| Google Sheets: Uninstall | Lets user uninstall GC Google Sheets. | gc-google-sheets_uninstall |
Integrations
GP Populate Anything
The Google Sheets Connection integrates seamlessly with our popular Populate Anything plugin (available with the Gravity Perks suite), allowing you to populate data directly from Google Sheets into your form.
When activated, Populate Anything will have access to any sheet created by or authorized for use with the Google Sheets Connection. If you would like to authorize a sheet specifically for use with Populate Anything, you can do so from the Google Sheets plugin settings.
For full details on this integration, see the Populate Anything documentation.
GP Nested Forms
You can import parent and child forms to the same spreadsheet by creating a feed for both the parent and child form. The parent form feed will be processed first and then the child form feed.
GP QR Code
It’s possible to send the URL of a QR Code generated by GP QR Code to Google Sheets. When mapping your spreadsheet columns, select the Add Custom Value option and insert the QR Code merge tag for the field you want.
In this example, the QR Code URL will be inserted into the Selected Option column in Google Sheets:

Developer’s Notes
Google Sheet Security
Privacy and security are core tenets of our authentication flow. Your Google Sheets data will never touch our servers.
Our OAuth service will handle getting an access/refresh token and pass it directly back to your WordPress site. There is no database attached to the service.
You will only interact with our OAuth service during initial authentication, when using the “Select existing sheet” functionality, refreshing access tokens, or re-authenticating your connection. For all other requests, your site will communicate directly with the Google APIs.
What can GCGS access?
GCGS can only access spreadsheets that you authorize. This includes spreadsheets created by GCGS and any existing sheet that has been connected to a GCGS feed.
It is important to note that when you disconnect a Google Sheet from a feed, this does not remove GCGS’ access to this spreadsheet. It is not possible to remove GCGS’ access to a specific spreadsheet once authorized. Instead, you must remove GCGS’ access globally and then reauthorize each feed/spreadsheet individually.
How does GCGS authentication work?
As of version 1.1, the Google Sheets Connection allows you to authenticate multiple Google accounts per user and no longer requires a “global” account. Any user with the capability to create new GCGS feeds will be able to select from a list of previously connected feeds; however, each user must authorize their own Google account in order to connect their own spreadsheets.
Administrators can manage which Google accounts are connected via the Google Accounts section on the plugin settings page.
GCGS will do everything it can to maintain a connection with any authorized Google account; however, there are some scenarios where an account or spreadsheet must be manually reauthorized/reconnected. For example, changing your Google account password or removing GCGS’s access to your Google account.
Check out the Issues section on the plugin settings page for a list of any connection issues GCGS may be experiencing.
Legacy Tokens
GCGS Beta 1 used a different authentication schema to connect to Google Sheets. Tokens generated via this schema are now considered legacy tokens. We strongly recommend re-authenticating feeds connected via a legacy token with the current authentication method.
To re-authenticate a feed attached to a legacy token, follow these steps:
- Disconnect the legacy token from your feed.
- Re-connect by authorizing your Google account and choosing a new or existing sheet.
Developer Metadata
Prior to version 1.4, GCGS used to use developer metadata on the sheet to store the relationship between rows and entries. Google has a hard limit on the amount of developer metadata that can be stored on a sheet. As of version 1.4, this feature has been switched to Lookup Column instead.
Feeds created before the 1.4 update will continue to rely on developer metadata until their lookup column is set. When this developer metadata is full, you may see an error in the entry notes stating the developer metadata would exceed the allowed storage limit.
This is not an error per se, but a warning from Google that the developer metadata is full. When this happens, new entries will continue to be sent to Google Sheets with no issues. However, the Update & Delete Rows feature will not work for new entries.
Known Limitations
- The Google Sheets Connection requires a header for each column that is mapped, and any column that comes before a mapped column. Even a character as simple as
-works as a header.- Advanced: If a column comes after all mapped columns, a header is not required.
- Similar to mapped columns requiring a header, hiding the first column that is mapped can cause Google’s appending logic to add the row to the top of the sheet rather than the bottom.
If any of these known limitations impact you, we’d love to hear from you. While some limitations are beyond our control, understanding how these limitations impact you is incredibly important in how we prioritize ongoing product development.
Error Handling
If there is an error processing a feed, the Google Sheets Connection will log that error as a note for the corresponding entry. If the error is due to a configuration issue, you can reprocess the feed via the Entry Detail Meta Box after correcting the configuration issue.
Error Notifications
GCGS will attempt to reprocess any feed that fails to process. If the error persists, a notification with be sent to the site administrator with recommendations on next steps. This notification will only be sent once per hour.
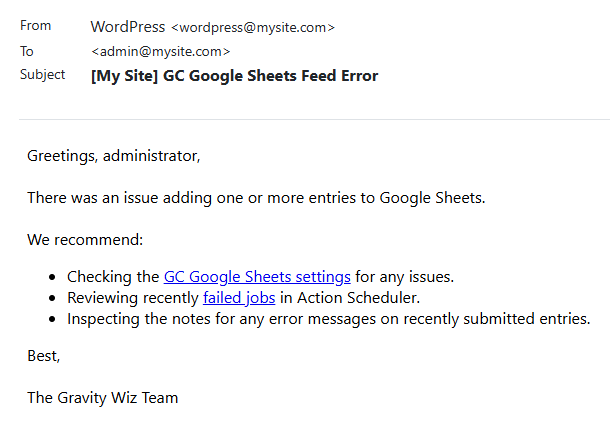
If you would like to be notified immediately of every error, you can create your own notification using Gravity Forms’ form notifications and selecting the “Google Sheets Feed Error” notification event.

Action Scheduler
To further increase the robustness of the Google Sheets Connection, any interactions with an entry that triggers a change in a Google Sheet (adding, editing, and deleting entries) will be run through Action Scheduler.
Troubleshooting Issues
If the Google Sheets Connection is not working as expected, here are some troubleshooting steps you can take:
- Check the Issues section for any account or feed related issues.
- Ensure cookies are enabled when selecting a spreadsheet to connect.
- If your account has disconnected from GCGS, check if your Google password has changed, or if access has been revoked. There are a few situations that will cause an account to become disconnected.
- If entries are failing to send to Google Sheets automatically, but work when manually triggering the feed via the entry view, the issue may be related to asynchronous feeds not working on your site.
- To see if this is the case, use this snippet to temporarily disable the asynchronous nature of the Google Sheets feed.
- If entries are successfully sent automatically when the snippet is active, you will need to reach out to your host to find out why asynchronous feeds are not working.
- Asynchronous feeds may also be negatively impacted if WP-Cron is disabled in an environment.
- To check the status of WP-Cron, navigate to Forms > System Status, and then view the “WordPress Environment” section. If enabled properly, WP-Cron should have a value of “Yes”.
- For a more comprehensive list of troubleshooting steps relating to async feeds, refer to this article.
- If all else fails, the issue may be related to Action Scheduler. Check out the Troubleshooting Action Scheduler section below.
The Issues Section
The Google Sheets Connection settings page includes an Issues section. This is the best place to start when troubleshooting.
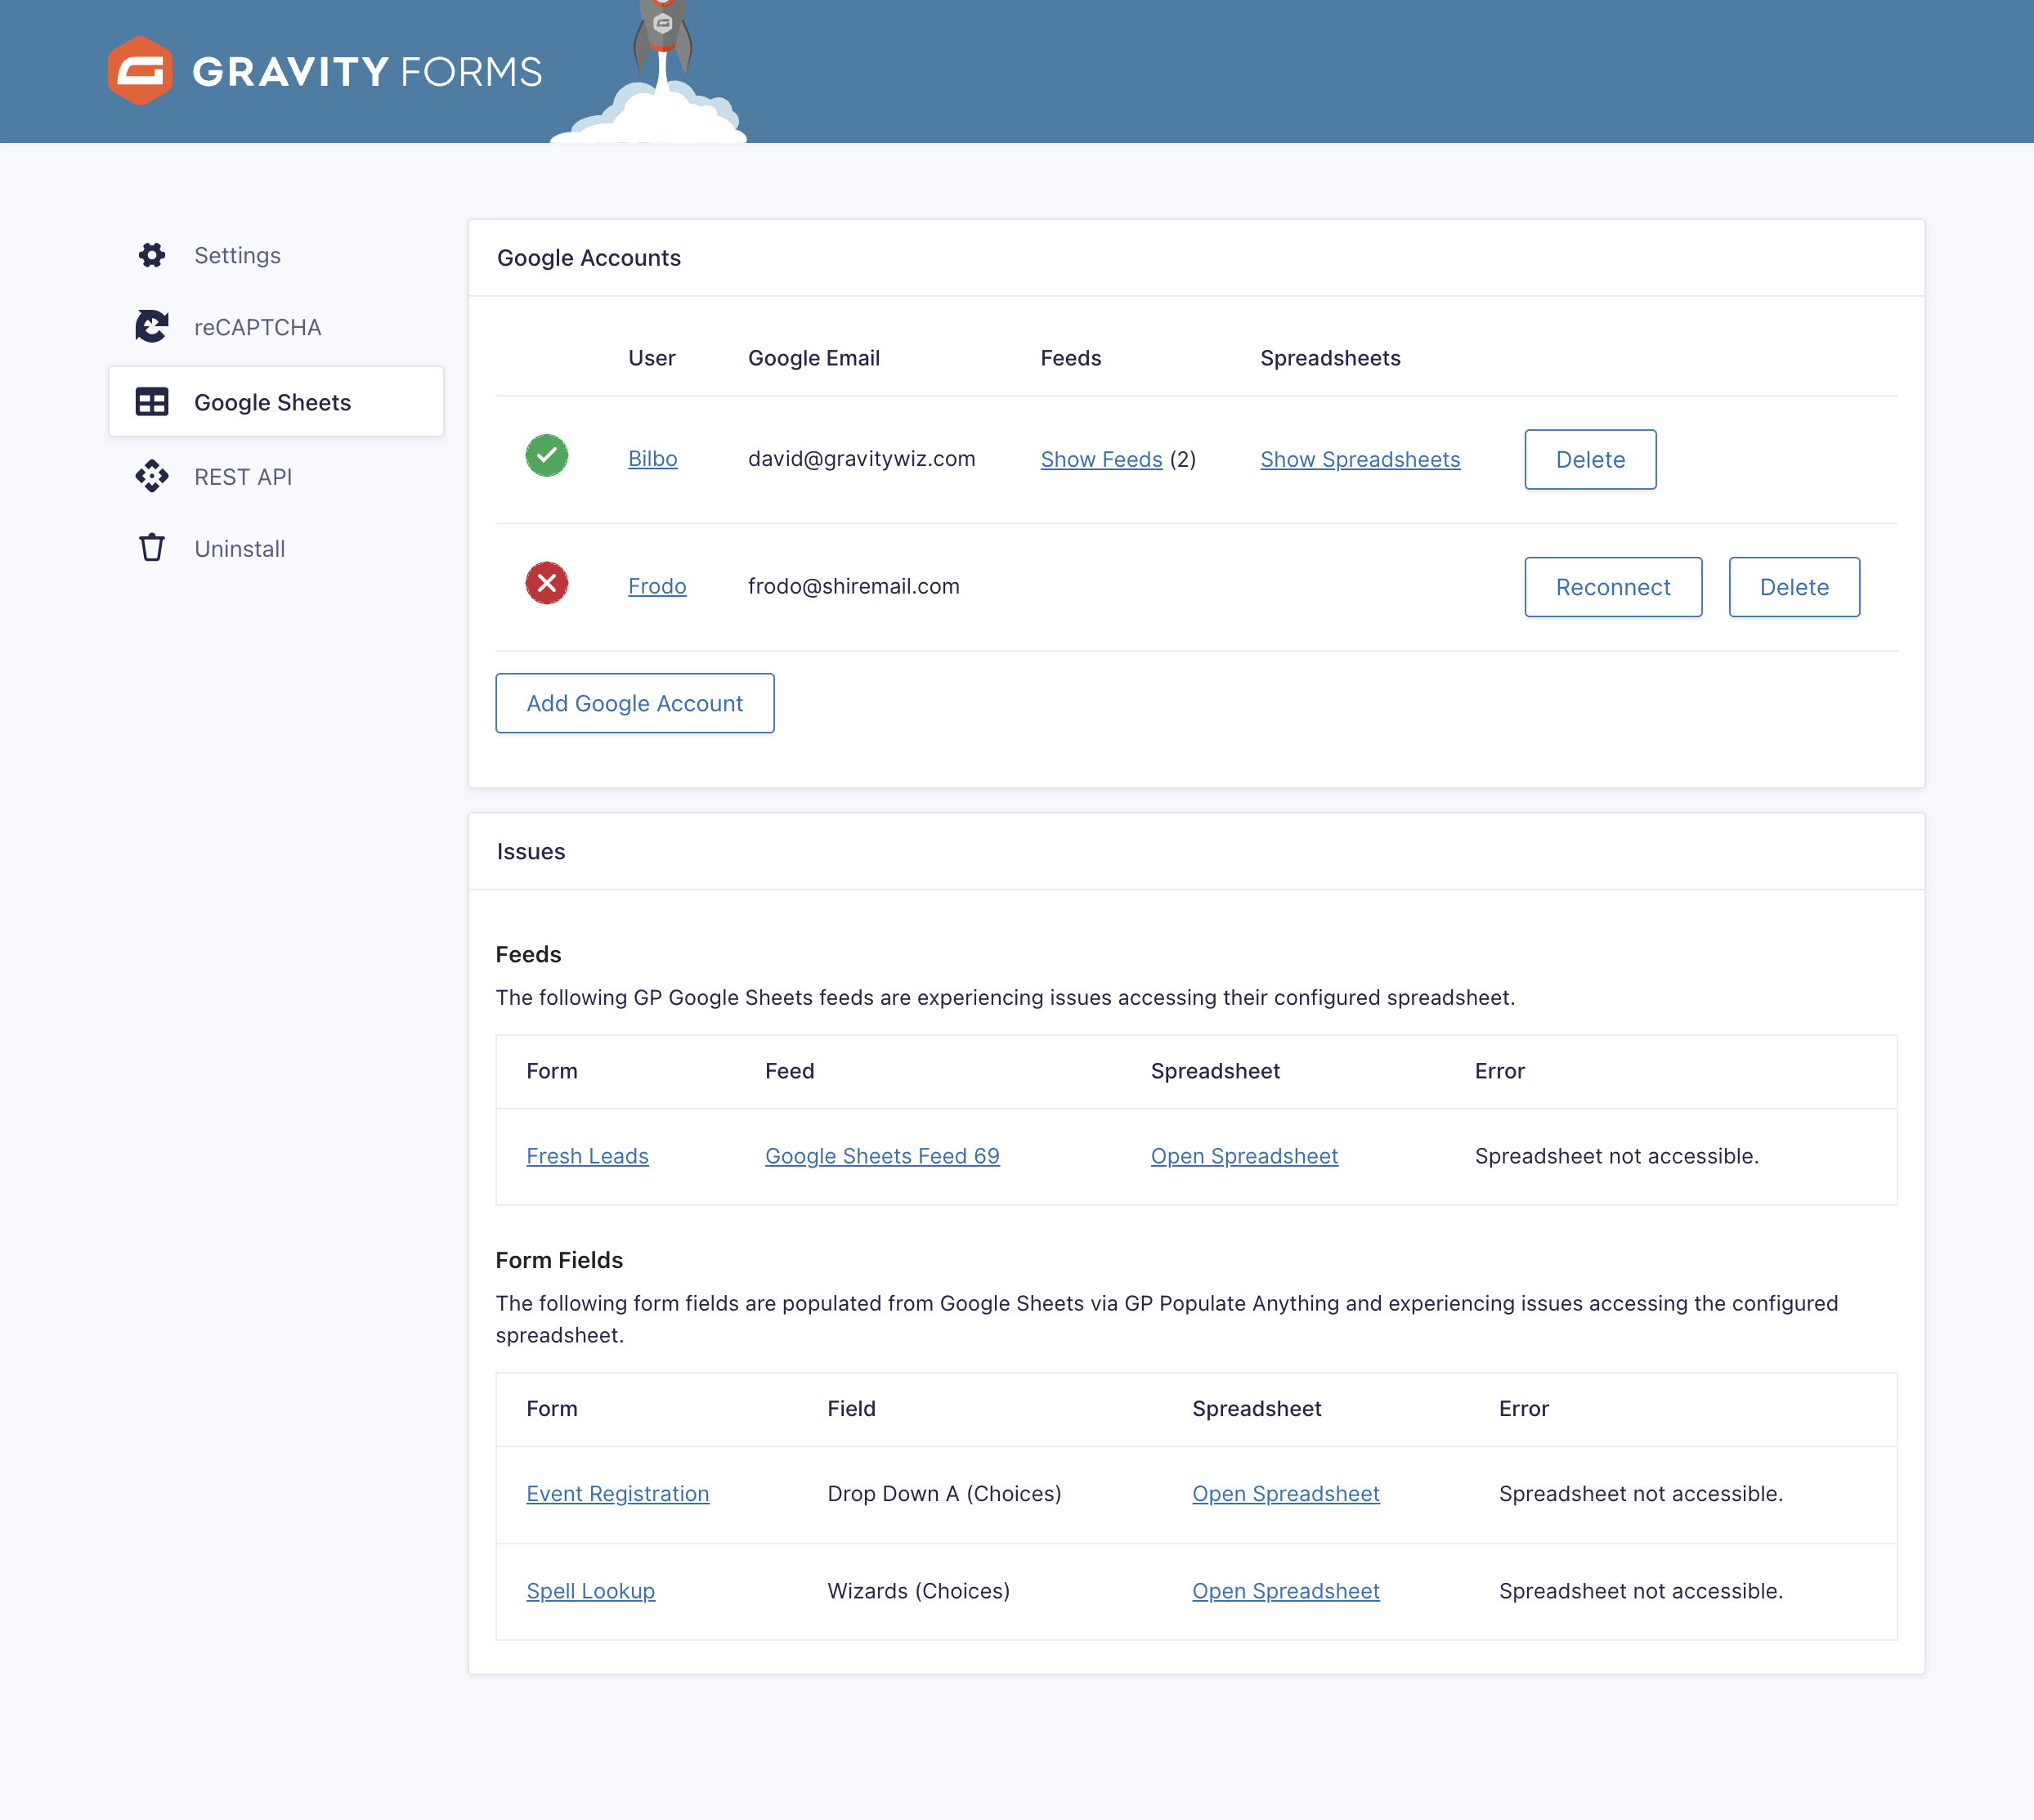
The Issues section will give you a summary of…
- Any feeds that cannot access their configured spreadsheet.
- Any form fields being populated via GP Populate Anything that cannot access their configured spreadsheet.
A few common reasons this can happen are the associated Google account’s password has changed, the spreadsheet has been deleted, or GCGS’ access has been manually removed from the account.
If an account becomes disconnected for any reason, the authorizing user can reconnect the account by clicking the Reconnect button for the disconnected account in the Google Accounts section.
Spreadsheet Selection Issues
Google’s File Picker tool requires cookies to be enabled. Please make sure that cookies are enabled in your browser by following the steps below:
Additionally, sometimes ad blocking plugins can create unexpected issues. If you’re using any form of ad blocker, try disabling it and start the setup process again.
Account Disconnection Issues
There are a few different reasons why the Google Sheets Connection may be disconnected from your Google Account. Changing your Google password, revoking access to GCGS, or API changes from Google can all cause the connection between your Google account and GCGS to break.
Thankfully, it’s easy to reconnect your Google Account via the Google Accounts plugin setting.
Troubleshooting Action Scheduler
If you’ve confirmed that your account is connected and your Connection feed is configured correctly, you may be experiencing an issue with Action Scheduler. This tool powers Gravity Connect’s ability to handle temporary failures by automatically attempting to process the feed or entry update again.
FAQ
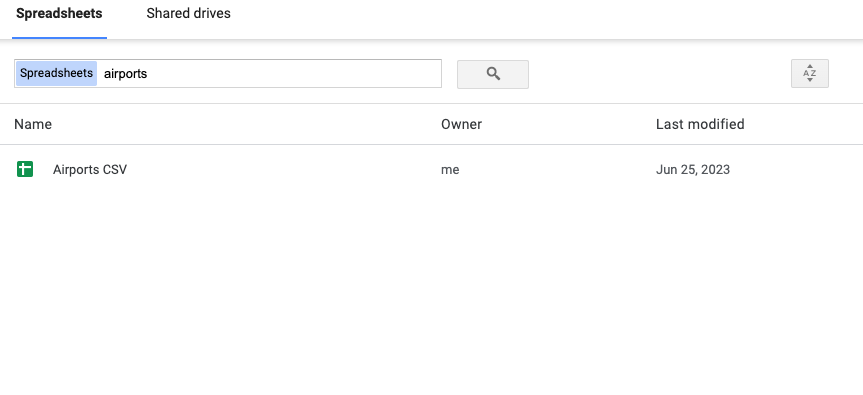
Does the Google Sheets Connection support files in shared drives?
Yes, files in shared drives are fully supported. If you’re looking to select a shared sheet and it does not appear by default, try searching for the name of the shared sheet:
Can I rename or reorder columns?
Yes. The Google Sheets Connection supports reordering or renaming columns, even after they have been mapped. To re-order a column, all you need to do is drag and drop the column heading in your Google Sheet:
Once you’re finished making your changes in Google Sheets, the feed will automatically update to use the new column order and names the next time it gets processed. That’s it!
Can I map a label instead of a value?
Yes! When setting up the Value for column mapping, select Add Custom Value. Then, click on Insert Merge Tags and insert the merge tag for the field. By default, Gravity Forms will replace merge tags with the label.
How can I allow multiple users to authorize Google Sheets?
Your best bet is to create a Google group account and add any users that should have access to authorize Google Sheets to this account. Then, ensure that all users use this same group account when interacting with Google Sheets via the GCGS plugin.
Is the Google Sheets Connection asynchronous?
Yes, the process to send form data to Google Sheets is asynchronous. This means the form will submit immediately without waiting for the GCGS feed to finish processing.
Can the Google Sheets Connection apply colors and formatting to my Google Sheet?
Not at this time. Instead, we recommend formatting your sheet directly within Google Sheets itself in order to have the most control and flexibility. Check out these handy guides that show how you can format your Google Sheets:
Why can’t I select a spreadsheet when setting up the Google Sheets Connection?
Google’s File Picker tool requires cookies to be enabled. Please make sure that cookies are enabled in your browser by following the steps below:
Additionally, sometimes ad blocking plugins can create unexpected issues. If you’re using any form of ad blocker, try disabling it and start the setup process again.
Why doesn’t the date format in my Date field match the date format in Google Sheets?
- When sending a Date field to Google Sheets, the format is always set to: YYYY-MM-DD. This is the standard format that Google Sheets uses and is the most compatible with all of Google Sheets’ capabilities.
- Solution: To display the date in a different format, you can always format the date column directly in Google Sheets.
Do Populate Anything requests count towards Google’s API quotas?
The Google Sheets Connection uses a special, highly performant API for requesting data for population via Populate Anything. In our testing, we found that these requests do not count towards Google’s API quotas.
Google could change this policy at any time so we use intelligent caching to reduce the number of requests made to Google’s API. Even still, we do not recommend populating dozens of fields with spreadsheet data or excessive chaining of multiple fields that are populated from Google Sheets.
If you need to populate lots of data across many fields from a spreadsheet, we recommend using something like wpDataTables to sync your spreadsheet with a local database table which Populate Anything can query/filter much more performantly.
Why does the Google Sheets Connection get disconnected from my Google Account?
There are a few different reasons why the Google Sheets Connection may be disconnected from your Google Account. Changing your Google password, revoking access to GCGS, or API changes from Google can all cause the connection between your Google account and GCGS to break.
Thankfully, it’s easy to reconnect your Google Account via the Google Accounts plugin setting.
How do I migrate from the free “GP Populate Anything – Google Sheets Object Type” plugin to the Google Sheets Connection?
The following steps will need to be repeated for each form and field that uses the old plugin.
- Open your form in the form editor and navigate to the field that is using the old plugin to populate from Google Sheets.
- Click on the Object Type select and select whichever “Google Sheet” option is not selected.
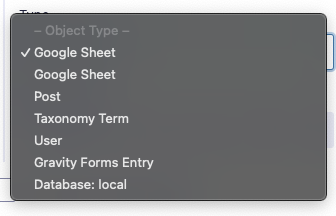
- You can be confident you’ve selected the correct “Google Sheet” object type as you will see separate settings for Spreadsheet and Sheet.
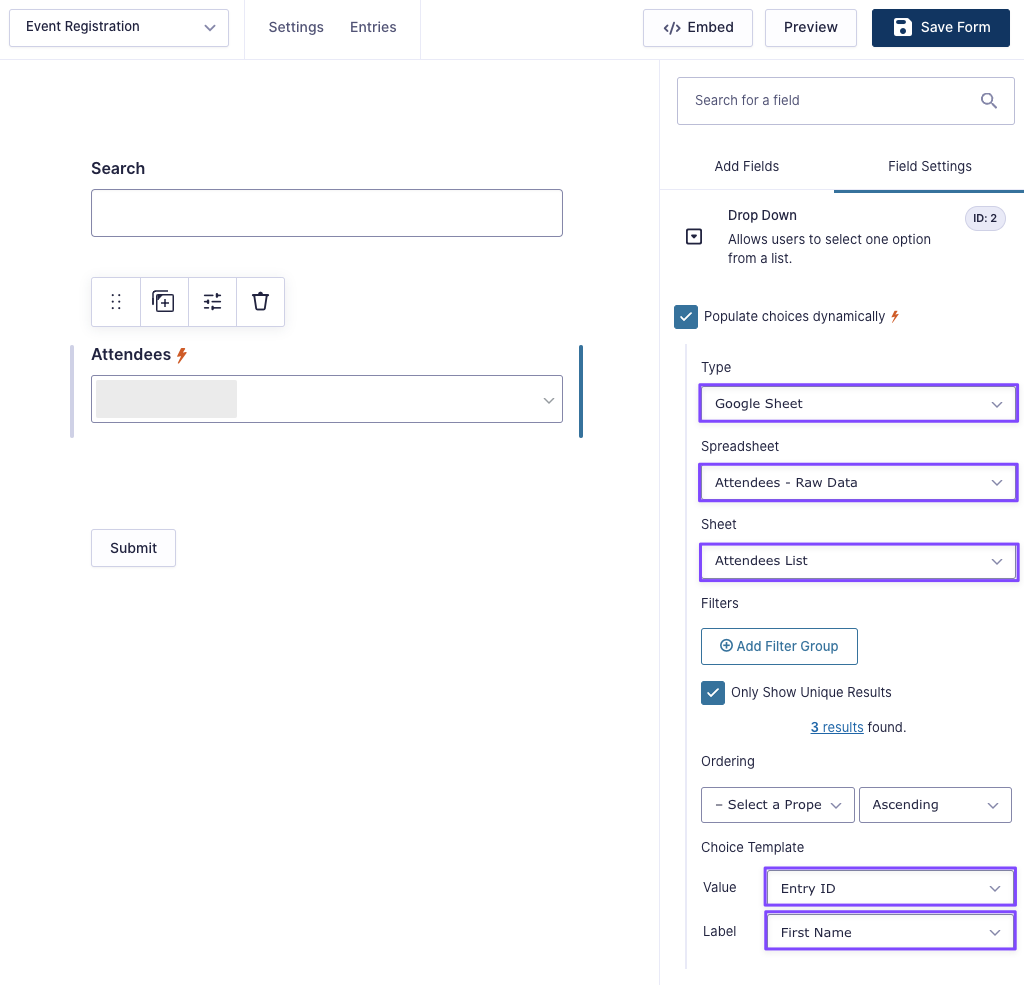
- Reconfigure filters and choice/value templates as needed.
- Save the form.
How do I insert the new entry row at the top of the Google Sheets?
Google makes this nearly impossible to do reliably programmatically. However, there’s a workaround that requires a little tweak in your Google spreadsheet. Here’s what you’ll do;
- Create a new sheet on the Google Spreadsheet.
- Set up the new sheet using the query below, to import the data from the original sheet and sort it in descending order of a column (e.g., by Entry ID or timestamp).
- Update
Originalin the query to the name of the main Google Sheets, and setAandDto the column range you want to copy to the new sheet. - Include the column you’ll use for sorting as part of the range and enter that column in the query, to order the data in descending order.
=Query(Original!A:D, "SELECT * ORDER BY A DESC")How do I preserve the original data format?
By default, data sent to Google Sheets is treated as raw string, which can sometimes result in an apostrophe (') being added before the value. This can affect numbers, dates, and other formatted data, causing them to lose their intended formatting.
You can use the gcgs_allow_user_entered_values filter hook, to prevent this and ensure that the data is correctly formatted in Google Sheets.
How do I send Partial Entries to Google Sheets?
If you’re using the Gravity Forms Partial Entries add-on, the partial entries are not sent to Google Sheets by default. If you need to send a partial entry to Google Sheets, you can use the Process Feed when Partial Entry is Saved snippet.
Do name changes affect the connection?
Nope! Changing the name of a spreadsheet, sheet, form, or feed won’t affect the connection between the Google Sheet feed and the Google Sheet itself.
How do I upgrade from the GP Google Sheets to the Google Sheets Connection?
GP Google Sheets was previously part of the Gravity Perks suite. It has now moved to the Gravity Connect suite and been renamed to GC Google Sheets. For up-to-date instructions on upgrading form GPGS to GCGS, see our FAQ on the migration announcement.
How do I bulk process parent and child entry feeds while keeping them in order?
When using GP Nested Forms with GF Feed Forge to bulk process feeds, only one form’s entries can be processed at a time. This means that when processing parent entries, any associated child entries are not automatically included.
This is especially important when using GC Google Sheets feeds, where you may want parent and child entries to appear together and in order within the same sheet.
To address this, you can use this snippet to automatically queue each parent entry’s child entries as it’s processed. This ensures the child entries are processed immediately after their parent, preserving the expected parent → child order, just like a normal form submission.
Note: When processing a large number of entries with GC Google Sheets feeds, Google API rate limits can occasionally affect row order. You can optionally add a small delay between feed processing to help mitigate this. If strict ordering is critical, consider handling it within the spreadsheet using formulas.
Translations
You can use the free Loco Translate plugin to create translations for any of our products. If you’ve never used Loco translate before, here’s a tutorial written for beginners.
Hooks
Gravity Forms has hundreds of hooks. Check out our Gravity Forms Hook Reference for the most thorough guide to Gravity Forms’ many actions and filters.
Related Resources
- Gravity Forms Data Export: A Step-by-Step Guide
Learn how to export Gravity Forms data in this step-by-step guide. Explore the benefits of exporting form data and how to get more out of your data export. - Guide: Two-Way Connect Gravity Forms with Google Sheets
Learn how to send Gravity Forms data to Google Sheets and populate data from Google Sheets into Gravity Forms, even within the same form. - How to Dynamically Populate Drop Down Fields in Gravity Forms
Learn how to dynamically populate Drop Down fields in Gravity Forms with users, form entries, database tables, and more!