Gravity Forms Notification Scheduler
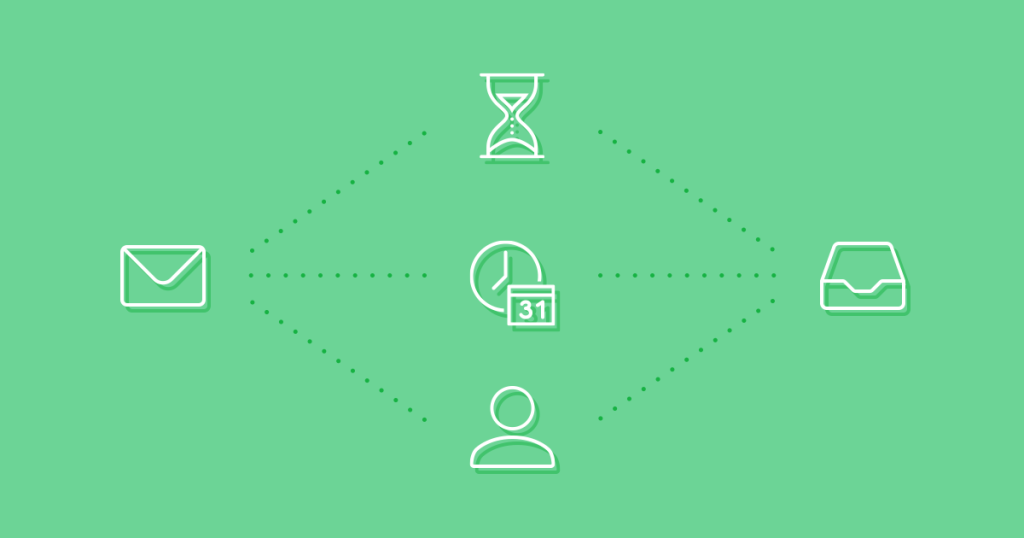
Schedule Gravity Forms notifications to arrive when they matter most — like onboarding campaigns, recurring anniversary offers, and event/expiration reminders!
What does it do?
By default, Gravity Forms sends notifications immediately after the form is submitted. With Notification Scheduler, you choose exactly when the notification should be sent with simple, effective scheduling options.
Schedule notifications relative to a Date field on the form, a static delay from the time the notification event is triggered (e.g. a form submission), or on specific date.
Here’s how you can use scheduled notifications to level up your business!
- Create robust drip campaigns to onboard new customers or nurture fresh leads.
- Send yearly offers to existing users on their birthday, signup anniversary, or any other recurring event.
- Schedule reminders ahead of the big event with helpful tips for a satisfying experience.
- Remind customers when their subscription or credit card is expiring.
And so much more!
Features
- Schedule notifications after a delay.
Send notifications minutes, hours, days, weeks, months, and years after a notification event (e.g. a form submission). - Schedule notifications on a specific date.
Deliver notifications on a static date. Useful for one-off event reminders and sale promotions. - Trigger notifications based on Date fields.
Send a notification before or after the value of a submitted Date field. Useful for birthday/anniversary emails, event/expiration reminders, etc. - Recurring notifications.
Automatically reschedule a notification to send daily, weekly, monthly, yearly forever or ending after a period of time. - Reschedule notifications.
Freedom to modify notifications and their schedules. Reschedule notifications with ease. - Integrates with Gravity Forms events.
Schedule notifications for any notification event, including events generated by third-party add-ons. - Automatic updates.
Get updates and the latest features right in your dashboard. - Legendary support.
We’re here to help! And we mean it.
Get Gravity Perks
This plugin is part of Gravity Perks, a suite of 47+ essential Gravity Forms addons with support you can count on.
Have a question?
We’re here to help, just send us a message.

- Version 1.3.11
- Updated July 24, 2024
- Released December 15, 2021
All Connections
All Perks
- GF Address Autocomplete
- GF Advanced Calculations
- GF Advanced Phone Field
- GF Advanced Save & Continue
- GF Advanced Select
- GF Auto List Field
- GF Auto Login
- GF Better User Activation
- GF Blocklist
- GF Conditional Logic Dates
- GF Conditional Pricing
- GF Copy Cat
- GF Date Time Calculator
- GF Disable Entry Creation
- GF Easy Passthrough
- GF eCommerce Fields
- GF Email Users
- GF Entry Blocks
- GF Expand Textareas
- GF File Renamer
- GF File Upload Pro
- GF Inventory
- GF Limit Checkboxes
- GF Limit Choices
- GF Limit Dates
- GF Limit Submissions
- GF Live Preview
- GF Media Library
- GF Multi-Page Navigation
- GF Nested Forms
- GF Notification Scheduler
- GF Page Transitions
- GF Pay Per Word
- GF Populate Anything
- GF Post Content Merge Tags
- GF Preview Submission
- GF Price Range
- GF QR Code
- GF Randomizer
- GF Read Only
- GF Reload Form
- GF Terms Of Service
- GF Unique ID
- GF Word Count
Documentation
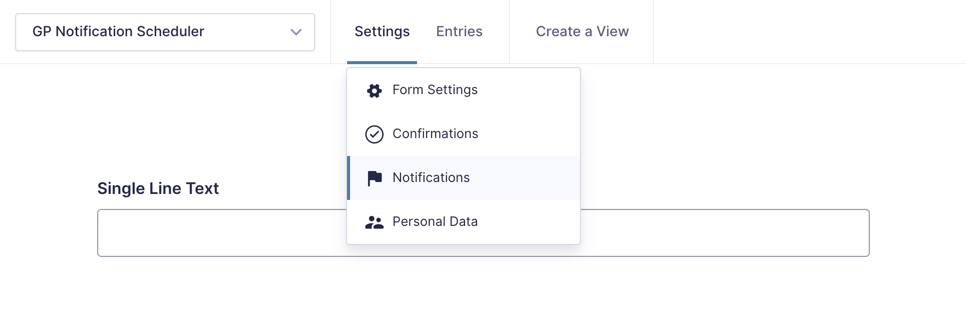
How do I enable this functionality?
After installing and activating Gravity Forms Notification Scheduler, options to schedule notifications will display in a notification’s settings under the Schedule heading.
|
Navigate to a form’s notification settings. |
|
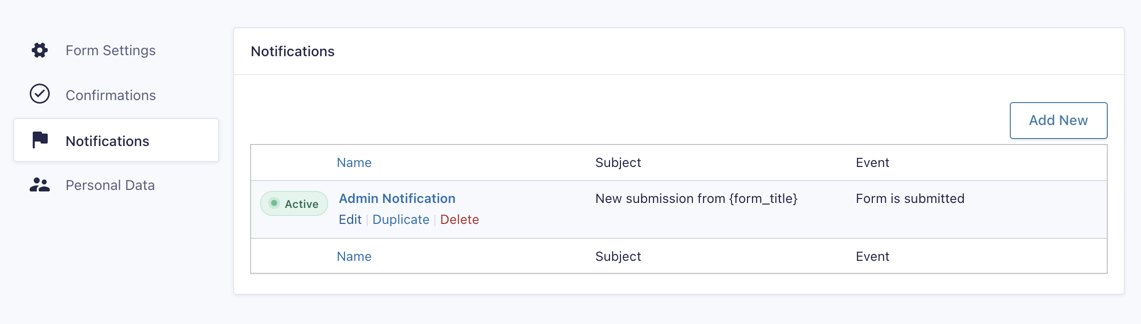
Edit an existing notification or create a new one. |

|
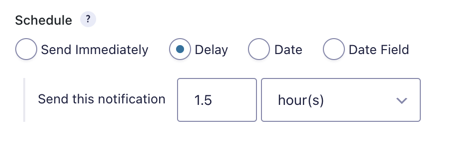
Adjust the Schedule setting to fit your sending needs. |
Feature Details
Delayed Notifications
Notifications can be sent on any interval after the specified event. Select Delay from the Schedule setting and insert any number along with the internal. Gravity Forms Notification Scheduler allows for whole and decimal numbers.
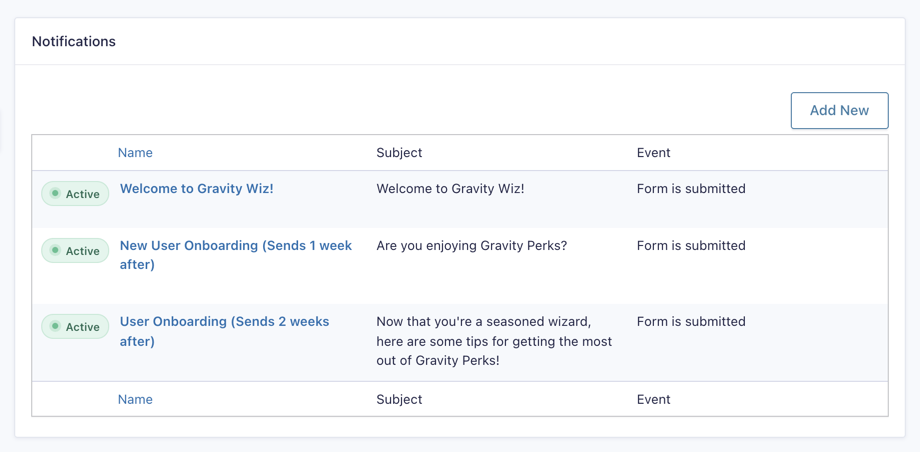
Since Gravity Forms allows forms to contain multiple notifications, you can use this to set up a robust email marketing campaign without the need for additional software or services. To do this, add multiple notifications that send after the form has been submitted and adjust the timing of the notifications to create a drip campaign.
Usage Examples
Specific Dates and Times
Scheduling notifications on a specific date and time is a similar process to delayed notifications. This feature is especially useful if you’re using your form to allow members to sign up for a volunteer event, to get updates on an upcoming sale, or to sell concert tickets. Select Date from the Schedule setting and then choose a date and time.

Trigger Notification Using Date Field Values
Notifications can be triggered before or after a date value that’s been submitted in a Date field on the form. Simply add a Date field to the form and the option to schedule notifications based on that date field will appear.

Since you can send notifications before the submitted date value, do note that if a notification’s determined schedule is a time before the current time, it will be ignored. The notification will not be sent and it will not appear in the Scheduled Notifications list.
For notifications scheduled relative to a Date field, editing the entry and modifying the date will reschedule that notification.
Recurring Notifications
Scheduled notifications can be sent every year, month, week, or day. Check Repeat to activate and choose the interval.
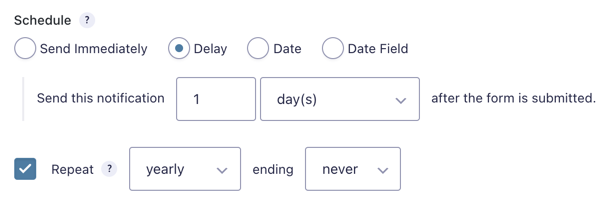
By default, repeating notifications send indefinitely. Set the ending after any interval of minutes, hours, days, weeks, months, or years.

Manage Notifications
Scheduled notifications can be viewed and deleted from the Entries page. View a single entry and scroll down to see all scheduled notifications. Hover over an unsent notification and click Delete to prevent the notification from sending.
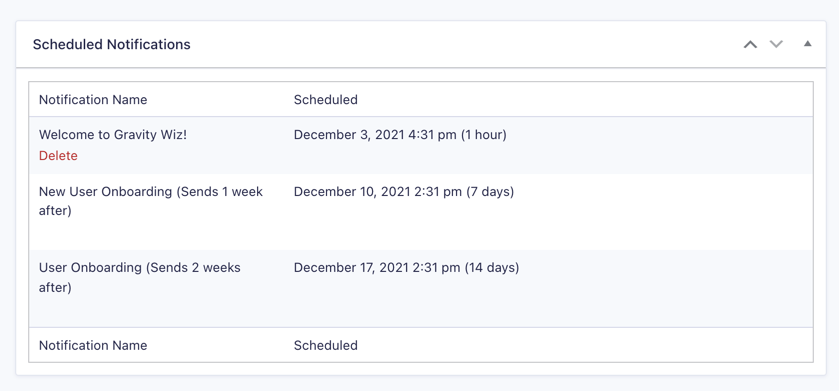
For recurring notifications, each recurrence is scheduled immediately after the previous notification has been sent. Future occurrences are not displayed in the Scheduled Notifications list.
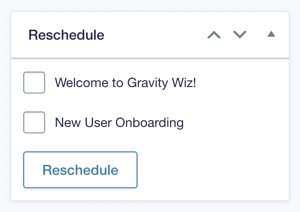
Reschedule Notifications
If you make changes to an existing notification’s schedule or create a new notification and want that new schedule to apply to existing entry, you can easily reschedule an entry’s notification. When viewing a single entry, scroll down to find the Reschedule meta box below Print Entry. The Reschedule meta box appears on the Entry Detail page if you have at least one scheduled notification configured for your form.
Notifications with a “Delay” schedule will be rescheduled based on the time of the original submission and not from the time of the rescheduling.
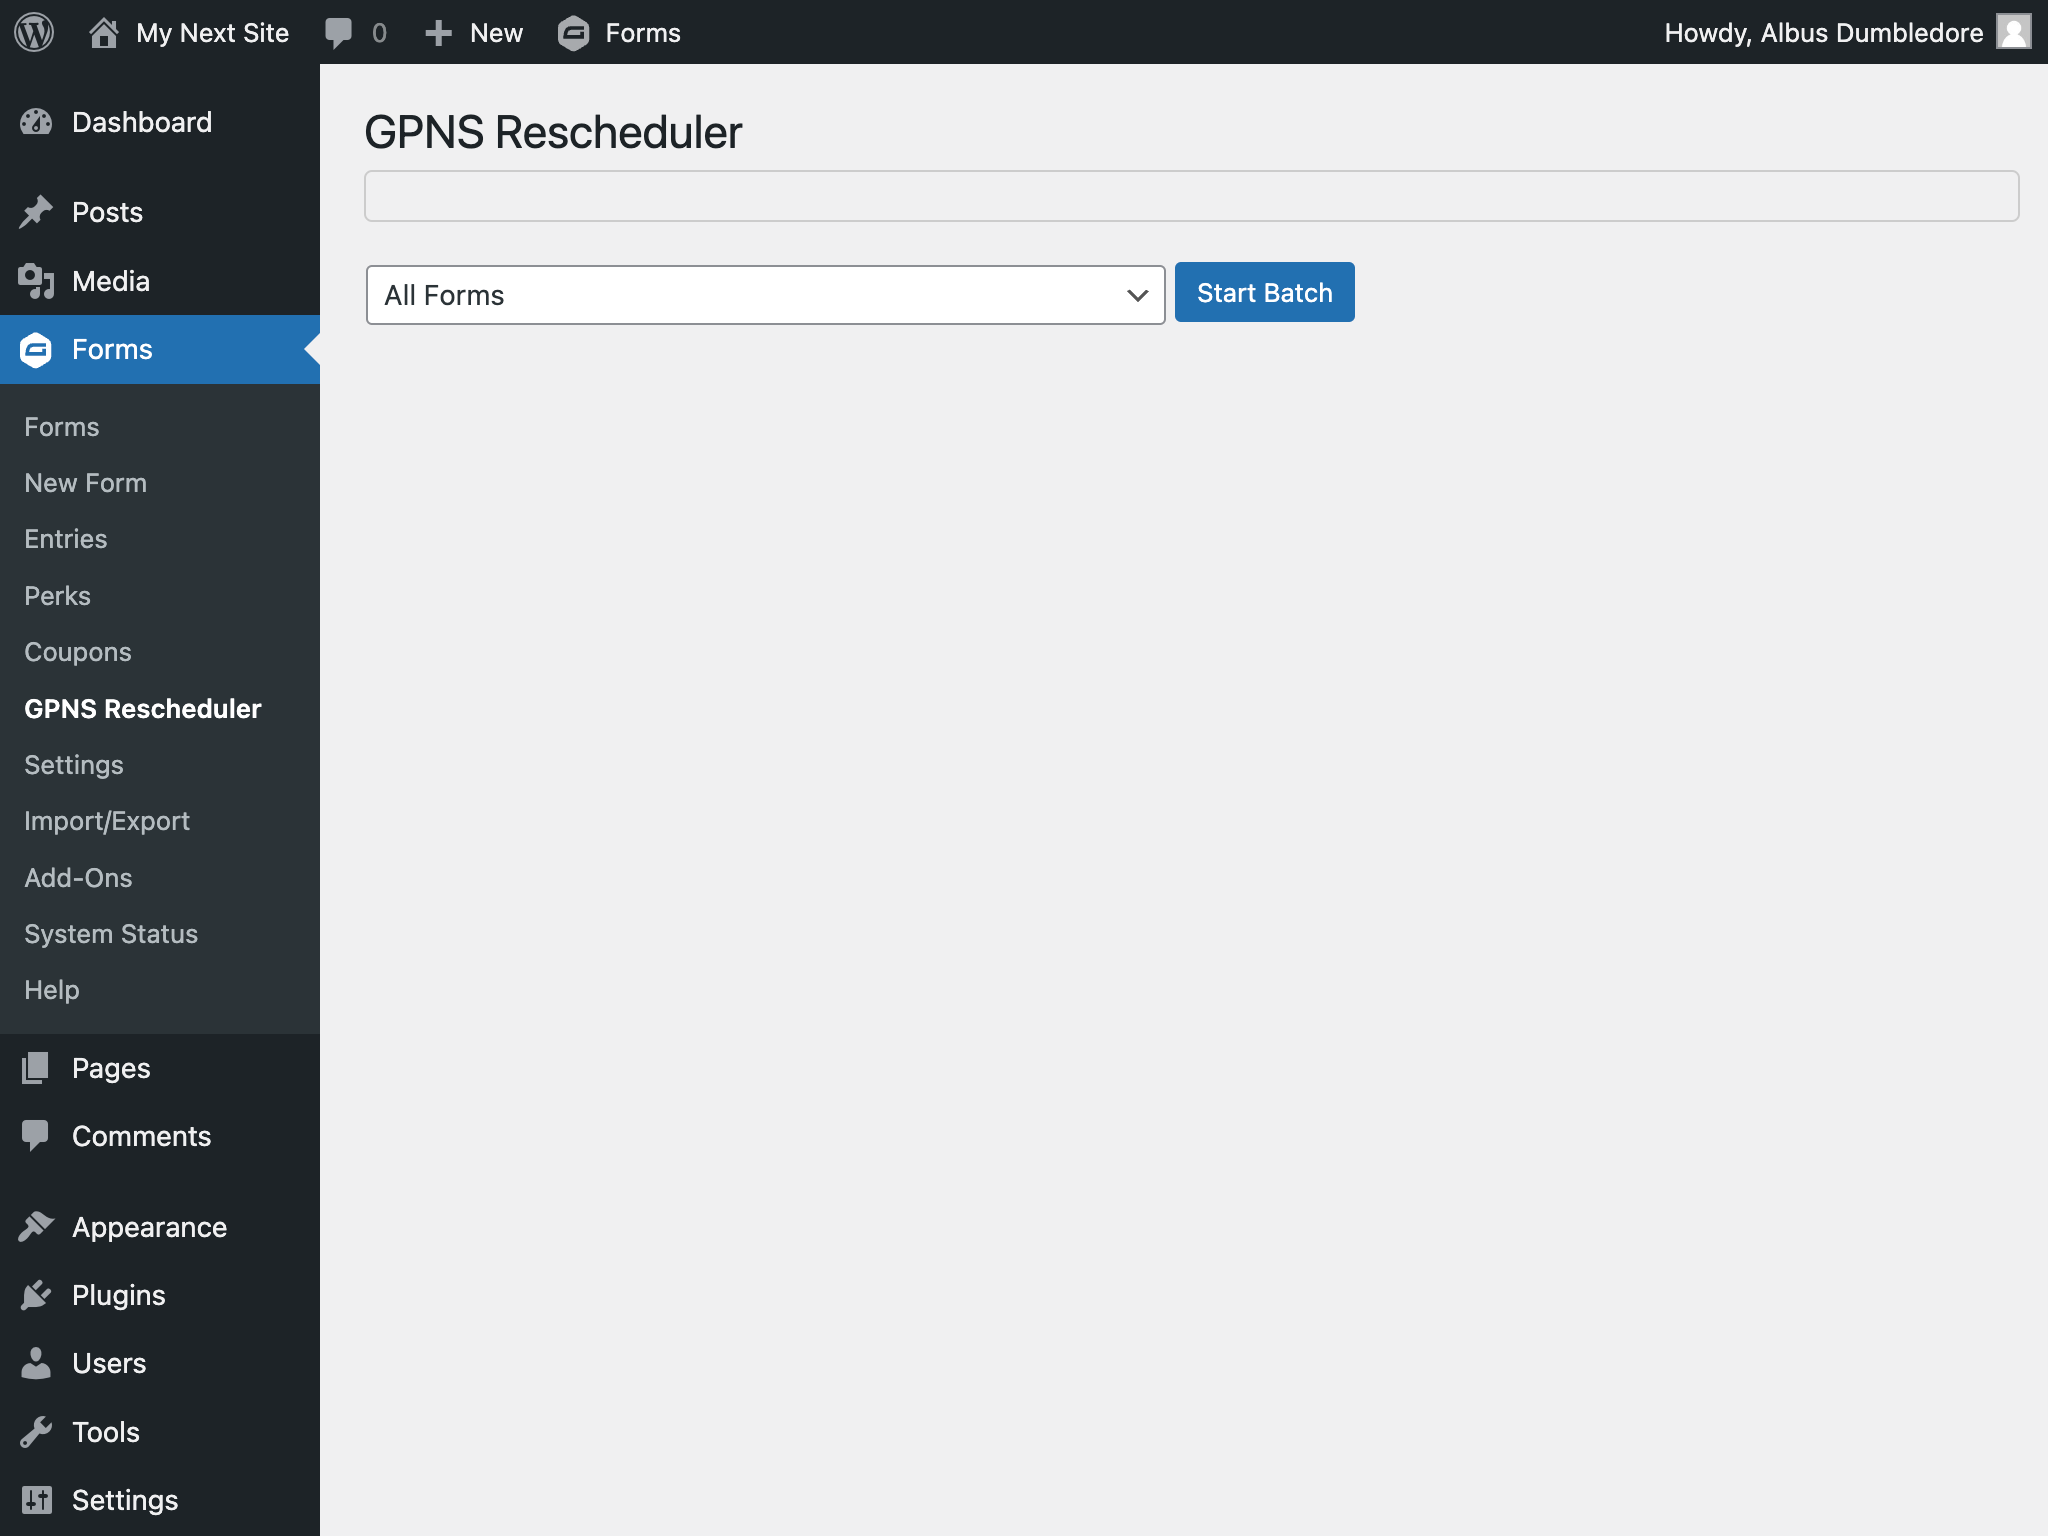
Bulk Rescheduling
If you have a lot of entries that need their notifications rescheduled, you can activate the bulk rescheduler using the gpns_enable_rebuild_batcher hook. Once enabled, you can find it under Forms > GPNS Rescheduler. Select the form to reschedule notifications, or reschedule all scheduled notifications for all forms.
Notification Event Integrations
Notification Scheduler automatically integrates with any notification event in Gravity Forms. Some examples of when notifications can be sent:
- GravityView: Entry is Approved, Disapproved, Approval Reset, Approval Changed
- Gravity Flow: Workflow Approved, Rejected, User Input, Complete, Cancelled
- Payment Add-ons (Stripe, PayPal, etc.): Payment Completed, Payment Refunded, Payment Failed, Subscription Created, Subscription Cancelled
Unsubscribe
If you’re using Notification Scheduler to send marketing emails to your customers, you will need to allow your recipients to unsubscribe to comply with your local anti-spam laws.
Use the {unsubscribe_link} merge tag to include a link that allows your recipients to unsubscribe. If you prefer to generate the link yourself, you can use the {unsubscribe_url} merge tag to output the unsubscribe URL.
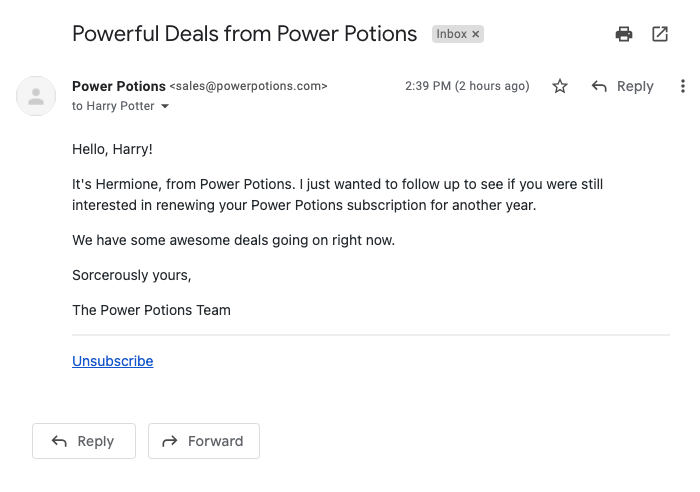
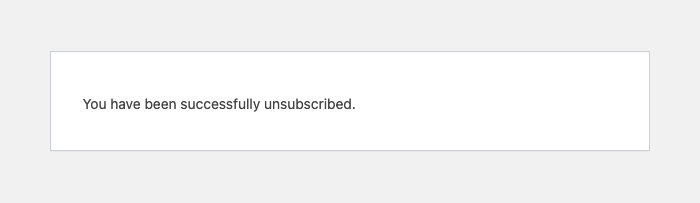
When the unsubscribe link is clicked, the recipient will be unsubscribed from all future scheduled notifications.
You can alter the unsubscribe behavior to only unsubscribe the recipient from a specific series of notifications or all notifications from a specific form using the gpns_unsubscribe_url_args filter.
Managing Unsubscribes
You can manually unsubscribe or resubscribe an email via the Notification Scheduler settings page. This is useful if a recipient has contacted you requesting to be unsubscribed or if a recipient has unsubscribed by mistake.
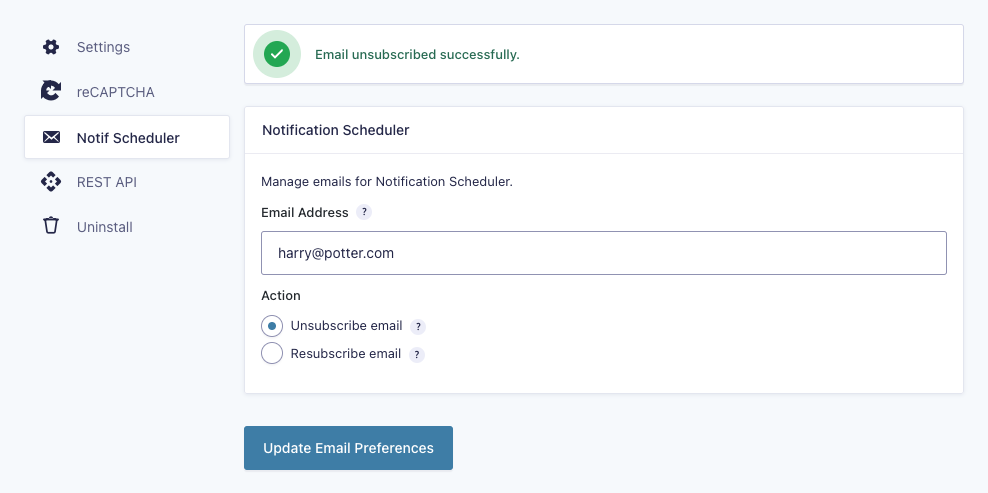
Note: Resubscribing an email will not automatically reschedule any notifications but that email will now be able to receive notifications that are scheduled after they have been resubscribed.
WP Cron
Notification Scheduler relies on WP Cron to handle scheduling. WP Cron is how WordPress handles scheduling any time-based task. WP Cron works by checking, on every page load, a list of scheduled tasks to see what needs to be run. Any tasks due to run will be called during that page load.
While mostly reliable, this approach to scheduled task has several shortcomings:
- Because scheduled tasks trigger on page load, running them too frequently can cause performance issues.
- If you schedule a notification for 2:00AM and no one visits your site until 9:00AM, then the notification won’t send until 9:00AM.
Notification Scheduler will attempt to send scheduled notifications every 5 minutes. That means if you schedule a notification to send less than 5 minutes after a notification event, it could possibly take up to 5 minutes before it actually sends.
Note for Developers: If you need to test scheduled notifications more quickly, we recommend Advanced Cron Manager or WP Crontrol.
If your site requires sending notifications in less than five minute intervals, you can use the WP Crontrol plugin to change the recurrence to every minute. Do note that this can negatively impact site performance.
Since scheduled tasks require site interaction to trigger, if you have a site that doesn’t get much traffic at specific times of the day, then notifications will likely not send at the exact time you want them to. Some hosting providers offer system cron, which means scheduled tasks run independently of user interaction. Here’s a list of some hosting providers that offer this:
Do note that these hosting providers may not run system cron at the same interval as WP Cron. We recommend reaching out to their support for more details on how they configure system cron.
Another option is to use cron-job.org to execute WP Cron on a specific interval. This free service will navigate to your site’s WP Cron page automatically. It can even send you emails with status updates on the job.
Rate Limiting
By default, Gravity Forms uses WordPress’s built in wp_mail() function to send email using your host’s email servers. Depending on how many notification emails you are sending, it’s possible that your emails will get rate limited. Limits are imposed by your email service provider and they determine how many emails you can send from your email account over a given period of time.
To prevent this potential problem, we recommend using a third-party email solution that was designed for sending bulk email. Below is a non-exhaustive table that compares many such services:
| Service | First Pricing Tier | Emails Per Month | Rate Limits |
|---|---|---|---|
| Amazon SES | $0.10/1,000 emails | N/A | None |
| Mailgun | $35/month | 50,000 | 300/minute, no daily limit |
| Postmark | $10/month | 10,000 | None |
| SparkPost | $20/month | 50,000 | 1,000-12,000 per day |
| Sendinblue | $25/month | 10,000 | None |
| SendGrid | $14.95/month | 40,000 | 600/minute |
| Mailjet | $15/month | 15,000 | None |
Sending through a third-party email service provider is typically handled through a dedicated WordPress plugin. All of the providers in the table above have dedicated plugins you can use for sending.
Many of these email providers offer free tiers. These are typically highly limited and reserved for testing, so we didn’t include them.
Developer’s Notes
Because WP Cron has no logged in user, we set the current user to the created_by of the entry if it’s present. This allows the the {user} merge tag to function when used in a scheduled notification.
FAQs
What happens to scheduled notifications if Notification Scheduler is deactivated?
If the Notification Scheduler plugin is deactivated, it will stop sending scheduled notifications. Any new notifications after deactivating will be immediate.
Reactivating the plugin will resume sending scheduled notifications.
How can I unsubscribe users programmatically?
Users can be programmatically unsubscribed by calling this method:
gp_notification_scheduler()->unsubscribe( $email, $scope, $form_id, $notification_id );Use the $scope variable to decide which notifications the user will be unsubscribed from:
- all – Unsubscribes an email from all scheduled notifications.
- form_id – Unsubscribes an email from the all scheduled notifications for the passed form ID.
- nid – Unsubscribes an email from a specific scheduled notification identified by the passed notification ID.
Here’s an example that will unsubscribe an email from a specific notification with this id: 6414cad4deaa1
gp_notification_scheduler()->unsubscribe( 'test@test.com', 'nid', 123, '6414cad4deaa1' );How can I programmatically delete scheduled notifications?
Notifications can be programmatically deleted with this method:
gp_notification_scheduler()->delete_notification_queue( $notifications, $entry );Delete all scheduled notifications programmatically
To remove all scheduled notifications for an entry, use an empty array for the $notifications parameter:
gp_notification_scheduler()->delete_notification_queue( array(), $entry );Delete a specific scheduled notification programmatically
To delete a specific scheduled notification for an entry, you will first need to fetch the notification meta by its ID. Then wrap that $notification variable and pass it as the $notifications parameter:
$notification = gp_notification_scheduler()->get_notification( $form, $notification_id );
gp_notification_scheduler()->delete_notification_queue( array( $notification ), $entry );
Hooks
- gpns_cron_schedule
- gpns_current_time
- gpns_date_fields
- gpns_enable_discarded_notifications
- gpns_enable_rebuild_batcher
- gpns_evaluate_conditional_logic_on_send
- gpns_recurring_ending_timestamp
- gpns_schedule_timestamp
- gpns_schedule_types
- gpns_units
- gpns_unsubscribe_confirmation
- gpns_unsubscribe_email
- gpns_unsubscribe_link_text
- gpns_unsubscribe_url_args
Gravity Forms has hundreds of hooks. Check out our Gravity Forms Hook Reference for the most thorough guide to Gravity Forms’ many actions and filters.
Related Resources
- Setting Up Gravity Forms Email Notifications Correctly
Learn how to set up Gravity Forms email notifications correctly, verify settings, create notifications, and troubleshoot bugs in this guide. - Spotlight: Sales Automation with Notification Scheduler
See how Michelle Marin uses Gravity Forms Notification Scheduler to personalize and automate pre-sales for her agency.
