
Gravity Connect Zoom
Automatically create Zoom meetings from Gravity Forms — connect with clients, teams, and more without the manual setup.
“Zoom” is a registered trademark of Zoom Communications, Inc. Gravity Wiz and Gravity Connect are not affiliated with, sponsored by, or endorsed by Zoom Communications, Inc. Using Zoom with Gravity Connect requires a Zoom account.
What does the Zoom Connection do?
This plugin integrates Gravity Forms to Zoom to automatically turn each form submission into a scheduled meeting using submitted values for the topic, date, time, duration, and invitees. This is done without requiring any additional software or monthly fees, and with an emphasis on security and performance.
Additionally, your Zoom can be automatically synced with your Gravity Forms entries, keeping your meetings accurate at all times.
With the Zoom Connection you can create:
- Consultation request forms that automatically create Zoom meetings with clients
- Demo request forms that turn interested leads into scheduled Zoom calls
- Coaching and tutoring forms that create Zoom sessions using submitted dates and times
- Interview scheduling forms that create Zoom meetings for candidates and hiring teams
- Support request forms that create Zoom meetings for personalized troubleshooting
- And many more!
Features
- Create Zoom meetings with Gravity Forms.
Turn form submissions into scheduled Zoom meetings for consultations, interviews, demos, and more. - Flexible date and time configuration.
Set meeting dates, start times, and durations using form fields, custom values, or merge tags. - Keep your meetings and entry data perfectly in sync.
Edits to your entries can automatically update your Zoom meetings. Meetings for trashed or spammed entries are automatically removed. - Invite attendees directly from form data.
Map form fields to attendee emails to include clients, teammates, or other guests in your Zoom meetings. - Security first.
Uses Zoom’s secure authentication method to ensure only you have access to your Zoom data. - Money-saving, value packed.
No monthly fees or meeting limits from us. You can Zoom freely. - Automatic updates.
Get updates and the latest features right in your dashboard. - Legendary support.
We’re here to help! And we mean it.
Why Zoom?
- Widespread adoption: Zoom is one of the most widely used video conferencing platforms, making it frictionless for your clients and team members to join meetings using a tool they already know.
- Real-time collaboration: Screen sharing, in-meeting chat, and annotation tools make it easy to present ideas, demonstrate products, and work through questions together.
- Cross-platform accessibility: Participants can join meetings from desktop and mobile apps or a supported web browser, making it convenient to connect from wherever they work.
- Meeting security and control: Zoom offers meeting security features like passcodes, waiting rooms, and host-controlled screen sharing to help you manage access and prevent disruptions.
- Integration with established tools: Zoom connects with Google Calendar, Microsoft 365, and other popular apps, helping virtual meetings fit into the workflows your team already uses.
Documentation
Before you begin
You’ll need:
- WordPress 6.0 or later.
- Gravity Forms 2.8.10 or later, installed and active.
- Spellbook, installed and active, with access to install GC Zoom.
- A WordPress account with permission to install plugins and manage Gravity Forms and GC Zoom settings.
- A Zoom account that can authorize the connection and create meetings.
Zoom account policies and plan limits still apply to meetings created through GC Zoom. If your organization restricts third-party apps, ask your Zoom administrator to allow the connection.
To install GC Zoom through Spellbook:
- Open Spellbook under Forms › Spellbook and search for GC Zoom.
- Select Install, then activate.
See Installing Your First Plugin with Spellbook if you need help with Spellbook itself.
How do I enable this functionality?
After installing and activating GC Zoom, you can create Zoom feeds in any form. Use these feeds to create events from your form submissions. You can connect your Zoom account directly in the feed settings.
Step 1
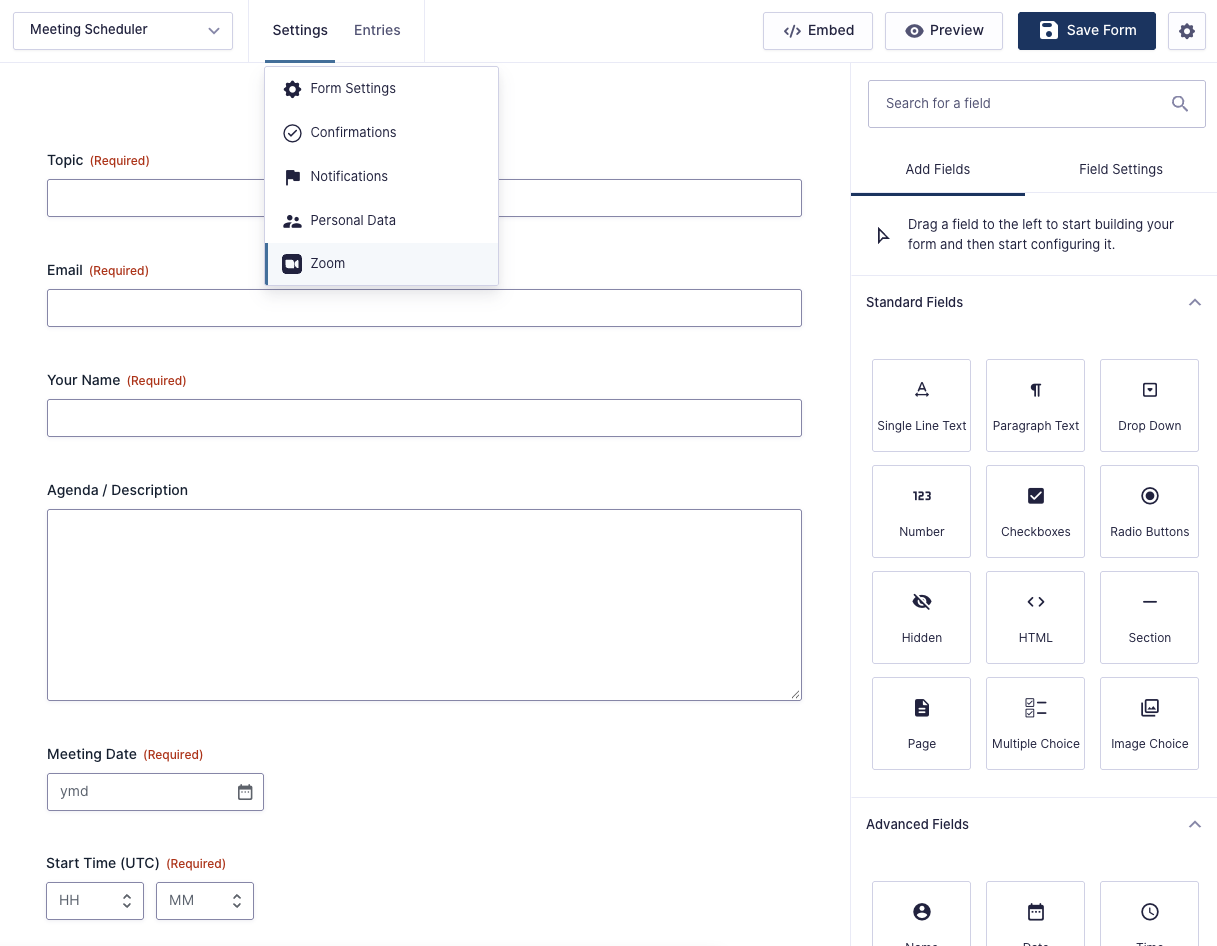
Navigate to your desired form and go to Settings › Zoom.
Step 2
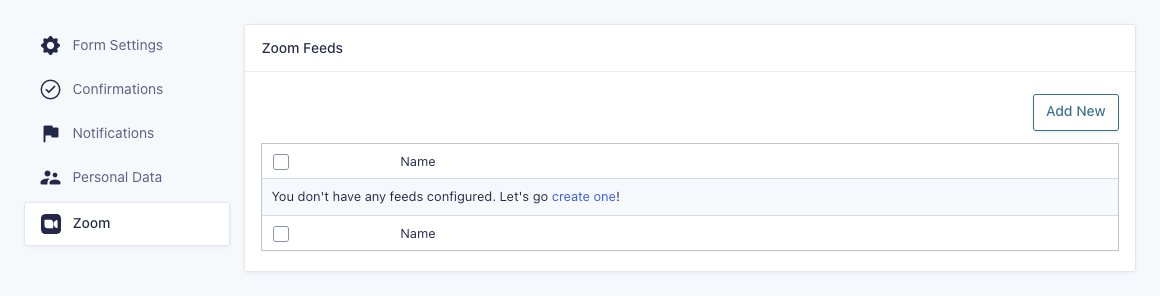
Click Add New to add a new Zoom feed.
Step 3
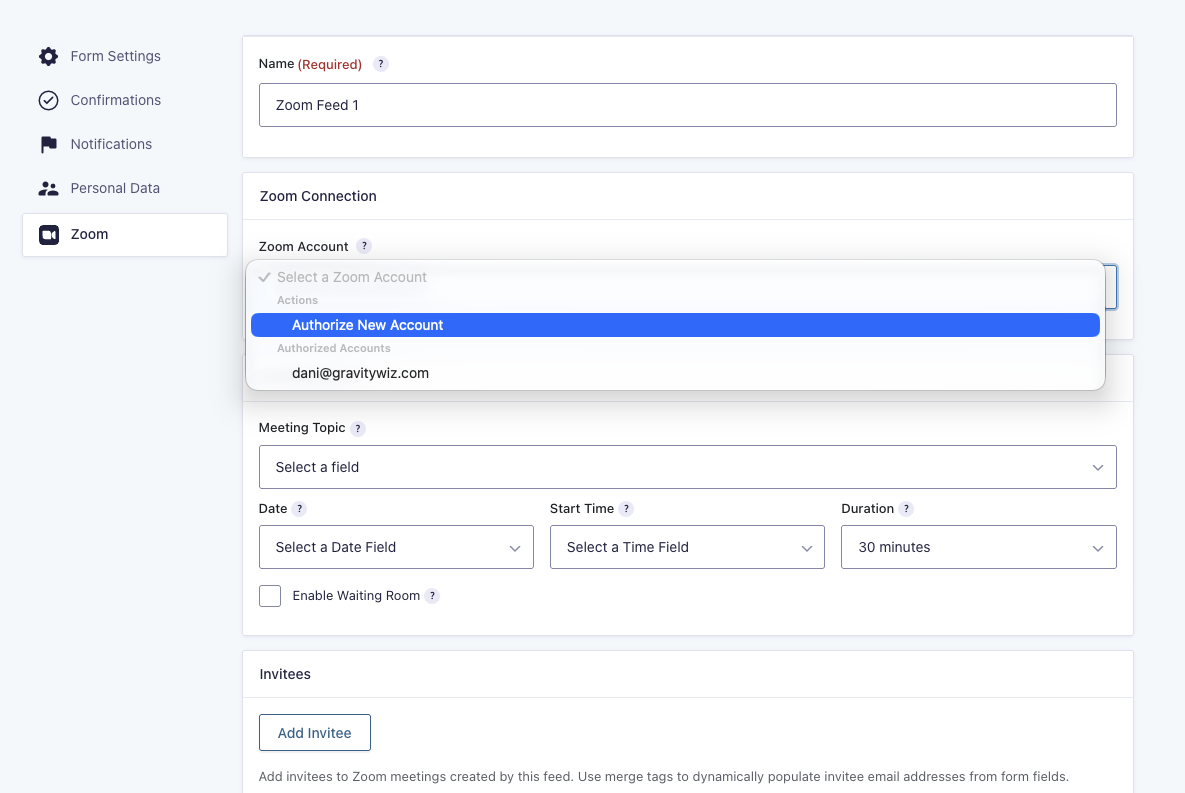
Connect your Zoom account by selecting “Authorize New Account” under the Zoom Account setting, or select a previously authorized account.
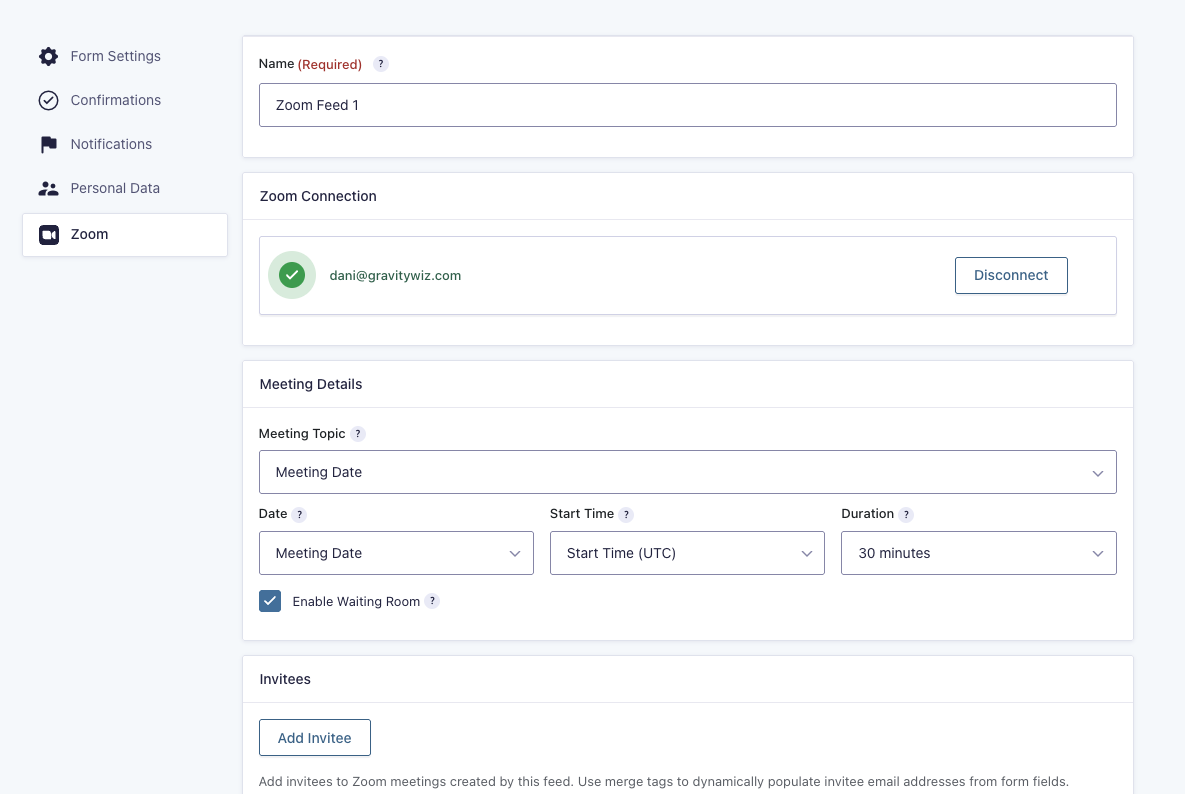
Step 4
Configure your meeting topic, start date, start time, and duration using form fields or custom values.
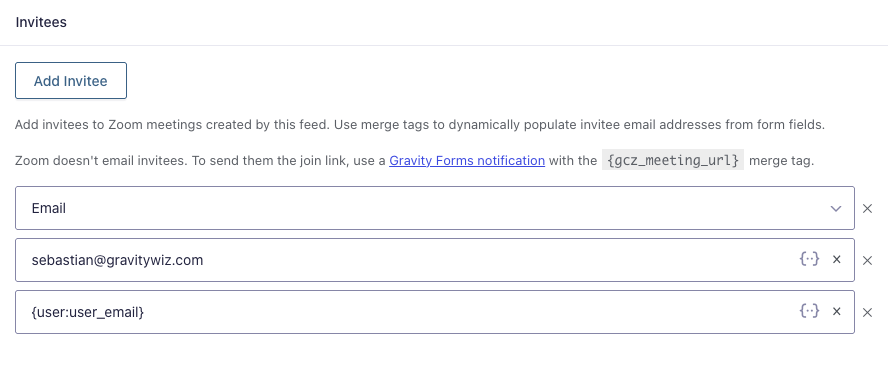
Step 5
Optionally, add invitees using email addresses from your form fields or custom values.
Save your feed to start creating Zoom meetings from form submissions. Learn more about what the Zoom connection is used for and troubleshooting tips.
Feed Settings
When configuring feeds for the Zoom Connection, you will be presented with the following settings.
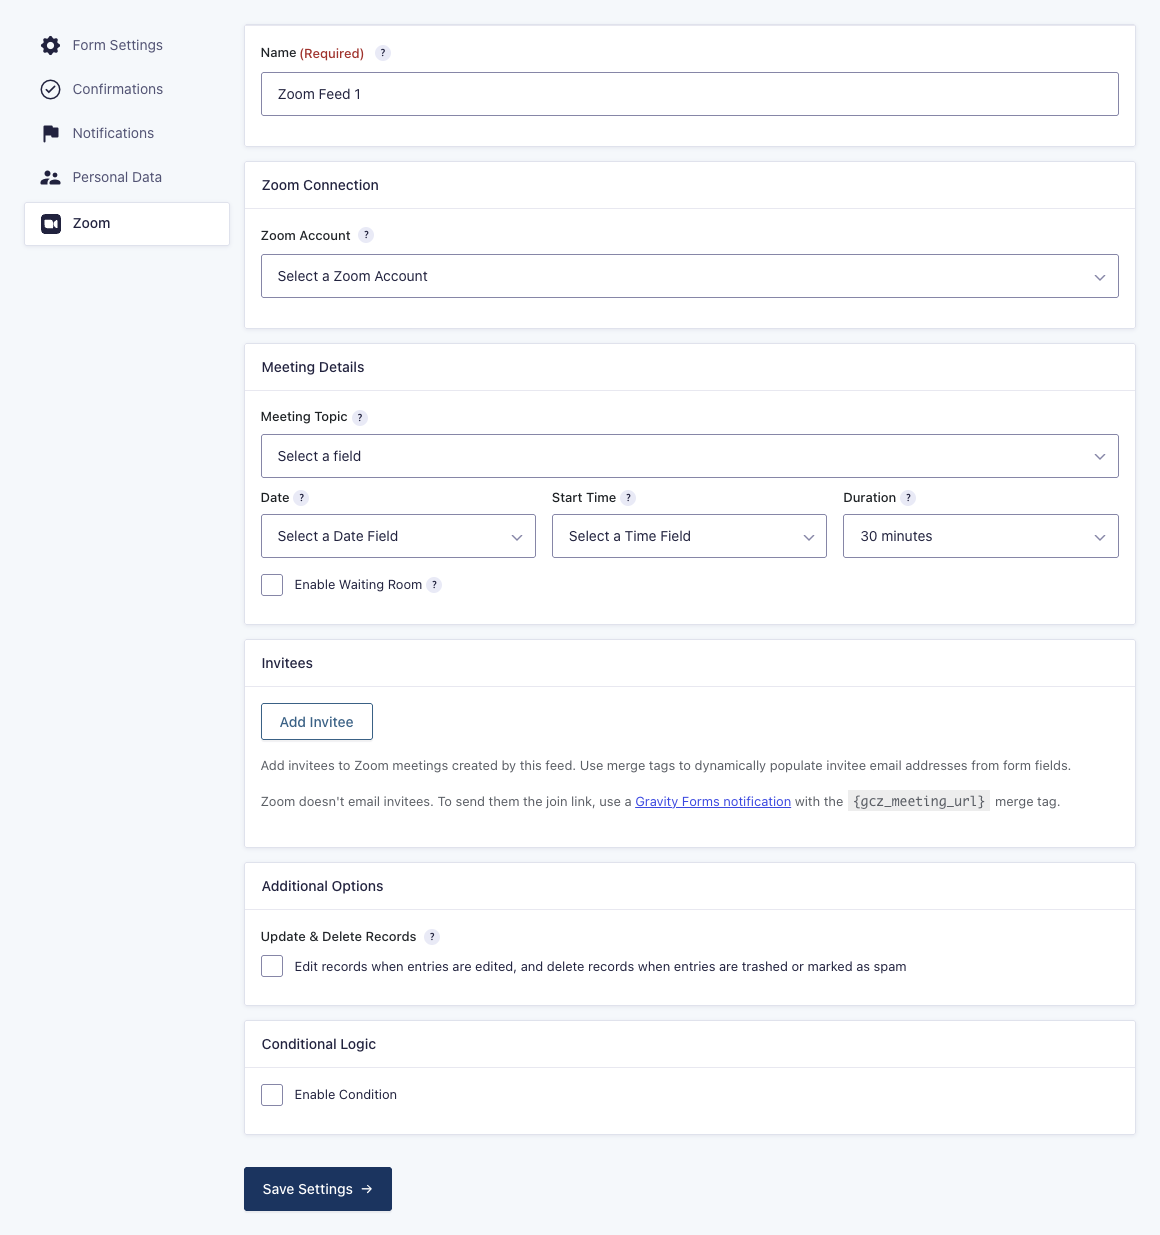
Feed Name
A unique name to identify this feed. This field is required and will auto-generate based on the feed ID.

Zoom Connection
Use these settings to connect to or select your Zoom account.

You can authorize a new account by selecting the Authorize New Account option or select a previously authorized account.
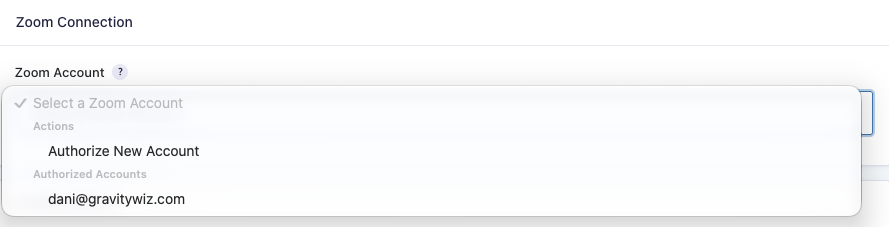
Authorizing a Zoom Account
- In the window that opens, sign in to the Zoom account that should host the meetings.
- Review the app’s requested permissions and approve the authorization request. Your Zoom organization may require administrator approval.
- When authorization finishes, return to the feed settings and confirm that the correct Zoom account is selected.
If the authorization window does not open, allow pop-ups for your WordPress admin site and try again. For other connection issues, see I cannot authorize Zoom.
Once an account is connected, you have the option to disconnect it from the feed. Disconnecting an account from an individual feed is different from removing it from GC Zoom. It only clears the account assignment to the feed itself so you can connect another account to it.
Meeting Details
Use these settings to configure how your Zoom meetings are created from form submissions.
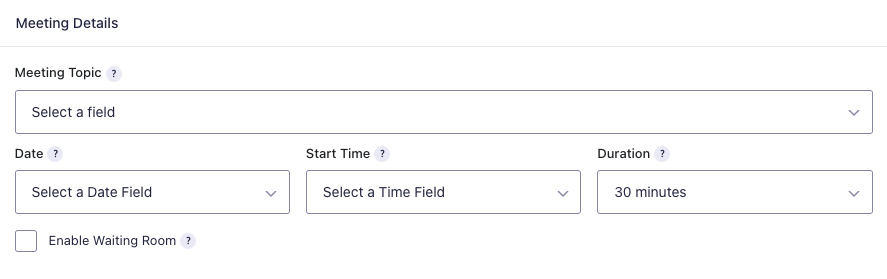
Meeting Topic
The title that will appear as the meeting topic. You can select a form field to use as the meeting topic, or enter a custom value using text and merge tags.
Example: Consultation with {Name (First):1.3} {Name (Last):1.6}.
If no value is specified, the feed name will be used.
Date
The date when the meeting happens.
Input Options:
- Date Field – Select any Date field from your form
- Custom Value – Use relative dates or merge tags (e.g.,
tomorrow,+3 days,next Monday,{Date:1}) - Static Date – Use the date picker for a fixed date
Supported Date Formats:
MM/DD/YYYY(mdy)DD/MM/YYYY(dmy)DD-MM-YYYY(dmy_dash)DD.MM.YYYY(dmy_dot)YYYY/MM/DD(ymd_slash)YYYY-MM-DD(ymd_dash)YYYY.MM.DD(ymd_dot)
Start Time
The time when the meeting begins.
Input Options
- Field – Select a field from your form. Time fields are preferred but other field types are supported with time-like values (e.g., a Drop Down field with choices like
9am,10 amor18:00). - Custom Value – Use relative times or merge tags (e.g.,
+30 minutes,+2 hours,{Time:1}). - Static Time – Use the time picker for a fixed time.
Supported Time Formats:
- 12-hour (
9:00 AM) - 24-hour (
14:30)
Duration
The duration of the meeting.
Input Options
- Static Value – Select from one of the pre-made duration options.
- Custom Value – Set your own duration (in minutes) or merge tags (e.g.,
{Duration:4}).
Enable Waiting Room
When checked, it enables Zoom’s waiting room for the meetings created by the feed, where invitees wait for the host to let them into the meeting.
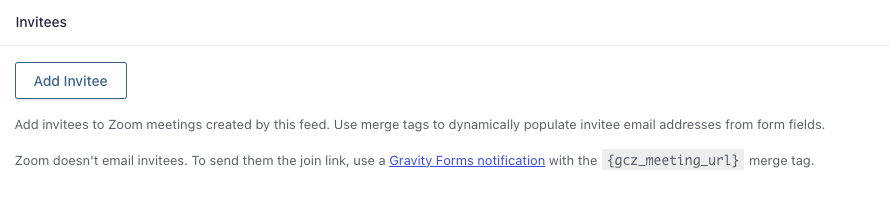
Invitees
Add invitees to your meeting.
Heads up
Zoom doesn’t email invitees. To send them the join link, use a Gravity Forms notification with the {gcz_meeting_url} merge tag.
Adding Invitees
Click Add Invitees to map invitee emails to your meeting.
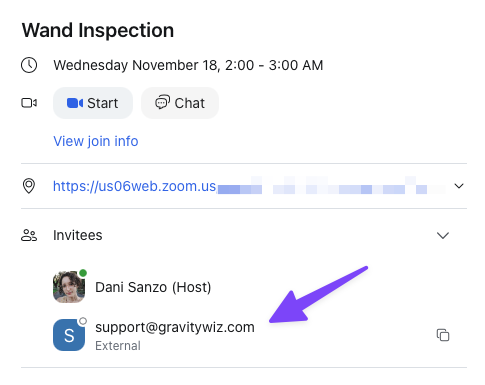
These emails are added to the meeting together with the host (a.k.a., the connected account that created the meeting).
Send Meeting Links to Attendees
Adding invitees to a meeting does not send them an email. To share the meeting’s join link, configure a Gravity Forms notification using the {gcz_meeting_url} merge tag.
- Open your form and go to Settings › Notifications.
- Create a notification or edit an existing one.
- Under Send To, choose Select a Field and select the Email field containing the attendee’s address.
- Add
{gcz_meeting_url}to the notification’s Message. You can also select Zoom Meeting URL from the merge tag picker. - Save the notification.
For example:
Your meeting has been scheduled!

Join your Zoom meeting:
{gcz_meeting_url}

Please keep this email so you can access the link when it’s time to join.
Additional Settings
Update & Delete Meetings
If you would like to keep your Zoom meetings synced to your entry data, enable the Update & Delete Meetings option. When enabled, meetings will be edited when entries are edited and deleted when entries are trashed or marked as spam.

If an entry is restored from trash or “unspammed”, a new meeting is created with the same configuration. In case of accidental deletions, you might need to send the new meeting link to your invitees.
Conditional Logic
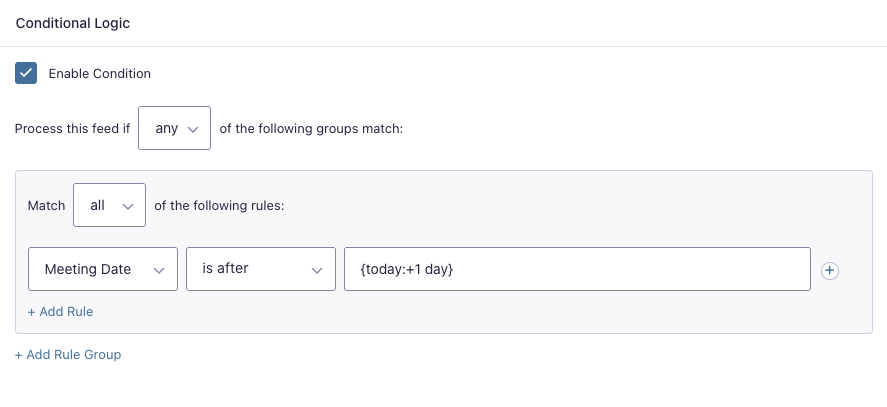
Use conditional logic to control when meetings are created.
Here’s an example where we use GP Advanced Conditional Logic to let the Zoom feed run only when Meeting Date is after {today:+1 day}.
If someone requests today or tomorrow, their entry is still saved for follow-up, but the Zoom feed doesn’t run, so no meeting is created.
Post Payment Actions
Feeds can be delayed until payment is received. To do so, simply configure the GC Zoom feed’s conditional logic to only process if the entry has a desired payment status. Here is an example configuration where the feed is configured to only process if the “Payment Status” is “Paid”.
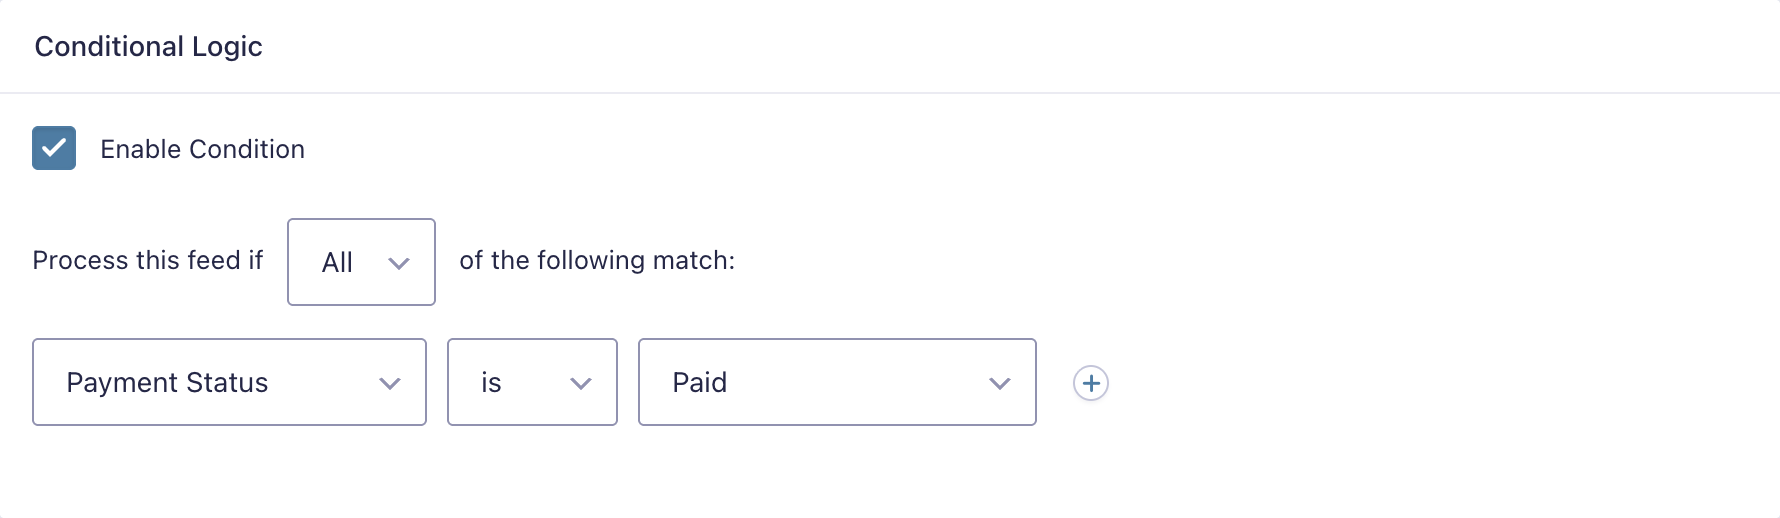
Even in contexts where the payment is collected after the entry has been collected (e.g., Stripe Checkout), the feed will be run as soon as the specified payment status is set.
Manage Zoom Accounts
You can manage authorized Zoom accounts on the plugin settings page. The Zoom Accounts section provides a list of authorized accounts, including the WordPress user who authorized the account and the feeds connected via to account.
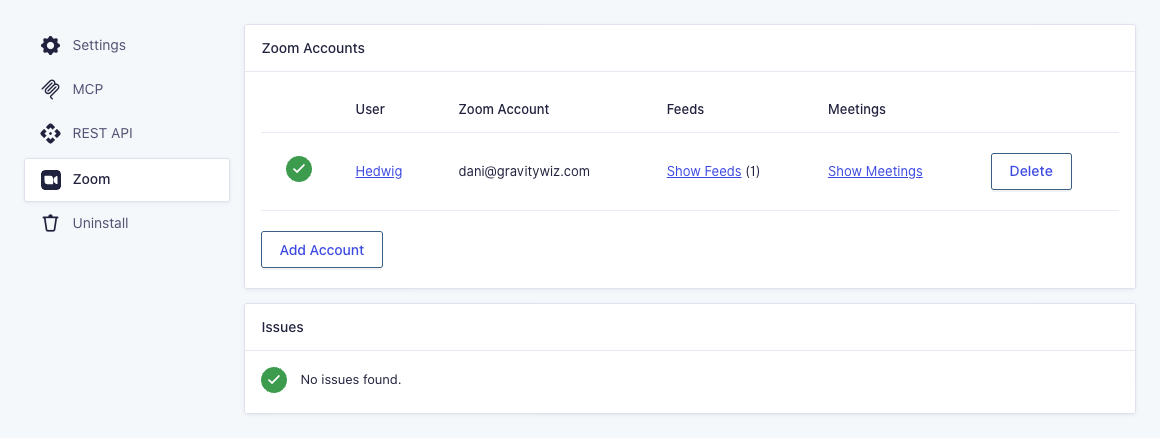
You can delete a Zoom account to disconnect it from the current site by clicking the Delete button. You can authorize a new Zoom account by clicking the Add Account button at the bottom of this section.
For more details on disconnecting Zoom accounts, check out Disconnect and Remove GC Zoom.
Create Zoom Meetings for Existing Entries
If you’re implementing GC Zoom on a form that has existing entries, you may want to create meetings for them. Here are two ways to do this.
Bulk Process Feeds
Our free Feed Forge plugin allows you to bulk process feeds for most feed-based add-ons (including the Zoom Connection). This is by far the easiest way to create new meetings from existing entry data.
Process Feeds on Import
GravityImport allows you to automatically trigger the feed for each imported entry.
Entry Detail Meta Box
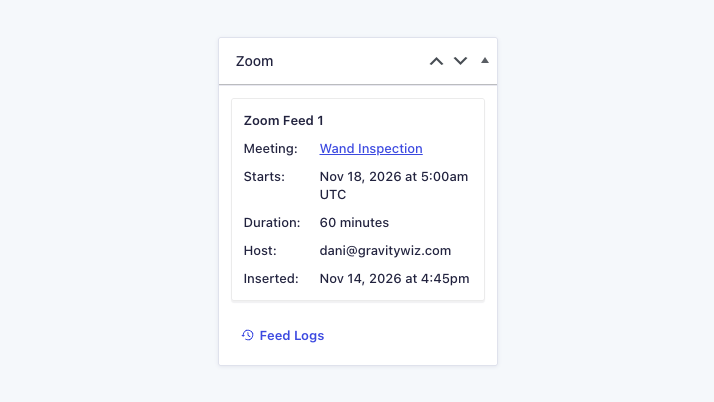
Use the Zoom meta box on the Entry Detail view for an overview of which Zoom feeds have been processed for the entry and which were not processed.
You can see the time the meeting was created and, if the Update & Delete Meetings option is enabled, when the meeting was last updated.
Note: When reprocessing a feed, feed conditional logic is ignored.
Required Capabilities
| Capability Label | Description | Capability Slug |
| Zoom: Form Settings | Lets user configure GC Zoom feed settings. | gc-zoom_form_settings |
| Zoom: Add-On Settings | Lets user view and edit the GC Zoom Add-On settings. | gc-zoom_settings |
| Zoom: Uninstall | Lets user uninstall GC Zoom. | gc-zoom_uninstall |
Integrations
GP Notification Scheduler
Keep attendees informed before and after their Zoom meetings. Send a reminder the day before a consultation, schedule a follow-up after an interview, or set up recurring notifications. GP Notification Scheduler uses a Date field on your form to determine when to send each message.
GP Limit Dates
Control which meeting dates people can request through your form. GP Limit Dates lets you exclude specific weekdays, disable past dates, or offer a rolling booking window—for example, only allowing requests within the next 30 days.
GP Advanced Conditional Logic
Decide whether a submission should create a Zoom meeting based on its date and time values. Add rules to the Zoom feed’s conditional logic to require advance notice, accept weekday requests only, or skip dates that have already passed. Submissions that don’t meet your conditions can still be saved without creating a meeting.
Feed Forge
Already have entries that need Zoom meetings? Feed Forge lets you process their Zoom feeds in bulk instead of opening each entry individually.
By default, Feed Forge skips feeds already processed for an entry, helping you avoid duplicate meetings. To run them again, enable “Reprocess feeds that have already been processed” when starting the bulk operation.
Developer’s Notes
Zoom Security
Privacy and security are core tenets of our authentication flow. Your Zoom data will never touch our servers.
Our OAuth service handles the authorization exchange and returns access and refresh tokens to your WordPress site, where they are stored. It also handles token refreshes to maintain the connection.
You will only interact with our OAuth service during initial authentication, refreshing access tokens, or re-authenticating your connection. Meeting requests go directly from your WordPress site to the Zoom API, rather than through our OAuth service
What is the Zoom account connection used for?
GC Zoom reads the connected Zoom user’s profile to identify the account. It creates meetings from your configured form values and retrieves meeting details, including join links.
When you enable the feed’s update and delete option, GC Zoom can also update associated meetings when entries are edited and delete them when entries are trashed or marked as spam.
Only authorize a Zoom account whose meetings you have permission to manage.
What can GC Zoom access?
Only authorized Zoom accounts.
Authorization grants access to profile and contact information, account details, meetings and calendars, participants and registrations, meeting content, usage information, and settings.
GC Zoom uses this data to identify your account, create meetings with your configured details and invitees, and retrieve meeting information such as join links. When enabled in your feed settings, it also updates meetings when entries change and deletes associated meetings when entries are trashed or marked as spam.
Removing an account from a feed does not revoke its Zoom authorization. Removing it from the Zoom Accounts settings deletes its stored token from your WordPress site, but does not revoke the authorization in Zoom.
To revoke access in Zoom, remove the app through the Zoom App Marketplace. If you do so, you will need to authorize the account again before GC Zoom can use it.
How does GC Zoom authentication work?
OAuth authorization for each connected Zoom account.
GC Zoom supports connecting multiple Zoom accounts. Each connection is associated with the WordPress user who authorized it, and users with the required settings permissions can select an already connected account when configuring a feed.
You only need to authorize an account once to use it across multiple feeds. To connect another account, select Authorize New Account in the feed settings or add it through the Zoom Accounts section on the plugin settings page.
GC Zoom automatically refreshes tokens to maintain authorized connections. If authorization is revoked or a token can no longer be refreshed, you will need to reconnect the account.
Check the Issues section on the plugin settings page for connection problems that may need your attention.
Known Limitations
- Webinars are not supported
- Invitees can’t be added retroactively
If any of these known limitations impact you, we’d love to hear from you. While some limitations are beyond our control, understanding how these limitations impact you is incredibly important in how we prioritize ongoing product development.
Error Handling
If there is an error processing a feed, GC Zoom will log that error as a note for the corresponding entry. If the error is due to a configuration issue, you can reprocess the feed via the Entry Detail Meta Box after correcting the configuration issue.
Error Notifications
GC Zoom will attempt to reprocess any feed that fails to process. If the error persists, a notification with be sent to the site administrator with recommendations on next steps. This notification will only be sent once per hour.
Troubleshooting Issues
If GC Zoom is not working as expected, here are some troubleshooting steps you can take:
- Check the Issues section for any account or feed related issues.
- If your account has disconnected from GC Zoom, check if your Zoom password has changed, or if access has been revoked. There are a few situations that will cause an account to become disconnected.
- If entries are failing to creating Zoom meetings automatically, but work when manually triggering the feed via the entry view, the issue may be related to asynchronous feeds not working on your site.
- To see if this is the case, use this snippet to temporarily disable the asynchronous nature of the Zoom feed.
- If entries are successfully sent automatically when the snippet is active, you will need to reach out to your host to find out why asynchronous feeds are not working.
- If all else fails, the issue may be related to Action Scheduler. Check out the Troubleshooting Action Scheduler guide.
Issues Section
The GC Zoom settings page includes an Issues section. This is the best place to start when troubleshooting.
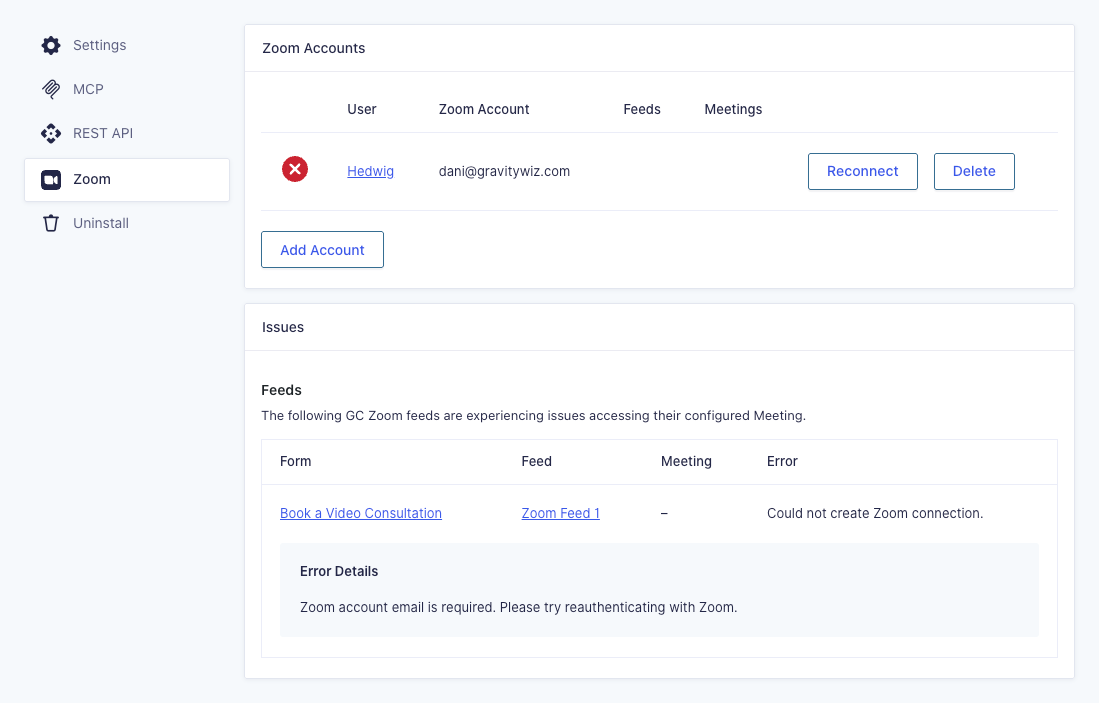
The Issues section will give you a summary of any feeds that cannot access their configured Zoom account.
A few common reasons this can happen are the associated Zoom account’s password has changed, been deleted, or GC Zoom’s access has been manually removed from the account.
If an account becomes disconnected for any reason, the authorizing user can reconnect the account by clicking the Reconnect button for the disconnected account in the Zoom Accounts section.
Account Disconnection Issues
There are a few different reasons why GC Zoom may be disconnected from your Zoom Account. Changing your Zoom password, revoking access to GC Zoom, or API changes from Zoom can all cause the connection between your Zoom account and GC Zoom to break.
Thankfully, it’s easy to reconnect your Zoom Account via the Zoom Accounts plugin setting.
Troubleshooting Action Scheduler
If you’ve confirmed that your account is connected and your Connection feed is configured correctly, you may be experiencing an issue with Action Scheduler. This tool powers Gravity Connect’s ability to handle temporary failures by automatically attempting to process the feed or entry update again.
Common Issues
I cannot authorize Zoom
- Allow pop-ups for your WordPress admin site and try again.
- Sign in to the Zoom account that should create the meetings.
- If your organization restricts third-party apps, ask your Zoom administrator whether the connection is approved.
- Check Forms › Settings › GC Zoom for account issues, and reconnect the affected account.
After reconnecting, confirm that the correct account is selected on the form’s feed and save it.
A submission did not create a meeting
- Open the form’s Settings › GC Zoom. Confirm the feed is active and its conditional logic matches the submission.
- Check that the entry is not marked as spam.
- Confirm the feed has a connected account and that it is still authorized.
- Open the entry and inspect its feed status and error notes.
- Check Forms › Settings › GC Zoom for connection issues.
- Review scheduled actions under Tools › Scheduled Actions, searching for
gc_zoom. Meeting work is asynchronous, and failures can schedule retries.
If the entry has no inserted meeting, its GC Zoom feed section can show Process Feed. Check Zoom and any pending scheduled actions before processing manually, so you do not unintentionally repeat an operation with an uncertain outcome.
GC Zoom logs processing errors and retries failed operations. Persistent creation failures can also produce a GC Zoom Feed Error email to the WordPress administrator. Do not assume a retry succeeded without checking the entry and Zoom.
The meeting has the wrong date or time
- Check Settings › General › Timezone in WordPress.
- Map Start Date directly to the Date field, and Start Time to the Time field.
- Use
YYYY-MM-DDwhen entering a custom fixed date. - Check the submitted values. An empty start date uses the submission date and time. A date without a time schedules the meeting at midnight.
Submit a new test entry after changing the feed. Editing the feed alone does not update meetings already created from older entries.
The notification has no join URL
- Make sure the message contains
{gcz_meeting_url}exactly. - Check that the entry’s active feed has successfully created a meeting.
- Confirm the account remains connected and can retrieve that meeting from Zoom.
- Review errors from the first processing attempt: delayed notifications can be released after a failed attempt, before a retry succeeds.
The tag can return an empty value when there is no accessible meeting. If creation later succeeds, verify the link and send a follow-up notification as needed.
The join-link notification never arrives
Check whether any active Zoom feed was skipped by conditional logic.
Entry edits do not change Zoom
Check Update & Delete Meetings on the feed. It must be enabled for entry edits to update a meeting. The entry must already have an associated meeting, and its account connection must remain available.
I cannot remove the app
Follow both parts of Disconnecting and removing GC Zoom: remove the app in Zoom App Marketplace, then disconnect the account in WordPress. If the app is not listed in Zoom, check which account you used to authorize it or ask your Zoom administrator. If the WordPress connection remains after removal in Zoom, disconnect it from Forms › Settings › GC Zoom › Zoom Accounts; Marketplace removal does not delete the stored WordPress credentials.
Still need help?
Our legendary support team can get you sorted! Submit a ticket here.
Disconnect and Remove GC Zoom
Removing GC Zoom involves two separate steps: removing its authorization in Zoom and deleting its saved account connections from WordPress.
Before disconnecting, disable any GC Zoom feeds that use the account and remove or revise notifications that rely on the {gcz_meeting_url} merge tag.
Remove GC Zoom from your Zoom account
- Sign in to Zoom Marketplace using the Zoom account you connected.
- Click My Library.
- Find the Gravity Connect app you authorized.
- Under Actions, click the More (…) menu, then Remove.
- Confirm removal.
For more details, see Zoom’s app-removal instructions.
This revokes the app’s authorization in Zoom. It does not delete the credentials saved in your WordPress database. Complete the following steps to remove those credentials.
Remove your Zoom account from GC Zoom
- Go to Gravity Forms › Settings › Zoom.
- Find your account under Zoom Accounts.
- Click Delete.
- Confirm the deletion when prompted.
- Repeat for any other connected accounts you want to remove.
Deleting an account here removes its saved access and refresh tokens from your WordPress database. It does not revoke authorization in Zoom; complete the Marketplace removal steps above as well.
Uninstall GC Zoom
If you no longer need the plugin, remove its saved account connections first using the process above, then:
- Go to Gravity Forms › Settings › Uninstall.
- Find Zoom.
- Click Uninstall.
- Confirm when prompted.
What happens after removal?
- Meeting actions stop working. Feeds using the removed connection can no longer create, retrieve, update, or delete Zoom meetings.
- Notifications may be affected. Notifications using
{gcz_meeting_url}may contain no join link or remain delayed, depending on your feed configuration. - Existing Zoom meetings remain. Removing the integration does not cancel meetings it already created. Manage or delete those meetings directly in Zoom.
- Gravity Forms entries remain. Removing the account connection does not erase existing form submissions.
- Backups are unchanged. Backups created before disconnection may still contain credentials and form data. Handle these under your site’s retention policies.
To use GC Zoom again, activate or reinstall it as needed, authorize your Zoom account, confirm the account selected on each feed, and test a submission before re-enabling your workflow.
Translations
You can use the free Loco Translate plugin to create translations for any of our products. If you’ve never used Loco translate before, here’s a tutorial written for beginners.
Hooks
Gravity Forms has hundreds of hooks. Check out our Gravity Forms Hook Reference for the most thorough guide to Gravity Forms’ many actions and filters.
Related Resources
No related resources found.