Gravity Forms Entry Blocks
The easiest way to display and edit Gravity Forms entries.
What does it do?
Gravity Forms Entry Blocks adds a new block to the WordPress Block Editor for displaying and editing entries. Use a standard variation like the Entries Table to display a list of your entries or completely customize your layout with the Entries Loop and hundreds of supported blocks.
With Entry Blocks you can create:
- Company directories with data taken from form entries
- Payroll dashboards with editable employee data
- Event management tools with attendees displayed in a searchable table
- Job boards powered by form entries
- Client portals that securely display and manage user-specific form submissions
- Maintenance request trackers where staff can view and manage requests in one place
- And many more!
Features
- Display Gravity Forms entries on the frontend.
Let users view entries anywhere on your site. Display entries in pages, posts, and even widgets! - Edit entries with ease.
Edit (and delete) entry data on the frontend without requiring access to the WordPress backend. - Fully customizable layouts with multiple default variations.
Display entries in a table or build your own block-based layout with the Entries Loop. - Harness the power of the Block Editor.
Built for the Block Editor with support for hundreds of blocks out of the box. - Automatic updates.
Get updates and the latest features right in your dashboard. - Legendary support.
We’re here to help! And we mean it.
Have a question?
We’re here to help, just send us a message.

- Version 1.0-beta-2.33
- Updated May 21, 2026
- Released March 3, 2022
All Connections
All Perks
- GF Address Autocomplete
- GF Advanced Calculations
- GF Advanced Conditional Logic
- GF Advanced Phone Field
- GF Advanced Save & Continue
- GF Advanced Select
- GF Auto List Field
- GF Auto Login
- GF Better User Activation
- GF Blocklist
- GF Bookings
- GF Conditional Logic Dates
- GF Conditional Pricing
- GF Copy Cat
- GF Date Time Calculator
- GF Disable Entry Creation
- GF Easy Passthrough
- GF eCommerce Fields
- GF Email Users
- GF Email Validator
- GF Entry Blocks
- GF Expand Textareas
- GF File Renamer
- GF File Upload Pro
- GF Inventory
- GF Limit Checkboxes
- GF Limit Dates
- GF Limit Submissions
- GF Media Library
- GF Multi-Page Navigation
- GF Nested Forms
- GF Notification Scheduler
- GF Page Transitions
- GF Pay Per Word
- GF Populate Anything
- GF Popups
- GF Post Content Merge Tags
- GF Preview Submission
- GF Price Range
- GF QR Code
- GF Randomizer
- GF Read Only
- GF Reload Form
- GF Sliders
- GF Submit to Access
- GF Terms Of Service
- GF Unique ID
- GF Word Count
Documentation
How do I enable this functionality?
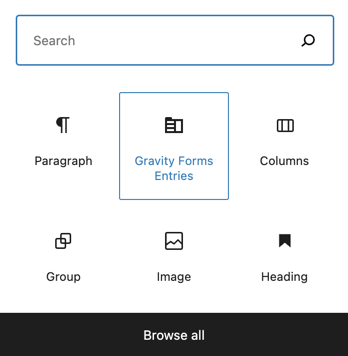
After installing and activating Gravity Forms Entry Blocks, the Gravity Forms Entries block will be available within the Block Editor.
|
Add a new Gravity Forms Entries block to your post. |
|
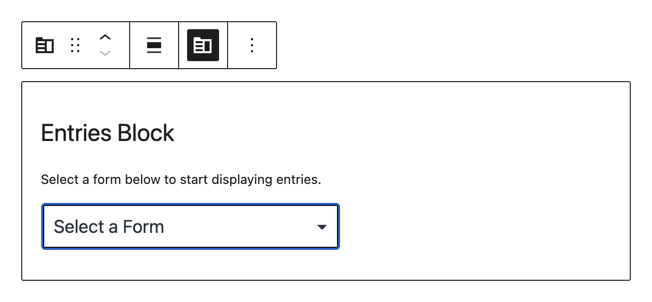
Select your form. |
|
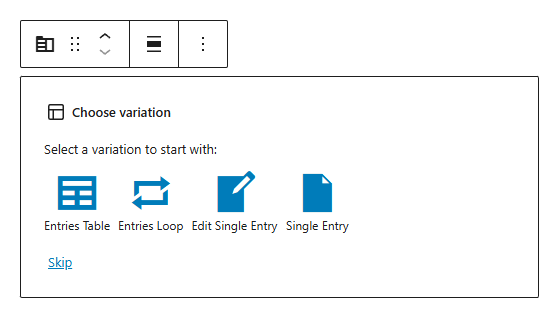
Choose a layout variation. |
Feature Details
Layouts
Entry Blocks offers four layout variations: Entries Loop, Entries Table, Edit Single Entry, and Single Entry. The variation is selected when adding the block to the page.
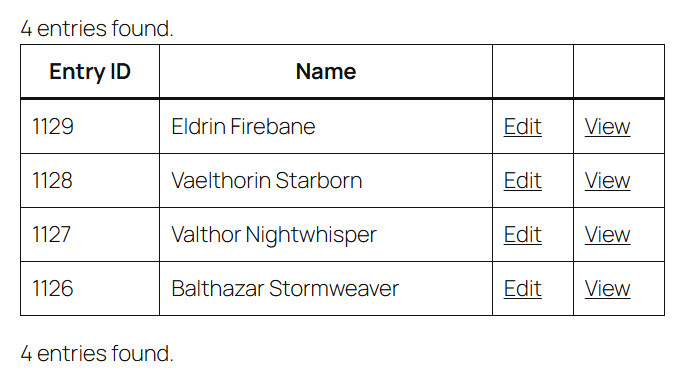
Entries Table
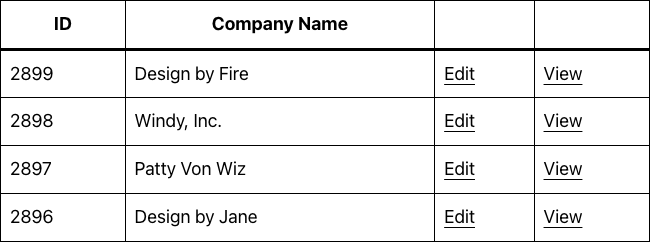
The Entries Table variation displays entries in a table format. This is a great way to display lots of entries on a single page.
Managing Columns
Columns can be managed using the Summary Columns setting. By default, three columns are displayed: Entry ID, Edit Link, View Link.
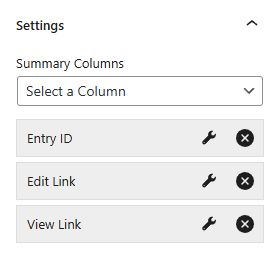
Add any form field as an additional column by selecting it from the columns dropdown. Once added, you can drag-and-drop the column into the desired order.
Remove a column by clicking the remove icon for the column you wish to remove.
Custom Columns
Custom columns allow you to include custom content (including merge tags) as a column in your table. To add a custom column, select the Custom option from the columns dropdown.
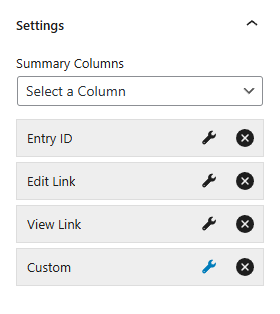
Once added, click the wrench icon to launch the custom column modal.
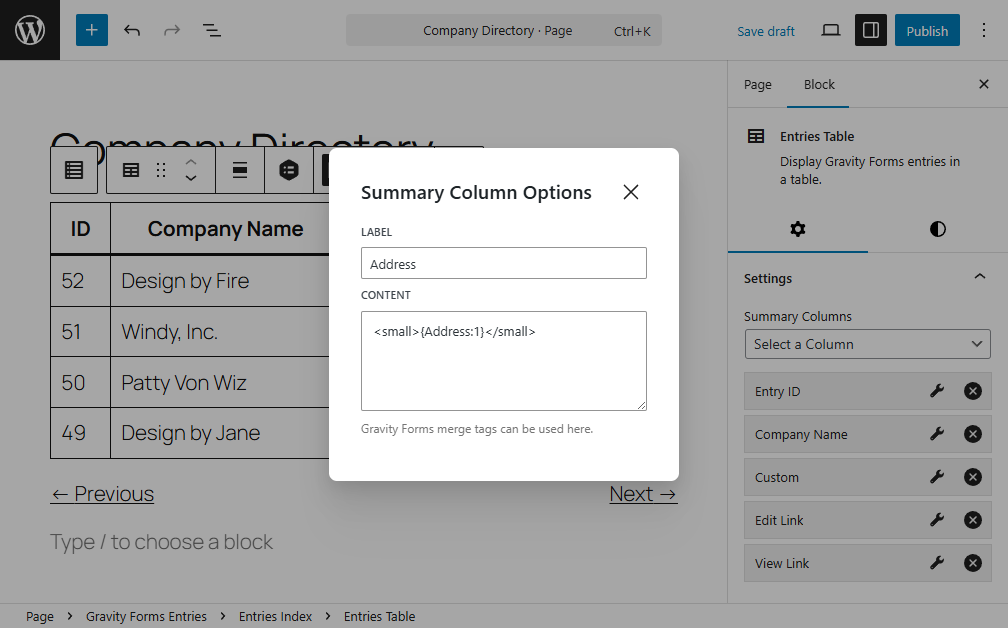
Custom columns can contain static content, merge tags, and HTML. For example, you could insert this into a custom column to create an edit link that displays the Entry ID:
<a href="{edit_url}">{entry_id}</a>Related Snippets
- Add Entry Button
- Show Entry Count
- Display Entry’s Date Created in Site Timezone
- Show a Log of Entry Edits
- Display Stars for Rating Fields
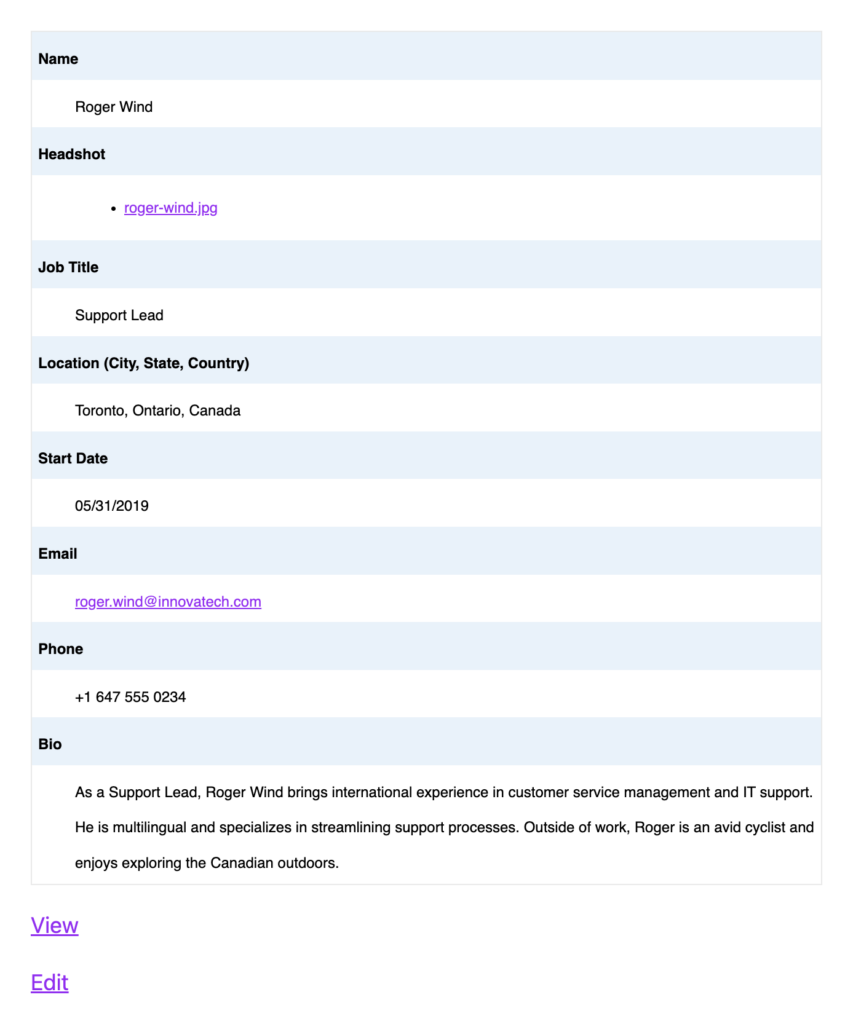
Entries Loop
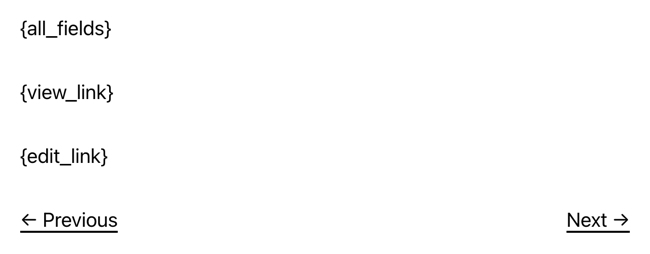
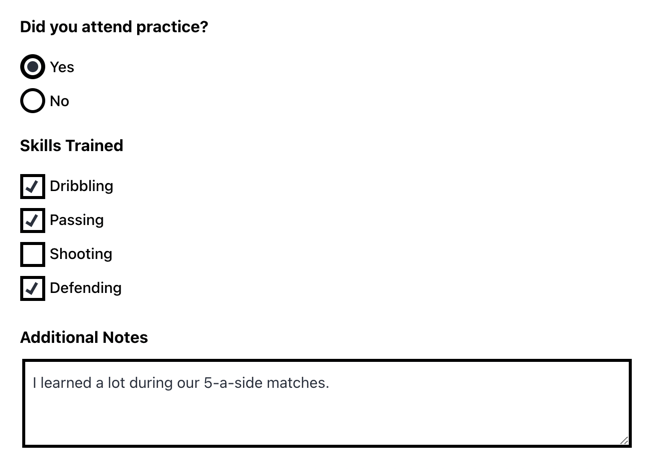
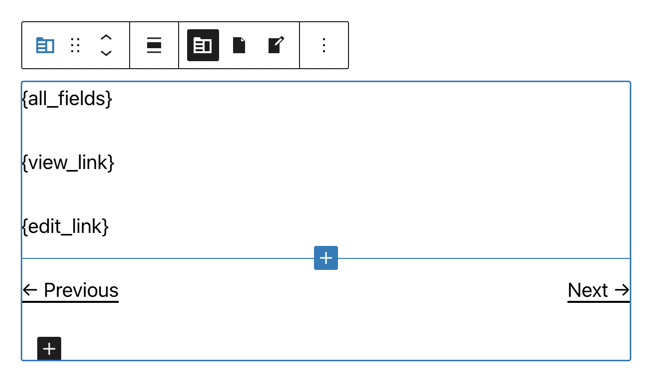
The Entries Loop variation displays entries using the {all_fields} merge tag. Each entry’s values are rendered the same as they are when the {all_fields} merge tag is inserted into a form confirmation or notification. By default, each entry will include a View and Edit link below the entry values.
To customize the layout of the {all_fields} merge tag, check out our All Fields Template.
Customizing the Entries Loop
The Entries Loop is powered by merge tags. Adding or removing merge tags changes what is displayed. By default, the three merge tags displayed are: {all_fields}, {view_link}, and {edit_link}.
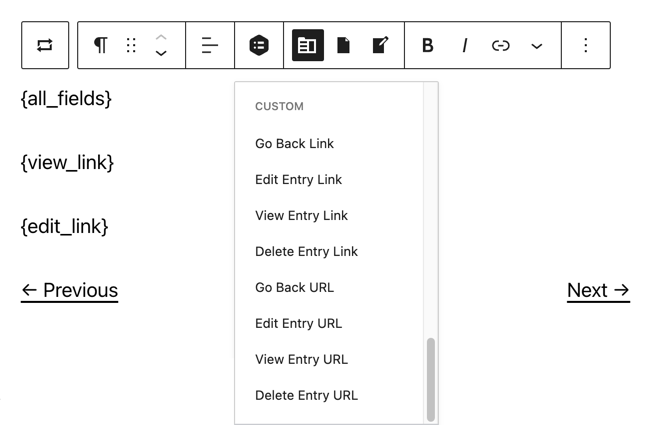
Click on the Entries Loop block to edit the merge tags for the block. Additional merge tags can be found under the merge tag icon.
Entries Loop and Table Views
The Entries Loop and Table layout variations consist of three views: Entries View, Single Entry View, and Edit Entry View. Each of these views can be customized using the Block Editor. To switch between the views, select the view from the block toolbar.

Usage Examples
Edit Single Entry
The Edit Single Entry variation will display the form with a single entry pre-populated. This is identical to the Single Entry View that is available in the Entries Loop and Table variations layout, except it is limited to a single entry.
By default, the entry displayed is the most recent one submitted. Entry Blocks will use the default theme set in Gravity Forms settings when displaying the edit form.
To modify which single entry is displayed, modify the Entry Query setting.
Usage Examples
Notifications when Editing
When editing an entry via Entry Blocks, the the “Entry Edited via Entry Block” notification event is triggered. Any notification configured for this event will be sent when an entry is edited via Entry Blocks.

Feed Handling when Editing
Reprocessing feeds on edit is currently supported via snippet. When an entry is edited through Entry Blocks, this snippet disables asynchronous feed processing, then loops through all registered add-ons to process their feeds.
Confirmations when Editing
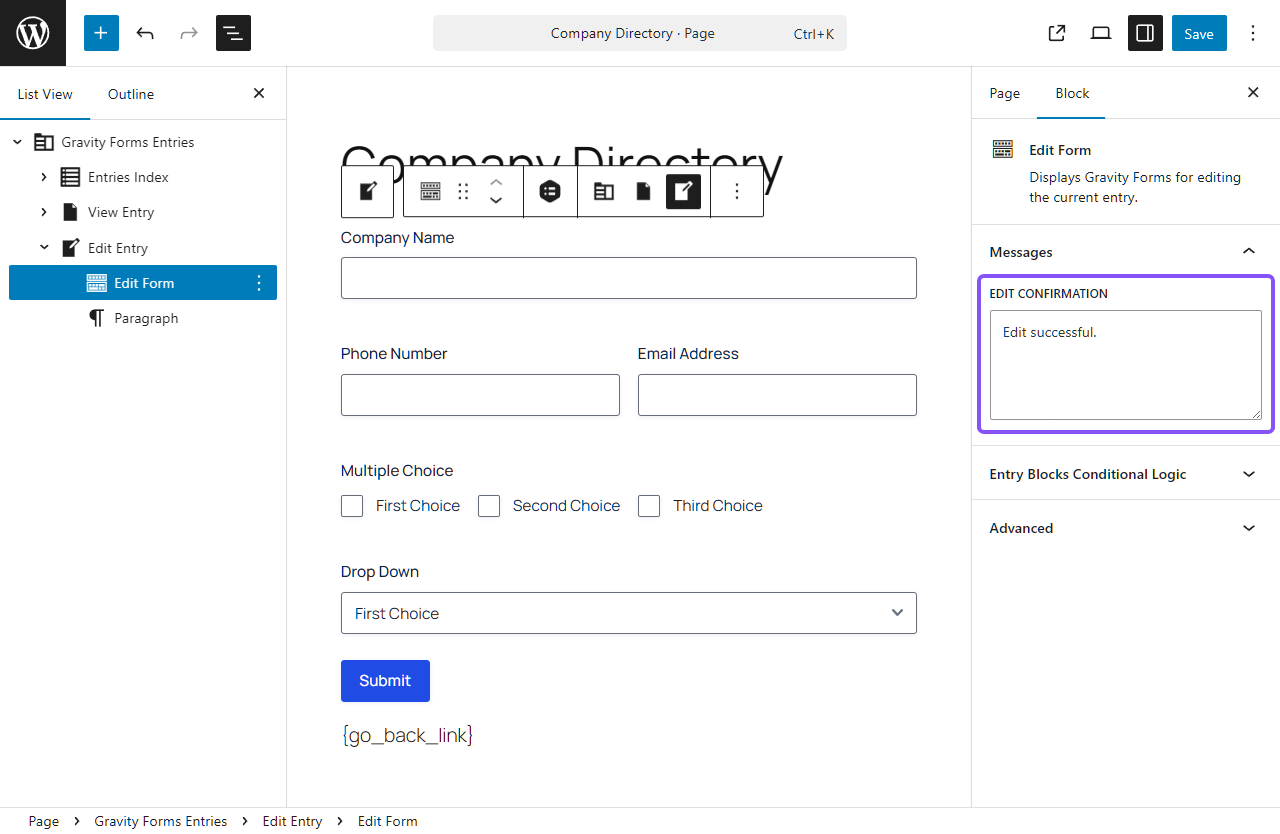
When an entry is edited via Entry Blocks, a confirmation message is displayed to the user. By default, a standard confirmation message is shown, but you can customize this through the block settings.
When editing the Entry Block, select the Edit Form block and look for the Edit Confirmation setting located in the block’s settings on the right side of the editor. Here, you can enter custom text that will be displayed after a user successfully edits an entry.
For more advanced control, such as redirecting the user after editing or showing different confirmations based on field values, use the gpeb_edit_confirmation hook.
Related Snippets
- Customize Edit Entry Form’s Submit Button Text
- Disable Field Conditional Logic When Editing
- Single Page Edit
- Show Default Form Confirmations on Edit
- Make Administrative Fields Visible on Edit
- Process Feeds on Edit
- Hide Product Fields on Edit
- Remove Fields On Edit
- Update Post on Entry Edit
Single Entry
The Single Entry variation displays a single entry using the {all_fields} merge tag. This is identical to how the Entries Loop displays entries, but is limited to a single entry. Like the Edit Single Entry variation, it defaults to the most recent entry.
Usage Examples
- Spotlight: Building a Self-managed Lawyer Directory using Entry Blocks
- Spotlight: Building an internal payroll tool using Gravity Forms Entry Blocks
Entry Query
The Entry Query determines what entries are displayed in Entry Blocks. Each block can have its own query and supports filtering, ordering, and limits. To modify the query on a block, first select the block, then click on the Entry Blocks icon.
Some of the Entry Blocks views are groups. If you select a single item in the group, you’ll first need to select the entire group before the Entry Blocks icon will display.
Once the block is selected, find the Entry Query setting on the right side of the editor.

From there, you can edit the filters, set the ordering, and the number of entries to display per page.
Want to filter the entries based on a query string in the URL? You’ll first need to install our Query Param Merge Tag snippet. This will add a new {query_param} merge tag, which you can use in your filters.
Filtering by Relative Date
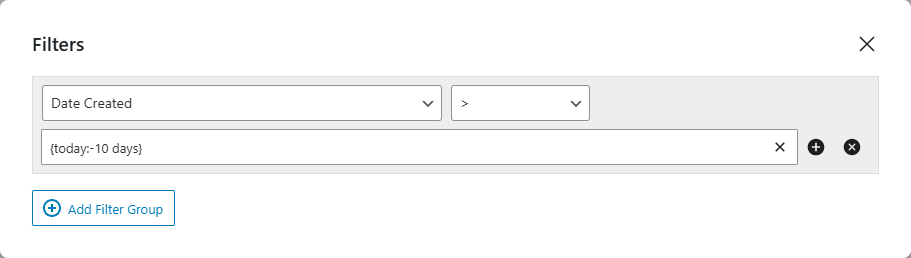
If you’re working with time-sensitive data, you may want to set the Entry Blocks to show only entries based on a date relative to the current date.
This can be done by using the {today} merge tag within the Entry Query filter. For example, if you want the Entry Blocks table to only show entries that were submitted in the last 10 days, the filter setup would be like so;
Related Snippets
Filters Block
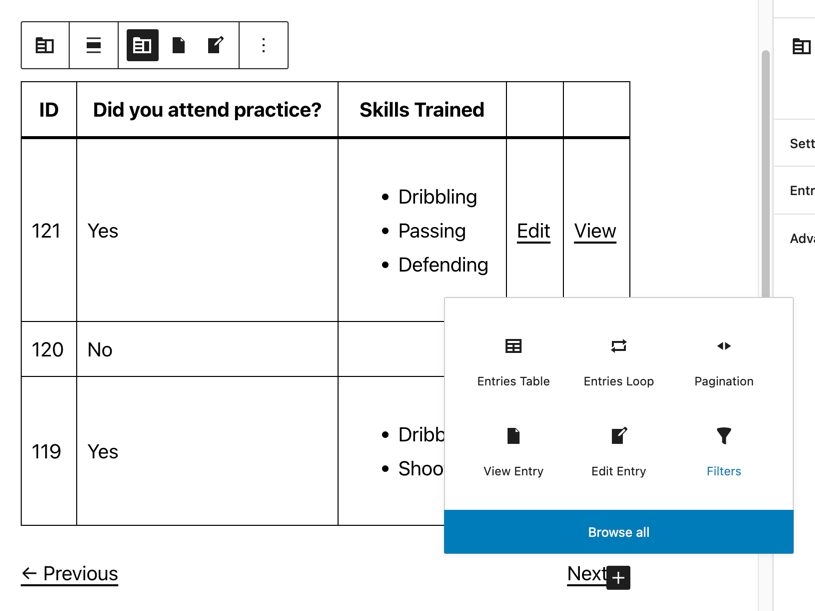
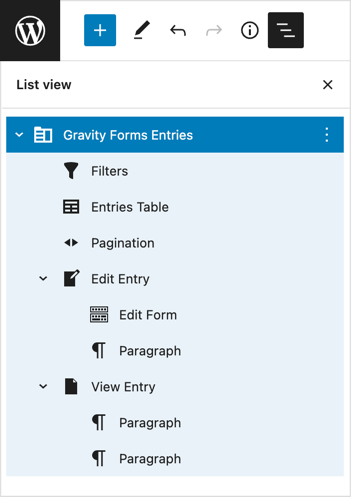
The Filters block adds interactable filters to the page. These filters can be used to search and filter entries on the front end based on the entry field values. To add a Filters block, first select the Entries block, then click the plus icon in the bottom-right of the block. Then, select “Filters” in the pop-up menu.
Having trouble with getting the plus to appear? Try the List View in the Block Editor. Once activated, you can easily select the Gravity Forms Entries block.
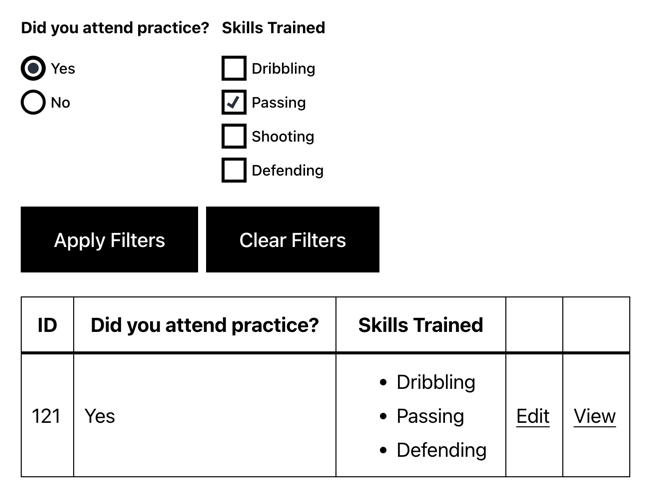
Once added, you can customize the Filters block by selecting which fields to filter on, whether to include a search, and the filter orientation.
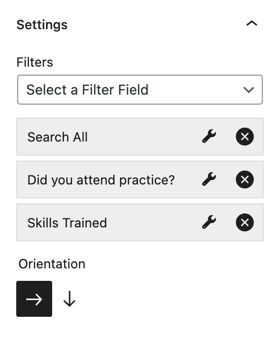
The filtering can then be used on your page to make finding the correct entry easy for your users.
Usage Examples
Related Snippets
Permissions
Who can view entries?
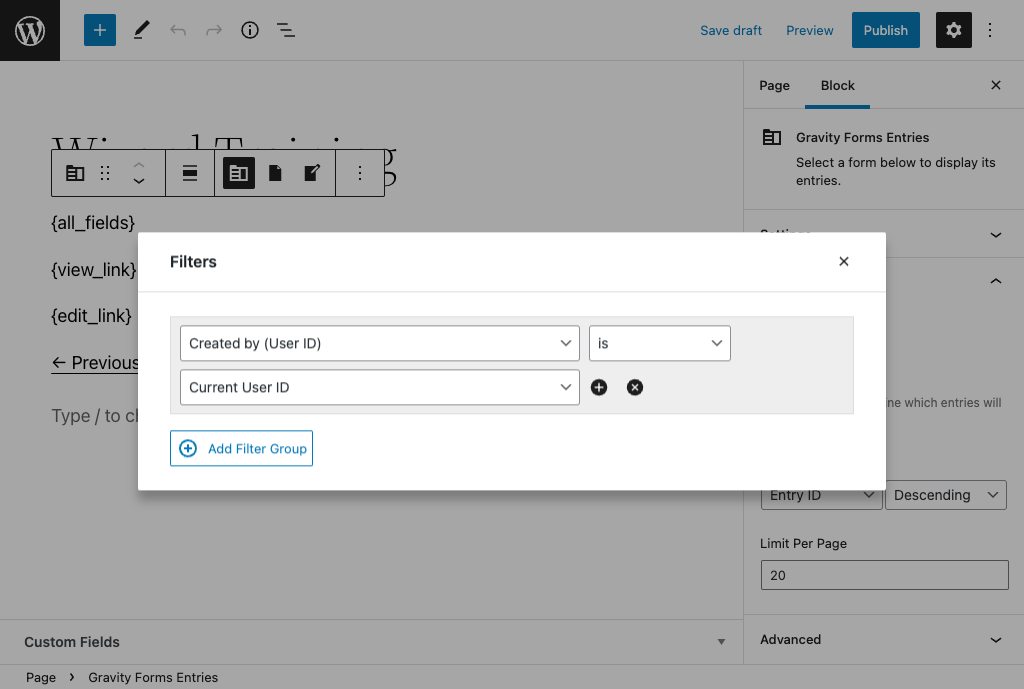
By default, all entries displayed via Entry Blocks will be publicly viewable.
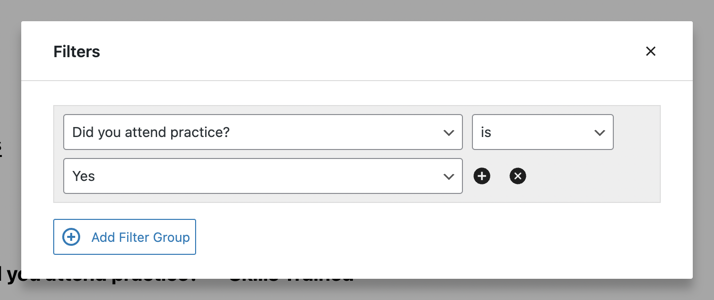
To only show the current user entries that belong to them, add a filter where the entry’s “Created by” property is the same as the “Current User ID”.
Who can edit entries?
The entry owner and any user whose role has been granted the corresponding Gravity Forms capability are able to edit an entry. The “Edit” link will not show up for users who do not have the correct permissions.
Need more control over who can edit specific entries? We have a snippet that allows you to grant permission to edit specific entries based on user meta.
Conditional Logic
Entry Blocks supports conditional logic on blocks within the Gravity Forms Entries block. Enable this option in the block’s settings to show or hide specific blocks based on Gravity Forms conditions.
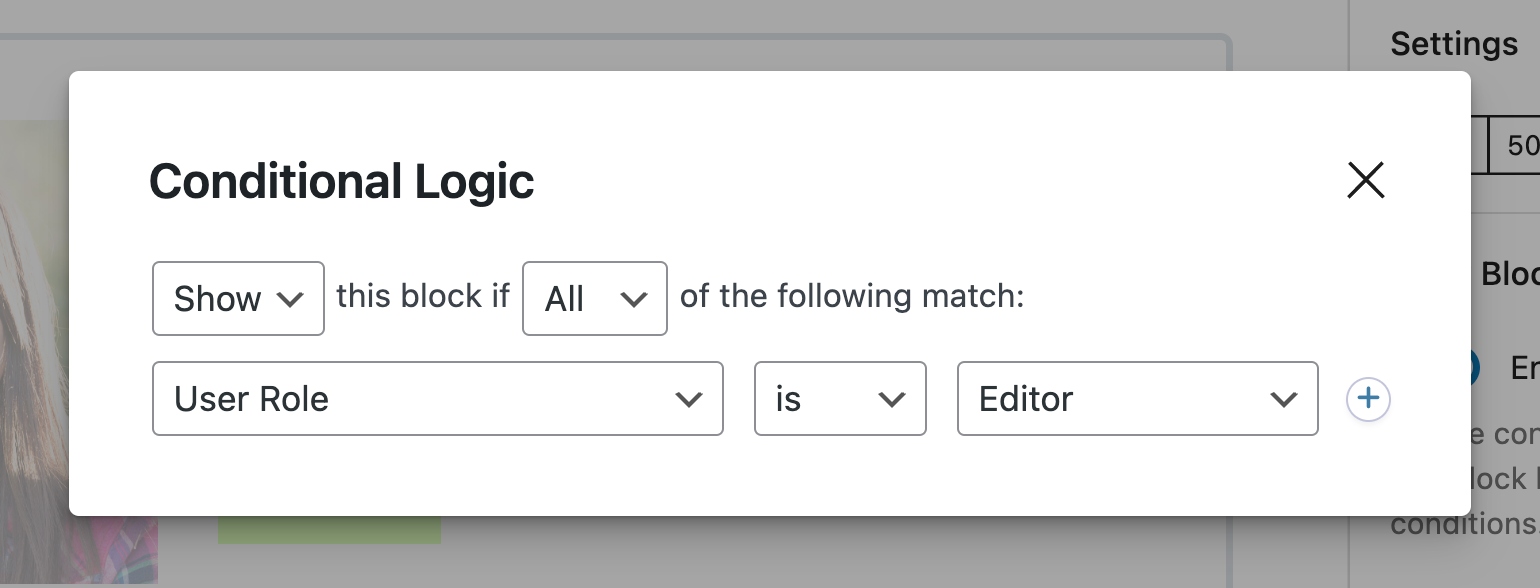
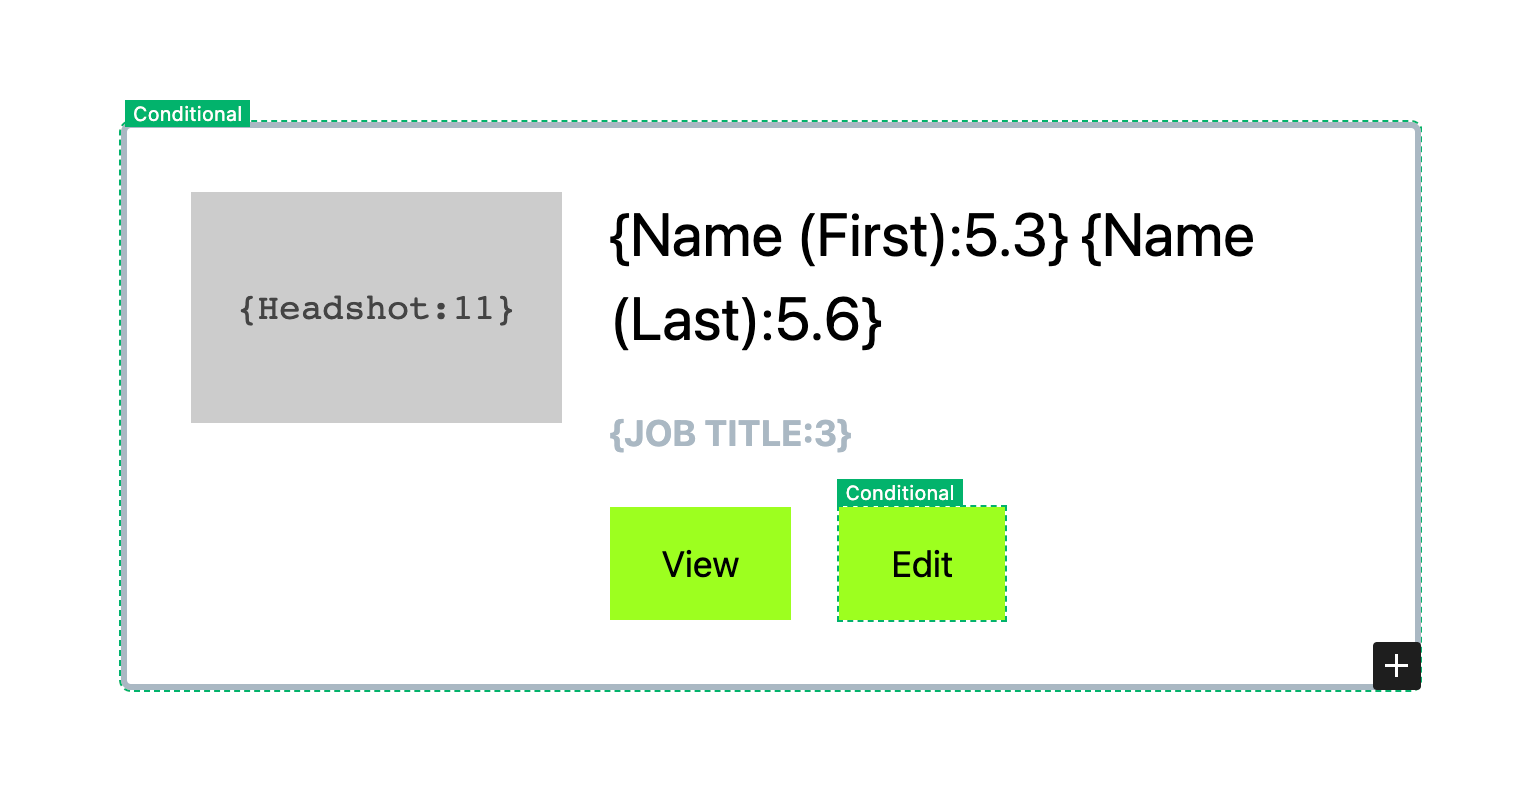
Blocks with conditional logic enabled will have a green box saying “Conditional” above them.
Additionally, the custom “User Role” option allows blocks to be displayed based on the logged-in user’s role.
Example: Only show a Button block that contains the Edit link if the user has the Editor role.
If the Edit link is in a block that is conditionally hidden, access to editing the entry will be restricted based on the condition applied to the block.
Conditional logic is not available on blocks contained within the Entries Index block. If you need to show or hide blocks here based on the current user role, you can use the free Block Visibility plugin.
Using Entry Blocks in the classic editor and other page builders.
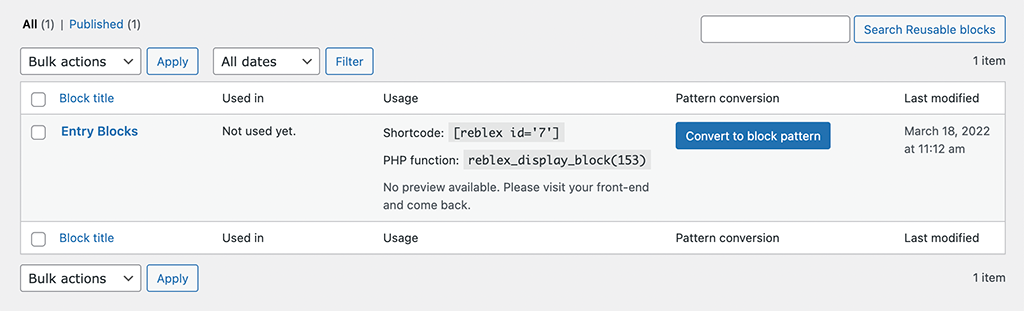
Entry Blocks works with other WordPress editors like Classic, Elementor, Beaver Builder, and Divi. This is made possible with Reusable Blocks Extended. Here’s how it works:
|
Create a Reusable Block and add your Entry Block into that. |
|
|
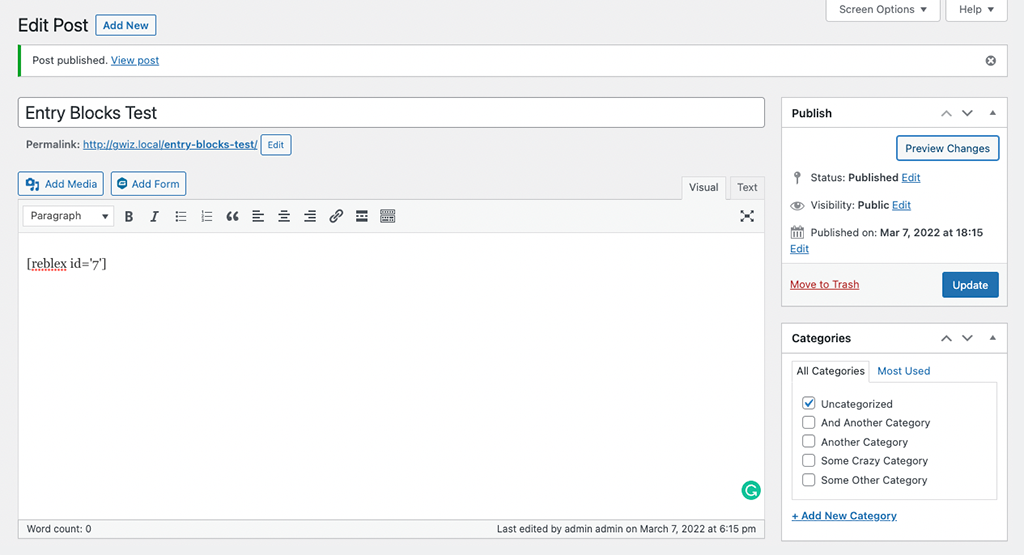
Grab the shortcode for the Reusable Block, for example [reblex id='7'].
|
|
Insert that shortcode into your alternative WordPress Editor. |
Don’t want to use the Block Editor (e.g. Gutenburg)? No problem! Reusable Blocks will work even if the Block Editor is disabled on your site.
Integrations
Gravity PDF
For entries where a Gravity PDF feed is attached, including a link to the PDF is simple. Follow this guide from Gravity PDF to set things up.
Gravity Forms Advanced Post Creation Add-On
Using this snippet, posts created using the Advanced Post Creation Add-On can be updated when the associated entry is edited with Entry Blocks.
Known Limitations
- By default, the Entries Table view is not mobile-responsive. Support for this is coming in the future.
- Solution: This plugin can help in the meantime!
- The Entries block cannot be nested inside of another Entries blocks.
- We’re eager to explore adding support for this feature to please reach out with your use-case!
- Multiple Entries blocks cannot be included on the same page.
- GP Page Transitions is not supported in the Edit Form block.
- Save and Continue is not supported when editing entries via Entry Blocks.
Troubleshooting Issues
If Entry Blocks isn’t working as expected, here are some troubleshooting tips you can try.
- If updates to entries are not appearing immediately, clear both your browser cache and any caching plugins. Excluding the page that contains Entry Blocks from your site cache will guarantee the latest data is displayed.
- If the Entry Block isn’t displaying correctly, try deleting and re-adding it in the Block Editor.
- Make sure there are no JavaScript errors appearing in the browser console, as they can interfere with Entry Blocks.
- Perform a theme or plugin conflict test to determine if another plugin is affecting the functionality of Entry Blocks.
FAQ
How can I display JetSloth’s Image Choices in Entry Blocks?
Add the :image merge tag modifier to your choice field’s merge tag to show the Image Choice’s image. For example, {Radio Buttons:1:image}. Refer to this guide from JetSloth for more details on customizing how the image is displayed.
How can I display the entry count?
You can use this snippet to display a count of the entries before and after the entries table.
How can I display data about the user who created the entry?
You can use the {created_by:[meta_key]} merge tag to display data about the user who created the entry. This merge tag supports any single user meta, including custom meta keys, and can be used anywhere within Entry Blocks.
For example, to display the first name, you would use {created_by:first_name}. More details about the merge tag usage can be found here.
Translations
You can use the free Loco Translate plugin to create translations for any of our Perks. If you’ve never used Loco translate before, here’s a tutorial written for beginners.
Hooks
Gravity Forms has hundreds of hooks. Check out our Gravity Forms Hook Reference for the most thorough guide to Gravity Forms’ many actions and filters.
Related Resources
- Accept Donations on Your WordPress Site with Gravity Forms
Accept donations in WordPress with Gravity Forms – customize donation forms, add payment gateways, and integrate with other platforms. - Guide: Two-Way Connect Gravity Forms with Google Sheets
Learn how to send Gravity Forms data to Google Sheets and populate data from Google Sheets into Gravity Forms, even within the same form. - Spotlight: Building a Self-managed Lawyer Directory using Entry Blocks
Richard Best built a women's lawyer directory that allows lawyers to build profiles and edit them from the front end. We explore how it works. - Spotlight: Building an internal payroll tool using Gravity Forms Entry Blocks
See how Desol Int. built an internal payroll tool from scratch in WordPress using Gravity Forms and Entry Blocks. - Spotlight: Entry Blocks for Conference Attendee Management at Scale
See how Henry Vandermeir used Entry Blocks to create a backend attendee management system for a Las Vegas conference of 500+ attendees. - Spotlight: How FileStack Powers Smooth Event Planning with Entry Blocks
Joel Armsden’s FileStack helps event organizers manage event presentation files and agendas. Built entirely in WordPress, it allows his clients to ditch email chains and the added stress that comes with them. - Spotlight: Turning Gravity Forms Entries into a Knowledge Base with Entry Blocks
Expeditions Alaska created their own master resource from a routine task. Their reports are automatically displayed in a searchable table interface that educates and motivates guides. - Spotlight: Turning Gravity Forms Into a Complete Hiring Platform
See how David Kendall worked his magic with Gravity Forms and Gravity Perks to build a complete recruiter CRM. - Spotlight: Updating Custom Post Types with Entry Blocks
See how Josh built an all-encompassing custom post type update workflow for his team using Gravity Forms.