

Use Cases
Triage an incident report and close it with sign-off
Route reports by severity, escalate urgent cases, queue routine work for a digest, and require sign-off before closure.
A safety report or service request lands in a shared inbox. Urgent work needs an immediate owner, while routine work can wait in a visible queue. Doing that by memory means urgent reports wait and closures happen without review.
What you’ll build
Section titled “What you’ll build”One report form feeds one workflow. A Switch routes by severity: urgent cases alert the on-call lead, high cases go to the response team, and everything else enters the daily digest. For urgent and high cases, the owner submits a closure request and a supervisor must approve it before the case is marked closed.
flowchart TD
    A[Incident form submitted] --> B{Route by severity}
    B -->|Urgent| C[Set status: Escalated]
    B -->|High| D[Set owner: Response team]
    B -->|Default| E[Set status: In queue<br/>Include in digest: Yes]
    C --> F[Email on-call lead:<br/>closure form link]
    D --> G[Notify response team:<br/>closure form link]
    E --> H[Daily digest]
    F --> R[Wait for Form Submission:<br/>closure request]
    G --> R
    R -->|Submitted| I[Wait for Approval:<br/>supervisor closure review]
    R -->|Expired| L
    I -->|Approved| J[Set status: Closed]
    I -->|Rejected| K[Email the owner:<br/>what still needs doing]
    I -->|Expired| L[Escalate closure<br/>to the safety lead]
    J --> M[Send Email: reporter<br/>with the outcome]
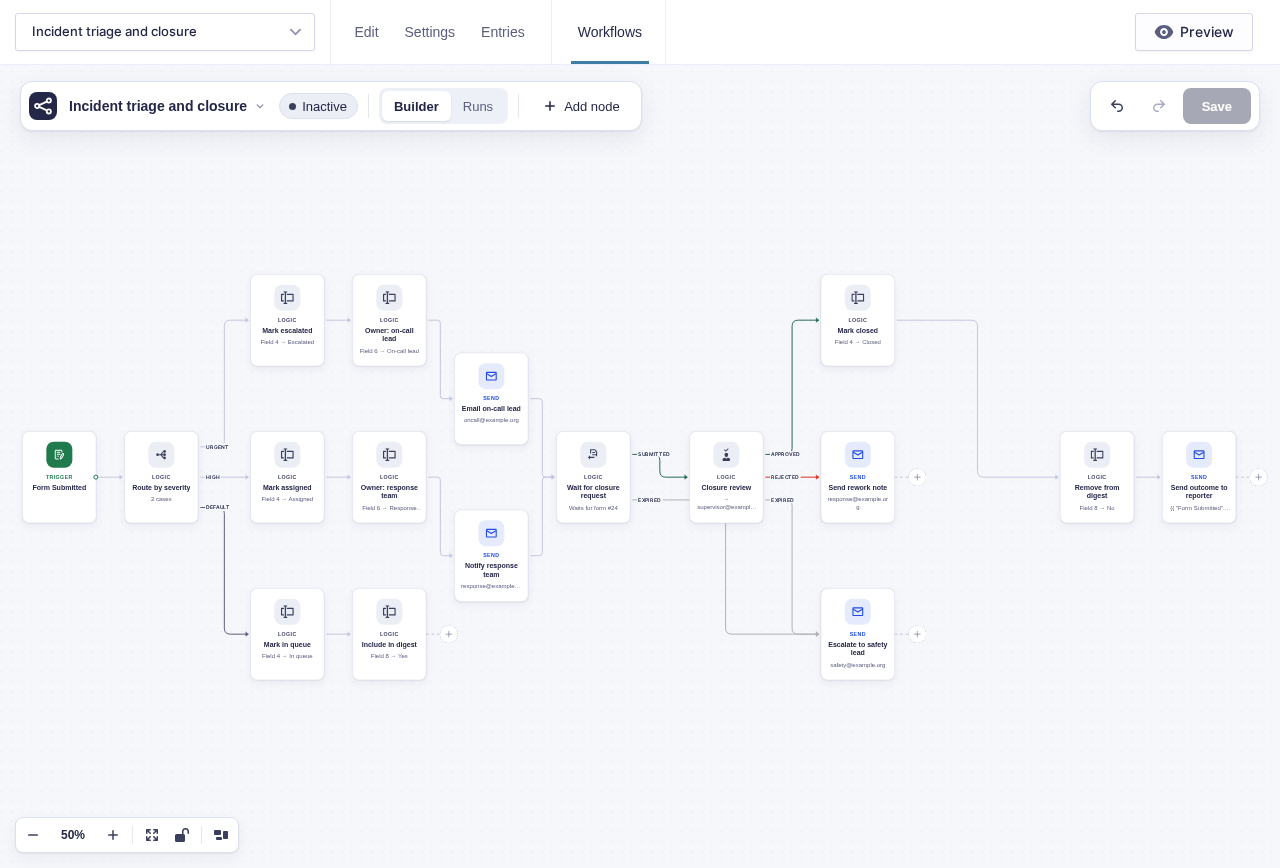
Before you build
Section titled “Before you build”- Define the allowed severity values and who owns each category.
- Add administrative Case status, Owner, and Include in digest fields.
- Create a separate closure-request form with a hidden
keyfield and a required resolution-summary field. - Choose monitored addresses for on-call, response-team, supervisor, and expiry messages.
- Decide what evidence a supervisor needs before approving closure.
Build it step by step
Section titled “Build it step by step”-
Build an incident form with a Severity field and incident description. Add administrative-only Case status, Owner, and Include in digest fields.
-
Build a Closure request form with a required resolution summary. Add a hidden field, enable dynamic population, and set its parameter name to
key. -
Open the incident form and click Workflows in the form toolbar. Click New Workflow, then Add Trigger and choose Form Submitted.
-
Add Switch named Route by severity. Add
Urgentfirst andHighsecond, each comparing the submitted Severity field to that exact saved value. Everything else falls to Default.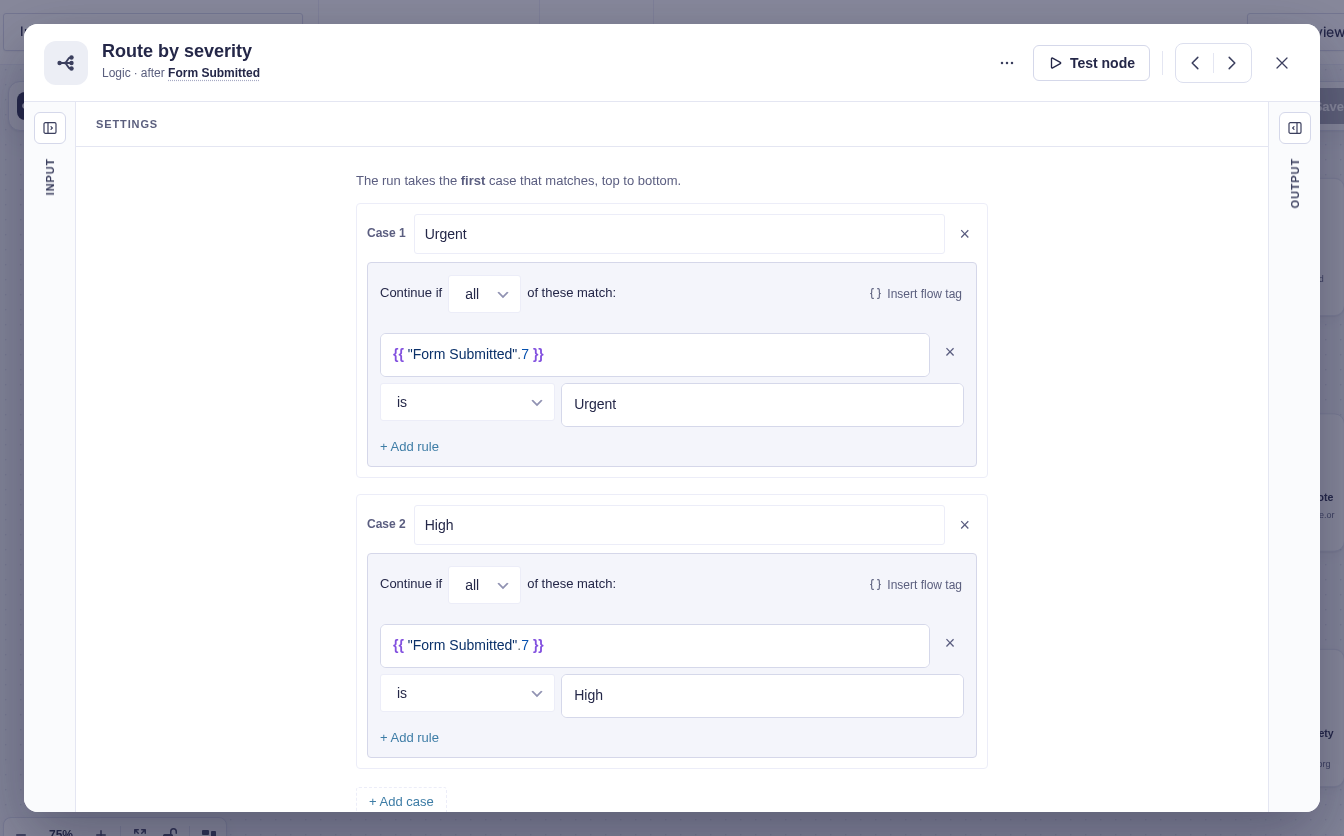
-
On Urgent, use Update Entry Field to set Case status to
Escalatedand Owner toOn-call lead. Send that owner the incident details and a closure link such ashttps://your-site.test/close-incident/?key={{run.key}}, replacing the domain and path with the real page. -
On High, set Case status to
Assignedand Owner toResponse team, then send the same kind of closure link with Send Notification or Send Email. -
Join Urgent and High at Wait for Form Submission named Wait for closure request. Choose the Closure request form, match its hidden key to
{{run.key}}, and set Expiry (hours) to the case deadline. Connect Expired to the safety-lead escalation. -
On Submitted, add Wait for Approval named Closure review. Address the supervisor, include the closure entry’s resolution summary, require a rejection note, and set Expiry (hours) plus reminders.
-
On Approved, set Case status to
Closed, set Include in digest toNo, and email the reporter. On Rejected, email the owner with{{ "Closure review".note }}. On Expired, escalate to the safety lead. -
On Switch Default, set Case status to
In queueand Include in digest toYes.
Data passed between nodes
Section titled “Data passed between nodes”| From | Data used later | Where it goes |
|---|---|---|
| Form Submitted | Severity, category, description, reporter email, and entry identity | Switch, owner update, and messages |
| Route by severity | One selected output | Urgent, High, or Default path |
| Run context | run.key |
Closure-form URL and Wait for Form Submission match |
| Wait for closure request | Closure entry entry_id and form identity |
Closure review input |
| Closure review | action, note, resolved_by, resolved_at |
Status update, rework message, and run history |
Edge cases
Section titled “Edge cases”- The Switch takes only the first match. Keep urgent cases first and preserve Default.
- The run key matches a closure request to the incident but does not prove who submitted it. Put the closure form behind authentication when identity matters.
- Low-severity cases stop at
In queue; another workflow or staff action must later assign and close them. - Approval expiry advances only approvals parked after expiry scheduling is available; older already-waiting approvals need manual attention.
Test and activate safely
Section titled “Test and activate safely”New workflows start Inactive. Use builder tests for every severity value and an unknown value. Then temporarily activate on staging or with test inboxes for controlled live runs so Urgent and High entries create parked waits; submit closure requests with matching and nonmatching keys. Builder tests cover approval and rejection, while closure and approval expiry need those real parked runs and short deadlines. Restore production values, activate only after Default and both Expired routes reach monitored inboxes, and inspect the first run in each severity branch.
What Flowcrafter adds
Section titled “What Flowcrafter adds”A notification can tell someone a report arrived. Flowcrafter makes triage a process: exactly one severity branch wins, the case’s owner and status are written where staff can see them, urgent cases jump the queue, and nothing closes without a recorded decision. Every step — routing, reminder, approval — stays in one run’s history, which is the audit trail an incident process needs.
The same shape fits fault tickets, maintenance requests, compliance reports, and service cases of every kind.
Related resources
Section titled “Related resources”- Switch — first-match severity routing with a Default branch
- Update Entry Field — keep case status and owner on the entry
- Wait for Form Submission — resume only for the matching closure request
- Wait for Approval — closure sign-off with notes and expiry