

Use Cases
Approve an expense claim by amount
Send small claims to a manager, large claims to finance too, and keep every decision, note, and expiry on the record.
An expense form is easy. The hard part is the policy around it: who needs to approve, what happens when they reject, and how a request that nobody answers gets escalated instead of forgotten.
What you’ll build
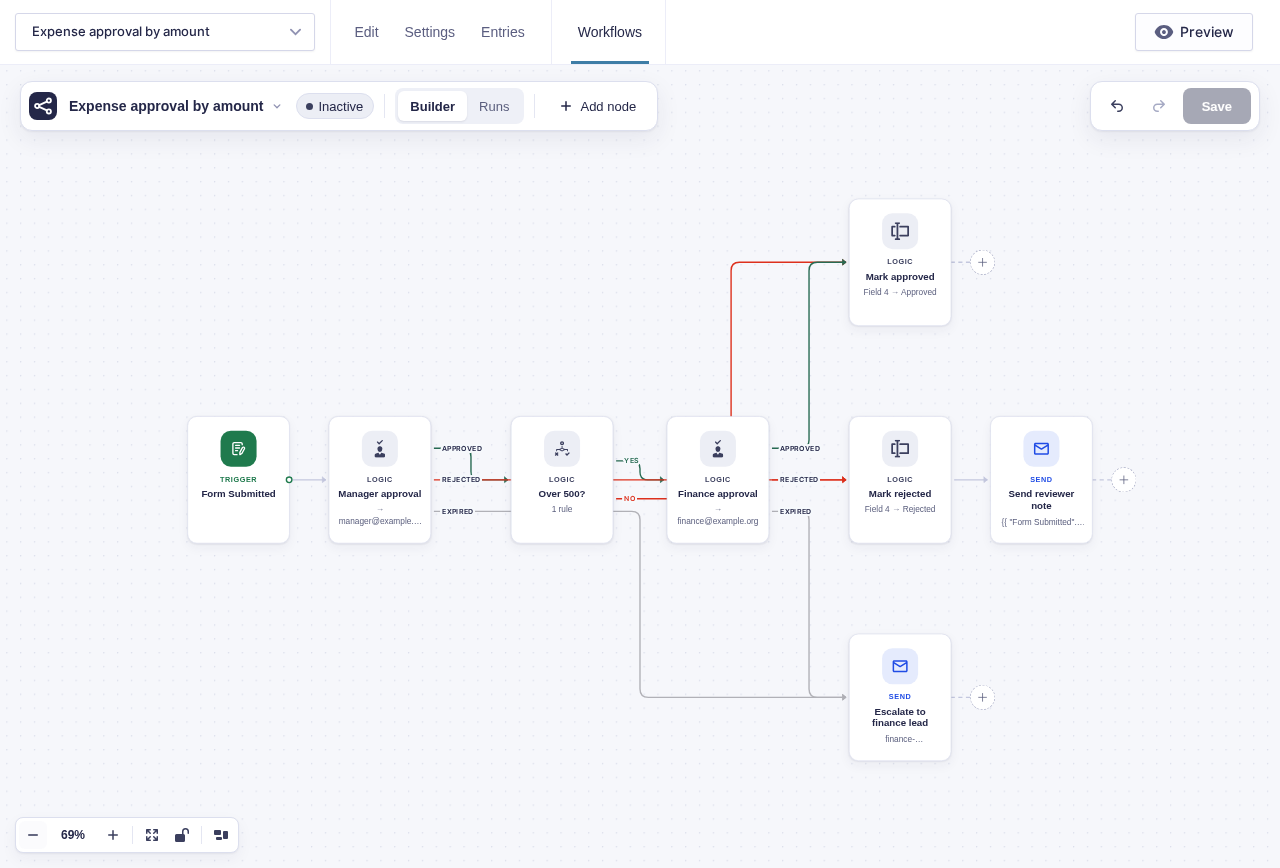
Section titled “What you’ll build”Every claim goes to the submitter’s manager. Claims over a threshold wait for finance as well — both approvals must land before the claim is marked approved. A rejection records the reason, marks the claim rejected, and tells the submitter the decision. An unanswered request escalates instead of sitting forever.
The manager and finance approvals share the same Rejected and Expired paths.
---
config:
  flowchart:
    nodeSpacing: 25
    rankSpacing: 25
    padding: 12
    subGraphTitleMargin:
      top: 8
      bottom: 15
---
flowchart TD
    A[Expense form<br/>submitted] --> C[Manager<br/>approval]
    C -->|Approved| B{Over<br/>threshold?}
    B -->|No| F[Set status:<br/>Approved]
    B -->|Yes| E[Finance<br/>approval]
    E -->|Approved| F
    C -->|Rejected| G[Set status:<br/>Rejected]
    E -->|Rejected| G
    G --> H[Email submitter<br/>with reviewer note]
    C -->|Expired| I[Escalate to<br/>finance lead]
    E -->|Expired| I
Before you build
Section titled “Before you build”- Add an amount field plus administrative Claim status and Manager email fields.
- Decide the finance threshold, approval policy, expiry, reminder interval, and escalation owner.
- Make sure manager email values come from trusted staff data, not a field the submitter can edit.
- Confirm WordPress can send approval mail reliably.
Build it step by step
Section titled “Build it step by step”-
Build an expense form with a total or amount field, and administrative-only fields for Claim status and, if you route by manager, the submitter’s manager. Set visibility to Administrative so submitters cannot pick their own approver or mark their own claim approved.
-
Open your expense form and click Workflows in the form toolbar. Click New Workflow, then Add Trigger and choose Form Submitted.
-
Add Wait for Approval named Manager approval. Set Approver emails from the administrative manager field, Approval policy to
First response decides, Expiry (hours) to72, and Reminder (hours) to24. Include the claim details in Email Body and turn on Require a note when rejecting. -
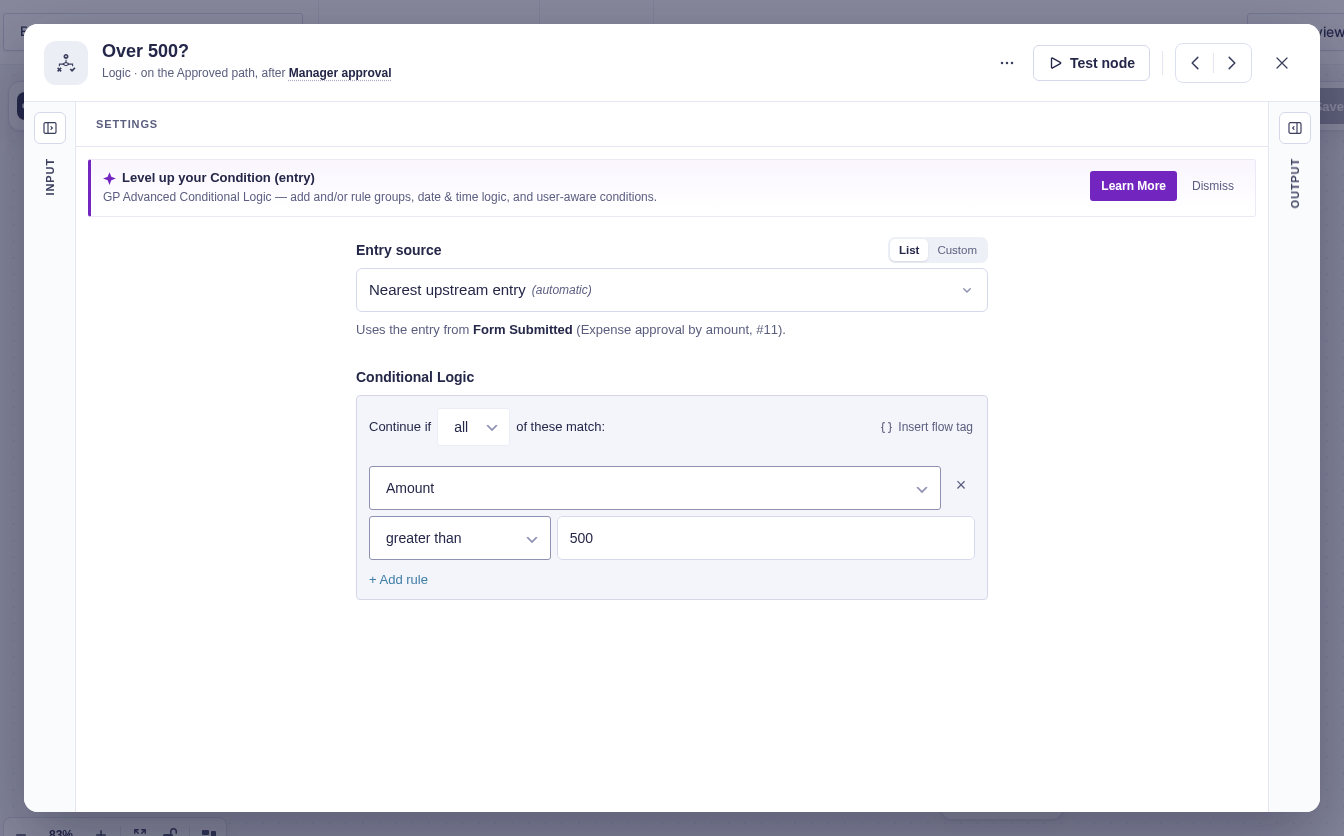
From the manager’s Approved output, add Condition (entry) named Over threshold. Build one rule — total is greater than your policy amount, such as
500.
-
On the condition’s Yes branch, add a second Wait for Approval named Finance approval. Use the All approvers must approve policy when more than one finance approver should sign off.
-
Join the condition’s No branch and Finance approval’s Approved output at one Update Entry Field that sets Claim status to
Approved. The shared node waits for whichever branch actually ran; the skipped one never blocks it. -
Connect both approval nodes’ Rejected outputs to one path that sets Claim status to
Rejected, then add Send Email for the submitter. Include{{ "Manager approval".note }}or{{ "Finance approval".note }}as appropriate. -
Connect both approval nodes’ Expired outputs to an escalation — an email to the finance lead or Add Entry Note — so a request nobody answers is still visible.
Data passed between nodes
Section titled “Data passed between nodes”| From | Data used later | Where it goes |
|---|---|---|
| Form Submitted | Amount, submitter email, manager email, and entry identity | Manager approval, threshold check, and status updates |
| Manager approval | Decision and note |
Threshold branch or rejection email |
| Finance approval | Decision and note |
Approved status or rejection email |
| Each approval | resolved_by and resolved_at |
Run history and optional entry note |
Edge cases
Section titled “Edge cases”- Exactly at the threshold:
greater than 500sends500down No. Usegreater than or equalif policy includes the boundary. - Missing manager: an empty Approver Emails value fails the node. Route incomplete staff data to triage before approval.
- Forwarded links: approval URLs are signed bearer links. Anyone holding one can act as that approver.
- Expiry: after the configured deadline, new parked approvals continue through Expired automatically. An approval already waiting before expiry scheduling was installed has no retroactive timer.
Test and activate safely
Section titled “Test and activate safely”New workflows start Inactive. Test below, at, and above the threshold. Simulate manager and finance rejection separately so the email uses the correct note. Expired needs a real parked run, so verify each expiry on staging or during controlled live tests with temporary recipients and short deadlines. Restore the policy values and production recipients, activate, then inspect the first low- and high-value claims in Runs.
What Flowcrafter adds
Section titled “What Flowcrafter adds”A notification can ask a manager, but it cannot hold the next step until the answer arrives, route by amount, or escalate when nobody answers. Flowcrafter turns the policy into the workflow: every claim waits for its manager, the threshold decides whether finance must review it too, and the approved, rejected, and expired paths are all visible on the record.
The same shape fits purchase requests, travel authorization, overtime, refunds, and leave — any process where the amount decides how many people must say yes.
Related resources
Section titled “Related resources”- Wait for Approval — approvers, policies, reminders, notes, and expiry
- Condition (entry) — decide who reviews based on the amount
- Update Entry Field — keep the claim status visible on the entry
- Pausing & Waiting — how parked runs resume